Deconstructed Pumpkin Pie in a Jar

Deconstructed Pumpkin Pie in a Jar

Hello Everyone! I’ll keep tonight’s introduction short as I have quite a bit to say at the end of this post – a disclaimer, or a little announcement(?) regarding Amcarmen’s Kitchen in light of the current pandemic.

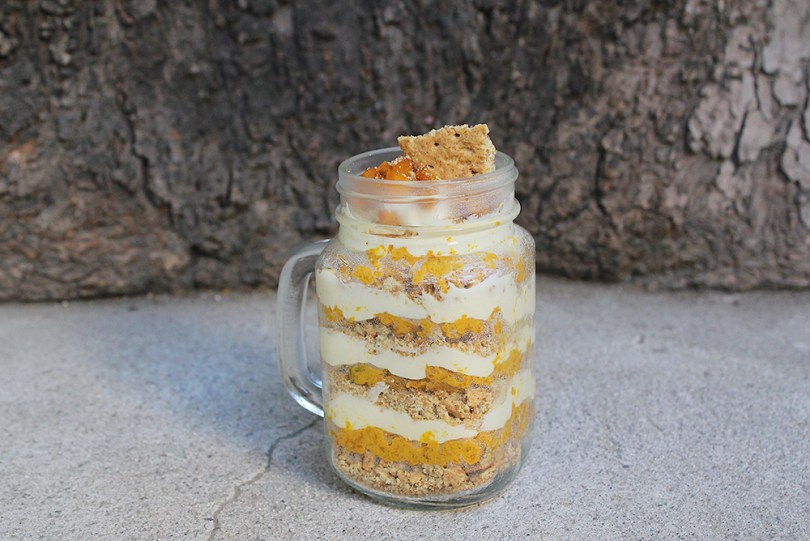
This Deconstructed Pumpkin Pie in a Jar is where it’s at. It is super easy to make and adorably cute served in a jar! Seriously delicious. Pumpkin Pie Purée. Cream Cheese Frosting. Ginger Biscuits. Layer, layer, layer and you’ve got yourself a dessert that’s sure to please everyone, not only with your culinary skills, but also with your creativity!

Deconstructed Pumpkin Pie in a Jar

Now, I think with the measurements I’ve stated below, you can make at least 2 large jars of Pumpkin Pie, 3 would be pushing it, but if your jars are smaller, it is possible. I only made one jar for the purpose of getting a photo for this post because I ended up saving two thirds of the pumpkin for our daily meal consumption. You’ll find out why at the end of this post.

Before we dive into tonight’s recipe, do take the time to check out where I drew my original inspiration for these Deconstructed Pumpkin Pies in a Jar over on Life, Love, and Sugar by Lindsay.

Deconstructed Pumpkin Pie in a Jar

PREP TIME 2 HOURS | COOKING TIME 20 MINS | SERVES 2-3

INGREDIENTS

For the pumpkin pie layer

  • 250g pumpkin, peeled, seeded, and cut into chunks
  • 3 tbsp brown sugar
  • 1 tbsp tequila
  • 1 tsp ground cinnamon
  • 1/2 tsp ground allspice
  • 1/4 tsp ground nutmeg
  • 2 tbsp heavy cream

For the cream cheese layer

  • 150g cream cheese
  • 1/2 cup confectioners’ sugar
  • 1/4 tsp vanilla

For the biscuit layer

  • 200g Ginger Nut Biscuits, crushed
  • 50g unsalted butter, melted
  • 1/2 tsp salt

METHOD

  1. Pumpkin Pie Layer: Preheat oven to 220C (425F or gas mark 7).
  2. Toss the pumpkin, sugar, spices, and everything nice (liquor) in an oven-safe baking dish. Sorry, I could not resist not saying that! *cheeky grin*
  3. Roast in the oven for about 20 minutes. Once done, set aside to completely cool down before puréeing the pumpkin. Mix the 2 tablespoons of cream into the pumpkin purée thoroughly.
  4. Biscuit Layer: Add the crushed ginger nut biscuits, salt, and melted butter together in a medium-sized mixing bowl. Mix together until well combined. Set aside in the fridge for about 15 minutes to chill.
  5. Cream Cheese Layer: Using an electric mixer fitted with a paddle attachment, beat, on medium speed, the cream cheese, confectioners’ sugar, and vanilla together in a large mixing bowl until smooth. Set aside in the fridge for about 15 minutes to chill.
  6. Assembly: Add about 1 & 1/2 tablespoons of the ginger nut biscuit crumbs to the bottom of the jar. Layer with 2 tablespoons of the pumpkin pie purée, and the 2 tablespoons of the cream cheese mixture. Repeat the layering process until your jar is full.
  7. Top each with a dollop of cream and a biscuit, of biscuit crumbs. Set in the fridge for about 30 to 60 minutes before serving. Enjoy!

Deconstructed Pumpkin Pie in a Jar

Deconstructed Pumpkin Pie in a Jar

As promised, here’s the announcement: with the on-going pandemic affecting the world to date, enhanced community quarantine here in the Philippines has already proven that it may be a little difficult for me to source the ingredients I need for the dishes I have planned out for the upcoming weeks (hopefully not months).

Public transportation systems have completely ceased, and the only way to get around now is by foot since I do not own a car, and I unfortunately don’t know how to ride a bike. It’s been difficult to get to the nearest market for fresh food, which I learnt on Sunday has also ceased its operations. The only way I can get access to fresh food is at the grocery store, which is even further than our local market.

Anyway, I will definitely have recipes up in the next two weeks since I managed to cook them in advance before we went into enhanced community quarantine. I will still try my best to find ways to source the ingredients I need to keep Amcarmen’s Kitchen up to date. I have some delicious recipes lined up for you until July and I’m excited to share all of them with you!

In the meantime, stay safe guys! Make sure you wash your hands, stay at home if you don’t have a reason to go out, and practice safe social distancing!

Deconstructed Pumpkin Pie in a Jar

BON APPÉTIT

– Ally xx

myTaste.com

Vegetarian Ilocos-style Empanada

Vegetarian Ilocos-style Empanada

Hello Everyone! Just about 2 weeks ago, I went on a road trip with a few of my workmates for a weekend away to Ilocos Norte and Ilocos Sur, specifically to the cities of Pagudpud and Vigan. Even though it was a stressful and quick trip, we had a lot of fun. I say stressful because literally right after work on the Friday, we made our way into the city to catch our private van. We drove through the night and arrived at Paoay before dawn.

We had our breakfast and then started our tour sightseeing Paoay before a rough morning ahead. A morning I think some of us will never forget. A rough 4×4 journey through the Paoay Sand Dunes followed by sand boarding activities. My multiple bruises took over a week to heal!

4x4 Paoay Sand Dunes, Ilocos Sur

We arrived in Pagudpud just in time for a sumptuous boodle fight lunch by the beach. Since were too full to go for a swim right after, and it was scorching hot as well, we decided to continue with the tour first to fulfil our #forthegram shots before returning to the Blue Lagoon for a refreshing afternoon ocean swim after a super hot day! After our swim, we headed on over to our accomodation for a much needed shower before dinner. Remember how I said earlier that we headed straight into the city after work? This was the first shower I had in more or less 36 hours.

Blue Lagoon, Pagudpud, Ilocos Notre

The next day we got up early and left our accomodation after breakfast to start making our way back south to the city of Vigan, Ilocos Sur. We arrived in Vigan just before lunch and took endless amount of #forthegram photos along the famous Calle Crisologo – pre-war beauty of whitewashed walls, cobbled streets, and old Spanish houses; a town saved from destruction because of a love story. It is now home to souvenir shops and interesting lokal products. After a quick lunch and a shopping/pasalubong spree, we were back on the road for our journey home to Manila.

Vigan City, Ilocos Sur

One of the many musts when visiting the city of Vigan, or just the region of Ilocos, is the famous Ilocos Empanada. It is an orange-tinged fried dish traditionally stuffed with vegetables like unripe papaya, skinless Vigan Longganisa, and egg. Modern versions of the dish add bagnet*, mung beans, and even hotdogs into the stuffing.

So my takeaway from this trip was to recreate the famous Ilocos Empanada at home, with a twist. Those who know me personally, ever since towards the end of last year, I’ve been trying to cut down on my meat intake for various health reasons. Those of you who also know me, I can’t cut out all meat from my diet and go completely vegetarian. And so, my diet as of this moment, consists of only chicken and seafood as my main source of animal protein. Hopefully, I can completely rule out chicken by the end of this year and go pescatarian.

Vegetarian Ilocos-style Empanada

Of course, I can’t not taste the original empanada first before attempting to put a twist to the classic. So just that one time, I broke my diet and had one (maybe 2) for myself. Before we dive into tonight’s recipe, here are a few links that you should check out that helped me put this recipe together:

* Bagnet, locally also known as chicharon in Ilocano, is a Filipino dish of pork belly that has been boiled first and then deep fried until it is crispy. It is seasoned with garlic, black peppercorns, bay leaves, and salt during the boiling process.

Vegetarian Ilocos-style Empanada Ingredients

PREP TIME 1 HOUR 30 MINS** | COOKING TIME 6-8 MINS | MAKES 8 EMPANADAS

** Allow up to a minimum of 6 hours or up to 24 hours for freezing time. Freezing the empanadas beforehand helps to keep them intact and prevent them from breaking apart during the frying process.

INGREDIENTS

For the crust

  • 1 & 1/4 cups rice flour
  • 3/4 cup water
  • 3 tbsp annatto oil***
  • 1 tsp salt

For the vegan longganisa mixture
(Note: This recipe makes around 16-18 small sausages)

  • 250g firm tofu, crumbled
  • 1 & 1/2 cups breadcrumbs
  • 1 & 1/2 cups dried shiitake mushroom, rehydrated and minced (or any other mushroom)
  • 8 garlic cloves, minced
  • 4 & 1/2 tbsp soy sauce
  • 4 tbsp coconut sugar
  • 2 tbsp white vinegar
  • 2 tsp smoked paprika
  • 1/2 tsp salt

For the filling

  • 8 small free range eggs
  • 2-3 garlic cloves, minced
  • 1 medium-sized unripe papaya, shredded
  • 1 medium-sized carrot, shredded
  • 1 medium-sized red onion, diced
  • Salt and ground black pepper, to taste
  • Vegan longganisa mixture
  • Cooking oil, for frying

*** The main purpose of using annatto oil is to provide colour to different dishes to make it more visually appealing. Since annatto oil is not always available in grocery stores, learning how to make it will surely be beneficial to you. Here are the details to get your started:

For the annatto oil

  • 1 & 1/2 tablespoons annatto seeds
  • 1/4 cup olive oil (vegetable oil, canola oil, and corn oil can also be used)

METHOD

  1. Annatto Oil: Combine the annatto seeds and olive oil in a small saucepan. Turn on the heat to medium.
  2. When bubbles start to form around the annatto seeds, turn the heat off and let the seeds soak in the oil for a minute or two. Do not overcook the seeds as this will produce a bitter taste.
  3. Use a strainer to filter-out the annatto seeds and transfer to a heat proof bowl. Set aside to cool down.
  4. Empanada Dough: Add the water, salt, and annatto oil in a medium-sized non-stick frying pan. Bring the mixture to a simmer over medium-high heat.
  5. Once simmering, add the rice flour all at once and mix using a wooden spoon, until all the liquid is absorbed and and dough starts to form. Remove from the heat and set aside to cool.
  6. Once completely cooled, knead until you get a smooth ball. Divide the dough into 8 equally-sized balls. Cover with cling wrap and set aside to rest for 30 minutes to an hour.
  7. Vegan Longganisa: In a medium-sized mixing bowl, mix all the ingredients together except for the breadcrumbs. Leave to marinate for about 30 minutes. Even though it’s not stated in the ingredients list, I ended up adding some chilli powder to the mixture for an extra kick of spice.
  8. Add the breadcrumbs to the mixture. Add more depending on the firmness you want to achieve. At this point, you can shape the mixture into sausages, but since we’ll be using them for the empanada filling, we won’t be needing to shape them.

Vegan Longganisa

  1. Empanada Filling: Add a tablespoon of coconut oil into a non-stick frying pan over medium-high heat. Sauté the garlic until golden brown, about 30 seconds, before adding the diced onion. Cook for a further minute until soft and fragrant.
  2. Add the tofu-mushroom mixture to the pan and stir-fry until cooked through, about 10 minutes. Once done, set aside to cool down completely.
  3. Prepare the unripe papaya and carrots in a separate bowl.
  4. Assembly: Place the dough ball between two sheets of plastic cling wrap to prevent it from sticking to your counter-top and rolling pin. Roll it out nice and thinly.
  5. Fill with the shredded unripe papaya and carrots, together with the vegan longganisa. Arrange them so that they create a well in the middle. Crack one egg into the well.
  6. Fold the dough over and seal the edges by pinching it using your fingers or a fork. Transfer into a tupperware lined with parchment paper to prevent the empanadas sticking to each other.
  7. Repeat for the remaining dough. Should make about 8 small or 4 large empanadas.

Vegetarian Ilocos-style Empanada

  1. Cook & Serve: Deep fry until golden brown and crisp, about 3-4 minutes per side. Once done, transfer to a wire rack and strain any excess grease from the empanadas. You can fry the empanadas longer if you prefer your egg to be cooked more, as long as you don’t burn the empanadas. I personally like my eggs runny.
  2. Enjoy with your favourite spicy coconut vinegar or of course, with some delicious Ilocos-made vinegar.

Vegetarian Ilocos-style Empanada

Note:

  • You will most definitely end up with a lot of leftover sautéed tofu & mushroom and shredded veggies.
    • Shredded Veggies: You can make a delicious Thai Papaya Salad with it and serve it with anything fried! My choice would be to serve it with a humble portion of fried fish.
    • Sautéed Tofu & Mushroom: Shape the leftovers into sausages and freeze. Pan-fry them for 3-5 minutes before serving.
  • If you want to make this dish completely vegan, omit the egg from the recipe.

Vegetarian Ilocos-style Empanada

BON APPÉTIT

– Ally xx

myTaste.com

Vegan Gajar Ka Halwa (Indian Carrot Pudding)

Vegan Gajar Ka Halwa (Indian Carrot Pudding)

Hello Everyone! I’m about to switch things up a bit tonight and share with you a recipe from a country that I have yet to culinarily explore. Amcarmen’s Kitchen is afterall, a Third Culture Foodie! It’s a bright orange Indian carrot pudding that is absolutely decadent and is sure to please, not only yourself, but your guests as well.

Gajar Ka Halwa, is a delicious and rich carrot pudding that’s perfect for any celebration. In India, this dessert is enjoyed mainly on the occasion of Diwali, Holi, Eid al-Fitr, and Raksha Bandhan. It can be served hot or cold. The classic Indian dessert is traditionally made using ghee and full-fat milk, but of course, you can easily substitute those dairy products out for non-dairy products for a vegan option of this dish, but apparently it won’t taste as great. I can’t judge for myself as I haven’t tasted the traditional version.

Vegan Gajar Ka Halwa (Indian Carrot Pudding)

Also, I just want to add that I had a hard time sourcing cardamom in store here in the Philippines. Cardamom has a complex flavour of fruity, nutty, spicy, woody, and citrusy that’s hard to replicate with other spices. However, cardamom substitutes like ginger, nutmeg & cinnamon are the closest.

If you too have difficulty in sourcing cardamom, I found online that you can mix together equal parts ground cinnamon and nutmeg and use in place of the cardamom called for in your recipe – which I already conveniently had both lying around at home in the pantry. If you don’t have nutmeg, then try equal parts cinnamon and ground ginger or equal parts cinnamon and ground cloves instead.

Before we delve into tonight’s recipe, please do check out the original by Ashley of My Heart Beets.

Vegan Gajar Ka Halwa (Indian Carrot Pudding) Ingredients

PREP TIME 5-10 MINS | COOKING TIME 25 MINS | SERVES 2

INGREDIENTS

  • 2 medium-sized carrots, peeled and grated/shredded
  • 1/4 cup full-fat coconut milk
  • 1/3 cup white granulated sugar
  • 3 tbsp water
  • 2 tbsp coconut oil
  • 1/8 tsp ground cardamom (or 1/16 tsp ground cinnamon and 1/16 tsp ground nutmeg)
  • Handful of chopped pistachios or other nuts, to garnish

METHOD

  1. Add the shredded carrots, coconut milk, and water to a large, heavy-bottomed pot. Cover and bring to a rapid simmer.
  2. Once simmering, add the sugar and cook for a further 6 to 7 minutes, or until most of the liquid has reduced.
  3. Add the coconut oil and stir-fry the carrots for a further 6 to 7 minutes, or until the carrots become dry and the coconut oil separates from the mixture. The carrots should look dark orange or reddish in colour.
  4. Add the ground cardamom and mix well.
  5. Transfer to individual serving ramekins and top with the chopped pistachios. Enjoy!

Vegan Gajar Ka Halwa (Indian Carrot Pudding)

Note: You can easily double or triple this recipe if you plan on making this dessert for a crowd.

BON APPÉTIT

– Ally xx

myTaste.com

Orange-glazed Salmon with Tarragon

Orange-glazed Salmon with Tarragon

Hello Everyone! As I stated in my very first post for the year 2020, I mentioned that I would not be revealing the theme for the year as I want to give you guys a chance to guess. I also mentioned that it might not be obvious for the first few months. But as a new month dawns upon us, this means that it’s time to change it up a little bit; to make it start to look a little clearer on where the journey of Amcarmen’s Kitchen will take us this 2020.

Tonight’s recipe is perfect for an easy weeknight meal, yet also fancy enough to impress your guests on the weekend! What’s even better is that it’s ready in under 30 minutes! It’s full of vibrant orange flavour and pairs well with the fresh tarragon. Actually, a little side note – the recipe uses fresh rosemary to pair with the salmon. I had a hard time sourcing rosemary the weekend I wanted to whip this dish up and so I ended up using the next best thing I could find – tarragon!

Orange-glazed Salmon with Tarragon

This Orange-glazed Salmon is a hearty and filling dish packed with fresh flavours and healthy fats. Sear the salmon first so that you get that delicious and slightly crisped golden-brown exterior with a tender, fall-apart interior. As this dish makes quite a bit of sauce, it is best served with a side of rice or couscous to soak up all that yummy goodness. Don’t forget a side of veggies too for some added fibre to your diet!

Before we dive into tonight’s recipe, please check out the original where I drew my inspiration from, another recipe from Jaclyn over on Cooking Classy.

Orange-glazed Salmon with Tarragon Ingredients

PREP TIME 10 MINS | COOKING TIME 15 MINS | SERVES 4

INGREDIENTS

  • 4 salmon portions (1-inch thick, skin on)
  • 2/3 cup fresh orange juice (about 2 small Navel oranges)
  • 2-3 garlic cloves, minced
  • 1/4 shrimp bouillon cube, dissolved in 5 tbsp of water
  • 1 & 1/2 tbsp honey
  • 1 & 1/2 tbsp orange zest
  • 1 tbsp fresh lemon juice
  • 2 & 1/2 tsp cornstarch
  • 2 & 1/2 tsp fresh tarragon, minced
  • 2 tsp olive oil
  • Salt and freshly ground black pepper, to taste
  • Tarragon sprigs, to serve

To serve

  • Blanched vegetables of choice
  • Navel orange wedges/slices
  • Steamed plain rice or couscous

METHOD

  1. Heat olive oil in a large non-stick frying pan or skillet over medium-high. Make sure that it is hot enough, but not too hot that it starts smoking.
  2. Season both sides of the salmon with salt and freshly ground black pepper before adding to the pan. Cook, skin side down first before flipping, about 3-4 minutes per side or until browned and cooked through. Once done, transfer the salmon to a plate lined with a paper towel to soak up any excess grease.
  3. With the same oil in the pan, add the garlic and minced tarragon. Sauté for about 20 seconds, taking care not to burn them, and then add 4 tablespoons of the shrimp bouillon cube dissolved in water. Simmer until mostly reduced. Stir in the orange zest, orange juice, lemon juice, and honey.
  4. In a small bowl, whisk together the remaining tablespoon of the shrimp bouillon cube dissolved in water with the cornstarch. Pour into the pan and whisk until thickened. Season the sauce with salt and freshly ground black pepper to taste. Allow to simmer for about a minute while constantly whisking.
  5. Return the salmon to the pan and spoon the sauce over. Remove from the heat.
  6. Serve with vegetables of choice, in this case I used mustard leaves, on the side with extra slices of fresh oranges and steamed rice (optional). Enjoy!

Orange-glazed Salmon with Tarragon

Orange-glazed Salmon with Tarragon

BON APPÉTIT

– Ally xx

myTaste.com