Seri Muka Kuih

Seri Muka Kuih

Hello Everyone! Our last recipe for the month of June is an amazing Malaysian and Nyonya kuih made of glutinous rice, coconut milk, sugar, and pandan leaves. Kuihs (or kuehs) are common snacks of the Hokkien, Teochew and Peranakan cuisine.The terminology is actually a general description for bite-size pastries/nibbles. These traditional delights come in many different forms and are either sweet or savoury snacks/desserts.

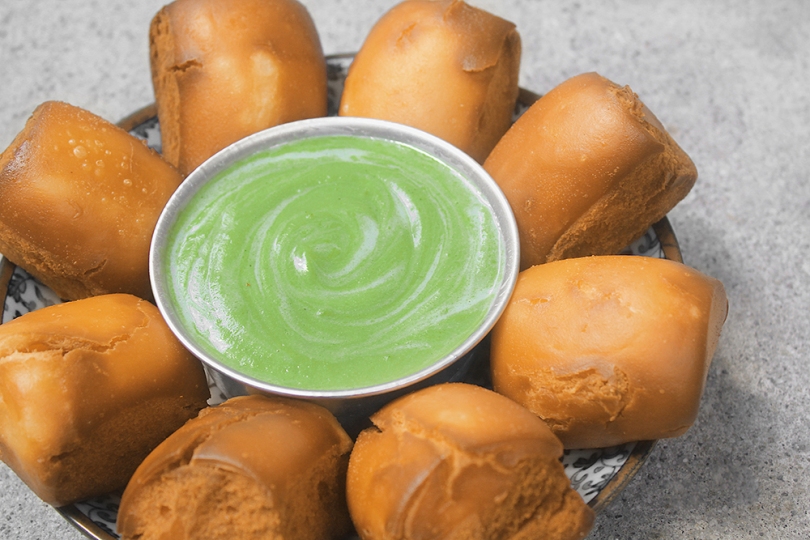
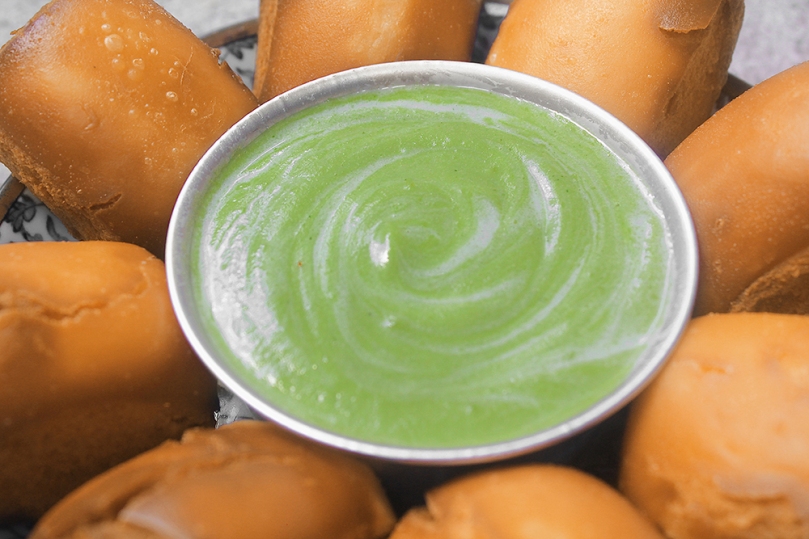
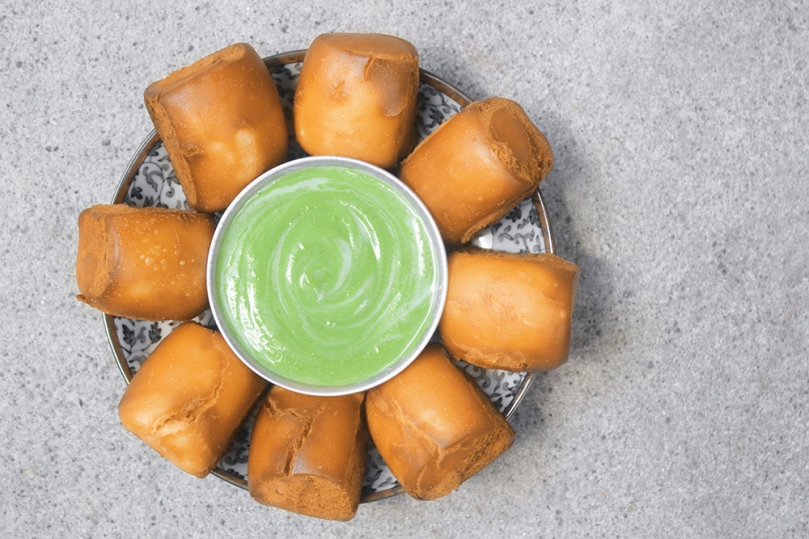
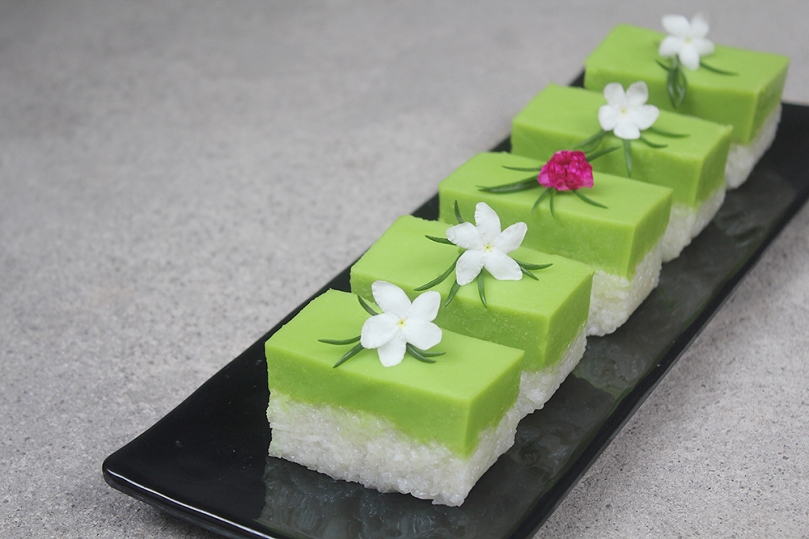
Seri Muka literally translates to beautiful face in Malay. It is a two-layered cake that consists of a glutinous rice layer steamed with coconut milk and topped off with a sweet and silky smooth pandan custard layer (hence the green colour). It’s heady with the flavour of coconut milk, a key ingredient used to impart a creamy taste when cooking the glutinous rice and making the custard layer.

Seri Muka Kuih

My fondest memory of Seri Muka would have to be during the festive season of the Islamic New Year. These pretty faces, alongside other kuihs of course, were served at almost every Malay household I would visit during that time of the year. The soft, sticky rice underneath with just a hint of saltiness pairs so deliciously with the decadently sweet pandan custard on top.

Before we dive into tonight’s recipe, please take the time to check out the original where I drew my inspiration from over on Rasa Malaysia by Bee. Seri Muka can also be found in the Indonesian province of South Kalimantan, and is also known as Kuih Putri Salat in Singapore.

Seri Muka Kuih Ingredients

PREP TIME 35 MINS | COOKING TIME 50 MINS | MAKES 14-16 SLICES
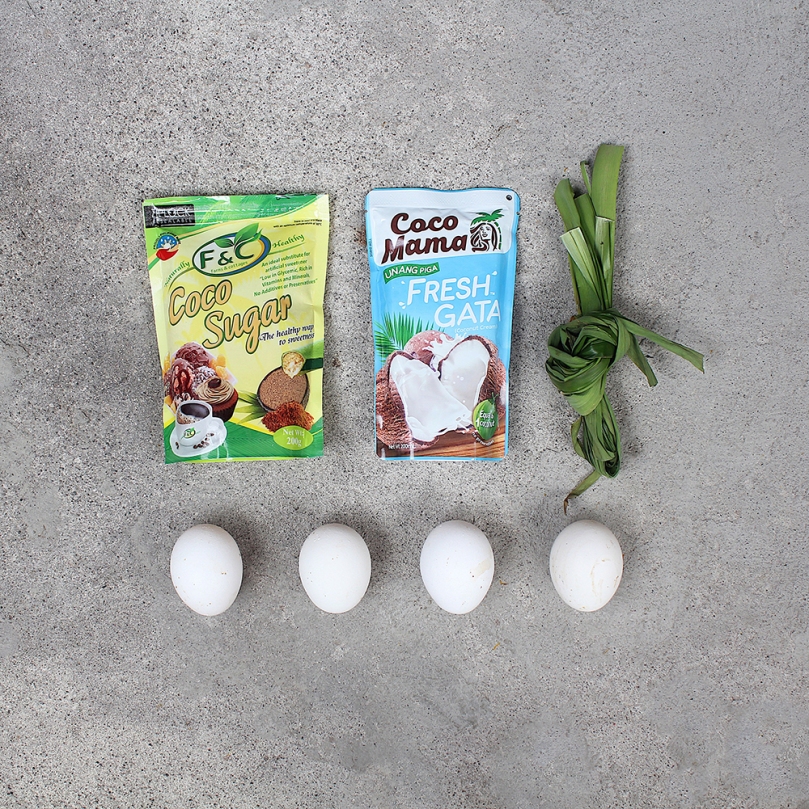
INGREDIENTS

For the bottom layer

  • 1 & 1/3 cups glutinous rice, soaked in water for 30 minutes
  • 1 cup thin coconut milk (1/2 cup coconut milk plus 1/2 cup water)
  • 2 pandan leaves
  • 1 tsp salt

For the top layer

  • 1 cup thick coconut milk (or coconut cream)
  • 1/2 cup pandan juice*
  • 1/2 cup white granulated sugar
  • 2 large free-range eggs
  • 2 large free range egg yolks
  • 5 tbsp all purpose flour
  • 2 tbsp cornstarch

*For the pandan juice

  • 8-10 pandan leaves
  • 1/2 cup water

METHOD

  1. Bottom Layer: In a large mixing bowl, combine all the ingredients needed, except for the pandan leaves, to make the bottom layer. Evenly spread onto a lightly greased 8in x 11in rectangular baking dish and add the in pandan leaves, making sure that they are submerged in the rice mixture. Steam over high heat for 20 minutes. Meanwhile, prepare the pandan juice for the top layer.
  2. Pandan Juice: Place the pandan leaves together with the water in a food processor or heavy-duty blender, and blitz/blend for a few minutes until the pandan leaves have been finely puréed.
  3. Pour the blended pandan-infused water over a fine sieve and into a small bowl. Strain the liquid from the pandan leaf pulp, pressing down firmly with the back of a spoon to extract all of the juice from the pulp. Discard the pandan leaf pulp.
  4. Top Layer: Mix all the remaining ingredients for the top layer in a medium-sized heatproof bowl until well combined.
  5. Create a bain-marie (double-boiler) by pouring some water into a pot that is slightly larger than your heat-proof bowl. Very important, check to see if your bowl can sit on top of the pot without any water touching the bottom of the bowl.
  6. Heat your pot of water over low-medium and bring to a slight simmer. Once slightly simmering, place the bowl with the pandan, coconut milk, and egg mixture over it. Cook until the mixture thickens slight, but is still runny enough to pour, about 8-10 minutes.
  7. Seri Muka Kuih: Once the rice layer is done, discard the pandan leaves. Stir and flatten the rice with the back of a spoon, making sure that it is compact. Using a fine sieve, strain the pandan, coconut milk, and egg mixture over the cooked rice. Return to the steamer and steam over medium heat for 30 minutes.
  8. Remove from the steamer once done and leave aside to completely cool down before cutting them into diamond or rectangular-shaped bite-size pieces. Serve with a hot cup of coffee or tea for a lovely mid-afternoon snack. Enjoy!

Seri Muka Kuih

Seri Muka Kuih

BON APPÉTIT

– Ally xx

myTaste.com

Dr. Seuss’ Green Eggs and No Ham

Dr. Seuss’ Green Eggs and No Ham

Hello Everyone! I’ve been wanting to do my own take on Dr. Seuss’ Green Eggs and Ham for Amcarmen’s Kitchen ever since last year. I was super excited when I realised that I could tackle this idea for this month, but then quickly questioned, what am I going to do about the ‘ham’ part of this recipe?

For those of you who don’t know me personally, or if you haven’t picked it up from the recipes I have been sharing since the beginning of the year, I’ve been slowly cutting meat out from my diet. Since the second half of last year, I’ve managed to cut both beef and pork from my diet (with very rare relapses – I can’t avoid a good beef kaldereta during work events). I tried cutting out chicken from my diet this year too and attempted a pescatarian diet, but that didn’t quite work out. Nonetheless, I’ve strictly kept the recipes I’ve been uploading on the blog to pescatarian, vegetarian, or vegan.

Dr. Seuss’ Green Eggs and No Ham

Mini tangent aside and back on to tonight’s recipe; after having spent countless hours on the Internet searching for how I could adapt Dr. Seuss’ Green Eggs and Ham without the ham, I came across Jenny’s Green Eggs, No Ham over on Jenny Can Cook.

Breakfast can’t get any healthier than this! This recipe for Dr. Seuss’ Green Eggs and No Ham has three servings of green vegetables to boost your immune system, combined with the fluffiest, moist, flavorful, and evenly cooked scrambled eggs for protein – all in one single meal!

The best thing about this recipe is that you can get creative with the greens. Choose what’s cheap and local to your area; what’s in season and most importantly, your favourite greens to eat!

Dr. Seuss’ Green Eggs and No Ham Ingredients

PREP TIME 10 MINS | COOKING TIME 10 MINS | SERVES 3

INGREDIENTS

  • 6 large free-range eggs
  • 1 red bird’s eye chilli, sliced
  • 1 small red onion, diced
  • 1 cup kale leaves, roughly chopped
  • 1 cup spinach leaves
  • 1/2 cup broccoli, roughly chopped
  • 4 tbsp milk
  • 2 tbsp olive oil
  • 1 tbsp sesame oil
  • Salt and freshly ground black pepper, to taste

METHOD

  1. In a small bowl, beat the eggs together with the sesame oil and milk. Season with a touch of salt and freshly ground black pepper then set aside.
  2. In a large non-stick frying pan, heat 1 tablespoon of the olive oil over medium-high. Add the diced onion and cook until soft, about 1 minute. Then add in the broccoli and cook for a further minute or two. Season with a touch of salt and freshly ground black pepper.
  3. Add in the kale leaves and give it a good mix before adding the spinach leaves in. Reduce the heat down to low and cover for about a minute to allow the leaves to wilt. Once wilted, transfer the cooked vegetables to a plate or bowl.
  4. Bring the heat back up to medium* and in the same frying pan, add the remaining olive oil. Pour the eggs into the pan and using a rubber spatula, begin pulling the cooked outer edges in towards the centre of the eggs. Uncooked eggs will flood the area you just pulled back while the cooked scrambled eggs will gather at the centre of the pan.
  5. When the eggs are about halfway cooked through, add the cooked vegetables back to the pan and continue pulling the uncooked eggs to the center of the pan.
  6. Turn off the heat when the eggs are 90% cooked. And transfer to a serving plate immediately. Perfectly cooked scrambled eggs are moist but not runny, with no crisp or brown edges.
  7. Garnish with some sliced red chillies, freshly ground black pepper, and a sprinkle of ground smoked paprika. Serve immediately with some toasted bread on the side if you desire. Enjoy!

Dr. Seuss’ Green Eggs and No Ham

* It’s important to leave the heat somewhere between medium-low and medium, so that it warms up but doesn’t get too hot. If the pan is too hot, the eggs will cook too quickly and become rubbery.

** If you plan on adding cheese to your eggs, add it in at this point. This will allow ample time for the cheese to melt and integrate into the eggs. Make sure that the cheese is shredded/prepared and set aside so you can add it to the eggs quickly.

Dr. Seuss’ Green Eggs and No Ham

BON APPÉTIT

– Ally xx

myTaste.com

Kaya (Malaysian Pandan Coconut Egg Jam) with Fried Mantou

Nyonya-style Kaya (Malaysian Pandan Coconut Egg Jam)

Hello Everyone! Try something new on your morning toast! If you’re looking to change up your breakfast condiment selection from the everyday jams and jellies, try this Pandan Coconut Egg Jam. It will transport you to the tropics with its flavourful, rich, and sweet taste!

Kaya (Malaysian Pandan Coconut Egg Jam) with Fried Mantou

Kaya in the Malay language means “rich”, with reference to the texture of this jam. It is a sweet coconut egg jam that is rich, thick and custard-like in texture, and flavoured with pandan, giving it a fun green colour.

There are two well-known varieties of kaya:

  • Nyonya, which is green in colour
  • Hainanese, which is darker brown in colour and often sweetened with honey

The colour variation depends on the number of eggs, the caramelisation of the sugar, and the amount of pandan leaves used. In the Philippines, a variation of this jam is known as matamís sa báo, but it does not contain eggs and is less thick in texture. In Thailand, it is known as sangkhaya.

Kaya (Malaysian Pandan Coconut Egg Jam) with Fried Mantou

This version of kaya that I will be sharing with you guys tonight is the Nyonya-style one, which gets its aromatic fragrance and natural green colour from the pandan leaf. The idea of treating it as a dip rather than a spread or a filling was inspired from my trip to Thailand a couple years back, in 2013. We (my family and I) were at a roadside stall for dinner and on their menu they had steamed thick-sliced bread with a kaya and condensed milk dip. I decided to recreate this dish to share with you guys tonight, but instead of serving it with steamed bread, I fried some mantou buns for that extra-added crunch on the outer layer while still keeping the inside of the buns soft.

Before we dive into tonight’s recipe, please take the time to check out the original where I drew my inspiration from over on Curious Cuisiniere by Michelle Wong.

Kaya (Malaysian Pandan Coconut Egg Jam) Ingredients

PREP TIME 5 MINS | COOKING TIME 15 MINS | MAKES 1 SMALL JAR

INGREDIENTS

  • 4-5 pandan (screwpine) leaves
  • 200ml coconut milk
  • 4 large free range eggs
  • 1/2 cup coconut sugar

Optional (to serve with)

  • Condensed milk
  • Fried mantou buns

METHOD

  1. Place the pandan leaves together with the coconut milk in a food processor or heavy-duty blender, and blitz/blend for a few minutes until the pandan leaves have been finely puréed.
  2. Pour the blended pandan-infused coconut milk over a fine sieve and into a large bowl. Strain the coconut milk from the pandan leaf pulp, pressing down firmly with the back of a spoon to extract all of the coconut milk from the pulp. Discard the pandan leaf pulp.
  3. In a separate heat-proof bowl, beat together the eggs and sugar, until frothy. Then, add the pandan-infused coconut milk to the egg and sugar mixture.
  4. Create a bain-marie (double-boiler) by pouring some water into a pot that is slightly larger than your heat-proof bowl. Very important, check to see if your bowl can sit on top of the pot without any water touching the bottom of the bowl.
  5. Heat your pot of water over low-medium and bring to a slight simmer. Once slightly simmering, place the bowl with the coconut milk and eggs over it and gently whisk for 10-15 minutes, ensuring no water escapes from the bottom pot. It’s important to keep a low simmer or else the eggs can curdle quickly (refer to notes).
  6. Once done, transfer the kaya to a small serving dish and add just a touch of condensed milk (just enough that it doesn’t become overly sweet) and serve with your choice of steamed or fried bread. Whatever tickles your fancy! Enjoy!

Kaya (Malaysian Pandan Coconut Egg Jam) with Fried Mantou

Transfer the remaining kaya into a sterilised and clean jar. Let it cool before storing in the refrigerator for up to two weeks. Kaya is eaten as a condiment spread on bread or toast, usually as breakfast.

Kaya (Malaysian Pandan Coconut Egg Jam)

Notes:

  • If you don’t have access to fresh pandan leaves, you may be able to find pandan extract which comes in a small bottle or pandan leaf powder, which will work perfectly fine with the recipe.
  • If your eggs curdle during the cooking process, not to fret! Continue to cook for the full 15 minutes, and then transfer the mixture to a blender. Blend until the kaya is smooth.

Growing up in Brunei, Nyonya-style kaya was my go-to choice of spread (together with peanut butter or just butter) on the waffles that you’d get at the local supermarket (Hua Ho) in the snack corner. Their freshly made kaya-filled pancakes, or even the kaya buns on their shelves were also my go-to choice. Also not forgetting the Hainanese kaya-filled cakoi (Chinese youtiao fried dough) from a nearby roadside stall from my workplace that my then workmates and I used to drive to our lunch breaks, and the kaya-buttered toast from a popular Chinese kopitiam known as Chop Jing Chew. These are, if not all, then some of my fondest memories of kaya.

BON APPÉTIT

– Ally xx

myTaste.com

Super Green Shakshuka

Super Green Shakshuka

Hello Everyone! I can’t believe that we’re already halfway through the year! Metro Manila has now shifted from Enhanced Community Quarantine to General Community Quarantine since the beginning of this week and I honestly don’t know what’s going to happen. We haven’t even started to flatten the curve, and here we are letting people out and go back to work with positive cases rising much higher than when we were under enhanced quarantine.

I’ll unfortunately be reporting back to the office starting this coming Monday and Tuesday, twice a week while the other 3 days will be to continue working from home. I honestly don’t see the point in risking my health and my life just to go into the office two times a week when there is still so much uncertainty with the on-going pandemic, especially when it’s ten times harder to get anywhere via public transport due to capacity limitations to comply with social distancing. It was hard enough to get a ride to and from work pre-pandemic times, what more now? I remember waiting almost an hour for a ride home on many occasions, now I’ll probably be waiting 2 or even more hours just to get home, exposed in the open to the virus. While there’s a shuttle service initiated by the company I’m working for to avoid this issue, I don’t know how long they’ll be able to keep up with a door-to-door pick-up/drop-off service.

Super Green Shakshuka

Anyway, mini tangent/rant aside, a new month means it’s time to move onto the next colour of the rainbow for this year’s theme on Amcarmen’s Kitchen! The recipe that I’ll be sharing with you tonight is inspired by a dish that I had way back when I was still living and studying in Australia. It was in fact a weekend farewell brunch for me as I left the country the following day for good after having completed my degree and graduated a couple months back before this weekend brunch gathering.

I first came across the idea of a green shakshuka at SHUK North Bondi. Green shakshuka puts a healthy green spin on the classic Middle Eastern shakshuka recipe. Traditionally, a shakshuka is a mixture of simmering tomato sauce and spices, topped with gently poached eggs. Within the tomato sauce there’s diced onions, garlic and bell peppers. Lastly, it’s garnished with freshly chopped herbs such as cilantro and parsley.

The great thing about a shakshuka is its versatility. Similar to how you can toss most ingredients from your fridge into a smoothie, the same can be said for a shakshuka. For this green shakshuka, I’ll be replacing the tomato sauce and bell peppers with an abundance of sautéed green vegetables.

Super Green Shakshuka Ingredients

Whatever veggies you’ve got lying around, just throw them in! For my improvised take on this recipe, I’m going with broccoli and asparagus for some bite, and leafy greens such as locally grown kale, spinach, chilli, and malunggay leaves. I also threw in some green chillies for a kick of heat and some fresh basil and green scallions for freshness.

Super Green Shakshuka Ingredients

PREP TIME 10 MINS | COOKING TIME 30 MINS | SERVES 3

INGREDIENTS

  • 3 large free range eggs
  • 1 cup broccoli, roughly chopped
  • 1 cup kale leaves, roughly chopped
  • 1 cup spinach leaves
  • 3/4 cup chilli leaves, stemmed
  • 1/2 cup asparagus, roughly chopped
  • 1/4 cup malunggay leaves, stemmed
  • 2-3 garlic cloves, finely minced
  • 2 large green chillies, sliced
  • 2 small red onions, finely diced
  • 2 small red bird’s eye chillies, sliced
  • 1 stalk green scallions, chopped
  • 3 tbsp olive oil
  • 2 tsp black olives, sliced
  • 2 tsp capers
  • Handful basil leaves, roughly chopped
  • Salt and ground black pepper, to taste
  • Shaved parmesan cheese

Optional (to serve with)

  • 1 large avocado, peeled, pitted, and sliced (optional)
  • Crusty bread, toasted

METHOD

  1. Heat olive oil in a non-stick sauté pan over medium heat. Add the minced garlic and sauté until golden brown and fragrant, about 30 seconds. Be careful to not burn the garlic. Then add in the diced onions together with half of the sliced green chillies and the white parts of the scallions, cooking until they soften, about 1-2 minutes.
  2. Next, add in the chopped broccoli and cook for about a minute before adding the chopped asparagus in. Season with a touch of salt and freshly ground black pepper. Give it a good mix and cook for a further minute or so until they start to soften a bit.
  3. Add in the chopped kale and spinach leaves with just a touch of water. Cover for about 30 to 45 seconds to allow the steam to wilt the leaves. Add in the chilli leaves followed by the malunggay leaves and give it a good mix. Cook, uncovered, for about a minute or two; turning the heat down to low at this point so that your veggies do not overcook.
  4. Flatten the veggie mixture with a spatula and create 3 small wells. Crack an egg into each well and season with a touch of salt freshly ground black pepper. Add the sliced black olives, capers, red and green chillies, and green scallions. Cook the eggs until done to your liking. You can also cover to steam and cook the eggs faster (about two minutes for cooked whites and a lovely runny yolk). Heat off, and sprinkle with the chopped basil leaves to garnish.
  5. Serve immediately with your choice of sliced avocado or crusty bread, or ever both for a heavy brunch. Enjoy!

Super Green Shakshuka

You can easily double this recipe to serve more hungry tummies. It’s an easy, one-pan dish filled with lots of green goodies and poached eggs. Whether you eat it for breakfast or dinner, it’s a hearty, nutrient-packed meal that will last you through any season!

Super Green Shakshuka

BON APPÉTIT

– Ally xx

myTaste.com