Salade Niçoise du Saumon Fumé

Salade Niçoise du Saumon Fumé

Hello Everyone! Man am I completely beat! Straight after work, I headed to the gym with my sister and my colleague Audry for an intense 2-hour Body Combat Session called “Combat Cancer” in conjunction with World Cancer Day. I can feel my leg muscles getting sore so I probably won’t be able to walk properly tomorrow morning. Also, can I just say that I have never sweated and smelled so much after that session. In addition, I completely forgot to bring makeup remover so I imagined eyeliner running down my face from the sweat. To my surprise, my makeup was still on point! Anyway, that aside, I’m glad that I had the time to write this post yesterday afternoon (it was a public holiday yesterday which meant no work! Most importantly, it was Brunei’s 32nd National Day).

So, it’s the last of our Healthy Eating journey for the month of February – of course the journey doesn’t completely end here as you should always be eating healthy! What I meant is that it’s the end of this theme for the blog. I will continue to share healthier recipes throughout the upcoming months in my blog, but focusing on other areas other than salads. Next month I will be sharing healthy smoothie recipes with you all; the last time I shared smoothies on my blog was back in October last year when I had Breakfast/Brunch Month on the blog. Hope y’all are excited for that!

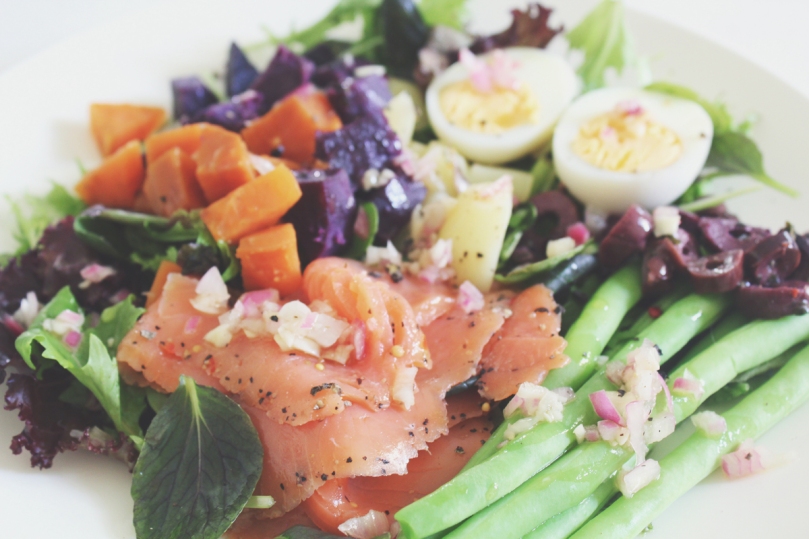
Anyway, I came across this recipe – well more like I saw a photo of this dish on Instagram and was instantly drawn to the beautiful colours from the greens and tricolour potatoes. I scrolled down to look at what the dish was a non-traditional Niçoise Salad. I didn’t follow a particular recipe for this dish, but instead I looked at the photo and pulled out the obvious ingredients that I could see. I then search for a dressing to go with the dish and voilà – Salade Niçoise du Saumon Fumé non-traditionnel (Non-traditional Niçoise Salad with Smoked Salmon):

Salade Niçoise du Saumon Fumé

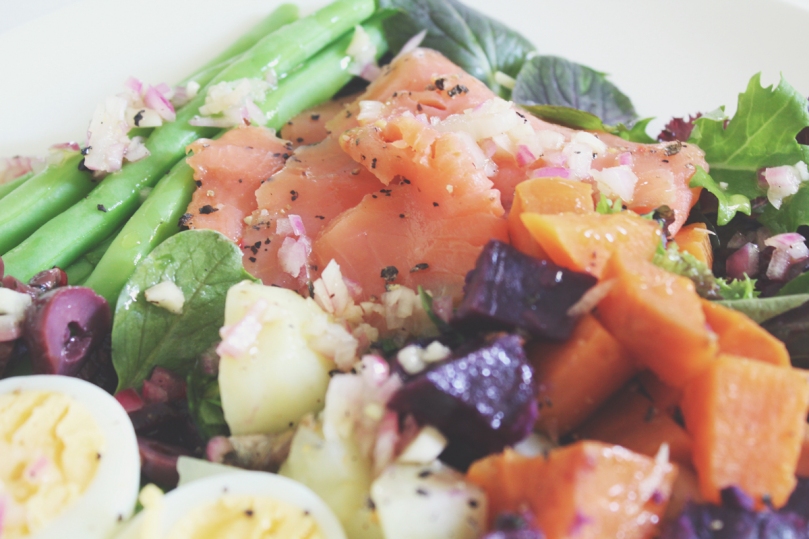
It is non-traditional because Salade Niçoise is typically composed of a salad of tomatoes, tuna (cooked or canned), hard-boiled eggs, Niçoise olives, and anchovies, dressed with a vinaigrette. It is served variously on a plate, platter, or in a bowl, with or without a bed of lettuce. The salad may include raw red peppers, shallots, artichoke hearts, and other seasonal raw vegetables, but according to many sources, excludes cooked vegetables, such as green beans and potatoes, which are commonly served in variations of Salade Niçoise around the world. So, yes, this version of Salade Niçoise that I will be sharing tonight is definitely not a traditional one as you can tell – but it will definitely knock your socks off! I really like this salad, and the dressing/vinaigrette that I made to go with it. Hope you enjoy it too! Feel free to add other veggies to it as you wish… You know, whatever floats your boat kind of thing 🙂

Salade Niçoise du Saumon Fumé

PREP TIME 15 MINS | COOKING TIME 15-20 MINS | SERVES 5-6

INGREDIENTS

For the salad

  • 250g green beans, ends trimmed
  • 250g mixed salad leaves, washed and drained
  • 220g smoked salmon*
  • 100g kalamata olives, sliced
  • 3 large free range eggs, soft or hard boiled**
  • Potato varieties such as chat, sweet potatoes, and purple sweet potatoes (or a range of heirloom potatoes), peeled and cut into chunks

For the dressing

  • 6 tbsp extra virgin olive oil
  • 3-4 anchovy fillets, roughly chopped
  • 3 tbsp red wine vinegar
  • 2-3 garlic cloves, minced
  • 1 small red onion, minced
  • Pinch of ground black pepper

*Plain smoked salmon is fine, or you ca mix it up a bit and get herbed smoked salmon or with five peppers which is the one I used for this recipe.

**Bring a small saucepan of room temperature water together with the eggs up to a boil. Once boiling, the the heat off and let it sit for five minutes is perfect for a runny yolk (or cook as long as seven minutes for a more firmly set, but still spoonable, yolk). For hard boiled eggs, cover and let it sit for 8-10 minutes off the heat.

METHOD

  1. Firstly, combine all the ingredients for the dressing in a medium-sized jar. Cover and shake well to combine the ingredients. Set aside. Tip: you can make the dressing in advance by a day or a few hours before serving to ensure that all the flavours infuse together. Keeps well in the fridge for up to a week if you have any leftovers. You can also add more olive oil and red wine vinegar throughout the week if you need more dressing.
  2. Toss the potatoes in a little bit of ground salt and black pepper. Then place in a steamer and steam for about 10-15 minutes, or until tender but still a bit firm. Once done, remove from the heat and set aside.
  3. Blanch the green beans in boiling water for about 5-6 minutes. Once done, transfer to an ice bath to stop the cooking process. This ensures that you’ll have nice and crisp green beans in your salad.
  4. Plate up accordingly and pour over the dressing. Share and enjoy with family and friends!

Salade Niçoise du Saumon Fumé

Salade Niçoise du Saumon Fumé

BON APPÉTIT

– Ally xx

myTaste.com

Quinoa, Avocado, & Grapefruit Salad with Lemon and Thyme Roast Chicken

Quinoa, Avocado, & Grapefruit Salad with Lemon and Thyme Roast Chicken

Hello Everyone! Hope everyone had a good weekend! I’m finally feeling better than I did last week, but my voice is still a bit husky. I can’t hit the high notes to a song whenever I’m performing in the shower, so I know I’ve still got a bit more of getting better to do. Other than that, things have been pretty chill at work – but I know it’s going to be hectic soon! There are two event coming up within the next 3 months, so I pray that I will have enough strength to persevere through! Over the weekend, my very first Uni friend from COFA (or now known as UNSWAD) visited me here in Brunei! It was so surreal as I never thought that we would meet… in Brunei! He is currently working on a project in KL and he had a free weekend to spare to come over for a visit! We toured him around a few places in Brunei, and we also caught up on work life, love life, and just anything else in general. I cannot believe that it had been exactly a year since we last saw each other in Sydney! It was definitely a great weekend.

Anyway! It’s week 3 of healthy eating month and I’ve got another quinoa recipe to share with you guys. As you already know, or not if you haven’t been following my blog on a week to week basis, quinoa (pronounced as KEEN-wah) is very beneficial to our health. It is incredibly nutritious as its fibre content is much higher than most grains. It is also very high in protein, containing the essential amino acids that we need . Quinoa contains a great amount of minerals – minerals that we other do not get enough of, especially magnesium, potassium, and zinc. If you would like to read up more on the health benefits of quinoa, click here. Pair it with some heart-healthy monounsaturated fatty acid avocados, grapefruit and orange segments, and you’ve got yourself a salad that is packed with minerals and vitamins such as: calcium, copper, fibre, folate, iron, magnesium, phosphorus, potassium, protein, zinc, and vitamins A, B5,B6, C, E, and K, and the list goes on.

Quinoa, Avocado, & Grapefruit Salad with Lemon and Thyme Roast Chicken Ingredients

PREP TIME 20 MINS* | COOKING TIME 40 MINS | SERVES 5-6

*Plus 4-5 hours waiting time to marinate the chicken.

INGREDIENTS

For the Salad

  • 100g feta cheese
  • 2 cups chicken stock*
  • 1 cup quinoa
  • 1 avocado, sliced
  • 1 grapefruit, segmented
  • 1 orange, segmented
  • 1 packet (250g) rocket leaves

For the lemon & thyme roast whole chicken legs

  • 500g whole chicken legs, washed and cleaned
  • 4-5 garlic cloves, minced
  • 2-3 springs of fresh thyme
  • 2 tsp smoked paprika
  • Juice of 1 lemon

*You can make you own stock by boiling chicken carcasses for about half an hour, together with whole black peppercorns, bay leaves, and salt. Or you can use the store bought ones, again, whatever tickles your fancy.

METHOD

  1. Combine all the roast whole chicken leg ingredients in a large baking dish. Leave to marinate for about 4-5 hours. Preheat oven to 190C. Sprinkle the chicken legs with paprika and place the baking dish in the oven and roast chicken for about 40 minutes or until done.
  2. Bring the quinoa and chicken stock to a boil in a medium-sized saucepan. Once boiling, reduce heat down to low, cover, and then simmer until tender and most of the liquid has been absorbed, about 15 to 20 minutes. Once done, fluff with a fork and transfer to a large mixing bowl.
  3. Add the sliced avocado, feta cheese together with the herbed olive oil, grapefruit, orange, and rocket leaves into the large mixing bowl together with the quinoa. Give it a good toss until well combined.
  4. Transfer to a serving dish together with a piece of lemon and thyme roast chicken leg.
  5. Serve and enjoy!

Quinoa, Avocado, & Grapefruit Salad with Lemon and Thyme Roast Chicken

Quinoa, Avocado, & Grapefruit Salad with Lemon and Thyme Roast Chicken

BON APPÉTIT

– Ally xx

myTaste.com

Avocado, Chickpea, & Roasted Capsicum Salad

Avocado, Chickpea, & Roasted Capsicum Salad

Hello Everyone! I hope everyone has had a relaxing CNY long weekend unlike me – well, it was relaxing as I stayed home all day on Sunday doing nothing, but it was also because I was sick over the long weekend *sad face*. I think I got sick from fatigue which resulted in a painful dry cough, a very high temperature, and muscle aches especially in my back, shoulders, and thigh regions. I’m feeling a little bit better with thanks to the long weekend as I get to rest up for 3 days after a straight 13 days of working from an average of 8am-11pm. Yes you read that right, I’m officially employed! I actually started working in late October in Brunei’s leading Advertising Agency known as D’Sunlit Sdn. Bhd. as a Graphic Designer for the Marketing Team. I was under a 3-month probation contract, and last Friday I was able to sign a permanent contract! Oh and the 13 days of straight working, that was because I was involved in an event known as the 17th Consumer Fair. I worked from Monday-Sunday two weeks ago, and last week I worked Monday-Saturday (yes no rest in between for working on that Sunday). So I guess that’s where my fatigue came from. I was actually already starting to feel under the weather last Thursday, but it only came into full effect on Saturday morning. I guess it didn’t quite help as well that I was surrounded by sick colleagues, and a sick mom and sister at home too. My sister got sick first, then me, and lastly my mom. I today in the office, I learnt that I may have made a few other colleagues sick too. How am I ever going to recover?!

Anyway, let’s move on to the recipe shall we? It’s week two of healthy eating, and I’ve got a yummy salad for you that you can pair up with any kind of meat be it beef, chicken, or lamb – whatever tickles your fancy that is! If you’re like me, and you can’t go without meat in your diet, then whip up your favourite roast chicken to go with your salad – we roasted some whole chicken legs with my Mom’s secret and special BBQ marinade. Otherwise, you can keep the dish vegetarian or vegan friendly. We all know that avocados are loaded with heart-healthy monounsaturated fatty acids known as oleic acid. Oleic acid has been linked to reduced inflammation and has been shown to have beneficial effects on genes linked to cancer. Not only does it contain this fatty acid, it also contains minerals and vitamins such as: fibre, folate, potassium, and vitamins B5,B6, C, E, and K.

Chickpeas, also called garbanzo beans, belong to the legume family, which includes a variety of beans, peanuts, soybeans and lentils. Opting for legumes over foods high in saturated fat might lower your risk of heart disease. Chickpeas also offer specific health benefits, and consuming them regularly boosts your intake of a few key nutrients such as: protein, fibre, manganese, and folate. The mineral manganese helps support bone development and wound healing and also helps carry out chemical reactions important to your metabolism. Folate, or vitamin B-9, aids in new cell growth and brain cell communication and protects against genetic mutations that contribute to cancer development.

Avocado, Chickpea, & Roasted Capsicum Salad Ingredients

PREP TIME 10 MINS | COOKING TIME 10 MINS | SERVES 5-6

INGREDIENTS

  • 2 avocados, peeled, pitted, and thinly sliced
  • 2 brown onions, peeled and quartered
  • 1 can (400g) chickpeas in water, drained
  • 1 packet (250g) mixed salad greens
  • 1 packet (150g) semi-dried tomatoes, halved, oil reserved
  • 1 yellow capsicum
  • Balsamic vinegar
  • Ground salt and black pepper, to taste
  • Olive Oil

METHOD

  1. Rub the yellow capsicum with a little bit of oil and place directly on open flame of gas stove. Rotate occasionally so that the capsicum blisters and chars on all sides. Once done, set aside to cool down. Peel the skin off and cut into strips once it has cooled down enough to handle. Add to a large mixing bowl.
  2. Blanch the chickpeas in boiling water for about 5 minutes. Drain and add to the large mixing bowl together with the roast capsicum strips.
  3. Heat olive oil in a small frying pan over medium-high. Add the onions and cook until soft and caramelised. Once done, transfer to the large mixing bowl.
  4. Add the semi-dried tomatoes together with its herbed oil, mixed salad greens, and balsamic vinegar. Season with a touch of ground salt and black pepper and give it a good toss until well coated. Transfer to a serving dish and top with the sliced avocados.
  5. Serve and enjoy!

Avocado, Chickpea, & Roasted Capsicum Salad

Avocado, Chickpea, & Roasted Capsicum Salad with Roast BBQ Chicken

BON APPÉTIT

– Ally xx

myTaste.com

Quinoa, Green Beans, and Roasted Capsicum Salad with Pan-seared Rump Steak

Quinoa, Green Beans, and Roasted Capsicum Salad with Pan-seared Rump Steak

Hello Everyone! I can’t believe that January flew by that quickly! We’re already into the second month of the new year but I feel as if though the year has just started! It’s going to be a short month too since it’s February. Anyway, when I got up this morning, I came across a photo on Instagram with the caption:

“Did y’all make New Year Resolutions? How’s it going so far? If you got lazy, you can always start back up today.”

We’re all human, and we all fall into that trap of not keeping our resolutions, but it is indeed never too late to start back up today… Or tomorrow. As long as you are determined to continue going, you will probably reach your end goal. One of my resolutions is to get fit and eat healthy, and I can honestly say that I haven’t been keeping up with this for the past 2 weeks. I’ve been busy with deadlines and helping out in a 5-day event that ended on the weekend, that I have completely ignored exercising and eating right. I am now determined to get back on track, but I feel a sore throat coming down so who knows when I’ll be able to get back on track – but I ain’t giving up that’s for sure.

Quinoa, Green Beans, and Roasted Capsicum Salad with Pan-seared Rump Steak

Tonight, I want to share an experimental recipe that I whipped up a few weeks ago. I rarely cook with quinoa (pronounced as KEEN-wah), and the sole reason for that is because it is very expensive – the bag of 280g (just a little bit under 2 cups) I bought already set me back $12.80. If we take a second to overlook the cost of quinoa, it is actually very beneficial to our health. It is incredibly nutritious as its fibre content is much higher than most grains. It is also very high in protein, containing the essential amino acids that we need . Quinoa contains a great amount of minerals – minerals that we other do not get enough of, especially magnesium, potassium, and zinc. If you would like to read up more on the health benefits of quinoa, click here.

I usually cannot go with a meal if it doesn’t have some sort of meat on the plate – which is why I decided to match this salad with another hit of protein from pan-searing a nice slab of rump steak. I was kind of going for medium-rare, but I think the beef turned out to be a bit more towards the rarer side of medium-rare. Nonetheless, it was delicious indeed (my mom seared the meat a little longer after cutting these few slices). You can pair it with any other meats if you wish, or have it completely vegetarian or vegan; whatever tickles your fancy.

Quinoa, Green Beans, and Roasted Capsicum Salad with Pan-seared Rump Steak

PREP TIME 10 MINS | COOKING TIME 30 MINS | SERVES 5-6

INGREDIENTS

  • 500g rump steak
  • 250g green beans, ends trimmed
  • 100g feta cheese
  • 2 cups chicken stock*
  • 1 cup quinoa
  • 1 cup wild rocket leaves
  • 1 red capsicum
  • Ground salt and black pepper, to taste
  • Olive oil fry pan-searing

For the dressing

  • 1 & 1/2 tbsp fresh lemon juice
  • 2 tsp honey
  • 2 tsp olive oil
  • 1 tsp smoked paprika

*You can make you own stock by boiling chicken carcasses for about half an hour, together with whole black peppercorns, bay leaves, and salt. Or you can use the store bought ones, again, whatever tickles your fancy.

METHOD

  1. Bring the quinoa and chicken stock to a boil in a medium-sized saucepan. Once boiling, reduce heat down to low, cover, and then simmer until tender and most of the liquid has been absorbed, about 15 to 20 minutes. Once done, fluff with a fork and transfer to a large mixing bowl.
  2. While the quinoa is simmering away, blanch the green beans in boiling water for about 5-6 minutes. Once done, transfer to an ice bath to stop the cooking process. This ensures that you’ll have nice and crisp green beans in your salad. Drain and then add to the large mixing bowl.
  3. Season the beef with some ground salt and black pepper. Bring a large frying pan with olive oil to a heat over high, until it starts to smoke. Add your steak and sear for about 2-3 minutes per side for rare, 3-4 minutes for medium-rare, 4-5 minutes for medium-well, or 5+ minutes per side for well done. Once done, set aside to rest for about 10 minutes.
  4. While the beef is resting, you can move on to roasting the capsicum. Rub the red capsicum with a little bit of oil and place directly on open flame of gas stove. Rotate occasionally so that the red capsicum blisters and chars on all sides. Once done, set aside to cool down. Peel the skin off and cut into strips once it has cooled down enough to handle. Add to the large mixing bowl together with the rocket leaves and feta cheese.
  5. Whisk the lemon juice, honey, oil, and paprika in a small bowl until well combined. Add to the large mixing bowl and toss the salad around until well coated and combined.
  6. Serve the salad topped with a few slices of the rump steak. Enjoy!

Quinoa, Green Beans, and Roasted Capsicum Salad with Pan-seared Rump Steak

ps: do not be deceived by the portion of this dish. I just used an oversized dish to plate it up. This kept me quite full for a few hours and I didn’t even finish everything on the plate!

BON APPÉTIT

– Ally xx

myTaste.com

Pink Grapefruit Lemonade

Hello Everyone! It’s the last of Juicy January and I’ve got a nice, refreshing drink for you that you can also add a little twist if you want something naughty for all that healthy juicing you’ve (I’ve) been doing for the past month. It was just a normal Sunday morning when I went grocery shopping with my Mom and sister. I saw these lovely, plump, fresh grapefruits on the shelves and Schweppes’ Apple & Pink Grapefruit Mineral Water that I always, or well, most of the time, had in my fridge when I was still studying in Australia, came into mind. So I grabbed these fruits, some lemons, and mint, and decided that I was going to make a Pink Grapefruit Lemonade. When I got around to making them, I realised that I had some strawberries in the fridge that were on the verge of becoming overripe, and so I decided to slice them up and add them to the drink as well.

Grapefruits vary in hue from white or yellow to pink and red and can range in taste from very acidic and even bitter to sweet and sugary. Grapefruits are low in calories but are full of nutrients, and are an excellent source of vitamins A and C. These fruits support clear, healthy skin, can help to lower our risk for many diseases and conditions, and may even help with weight loss as part of an overall healthy and varied diet. To read into more details on how, for example, grapefruits can aid in weight loss, click here.

Pink Grapefruit Lemonade

Mix the juice of one grapefruit together with the juice of a lemon and you’ve got yourself and juice that’s rich in many nourishing elements like vitamin C, vitamin B6, vitamin A, vitamin E,  copper,  calcium, iron,  magnesium, potassium, zinc, phosphorus, protein, and the list goes on. The health benefits of lemons include the treatment of throat infections, indigestion, constipation, dental problems, and fever, internal bleeding, and high blood pressure, while it also benefits hair and skin care. They also help to strengthen your immune system, cleanse your stomach, and it is considered a blood purifier.

Throw in some roughly chopped mint leaves for a fresh, aromatic, sweet flavor with a cool aftertaste. If you happen to have strawberries in your fridge too, or if you actually bought them to try this out, throw them in too for an extra added nutrients and antioxidants, offering a wide range of health benefits that may surprise you – click here for more information.

PREP TIME 5 MINS | COOKING TIME | SERVES 3-4

INGREDIENTS

  • 650ml cold water
  • 1 punnet (125g) fresh strawberries, sliced thinly
  • 1 large grapefruit, peeled and cut into quarters
  • 1 large lemon, juice squeezed
  • 1/2 bunch of mint, roughly chopped
  • 1/4 cup boiling water
  • 1 tbsp white sugar

Optional:

  • 2-3 tbsp white rum

METHOD

  1. Add the white sugar and boiling water to a large pitcher. Stir until the sugar has full dissolved.
  2. Add the lemon juice together with the cold water, mint leaves, sliced strawberries.
  3. Juice the grapefruit using an electric juicer and then pour into the pitcher. Give it a good stir.

Pink Grapefruit Lemonade

If you’re feeling a little bit cheeky, throw in a few tablespoons of coconut rum (that was the only thing I had available at that time) or just plain white rum, tequila, or vodka – whatever tickles your fancy that is! 🙂 Enjoy and happy juicing!

BON APPÉTIT

– Ally xx

myTaste.com

Cucumber, Green Apple, & Kiwi Juice

Hello Everyone! Before I begin, I just wanted to take this opportunity to say (before I forget that is), that I am not a huge fan of cucumber. Why am I saying this? Well, it’s only because I realised that I posted a recipe last week with cucumber in it and I didn’t mention about this love/hate relationship that I have with cucumber. I actually paused for a bit there when I was trying to decide whether love/hate was the right choice of words – because it’s more hate and not even an ounce of love. I can’t exactly put my finger on why I’m not all that about cucumber, I just know that if I see it on my plate, I won’t touch it. I don’t know if it’s taste, or texture, or whatever else there is to it. I just don’t like it. However, I do realise that when it is cut up quite small and finely, and it is mixed with other foods, then I’ll eat it, but only because I’m too lazy to pick them out one by one *cheeky grin* Yes, so after all that, I still wonder why I’d drink a juice with cucumber in it. Well, I can’t exactly answer that question myself to be honest.

Cucumber, Green Apple, & Kiwi Juice

This combination of Apple + Cucumber + Kiwi helps improve skin complexion. However, after doing some research, I’m pretty sure that this combination of fruits and veggies help in many more ways that just keeping us from ageing:

In my previous post, I mentioned that cucumbers are beneficial in helping one to avoid nutrient deficiencies, especially those that are accustomed to eating a typical American diet. In addition, cucumbers contain an extraordinary amount of naturally purified water and therefore contains a higher quality of water content than that of ordinary water. It is no wonder that cucumbers should be eaten all year long. Yeah – even after all that research and knowing how good cucumber actually is for my health, it’s still a no, with the exception for this juice recipe and the previous one I guess.

Aside from the health benefits of cucumber, pair it with a kiwi or two and you’ve got your hit of vitamin C and E. It is known that two medium-sized kiwis contain a whopping amount of vitamin C (boosting up to about 230% more than the daily recommended about of vitamin C intake), that aids in boosting our immune system, fights the stress away, and helps protect our skin from ageing. It also promotes wound healing and iron absorption for healthy bones, blood vessels, and teeth. Besides the C, there’s also the E which, a kiwi carries a rare and fat-free form of it. This is a potent antioxidant said to help lower cholesterol and boost immunity. I could write a whole essay on the health benefits of kiwis as the list goes on – but I won’t *cheeky grin*

Lastly, we all know the saying “an apple a day drives the doctor away” – but what does it really mean? Well, apples are extremely rich in important antioxidants, flavanoids, and dietary fibre, and therefore may help reduce the risk of developing cancer, hypertension, diabetes, and heart disease. I mean, I guess that pretty much says it all doesn’t it? The list of benefits continue on! And here are 15 health benefits of apples.

PREP TIME 5 MINS | COOKING TIME | SERVES 1

INGREDIENTS

  • 1 large green apple, quartered and cored
  • 1 large cucumber, peeled and cut into thirds
  • 1 kiwi, peeled and halved lengthwise

METHOD

  1. Juice all the ingredients using an electric juicer. Pour into a tall glass and add ice if you want your juice cold. Serve and enjoy, especially on a hot tropical afternoon for a nice refresher!

Apple, Celery, & Cucumber Juice

Swap out the kiwi and go for a combination of Apple + Cucumber + Celery to help prevent cancer, reduce cholesterol, and eliminate stomach upset and headache. We ran out of green apples, so we used the red ones we had in the fridge – I don’t see a difference in using either, but for me it would’ve just looked visually nicer if the apple was green in the photograph hehehe. Happy Juicing!

BON APPÉTIT

– Ally xx

myTaste.com

Cucumber, Ginger, & Orange Juice

Hello Everyone! I do apologise if last weeks post felt rushed and not planned, well it was actually – at that time, I had just returned home from a gym workout and I hadn’t even written that post yet nor did I prepare the photographs to upload that night as well. Such a great start to the New Year am I right? Anyway, I’m starting this post off right now (which is a Sunday night) and then I’ll probably be wrapping it up on Wednesday night after my gym workout once again.

So as you may or may not know already, depending if you’re a regular follower on my blog and social media pages, the theme for this month is healthy juices a.k.a. Juicy January! I thought that it’d be a nice way to kick off the New Year since a majority of the population would have made a resolution sounding like this: Workout, Get Fit, Lose Weight, Eat Clean/Healthy, etc. etc. And yes, this is me EVERY single New Years, and then three months in… What workout? Eat Clean? No way… FRIES! Let me make this clear though – no, I am not on a juice diet (detox?) whatever it’s called, I’m just exploring new ways I can enjoy fruit and vegetables combined as a post-workout refresher when I get home. I still (sometimes) eat like there’s tomorrow *cheeky grin*. Anyway, yes, it’s already 10pm on a Wednesday night, and here I am still writing this part of the post after coming home from the gym, having a banana, showered ready for bed, and then I remember that I still have this to do!

Cucumber, Ginger, & Orange Juice

This combination of Orange + Ginger + Cucumber helps improve skin texture and moisture, and reduces body heat.

Many just assume that oranges contain high levels of vitamin C which strengthens our immune responses of the body, protecting us against recurring cold and cough or any other common infections. That is basically just one of the may heath benefits of a single medium-sized orange. For example, oranges also help prevent the ageing of our skin which is from the vitamin A present in oranges that help keep the skin membranes healthy. It also contains a powerful antioxidant known as beta-carotene, which protects the cells from being damaged. Other vitamins and minerals that can be found is oranges include: vitamin B1, calcium, copper, fibre, potassium, and much more.

“…there’s reason to eat cucumbers all year long. With vitamin K, B vitamins, copper, potassium, vitamin C, and manganese, cucumbers can help you to avoid nutrient deficiencies that are widespread among those eating a typical American diet.” — Dr. Mercola

There are many proven health benefits of ginger, but in a nutshell, ginger has a long history of use for relieving digestive problems such as nausea, loss of appetite, motion sickness and pain. What I do find quite relevant though (since I am getting back into a regular exercise regime), is that ginger has been shown to be effective against exercise-induced muscle pain. Ginger does not have an immediate impact, but may be effective at reducing the day-to-day progression of muscle pain.

PREP TIME 5 MINS | COOKING TIME | SERVES 1

INGREDIENTS

  • 1 large orange, peeled and cut into wedges
  • 1 large cucumber, peeled and cut into thirds
  • Small thumb-sized piece of ginger, peeled

METHOD

  1. Finely rate the ginger and extract it’s juices by squeezing it, about a quarter teaspoon should do. Add to a tall glass.
  2. Juice the other two ingredients using an electric juicer. Pour into the tall glass and add ice if you want your juice cold.Serve and enjoy, especially on a hot tropical afternoon for a nice refresher or for a post-workout drink.

Cucumber, Ginger, & Orange Juice

BON APPÉTIT

– Ally xx

myTaste.com

Apple, Carrot, & Celery Juice

Hello Everyone and a very Happy New Year to all my family, friends, and followers! I’ll keep this part short, and probably write more in my next post as it’s currently way past bedtime for me here in Brunei. I just want to let you guys know that Amcarmen’s Kitchen is back for 2016, kicking it off with some health juices for the month of January! I am also back with an all new upload schedule, which I will probably explain in next week’s post – but basically, from today onwards, tune in to Amcarmen’s Kitchen every Wednesday night for a new post!

So, I think the combination was meant to go like Apple + Carrot + Tomato, in which, this combination helps to improve skin complexion and eliminate bad breath, but we never got around to juicing up this combination – maybe because we didn’t have tomatoes in our vegetable compartment that time? Anyway, we had celery and used that instead. I’m not sure now what health benefits this combination with celery provide, but celery contains an excellent source of vitamin K which is beneficial to the human body as it is required for complete production of certain proteins that are prerequisites for blood coagulation. Our bodies need this for controlling the binding of calcium in bones and other tissues. Other health benefits of celery include: vitamin A, vitamin C, potassium, and despite being mainly water, celery also provides a fair amount of dietary fibre. So mix that in with some sweet apples and a carrot for more rich vitamins and minerals such as iron, copper, and manganese, and you’ve got yourself a tasty and super healthy juice!

Apple, Carrot, & Celery Juice

PREP TIME 5 MINS | COOKING TIME | SERVES 1

INGREDIENTS

  • 1 large green or red apple, quartered and cored
  • 1 large carrot, peeled and cut into thirds
  • 1 celery stalk, cut into thirds

METHOD

  1. Juice all the ingredients using an electric juicer. Pour into a tall glass and add ice if you want your juice cold. Serve and enjoy, especially on a hot tropical afternoon for a nice refresher!

You may also replace the celery with about a half teaspoon of ginger juice. This combination helps to boost and cleanse our system. Happy juicing everyone!

Apple, Carrot, & Ginger Juice

BON APPÉTIT

– Ally xx

myTaste.com

Paella de Marisco (Seafood Paella)

Paella de Marisco (Seafood Paella)

Hello Everyone! Maligayang Pasko! Joyeux Noël! ¡Feliz Navidad! Vrolijk Kerstfeest! And a very Merry Christmas to my family, friends and followers from all around the world! It’s weird knowing that Christmas  Day is coming to an end, and that the New Year is just around the corner! The year definitely went by real quick! Anyway, tonight will by my last post for the year (maybe) and it is also the very last post for my Festive Filipino Foods series for the blog. Day 12 of 12 is finally here and I have definitely saved the best for last!

If you weren’t able to guess from the hints I dropped in yesterday’s post, tonight’s dish is a Valencian rice dish with ancient roots that originated in its modern form in the mid-19th century near Albufera lagoon on the east coast of Spain adjacent to the city of Valencia. The dish is highly regarded as Spain’s National Dish with various types ranging from Vegetarian/Vegan Paella (Paella de Verduras), Seafood Paella (Paella de Marisco), Mixed Paella (Paella Mixta), and many, many more variants! From the name of this blog, you’ll already know what type of Paella I’ll be covering tonight, but now that I look back and think about my dish, it can actually be a Paella Mixta because what I will be sharing with you tonight is a free-style combination of land animals (well mainly processed pork in the form of a chorizo sausage), seafood, and vegetables.

According to tradition in Valencia, Paella is cooked over an open fire, fueled by orange and pine branches along with pine cones. This produces an aromatic smoke which infuses the Paella. It is cooked in a special wide-flat pan called a Paellera, and dinner guests traditionally eat directly out of the pan as well. Since paellera’s aren’t commonly found, or if you don’t have one handy, the recipe method below will show you how you can still make paella in a normal cooking pot. The last time I made Paella was back in 2012 if I’m not mistaken. I cooked it up together with my then housemate Vanessa and shared it with a friend of mine and her mother one cold wintery evening. We cooked it in a large frying pan and even served it up in that pan!

Paella de Marisco (Seafood Paella) Ingredients

Paella de Marisco (Seafood Paella) Ingredients

PREP TIME 20 MINS | COOKING TIME 30-40 MINS | SERVES 8-10

INGREDIENTS

  • 2 cups plain medium-grain rice, washed and drained
  • 1 cup glutinous rice, washed and drained
  • 1 cup frozen green peas
  • 300g fresh or frozen mussels
  • 200g fresh prawns, peeled and deveined, peels and heads reserved
  • 150g fresh or frozen baby clam meat
  • 100g squid, cleaned and cut into rings
  • 4-5 garlic cloves, minced
  • 2-3 dried bay leaves
  • 1 brown onion, diced
  • 1 chorizo sausage, sliced diagonally
  • 1 large tomato, diced
  • 1 lemon, cut into wedges
  • 1 yellow capsicum, sliced
  • 1 tbsp smoked paprika
  • Ground salt and black pepper, to taste
  • Pinch of Saffron threads
  • Whole black peppercorns

METHOD

  1. Start by making the broth to flavour your paella by adding the prawn heads and peels to a medium-sized pot and cover with about a litre and a half of water. Season with a bit of salt, bay leaves, and whole black peppercorns. Bring to a boil over high heat and then turn it down to a slow simmer. Make sure to press down on the heads and peels as it simmers away to extract as much flavour as you can. Leave it to simmer for about 30 minutes. Once done, turn the heat off and set aside.
  2. Heat about 2-3 tablespoons of oil in a large pot over medium-high, and panfry the chorizo slices until browned, about a minute per side. Remove and transfer to a plate lined with a paper towel to soak up any excess oil.
  3. In the same pot, sauté the garlic until fragrant and golden brown. Add in the onions and cook until soft, about 2-3 minutes altogether. Follow with the diced tomatoes and cook until soft, a further 3-4 minutes.
  4. Add in the rice, paprika, saffron threads, and season with and bit of ground salt and black pepper. Give it a good mix before adding about 3 cups of the prawn stock. Cover and leave it to cook without stirring – at this point, you may want to turn your heat down to medium to avoid the rice sticking to the bottom of the pan. Leave it alone for about 15 minutes or once the rice has absorbed most of the liquid.
  5. Turn the heat down to low, and add the seafood (if you are going to serve it up in the pot you cooked it in, then I suggest that you arrange your seafood in a presentable way, if not, then you can just chuck them in and arrange it later when you transfer your paella to a serving dish). Cover and leave it to cook/bake for a further 15 minutes, or until the seafood is cooked through. Add the vegetables and chorizo slices and cook for a further 5 minutes, after which you can turn the heat off and leave it in the pot for a further 5-10 minutes before serving.
  6. Serve immediately with a fresh squeeze of lemon, and enjoy amongst family and friends!

Paella de Marisco (Seafood Paella)

Paella de Marisco (Seafood Paella)

Paella de Marisco (Seafood Paella)

BON APPÉTIT

– Ally xx

ps: I may or may not actually post up two more festive recipes, depending if I have time to write them up from tomorrow onwards before the New Year kicks in.

myTaste.com

Buko Pandan

Buko Pandan

Hello Everyone! We’re on our second last day of Festive Filipino Foods! If you have been living under a rock and basically haven’t been following my blog for the past week and a half, I have been posting a recipe every single day for the past 10 days now (tonight will be the 11th of 12 posts) cooking up recipes leading up to Christmas Day. Tonight, I will be sharing one final dessert recipe before I close this series for the month of December. I have saved the best savoury dish for last tomorrow, and if you’d like to take a stab at what I’ll be making, here are some clues: Spanish-inspired with lots and lots of seafood including prawns, clams, mussels, and calamari.

But enough of the seafood talk, that will be for tomorrow – tonight I will be sharing with you a recipe for a dessert that is a classic Filipino favourite known as Buko Pandan, that originated from the island province of Bohol in the Central Visayas region. It is a dessert dish found on the tables at every fiesta and family gatherings. The two main ingredients for this dessert are buko, which is a young coconut, and screwpine leaves which are locally known as pandan leaves. You can find these leaves in most Asian grocery stores, but if you’re a lucky duck like me, you might have a neighbour that grows these leaves and you have full access to it for free. However, you can use bottled pandan extract if this is more convenient for you.

At first glance, this sumptuous dessert can be mistaken for Buko Salad because of the similarity in texture and dairy ingredients used. However, the green gelatin which contains the aroma and flavor of the Pandan gives the distinction. — Vanjo Merano from Panlasang Pinoy

The dessert is usually topped with pinipig (immature grains of glutinous rice pounded until flat before being toasted), but I just went for what I had in the pantry, which is cornflakes and it’s just as good because you get that crunch in the dish anyway from it too. Rice Krispies may be used as well. I don’t think it is really added, but I like my Buko Pandan Dessert with large sago pearls, which is why I have added it to the dish. I’ve read that you can also add palm seeds or nata de coco in your dessert too if you like.

ps: before I move on to the recipe, I’d like to first apologise once again for a later than usual post. We’ve had a busy morning/afternoon cooking up a storm in the kitchen for our Noche Buena, and I only had time to write this post in between cooking/waiting times, and after all the cleaning up after our dinner.

Buko Pandan Ingredients

PREP TIME 15 MINS | COOKING TIME 90 MINS | SERVES 10-12

INGREDIENTS

  • 3 young coconuts, flesh removed and cut into strips
  • 1L water
  • 1 packet (200ml) crème fraîche
  • 1/2 can (190g) condensed milk
  • 1 packet (10g) unflavoured green agar-agar powder, or simply just gelatine powder
  • 1 cup large sago balls
  • 1 cup white sugar
  • 2 tsp pandan extract*
  • Handful of cornflakes

*You can extract your own from pandan leaves, and here’s how you can do it: Place the pandan leaves and water into a blender (1 bunch (12 leaves) to about a half cup of water). Blend until the leaves are chopped very finely. Pour contents through a fine sieve and press against it using a spoon to draw out any extra juice. Discard the leaves. Tip: if you keep the extract in a sealed bottle, you can keep it for up to one week in the fridge. Do not freeze though.

METHOD

  1. Dissolve the agar-agar powder in 1L of water. Add the sugar, stir, and bring to a boil over low heat for about 10-15 minutes. Once done, pour into a large square mould (about 10″ in size) and leave it aside to cool down before placing it in the fridge to completely set.
  2. Meanwhile, bring a large pot of water to a boil, about 2L. Once boiling, add the large sago balls in and cook until tender – mine took more than an hour to cook through, about an hour and 20 minutes to be exact.
  3. While the sago is cooking away, mix all the ingredients together (except for the cornflakes) in a large bowl. Check to see if your gelatine has set, and once it has, cut it into small chunks and mix in the bowl together with all the other ingredients.
  4. Once the sago is done, drain and add it to the mixture. Give it once good final mix and then place in the fridge for about 3-4 hours before serving.
  5. Serve chilled, topped with cornflakes, or anything crunchy, and enjoy!

Buko Pandan

Buko Pandan

BON APPÉTIT

– Ally xx

myTaste.com