Mini Sausage Rolls with a Hazelnut-dressed Mixed Leaf Salad

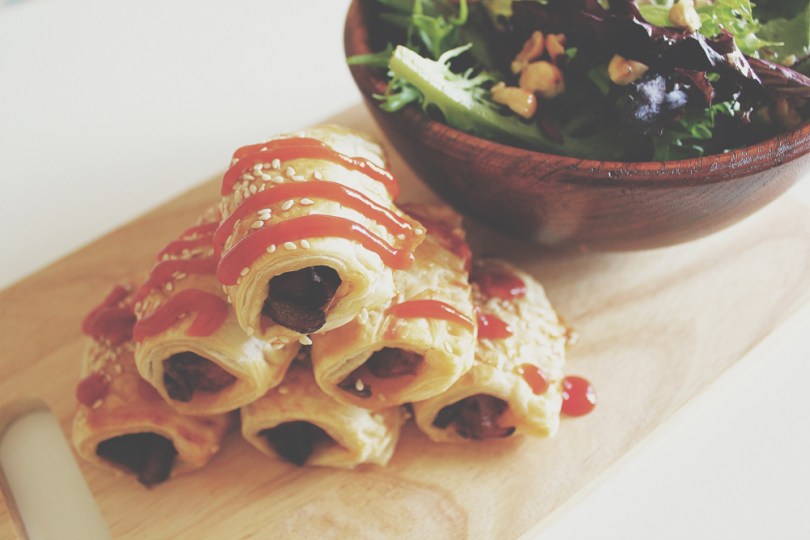
Hello Everyone! A few days ago I decided to make sausage rolls just because I wanted to. You could argue though, why go through all the trouble to make your own when you can easily just by pre-packed frozen sausage rolls from the supermarket? I guess this way you can be a little bit more creative in what you want in your sausage rolls rather than the generic minced beef that supermarkets sell. You can basically wrap any sort of flavoured sausages in puff pastry (homemade or store bought, doesn’t really matter)! For today’s recipe, I went on and made myself some Mexican Chorizo with Caramelised Onion sausage rolls.

Chorizo, for those of you who don’t know, is a name given to a variety of sausages, both fresh and cured. The two most common types of chorizos are:

  • Spanish Chorizo – cured, or hard, sausage made from coarsely chopped pork. It has a deep, smoky flavour due to the heavy amounts of paprika in the spice mix. Also, it can be eaten without cooking because it has been cured.
  • Mexican Chorizo – ground, rather than chopped, and the sausage is fresh rather than cured. Also, the red colour comes from the spicy red pepper rather than the smoked paprika. It must be cooked prior to eating.

PREP TIME 20 MINS | COOKING TIME 15-20 MINS SERVES 24 ROLLS

INGREDIENTS

For the sausage rolls

  • 3 Mexican chorizo sausages, removed from casing
  • 2 sheets frozen puff pastry, semi-thawed
  • 1 large red onion, halved and then sliced
  • 1 egg, beaten
  • 1 tbsp milk
  • Sesame seeds
  • Knob of unsalted butter
  • Tomato sauce, to serve (optional)

For the salad (original recipe from Coles)

  • 1 packet (120g) Coles brand 4 leaf salad mix
  • 2 tbsp hazelnuts
  • 1/4 cup extra virgin olive oil
  • 1 tbsp white wine vinegar
  • 1/2 tsp white sugar
  • Ground sea salt and pepper to taste

Mini Sausage Rolls with a Hazelnut-dressed Mixed Leaf Salad

METHOD

  1. Preheat oven to 200C. Roast hazelnuts on a baking tray for 5 minutes. Transfer to a clean tea towel and let to cool.
  2. In a medium pan, melt butter and sauté onions until soft and caramelised. Remove from heat and set aside.
  3. Cut puff pastry sheets into 8 rectangles (halved and 4 cuts across). Add about a teaspoon of sausage meat to one end of the rectangle and top with caramelised onions. Tightly roll the pastry around the sausage meat and brush the ends with the beaten egg and milk mixture to secure. Using the tips of the back of a fork, gently press down on the edges to seal the join.
  4. Space them out on a tray lined with baking paper. Brush the tops with the rest of the egg wash and sprinkle with sesame seeds. Bake in the oven for 15-20 minutes or until puffed, golden and cooked through.
  5. Meanwhile, return to the hazelnuts. Rub to remove the skins then roughly chop. Combine the oil, vinegar and sugar in a small bowl and season with a touch of ground sea salt and pepper. Stir in the hazelnuts. Place the salad leaves in a large bowl and add the dressing. Toss to combine. Serve with fresh out of the oven sausage rolls.

Mini Sausage Rolls with a Hazelnut-dressed Mixed Leaf Salad

BON APPÉTIT

– Ally xx

myTaste.com

Clam Corn Chowder

Clam Corn Chowder

Happy Hump Day Everyone! The weather has been nice and warm all week, which is a bit unusual since it’s nearing the end of fall and entering winter next month – I’m not complaining though! And yes, I know that Australian winters aren’t as cold as Northern American and European countries, it’s cold for me because coming from the tropics, it doesn’t get as cold as 24C. I love the heat! I’ve been planning on making this dish for a while now, as in a few weeks ago when the weather dropped to about 10-15C, but I never got around to. I had half a pack of vongole left from my spaghetti alle vongole in the freezer and I wanted to cook it. So yesterday for dinner I decided to make Clam Corn Chowder.

I made this dish once before last year when I went on holiday with my flatmate and two other friends. It was a great winter weekend away at Port Stephens – though it was in the middle of winter, we did very non-wintry activities: parasailing, camel riding and sand boarding. The evenings were a little chillier, and we also had a ‘Christmas in July’ dinner night, where I whipped up a nice pot of Clam Corn Chowder; full of sweet corn, smoky bacon, and delightfully briny clams.

Also, please check out the original recipe that I followed here: Epicurious.

PREP TIME 10 MINS | COOKING TIME 20 MINS | SERVES 4-6

INGREDIENTS

  • 1kg NZ Westhaven Vongole
  • 3 hickory smoked bacon slices, diced
  • 1 can (400g) super sweet corn kernels, drained
  • 500g potatoes, wash, peeled and cubed
  • 2 cups fish stock (clam juice preferable if available)
  • 1/2 cup water
  • 3 stalks scallions, chopped
  • 1 cup whole milk
  • 1/2 cup thickened cream
  • 2 tbsp unsalted butter, divided
  • Ground salt and pepper to taste

METHOD

  1. In a large pot, melt 1 tbsp of the butter and sauté bacon until lightly browned, but not crisp, over medium heat. Add in the scallions (pale white parts) and cook, stirring for 2 minutes. Add in the corn and potatoes, and sauté for 2-3 minutes. Then add in the fish stock, water, and season with pepper. Bring to a boil, uncovered.
  2. Add the clams in and bring to a boil again, uncovered. Stir occasionally until the clams open (about 5-8 minutes). Discard any clams that remain unopened after 8 minutes.
  3. Add the milk and cream to the chowder, remaining butter, and season with salt. Cook until heated through but do not let it boil. Garnish with green scallions and serve with buttered bread roll.

Clam Corn Chowder

BON APPÉTIT

– Ally xx

myTaste.com

Fried Chicken with Salted Duck Egg Sauce

Fried Chicken with Salted Duck Egg Sauce

Hello Everyone! Today for lunch I decided to pull out an old recipe that I have been making for a while now. I first came across a similar dish back in 2009/2010 maybe, at a restaurant back home, Mangrove Paradise Restaurant, where one of the waiters recommended the stir fried prawns with salted egg sauce. I am so glad that they made that recommendation because the dish was simply divine! I never tried to recreate this dish at home because, if you read my story on My Kitchen Journey, I was never really into cooking until 2 years ago really.

I was looking up recipes online one day figuring out what to make, and then I remembered this dish. I searched and searched online but could not find the one that I specifically had. I came across variations of the dish, but it wasn’t what I wanted to make. I then came across this recipe from yummylittlecooks which was close enough. I tweaked the recipe and method a bit, but I actually haven’t tested this recipe out with prawns, which I should definitely do next time, with some fresh curry leaves (I couldn’t find any this week so I resulted to used dried ones). They go so well with fried chicken though!

PREP TIME 1 HOUR | COOKING TIME 20-25 MINS SERVES 4-5

INGREDIENTS

  • 1/2 cup canola oil for shallow frying

For the marinade

  • 15 pcs chicken mid-wings, washed and cleaned
  • 1/2 tsp salt
  • 1 tsp sesame oil
  • 2 tbsp water
  • 2 tbsp cornflour
  • 2 tbsp plain flour
  • Dash of ground black pepper

For the sauce

  • 3 salted duck egg yolks, steamed and smashed
  • 2 sprigs fresh curry leaves (dried leaves can be used as well if not available)
  • 3-4 red bird’s eye chillies, chopped
  • 1 can (350ml) evaporated milk

METHOD

  1. Combine all the marinade ingredients in a large bowl and mix the chicken around until well coated. Cover the bowl with cling wrap and leave to marinade for 1 hour. Do not refrigerate it to bring the meat down to room temperature before cooking.
  2. Preheat oven to 180C. Heat up oil in a large frying pan an working in batches, shallow dry the chicken until skin is crispy and golden (about 4-5 minutes per side). Remove from the heat and place on a baking tray lined with aluminium foil.
  3. Place the wings in the oven for a further 8-10 minutes to finish off in the oven. *In the past I have found that my wings were still a bit raw on the inside after frying, and frying them longer in the pan would either burn my wings or make it go dry, which is why I added this step in to finish cooking the wings without burning, and the wings remained crispy on the outside and juicy on the inside
  4. Meanwhile, drain some on the oil from the pan and sauté the egg yolks, curry leaves and half of bird’s eye chillies until fragrant. Add the evaporated milk and bring to a boil until the sauce has slightly thickened. *This recipe calls for 350ml of evaporated milk, if you want a drier dish, then use less milk
  5. Place the chicken wings on a shallow serving bowl and pour the sauce over the top. Garnish with the remaining chillies and curry leaves. Serve with steamed rice.

Fried Chicken with Salted Duck Egg Sauce

BON APPÉTIT

-Ally xx

myTaste.com

Spaghetti alle Vongole

Spaghetti alle Vongole

Spaghetti alle Vongole (basically ‘spaghetti with clams’ in Italian) is one of my all time favourite seafood pasta, alongside with probably almost ALL seafood pastas out there to be honest. I cooked this up over the weekend but hadn’t found the time to upload it then, so here it is now. It is a dish that is highly popular throughout the central regions of Italy, including Rome, as well as further south in Campania. Italians prepare the dish in two ways:

  • in bianco: with oil, garlic, parsley, and sometimes a splash of white wine; or
  • in rosso: like the former but with tomatoes and fresh basil, the addition of tomatoes being more frequent in the south.

Cheese and cream are sometimes added to the dish in most Italian-American recipes. However, these ingredients are quite alien to the spirit of Italian cooking. In the true spirit of Italian cooking, cheese is never added to this dish, accentuating the simple flavours of the clams and of good quality olive oil.

PREP TIME 5 MINS | COOKING TIME 10 MINS SERVES 2-3

INGREDIENTS

  • 1kg NZ Westhaven Vongole
  • 300g angel hair pasta
  • 2 cloves garlic, crushed and finely chopped
  • 2 red bird’s eye chill, sliced
  • 1 punnet (250g) cherry tomatoes, quartered
  • 1/4 cup extra virgin olive oil
  • 3/4 cup fish stock*
  • 3/4 cup Chardonnay
  • 1/2 cup fresh Italian parsley, chopped
  • Ground salt

*I would usually go for clam juice, but I couldn’t find any at the supermarkets.

METHOD

  1. In a large saucepan over medium heat, sauté the garlic and chillies in the olive oil until fragrant and the garlic is golden brown, about a minute. Then add the clams, fish stock, and wine. Cover and simmer over medium heat, shaking the pan occasionally until all the clams open. Add in the cherry tomatoes and remove from the heat.
  2. While the clams are simmering, bring a large pot of salted water to a boil. Add the pasta and cook, stirring frequently, until al dente (read packet instructions, 4-5minutes for angel hair pasta). Drain the pasta and transfer to the saucepan and toss well with the clam sauce and parsley. Serve immediately.

Spaghetti alle Vongole

BON APPÉTIT

– Ally xx
myTaste.com

Banana, Blueberry & Peanut Butter Teddy Toasts

Banana, Blueberry & Peanut Butter Teddy Toasts

Good afternoon everyone! Maybe still morning for others, even maybe early morning or late evening. Today’s post is very simple, no method needed really. I made this a while back and was inspired by an Instagram photo that my sister tagged me in. A creative fix to shake away the Monday Blues! That’s really all I have to say today 🙂

PREP TIME 5 MINS | COOKING TIME  SERVES 1

INGREDIENTS

  • 3 slices of Wholemeal Omega-3 Chia Bread, from Baker’s Delight
  • 1 large banana
  • 1 punnet (125g) fresh blueberries
  • Crunchy peanut butter
  • Honey & maple syrup blend, to drizzle

I just realised when writing the ingredient list out, how stupid it looked when I first wrote “9 slices of bananas” and “9 blueberries” 😛

Banana, Blueberry & Peanut Butter Teddy Toasts

BON APPÉTIT

– Ally xx
myTaste.com

Oatmeal Shortbread with Raspberry Compote

Oatmeal Shortbread with Raspberry Compote

Mother's Day 2014“We laugh, we cry, we make time fly. We are best friends, my Mom and I.” – (The photo above was taken back in December during our family trip to Thailand at the Chiang Mai Zoo, it was the most recent one I could find of the both us where we actually looked decent).

Happy Mother’s Day to all mothers and moms-to-be out there in the world, especially to a woman so dear to me, Mama G. Thank you for always being there for me. I should tell you how much a love you every single day, but I don’t. So here it is: I LOVE YOU.

So for today’s recipe, I decided to make oatmeal shortbread with a raspberry compote to commemorate Mother’s Day. If you have read my previous post last week on my Mother’s Birthday, you’ll know that a) she’s actually in another country, 2 hours behind, and b) she’s a diabetic. So today’s recipe is diabetic-friendly, and again she won’t be here to actually eat it, but maybe next year when I’m definitely back home for her birthday and Mother’s Day, I’ll whip it up for her again. For now, she’ll just have to enjoy looking at the pictures.

Note, I followed Martha Stewart’s Oatmeal Shortbread recipe for this so please check out the original on Yummly. The original recipe uses confectioners sugar, and I went online to see if there are any substitutes for this and I came across this website: Fitday. Basically you mix an artificial sweetener, such as Equal or Splenda, and cornstarch, and grind it in a blender.

PREP TIME 5 MINS | COOKING TIME 30-35 MINS SERVES 3-4

INGREDIENTS

For the Oatmeal Shortbread

  • 1/2 cup plus 2 tbsp extra old-fashioned rolled oats (not quick-cooking)
  • 3/4 cup plain flour, levelled
  • 1/3 cup confectioners sugar substitute (see above)
  • 1/2 tsp ground salt
  • 120g unsalted butter, cubed

For the Raspberry Compote

  • 1 punnet (125g) fresh raspberries
  • 1 tbsp granulated sugar substitute (I used Equal in this case)
  • 1 tbsp fresh lemon juice
  • 1/4 tsp cornstarch

METHOD

  1. Meanwhile, combine all the raspberry compote ingredients in a small saucepan. Simmer for 10 minutes over medium-low heat, stirring occasionally. Once the raspberries fall apart and the sauce is thickened, remove from heat. Allow it to cool down to room temperature before serving.
  2. Combine the flour, sugar, salt, and 1/2 cup of the cooled oats in a food processor. Process for about 1 minute or until finely ground. Then add in the butter. Pulse until the mixture’s consistency is of a coarse meal. Transfer to an 8-inch square baking pan and press firmly into bottom. Sprinkle remaining oats on top, and press gently.
  3. Bake for about 30-35 minutes until firm and lightly browned. Using a paring knife, immediately score shortbread into squares, and then score each square diagonally into 2 triangles. Place the baking pan on a wire rack and allow to cool on a wire rack. Gently invert, and break along scored lines. Serve with the raspberry compote.

Oatmeal Shortbread with Raspberry Compote

BON APPÉTIT

– Ally xx

myTaste.com

Three-ingredient Pancakes

Three-ingredient Pancakes

A very good morning to all! Well, it’s like past 10am here in Sydney (almost 11am probably by the time I get this post up), but probably only just about past midnight in parts of the world, or maybe just a few hours behind/ahead depending where you are really. Anyway, today, I managed to get out of bed by 8am (I usually wake up at 8 but laze around until 9-9:30), maybe because it wasn’t as cold as the previous days that made me just want to snuggle in my thick warm blanket. Who I am kidding? I got out of bed because I was hungry and I wanted to do something about my overripe bananas sitting in the corner of my room. I then remembered a friend of mine posting a photo (probably a month ago or so) on Instagram about his ‘failed’ two-ingredient pancakes – well more like when he tried to flip it, it tore. And it was slightly burnt.

Anyway, so this magical two-ingredient pancake is gluten and dairy free – basically two eggs per large banana. But I decided to put a little twist to my two-ingredient pancake and make it my very own three-ingredient pancake (I’m pretty sure someone out there thought about it already, but who cares). I decided to add a spoonful (or two) of crunchy peanut butter to the mix. YUM. I love peanut butter, especially the crunchy ones. I also added a touch of vanilla and more than I should’ve added, ground cinnamon. I also love me some cinnamon. You can never go overboard with it – I guess?

PREP TIME 5 MINS | COOKING TIME 15-20 MINS SERVES 4 PANCAKES

INGREDIENTS

  • 1 large ripe banana, mashed
  • 2 large free range eggs
  • 2 tbsp crunchy peanut butter
  • Dash of vanilla extract
  • Dash of ground cinnamon
  • Honey & maple syrup blend, to drizzle
  • 1 tbsp vegetable oil

METHOD

  1. Add the peanut butter and eggs in a medium-sized bowl and beat together. Add in the mashed bananas, vanilla extract and cinnamon. Mix until well combined. (Tip: if you are pressed for time, use a blender to mix all the ingredients together).
  2. Heat a small pan (nonstick or cast-iron) over medium heat. Fold a sheet of paper towel in half, and moisten with the vegetable oil and carefully rub the pan with the oiled paper towel. Ladle the batter onto the pan, using the back of the ladle to spread the batter into a round shape. Cook until the surface of the pancake starts to bubble, about 2-3 minutes. Flip carefully with a spatula, and cook until browned on the underside, about 1-2 minutes more (I am actually unsure about the timings so please don’t accurately follow them, I just used my eyes and instincts to tell whether they are cooked through or not).
  3. Continue with more oil and remaining batter (makes about 4 pancakes). Serve warm, with desired toppings.

Three-ingredient Pancakes

BON APPÉTIT

– Ally xx

myTaste.com

Scallops with Bacon and Beet Purée

Scallops with Bacon and Beet Purée

Happy Tuesday everyone! Beetroot is making an appearance in today’s post (from the leftover purée I had from the Beetroot Gnocchi recipe I posted last week). So, as you all probably know if you read that post, beetroot isn’t quite to my liking and I have no valid reason as to why I don’t particularly like it. As I said, can’t quite put my finger on it, might be the taste but I honestly have no idea. However, I did not want to waste such good produce so I decided to make something that goes with beet purée, and I found this recipe online that appealed a lot to me, mainly because I love scallops and I rarely get to eat them, or even cook with them because it’s a little bit over the ‘student’ budget (but today I will make an exception).

The original recipe garnishes the dish with goat cheese, and I would’ve added the goat cheese in if I hadn’t actually forgotten about it – yeah, it’s now sitting in my fridge and I’m trying to think of a dish that can incorporate this so I don’t have to store it in the fridge for a long time and eventually forget about it and then throw it out. But enough chitter-chatter, time to get on with the recipe (check out the original recipe here)! Also, before I continue, my scallops weren’t as thick as the ones in this recipe, so it looked a bit flat on the dish for me, but nonetheless, flavour was definitely there.

PREP TIME 5 MINS | COOKING TIME 10 MINS SERVES 2

INGREDIENTS

  • 1 dozen sea scallops
  • 1/2 cup roasted beet purée*
  • 1 bacon strip (in this case I used hickory-smoked bacon), diced
  • 1/4 red onion, minced
  • 1/2 cup Chardonnay
  • 1/4 cup thickened cream
  • Ground sea salt and pepper to taste
  • Fresh Italian parsley, chopped
  • Knob of butter
  • Fresh goat cheese

*See my Beetroot Gnocchi recipe on how to roast beets if you don’t have any ready at hand.

METHOD

  1. Melt butter in a medium-sized frying pan and cook the bacon over medium-high heat until crisp. Transfer the bacon to paper towels to drain off any excess oils. Pour out any excess oil from the pan leaving a bit behind, then add in the onions and sauté over medium heat until soft and caramelised (about 2 minutes).
  2. Add the Chardonnay and boil until reduced by half, scraping up any browned bits, about 1 minute. Add the cream and beet purée. Simmer until a thick purée is formed. Season to taste with salt and pepper. Remove from the heat.
  3. Meanwhile, pat the scallops dry and sprinkle with salt and pepper. Melt a knob of butter in a small frying pan and then add the scallops and cook until they’re brown, about 30 seconds to a maximum of 45 seconds per side (they will be slightly translucent in the centre).
  4. Spoon the beet purée onto a serving plate, spreading in a circular motion. Top with the scallops, drizzling any juices from the plate over the top. Spoon small dollops of the goat cheese, and sprinkle with bacon and fresh Italian parsley.

Scallops with Bacon and Beet Purée

BON APPÉTIT

– Ally xx

myTaste.com

Beetroot Gnocchi

Beetroot Gnocchi

Yesterday (30th April) was the 10-year anniversary of the iconic and always quotable click flick Mean Girls. I cannot even begin my obsession over this movie (okay, I’m not that obsessed, I just love it so much that I can quote it all day long). Leading up to this day, I planned a Mean Girls themed party and since its anniversary fell on a Wednesday, we had to bring in a pink dish to share, and of course wear pink as to quote Karen Smith, “On Wednesdays we wear pink”. If you want to skip ahead to the recipe, scroll down, otherwise enjoy reading about my DIY Mean Girls shirt:

Mean Girls Day: DIY Shirts

I was initially going to buy a shirt off eBay but it was a bit too expensive – well that was one of the reasons, the other reasons were the font not being right, not the right shade of pink, etc. Yes, the designer in me kicked in. And then I thought, yeah I’m a designer, why not I just make my own t-shirt? And so I did! I bought a pink tank top from Esprit and can I just say what a snatch! Originally priced at $14.95 and was down to $7.95 – and then a further 50% off from that price! With the help of my lovely friend Tara who does textiles as one of her majors for her degree, she taught me how to screen print using the photo-emulsion technique. Yeap, making my own screen printed shirt was the way to go, literally costed me less than $5 but a bit of time and effort. At least it was something that I am happy with and it turned out so great! “YOU CAN’T SIT WITH US!”

Mean Girls Day: DIY Shirts


So for the pink dish that I made to share with everyone, I made Beetroot Gnocchi. I’ve never made gnocchi before so I was a bit nervous as I didn’t want to screw up and have nothing for my guests to eat, but as always, beginner’s luck was on my side once again. They turned out really well and I would like to say that they taste really good (and I’m sure they do), I’m just not a very big fan of beetroot. It’s just something about the taste of it that I can’t really put my finger on. But as I said, I’m sure they would be so fetch for beetroot lovers.

Beetroot Gnocchi

PREP TIME 30 MINS | COOKING TIME 30 MINS SERVES 5-6

INGREDIENTS

For the beetroot purée

  • 1 bunch beetroot, cleaned and scrubbed (if the greens are still attached, cut them off, wash them, and reserve them for another use such as for salads)
  • Extra virgin olive oil
  • 2 sprigs rosemary

For the beetroot gnocchi dough

  • 3/4 cup roasted beetroot purée
  • 2 cups plain flour, divided
  • 1 cup ricotta cheese
  • 3/4 cup grated parmesan cheese
  • 1 large egg
  • 1 tsp salt
  • 1/2 tsp black pepper

To garnish

  • Juice and zest of one lemon
  • Rosemary sprigs

METHOD

  1. Preheat the oven to 250C. Place the beets in a large piece of aluminium foil. Coat the beets with the olive oil and sprinkle rosemary leaves over. Feel free to use plenty of olive oil as we will then use the beet-infused oil to dress the gnocchi. Fold the foil over and crimp the sides closed. This helps keep the beets moist, and also contains all the juices. Place in the oven and roast until tender. Smaller beets take about 25 minutes while larger and older beets can take up to an hour. You can check its tenderness by piercing a fork through them. Once done, remove the beets from the oven and set aside so that it is cool enough to handle. Once cool, you can use your fingers to to rub off the their peels. Transfer the beet-infused oil into a small bowl and reserve for later.
  2. Cut the beets into chunks and place them into a blender. Blend until smooth. Take 3/4 cup of the beet purée and place it into a medium bowl. If you have any extra puréed beets, place them into a container and refrigerate. You can use them for other dishes. Stir in the ricotta and parmesan cheese, eggs, salt, and pepper. Then mix in 1 & 1/2 cups of flour (the dough can be made a day ahead, just keep it refridgerated).
  3. Place the remaining 1/2 cup of flour in a bowl. Lightly dust a baking sheet with flour. Scoop the dough into rounds and transfer to the bowl with flour. Then with the tinges of a fork, press down into the dough and then transfer to baking sheet.
  4. Working in batches, cook the gnocchi in a large pot of simmering salted water. Cook for about 2 minutes or until when the gnocchi starts to float to the surface. Cook the gnocchi for a further 1 & 1/2 minutes longer. Then, using a slotted spoon, transfer gnocchi to a serving dish. Drizzle with the beet-infused oil and top with lemon zest, a few squeezes of lemon juice and fresh rosemary leaves.

Beetroot Gnocchi

Beetroot Gnocchi

BON APPÉTIT

– Ally xx

myTaste.com

Diabetic-friendly Chocolate Lava Cake

Diabetic-friendly Chocolate Lava Cake

Happy Birthday Mom!
Here’s to another year. Happy Birthday to the strongest woman I know; my chef, my role model, my bestfriend, my queen, Mama G. Thank you for making me into the person that I am today. Thank you for supporting me in my decisions. Thank you for being kind and generous to my sisters and myself. Thank you for feeding me and most of all thank you for teaching me how to cook! Thank you for everything. I love you ❤

Today (May 1st) as you can see, is my mother’s birthday. Unfortunately for the past four years, I have not been able to celebrate with her and the family back home being away for university. But today I decided to bake her a cake, a chocolate lava cake. A diabetic-friendly chocolate lava cake. For her birthday. Even though she’s not here to eat it.

I initially looked at this recipe by theurbanbaker but changed the portions slightly to make 2 chocolate lava cakes (I had to eat them all in the end since my Mom isn’t actually here to eat it with me, and 4 seemed a bit too much to handle for me).

Diabetic-friendly Chocolate Lava Cake

PREP TIME 10 MINS | COOKING TIME 6-7 MINS | MAKES 2 CAKES

INGREDIENTS

  • 3 tbsp unsalted butter, plus extra for greasing the ramekins
  • 50g Nestlé 70% cocoa dark chocolate for cooking, chopped
  • 1 large egg
  • 1 egg yolk
  • 1 tbsp granulated sugar substitute (in this case I used Equal)
  • 1 tsp plain flour
  • Unsweetened cocoa powder for dusting

METHOD

  1. Preheat oven to 230C. Grease the ramekins with room temperature butter and light dust with sifted cocoa powder.
  2. Add the chocolate and butter to a small bowl. Melt in the microwave for about a minute. Stir until smooth.
  3. In a medium bowl beat the egg, egg yolk and sugar substitute together until lightened in colour and thickened. Add the chocolate mix and stir until smooth and combined. Stir in the flour and divide between the ramekins.
  4. Bake for about 6-7 minutes. The sides will be cooked but the centre will be soft.
  5. Invert onto a plate and wait 10 seconds before sliding the ramekin off. The cake will fall into place. Light dust with confectioners sugar, garnish with a strawberry and serve with a glass of chilled St. Andrew’s Pink Moscato (optional).

Diabetic-friendly Chocolate Lava Cake

BON APPÉTIT!

– Ally xx

myTaste.com