Easter Hot Cross Buns

Easter Hot Cross Buns

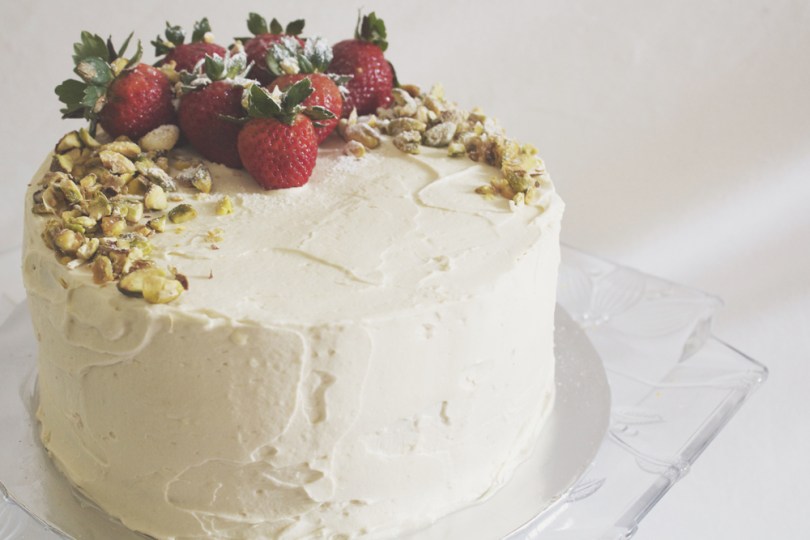
Hello Everyone! It’s been a while hasn’t it? Bare with me as I get back on track with my posting schedule, but I must warn you once again that I may or may not be travelling back to the Philippines, and as you already know, Internet connection will once again be disrupted, but hopefully for only a week or so. I am aware that it is a Sunday, and on amcarmenskitchen it should in fact be a Review Sunday! But not today for I have a special post for you guys tonight as it is Easter Sunday! I will sort out my reviews from various places that I visited during my month-long trip to the Philippines and get working on them to have one up for next week.

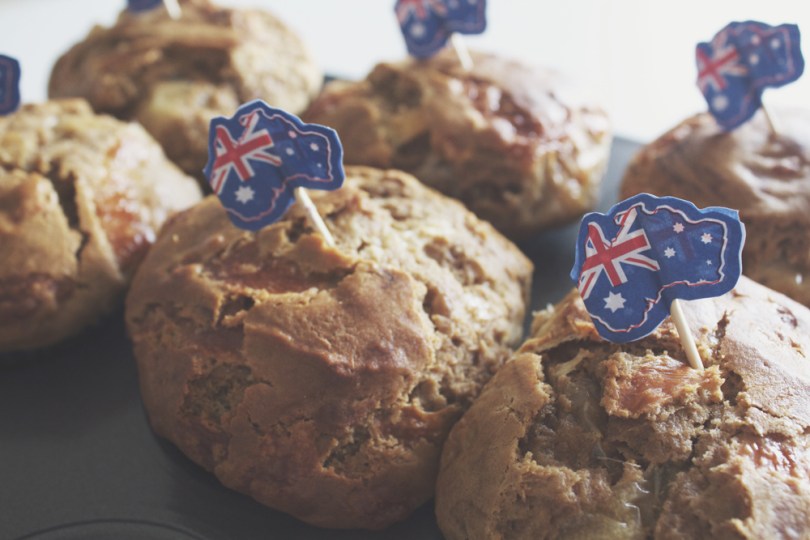
I remember how every bakery in Sydney, be in along the streets, inside a shopping centre, or supermarket, smelled of freshly baked hot cross buns. I definitely miss those chocolate chip flavoured ones from Baker’s Delight! A hot cross bun is a spiced sweet bun made with currants or raisins and marked with a cross on the top, traditionally eaten on Good Friday in most parts of Europe, the United States, and Australia/New Zealand. Apparently, hot cross buns may go on sale in Australia and New Zealand as early as New Year’s Day or even right after Christmas.

Easter Hot Cross Buns

To be honest, I was quite reluctant on whether or not I should post this up because a few things went wrong even though I followed the recipe from Taste very carefully. My buns did not at all look like the photograph and I think it because I under baked the buns (even though I followed the recipe). Okay, I technically didn’t quite follow it because the dough was very wet and quite sticky so I added probably the equivalent of about 1/2 or 3/4 more cups of flour. Maybe this is where it went wrong? I don’t know. Half of the buns deflated when I removed them from the oven (this is why I mentioned that I may have quite possibly under baked them), and they were still pretty pale when they had an extra 15 minutes in the oven. The crosses ended up appearing the same in terms of colour as the bun and didn’t look as evident. Oh the many mishaps; and now you see why I was hesitant to show my fail buns. Anyway, I deserve an A for effort as this is my first time making bread ever! And even still I am showing you my result!

When I reheated the buns again our small electric oven for about 6-8 minutes (for our afternoon snack), the tops browned nicely; and it was only then did I decide that maybe I should post it on my blog even if they don’t look that appetising. However, by this time, having been in the oven for quite some time since the initial baking, the bottoms and even the outside became quite crusty, however, the inside remained soft and dense. The 6 that are missing from the photograph were the deflated ones that we ate, and so I only managed to photograph the remaining 6. I will definitely give this recipe another go some other time.

Easter Hot Cross Buns Ingredients

PREP TIME 2 HOURS 20 MINS | COOKING TIME 20-25 MINS | MAKES 12 BUNS
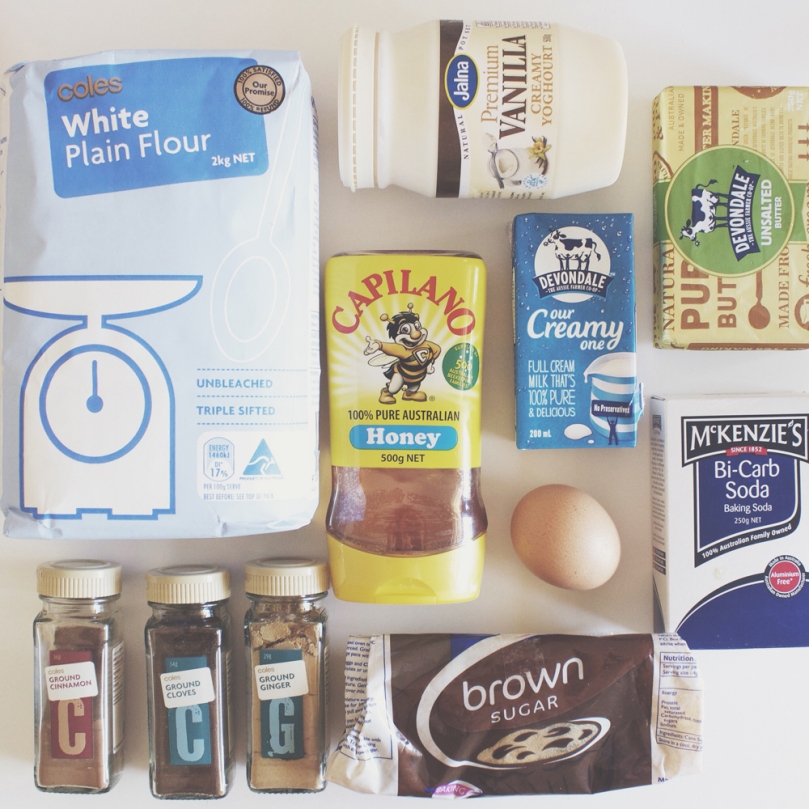
INGREDIENTS

For the dough

  • 4 cups plain flour
  • 1 & 1/2 cups of raisins (or currents/sultanas)
  • 1 cup milk
  • 1/4 cup caster sugar
  • 40g butter
  • 2 eggs, lightly beaten
  • 2 sachets (7g each) dried yeast
  • 1 & 1/2 tsp mixed spices (I used cinnamon, cloves, & nutmeg)
  • Pinch of salt

For the flour paste

  • 1/4 cup plain flour
  • 3 tbsp water

For the glaze

  • 1/3 cup water
  • 2 tbsp caster sugar
  • Butter to serve

METHOD

  1. Bread Dough: Combine flour, yeast, sugar, mixed spices, and salt in a large bowl.
  2. Melt butter in a small saucepan over medium heat and then add in the milk. Heat for about a minute, or until the mixture is lukewarm. Add warm milk mixture and eggs to flour mixture. Then, using a flat-bladed knife, mix until the dough almost comes together. Use clean hands to finish mixing to form a soft dough.
  3. Turn the dough out onto a floured surface and knead for 10 minutes, or until the dough is smooth. Place the dough into a lightly oiled bowl and cover with plastic wrap. Set aside in a warm, draught-free place for 1 to 1 & 1/2 hours, or until the dough doubles in size.
  4. Punch the dough down to its original size and add the raisins to the dough. Knead with the raisins for about a minute on a lightly floured surface until smooth. Divide into 12 even portions. Shape each portion into a ball. Place balls onto a large tray lined with baking paper, about 1cm apart, and cover with plastic wrap. Set aside in a warm, draught-free place for 30 minutes, or until buns double in size. Meanwhile, preheat the oven to 190C.
  5. Flour Paste: Mix flour and water together in a small bowl until smooth, adding a little more water if paste is too thick. Spoon into a small snap-lock bag and snip off a corner of the bag. Pipe flour paste over tops of buns to form crosses.
  6. Bake for 20 to 25 minutes, or until buns are cooked through.
  7. Glaze: Place water and sugar into a small saucepan over low heat, and stir until the sugar dissolves. Bring to the boil and let it boil for about 3-4 minutes. Then, brush the warm glaze over the hot cross buns. Serve warm or at room temperature.

Easter Hot Cross Buns

Easter Hot Cross Buns

BON APPÉTIT

– Ally xx

myTaste.com

Red Velvet Cheesecake Brownies

Red Velvet Cheesecake Brownies

Hello Everyone! First off, I’d like to apologise for not posting a recipe over the weekend – reason being just that I haven’t had the time to sit down and write one, and even better, my laptop charger decided that it was time for it to die. Also, another heads up, I will be leaving Lucena tomorrow and back to Bulacan where I will once again have no connection, so this will be the last post for March! I will see you again in April when I come back from my vacation!

Red Velvet Cheesecake Brownies

Moving on, today’s recipe is a belated one as it was meant to go up on Valentine’s Day. But for those who have been following for a while, you would’ve known that that was a busy week for me. I spent late morning/early afternoon of Valentine’s Day with a few of my very close friends over brunch at Cuckoo Callay for their Bacon Festival. I spent the rest of the day finalising my packing, moving all my things to a friends house, and having dinner with Vidhya that night. I left Sydney the next day.

I’ve made these a total of 3 times now. The first two were a complete fail and the third time was ALMOST a fail but worked out in the end. The first time I filled my square pan right to the top. I forgot how deep that pan was but nevertheless the brownies were too thick. The top started to brown a lot and it was nowhere close to being halfway done. The second time I tried it, I made the same mistake, but it wasn’t that I didn’t learn from my first mishap, it was another miscalculation on my side. I used a bigger dish this time, but one recipe wasn’t enough to fill it, do I doubled the quantities. It didn’t fill up all the way to the top, but it was still too thick. The brownie cooked about 3/4 of the way and the bottom was still batter. The second time I made it, I had planned on bringing it to office as a treat for my boss and managers, but because I didn’t want to bring in underdone brownies, I waited until my next day off to make the brownies again and finally bring them in on my last day of work.

Red Velvet Cheesecake Brownies

Now for the third batch, I used 1 and a half recipes this time and it was just the right thickness, FINALLY. When I said that it was an almost fail, it was because it was taking three times as long as it should to bake in the oven. The reason is because firstly, the oven at the lodge in Sydney is just unreliable. Secondly, I noticed that the top was starting to brown and the brownies aren’t all the way cooked yet, so I resulted to having to cover the top with foil so that it’d stop browning any further. Anyway, it got there in the end and it was a huge hit in the office! And Vidhya loved it as well, even though the had some from the first batch.

The original recipe can be found on Sally’s Baking Addiction. As stated before, I used 1 and a half recipes (just for the red velvet batter, I stuck to the same quantities for the cheesecake mix) from Sally’s so that my brownies were of the right thickness for my baking dish (about 8″ x 13″). Also, since at that time I was in midst of clearing out my pantry, I only had about a half cup of plain flour left, and quite a bit of self rising. I didn’t want to use self rising because I didn’t want it to rise, and Vidhya wasn’t home so I couldn’t borrow her plain flour. So I ended up using what’s left of Jialing’s wholemeal flour that she left at my place. I don’t exactly know if using wholemeal changes the texture or the taste, but it worked out in the end.

Red Velvet Cheesecake Brownies Ingredients

PREP TIME 15 MINS | COOKING TIME 45 MINS | SERVES 6-8

INGREDIENTS

For the red velvet brownies

  • 1 & 1/2 cups sugar
  • 1 cup wholemeal flour
  • 170g unsalted butter
  • 3 large free range eggs
  • 6 tbsp unsweetened cocoa powder
  • 1 tbsp vanilla extract
  • 1 & 1/2 tbsp liquid or gel red food colouring
  • 1 tsp white vinegar
  • 1/4 teaspoon salt

For the cheesecake mix

  • 8 ounces cream cheese, softened
  • 1 large free range egg, yolk only
  • 1/4 cup sugar
  • 1/2 tsp vanilla extract

METHOD

  1. Preheat oven to 180C. Grease an 8×13 baking dish with a little butter. Set aside.
  2. Red Velvet Brownie Mix: Beat the eggs together in a small bowl and set side. Then melt the butter in a large microwave safe bowl in 30-second increments until fully melted.
  3. Stir in the sugar, vanilla extract, cocoa powder, salt, food coloring, and vinegar, mixing each of the ingredients into the batter in that order.
  4. Whisk in the eggs, then fold in the flour until completely incorporated. Do not overmix.
  5. Pour the brownie batter into prepared baking pan. Leave about 3 or 4 tablespoons to top the mixture later for the top.
  6. Cheesecake Mix: Beat the softened cream cheese, sugar, egg yolk, and vanilla extract in a medium-sized bowl using a hand-held electrical mixer on medium speed. Make sure that the mixture is completely smooth (about a minute or so).
  7. Dollop spoonfuls of the cream cheese mixture on top of the prepared brownie batter and top with the remaining tablespoons of brownie batter. Glide a knife through the layers, creating a swirl pattern.
  8. Bake the brownies for 45 minutes or until a toothpick inserted in the middle comes out clean. Once down, allow the brownies to cool completely before cutting into squares.
  9. Cover the brownies and store at room temperature for 3 days or in the refrigerator for up to 6 days.

Red Velvet Cheesecake Brownies

Red Velvet Cheesecake Brownies

BON APPÉTIT

– Ally xx

myTaste.com

Garlic & Rosemary Pizza

Garlic & Rosemary Pizza

Hello Everyone! Sorry for the lack of updates on the blog! I did say in the last post or so perhaps that I’d be travelling during this time and that I was unsure of whether I’d have, not so much the time, but more the internet connection to be able to post updates for you guys – and that’s exactly what happened! The first week of my trip I was staying in Sta. Maria Bulacan where my grandmother is currently residing has no wi-fi connection. I am now in Lucena at my cousin’s place with internet!

Garlic & Rosemary Pizza Ingredients

3 pizzas down and just 1 more to go after this recipe. I prepared this post and the next even before I left for holidays, but as I said, I didn’t have the connection. Today I have a very simple pizza recipe for you. The first time I had this pizza was back home in Brunei at a restaurant called Fratini’s. I was with my Mom and two younger sisters at that time for a 50% off dinner promotion during the month of fasting for Muslims known as Ramadhan. If I’m not mistaken (since I am talking about several years ago), we ordered their winning dish Linguine Fratini which was quite a hefty dish, but sharing that between 4 people was not enough; just. So we decided that we wanted to order a pizza too, to share, but nothing to hefty as the pasta dish. So the waiter/waitress at the time recommended the garlic and rosemary pizza, which we ended up ordering at the end. When it came to the table, I was actually quite shocked. “Where’s the sauce?” I asked myself. Everything that I knew about what pizza was meant to be, stuffed crust, tomato sauce, and cheesy goodness, all gone. But when I had a slice of that pizza, I was in heaven. It was like garlic bread, but in pizza form. It was delicious that I didn’t even want to share the pizza with anyone else!

My pizza came out a little too tan for my liking, and didn’t really have the same flavour I experienced back then. It was nonetheless still tasty, however I think I overdid the salt a wee-bit too much.

Garlic & Rosemary Pizza Ingredients

PREP TIME 10 MINS | COOKING TIME 8-10 MINS | SERVES 3-4

INGREDIENTS

METHOD

  1. Combine all the ingredients to a small bowl and let it sit for about 30 minutes to an hour for the fresh garlic and rosemary leaves to macerate in the olive oil.
  2. Preheat oven to 220C. Place your pizza stone in the oven as well to heat it up.
  3. Roll out your dough to a circle the same size as your pizza stone on a lightly floured surface as thick or thin as you want. Then drizzle the olive oil mixture over the top of the dough.
  4. Carefully remove the stone from the oven and quickly slide the pizza over the top of the stone. Place it back in the oven and bake for about 8-10 minutes or until cooked all the way through. It should not take more than 15 minutes in total.
  5. Remove from the oven and serve with any sort of pasta dish as a side!

Garlic & Rosemary Pizza

Garlic & Rosemary Pizza

BON APPÉTIT

– Ally xx

myTaste.com

Layered Pistachio Cake with Honey Vanilla Buttercream

Layered Pistachio Cake with Honey Vanilla Buttercream

Hello Everyone! Today I have a special post for you as today is my not so little sister’s 19th birthday! Today is also the first time in 4 years that I have been home to celebrate with her and the rest of the family. If you have been following my blog since September last year, you would know that I started getting into baking cakes. I never really liked baking cakes to be honest, only because I find it very time consuming and my level of patience does have a limit. Since I started baking cakes, my Mom and sisters now prefer a homemade birthday cake instead of an expensive and cliché store-bought cake. So on Sunday, with the help of the birthday girl, we baked her birthday cake together. We baked it on Sunday even though her birthday is today. Why? Well only because tomorrow we’ll be off for a 1-month vacay to the Philippines, and if we had baked it today, leftovers would be sitting in the fridge until April.

Layered Pistachio Cake with Honey Vanilla Buttercream

Today’s cake recipe has been slightly adapted from, and can be found on Joanne Eats Well With Others. As you have already read from the title, it is a 3-layer pistachio cake with honey vanilla buttercream. I decided to add the strawberries and crushed pistachios on top to bring some life and colour to the presentation of the cake. I substituted some ingredients, such as instead of using cream of tartare, I used lemon juice instead. I barely use cream of tartare in my baking and buying a jar of it didn’t seem very economical as I know it’ll just sit in the pantry waiting for its expiry date. Also, instead of cake flour, also because I barely use it, I used plain flour combined with cornstarch instead. The easiest way to do this substitution is to put 2 tablespoons of cornstarch in the bottom of a 1-cup measuring cup, then fill the cup as usual with plain flour and level the top. In addition, I lessened the amount of sugar and butter in this recipe and it still turned out fine for me! I am not a huge fan of overly sweet desserts, and also I had to take into consideration my Mom who is a diabetic.

Layered Pistachio Cake with Honey Vanilla Buttercream

Before I move on to the recipe, I HIGHLY recommend that you buy shelled pistachios. We went to four different grocery stores and could not find any and so we decided to buy the shelled ones. It took forever to shell just over a cup of pistachios – thank goodness I had my Mom and my sisters to do the tedious job while I worked on the batter. Also, have a food processor handy, but if you’re like me and don’t own one, then all you need is a motor and pestle to bash it all up as well as grinding it. It takes time but it gets the job done. I think that’s why towards the end of this cake I was starting to lose a little bit of my patience because everything took longer to do! But hurray for a gas oven! I cannot stress how much I hated using the oven at the Doncaster Lodge. Everything took at least double or triple the normal time to cook!

Layered Pistachio Cake with Honey Vanilla Buttercream Ingredients

PREP TIME 30 MINS | COOKING TIME 1 HOUR | SERVES 8-10

INGREDIENTS

For the cake
  • 3 & 1/4 cups plain flour
  • 1 & 1/2 cups ice water
  • 1 cup caster sugar
  • 1 cup shelled pistachios, plus extra for decorating
  • 250g unsalted butter, softened
  • 3 large free range egg whites, at room temperature
  • 1 large free range egg
  • 5 tbsp cornflour
  • 1 tbsp baking powder
  • 1 tbsp vanilla extract
  • 1 tsp baking soda
  • 3/4 tsp salt
  • 1/4 tsp lemon juice
For the buttercream
  • 300g unsalted butter, soft, cut into small pieces
  • 1 & 1/2 cups milk
  • 1 cup caster sugar
  • 1/3 cup plain flour
  • 1/3 cup thickened cream
  • 3 tbsp honey
  • 1 tsp vanilla extract

METHOD

  1. Preheat the oven to 160C or gas mark 3. Grease three 8.5-inch cake pans with a little butter.
  2. For the Cake Batter: Using a food processor, pulse the pistachios until coarsely chopped. Remove half of the pistachios and transfer to a small bowl. Pulse the remaining pistachios until they are an almost powder-like consistency.
  3. Transfer to a large bowl and whisk together both the roughly chopped and fine pistachios with the plain flour, cornstarch, baking powder, baking soda, and salt. Set aside
  4. Cream the butter using an electrical mixer on high speed for about 3 minutes. Add in the sugar and vanilla and beat until fluffy for about another 3 minutes. Scrape down the sides of the bowl, and then add in the egg, mixing until just combined.
  5. Turn the mixer to low and add the flour+pistachio mix to the butter mixture in three additions, alternating with the ice water, mixing each time until just combined. Scrape down the bowl and mix on low speed for a few more seconds.
  6. In a medium, clean bowl whisk together the egg whites with the lemon juice until soft peaks form, about 3-5 minutes. Fold the egg whites into the batter.
  7. Divide the batter evenly among the cake pans and smooth the tops. Bake for 40-45 minutes, rotating the pans halfway through baking, until a toothpick inserted in the centre comes out clean.
  8. Transfer to a cooling rack and let them completely cool.
  9. For the Buttercream: Meanwhile, as the cakes are cooling down, whisk together the flour and sugar in a medium-sized saucepan. Then, add in the milk and cream, and cook over medium heat, whisking frequently, until the mixture comes to a boil and then thickens, about 10 to 15 minutes.
  10. Transfer the hot milk mixture to a large bowl and mix on high speed until cool, about 9 minutes. Reduce the speed to low and add the butter, a few pieces at a time, until it is full incorporated. Increase the speed to medium-high and beat until light and fluffy for a further few minutes. Then add in the vanilla and honey, and continue mixing until combined. If the frosting is too soft, chill it in the freezer for a while and then mix again.
  11. Assembly: Place one cake layer top side up on a serving platter. Use a long serrated knife to cut the top so that it is flat and even. Spread a little over a cup of frosting on top. Add the next later and, again, trim so that it is flat. Top with another cup of frosting. Add the remaining cake layer and trim the top again. Spread cake with a very thin layer of frosting for the crumb coating. Put in the freezer for 5 to 10 minutes. Spread the sides and top of the cake with the remaining frosting and decorate as desired.

Layered Pistachio Cake with Honey Vanilla Buttercream

Happy Birthday Alyssa!

BON APPÉTIT

– Ally xx

myTaste.com

Breakfast Muffins: Vegemite & Cheese

Breakfast Muffins: Vegemite & Cheese

Hello Everyone! Knowing that Muffin Making Monday would fall on ‘Straya Day, I just knew I had to make these muffins. All I can say is that when I was out doing groceries over the weekend, I had so many doubts about this, and I could not even comprehend WHY I decided to do this. I even struggled to place the tiny jar of vegemite into my trolley of groceries. I just could not bring myself to, but in my head I kept saying, “just do it. Do it for ‘Straya Day” and I did (what am I doing to myself).

Besides lamb, vegemite is another ‘Australian thing’. Vegemite has appeared on my blog once before, but for those of you who don’t know, vegemite is like the Australian version of marmite, a popular spread for sandwiches, toast, crumpets, crackers, and as well as a filling for various pastries. It is salty, slightly bitter, and apparently is similar to beef bouillon. You’ll either love it or hate it, and I did mention before that I am on the hateful side. The smell for me is a bit off-putting, and I know Vidhya hates it too, so I kept shoving the jar of vegemite up her nose whenever I had the chance to *cheeky grin*.

Breakfast Muffins: Vegemite & Cheese

I was too scared to bake a whole dozen muffins because I wasn’t too sure on how the taste would go down with me, so I only baked half a dozen, however, please note that the recipe below is for a full dozen – if you’re like me and don’t want to end up having to throw away the whole batch after eating one, then just half the measurements from the recipe below! Also, a little side note, I followed Sally’s master muffin mix recipe for these, and then added the vegemite and cheese. I only added about a tablespoon of vegemite as I was again afraid that the saltiness of it would overpower the taste of the muffin. But I can tell you that the batter smelled amazingly good!

But to be completely honest, these muffins did NOT taste as bad as I thought they would. It’s sort of like a taste that I cannot really describe. The only issue I had with them this morning was that because knowing that there was vegemite in them, I gagged a couple of times before even putting them in my mouth, so it kind of threw me off just a little bit. Nevertheless, the muffins were beautifully moist though, and I think that all the other ingredients mixed together with the vegemite sort of diluted its taste a bit. They weren’t at all overly salty like I thought they’d perhaps turn out to be. Having said that though, I would probably still never indulge in vegemite just as it is, like on toast or something as they have it here down under.

Breakfast Muffins: Vegemite & Cheese Ingredients

PREP TIME 25 MINS | COOKING TIME 25 MINS | MAKES 6 MUFFINS

INGREDIENTS

  • 3 cups plain flour
  • 1/2 cup granulated sugar
  • 1 cup milk, at room temperature
  • 1/2 cup light brown sugar
  • 1/2 cup vegetable oil
  • 2 handfuls of grated mozzarella cheese
  • 2 large free range eggs, at room temperature
  • 1-2 tbsp vegemite
  • 4 tsp baking powder
  • 1 tsp vanilla extract

METHOD

  1. Preheat oven to 220C. Line a 12 hole muffin pan with paper cases.
  2. Add the baking powder and flour in a large bowl, gently whizzing together until well combined. Set aside.
  3. In a medium-sized bowl, whisk together the eggs, granulated sugar, and brown sugar until combined. Then add in the milk, oil, and vanilla extract. Whisk together until the mixture is pale and yellow in colour.
  4. Using a spatula, fold the wet ingredients into dry ingredients and lightly mix everything together until all the flour is off the bottom of the bowl and no big pockets of flour remain. Then add in the cheese and vegemite, and continue to mix. Be careful as to not over mix the batter; it will result in tough, dense muffins. The batter will be extremely thick and somewhat lumpy.
  5. Spoon the batter into prepared muffin cups, filling them all the way to the top.
  6. Bake at 220C degrees for 5 minutes. Then reduce oven temperature to 190C and continue to bake for a further 25-26 minutes until tops are lightly golden. A toothpick inserted in the centre should come out clean. Allow to cool for 10 minutes before transferring to a wire rack to cool down completely.

Muffins taste best fresh the same day. Store muffins at room temperature in an airtight container for up to 5 days. Muffins freeze well, up to 3 months.

Breakfast Muffins: Vegemite & Cheese

Breakfast Muffins: Vegemite & Cheese

BON APPÉTIT

– Ally xx

myTaste.com

Breakfast Muffins: Mixed Berries

Breakfast Muffins: Mixed Berries

Hello Everyone and three cheers for the return of Muffin Making Mondays! I hate to start off on a bad note, but this is sadly my second last muffin making session with Jialing as I will be leaving this beautify country that I have called my second home for the past 4 years. I now truly understand the concept of time flying past.

Anyway, all that mushy stuff aside, yesterday we were joined by Yvonne, who spectated our Muffin Making Monday session, and was going on about how she should’ve started coming over when we first started our muffin baking sessions. It wasn’t so that she could bake with us too, but so that she could have a muffin from each of us to eat on the spot, and another to takeaway!

Breakfast Muffins: Mixed Berries

I whipped up a dozen very berry muffins while Jialing made a muffin. Yes you read that right, just ONE muffin. One BIG muffin. She had no muffin cups left and said that it was too far to go out and buy new ones; so she brought her pie tin over instead and made the decision to make ‘muffin slices’. She made an eggless and flourless chocolate muffin (cake) topped with chocolate bits, a chocolate streusel and mixed berries. Unfortunately for her, the streusel burnt, but nonetheless, beneath that was a very chocolatey and moist muffin (cake). It tasted delicious even though the little mishap!

Mine tasted really good as well! If you want to check out the original recipe, please head on over to Sally’s Baking Addiction. Also, while you are there, read up on how she came up with the Master Muffin Mix; basically kitchen tested bakery-style muffin batter with endless possibilities! Never have flat and/or deflated muffins ever again with her master mix!

Breakfast Muffins: Mixed Berries Ingredients

PREP TIME 10 MINS | COOKING TIME 25 MINS | MAKES 12 MUFFINS

INGREDIENTS

  • 3 cups plain flour
  • 2 cups mixed berries, fresh or frozen (not thawed)
  • 1/2 cup granulated sugar
  • 1 cup milk, at room temperature
  • 1/2 cup light brown sugar
  • 1/2 cup vegetable oil
  • 2 large free range eggs, at room temperature
  • 4 tsp baking powder
  • 1 tsp ground cinnamon
  • 1 tsp vanilla extract
  • 1/2 tsp salt
  • Coarse sugar for sprinkling on top

METHOD

  1. Preheat oven to 220C. Line a 12 hole muffin pan with paper cases.
  2. Add the baking powder, cinnamon, flour, ad salt in a large bowl, gently whizzing together until well combined. Set aside.
  3. In a medium-sized bowl, whisk together the eggs, granulated sugar, and brown sugar until combined. Then add in the milk, oil, and vanilla extract. Whisk together until the mixture is pale and yellow in colour.
  4. Using a spatula, fold the wet ingredients into dry ingredients and mix everything together until all the flour is off the bottom of the bowl and no big pockets of flour remain. Be careful as to not over mix the batter; it will result in tough, dense muffins. The batter will be extremely thick and somewhat lumpy.
  5. Spoon the batter into prepared muffin cups, about halfway. Then press a few berries into the batter of each muffin cup. Spoon the rest of the batter into each cup, filling them all the way to the top. Press a few more berries into the tops of each muffin and sprinkle with coarse sugar.
  6. Bake at 220C degrees for 5 minutes. Then reduce oven temperature to 190C and continue to bake for a further 25-26 minutes until tops are lightly golden. A toothpick inserted in the centre should come out clean. Allow to cool for 10 minutes before transferring to a wire rack to cool down completely.

Muffins taste best fresh the same day. Store muffins at room temperature in an airtight container for up to 5 days. Muffins freeze well, up to 3 months.

Breakfast Muffins: Mixed Berries

Breakfast Muffins: Mixed Berries

BON APPÉTIT

– Ally xx

myTaste.com

Cherry Ripple Black Forest Cake

Cherry Ripple Black Forest Cake

Hello Everyone! Yes, I know it is a Sunday which for those of you who are new to my blog, I don’t normally post on a Sunday – but I wanted to get all the Noche Buena recipes up before the New Year because I’ll probably have another batch of recipes to post from a New Years Day Lunch (maybe dinner depending on how energised I am to cook after a long day/night out the previous night) that I am planning to host – a small one though with probably 2-3 dishes maximum. Noche Buena was hectic and I don’t want to have a repeat that’s a week apart from each other. I won’t be doing Media Noche because I will most likely be camping out the whole day/night for a good spot by the harbour to view the Harbour Bridge Fireworks at midnight.

Cherry Ripple Black Forest Cake

Anyway, tonight’s recipe is from our Noche Buena dinner that Jialing and I hosted on the Eve of Christmas. This Cherry Ripple Black Forest Cake is one of the many desserts we had on the menu for the night. When deciding on a cake to make for the festive dinner, we found it difficult to decide on a cake that felt festive – besides a Yule Log. Even though I wasn’t too fond of a Black Forest cake, that is what we decided on. The reason why I am not fond of it is because every time I indulged in a store bought Black Forest cake, they ALWAYS use those horrible canned/tinned/jarred Maraschino Cherries that I absolutely hate. Not for our Black Forest cake NO! I was determined to use fresh cherries and if I had to use cherries from a can, at least not the maraschino ones!

Before Jialing and I went to do our groceries for the dinner, we talked about how we haven’t been seeing any fresh cherries at the local supermarkets. But when we got to Coles, we saw that cherries were on special and looking very fresh! I was so happy! Also, please do check out the original recipe over on Taste. Like how I’ve probably been describing over and over again in my previous posts, the recipe says to use a little more than 1/4 cup of Jim Beam Black Cherry Bourbon, but I didn’t want to buy a 700ml bottle for $30 for that amount. So from the leftover vodka I had from the East Orange Frosting I made for my Gingerbread Men, Jialing had the idea of infusing that into the cherry syrup for that boozy touch. Also, our sponge didn’t rise that much to be able to cut it into three layers, so we ended up having a two layer cake.

Cherry Ripple Black Forest Cake Ingredients

PREP TIME 10 MINS | COOKING TIME 1 HOUR 20 MINS | SERVES 8-10

INGREDIENTS

For the chocolate sponge

  • 1 & 1/4 cup self-raising flour
  • 1 cup brown sugar, firmly packed
  • 1/2 cup almond meal
  • 1/2 cup buttermilk
  • 1/4 cocoa powder
  • 200g dark cooking chocolate, melted and cooled
  • 200g unsalted butter, at room temperature
  • 2 large free range eggs

For the cream-jam filling

  • 1 can (425g) pitted black cherries in syrup, drain and reserve syrup
  • 300ml double cream
  • 250ml thickened cream
  • 1/2 cup black cherry jam

For the choc-cherry ganache

  • 100g dark cooking chocolate, chopped
  • 60ml thickened cream
  • Vodka-infused cherry syrup*
  • Fresh cherries
  • Chocolate curls

*Add the reserved syrup to a small sauce pan together with about a tablespoon of vodka to the reserved syrup and bring to a simmer to infuse the flavours. Use this to brush onto the sponge cake layers and in the chocolate ganache.

METHOD

  1. Preheat oven to 160C. Grease the sides of a 20cm round springform cake pan with melted butter and line the base with baking paper.
  2. Chocolate Sponge Cake: Sift the flour, almond meal, and cocoa powder into a medium sized bowl. Whisk until combined and set aside.
  3. In a large bowl, beat the butter and sugar using an electric handheld mixer until pale and creamy. Beat in the melted chocolate and eggs, and fold in the dry ingredients and buttermilk until well combined. Spoon the batter into the prepared pan.
  4. Bake for 1 hour and 20 minutes or until a skewer inserted into the centre comes out clean. Set aside to cool slightly before transferring the cake to a wire rack to cool completely.
  5. Choc-cherry Ganache: While the cake is baking in the oven, stir all the ingredients (leaving about 1/4 cup of the vodka-infused syrup for brushing) for the choc-cherry ganache in a small saucepan over low heat for 5 minutes or until the chocolate has melted and is smooth. Set aside cool slightly.
  6. Cream-jam Filling: Using an electric mixer, beat the double and thickened cream in a large bowl until firm peaks form. Then fold in the jam to create a swirled effect.
  7. Assembly: Cut the cake horizontally into 2 (or 3 if you can) even layers. Place the cake base on a round cake board and brush the cut surface with half of the vodka-infused syrup and spoon over the cream-jam mixture. Dip each pitted black cherry into the ganache and place on top of the cream filling. Brush the vodka-infused syrup on the cut surface with the other half of the cake layer and top over the base. Pour the choc-cherry ganache over the cake and decorate with fresh cherries and chocolate curls. Sprinkle with a bit a icing sugar for a Christmasy finish.

Cherry Ripple Black Forest Cake

Cherry Ripple Black Forest Cake

Cherry Ripple Black Forest Cake

BON APPÉTIT

– Ally xx

myTaste.com

Gingerbread Stained Glass Cookies

Gingerbread Stained Glass Cookies

Hello Everyone! So today’s recipe was inspired by a video I watched on YouTube from one of my favourite channels SORTED Food. This recipe is by far one of my new Christmas favourites and spot on because this year for Christmas planned on decorating our Christmas Tree with food items! We strung some popcorn and wrapping them around our tree. We have candy canes, Ferrero Rochers, Lindt chocolate, and sugar cookie wreaths lined up as our ornaments:

Edible Christmas Tree

I actually completely forgot about this recipe for Stained Glass Cookies until the night before Jialing and I had planned to make the cookies. It’s a good thing that we picked up the Turkey I preordered yesterday which meant that I could also pick up some boiled candy for this recipe! But I mean, does Australia have something against boiled sweets? Or did they just sell out or something? I swear I could not find any form of boiled sweets at the local supermarkets other than soothers or lozenges. Lucky for me that Woolies stocked their own home brand fruity sweets. But even so, the bag of candy only had 4 green sweets and half of the bag was filled with yellow sweets. So I ended up crushing some of the yellow with the green and added a few drops of green food colouring to it.

Initially I had planned to make my gingerbread cookies again for the tree, and since I have all the ingredients ready for some gingerbread making, I decided to do a little twist on their recipe and make Gingerbread Stained Glass Cookies. Do check out the original recipe on their main channel: Stained Glass Cookie Decorations, or if you want to see a step-by-step write-up version of the recipe, check it out on their website: SORTED Food.

Gingerbread Stained Glass Cookies

The first batch of cookies turned out to be a massive fail that they only deserved a before picture. Can’t even bare the look of the result after. Lesson learned? Don’t bake these stained glass cookies with raising agents in them – just don’t. I think you may have a picture in your head how these first batch of cookies turned out:

Gingerbread Stained Glass Cookies Ingredients

PREP TIME 30 MINS | COOKING TIME 12 MINS | MAKES 2 DOZEN

INGREDIENTS

  • 2 cups plain flour (plus 1/2 cup additional for rolling, if needed)
  • 85g unsalted butter, softened
  • 1 large free range egg
  • 1/2 lemon, juiced
  • 1 cup caster sugar
  • 1/4 cup dark molasses (or honey in my case)
  • 2 tbsp milk
  • 2 tsp ground dry ginger
  • 1 tsp ground cinnamon
  • 3/4 tsp baking powder
  • 1/4 tsp baking soda
  • 1/4 tsp ground allspice
  • 1/4 teaspoon ground cloves
  • 1/4 tsp ground nutmeg
  • 1/4 teaspoon salt
  • Boiled Sweets (Hard Candy)

METHOD

  1. Preheat oven to 200C. Add the unsalted butter and sugar in a large bowl and beat using an electric mixer fitted with a paddle at medium-high speed until smooth; about 5 to 8 minutes.
  2. Meanwhile, in another bowl, sift together the flour, baking powder, baking soda, dry ginger, nutmeg, allspice, cinnamon, cloves, and salt. Whisk to blend and then set aside. In another bowl, whisk together the eggs, milk, molasses (or honey), and lemon juice.
  3. When the butter and sugar mixture is smooth, lower the speed of the mixer and add the wet ingredients. Then gently fold the dry ingredients until a dough starts to form.
  4. Divide the cookie dough in half. Wrap each half with cling wrap and chill in the fridge for about 15 minutes. This step will make it easier to finish rolling out the dough when it has chilled. It will also mean you only have half of the dough getting warm as you roll it.
  5. Lightly flour a flat surface. Use a floured rolling pin to gently roll the first half of the dough about 1/2-inch thick. Lightly flour the cookie cutter(s) and cut out your desired cookie shapes. Cut another shape out of the centre of each cookie and transfer the cookies to a lined baking tray.
  6. Chop up some boiled fruit sweets with a knife or by bashing them with a rolling pin whilst still in their wrappers, keeping the different colours separate. Sprinkle the chopped sweets into the hole in the centre of the cookies and bake them for 12 minutes.
  7. Leave to cool until completely cold before removing them from the lined baking tray. Ice them however you wish and thread a ribbon through the hole to hang your decorations. For these cookies, I made a simple vanilla icing to decorate with and edible silver balls.

Gingerbread Stained Glass Cookies

Gingerbread Stained Glass Cookies

Hope everyone had a merry festive Christmas!

BON APPÉTIT

– Ally xx

myTaste.com

Gingerbread Cookies

Gingerbread Cookies

Hello Everyone! I apologise in advance for not posting yesterday as scheduled. Long story short, I didn’t write my post yesterday (I have my reasons) and I just wanted to go to bed when I got home from a work event yesterday. Anyway, if you read my last post on the Gingerbread Muffins, you would’ve know what tonight’s recipe will be about. I wanted to do something nice for my colleagues in the office for my last week before the Christmas/New Year holidays, so I decided to bake batches of Gingerbread Cookies. Actually these cookies inspired me to try out and bake Gingerbread Muffins on Monday to stick to the festive theme. I packed them into little plastic bags and tied them up with Christmas tags that I bought from the Christmas Markets at The Grounds of Alexandria.

Gingerbread Cookies

I think, if not all, most of them loved my cookies. My boss had the best reaction hands down when he saw his bag of goodies on his desk when he came into work; he let out what seemed like a squeal of excitement. I also managed to change my manager’s view on gingerbread – she normally doesn’t like gingerbread, but mine were an exception. I genuinely believe that she wasn’t just saying that because I was there; she apparently went on for about 5 minutes about the cookies to her sister. Also, one of the interns didn’t come in at all so he didn’t get his bag of goodies, so the other manager said that he was tempted to just open his bag for more. Towards the end of the day I saw the bag closer to his desk and opened. Yesterday I asked him if he ate all of the other intern’s cookies, and he said he gave some to his housemates!

Some of my cookies ended up on Instagram as well:

Gingerbread Cookies on Instagram

Like the little gingerbread men that was featured on Tuesday’s post, I made my own cookie cutter using aluminium foil, which meant that each time I pressed it on the rolled out dough, it would slightly deform. I would then reshape it, but that meant that I had men that differed in shape – some were fat, some skinny. Some had one leg longer than the other, one arm higher than the other, big heads, small heads, etc. but to quote Jialing (as well as from the previous post), “everyone is different in their own way and we don’t discriminate!” Also, a special thanks and shoutout to my main girl Jialing for decorating my cookies while I frantically tried to do some many things at once in the kitchen. They look absolutely stunning!

Before I move onto the recipe, please do visit the site where I originally got the recipe from: Food Network. As usual, I used slightly different ingredients only because some I didn’t have on me – or I wasn’t up for buying let’s say a bottle worth $30+ of orange liqueur when I only needed half a teaspoon of it. Making my own orange liqueur crossed my mind, but then I only thought of a week before making these cookies. I still wanted to add a hint of booze to my frosting though, so I ended up getting a tiny bottle of vodka for this. Again, I didn’t want to buy a big bottle of vodka because I don’t drink vodka. If you are making these for the little ones, just remember to exclude the vodka from the frosting!

Gingerbread Cookies Ingredients

Gingerbread Cookies Ingredients

PREP TIME 25 MINS | COOKING TIME 8-10 MINS | MAKES 3 DOZEN

INGREDIENTS

For the gingerbread dough

  • 4 cups plain flour (plus 1/2 cup additional for rolling, if needed)
  • 170g unsalted butter, softened
  • 2 large free range eggs
  • 1 large navel orange, zested
  • 1 lemon, juiced
  • 1 & 2/3 cups caster sugar
  • 1/2 cup dark molasses (or honey in my case)
  • 1/4 cup milk*
  • 1 tablespoon ground dry ginger
  • 2 teaspoons ground cinnamon
  • 1 & 1/2 teaspoons baking powder
  • 1/2 teaspoon baking soda
  • 1/2 teaspoon ground allspice
  • 1/2 teaspoon ground nutmeg
  • 1/2 teaspoon salt
  • 1/4 teaspoon ground cloves

For the easy orange frosting

  • 1 cup soft icing sugar
  • 1 large orange, zested and juiced
  • 1 tsp vodka (optional)

*I don’t know what I did wrong but when I was rolling out my dough after I had chilled it in the fridge for about 15-20minutes, my dough it felt a bit dry and crumbly. I fixed it by adding some milk and putting it back into the fridge before rolling it out again. It seemed to have worked this way! I’m not sure if I did something wrong or just looking at the recipe, maybe the ratio between dry and wet was a bit out of proportion.

METHOD

  1. Preheat oven to 180C. Add the unsalted butter, sugar, and orange zest in a large bowl and beat using an electric mixer fitted with a paddle at medium-high speed until smooth; about 5 to 8 minutes.
  2. Meanwhile, in another bowl, sift together the flour, baking powder, baking soda, dry ginger, nutmeg, allspice, cinnamon, cloves, and salt. Whisk to blend and then set aside. In another bowl, whisk together the eggs, molasses (or honey), and lemon juice.
  3. When the butter and sugar mixture is smooth, lower the speed of the mixer and add the dry ingredients. Then add the egg mixture until well blended. At this point, if you feel your mixture is too dry or crumbly, add the milk in.
  4. Divide the cookie dough in half. Wrap each half with cling wrap and chill in the fridge for about 15 minutes. This step will make it easier to finish rolling out the dough when it has chilled. It will also mean you only have half of the dough getting warm as you roll it.
  5. Lightly flour a flat surface. Use a floured rolling pin to gently roll the first half of the dough about 1/2-inch thick. Lightly flour the cookie cutter(s) and cut the shapes, making as few scraps as possible. Got scraps? Form the scraps into a ball, press it flat and chill in the refrigerator. These cookies may be a little more “tough” because the dough will have been worked a little more than the others.
  6. Transfer the cut out cookies to a tray lined with baking paper. Leave room between the cookies as they can spread a little. You’ll end up having to bake them it batches depending on the size of your cookies and how many can fit into a single baking tray. Bake until brown around the edges; about 8 to 10 minutes. While your first half of your batch of dough is cut and baking/waiting to bake, work on your second half of cookie dough. Once your cookies are done, set them aside to cool down and get started on making your easy orange frosting.
  7. Easy Orange Frosting: In a medium bowl add all of the ingredients and whisk together to combine. If the consistency is too thick, add a touch more orange juice (or vodka if you prefer) to thin it out. Transfer the frosting into a party bag (or if you are like me and don’t have one, you can use a zip lock bag and cut a hold at the tip, OR even use a ketchup bottle as you will see in one of the photographs below).
  8. Work on and decorate the batch of cookies that went into the oven first as these would have had enough time to cool down before the others. The work your way through the batches of cookies.

I guess, if you want it to look more festive you can go with green/red decorations but our local Coles only had blue or pink. Of course, cookies are best served fresh but you can store these cookies in an airtight container for up to 5 days.

Gingerbread Cookies

Gingerbread Cookies

BON APPÉTIT

– Ally xx

myTaste.com

Breakfast Muffins: Gingerbread

Breakfast Muffins: Gingerbread

Hello Everyone! Another Muffin Making Monday recipe post for all of you tonight, and why not bake these not so little, but cute muffins for the kids or maybe even the adults this holiday season? Just remember to exclude that hint of vodka in the orange frosting when serving it up for the little ones! These muffins are moist and packed with a spicy sweet gingerbread flavour with that touch of citrusy goodness; not to mention they also create a beautiful gingery aroma in the kitchen. As usual with all my baking adventures, I always look to Sally’s Baking Addiction. Her recipes are straight forward, easy to follow, and really require minimal work in the kitchen (as far as I know from the recipes I’ve tried). I also always try to tweak the recipe myself, which I have definitely done here to make these muffins a little more special for this festive season.

Besides tonight’s muffin post, I also baked gingerbread cookies yesterday to bring in and share amongst my workmates. The recipe for these gingerbread cookies will be up on Thursday’s post. From the dough I had,  I made little gingerbread men to stuff into my muffins. I also topped the muffins with leftover orange frosting. I shall call these Hot Tub Gingerbread Muffins! I actually got this idea from the front cover of the December issue of Coles Magazine. The featured cupcakes were topped with frosting and little gingerbread man cookies. I pre-baked the little gingerbread men before baking my muffins, and my plan was to stuff the muffins with the men while the tops were still moist before completely cooked. But forgetting that I wanted to do that, Jialing had already frosted and decorated my little men, and putting them into the oven would basically just melt the frosting off. Also it meant that the gingerbread men would potentially over bake in the oven. So what I did was once the muffins were ready and slightly cooled, I cut a slit in the muffins and inserted the little men. They were a bit large for the muffins, so I ended up amputating their legs just so they would fit snuggly. I remember when I brought a muffin into work today, one of the managers noticed that his legs were missing and asked where his legs went. I told her the sad story.

Breakfast Muffins: Gingerbread

I also by the way, did not have any cookie cutters for these, instead I made my own cookie cutter using aluminium foil following this tutorial on wikiHow. I mean, it wasn’t ideal for the foil kept reshaping itself every time I pressed down on it to cut out my cookies, so as you can see from the image above, some were fat, some skinny. Some had one leg longer than the other, one arm higher than the other, big heads, small heads, etc. but as Jialing said, everyone is different in their own way and we don’t discriminate! And of course, being such a professional baker (sarcasm intended), I don’t even own a rolling pin – but who says a bottle of Jack can’t fix the problem and stand in as a makeshift rolling pin?

Breakfast Muffins: Gingerbread

I went ingredient shopping two days before making these muffins, and unfortunately I could not get a hold of molasses which gives the muffins their deep brown colour and rich flavour. I wasn’t able to look at another grocery store on the Sunday because I had my own little adventure kayaking over the Sydney Harbour, overlooking the Sydney Opera House and Harbour Bridge. So I settled with using honey for this recipe, which is one of the various substitutes for molasses. Also, you may notice that the batter is quite thick. Very, very thick. It may make you wonder if you’ve done anything wrong, or if the proportions of this recipe is right. Well, you didn’t do anything wrong, and neither is the recipe wrong. A thick batter helps make a muffin have that beautiful high dome top. So do expect a thick (and lumpy) batter and you’ll be happy with the results of your muffins! In addition, no need to take out your electric mixer for this, because I always dread having to dig for it at the back of the cupboard and cleaning it up afterwards.

Also, just a quick note incase you missed it, the recipe for the gingerbread men will be posted on Thursday – as well as the orange frosting since that came with the gingerbread recipe, so stay tuned for that! Tonight will just be on the Gingerbread Muffins.

Breakfast Muffins: Gingerbread Ingredients

PREP TIME 10 MINS | COOKING TIME 15 MINS | MAKES 12 MUFFINS

INGREDIENTS

  • 3 cups plain flour
  • 115g unsalted butter
  • 1/2 cup dark brown sugar
  • 3/4 cup dark molasses (or honey in my case)
  • 3/4 cup plain or vanilla yoghurt
  • 1/4 cup milk
  • 1 large free rage egg
  • 1 & 1/2 tsp baking soda
  • 1 & 1/2 tsp ground cinnamon
  • 1 & 1/4 tsp ground ginger
  • 1/2 tsp ground cloves
  • 1/4 tsp salt

METHOD

  1. Preheat oven to 220C. Line a 12 hole muffin pan with paper cases.
  2. Add the flour, salt, baking soda, ginger, cinnamon, and cloves in a large bowl and whisk together. Set aside. Add the honey and unsalted butter together in a microwave-safe bowl and heat on high for about 1 minute in the microwave. Stir until thoroughly mixed together. Set aside. In third bowl, whisk together the brown sugar, egg, yogurt, and milk.
  3. Pour the mixture into the into the honey and butter mixture and whisk until everything is incorporated. Then pour the wet ingredients into dry and mix until just combined, careful to not over mix the batter which will be very thick and lumpy.
  4. Fill your muffin cups tins to the very top and bake for about 5 minutes at 220C. Baking them at a higher temperature right at the beginning will help create a burst of steam inside the muffin and rapidly lift the tops. Then reduce the temperature down to 190C and continue to bake for about 15 more minutes. Muffins are finished when a toothpick inserted into the centre comes out clean.
  5. Once done, remove the muffins from the oven and set aside to cool down for a bit. Cut slits into your muffins and insert a gingerbread man in each. Top with a drizzle of orange frosting. Serve!

Muffins taste best eaten the same day, and can be stored in an air-tight container at room temperature.

Breakfast Muffins: Gingerbread

BON APPÉTIT

– Ally xx

myTaste.com