Gingerbread Cookies

Gingerbread Cookies

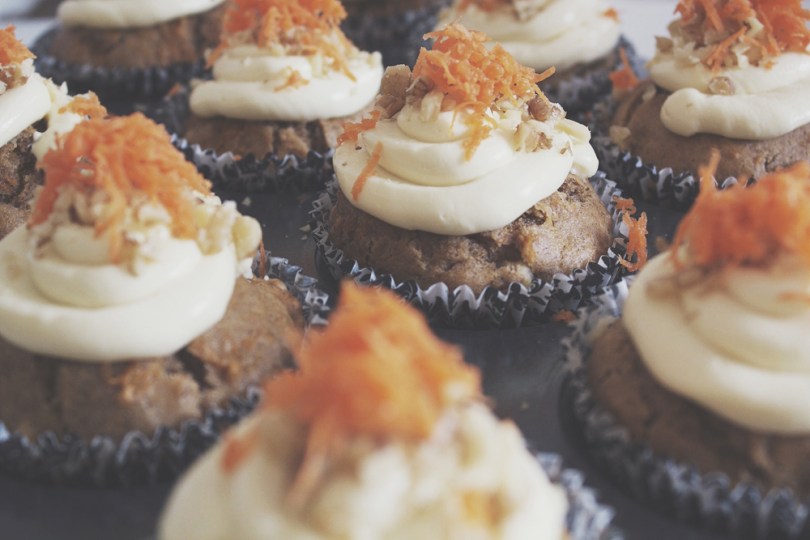
Hello Everyone! I apologise in advance for not posting yesterday as scheduled. Long story short, I didn’t write my post yesterday (I have my reasons) and I just wanted to go to bed when I got home from a work event yesterday. Anyway, if you read my last post on the Gingerbread Muffins, you would’ve know what tonight’s recipe will be about. I wanted to do something nice for my colleagues in the office for my last week before the Christmas/New Year holidays, so I decided to bake batches of Gingerbread Cookies. Actually these cookies inspired me to try out and bake Gingerbread Muffins on Monday to stick to the festive theme. I packed them into little plastic bags and tied them up with Christmas tags that I bought from the Christmas Markets at The Grounds of Alexandria.

Gingerbread Cookies

I think, if not all, most of them loved my cookies. My boss had the best reaction hands down when he saw his bag of goodies on his desk when he came into work; he let out what seemed like a squeal of excitement. I also managed to change my manager’s view on gingerbread – she normally doesn’t like gingerbread, but mine were an exception. I genuinely believe that she wasn’t just saying that because I was there; she apparently went on for about 5 minutes about the cookies to her sister. Also, one of the interns didn’t come in at all so he didn’t get his bag of goodies, so the other manager said that he was tempted to just open his bag for more. Towards the end of the day I saw the bag closer to his desk and opened. Yesterday I asked him if he ate all of the other intern’s cookies, and he said he gave some to his housemates!

Some of my cookies ended up on Instagram as well:

Gingerbread Cookies on Instagram

Like the little gingerbread men that was featured on Tuesday’s post, I made my own cookie cutter using aluminium foil, which meant that each time I pressed it on the rolled out dough, it would slightly deform. I would then reshape it, but that meant that I had men that differed in shape – some were fat, some skinny. Some had one leg longer than the other, one arm higher than the other, big heads, small heads, etc. but to quote Jialing (as well as from the previous post), “everyone is different in their own way and we don’t discriminate!” Also, a special thanks and shoutout to my main girl Jialing for decorating my cookies while I frantically tried to do some many things at once in the kitchen. They look absolutely stunning!

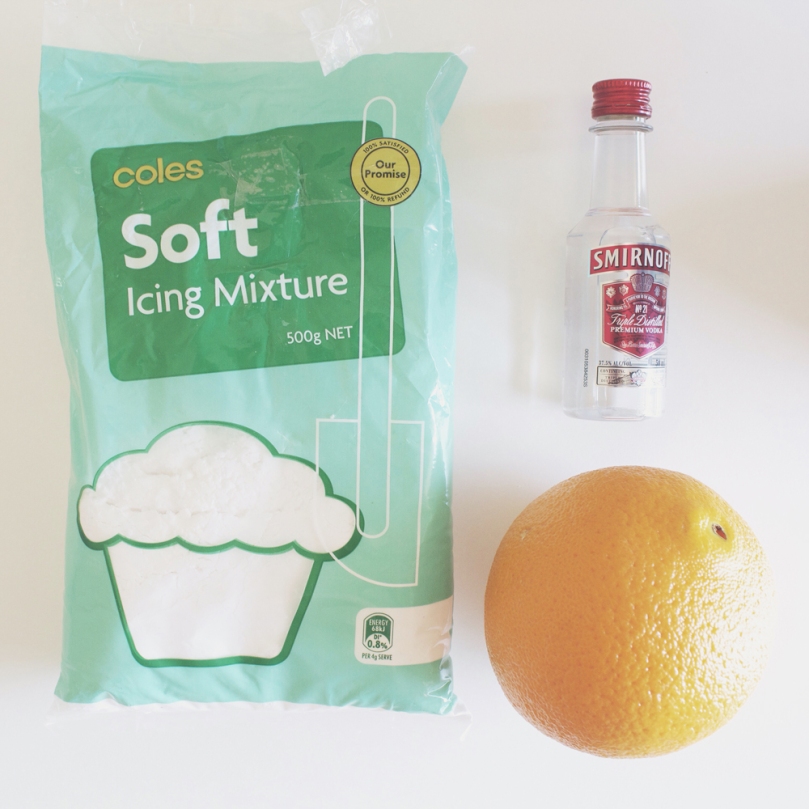
Before I move onto the recipe, please do visit the site where I originally got the recipe from: Food Network. As usual, I used slightly different ingredients only because some I didn’t have on me – or I wasn’t up for buying let’s say a bottle worth $30+ of orange liqueur when I only needed half a teaspoon of it. Making my own orange liqueur crossed my mind, but then I only thought of a week before making these cookies. I still wanted to add a hint of booze to my frosting though, so I ended up getting a tiny bottle of vodka for this. Again, I didn’t want to buy a big bottle of vodka because I don’t drink vodka. If you are making these for the little ones, just remember to exclude the vodka from the frosting!

Gingerbread Cookies Ingredients

Gingerbread Cookies Ingredients

PREP TIME 25 MINS | COOKING TIME 8-10 MINS | MAKES 3 DOZEN
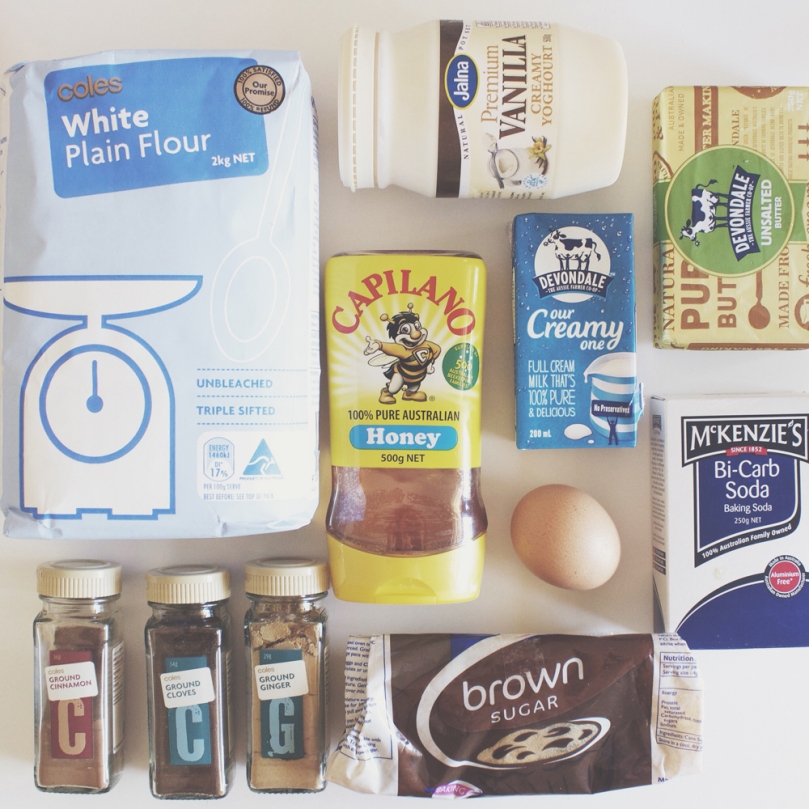
INGREDIENTS

For the gingerbread dough

  • 4 cups plain flour (plus 1/2 cup additional for rolling, if needed)
  • 170g unsalted butter, softened
  • 2 large free range eggs
  • 1 large navel orange, zested
  • 1 lemon, juiced
  • 1 & 2/3 cups caster sugar
  • 1/2 cup dark molasses (or honey in my case)
  • 1/4 cup milk*
  • 1 tablespoon ground dry ginger
  • 2 teaspoons ground cinnamon
  • 1 & 1/2 teaspoons baking powder
  • 1/2 teaspoon baking soda
  • 1/2 teaspoon ground allspice
  • 1/2 teaspoon ground nutmeg
  • 1/2 teaspoon salt
  • 1/4 teaspoon ground cloves

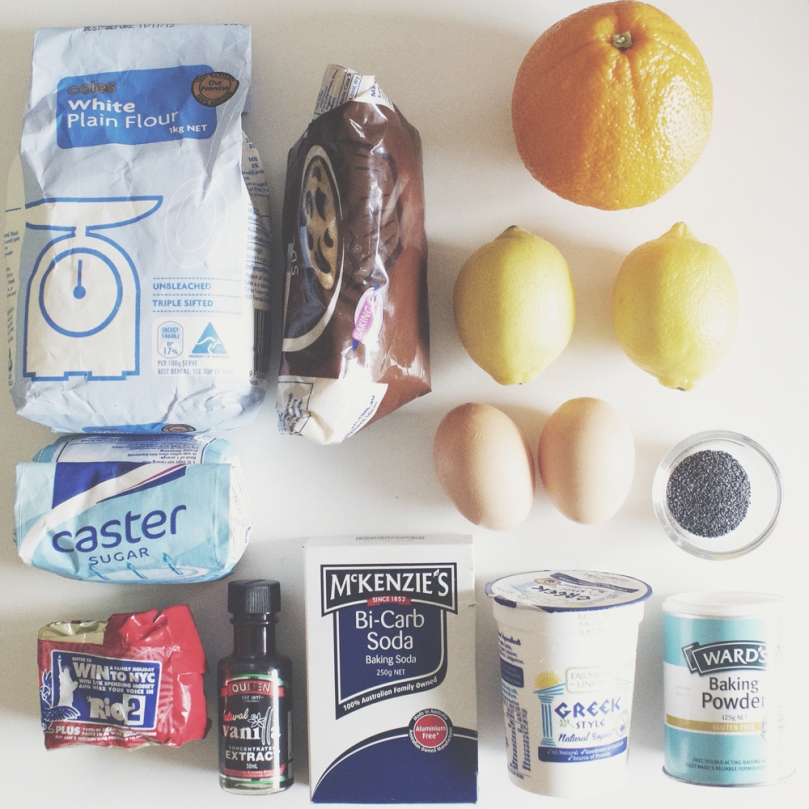
For the easy orange frosting

  • 1 cup soft icing sugar
  • 1 large orange, zested and juiced
  • 1 tsp vodka (optional)

*I don’t know what I did wrong but when I was rolling out my dough after I had chilled it in the fridge for about 15-20minutes, my dough it felt a bit dry and crumbly. I fixed it by adding some milk and putting it back into the fridge before rolling it out again. It seemed to have worked this way! I’m not sure if I did something wrong or just looking at the recipe, maybe the ratio between dry and wet was a bit out of proportion.

METHOD

  1. Preheat oven to 180C. Add the unsalted butter, sugar, and orange zest in a large bowl and beat using an electric mixer fitted with a paddle at medium-high speed until smooth; about 5 to 8 minutes.
  2. Meanwhile, in another bowl, sift together the flour, baking powder, baking soda, dry ginger, nutmeg, allspice, cinnamon, cloves, and salt. Whisk to blend and then set aside. In another bowl, whisk together the eggs, molasses (or honey), and lemon juice.
  3. When the butter and sugar mixture is smooth, lower the speed of the mixer and add the dry ingredients. Then add the egg mixture until well blended. At this point, if you feel your mixture is too dry or crumbly, add the milk in.
  4. Divide the cookie dough in half. Wrap each half with cling wrap and chill in the fridge for about 15 minutes. This step will make it easier to finish rolling out the dough when it has chilled. It will also mean you only have half of the dough getting warm as you roll it.
  5. Lightly flour a flat surface. Use a floured rolling pin to gently roll the first half of the dough about 1/2-inch thick. Lightly flour the cookie cutter(s) and cut the shapes, making as few scraps as possible. Got scraps? Form the scraps into a ball, press it flat and chill in the refrigerator. These cookies may be a little more “tough” because the dough will have been worked a little more than the others.
  6. Transfer the cut out cookies to a tray lined with baking paper. Leave room between the cookies as they can spread a little. You’ll end up having to bake them it batches depending on the size of your cookies and how many can fit into a single baking tray. Bake until brown around the edges; about 8 to 10 minutes. While your first half of your batch of dough is cut and baking/waiting to bake, work on your second half of cookie dough. Once your cookies are done, set them aside to cool down and get started on making your easy orange frosting.
  7. Easy Orange Frosting: In a medium bowl add all of the ingredients and whisk together to combine. If the consistency is too thick, add a touch more orange juice (or vodka if you prefer) to thin it out. Transfer the frosting into a party bag (or if you are like me and don’t have one, you can use a zip lock bag and cut a hold at the tip, OR even use a ketchup bottle as you will see in one of the photographs below).
  8. Work on and decorate the batch of cookies that went into the oven first as these would have had enough time to cool down before the others. The work your way through the batches of cookies.

I guess, if you want it to look more festive you can go with green/red decorations but our local Coles only had blue or pink. Of course, cookies are best served fresh but you can store these cookies in an airtight container for up to 5 days.

Gingerbread Cookies

Gingerbread Cookies

BON APPÉTIT

– Ally xx

myTaste.com

Breakfast Muffins: Gingerbread

Breakfast Muffins: Gingerbread

Hello Everyone! Another Muffin Making Monday recipe post for all of you tonight, and why not bake these not so little, but cute muffins for the kids or maybe even the adults this holiday season? Just remember to exclude that hint of vodka in the orange frosting when serving it up for the little ones! These muffins are moist and packed with a spicy sweet gingerbread flavour with that touch of citrusy goodness; not to mention they also create a beautiful gingery aroma in the kitchen. As usual with all my baking adventures, I always look to Sally’s Baking Addiction. Her recipes are straight forward, easy to follow, and really require minimal work in the kitchen (as far as I know from the recipes I’ve tried). I also always try to tweak the recipe myself, which I have definitely done here to make these muffins a little more special for this festive season.

Besides tonight’s muffin post, I also baked gingerbread cookies yesterday to bring in and share amongst my workmates. The recipe for these gingerbread cookies will be up on Thursday’s post. From the dough I had,  I made little gingerbread men to stuff into my muffins. I also topped the muffins with leftover orange frosting. I shall call these Hot Tub Gingerbread Muffins! I actually got this idea from the front cover of the December issue of Coles Magazine. The featured cupcakes were topped with frosting and little gingerbread man cookies. I pre-baked the little gingerbread men before baking my muffins, and my plan was to stuff the muffins with the men while the tops were still moist before completely cooked. But forgetting that I wanted to do that, Jialing had already frosted and decorated my little men, and putting them into the oven would basically just melt the frosting off. Also it meant that the gingerbread men would potentially over bake in the oven. So what I did was once the muffins were ready and slightly cooled, I cut a slit in the muffins and inserted the little men. They were a bit large for the muffins, so I ended up amputating their legs just so they would fit snuggly. I remember when I brought a muffin into work today, one of the managers noticed that his legs were missing and asked where his legs went. I told her the sad story.

Breakfast Muffins: Gingerbread

I also by the way, did not have any cookie cutters for these, instead I made my own cookie cutter using aluminium foil following this tutorial on wikiHow. I mean, it wasn’t ideal for the foil kept reshaping itself every time I pressed down on it to cut out my cookies, so as you can see from the image above, some were fat, some skinny. Some had one leg longer than the other, one arm higher than the other, big heads, small heads, etc. but as Jialing said, everyone is different in their own way and we don’t discriminate! And of course, being such a professional baker (sarcasm intended), I don’t even own a rolling pin – but who says a bottle of Jack can’t fix the problem and stand in as a makeshift rolling pin?

Breakfast Muffins: Gingerbread

I went ingredient shopping two days before making these muffins, and unfortunately I could not get a hold of molasses which gives the muffins their deep brown colour and rich flavour. I wasn’t able to look at another grocery store on the Sunday because I had my own little adventure kayaking over the Sydney Harbour, overlooking the Sydney Opera House and Harbour Bridge. So I settled with using honey for this recipe, which is one of the various substitutes for molasses. Also, you may notice that the batter is quite thick. Very, very thick. It may make you wonder if you’ve done anything wrong, or if the proportions of this recipe is right. Well, you didn’t do anything wrong, and neither is the recipe wrong. A thick batter helps make a muffin have that beautiful high dome top. So do expect a thick (and lumpy) batter and you’ll be happy with the results of your muffins! In addition, no need to take out your electric mixer for this, because I always dread having to dig for it at the back of the cupboard and cleaning it up afterwards.

Also, just a quick note incase you missed it, the recipe for the gingerbread men will be posted on Thursday – as well as the orange frosting since that came with the gingerbread recipe, so stay tuned for that! Tonight will just be on the Gingerbread Muffins.

Breakfast Muffins: Gingerbread Ingredients

PREP TIME 10 MINS | COOKING TIME 15 MINS | MAKES 12 MUFFINS

INGREDIENTS

  • 3 cups plain flour
  • 115g unsalted butter
  • 1/2 cup dark brown sugar
  • 3/4 cup dark molasses (or honey in my case)
  • 3/4 cup plain or vanilla yoghurt
  • 1/4 cup milk
  • 1 large free rage egg
  • 1 & 1/2 tsp baking soda
  • 1 & 1/2 tsp ground cinnamon
  • 1 & 1/4 tsp ground ginger
  • 1/2 tsp ground cloves
  • 1/4 tsp salt

METHOD

  1. Preheat oven to 220C. Line a 12 hole muffin pan with paper cases.
  2. Add the flour, salt, baking soda, ginger, cinnamon, and cloves in a large bowl and whisk together. Set aside. Add the honey and unsalted butter together in a microwave-safe bowl and heat on high for about 1 minute in the microwave. Stir until thoroughly mixed together. Set aside. In third bowl, whisk together the brown sugar, egg, yogurt, and milk.
  3. Pour the mixture into the into the honey and butter mixture and whisk until everything is incorporated. Then pour the wet ingredients into dry and mix until just combined, careful to not over mix the batter which will be very thick and lumpy.
  4. Fill your muffin cups tins to the very top and bake for about 5 minutes at 220C. Baking them at a higher temperature right at the beginning will help create a burst of steam inside the muffin and rapidly lift the tops. Then reduce the temperature down to 190C and continue to bake for about 15 more minutes. Muffins are finished when a toothpick inserted into the centre comes out clean.
  5. Once done, remove the muffins from the oven and set aside to cool down for a bit. Cut slits into your muffins and insert a gingerbread man in each. Top with a drizzle of orange frosting. Serve!

Muffins taste best eaten the same day, and can be stored in an air-tight container at room temperature.

Breakfast Muffins: Gingerbread

BON APPÉTIT

– Ally xx

myTaste.com

Breakfast Muffins: Citrus Poppyseed

Breakfast Muffins: Citrus Poppyseed

Hello Everyone! So I think I mentioned that last week was supposed to be Muffin Making Monday, but because I was still travelling the outback, scaling one of the best climbs from that trip, and ever, at Kings Canyon. I do apologise if I happen to bring this up in every single post for the next couple of weeks – I just can’t get over such an amazing trip!

Anyway, so technically Jialing and I had our Muffin Making Monday… on a Sunday. Jialing got called into work just for this Monday, but we still didn’t want to miss out on muffins as to quote Jialing “I didn’t have breakfast for the past two weeks” *insert sad face emoji*. So we then decided to bake on Sunday instead! Jialing again whipped up her Raspberry & White Chocolate with Lemon Streusel Muffins (she actually wanted to do a mixed berry one this time, but gutted that Coles ran out of them when we went to do our groceries together). And as the heading of this post states, I made Citrus Poppyseed Muffins, which Jialing actually made before and tasted so good that I wanted to make them for myself this time around. Please check out the original recipe over on Sally’s Baking Addiction. The original recipe calls for 3 tablespoons of poppyseeds, but because I used what Jialing had leftover from last time. I think I only had about a tablespoon for these so they aren’t quite as evident in the photographs.

Poppyseed fun fact: It takes 2,000,000 of these tiny black polka dots to equal one kilo.

Breakfast Muffins: Citrus Poppyseed Ingredients

PREP TIME 10 MINS | COOKING TIME 15-18 MINS | MAKES 12 MUFFINS

INGREDIENTS

  • 2 & 1/3 cups plain flour
  • 1/2 cup Greek or regular yoghurt
  • 1/2 cup white sugar
  • 1/4 cup brown sugar
  • 115g salted butter, melted
  • 2 large free range eggs
  • Juice and zest of 2 medium-sized lemons
  • Juice and zest of 1 large orange
  • 3 tbsp poppyseeds
  • 2 tsp baking powder
  • 1 tsp vanilla extract
  • 1/2 tsp salt
  • 1/4 tsp baking soda
  • Coarse sugar, for sprinkling

METHOD

  1. Preheat oven to 220C. Line a 12 hole muffin pan with paper cases.
  2. Whisk the flour, white sugar, brown sugar, poppyseeds, baking powder, baking soda, and salt together in a large bowl until well combined. Set aside.
  3. In a medium bowl, whisk the melted butter, lemon juice, lemon zest, orange juice, and orange zest together thoroughly mixed. Then, whisk in the eggs one at a time, and then whisk in the yoghurt and vanilla.
  4.  Pour the wet ingredients into the dry and gently mix together until no pockets of flour remain. Be careful as to not over mix the batter. The consistency of the batter should be quite thick.
  5. Spoon the thick batter into the muffin cups, filling them all the way to the top and sprinkle each with additional lemon and orange zest as well as coarse sugar.
  6. Bake in the oven for 5 minutes at 220C. Then, reduce oven temperature to 190C and continue to bake for 10-13 minutes longer or until tops are lightly golden. To check if they are done, insert a toothpick in the centre of the muffin. If it’s cooked through, the toothpick should come out clean, if not then bake further at 2-3 minute intervals (as to not accidentally over bake them).
  7. Once done, remove from the over and allow to cool for 10 minutes. Muffins stay fresh in an airtight container at room temperature for up to 5 days.

Breakfast Muffins: Citrus Poppyseed

Breakfast Muffins: Citrus Poppyseed

BON APPÉTIT

– Ally xx

myTaste.com

Double Chocolate Sea Salt Caramel Cookies

Double Chocolate Sea Salt Caramel Cookies

Hello Everyone! Before I dive into today’s recipe, I just want to let you know that I may not be posting up a recipe next week Tuesday as I will be away from Saturday to Tuesday evening (I say ‘may’ only because depending if I can write up a post in advanced or even write one the night I get back, but may be to tired for that). This also means that Jialing and I won’t be having our fortnightly Muffin Making Monday because well, Monday I will be on a road trip back to base camp. I will be heading to the Red Centre of Australia exploring the rugged outback beauty and taking in all the richness in Aboriginal culture. For a person who loves adventure but hates camping, it’s going to be an experience, and I don’t know whether I am looking forward to or will regret looking forward to a weekend of 38-42 degree celsius weather over at Alice Springs/Uluru…

Double Chocolate Sea Salt Caramel Cookies

Anyway, you’ll probably hear more of that on next week’s post I presume, so let’s get back to the point of tonight’s post. So as you know from my previous post, Jialing’s actual birthday was on Tuesday. On Monday she came over and baked herself some birthday cupcakes, gluten free chocolate cupcakes I believe. Anyway, as usual, I didn’t want to just sit around and watch her bake, so I decided to bake too! Just something simple to kill time and something that I could easily take to work because I wasn’t keen on having them all to myself – and so I decided on baking some cookies. I wasn’t sure of what I wanted to make at first, until I stumbled upon Martha Stewart’s recipe for Double Chocolate Chunk Cookies. It was so convenient because I practically had every ingredient in my pantry, except of course the chocolate and I was a little short on cocoa powder as well. When I got to the chocolate/lollies section at Coles, I was unsure of what chocolate to get for the cookies. The original recipe uses milk chocolate, but I personally don’t really like milk chocolate – I like them dark… Just like my men (just kidding)! If you know me, I never fail to finish a sentence, be it my own or a friend’s, like that! Just as how I finish a sentence breaking out into a song if the first part resembles lyrics to a song I know. Anyway, got side tracked there, as I was browsing through the dark chocolates, I came across Lindt’s Sea Salt Caramel Dark Chocolate. I knew instantly that these bad babies are going into my cookies. And I’m glad I got them! They did not overpower the double chocolate flavour of the cookies, but instead they gave just a subtle hit of saltiness and oozy gooey caramel. Soft and moist on the inside, crunchy on the outside. I am actually salivating now just typing that!

Double Chocolate Sea Salt Caramel Cookies Ingredients

PREP TIME 10 MINS | COOKING TIME 15 MINS | MAKES 15 COOKIES

INGREDIENTS

  • 2 large free range eggs
  • 1 cup plain flour
  • 1 cup sugar
  • 1/2 cup cocoa powder
  • 200g Lindt Sea Salt Caramel dark chocolate (or any other kind of chocolate), 100g coarsely chopped, 100g cut into chunks
  • 100g unsalted butter
  • 1 tsp vanilla extract
  • 1/2 tsp baking soda
  • 1/4 tsp salt (optional)*

*The original recipe adds 1/2 tsp of salt, but because I am using a chocolate that already has sea salt in it, I lessened the amount of salt a little bit – or I guess depending you can ignore the salt completely. My cookies did not turn out to be very salty in the end anyway.

METHOD

  1. Preheat oven to 160C.
  2. Add the flour, cocoa powder, baking soda, and salt into a medium bowl and whisk together until combined. Set aside.
  3. Melt coarsely chopped chocolate together with the butter in a small heatproof bowl set over a pan of simmering water, or in the microwave for about 30-45 seconds. Stir to combine the mixture.
  4. In a large bowl, add the sugar, eggs, vanilla, and the chocolate mixture. Using a handheld electric mixer, mix on medium speed until well combined combined. Then reduce the speed to low and gradually mix in the flour mixture. Once combined, fold in chocolate chunks using a spatula.
  5. Scoop the batter onto a baking tray lined with baking paper (as Martha’s recipe goes, I used an ice cream scooper to measure out my cookie batter). Leave about a 2-cm gap between the cookies as they will flatten out while baking in the oven.
  6. Bake until cookies are flat and the surfaces begin to crack (about 15 minutes). Once done, remove from the oven, lift the baking paper from the tray and transfer the cookies to a wire rack. When you remove the cookies from the oven, you will notice that they are a bit soft – this is normal as they will start to firm up when they cool down. So be careful to not assume they are underdone and risk over-baking them.
  7. Let them cool for about 5-10 minutes. Cookies can then be stored in an airtight container at room temperature for up to 3 days.

Double Chocolate Sea Salt Caramel Cookies

Double Chocolate Sea Salt Caramel Cookies

I mean, just look at that caramel goodness trying to peak through the cracks! As I mentioned above, I brought these bad boys into work the next day and they were a crowd pleaser! My boss Max (who by the way, just got back from Bali that day and said he’d have half because he’s on a “diet”), had a whole cookie to himself and was practically having foodgasms. I don’t blame him, they were THAT good. Everyone in the office loved it, but not enough for a second helping, or maybe because they were just so sinful, they couldn’t bring themselves to have another – except for my community manager James. He was quick to ask for another cookie before he stepped into a meeting, and before I left for the day.

If you want to attempt making these cookies – I HIGHLY recommend the sea salt caramel by Lindt! Even if it’s just eating them on their own. Too good!

BON APPÉTIT

– Ally xx

myTaste.com

Ferrero Rocher & Nutella Cake with Hazelnuts

Ferrero Rocher & Nutella Cake with Hazelnuts

Hello Everyone! I would like to dedicate today’s post to my partner in crime, my matchy-matchy twin, and all round foodie & gym/boxing buddy, Maria the Mew (also known as Jialing), the happiest of birthdays! Happy Birthday my love, and I hope you had a most fantabulous day today! Hope you also liked my essay-like birthday card and present that I got for you 🙂

Though it wasn’t a particularly sunny day, we celebrated an early birthday on Saturday afternoon at Coogee Beach with lots of cake, dessert, drinks, and food. Oh and BARBECUE! Then ending the night at Beach Burrito Company with some margaritas and tequila. We also celebrated her birthday today by having dinner at Pizza e Birra on Crown Street at Surry Hills and having left over cake and flan for dessert.

Ferrero Rocher & Nutella Cake with Hazelnuts

So today’s recipe can originally be found on Better Baking Bible, and was actually baked by Jialing while I assisted in preparing the decorations for her cake. I also helped crush the hazelnuts and slap them on to the sides of the cake. On Friday night after work for the both of us, Jialing came over to my place to bake her cake while I made flan for her birthday celebration the next day. We actually started making stuff at around 7pm and seriously did not finish making her cake until about 1am. We honestly had no idea where all the time went – we didn’t even get to bake her quiche as planned originally. Well, we did have an hour and a half or so of a dinner break in between. I mean honestly, this is how I’ve spent two Friday nights in a row – baking until 1am (my birthday cake last week).

I also think time went into having to make another batch of cake batter and waiting for that to cool down as well. The original recipe actually says to split the cake into 2 even layers, however when we took the cakes out of the oven, they looked like an okay size for a single layer and would appear to be too skinny if we had sliced them in half. So Jialing decided to make another batch of batter for just one more layer to make a three layer cake (two is never enough, and honestly probably wouldn’t look as epic). I have adjusted the quantities from the original recipe specifically to Jialing’s cake, as well as adding extra ingredients such as hazelnuts into half of the frosting mixture.

Ferrero Rocher & Nutella Cake with Hazelnuts

PREP TIME 20 MINS | COOKING TIME 25-30 MINS | SERVES 8-10

INGREDIENTS

For the cake

  • 10 large free range eggs
  • 3 cups hazelnut meal
  • 3/4 cup granulated sugar
  • 4 tbsp cocoa powder
  • 4 tbsp plain flour
  • 4 tsp baking powder

For the frosting

  • 300g unsalted butter, softened
  • 2 & 1/4 cups dark chocolate, roughly chopped (or chocolate chips)
  • 1 & 1/2 cup wafer biscuits, crushed
  • 1/2 cup Nutella
  • 1/4 cup roasted hazelnuts, roughly chopped
  • 1 & 1/2 tsp vanilla extract

For decorating

  • 8 Ferrero Rocher Chocolates
  • 3/4 cups roasted hazelnuts, roughly chopped (some whole)
  • 1 packet (125g) vanilla wafers, crushed (reserve some whole)

METHOD

  1. Preheat oven to 180C. Butter three 8-inch round pans.
  2. Cake batter: In a large mixing bowl, sift together the flour, baking powder, and cocoa powder. Mix in the hazelnut meal and set aside. In a separate mixing bowl, whip the eggs and sugar using an electric mixer on high, for about 5 minutes (when it has tripled in size). Slowly mix in the dry ingredients into the egg mixture and then divide the batter evenly between the three pans. Bake for about 25 minutes or until a toothpick comes out clean when pierced. Remove from the oven and allow to cool for about 5 minutes before transferring to a cooling wire rack to completely cool down before frosting.
  3. Frosting: Add the chocolate to a microwave safe bowl and melt the microwave, stopping every few seconds to stir and prevent the chocolate from burning. Once melted, remove and allow to slightly cool to room temperature. Transfer the chocolate to a mixing bowl and whip together with the unsalted butter, Nutella, and vanilla extract until well combined. Take half of the frosting mixture and place it into another bowl and stir in the crushed roasted hazelnuts.
  4. Assembly: Place the wafer biscuits in a ziplock bag and crush them with a rolling pin. Place the first layer of the cake onto a round cake board. Spread with half of the hazelnut frosting mixture of the frosting and sprinkle with some of the crushed wafers. Repeat for the remaining layer.
  5. Decorating: Cover the whole cake and sides with the plain chocolate frosting. Press the roughly chopped hazelnuts onto the sides of the cake and decorate the top of the cake accordingly or however you wish to. Serve!

Ferrero Rocher & Nutella Cake with Hazelnuts

Ferrero Rocher & Nutella Cake with Hazelnuts

BON APPÉTIT

– Ally xx

myTaste.com

Breakfast Muffins: Spiced Carrot

Breakfast Muffins: Spiced Carrot

Hello Everyone! Back with another muffin (borderline cupcake) recipe for you! This week, I decided to whip up some lovely spiced carrot muffins while Jialing made some yummy raspberry and white chocolate muffins with a lemon crumb top. I had a bag of about 400g of baby carrots sitting in the fridge, given to me by my housemate Vidhya before she flew off to South Africa. She was telling me how she went out and bought a lot of food, not realising that she’d be jetting off in a few days for a month. So hence why I got the bag of carrots! Now, for those of you who don’t know me that well, I am actually not a fan of carrots. There’s just something about the taste (raw and/or cooked) that I don’t like. I remember how I’d use to add it to my stir-fry just for the colour. I’d eat a slice or two and I’d just be like, no. So when I got this bag of carrots, I had no idea what I was going to do with them. I wanted to give them to Lydia, but I know for a fact that she also does not like carrots. She only eats them because she knows it’s good for your eyes. But other than that, she tries to avoid eating them too.

Breakfast Muffins: Spiced Carrot

Solution? Spiced Carrot Muffins! At least this way I won’t taste much of the carrot… I hope. And I still even have 3-4 baby carrots lying in my fridge! No clue what to do with them next. In the end I think my Spiced Carrot Muffins turned out to be Spiced Carrot Cake Cupcakes because I decided to top the muffins with a yummy cream cheese frosting (I know, so much cream cheese for the past week – for those of you who didn’t see it, I made a Red Velvet Cheesecake on the weekend for my birthday!) I know, this week I was supposed to make savoury muffins as I was unintentionally alternating between sweet and savoury. I feel like it’s a mix? Remove the cream cheese frosting and you have a sort of savoury muffin? Maybe. Please also check out the original recipe over on Williams-Sonoma. The original recipe uses raisins, and if you know me, another thing I don’t like. So add them if you want to (about half a cup), otherwise, I replaced them with roughly chopped walnuts. I also tweaked up the spices by adding ground allspice, cloves, and nutmeg. Much yumminess indeed!

Breakfast Muffins: Spiced Carrot Ingredients

PREP TIME 15 MINS | COOKING TIME 15-18 MINS | MAKES 12 MUFFINS

INGREDIENTS

For the muffin batter

  • 2 cups all-purpose flour
  • 1 & 1/2 cups carrots, peeled and finely shredded (2 large carrots, or 4-5 baby carrots)
  • 2 large free range eggs
  • 1 cup buttermilk or sour cream
  • 2/3 cup firmly packed light brown sugar
  • 1/2 cup walnuts, roughly chopped (optional)
  • 6 tbsp unsalted butter, melted
  • 2 tsp baking powder
  • 1 tsp ground cinnamon
  • 1/2 tsp baking soda
  • 1/2 tsp ground allspice
  • 1/4 tsp ground cloves
  • 1/4 tsp ground nutmeg
  • 1/4 tsp salt

For the cream cheese frosting

  • 250g cream cheese, at room temperature
  • 60g butter, at room temperature
  • 1/3 cup icing sugar, sifted
  • 1/4 tsp vanilla extract

METHOD

  1. Preheat oven to 220C. Line a 12 hole muffin pan with paper cases.
  2. Add the flour, baking powder, baking soda, salt, and spices into a large bowl and stir together until combined. In another bowl, whisk together the eggs and brown sugar until blended. Whisk in the buttermilk, and then butter.
  3. Add the egg mixture to the flour mixture and, using a rubber spatula, stir just until evenly moistened. Fold in the carrots and walnuts just until evenly distributed (reserve some for decorating later).
  4. Spoon the batter into the prepared muffin cups, filling them 3/4 of the way full. Bake for about 15 to 18 minutes, or until the muffins are golden brown and a toothpick inserted into the centre comes out clean. Once done remove from the oven and set aside to completely cool down.
  5. Meanwhile, as the muffins bake in the oven, smooth the butter, cream cheese, and vanilla together using an electric handheld mixer. Fold in the icing sugar, and then use the mixer again to beat it until it is light and fluffy. Place the icing mixture into a piping bag (or a regular zip lock bag if you don’t have one in handy like me, and snip off a corner to allow the frosting through). Frost the muffins/cupcakes, and top with some crumbed walnuts and shredded carrots.

Breakfast Muffins: Spiced Carrot

I think I may have gotten Lydia into a dilemma; she now can’t choose between my Banana and Cinnamon Crumb Top Muffins, my Pumpkin and Cheesecake Muffins, and now these babies!

BON APPÉTIT

– Ally xx

myTaste.com

Red Velvet Cheesecake

Red Velvet Cheesecake

Hello Everyone! I just want to start off by saying that I AM FINALLY DONE WITH MY DEGREE! Well, more like I am free from formal classes FOREVER for my Bachelor of Design degree! I’m still not entirely free as I still have my internship to complete until mid-Fenruary next year. This just means that I will have more time to spend in the kitchen, cooking up meals and experimenting with recipes. It will also give me more time write up these recipes for my blog, which makes me happy! So to keep this blog up to date on a regular basis, I have decided to run an upload schedule every Tuesday & Thursday nights. Tuesday posts will feature Muffin Making Monday recipes every two weeks, while Thursdays will predominantly be for other recipes and reviews.

Yesterday was Muffin Making Monday, but I will save that recipe for Thursday’s blog post as today will be a special one. For those of you who don’t know me personally, my birthday was 2 days ago. I celebrated my 23rd with my closest friends from uni, from primary/highschool friends from Brunei, and old/new housemates. On the Saturday I hosted a high tea & water balloon party just at the lodge – cheese & deli platters, quiches, salads, sangria, scones, and tea! Oh and of course, how could I fail to mention Red Velvet Cheesecake? Despite that everything went well, we probably spent close to 4/5 hours making water balloons that only lasted less than two minutes. Barely any of us got wet, well, I was soaking because I took a bucket of water to the head and got sprayed with the hose after stupidly approaching Marissa to genuinely lend her my slippers because ‘her feet hurt’.

On Sunday, which was my actual birthday, I celebrated with more friends at the Potting Shed at the Grounds of Alexandria. We had drinks, lots of food, and always room for some self-saucing chocolate pudding! Afterwards, we roamed around the grounds, looking at more food stalls and the on-going markets. We visited Kevin Bacon (the pig) as well and apparently it was also his birthday weekend! After the Grounds, Zargham, Jialing, and I went to the Ritz Cinema Randwick to watch Interstellar – 10/10! Brilliance is all I can say. Yvonne then join us afterwards for dinner in Kingsford and that was basically the end of a perfectly sunny spring/summery birthday weekend.

Though the weekend was perfect, can’t say the same for the week that led up to it. I had a photography assignment due the Monday of that week. Pretty much all the photographing was done – it was coming up with a bloody concept that took forever – but in the end, I got there and was able to convince my tutor for my choices. On Thursday afternoon, I decided to get a start on making my Red Velvet Cheesecake, basically just the sponge so that I would have it ready and cooled to layer with the cheesecake the next day. On the night before my celebration at home, I had a 2000w essay that needed finishing. I also had work that morning so it was indeed a stressful day/night. Once I was done and over with that essay, I submitted it online at 11:57pm and contemplated on whether I should start my Red Velvet Cheesecake or do it early morning. Knowing that I would probably end up sleeping in until very late, I decided to make my cheesecake right after submitting. And so I did. I probably started at around 12:30am and didn’t finish until an hour later (considering I had to be quiet as to not disturb my the other tenants in the house). Placed it in the fridge and went to bed happy that the cheesecake was done and setting (kind of) overnight in the fridge. The next day, Jo Yee helped me make the frosting while Jialing frosted and decorated the cake while I was busy preparing all the other foods, setting up, and lending my face to Daniel to make me pretty (not that I wasn’t pretty to begin with). But enough babble, as I’m pretty sure Vidhya has read enough to last her until Thursday, let’s get on with the recipe!

The original recipe can be found on Jamie Oliver’s Foodtube that features Eric Lanlard & Donal Skehan. I stumbled across this video on Youtube about 2 months ago and bookmarked it for I instantly knew that this was the cake I wanted to make for my birthday.

Red Velvet Cheesecake Ingredients

Red Velvet Cheesecake Ingredients

Red Velvet Cheesecake Ingredients

PREP TIME 30 MINS* | COOKING TIME 35-40 MINS | SERVES 8-10

*Add extra 4 hours (or overnight) for chilling and assembling

INGREDIENTS

For the red velvet cake mix (double quantities if you want to make a 2-layer cake)

  • 185g butter, at room temperature, plus extra melted, to grease
  • 125ml buttermilk
  • 2 large free range eggs
  • 2/3 cup caster sugar
  • 1/2 cup self-raising flour, sifted
  • 1/4 cup plain flour, sifted
  • 2 tbsp cocoa powder
  • 2 tbsp red food colouring
  • 1/4 tsp baking soda

For the cheesecake filling

  • 300ml double cream, whipped
  • 250g cream cheese, at room temperature
  • 1/4 cup caster sugar
  • 2 tbsp fresh lemon juice
  • 2 tbsp hot water
  • 1 & 1/2 tsp gelatine powder

For the cheesecake frosting

  • 250g cream cheese, at room temperature
  • 60g butter, at room temperature
  • 1/3 cup icing sugar, sifted
  • 1/4 tsp vanilla extract

METHOD

  1. Preheat oven to 180C. Prepare cake tin by slightly greasing the bottom and sides, and adding a piece of baking paper at the bottom of the tin.
  2. Red Velvet Cake Mix: Sift the baking soda, cocoa powder, plain flour, self-raising flour into a medium-sized bowl and set aside. Meanwhile in a large bowl, cream the butter and the sugar using an electric handheld mixer. Mix until pale and creamy. Add the eggs and beat on slow speed, making sure that it’s all blended in. Add the flour mixture into egg mixture and gently fold it in. Finally, add in the buttermilk and red food colouring. Mix together. Transfer the mixture to your prepared cake tin and bake in the oven for 35-40 minutes or until cooked through. Once done, remove from the oven and allow to cool down for about 20 minutes. Trim the tops of the sponge cake, saving the trimmings to decorate with later.
  3. Cheesecake Filling: Combine the cream cheese and caster sugar using a handheld electric mixer until it is nice and smooth. Add in the lemon juice and combine further. In a small bowl, add the gelatine powder to the hot water and mix through until it is well dissolved. Straight away add the gelatine mix to the cream cheese mix and combine. Fold the whipped cream into the cream cheese mix until well combined.
  4. Assembling: Line a springform cake tin with cling film. Take one layer of the red velvet sponge and gently press down. Add about a quarter of the cheesecake filling to the tin, pushing it all the way to the sides to get a nice edge. Add the second layer of sponge, again pressing down gently, and add the remaining cheesecake filling. Fold in the cling film to give it a nice smooth edge, and place in the fridge to fully set (minimum 4 hours, but preferably overnight so that it is nice a firm).
  5. Cream Cheese Frosting: Smooth the butter, cream cheese, and vanilla together using an electric handheld mixer. Fold in the icing sugar, and then use the mixer again to beat it until it is light and fluffy.
  6. Assembly & Decoration: Gently remove the cake from the springform and place the cake on a plate. With a palette knife, push the icing on top of and around the edges of the cake to make a nice thin layer of frosting. To bring some colour back to it, take your sponge trimmings and crumble it on the top and edges of your cake. Lightly dust some icing sugar on the top of the crumbs and it is ready to serve!

Red Velvet Cheesecake

Happy Birthday to me (Allison)

BON APPÉTIT

– Ally xx

myTaste.com

Breakfast Muffins: Pumpkin & Cheesecake with a Brown Sugar Streusel

Breakfast Muffins: Pumpkin & Cheesecake with a Brown Sugar Streusel

Hello Everyone! First off I just want to say that I was meant to write up and post this recipe last night, but with interning all day, going for my first boxing class, preparing my pictures to print for photography class, and preparing for my visual communication class all in one day yesterday, it was hardly possible to squeeze blogging in.

It’s been a while since my last post, and we should all know why by this time as I mention it in almost every blog post, especially if I haven’t posted in a while. But before I get onto today’s recipe, I just want to let you all know that I am officially done with formal classes! Not just for the semester, but for my whole degree as well! Yay me! I only 2 more assignment submissions, one for photography worth 40% and the other an essay for my visual communication class worth 50%! After that, I have my internship to power through until mid-February and if all is good, I can kiss uni goodbye (unless I decide to come back for Masters or a second degree in Culinary Arts) and graduate from my Bachelor’s Degree in Design!

Also, once the assignment wave is over, I hope to upload more regularly. I hope to cook more often too but because I will still be interning, I can’t guarantee that I’ll be cooking and experimenting much, as sometimes after spending the whole day in front of the computer and a workout at the gym, I just want to lie down. Now, this doesn’t mean not eating at all, it just means that on days like this I either have a very quick and simple meal, or I prepare and make dinner for the next few days or so and store it in the fridge so that it’s just ready for consumption.

Breakfast Muffins: Pumpkin & Cheesecake with a Brown Sugar Streusel Ingredients

Anyway, as the title states, 3 days ago was yet another Muffin Making Monday with Jialing. For those of you who don’t know, every 2nd Monday my friend Jialing and I bake muffins for ourselves to take to work with us in the mornings. It started off as Jialing just wanting/needing to come over to bake muffins because she doesn’t have an oven at her place. I also remember saying to myself that I wasn’t just going to sit around and watch her bake, so I decided to bake muffins that day too, and now it’s become a tradition for us. I also asked Jialing on Monday, what we would do if we started interning full time? Would we move our Muffin Making Mondays to the weekend? She was actually quite sad at the idea that it wouldn’t be called Muffin Making Mondays anymore – so she said that we should just work from Tuesday-Friday and take our Mondays off! Hilarious; but not a bad idea.

Okay, enough story time (Vidhya). Let’s get onto today’s recipe where the original cane be found on Sally’s Baking Addiction. I am seriously in love with her recipes. I think I’ve attempted a fair share of recipes from her, and this one just called out to me. Also, in spirit of Halloween, I decided to make her Pumpkin and Cheesecake Muffins with a Brown Sugar Streusel. Today’s recipe has three components to it, which doesn’t seem a lot but it can be a handful especially for inexperienced bakers. But don’t be frightened about the amount of work it will take to make these muffins because trust me, they are so worth the effort! This is probably my favourite muffins to date, and even Lydia’s (maybe; she actually cannot decide between my Banana Crumb Top Muffins and this). If you had to pick a recipe to follow from all the muffin recipes that I have posted, pick this one for sure. Happy Baking!

Breakfast Muffins: Pumpkin & Cheesecake with a Brown Sugar Streusel Ingredients

PREP TIME 10 MINS | COOKING TIME 25 MINS | MAKES 12 MUFFINS

INGREDIENTS

For the crumb topping

  • 1/2 cup plain flour
  • 1/4 cup dark or light brown sugar
  • 1/4 cup unsalted butter, melted
  • 1 tsp cinnamon

For the pumpkin muffin batter

  • 1 & 3/4 cups plain flour
  • 1 cup pumpkin purée (canned or from scratch, I used a butternut pumpkin)
  • 2 large free range eggs
  • 1/2 cup dark or light brown sugar
  • 1/2 cup vegetable oil
  • 1/3 cup milk
  • 1 & 1/2 tsp cinnamon
  • 1 tsp baking powder
  • 1 tsp baking soda
  • 1 tsp pumpkin pie spice*
  • 1 tsp vanilla extract
  • 1/2 tsp salt

For the cheesecake filling

  • 1 block (8oz.) cream cheese, softened to room temperature
  • 1 free range egg yolk
  • 3 tbsp granulated sugar
  • 1 tsp vanilla extract

*If you can’t find pumpkin pie spice at your local grocers, you may use 1/4 tsp ground cloves, 1/2 tsp ground allspice, and 1/4 tsp ground nutmeg.

METHOD

  1. Preheat oven to 180C. Line a 12 hole muffin pan with paper cases.
  2. Pumpkin Purée: Cut the butternut pumpkin into small chunks and distribute onto a baking tray lined with aluminium foil. Drizzle with a bit of olive oil and season with salt. Roast in the oven for about 20-25 minutes or until soft and tender. Once done, remove from the oven and set aside to cool before puréeing (purée just enough pumpkin chunks to make a full cup and save the rest for a nice roasted pumpkin salad). Turn the oven heat up to 220C.
  3. Crumb Topping: Add the brown sugar, flour, and cinnamon to a small bowl and mix until combined. Add the melted butter and mix until crumbs form. Set aside in the fridge so that it stiffens up a bit.
  4. Pumpkin Muffin Batter: Toss the flour, baking powder, baking soda, salt, cinnamon and pumpkin pie spice together in a large bowl until well combined. Set aside and then, in a medium bowl, whisk the brown sugar and eggs together until combined. Whisk in the pumpkin, oil, milk, and vanilla extract. Pour the wet ingredients into the dry ingredients and stir until just combined, being careful as to NOT overmix the batter.
  5. Cheesecake Filling: In a medium sized bowl, beat the cream cheese with an electric mixer on medium-high speed until creamy. Add the egg yolk, vanilla extract, and sugar in, and beat until combined.
  6. Spoon about a tablespoon of pumpkin muffin batter into the cups and layer another tablespoonful of of cheesecake filling. Top with another tablespoon of muffin batter, filling the cups all the way to the top. Sprinkle each muffin evenly with crumb topping and press the topping down into the muffin so it sticks.
  7. Bake the muffins for 5 minutes at 220C. Then lower the temperature down to 180C and bake for an additional 15 minutes or until a toothpick inserted in the center comes out clean (try not to overbake though; mine needed an extra 8 minutes or so). Allow the muffins to cool for 10 minutes in the muffin sheet, then transfer to a wire rack to cool until ready to eat.

Breakfast Muffins: Pumpkin & Cheesecake with a Brown Sugar Streusel

Breakfast Muffins: Pumpkin & Cheesecake with a Brown Sugar Streusel

I say again, yes it does look like that there are a lot of ingredients to handle, but most of them are repeated through each layer. You won’t regret these super-moist spiced pumpkin muffins stuffed with cheesecake filling and topped with brown sugar cinnamon streusel! Muffins taste best on the same day, though they may be stored covered tightly at room temperature for 3 days or in the refrigerator for 5 days.

BON APPÉTIT

– Ally xx

myTaste.com

Breakfast Muffins: Bacon, Cheese & Zucchini

Breakfast Muffins: Bacon, Cheese & Zucchini

Hello Everyone! Yes I am back and I do apologise for not posting a recipe or review for over 3 weeks now I think! I’ve been busy, with work, uni, and mainly procrastinating really. I haven’t stopped cooking though, in fact I have quite a few dishes to post – I just haven’t had the time to sit down and actually write a post for it. I know, you’re probably thinking that it’s not so hard writing up a recipe especially if it’s one that I followed from a book or online. Writing up the recipe isn’t the hard part, what’s sort of hard for me is spending time writing about let’s say a back story or just a story in general. I know this is a food blog but I do like to share a few things about myself, or my day/week etc.

Anyway, before I get to today’s recipe post, I just want to update all of you, about what’s been going on lately – also because I think my housemate Vidhya deserves a story to read after she was falsely mislead from my previous post. Now that I think about it, there’s actually nothing much to talk about – I know I have such a boring life! Just kidding! Otherwise I would’ve had all the time in the world to keep this blog updated. I mean, between uni and work, I do go out and see my friends over the weekend. I don’t even think that I’ve spent a lazy weekend at home just sleeping in and doing nothing all day for quite some time.

Breakfast Muffins: Bacon, Cheese & Zucchini

Two weeks ago I had a mid semester break, which really meant that I only had 2 weekdays off from classes because I still had to go in for my internship. And even so, those two days were spent out eating, shopping, and going to the cinema with friends. I went to Parramatta with Marissa and Jialing to check out this place called Paper Plane Café and the trip there was worth it all especially aster we massacred our brunch. I will get into more detail with this when I get around to posting a review on the place. I also recently joined the gym with Jialing! We’ve probably been going for three weeks now, basically just adding exercise into our daily life, toning the muscles, and overall staying fit (we have to burn all the brunches somehow)! I also hosted a dinner party probably 2 weeks ago or so for my COFA friends; a great success in terms of food and laughter. Those were probably the highlights of the past 3 weeks. Oh I almost forgot, the public holiday after the mid semester break, Edison, Jialing, and I had a photo shoot at the Royal Botanical Gardens, well more like Edison needed a new profile picture before he turned 23 and of course asked me to take the photos. Jialing and I had to join in the photo shoot fun of course! This photo shoot happened last week Monday which interrupted Muffin Making Mondays with Jialing and I – which is why we had our muffin session this Monday instead!

Today’s recipe post was actually requested by my mother. She told me she watched a cooking show with Chef Michael Smith in which he made mini bacon and cheese muffins. She told me to give it a go and tell her how it went and if it tasted good or not. I went online and found a recipe from Taste – Bacon, Cheese, and Zucchini Muffins! They taste so good! And I definitely made a few people in the office jealous I think as the smell of bacon travelled around. Jialing on the other hand made Orange, Lemon, and Poppy Seed Muffins – also so good! So good that I think I may make them for our next Muffin Making Mondays. I also baked some Macadamia and White Chocolate Cookies that Monday, but I will save the recipe for another time.

Breakfast Muffins: Bacon, Cheese & Zucchini Ingredients

PREP TIME 10 MINS | COOKING TIME 22 MINS | MAKES 12 MUFFINS

INGREDIENTS

  • 4 hickory-smoked bacon rashers, diced
  • 2 eggs, lightly beaten
  • 1 cup milk
  • 1 cup plain flour
  • 1 cup self-raising flour
  • 1/2 cup tasty cheese, grated
  • 1/2 cup zucchini, grated
  • 1/4 cup vegetable oil
  • 1 tsp baking powder
  • 1 tsp olive oil

METHOD

  1. Preheat oven to 190C. Line a 12 hole muffin pan with paper cases.
  2. Heat olive oil in a frying pan over medium-high heat. Add the bacon bits and cook for 5 minutes or until crisp. Once crisp, transfer the bacon bits to a dish lined with paper towels to drain off all the excess oils. Allow to cool.
  3. Meanwhile, squeeze the excess liquid from zucchini, this will prevent your muffins from becoming soggy. Tip, place the grated zucchini in a clean tea towel and squeeze – otherwise you can also just use your hands like what I did, working in small batches.
  4. Sift flours and baking powder into a bowl and make a well in the centre. Add in the vegetable oil, milk, and egg. Mix well until combined, and then fold in bacon, cheese, and zucchini.
  5. Spoon the mixture between the paper cases (makes 12 muffins). Bake for 20 to 22 minutes or until golden and just firm to touch. Stand in pan for 5 minutes and then transfer to a wire rack to cool.

Breakfast Muffins: Bacon, Cheese & Zucchini

Breakfast Muffins: Bacon, Cheese & Zucchini

BON APPÉTIT

– Ally xx

myTaste.com

Breakfast Muffins: Banana & Cinnamon Crumb Top

Breakfast Muffins: Banana & Cinnamon Crumb Top

Hello Everyone! Sorry for not posting in a while, and I’m pretty sure my regular followers should know by now the reason for it. Just because I haven’t been uploading, doesn’t mean that I’ve stopped cooking and experimenting in the kitchen. I actually have three dishes that are waiting to be posted (basically I have the photos, I just haven’t had the time to do a write up). I know for sure that I have a handful of readers out there (or maybe just Vidhya), who actually like reading this part of the post. She was upset that the last post I made was short and had no back story. Well, I guess I won’t disappoint her here!

Anyway, today’s recipe is part of what I think will start becoming a regular thing, which is Muffin Making Monday’s (fortnightly) with Jialing. For those of you who don’t know Jialing (and basically haven’t read ANY of my previous posts because her name comes up almost ALL the time), she started this whole idea of making muffins on Monday’s because she wanted to be able to have a quick breakfast, be it at home or at the bus stop, or even at work. Since she doesn’t have an oven at home, she asked if she could bake at my place. That’s when I thought, what a great idea for breakfast on the go, because as you may/may not know, I am pretty bad at breakfast – meaning that I just altogether skip breakfast and go straight to brunch/lunch. Also, I wasn’t just going to sit around and watch her bake muffins, so I decided to bake a batch myself.

Breakfast Muffins: Banana & Cinnamon Crumb Top

Two weeks ago I made a batch of savoury muffins with Prosciutto & Chives, while Jialing made a sweet batch with Apple, Pear, and Sultanas. Yesterday we unintentionally switched and this time I made a batch of sweet muffins with Banana & Cinnamon Crumb Top, while Jialing made a batch with Turkey, Pesto, Sun-dried Tomatoes, and Cheese. I followed a recipe from allrecipes, and I think I might recommend adding a little less salt than said because I found my muffins just a tad salty. Who doesn’t? Otherwise, the result was amazing! Tasted really good, especially the crumb topping! Which also reminds me, I added a tad more cinnamon because I LOVE cinnamon. I didn’t realise how much these muffins were going to rise – I didn’t even peak through the oven door while they were cooking because I was busy washing up all the bowls and utensils that Jialing and I used. So to my surprise, when my timer rang and I looked at them I said out loud and in a shocking tone “OH MY GOD! THEY ARE SO FAT!” It was pretty hilarious, and priceless might I add.

Breakfast Muffins: Banana & Cinnamon Crumb Top Ingredients

PREP TIME 5 MINS | COOKING TIME 18-20 MINS | MAKES 12 MUFFINS

INGREDIENTS

For the muffin batter

  • 3 large bananas, mashed (plus one extra banana, sliced)
  • 1 & 1/2 cups plain flour
  • 1 egg, lightly beaten
  • 3/4 cup white sugar
  • 1/3 cup unsalted butter, melted
  • 1 tsp baking powder
  • 1 tsp baking soda
  • 1/4 tsp salt

For the crumb topping

  • 30g unsalted butter, chilled and cut into cubes
  • 1/3 cup packed brown sugar
  • 2 tbsp plain flour
  • 1/2 tsp cinnamon

METHOD

  1. Preheat oven to 190C. Lightly grease a muffin tray, or line with muffin paper cups.
  2. In a large bowl, mix together the flour, baking powder, baking soda and salt. In another bowl, beat together the bananas, sugar, egg, and melted butter. Stir the banana mixture into the flour mixture until moistened. Spoon the batter into the prepared muffin cups, about 2/3 of the way full.
  3. In a small bowl, mix together the brown sugar, flour, and cinnamon. Add the cubed butter and using your finger tips, quickly mix the ingredients together until looks like rough bread crumbs. If your mixture is too warm, put the bowl into the refrigerator for 15 minutes and start again when it has chilled.
  4. Sprinkle the crumb topping over the muffin batter and top with a slice of banana.
  5. Bake in preheated oven for 18 to 20 minutes, or until a toothpick inserted into center of a muffin comes out clean.  Makes about 12 muffins.
  6. Store any leftovers in the fridge and remember to warm slightly before serving.

Breakfast Muffins: Banana & Cinnamon Crumb Top

Breakfast Muffins: Banana & Cinnamon Crumb Top

BON APPÉTIT

– Ally xx

myTaste.com