Puto Bumbong

Puto Bumbong

Hello Everyone! I’d like to start the last post for the year by wishing everyone a very Merry Christmas! I hope everyone had a splendid eve celebrating, feasting, and continuing tradition with family and loved ones. What are some of your Christmas traditions? I’d love to know in the comments below! We had a simple and quiet Noche Buena at home, and of course watched some Christmas classics such as the Home Alone series. We’re not a family who gives gifts during the season of Christmas because we treat each other throughout the year – be in paying for the entire meal when we eat out as a family, or paying for the tickets and snacks when we go to the cinema together; gifts that allow us to spend time together as a family rather than materialistic things.

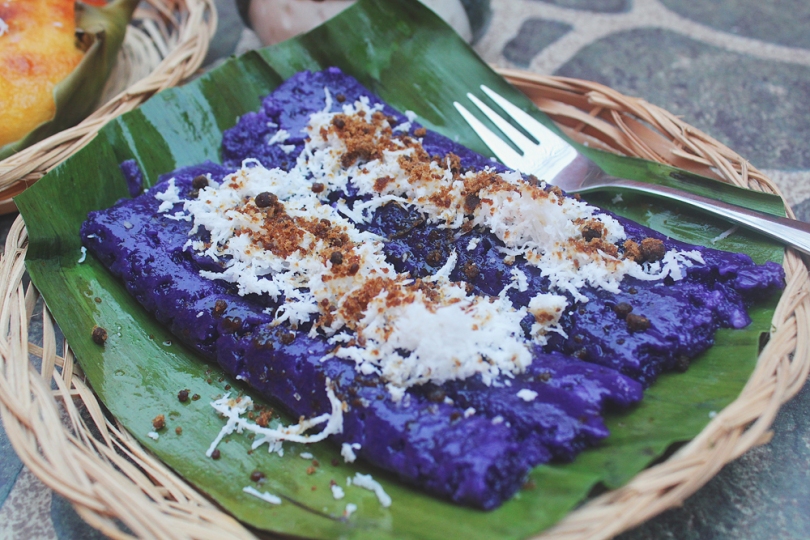
That aside, I mentioned in my last post that Christmas or Simbang Gabi would not be complete without this famous breakfast kakanin that is sold alongside Bibingka just outside the church. But, as all the other kakanins out there, you don’t have to wait until the Christmas season to roll around as you can find Puto Bumbong every day of the year at your local market, various street stalls, and in many restaurants and cafés nationwide.

Team Bibingka or Team Puto Bumbong

Puto Bumbong is a type of Filipino steamed rice cake that is traditionally made from a special variety of heirloom sticky (glutinous) rice known as pirurutong which has a distinct purple colour to it. Food colouring is not necessary for this. It is soaked in salted water and then dried overnight. It is then ground in a grinder made of solid stone before it is stuffed into a bamboo tube known as bumbong ng kawayan. It is then steamed until steam rises out of the bamboo tubes, placed onto a pre-cut banana leaf, and topped with margarine (or butter), grated coconut, and muscovado sugar to enhance its flavours.

And so for my last breakfast recipe of the year, I will share two ways in how you can make Puto Bumbong at home, with and without the bamboo tubes – depending if you have bamboo tubes readily available or not to be able to tackle this recipe. Before we dive in, be sure to check out the original recipe that I followed over on Panlasang Pinoy.

Puto Bumbong

PREP TIME 2 DAYS* | COOKING TIME 20 MINS | SERVES 6

*Be sure to allot yourself 2 days before you plan on tackling this recipe, as the rice needs to soak.

INGREDIENTS

For the puto bumbong

  • 6 cups water at room temperature, for soaking the rice
  • 1 & 1/3 cup sticky purple rice
  • 1 & 1/3 cup white glutinous rice
  • 2/3 cup long grain purple rice

For the toppings

  • Freshly grated coconut
  • Muscovado sugar
  • Softened butter or margarine
  • Banana leaves
  • Bamboo tubes

METHOD

  1. Combine all the different types of rice in a large mixing bowl together with the room temperature water. Set aside and leave to soak for at least 2 days.
  2. Drain and place the soaked rice in a large food processor. Pulse and grind until the rice becomes very fine (takes about 8 to 10 minutes to achieve this consistency). If you only have a small food processor handy, then work the rice in batches.

Cooking with Bamboo Tubes

  1. Fill each bumbong (bamboo tube) with the powdered rice mixture, making sure not to compress the rice to allow the steam to pass easily.
  2. Prepare the steamer with enough water for steaming. Once the water has been brought to a boil, arrange each bamboo tube on the steamer. Cook until steam starts coming out of the tubes, about 8 to 10 minutes.
  3. Remove the tubes from the steamer, and carefully remove the puto bumbong from the tube and place over a piece of banana leaf.
  4. Spread with butter or margarine (I chose to leave this out of my serving) and top with freshly grated coconut and muscovado sugar. Serve, share, and enjoy with a hot cuppa!

Cooking without Bamboo Tubes

  1. Add about 2 cups of water to the powered rice mixture and mix together to form a dough. You may need less or more water, depending, so it’s best to add the water in gradually. Knead until smooth.
  2. Pinch off about 2 tablespoons of the dough and, using your hands, make a ball and then roll into a log, about 4 to 5 inches in length. Alternatively you can place the dough into a piping bag and using piping tip #807, pipe the dough onto a heat-proof plate greased with a bit of butter or margarine.
  3. Place the plate into a prepared steamer with a muslin-covered lid to prevent any droplets of water dripping onto the puto bumbong mixture. Steam for about 8 – 10 minutes.
  4. Remove from the steamer and place onto a banana leaf. Top with your preferred toppings and enjoy!

Puto Bumbong

A lot has happened this year, both in my personal and work life, which resulted in me having to put my attention to Amcarmen’s Kitchen on hold for a couple of months collectively. That being said, I’m going to try my best not to take as many breaks as possible for the upcoming year ahead, *fingers crossed*

I usually take the first month of the beginning of the year off to properly plan for the upcoming year ahead and to get a head start on experimenting in the kitchen for recipes to share with you guys. But since I haven’t been working since August of this year (still continuing to look for a job as I write this), I’ve had time to plan ahead and I’m excited to share with you what I have in store for the upcoming year! You’ll just have to wait until next week to find out the theme for the year ahead – which technically is in another week I just realised!

So for now, I would like to wish all my family, friends, and followers a Happy & Prosperous New Year! May the New Year bring you happiness, health, wealth, and peace!

BON APPÉTIT

– Ally xx

myTaste.com

Bibingkute (Mini Bibingka)

Bibingkute (Mini Bibingka)

Hello Everyone! Only less than a week left to Christmas! How will you and your family be spending the festivities? Though my family and I are back in the Philippines, we’re used to just spending a quiet night at home and that’s probably how we’ll be spending our Christmas this year again. I honestly am not all about spending money that I don’t have on gift giving. Please don’t judge me, as I am definitely not a cold-hearted Grinch – I just don’t see why we have to go such great lengths to please other people. Christmas is about celebrating the birth of our Saviour Jesus Christ – and not about what I have just mentioned above.

Tangent/mini rant aside, this festive kakanin known as Bibingka, or in English, Filipino Coconut Rice Cake, is usually eaten for breakfast especially during the Christmas season, typically sold alongside Puto Bumbong. Just like other kakanins, this treat can be enjoyed all year round and not just during the festive season. They can be found on the streets, in the markets and even in cafés and restaurants.

Bibingka

Bibingka is a round rice cake that is traditionally cooked in banana-lined clay pots and baked over pre-heated live coals, but more commericalised bibingkas can also be baked in the oven. Now, I’m not entirely sure that ‘Bibingkute’ is the actual term used for mini bibingkas – I just came across it during my research for a recipe. I think the name came from this statement on Kawaling Pinoy:

“And to increase the cute factor, I used muffin pans to bake the cakes.”

Quite a creative name I might add.

Bibingka is traditionally made with galapong, which is milled glutinous rice as the main ingredient. Nowadays you can easily buy glutinous rice flour and use that instead of milling your own rice. The cakes are also full of carbohydrates which makes it a breakfast favourite enjoyed with a strong serving of coffee to get one going through their morning commute to school or work. Other ingredients in bibingka include coconut milk, margarine, cheese, salted egg, and sugar.

Bibingkute (Mini Bibingka)

PREP TIME 15 MINS | COOKING TIME 15-25 MINS | SERVES 12 MINI CAKES

INGREDIENTS

For the bibingka batter

  • 2 cups rice flour
  • 1 & 1/2 cups coconut milk (fresh, canned, or frozen)
  • 3/4 cup granulated white sugar
  • 5 free range eggs, beaten
  • 2 tbsp baking powder
  • 2 tbsp unsalted butter, melted
  • 1/2 tsp salt

For the toppings

  • 2 salted duck eggs, cooked and sliced
  • Granulated white sugar
  • Grated and sliced cheese
  • Grated mature coconut (niyog)
  • Margarine, softened
  • Banana leaves

METHOD

  1. Preheat oven to 180C (350F or gas mark 4).
  2. Banana Leaves: Prepare the banana leaves by rinsing them under warm water. Trim away the thick edges and cut the leaves into about 5 or 6-inch diameter rounds, large enough to cover the bottom and sides of a single muffin cup.
  3. Quickly pass and heat the banana leaves over stove flames for a few seconds, just until the leave if soften and pliable to work with. Line a 12-hole muffin pan with the prepared banana leaves. Make sure the leaves are intact with no rips. Set aside.
  4. Bibingkute: Combine the rice flour, sugar, baking powder and salt in a medium-sized mixing bowl. Whisk the ingredients together until well dispersed.
  5. In another large mixing bowl, combine the coconut milk and melted butter. Stir until well blended before adding in the rice flour mixture. Stir gently until the batter is smooth. Add the beaten eggs and combine until well blended.
  6. Pour and divide the batter equally into the prepared muffin pan, filling only about 3/4 of the way. Top each with a slice of salted egg and a slice of cheese.
  7. Bake: Place in the oven for about 15 to 25 minutes or until golden and a toothpick inserted in the middle of the cakes come out clean.
  8. Optional, if desired, place under the broiler for about 1 minute or until nicely charred.
  9. Remove from the oven and spread with margarine on top. Garnish with grated coconut or grated cheese and sprinkle with sugar to taste.
  10. Serve and enjoy hot for breakfast or merienda.

Bibingka

BON APPÉTIT

– Ally xx

myTaste.com

Sapin-Sapin

Sapin-Sapin

Hello Everyone! Only 13 more days to Christmas!

Before I start, I’m going to make this post short a sweet. I’ve had a busy day of designing to meet a 9-hour deadline so I’m pretty much mentally drained at this point – apologies in advance.

Anyway, in my previous post that I shared last week, I talked about how a much-loved part of the Simbang Gabi tradition during the Christmas season amongst Filipinos is the various local delicacies served just outside of the churches. Last week I shared all about Suman, and tonight I will be sharing a favourite with you, Sapin-Sapin.

Sapin-Sapin is a Filipino sticky rice cake that is made from glutinous rice and coconut milk that is traditionally composed of layers with different colours and flavour profiles that compliment each other. Sapin-Sapin can be made of 4, 3 or 2 layers, or even enjoyed just on its own single slab. The most common flavours are coconut, ube, and jackfruit. It is then topped with a toasted residue of coconut milk known as latik.

Sapin-Sapin

PREP TIME 15 MINS | COOKING TIME 45 MINS | SERVES 10

INGREDIENTS

For the sapin-sapin

  • 4 cups coconut milk (fresh, canned, or frozen)
  • 2 cups glutinous rice flour
  • 1 cup granulated white sugar
  • 3/4 cup ube (purple yam), cooked and mashed
  • 1/2 cup ripe jackfruit
  • 1/4 cup latik*
  • 30ml condensed milk
  • 1 tbsp coconut oil
  • 1/2 tsp pure vanilla extract
  • 1/4 tsp ube extract
  • Violet food colouring
  • Yellow food colouring

*For the latik

  • 1 cup coconut milk

METHOD

  1. Latik: Pour the coconut milk into a small saucepan and bring to a boil over medium-high heat. Continuously stir until most of the liquid evaporates. This will take about 12 to 15 minutes per cup of coconut milk.
  2. When the texture of the milk turns gelatinous, lower the heat and continue to stir. By this time the oils should start separating from the milk. Keep stirring until brownish residues are formed.
  3. Turn the heat off and place the latik on a small plate lined with a paper towl to soak up the excess oil. Set aside. At this point you can store the latik in a container and in the fridge for up to a week or use it immediately to top various rice cakes.
  4. Sapin-Sapin: Combine the glutinous rice flour and sugar in a large mixing bowl. Then, pour in the condensed milk, coconut milk, and vanilla extract, mixing well until the texture of the mixture is smooth.
  5. Divide the mixture into 3 equal parts into smaller mixing bowls.
  6. Add the mashed purple yam, ube extract, and violet food colouring into one of the mixtures. Stir thoroughly and then set aside.
  7. Shred the jackfruit (without the seeds) in a food processor. Add the shredded jackfruit into another mixture along with the yellow food colouring. Set aside.
  8. Leave the last mixture as it is.
  9. Grease a 9in round baking pan by brushing a bit of coconut oil and pour in the plain coconut mixture into the pan. Make sure that the mixture settles. Cover the baking pan with cheesecloth and then steam for about 12 to 16 minutes.
  10. Once done, remove the baking pan and then pour over the ube mixture. Use a spatula to spread it evenly on top of the coconut mixture. Remove excess water from the cheesecloth by squeezing it. Place it back on top of the baking pan, and into the steamer to steam for another 12 to 16 minutes.
  11. Repeat step 10 again for the jackfruit mixture and then steam for a further 15 to 20 minutes. If you think your mixture is still a tad bit runny, steam for a further 5 minutes. Remove of the steamer and set aside.
  12. Serve: Place a clean banana leaf over a wide serving plate and brush a bit of coconut oil over the leaf.
  13. Gently run the side of the baking pan using a spatula brushed with coconut oil. Turn the baking pan over onto the banana leaf and let the cooked sapin-sapin fall out of the pan on its own. Therefore make sure that the colour that you want on top is the bottom layer in the pan when being cooked.
  14. Brush some coconut oil on top of the sapin-sapin and sprinkle generously with latik.
  15. Serve for breakfast, merienda, or dessert with a hot cup of coffee. Share and enjoy!

Sapin-Sapin

Unfortunately, most commercial sapin-sapin delights that you find in large supermarket chains omit the use of natural flavours such as the ube and jackfruit to reduce costs. In fact, if you see, red is also often used in the making of sapin-sapin. When I was researching the flavours, I found out that the red layer actually has no flavouring to it, just the plain coconut from the initial mixture.

Before I end tonight’s post, what are some of your favourite traditional Christmas treats? I’d love to hear about the different food traditions from around the world! Comment down below!

BON APPÉTIT

– Ally xx

myTaste.com

Full Pinoy Breakfast

Full Pinoy Breakfast

Hello Everyone! I can’t believe that we’re nearing the end of November! The month went by so quickly and before we know it, the year will be over too. I’m not going to say that tonight will be the last of my Filipino breakfast series because expect more for the month of December. The only twist is that I will be sharing Filipino Christmas Breakfast treats, so stay tuned for that! I will also be sharing with you a Noche Buena Special next month be sure to so look out for that too!

Tonight’s recipe is a dish that draws inspiration from a Full English Breakfast – but with a Filipino twist to it. I’m not sure if this has been done before (I’m sure it has), but nevertheless, I’ve swapped out traditional English Breakfast ingredients with its Filipino counterpart i.e. sausages for longganisa, toast for pandesal, and so on. I came across this idea while researching the top favourite Filipino Breakfast dishes and it clicked into mind: “what if I substitute the ingredients from a Full English Breakfast and make a Filipino version of it?”

The end result definitely put a smile on my face, and I’m sure it will do the same for you.

Full Pinoy Breakfast Ingredients

PREP TIME 10 MINS | COOKING TIME 20 MINS | SERVES 4

INGREDIENTS

  • 250g fresh corned beef
  • 250g oyster mushrooms*
  • 12 Vigan longganisa**
  • 8 freshly baked malunggay pandesal***
  • 4 large free range eggs
  • 4 slices of pineapple-marinated holiday ham****
  • 4-5 garlic cloves, minced
  • 1 small potato, diced
  • 1 small red onion, halved and sliced
  • Knob of unsalted butter
  • Salt and freshly ground black pepper, to taste

To garnish

  • Lettuce leaves
  • Tomatoes, sliced

*Or any other type such as button, cup, or Portobello, whichever is readily available and fresh at your local market or grocers. In my case, the oyster mushrooms were the freshest from the rest.

**Quantity depends on the size and type, more if you get the smaller ones.

***You can bake your own pandesal or you can pop over to your nearest pandesal stall (ours is just a 2 minute walk from our house) and buy at 3 pesos a piece of freshly baked malunggay pandesal.

Malunggay Pandesal

****Since Christmas is nearing, Hamon de Bola (Ham Ball or Holiday Ham) can now be found in every grocery store nationwide! Since this is our first time being back in the Philippines for good, we’ve been scouting around for the best tasting Holiday Ham by just buying slices of the various brands out there before buying the whole ball to serve for our upcoming Noche Buena Feast next month.

METHOD

Get ready for some one-pan action!

  1. Preheat oven to 90C (190F) just hot enough to keep each element of the dish warm as we work through each one of them individually. Place your store-bought pandesal into the oven.
  2. Fried Egg: Heat a large frying pan over medium-high heat with about a tablespoon of oil. Crack the eggs gently into the pan to keep the yolks intact. Don’t overcrowd the pan, so if needed, fry the eggs in batches.
  3. Cook until the tops of the whites are set, but the yolk is still runny. Browned and crispy on the edges with a golden liquidy yolk is how I like my fried eggs! Transfer to a heat-proof plate and set aside in the oven.
  4. Garlic Sautéed Mushies: In the same pan, add half of the minced garlic and sauté until fragrant and golden brown, about 30 seconds. Add in the mushrooms and cook until softened, about 3 minutes.
  5. Add a knob of unsalted butter, and season with a touch of salt and freshly ground black pepper. Give it one good stir to combine and transfer to a small heat-proof bowl. Set aside in the oven.
  6. Corned Beef: Add about a tablespoon of oil to the pan and sauté the remaining minced garlic until fragrant and golden brown, about 30 seconds. Add in the onions and cook until soft for about 1 minute before adding in the corned beef.
  7. Continue to cook for 5 to 6 minutes, seasoning with a touch of fragrant and golden brown, about 30 seconds. Add in the diced potatoes and cook further until the potatoes are soft, about 2-3 minutes. Once done, set aside in a small heat-proof bowl and set aside in the oven.
  8. Longganisa: Wipe down the pan with a kitchen towel tissue and add about a quarter cup of water to the pan together with the longganisa. Bring the water to a boil. Roll the longganisa occasionally and continue to boil until the water in the pan evaporates.
  9. When the water has fully evaporated, let the longganisa fry in its own oil. Continue to fry the longganisa for about 5 minutes while constantly rolling them around to cook evenly on all sides. When the longganisa is slightly crisp on the outside, it’s done! Set aside on a heat-proof plate lined with a paper towel to absorb any excess oil. Set aside in the oven to keep warm.
  10. Holiday Ham: Again, wipe down the pan with a kitchen towel tissue and add about a tablespoon of oil. Add the ham slices to the pan and fry until golden brown both sides. Set aside on a single plate lined with a paper towel to absorb any excess oil.
  11. Plate Up: Remove all the cooked elements from the oven and plate up accordingly into four individual serving plates. Garnish with fresh lettuce leaves and fresh sliced tomatoes. Serve with coffee or any hot beverage of your choice and here you have it! Enjoy a Full Filipino Breakfast for the upcoming weekend!

Full Pinoy Breakfast

Full Pinoy Breakfast

BON APPÉTIT

– Ally xx

myTaste.com

Classic Champorado (Chocolate Rice Porridge)

Classic Champorado (Chocolate Rice Porridge)

Hello Everyone! I hope everyone has had a fantabulous week so far and will have a great week ahead with the weekend to look forward to. Tonight I will be sharing a Filipino breakfast staple that is sure to spark some doubts, especially amongst those who aren’t very familiar with this foreign food pairing. Let me explain further.

Champorado, or in English, Chocolate Rice Pudding, is a classic dish found in many homes across the Philippines commonly served for breakfast. Chocolate for breakfast sounds like a heavenly dream doesn’t it? But wait, there’s a catch! Champorado is usually served with a piece of Tuyo, which in English is known as dried salted fish! Chocolate and dried salted fish?! That sounds like a bizarre combination!

Classic Champorado (Chocolate Rice Porridge)

Is it really though? While the sound of pairing chocolate together with fish seems like whoever came up with this combination was stoned, drunk, or suffered a milk mild concussion, let’s look at the flavour profiles instead. Okay before I continue, I would like to take a small shortcut – I had a major laugh fit when proof reading what I wrote above… What even is a milk concussion?!

Anyway, continuing on, there are a lot of impeccable desserts and sweet dishes out there that embrace the salty-sweet combination, and that’s exactly what you get from Champorado and Tuyo. It’s exactly like eating salted chocolate! The dried salted fish, which is shredded and mixed into the Champorado adds pops of salty surprises to each spoonful of the sweet chocolate rice porridge that you take.

Still not convinced? As the say, don’t judge a book by it’s cover if you haven’t tried it yet. Otherwise, you could get away with adding a pinch of rock salt into your Champorado – but it won’t be the same.

Classic Champorado (Chocolate Rice Porridge) Ingredients

PREP TIME 5 MINS | COOKING TIME 25 MINS | SERVES 8

INGREDIENTS

  • 5 pieces tsokolate tablea*
  • 1 cup glutinous rice
  • 6 cups water
  • 3 tbsp brown sugar

Topping choices

  • Cacao nibs
  • Fried tuyo
  • Full cream milk
  • Sweetened condensed milk
  • Other dairy alternatives such as almond milk and/or coconut milk

*Tsokolate tablea, or literally translated to chocolate tablets is dried local cocoa beans roasted for a few hours before being ground to a rich, chocolate-y paste. Sugar, most often muscovado, is then added to the paste before it is shaped into balls or tablets, hence its name. Tsokolate tablea is traditionally used to make Champorado, but other alternatives such as unsweetened cocoa powder or a dark chocolate bar can be used in its place.

METHOD

  1. Pour the water into a large heavy bottom saucepot over medium-high heat and bring to a brisking boil. Add in the tablea chocolate and dissolve. Once dissolved, add in the rice and bring back to a boil.
  2. Once boiling, turn the heat down to reduce to a simmer and stir the rice every 3 minutes or so to prevent it from sticking to the bottom of the pot and burning. Leave uncovered to cook further for another 15 to 20 minutes until the water is absorbed and the rice is cooked through. The consistency should be thick but soft, just like porridge.
  3. Add in the brown sugar and stir to combine until dissolved. Remove from the heat and transfer into individual serving bowls. Top with dairy of choice and fried tuyo (optional for those feeling adventurous).
  4. Serve and enjoy!

Classic Champorado (Chocolate Rice Porridge)

Note: Even after cooking with the heat turned off, the glutinous rice will continue to expand and absorb the liquid, therefore it is important to serve it immediately to avoid dry Champorado.

You may also like to add a bit of chilli to your Champorado. It is not traditionally a spicy dish, but if you want that extra kick to the guts to get you going in the mornings, then go for it! Chocolate and chilli afterall is another classic flavour combination!

BON APPÉTIT

– Ally xx

myTaste.com

Level Up Instant Noodles

Level Up Instant Noodles

Hello Everyone! When you think of breakfast, it should be quick to prepare and warm up your empty stomach – if you’re in a rush that is. It should also be filling. You can find all those characteristics in instant noodles!

Comfort food for some, a staple for the rest – instant noodles in the Philippines is favoured by many, either dry or with a soup base. A hot bowl of soup with noodles in the morning gets us going through the day. You simply put a block of noodles in briskly boiling water for about 3 minutes, stir in the seasonings and pour it into a bowl. Tada! Breakfast is solved! Just remember, eating instant noodles is not commendable, but we can still eat them in moderation.

Level Up Instant Noodles

This is how I normally like to have my instant noodles for breakfast once a week – boiled and tossed in its packet seasonings and topped with fried egg with a runny yolk. I also add in more chilli powder just because I love a good hard kick of spice, and a squeeze of fresh calamansi juice for a bit of tang. But of course, I’m not going to just write up a recipe for instant noodles with fried egg for you…

There’s only one type of instant noodles you’ll see me eating, and that’s Indofood Mi Goreng, which if not mistaken, can be found in Indonesia and is only distributed in Brunei. I’m sure most of my follow Bruneians have seen lots and lots of boxes of these being checked-in by almost every single Filipino passenger (myself included), so it’s no doubt that this particular brand of instant noodles is a big hit with our community.

Level Up Instant Noodles

I recently saw a hashtag thread on Instagram for #JazzedUpInstantNoodles and that’s where the inspiration came from. Since instant noodles is a heavy favourite, not only amongst Filipinos, but also across the Asian (and most likely Western) community, I’ll be sharing with you tonight my version of Level Up Instant Noodles, the Filipino way of course. When I say Filipino way, I mean by using Filipino favourites like Lechon to mash up with my favourite pack of instant noodles for a super filling breakfast!

Level Up Instant Noodles

PREP TIME 5 MINS | COOKING TIME 5 MINS | SERVES 1

INGREDIENTS

  • 1 packet (80g) Indofood Mi Goreng, or any other instant noodles
  • 150g of spit-roasted lechon, cooked
  • 1 bird’s eye chilli, chopped
  • 1 calamansi, halved
  • 1 large free range egg
  • Chilli powder, to taste
  • Lechon sauce
  • Spring Onions, chopped

METHOD

  1. Heat a large frying pan over medium-high heat with about a tablespoon of oil. Crack the egg gently into the pan to keep the yolks intact. Cook until the tops of the whites are set, but the yolk is still runny. Browned and crispy on the edges with a golden liquidy yolk is how I like my fried eggs! Transfer to a small plate and set aside.
  2. Bring a small pot of water to a boil over high heat. Add the block of instant noodles and cook until al dente, about 3 minutes.
  3. Once the noodles are done, drain and return them to the pot with a little bit of the cooking water. Mix in thoroughly the packet seasonings and extra chilli powder.
  4. Transfer to a serving plate together with the lechon and fried egg. Top with extra chilli powder and spring onions. Enjoy!

Level Up Instant Noodles

You can buy small portions of lechon at your local market if they sell it there rather than the whole pig. I got mine from our local weekend market that sells for P700 a kilo. I usually go for the liempo (belly) part because there are less bones and is juicier that other parts. However, it is also the fattiest part of the pig. What I usually do it throw out the fat, but is also such a waste in terms of paying for the fat included. Dilemma.

Of course, there are many other ways in which you can level up your instant noodles at home. A growing popular trend in Brunei and across certain parts of Asia as well is to add salted egg to everything. You can now have Mi Goreng coated with salted egg sauce, or even Mi Goreng with Ayam Penyet (fried chicken) that’s drenched in salted egg sauce! The possibilities are endless and it’s up to you to pair your favourites and get creative in the kitchen!

Level Up Instant Noodles

BON APPÉTIT

– Ally xx

myTaste.com

Taho (Silken Tofu with Syrup & Tapioca Pearls)

Taho (Silken Tofu with Syrup & Tapioca Pearls)

Hello Everyone! So usually a new month on the blog means a new theme as well, but this time around I’ve decided to continue sharing Filipino breakfast favourites as there are so much more to cover than just the –silog dishes!

Tonight I will be sharing with you a popular breakfast protein in a cup known as Taho, pronounced tah-ho. It is basically warm bland silken tofu that is sweetened with a caramelised sugar syrup known as arnibal, and is topped with tiny sago (tapioca) pearls. The tofu base is as fine as custard that practically disintegrates into your mouth at every slurp. The arnibal imparts a warm, molasses-like aroma, and addition to the sweetness it brings to lift the tofu, it also gives it an earthy dimension. The sago? Ties the whole cup together by giving it some bite. It is a perfect breakfast to-go that warms your insides, is filling, and has enough sugar to get you through the morning.

Traditionally, taho vendors hawk their product using a yoke-and-bucket system that is hundreds of years old. Two aluminium buckets are suspended from each end of a bamboo pole – one containing the silken tofu, and the other carrying the arnibal, sago, and other necessities like plastic cups, spoons, and the day’s takings. Taho vendors balance their signature contraption on one shoulder and walk the streets in the mornings calling out “tahhoooooo” drawing out the second syllable for as long as their breath can handle.

As easy as it is to get taho from vendors, it is also just as easy to make it at home yourself with either store-bought silken tofu, or by making your own at home with instant or Homemade Soy Milk with a coagulant agent to help aid in the curdling of the soy milk to form taho – in this case, the recipe uses Epsom salt. Original recipe can be found over on Foxy Folksy.

Taho (Silken Tofu with Syrup & Tapioca Pearls)

PREP TIME 5 MINS | COOKING TIME 20 MINS | SERVES 4

INGREDIENTS

For the silken tofu

  • 2 cups unsweetened soy milk, instant or homemade
  • 1/8 cup water
  • 1 tbsp + 1 tsp cornstarch
  • 2 & 1/2 tsp (leveled) Epsom salt

For the arnibal

  • 1 cup brown sugar
  • 1 cup water
  • 1/4 cup small-sized tapioca pearls, uncooked

METHOD

If using store-bought silken tofu, skip ahead to step 6

  1. Taho: In a large cooking pot over the stove, place a heat-proof bowl that is big enough to hold at least 500ml of liquid in it.
  2. Dissolve the cornstarch in 1/8 cup of water in a small bowl. Add the Epsom salt to the mixture and then stir until dissolved.
  3. Pour the mixture into the prepared bowl in the cooking pot. Then slowly pour in the instant/homemade soy milk to the cornstarch and Epsom salt mixture. DO NOT STIR! Once both mixtures are combined, try not to agitate it otherwise it will not curdle smoothly.
  4. Pour boiling water into the pot just enough to be on the same level of the soy milk mixture in the bowl. Cover the pot with the lid wrapped with a clean cloth to absorb the steam and prevent the droplets formed from dripping into the taho mixture.
  5. Turn the heat to medium-low and let the taho cook for about 15 to 20 minutes or until it is firm to the touch but still wiggly. While waiting for the taho to cook, you can prepare the arnibal and tapioca pearls.
  6. Arnibal: Combine equal parts of brown sugar and water in a small pot and bring it to a boil over medium heat. Stir occasionally and let it simmer until it thickens into a syrup, about 7 to 10 minutes.
  7. Tapioca Pearls: In a small pot, bring to a boil about a half litre of water before adding the tapioca pearls in. Leave to cook for about 10 minutes. Cooking time may vary depending on the size of your pearls.
  8. Place a colander or strainer in a bowl or pot and pour the pearls through to separate them from the water. Pour the same water used back into the cooking pot and bring the water to a boil again.
  9. Wash the strained tapioca pearls thoroughly with tap water and then place it back into the pot of boiling water again. Cook further until they become completely translucent ensuring that there are no white spots at the core.
  10. Serve: Using a wide spoon or ladle, make thin scoops of taho and transfer to a glass or mug. Top with the arnibal syrup and tapioca pearls. Enjoy while it’s warm!

Taho (Silken Tofu with Syrup & Tapioca Pearls)

You can find taho vendors almost in every corner – everywhere! There’s usually a vendor just outside the entrance to the weekend market where my Mom and I do our weekly groceries. I also remember coming across a taho vendor on the beach as well. In fact, we have our own taho vendor who comes on his bicycle every morning around 9am yodeling “tahhoooooo” on our street. Occasionally we’d call out to him for a cup (or two) of delicious taho, and since he comes right to our doorstep, we opt to use our own ceramic cups/mugs instead of the plastic cups he usually serves them in – we need to do what we can to reduce plastic waste!

In Baguio City, Strawberry Taho is a big hit where locally grown strawberries from the region are preserved as chunky jam and then added to the bland tofu instead of arnibal. Make you own chucky strawberry jam at home with my Homemade Strawberry Jam to bring the City of Baguio into your kitchen!

BON APPÉTIT

– Ally xx

myTaste.com

Tinapang Bangusilog with Ensaladang Lato

Tinapang Bangusilog with Ensaladang Lato

Or in English, Smoked Milkfish, Rice, and Egg with Seaweed Salad.

Hello Everyone! Firstly, I would like to wish everyone a Happy Halloween! Sorry I don’t have any spooky recipes to share this year – with so much that’s been going on for the past few months, we’re still slowly settling in.

Anyway, though this may be the last of my –silog series for the month of October on the blog there are still endless possibilities out there! For example, there’s adosilog, bacsilog, dangsilog, chiksilog, cornsilog, hotsilog, litsilog, sisilog, and the list goes on! The ones that I have shared with you are the most popular ones that can be found in almost any café, restaurant, or calenderias across the Philippines. They are also most definitely my favourite –silogs to whip up at home whenever I feel like fueling up with rice in the mornings, or whenever I’m in the mood for breakfast for dinner.

Tinapang Bangus or Smoked Milkfish

Tonight, I will be sharing with you a long time favourite – tinapang bagus, or in English, smoked milkfish. Milkfish is another popular staple in a Filipino household, one that we’ve grown up with despite growing up in Brunei where milkfish is also readily available all year round. What Brunei didn’t have though was smoked milkfish readily available in the markets or supermarkets. So whenever we’re back in the Philippines for the holidays, we’d make sure that we’d get our fair share of smoked milkfish in our bellies *cheeky grin* Now that we’re permanently back in the Philippines, you’ll always find tinapang bangus in our fridge!

I’ve added a little twist to the regular bangusilog of just garlic rice, fried egg, and bangus – I’ve also added a fresh element to cut through the dryness of the overall dish. If you’ve noticed from the previous –silogs I’ve shared with you, they’re pretty much dry and have no veggies to them at all which to be honest, makes me feel guilty for not consuming any greens!

Green Caviar, Sea Grapes, Seaweed, or Lato

Known as Green Caviar or Sea Grapes, it is set to lead the health food market with their bountiful benefits. Now this is probably a type of seaweed that isn’t commonly seen everywhere. In fact, they can only be found on the shores of Japan, Philippines, Thailand, Vietnam, and now Singapore. Here in the Philippines we call these Lato. I first came across these when I was dining at Blackbeard’s Seafood Island during one of my trips to the Philippines way back when. I was reluctant to try them only because they looked so foreign. I was convinced that they were just there on the dish for decoration until our friends that we were dining with told me that they were edible. They have a good fresh crunch to them and also pop in your mouth like caviar – minus the hint of saltiness that you get from actual caviar.

Here in the Philippines, Lato is commonly used to make Ensaladang Lato, which in English translates to Seaweed Salad. There are a few variations to this, but generally it consists of tomatoes, salted egg, fish sauce, and a squeeze of fresh calamansi juice. The simpler, the better.

Ensaladang Lato Ingredients

PREP TIME 10 MINS | COOKING TIME 15 MINS | SERVES 4

INGREDIENTS

  • 2 tinapang bangus (boneless)*

For the ensaladang lato

  • 1/2 kg green caviar seaweed (or known as Lato in the Philippines)
  • 2 salted eggs, quartered
  • 2 tomatoes, quartered
  • Fish sauce, to taste
  • Fresh calamansi juice, to taste
  • Freshly ground black pepper, to taste

To serve with

  • Garlicky fried rice or steamed rice
  • Fried sunny-side up egg or scrambled egg

*We usually only eat half of a bangus per serving but feel free to eat a whole fish for yourself!

METHOD

  1. Ensaladang Lato: In a large bowl, combine the tomatoes, salted egg, and lato.
  2. Toss through the fish sauce, calamansi juice, and season with freshly ground black pepper. Adjust to your liking. Set aside for at least 10 minutes before serving.
  3. Tinapang Bangusilog: Heat about a tablespoon of oil in a large frying pan. Fry both sides of the bangus over medium heat, until the colour turns medium brown.
  4. Serve hot with garlicky fried rice (or steamed rice), fried or scrambled egg, together with the ensaladang lato. Enjoy!

Tinapang Bangusilog with Ensaladang Lato

Tinapang Bangusilog with Ensaladang Lato

BON APPÉTIT

– Ally xx

myTaste.com

Kapampangan Tosilog

Kapampangan Tosilog

Hello Everyone! How was your day today? Or if you are just about to start your day, I hope you have a great ahead! I thought I’d start tonight’s post a little different, as I seem to either always apologising for something or delving right into the recipe. Anyway, I had a productive day(?) I’m not sure if going into the city and doing some window-shopping count as being productive *cheeky grin*

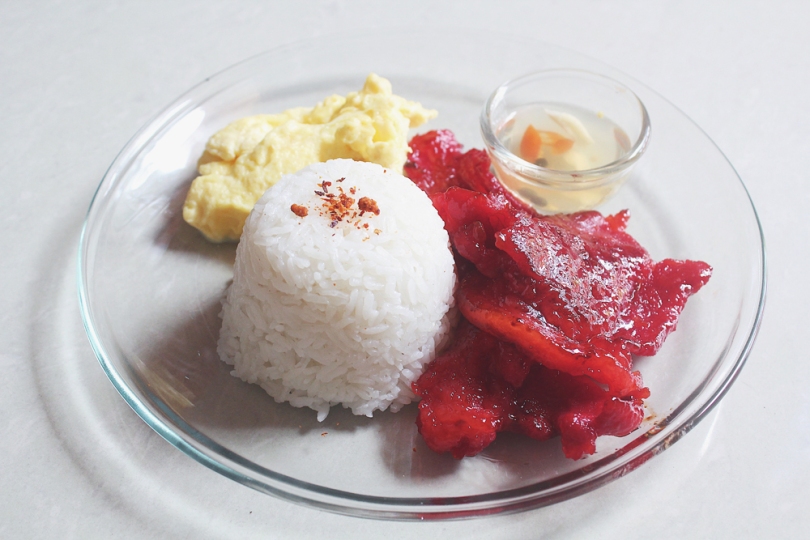
Tocino, just like Beef Tapa and Longganisa, are staples that are native to the Philippines. Tocino is basically sweet cured pork, with similar ways of preparation to that of ham and bacon, although beef and chicken can often be used as alternatives. It is sweet and savoury in taste and artificially reddish in colour to make it look more appetising. Of course, the addition of red food colouring is optional, as it does not affect the overall taste of the meat.

Though tocino is usually eaten for breakfast such as tosilog, it has been a famous Filipino ‘anytime’ food because it is readily available in almost every grocery store and can be consumed at any time of the day. We usually have tosilog for dinner – I mean who can say no to breakfast for dinner?

The process of making tocino varies from different regions of the Philippines – my favourite would definitely have to be the Kapampangan way in which boast “The Original Tocino” makers. The more popular kind of tocino, which we’ve already established is sweet, Kapampangans have a special kind called Pindang which has an added tanginess to it. In addition, to achieve that soft and tender meat, Kapampangans mix all the ingredients together by hand for a whopping 3 to 5 hours! It is then left covered overnight at room temperature to ferment before putting it in the fridge to cure.

The original recipe for making your own homemade pork tocino, Kapampangan style, can be found over on Foxy Folksy.

Kapampangan Tosilog

PREP TIME 10 MINS* | COOKING TIME 20 MINS | SERVES 4-5

*If making your own homemade tocino, allow for up to 2 days preparation before proceeding to dish up a Tosilog dish for breakfast

INGREDIENTS

For the tocino marinade

  • 1kg pork butt, shoulder, ham or belly, cut into 1/4 inch thin slices
  • 3/4 cup brown sugar
  • 1/4 cup pineapple juice
  • 3 cloves garlic, finely minced
  • 2 tbsp rice vinegar
  • 1 & 1/2 tbsp salt
  • 1 tbsp light soy sauce
  • 1/2 tbsp freshly ground black pepper
  • Natural red food colour (optional)

To serve with

  • Garlicky fried rice or steamed rice
  • Fried sunny-side up egg
  • Spicy vinegar

METHOD

If using store-bought tocino, skip ahead to step 5

  1. In a large mixing bowl. Add all the ingredients for the tocino marinade except for the pork slices. Mix the ingredients together until will combined.
  2. Add the pork slices into the marinade and mix by hand for up to an hour, or more if you have the patience to do so. Don’t forget to use gloves to avoid stained hands!
  3. Once done with the mixing, transfer the pork to a container with a cover and let it sit overnight on the countertop.
  4. Mix pork around for a couple of times more before placing it in the fridge to cure for 24 hours or up to 3 days. It can be frozen afterwards and stored for longer (up to 3 months).
  5. Now that you’ve acquired the knack of making your own tocino (or no shame in just getting store-bought ones), it’s time to cook it!
  6. Add about 2 cups of water (or just enough to cover the meat) and 1/4 cup of cooking oil into a large frying pan together with the pork tocino slices. Boil over high heat. The process of boiling further tenderises the meat while cooking.
  7. When the water evaporates, the cooking oil will be left, instantly frying the meat. Turn the meat over after a few minutes of frying to cook evenly on all sides.
  8. Serve hot with garlicky fried rice or steamed rice and fried egg – browned and crispy on the edges with a golden liquidy yolk is how I like my fried eggs. In addition, it tastes best when dipped in spicy vinegar!

Kapampangan Tosilog

Kapampangan Tosilog

Just a word of advice before I leave it here for tonight – it is indefinitely hard to resist the taste of good cured meat but moderate consumption is recommendable. We want to avoid too much intake as it can still affect our health in the long run. Try to limit your servings of pork tocino to at least once or twice a month.

BON APPÉTIT

– Ally xx

myTaste.com

Tocino Spamsilog Fries

Tocino Spamsilog Fries

Hello Everyone! Firstly, I do apologise on getting what was supposed to be last week’s post up super duper late (yesterday) – if you have read my last post just prior to this, then you’d know the reason why, but moving on…

Tocino and Spam, alongside Beef Tapa and Longganisa, are all staples that you can find in a Filipino household. Our fridge should at least have one of them in it, on standby, when there’s nothing else to whip out for lunch or dinner (yes we also eat them at any time of day, not just for breakfast). Right now I can tell you that we have Tocino in our fridge, and cans of Spam in our pantry – heck we even had fried regular Spam for dinner tonight!

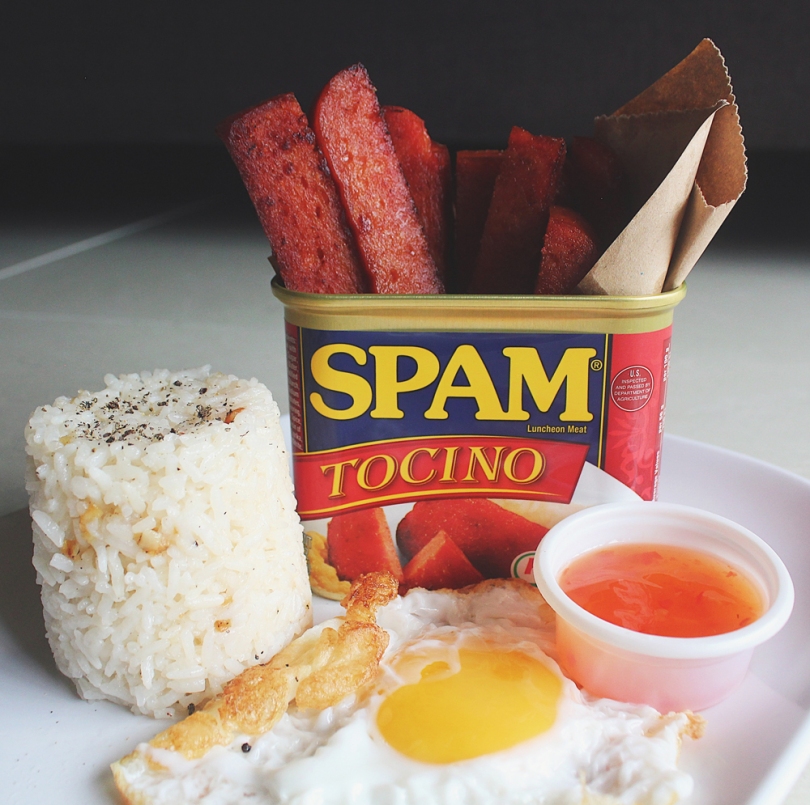
But what happens when you can’t decide on whether you want Tocino or Spam to complete your –silog meal? Behold, SPAM TOCINO!

Spam Tocino

So I may be late on the discovery of Spam Tocino bandwagon (early last month), but needless to say that there are a few (thousands probably) products that don’t get imported into Brunei, especially if they’re non-halal. So yes, while we did have Spam in Brunei (only at certain supermarkets), we only got their regular flavours such as the original Spam, and lite Spam really. So seeing Spam Tocino on the shelves at our local supermarket while I had already set out to just get Bacon flavoured Spam, got me super excited to try it out!

PREP TIME 10 MINS | COOKING TIME 20 MINS | SERVES 4

INGREDIENTS

  • 1 can (340g) Tocino flavoured Spam, sliced and then cut into thick matchsticks

To serve with

  • Garlicky fried rice
  • Fried sunny-side up egg
  • Sweet chilli sauce

METHOD

  1. Place the Spam in a frying pan, adding enough water to cover the slices.
  2. On medium heat, cook the Spam until the water has reduced to form a syrup which can be used as a glaze.
  3. Once the slices start to caramelise, lightly dress with olive oil and continue to cook, turning the heat up to high until seared and caramelised on both sides.
  4. Serve hot with garlicky fried rice and fried egg – browned and crispy on the edges with a golden liquidy yolk is how I like my fried eggs.

Tocino Spamsilog Fries

*Note: You can’t just plop these Spam slices and fry them in oil like how you would fry regular flavoured Spam. Because of the caramalisation that happens when cooking Spam Tocino, frying them directly in oil will result with a burnt outer layer, and undercooked Spam on the inside – this was totally the mistake I made because I did not read the back of the can where it says how to cook this special kind of Spam.

While doing my research, I came across a little interesting fact – whether the fact is true or false, I do not know, but it’s nonetheless intriguing. Basically, or more so apparently, Spam heard the Filipinos love Spam so much that they were inspired to create a variant of their product that will cater to the Filipino palate. From there, Tocino flavoured Spam was born. I also read on someone’s blog that these were limited edition – the post was made in 2014 and 4 years later it’s still selling on the shelves of my local supermarket. This can only mean one thing – it was probably a huge hit here in the Philippines and has thus continued to produce Spam Tocino as part of their collection of flavours!

Seeing the words syrup and glaze in this recipe gives you a clue that this is a sweeter version of Spam – which may not sit well with some people. Hardcore Spam-lovers may not be too enticed just because they prefer the salty, savoury version of it, which is what Spam is known for originally! The feeling is mutual for me, though Spam Tocino did excite and tickle my taste buds, I can’t overcome my love for the original flavour profile.

Tocino Spamsilog Fries

BON APPÉTIT

– Ally xx

myTaste.com