Lemon Sunshine Cake

Lemon Sunshine Cake

Hello Everyone! Yes I am fully aware that it’s Thursday today, which means I’m a day late from my normal upload schedule of every Wednesday night (Philippine time). There’s a reason for this, because:

AMCARMEN’S KITCHEN TURNS SIX TODAY!

For my new followers and friends who don’t know the story behind my blog, before I got it up and running, I already had an interest in cooking. I was already sharing photos of my kitchen adventures on Facebook throughout my first year in university up until my third year. Throughout these years, I kept getting comments and messages from family and friends, encouraging me to start up a blog and share my recipes online.

Finally, after many years of encouragement and pure procrastination, I started what was formerly known as Kitchen Headquarters back in April 16 of 2014. It happened when I was 2 months into my last year of university and in the middle of my mid-semester Easter break; not wanting to tackle the many assignments I had on my to-do list before resuming classes.

Lemon Sunshine Cake

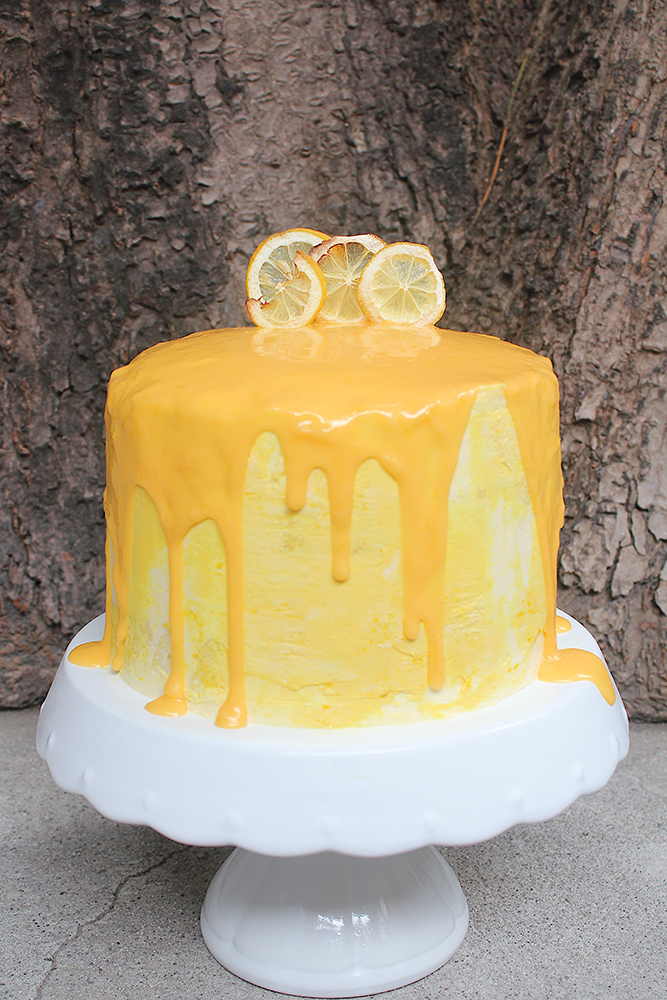
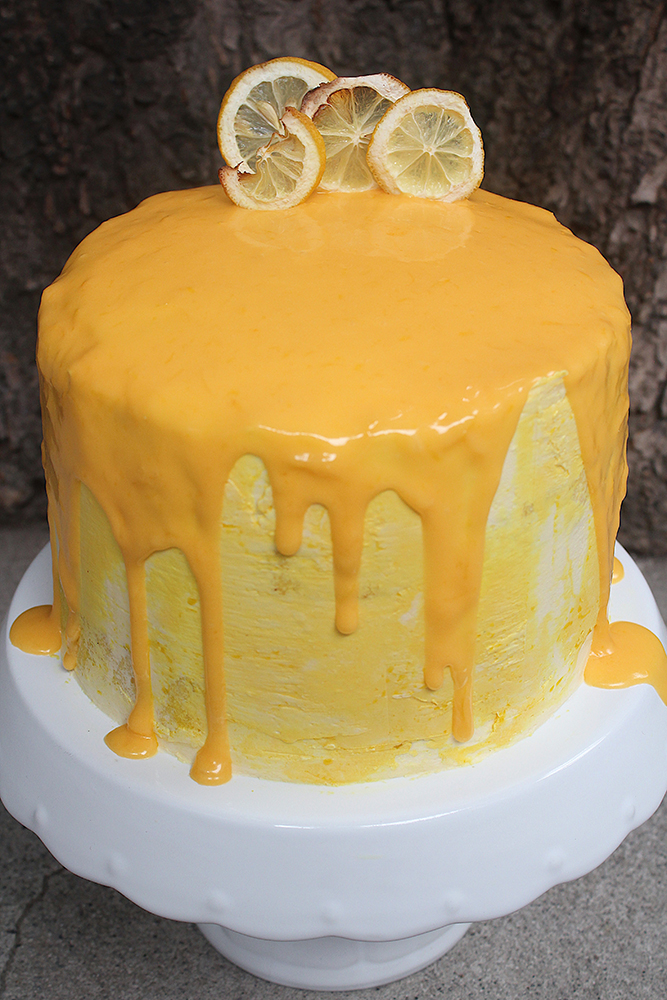
To celebrate today’s occasion, I’ve baked a Lemon Sunshine Cake. It strikes the perfect balance between tart and sweet with homemade lemon curd, a moist lemon cake, and a rich, creamy vanilla buttercream frosting. It’s delicious and sure to brighten your day!

Before we dive into tonight’s recipe, please take the time to check out the original recipe that I drew my inspiration from over at The Simple Sweet Life by Claire.

Lemon Sunshine Cake Ingredients

PREP TIME 2 HOURS & 30 MINS | COOKING TIME 35 MINS | SERVES 10-12

INGREDIENTS

For the lemon curd

  • 60g unsalted butter, cubed
  • 4 free-range egg yolks
  • 1/2 cup white granulated sugar
  • 1/4 cup fresh lemon juice (about 1 large lemon)
  • 1 tbsp lemon zest

For the lemon cake

  • 200g unsalted butter, melted
  • 6 large free-range eggs
  • 3 cups cake flour
  • 1 & 1/2 cup white granulated sugar
  • 1 cup soy milk
  • 6 tbsp fresh lemon juice
  • 2 tbsp lemon zest
  • 4 tsp baking powder

For the vanilla buttercream frosting

  • 500g unsalted butter (cold), cubed
  • 10 free-range egg whites*
  • 2 cups white granulated sugar
  • 10 tbsp water
  • 1 tsp vanilla extract
  • Yellow food colouring (optional)

* Don’t throw away the egg yolks! You can keep them in the fridge for up to two days while you decide what you can make with them. I made an easy Leche Flan (Crème Caramel) recipe. If you’re feeling a little bit creative and inspired, try turning them into Crispy Fried Leche Flan instead!

METHOD

  1. Lemon Curd: Whisk together the sugar, lemon juice and zest, and egg yolks in a heat-proof bowl over a pot of boiling water.
  2. Cook the mixture, stirring occasionally, until it thickens. It should almost have the consistency of a pudding. Once the lemon curd has thickened, carefully remove the bowl from the pot of boiling water and allow to cool for about 10 minutes.
  3. Slowly incorporate the cubed butter into the slightly cooled curd mixture. Cover and then allow for the curd to cool completely in the refrigerator before use.
  4. Lemon Cake: Preheat oven to 180C (350F or gas mark 4).
  5. Add the eggs and sugar in a large mixing bowl. Using a handheld electric mixer on high speed, whip them together until light and fluffy.
  6. Add the dry ingredients (flour and baking powder) and mix on low speed until just combined. Repeat with the remaining ingredients.
  7. Evenly distribute the batter into four 8” parchment paper-lined and greased cake pans. Bake for 22 to 25 minutes or until a toothpick inserted in the centre of the cakes come out clean. Remove from the oven and set aside to cool for about 5 to 10 minutes before turning them out onto a wire rack to cool down completely.
  8. Vanilla Buttercream Frosting: In a small saucepan, combine the water and sugar and bring to a boil over high heat, cooking until the sugar becomes clear.
  9. While the syrup cooks, whip the egg whites in a large mixing bowl until stiff peaks form.
  10. With the mixed running on high, slowly pour the sugar syrup into the egg whites and whip until the mixture has cooled down to room temperature.
  11. Turn the mixer speed down to low and slowly incorporate the butter and vanilla extract. Continue beating until the frosting is thick and smooth.
  12. Assembly: If necessary, level your cakes before layering for assembly. Place one cake layer on a cake board and spread a layer of frosting on top.
  13. Using an offset spatula, carve out an indent in the frosting and fill with the lemon curd. Repeat with the second and third layer and then top with the fourth. Coat the outside with a thin crumb coat and allow for the cake to set in the refrigerator for about 15 to 20 minutes to set.
  14. Optional: Equally divide the remaining frosting into three batches. Tint each batch a different shade of yellow.
  15. Cover the cake with the frosting and use an offset spatula or bench scraper to smoothen the frosting and remove any excess. Feel free to get creative in how you’re going to use the colours to decorate and present your cake.I topped the cake with the remaining lemon curd and added a few slices of baked/dehydrated lemon slices for that finishing touch.
  16. Place in the refrigerator to chill before serving. Enjoy!

Lemon Sunshine Cake

Here are some helpful tips to note when making this Lemon Sunshine Cake:

  1. Make the lemon curd in advance: You can make the lemon curd a week and store it in the refrigerator if you’re looking to save some time when you come around to making this cake.
  2. Crumb coating: Spreading a thin layer of frosting around the sides and top of the cake, and then refrigerating it will lock in any crumbs and keep them from reaching the surface of your frosted cake.
  3. The trick for smooth frosting: You’ll need a rotating cake stand and a bench scraper. Place the small end of the bench scraper on the cake stand, long end against the frosting and turn the table. Once excess frosting is removed, heat the scraper in hot water, wipe and drag around the outside of the cake.
  4. Chill your cake: Cool cake is easier to cut and handle, so chilling your cake for a short while before use will make this process easier.

Lemon Sunshine Cake

Before I end tonight’s post, I want to thank everyone for all the love and support. Of course all the hard work that goes into Amcarmen’s Kitchen wouldn’t have been possible without my #1 supporter, my Mom. I asked my Mom to teach me how to cook after trying to survive off regular takeaway meals from the nearest shop or my attempts at home-cooked food of very poor quality during my first year away from home.

I have my Mom to thank for the days she had to put up with my very little knowledge in the kitchen, and my inability to choose the best produce when she would bring me along to her trips to the market. Thank you Mama for passing down your knowledge and love for food on to me. I know you’re proudly watching over me.

Lastly, I want to thank a very special someone in my life. Since the day we first started talking to each other, you’ve always been very proud and supportive by sharing my recipes each week. And for that, thank you for encouraging and motivating me to continue doing what I love to do!

Lemon Sunshine Cake

BON APPÉTIT

– Ally xx

myTaste.com

Advertisement
Pear & Walnut Cake with Spiced Red Wine Pears

Pear & Walnut Cake with Spiced Red Wine Pears

Hello Everyone! I’ve got a special post for you this evening as today marks 4 years of Amcarmen’s Kitchen! Don’t worry, I’ll still post a Breakfast Smoothie Bowl up for you guys most probably towards the end of the week since I already had the post and pictures prepared for it.

Anyway, technically I started this blog on April 16th, but it wasn’t until 2 days after on the 18th that I posted my very first recipe! You can check it out here: Cheesy Mushroom Omelette with Avocado Mint Greek Yoghurt & Wilted Spinach. Yes, you could say I was less talkative (wordy) for my first few posts, mainly because I had no clue on what else I could write about. When I started this blog out of pure procrastination way back in 2014 during my uni mid-semester break, I didn’t think I would be able to make it this far to be honest! I did slack behind a bit (a lot) towards the end of last year as it wasn’t easy juggling both a very demanding job, this blog, time for family and friends, and wanting some free time to myself as well. I have been doing a better job at keeping up so far, but it’s too early to tell to be honest, since I only just started getting back into this last month.

Pear & Walnut Cake with Spiced Red Wine Pears

I want to say that I promise that I will try to do better this year, but even I know that that’s a promise that I won’t be able to keep, so bear with me my dear followers! I know it is not in any way an obligation for me to share with you guys every single week, but I feel a sense of accomplishment for when I do so, and I don’t ever want this blog to drift away. It’s the only passion that I have going on for me right now because of my busy work schedule, and I don’t want all the hard work I’ve put into this blog for the past now coming 4 years to just become all for nothing.

With that being said, tonight I will be sharing a recipe that I tackled last November actually… For my 26th birthday! I never got around to posting it, and since I literally just got back from Hong Kong last night and had to report straight to work this morning, I’ve had no time to bake a new cake to celebrate Amcarmen’s Kitchen turning 4. So here’s my Pear & Walnut Cake that I drew inspiration from Olivia over on Liv for Cake. The cake itself was moist, not too sweet and had a lovely texture from the soft pear chunks and crunchy toasted walnuts. The honey buttercream was light and fluffy, beautifully contrasted by the deep red pears sitting atop a white-frosted cake.

(Apologies for not having an ingredient shot like how I normally do for almost all my recipe posts, but the photo didn’t turn out so great so I just decided not to post it)

PREP TIME 20 MINS | COOKING TIME 30 MINS | SERVES 8-10

INGREDIENTS

For the pear and walnut cake

  • 2 & 1/4 cups plain flour
  • 1 cup buttermilk, at room temperature
  • 1 cup toasted walnuts, roughly chopped (plus extra to top)
  • 180g unsalted butter, at room temperature
  • 3/4 cup brown sugar
  • 3/4 cup granulated sugar
  • 3 large free range eggs, at room temperature
  • 2 large pears, peeled, cored, and coarsely shredded
  • 2 tsp baking powder
  • 1 & 1/2 tsp vanilla extract
  • 3/4 tsp salt
  • 1/2 tsp ground cinnamon

For the honey Swiss meringue buttercream

  • 4 large free range eggs, whites only
  • 360g unsalted butter, at room temperature
  • 1 cup granulated sugar
  • 1/4 cup honey

Optional: for the spiced red wine poached pears to top

METHOD

  1. Spiced Red Wine Poached Pears: Follow the recipe method provided in the link above.
  2. Pear and Walnut Cake: Preheat oven to 180C (350F or gas mark 4). Grease and flour two 8-inch cake rounds and line with parchment paper.
  3. In a medium-sized bowl, whisk the plain flour, baking powder, ground cinnamon, and salt until well combined. Set aside.
  4. Next, using a stand mixer fitted with a paddle attachment, cream the butter and sugar on medium-high speed until the mixture becomes pale and fluffy (approximately 3 minutes). Reduce the speed and add the eggs in one at a time to allow to fully incorporate after each addition. Add the vanilla extract.
  5. Alternate adding the flour mixture and buttermilk, beginning and ending with flour (3 additions of flour and 2 of milk altogether). Make sure to fully incorporate after each addition. Then, gently fold in the toasted walnuts and shredded pears, and divide the mixture evenly between the two pans.
  6. Bake for 50 to 55 minutes or until a toothpick inserted into the centre of both cakes come out mostly clean. Place the cakes on wire rack to cool for about 10 minutes and then turn out onto the wire rack to cool further.
  7. Honey Swiss Meringue Buttercream: Place the egg whites and sugar into the bowl of a stand mixer, and whisk until combined.* Place the bowl over a double boiler on the stove and whisk constantly until the mixture is hot and no longer grainy to the touch (approximately 3 minutes), or until it registers 70C/160F on a candy thermometre.
  8. Place the bowl back on your stand mixer and whisk on medium-high speed until the meringue is stiff and has cooled (the bowl is no longer warm to the touch (approximately 5 to 10 minutes).
  9. Switch to a paddle attachment and slowly add in the butter (cubed). Mix until smooth.** Add the honey and whip until smooth. Set aside.
  10. Assembly: Place one layer of cake on a cake stand or serving plate. Top with approximately 1 cup of the buttercream and repeat with the remaining layer. Crumb coat the cake and place in the fridge to chill for about 20 minutes.
  11. Continue to frost the top and sides of the cake in a rustic manner. If desired, add toasted walnuts along the bottom and top, and place the poached pears on top. Secure pears in place with toothpicks and drizzle with the poaching syrup.
  12. Serve and enjoy!

* Ensure that there are NO traces of egg yolks in your whites and that your mixer bowl and whisk is completely grease free or your meringue won’t stiffen.

** The buttercream may look like it’s curdled at some point. Keep mixing until it is completely smooth.

Pear & Walnut Cake with Spiced Red Wine Pears

BON APPÉTIT

– Ally xx

myTaste.com

Salted Caramel Popcorn Layered Cake

Salted Caramel Popcorn Layered Cake

Hello Everyone! Today is a special day, and that special day is my birthday! For those who want to know, I am 24 years young today, and another year wider, I mean, wiser, but not another year taller unfortunately. It’s been 4 years since I last celebrated my birthday in Brunei with my family, and friends I grew up and went to high school with. It’s been that long because for the past 4 years I’ve spent my birthday’s in Australia, with my friends from uni. I didn’t really plan anything special, I just organised a dinner party at Villa Mauri last Friday night with some friends; exchanging conversations, laughter, and of course, no gathering is complete without some dirty talk! We’ve all not changed one bit 🙂 I’d just like to take this opportunity to thank those who came that night, and also thank everyone else who has greeted me so far. I am so blessed to have family and friends from all over sending love my way. I know, that sounded a bit cheesy.

24th Birthday Celebrations
Birthday with my high school friends at Villa Mauri (November 6th, 2015)

24th Birthday Celebrations
Birthday with my work friends at 
Patisserie (November 9th, 2015)

I baked this cake yesterday afternoon for my birthday dinner tonight with my mom and my sister. Seriously, I cannot stress out how much I hate frosting – it take so bloody long for me to get it perfect. Well, not so much perfect, but for me to get it to cover the cake. I don’t know if I’m doing it wrong or I should blame the climate, but the buttercream is runny to begin with, so I put it in the freezer to stiffen up a bit before I frost. Then when I start frosting, it quickly becomes runny again to the point that I have to keep placing the cake in and out of the freezer multiple times before I can get the frosting to somewhat cover the cake. But anyway, after much frustration on the eve of my birthday, I managed to get a decent looking cake up I guess (so over it right now – so over baking cakes altogether).

Actually, I think I know the reason (maybe not really) why my frosting was runny. I had a look at the ingredients photo that I took and saw that I had icing sugar in it. At first, I thought that that might’ve been the reason, but when I looked at the original recipe, there was no sign of icing sugar. So why did my frosting go wrong?! 😦 Not enough butter?

24th Birthday Celebrations
Birthday with my family at home (November 9th 2015)

Anyway, I’ve been wanting to make a cake like this for a while; as in the whole salted caramel with caramel popcorn on top kind of cake. I was blown away when I came across it over on La Pêche Fraîche – so beautiful and well photographed. So don’t forget to check out the original recipe over on her blog; she has adapted the different components to making this cake from various recipes (all links have been acknowledged below). Plus, her’s looks much more beautiful, and somehow taller than my cake *cries*.

Salted Caramel Popcorn Layered Cake Ingredients

PREP TIME 20 MINS | COOKING TIME 50-55 MINS | SERVES 8-10

INGREDIENTS

For the yellow butter cake (adapted from Joy of Baking)

  • 120g unsalted butter
  • 4 large free range egg yolks
  • 2 & 1/4 cups plain flour
  • 1 cup sugar
  • 3/4 cup milk
  • 2 & 1/4 tsp baking powder
  • 1 & 1/2 tsp vanilla
  • 1/4 tsp salt

For the salted caramel (adapted from FoodSwoon)

  • 30g unsalted butter
  • 1/2 cup sugar
  • 1/4 cup + 2 tbsp heavy cream
  • 2 tbsp water
  • 1 tbsp corn syrup
  • 1/4 tsp salt

For the salted caramel Italian meringue buttercream (adapted from FoodSwoon)

  • 350g unsalted butter, cut into small chunks
  • 4 egg whites
  • 1 cup sugar
  • 1/4 cup water
  • 1 tsp corn syrup
  • Pinch of salt
  • Half of a batch of salted caramel, cooled, the rest reserved for drizzling (see recipe below)

For the salted caramel popcorn (adapted from the Kitchn)

  • Popped popcorn from about 1 & 1/2 bags of popcorn
  • 130 grams unsalted butter
  • 3/4 cup brown sugar
  • 1/4 tsp baking soda
  • Big pinch salt, plus a little for sprinkling

METHOD

  1. Yellow Butter Cake:
    • Preheat oven to 180C (350F or gas mark 4). Grease 2 x 8.5-inch pans with a little bit of butter.
    • In a medium-sized bowl, whisk together the plain flour, baking powder, and salt together. Set aside.
    • In a large bowl, beat the butter and sugar together until light and fluffy, about 4 minutes altogether. Scrape the sides of the bowl, then add the egg yolks in and beat for a further 2 minutes. Add in the milk and vanilla, stirring gently to combine.
    • Add in the dry ingredients all at once, and stir gently until the batter comes together. Divide the batter evenly between your prepared pans and bake in the oven for 20-25 minutes or until a tooth pick inserted into the centre of the cake comes out clean.
    • Set the cakes aside to cool down completely before frosting.
  2. Salted Caramel:
    • Heat the sugar, water, corn syrup and salt together over medium-low in a small saucepan . Whisk at the beginning until they dissolve. Once dissolved, leave the mixture to caramelise into an amber colour.
    • Once amber, remove from the heat and quickly whisk in the butter and cream. Be careful of any splattering that may occur. Whisk until completely smooth.
    • Set aside to cool down before using it.
  3. Salted Caramel Italian Meringue Buttercream:
    • Place the water, sugar, corn syrup, and salt in a small saucepan. Heat on low until it reaches to about 115C/240F.
    • Meanwhile, as your sugar+water mixture is slowly heating up, place the egg whites in a large bowl and start to beat using a handheld electric mixer. Beat the eggs until soft peaks start to form. Then, slowly stream the water+sugar syrup into the egg whites with the mixer still going.
    • Beat the meringue until cooled to about body temperature, and then beat in the butter about 2 tablespoons (30g) at a time. Continue whipping the buttercream until it is silky before adding half of the caramel mixture in.
    • Set aside in the fridge until it is time to frost your cake.
  4. Salted Caramel Popcorn:
    • Preheat oven to 130C (250F or gas mark 1/2) and line a baking tray with parchment paper.
    • Place the popcorn in a big bowl and make sure not to include any unpinned kernels.
    • In a small saucepan, heat the butter, brown sugar, and salt until they begin to caramelise. Whisk well to combine, and then add in the baking soda. Quickly pour the caramel over the popcorn and toss well to coat.
    • Scrape the popcorn  out onto the baking tray and lightly sprinkle with a touch of salt. Bake in the oven for 30 minutes or until the caramel is completely dry and crunchy. Once done, set aside.
  5. Assembly:
    • Stack your cake on a cake stand and frost it with the buttercream. Drizzle the remaining caramel on the edges of the cake and then top the cake with a mountain of caramel popcorn!
    • Serve, share, and enjoy!

Salted Caramel Popcorn Layered Cake

BON APPÉTIT

– Ally xx

myTaste.com

Layered Pistachio Cake with Honey Vanilla Buttercream

Layered Pistachio Cake with Honey Vanilla Buttercream

Hello Everyone! Today I have a special post for you as today is my not so little sister’s 19th birthday! Today is also the first time in 4 years that I have been home to celebrate with her and the rest of the family. If you have been following my blog since September last year, you would know that I started getting into baking cakes. I never really liked baking cakes to be honest, only because I find it very time consuming and my level of patience does have a limit. Since I started baking cakes, my Mom and sisters now prefer a homemade birthday cake instead of an expensive and cliché store-bought cake. So on Sunday, with the help of the birthday girl, we baked her birthday cake together. We baked it on Sunday even though her birthday is today. Why? Well only because tomorrow we’ll be off for a 1-month vacay to the Philippines, and if we had baked it today, leftovers would be sitting in the fridge until April.

Layered Pistachio Cake with Honey Vanilla Buttercream

Today’s cake recipe has been slightly adapted from, and can be found on Joanne Eats Well With Others. As you have already read from the title, it is a 3-layer pistachio cake with honey vanilla buttercream. I decided to add the strawberries and crushed pistachios on top to bring some life and colour to the presentation of the cake. I substituted some ingredients, such as instead of using cream of tartare, I used lemon juice instead. I barely use cream of tartare in my baking and buying a jar of it didn’t seem very economical as I know it’ll just sit in the pantry waiting for its expiry date. Also, instead of cake flour, also because I barely use it, I used plain flour combined with cornstarch instead. The easiest way to do this substitution is to put 2 tablespoons of cornstarch in the bottom of a 1-cup measuring cup, then fill the cup as usual with plain flour and level the top. In addition, I lessened the amount of sugar and butter in this recipe and it still turned out fine for me! I am not a huge fan of overly sweet desserts, and also I had to take into consideration my Mom who is a diabetic.

Layered Pistachio Cake with Honey Vanilla Buttercream

Before I move on to the recipe, I HIGHLY recommend that you buy shelled pistachios. We went to four different grocery stores and could not find any and so we decided to buy the shelled ones. It took forever to shell just over a cup of pistachios – thank goodness I had my Mom and my sisters to do the tedious job while I worked on the batter. Also, have a food processor handy, but if you’re like me and don’t own one, then all you need is a motor and pestle to bash it all up as well as grinding it. It takes time but it gets the job done. I think that’s why towards the end of this cake I was starting to lose a little bit of my patience because everything took longer to do! But hurray for a gas oven! I cannot stress how much I hated using the oven at the Doncaster Lodge. Everything took at least double or triple the normal time to cook!

Layered Pistachio Cake with Honey Vanilla Buttercream Ingredients

PREP TIME 30 MINS | COOKING TIME 1 HOUR | SERVES 8-10

INGREDIENTS

For the cake
  • 3 & 1/4 cups plain flour
  • 1 & 1/2 cups ice water
  • 1 cup caster sugar
  • 1 cup shelled pistachios, plus extra for decorating
  • 250g unsalted butter, softened
  • 3 large free range egg whites, at room temperature
  • 1 large free range egg
  • 5 tbsp cornflour
  • 1 tbsp baking powder
  • 1 tbsp vanilla extract
  • 1 tsp baking soda
  • 3/4 tsp salt
  • 1/4 tsp lemon juice
For the buttercream
  • 300g unsalted butter, soft, cut into small pieces
  • 1 & 1/2 cups milk
  • 1 cup caster sugar
  • 1/3 cup plain flour
  • 1/3 cup thickened cream
  • 3 tbsp honey
  • 1 tsp vanilla extract

METHOD

  1. Preheat the oven to 160C or gas mark 3. Grease three 8.5-inch cake pans with a little butter.
  2. For the Cake Batter: Using a food processor, pulse the pistachios until coarsely chopped. Remove half of the pistachios and transfer to a small bowl. Pulse the remaining pistachios until they are an almost powder-like consistency.
  3. Transfer to a large bowl and whisk together both the roughly chopped and fine pistachios with the plain flour, cornstarch, baking powder, baking soda, and salt. Set aside
  4. Cream the butter using an electrical mixer on high speed for about 3 minutes. Add in the sugar and vanilla and beat until fluffy for about another 3 minutes. Scrape down the sides of the bowl, and then add in the egg, mixing until just combined.
  5. Turn the mixer to low and add the flour+pistachio mix to the butter mixture in three additions, alternating with the ice water, mixing each time until just combined. Scrape down the bowl and mix on low speed for a few more seconds.
  6. In a medium, clean bowl whisk together the egg whites with the lemon juice until soft peaks form, about 3-5 minutes. Fold the egg whites into the batter.
  7. Divide the batter evenly among the cake pans and smooth the tops. Bake for 40-45 minutes, rotating the pans halfway through baking, until a toothpick inserted in the centre comes out clean.
  8. Transfer to a cooling rack and let them completely cool.
  9. For the Buttercream: Meanwhile, as the cakes are cooling down, whisk together the flour and sugar in a medium-sized saucepan. Then, add in the milk and cream, and cook over medium heat, whisking frequently, until the mixture comes to a boil and then thickens, about 10 to 15 minutes.
  10. Transfer the hot milk mixture to a large bowl and mix on high speed until cool, about 9 minutes. Reduce the speed to low and add the butter, a few pieces at a time, until it is full incorporated. Increase the speed to medium-high and beat until light and fluffy for a further few minutes. Then add in the vanilla and honey, and continue mixing until combined. If the frosting is too soft, chill it in the freezer for a while and then mix again.
  11. Assembly: Place one cake layer top side up on a serving platter. Use a long serrated knife to cut the top so that it is flat and even. Spread a little over a cup of frosting on top. Add the next later and, again, trim so that it is flat. Top with another cup of frosting. Add the remaining cake layer and trim the top again. Spread cake with a very thin layer of frosting for the crumb coating. Put in the freezer for 5 to 10 minutes. Spread the sides and top of the cake with the remaining frosting and decorate as desired.

Layered Pistachio Cake with Honey Vanilla Buttercream

Happy Birthday Alyssa!

BON APPÉTIT

– Ally xx

myTaste.com