Ube Biscoff Cheesecake

Ube Biscoff Cheesecake

Hello Everyone and a Happy belated Birthday to me! I was supposed to get this recipe up on the day of my birthday, but only having baked this Ube Biscoff Cheesecake the night before, I didn’t have time to edit the photos and videos for uploading and for my Instagram posts. Nevertheless, to make up for that, I have a special announcement to make, which you can read at the end of this post!

If you had asked me where or how I would be spending my birthday this year at the start of our country-wide Enhanced Community Quarantine due to the on-going pandemic, I would’ve never guessed that 8 months later, we’d still be celebrating birthdays in quarantine. Nevertheless, I’m still super thankful that even with the virus still spreading, my family, friends, and myself included, are all safe and healthy.

Ube Biscoff Cheesecake

So to be perfectly honest, this wasn’t the cake I had intended to make for my birthday. I only made the last minute decision (as in the morning before my actual birthday) to make an Ube Biscoff Cheesecake, inspired by an Instagram post I saw about a week or two ago. Well okay, the plan was to still push through with the cake I originally had in mind, and then bake mini Ube Biscoff Cheesecakes to share with my workmates, but baking two cakes in one day sounded daunting. I could already foresee the countless mishaps that are bound to happen juggling two recipes at the same time.

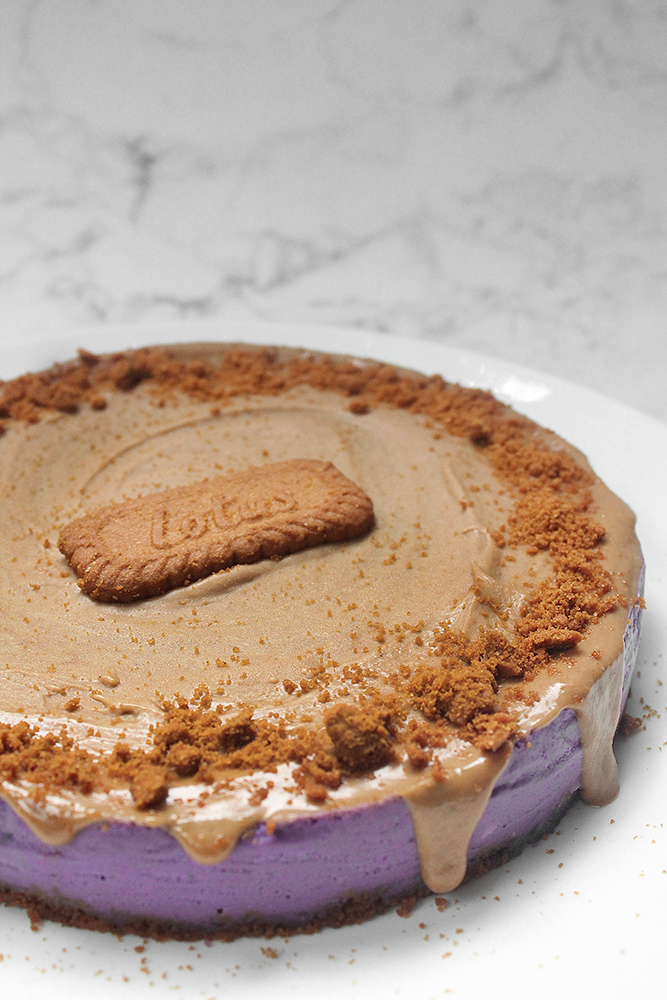
This Ube Biscoff Cheesecake is the perfect recipe for all the ube, biscoff, and cheesecake lovers. If you’ve never tried biscoff before, you should definitely try this dessert! This is utterly delicious and different to my other cheesecakes I’ve made in the past – the biscoff spread on top gives a nice rich addition to the cheesecake and creates a delicious spiced cookie flavour. The biscoff crust is buttery and sweet, and the cheesecake filling is thick and rich with ube that just melts-in-your-mouth with every bite. Honestly, it’s everything a cheesecake should be, and you may opt to do a no-bake or baked cheesecake with this recipe.

Ube Biscoff Cheesecake Ingredients

PREP TIME 15 MINS | COOKING TIME 1 HOUR | SERVES 6-8
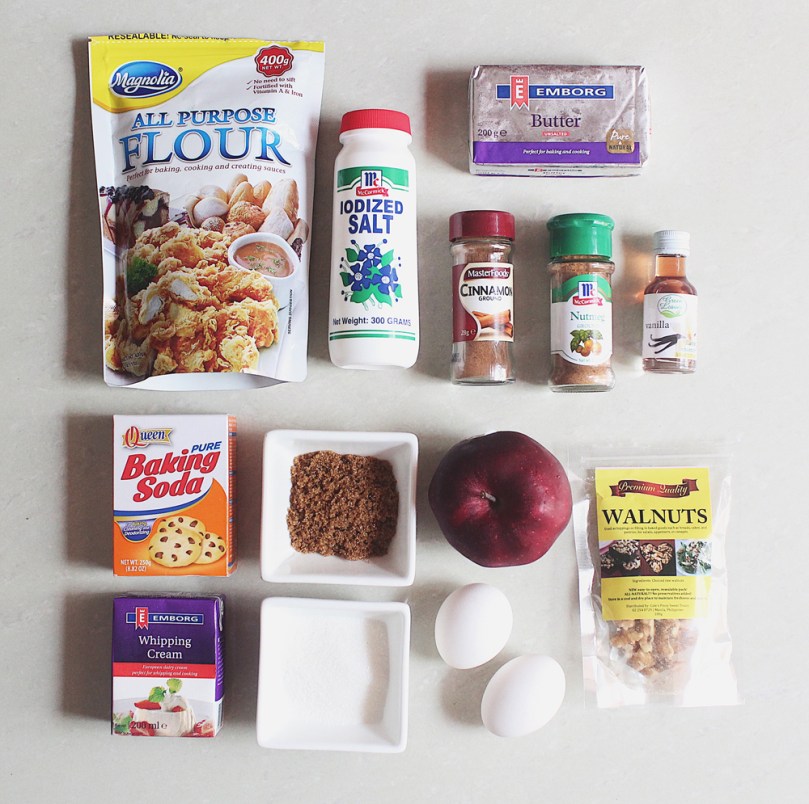
INGREDIENTS

For the ube cheesecake mixture

  • 450g cream cheese
  • 250ml all purpose cream
  • 2 large free-range egg
  • 1 cup ube halaya (or ube jam)
  • 1/4 cup white or brown sugar
  • 1 tsp ube extract

For the biscoff crumb base

  • 200g Lotus biscoff cookies, crushed
  • 75g unsalted margarine, melted
  • Pinch of salt

For the biscoff spread

  • 50g Lotus biscoff cookies, crushed
  • 1/4 cup water
  • 1/8 cup coconut oil
  • 2 tbsp unsalted margarine, melted
  • Dash of vanilla extract
  • Pinch of ground cinnamon

METHOD

  1. Preheat oven to 130C (250F or gas mark 1).
  2. Biscoff Crumb Base: Add the crushed biscoff cookies, salt, and melted butter together in a small mixing bowl. Mix together until well combined.
  3. Grease an 8” spring-form pan with a bit of margarine and line the bottom and sides it with parchment paper. Cover the outside of the pan with tin foil. Press the crumb into the base of the cake pan and set aside in the fridge for about 15 minutes to set.
  4. Ube Cheesecake Mixture: Using an electric handheld mixer, beat, on medium speed, the cream cheese and sugar together in a medium-sized bowl until smooth.
  5. With the mixer running, add in the eggs, all purpose cream cream, ube halaya, and ube extract, mixing for a further 2 minutes.
  6. Pour the mixture into the prepared spring-form cake pan, evenly covering the biscuit base.
  7. Place the cake pan in a water bath and bake for 1 hour, or until just set.
  8. Allow to cool down to room temperature and then chill in the fridge for about half an hour before serving.
  9. Biscoff Spread: While the cake is chilling in the fridge, add the crushed biscoff cookies, ground cinnamon, vanilla extract, coconut oil, and butter into an immersion blender cup. Blend until the ingredients are well incorporated.
  10. Add the water and blend further until you have a nice, smooth, and creamy spread. Set aside until ready to use.
  11. Assemble: Carefully remove the cheesecake from the spring-form pan. Top the cheesecake with the biscoff spread and a biscoff cookie. Serve a slice or two… maybe three, immediately! *cheeky grin* Enjoy!

Ube Biscoff Cheesecake

Ube Biscoff Cheesecake

And now, here’s the announcement that I promised to share with you guys. One of my Auguesters, known as Karina Pineda a.k.a. @wanderlittlegirl, partnered up for my birthday to launch our very first Instagram Giveaway! The giveaway was launched on Monday and will run through until November 20. Further details of the giveaway are specified on my Instagram post which you can find here on @amcarmenskitchen. The giveaway is only open to residents in Metro Manila, but if you have family or friends living in the area, feel free to share the giveaway with them. My goal is to help my lovely friend promote her smol home-grown business (@madebywanderlittlegirl) and also in return, treat two (2) lucky winners with some home-baked goodies!

#AMCxMADE Cookie Giveaway

#AMCxMADE Cookie Giveaway

BON APPÉTIT

– Ally xx

myTaste.com

Auguest 2020: Simon Swadling

Salted Coconut & Rum Pineapple Upside-down Cake

“I love making food that makes people smile, or brings them joy, whether it’s a fancy beautiful patisserie creation, or a simple but delicious cake.” — Simon Swadling

Auguest 2020: Simon Swadling

This easy Salted Coconut & Rum Pineapple Upside-down Cake is loaded down with the flavours of the Caribbean islands and the tropics. Sweet caramelised pineapple slices lay perfectly on top of this light and fluffy coconut-infused yellow cake for a summer treat like no other. It is a play on a piña colada, which is a sweet cocktail made with rum, cream of coconut or coconut milk, and pineapple juice, usually served either blended or shaken with ice.

Salted Coconut & Rum Pineapple Upside-down Cake Ingredients

PREP TIME 20 MINS | COOKING TIME 1 HOUR 20 MINS | SERVES 8-10

INGREDIENTS

For the caramelised pineapple

  • 1/2 a pineapple
  • 20g butter
  • 3/4 cup sugar
  • 1/4 cup cream

For the cake batter

  • 150g butter
  • 100g almond meal
  • 100g all-purpose flour
  • 50g desiccated coconut
  • 3 large free-range eggs
  • 3/4 cup sugar
  • 1 tbsp golden syrup
  • 1 tbsp rum
  • 1 tbsp sour cream
  • 1 & 1/2 tsp baking powder
  • 1 tsp salt
  • 1 tsp vanilla extract

METHOD

  1. Preheat the oven to 160C (325F or gas mark 3). Grease and line an 8” (20.5 cm) round cake tin with parchment paper.
  2. Caramelised Pineapple: Peel and core the pineapple. Cut into 1cm thick slices and then thirds.
  3. In a heavy-based frying pan (do not use a non-stick pan!), add the sugar and cook on medium heat until it melts and begins to caramelise. Stir to avoid burning ‘hot spots’.
  4. When the caramel is golden brown, mix in the butter and then cream, being careful not to burn the caramel.
  5. Add in the pineapple sliced and cook until soft and semi transparent, about 10 to 15 minutes.
  6. Cake Batter: Add all the dry ingredients into a food processor and blitz to combine. Next, add in the butter and pulse until it is blended into the flour mixture.
  7. In a separate bowl, combine all the wet ingredients together and whisk. Slowly pour into the processor and pulse until combined and smooth.
  8. Layer the petals of pineapple at the bottom of your cake tin in an aesthetic pattern, adding a little bit of the caramel. Top with the cake batter.
  9. Bake for 55 minutes, or until done. You can tell when it’s done by piercing the middle of the cake with a skewer and it comes out clean. If not, bake further.
  10. Remove the cake from the oven and cool on a wire rack for about 20 minutes.
  11. Serve: Invert the slightly cooled cake onto a cake stand or serving plate. Some of the juices from the topping will seep over the sides – that’s okay.
  12. You can slice and serve the cake warm, or cool the cake down completely at room temperature before slicing and serving. Enjoy!

Salted Coconut & Rum Pineapple Upside-down Cake

Salted Coconut & Rum Pineapple Upside-down Cake

Photo Courtesy & Recipe Copyright © 2020 | Simon Swadling (@thebeardedpatissier)

BON APPÉTIT

– Simon Swadling

myTaste.com

Seri Muka Kuih

Seri Muka Kuih

Hello Everyone! Our last recipe for the month of June is an amazing Malaysian and Nyonya kuih made of glutinous rice, coconut milk, sugar, and pandan leaves. Kuihs (or kuehs) are common snacks of the Hokkien, Teochew and Peranakan cuisine.The terminology is actually a general description for bite-size pastries/nibbles. These traditional delights come in many different forms and are either sweet or savoury snacks/desserts.

Seri Muka literally translates to beautiful face in Malay. It is a two-layered cake that consists of a glutinous rice layer steamed with coconut milk and topped off with a sweet and silky smooth pandan custard layer (hence the green colour). It’s heady with the flavour of coconut milk, a key ingredient used to impart a creamy taste when cooking the glutinous rice and making the custard layer.

Seri Muka Kuih

My fondest memory of Seri Muka would have to be during the festive season of the Islamic New Year. These pretty faces, alongside other kuihs of course, were served at almost every Malay household I would visit during that time of the year. The soft, sticky rice underneath with just a hint of saltiness pairs so deliciously with the decadently sweet pandan custard on top.

Before we dive into tonight’s recipe, please take the time to check out the original where I drew my inspiration from over on Rasa Malaysia by Bee. Seri Muka can also be found in the Indonesian province of South Kalimantan, and is also known as Kuih Putri Salat in Singapore.

Seri Muka Kuih Ingredients

PREP TIME 35 MINS | COOKING TIME 50 MINS | MAKES 14-16 SLICES

INGREDIENTS

For the bottom layer

  • 1 & 1/3 cups glutinous rice, soaked in water for 30 minutes
  • 1 cup thin coconut milk (1/2 cup coconut milk plus 1/2 cup water)
  • 2 pandan leaves
  • 1 tsp salt

For the top layer

  • 1 cup thick coconut milk (or coconut cream)
  • 1/2 cup pandan juice*
  • 1/2 cup white granulated sugar
  • 2 large free-range eggs
  • 2 large free range egg yolks
  • 5 tbsp all purpose flour
  • 2 tbsp cornstarch

*For the pandan juice

  • 8-10 pandan leaves
  • 1/2 cup water

METHOD

  1. Bottom Layer: In a large mixing bowl, combine all the ingredients needed, except for the pandan leaves, to make the bottom layer. Evenly spread onto a lightly greased 8in x 11in rectangular baking dish and add the in pandan leaves, making sure that they are submerged in the rice mixture. Steam over high heat for 20 minutes. Meanwhile, prepare the pandan juice for the top layer.
  2. Pandan Juice: Place the pandan leaves together with the water in a food processor or heavy-duty blender, and blitz/blend for a few minutes until the pandan leaves have been finely puréed.
  3. Pour the blended pandan-infused water over a fine sieve and into a small bowl. Strain the liquid from the pandan leaf pulp, pressing down firmly with the back of a spoon to extract all of the juice from the pulp. Discard the pandan leaf pulp.
  4. Top Layer: Mix all the remaining ingredients for the top layer in a medium-sized heatproof bowl until well combined.
  5. Create a bain-marie (double-boiler) by pouring some water into a pot that is slightly larger than your heat-proof bowl. Very important, check to see if your bowl can sit on top of the pot without any water touching the bottom of the bowl.
  6. Heat your pot of water over low-medium and bring to a slight simmer. Once slightly simmering, place the bowl with the pandan, coconut milk, and egg mixture over it. Cook until the mixture thickens slight, but is still runny enough to pour, about 8-10 minutes.
  7. Seri Muka Kuih: Once the rice layer is done, discard the pandan leaves. Stir and flatten the rice with the back of a spoon, making sure that it is compact. Using a fine sieve, strain the pandan, coconut milk, and egg mixture over the cooked rice. Return to the steamer and steam over medium heat for 30 minutes.
  8. Remove from the steamer once done and leave aside to completely cool down before cutting them into diamond or rectangular-shaped bite-size pieces. Serve with a hot cup of coffee or tea for a lovely mid-afternoon snack. Enjoy!

Seri Muka Kuih

Seri Muka Kuih

BON APPÉTIT

– Ally xx

myTaste.com

Mexican Sweet Corn Cake

Mexican Sweet Corn Cake

Hello Everyone! Tonight’s recipe is one that I came across while I was doing some research for my blog. I instantly fell in love with these words, “…soft, moist, tender, savoury, sweet corn…” I knew that this was a recipe that I wanted to tackle, and it did not disappoint! It was tender. It was moist. It was… dangerous. Dangerous in a way that you can literally take the whole pan with you and hide; devouring it all by yourself. It’s that good.

This Mexican Sweet Corn Cake is deliciously moist, buttery, and crumbles as you dig into it (but in no way means that it’s dry). This corn cake utilises corn in 3 ways: masa harina (or corn flour), regular corn meal, and is flecked with sweet corn niblets/whole corn kernels. That’s three times the corn flavour! In addition, you can roast the corn kernels first for extra flavour and flair!

Mexican Sweet Corn Cake

The cake is baked in a water-bath, sort of like a cheesecake so that it won’t crisp or turn golden; so it’s kind of like a cake-y cornbread. You could have this savoury cake on the side with pretty much any dish, or even on it’s own as a perfect mid-afternoon snack.

It’s a perfect recipe to whip up under quarantine as all ingredients may already be readily available in your pantry. If not, it’s easy to grab them on your next grocery run! If you can’t find masa harina at your local supermarket, then you can swap it out with either all purpose flour or cake flour – which is exactly what I did for this recipe! It wasn’t because I could not source for corn flour; it was simply because I didn’t want to have an opened pack of it sitting in the pantry for centuries (which is what happened, and is still happening, to my pack of cornmeal). The corn flavour still pops through nonetheless, but probably not as powerful as if you would have used masa harina instead.

Anyway, before we dive into tonight’s recipe, please take the time to check out the original where I drew my inspiration from over on Simply Scratch by Laurie.

Mexican Sweet Corn Cake Ingredients

PREP TIME 15 MINS | COOKING TIME 50 MINS | SERVES 6

INGREDIENTS

  • 225g unsalted butter/margarine, softened
  • 1 cup sweet corn (fresh, frozen, or canned), roughly chopped
  • 2/3 cup all purpose flour*
  • 1/2 cup yellow cornmeal
  • 1/2 cup water
  • 1/3 cup white granulated sugar
  • 4 tbsp soy milk
  • 1 & 1/2 tsp baking powder
  • 1/2 tsp salt

* If you have masa harina (cornflour) on hand, then use this instead!
** If you are using canned corn, drain before adding to the batter. If you are using frozen corn, make sure you thaw them first.

METHOD

  1. Preheat oven to 180C (350F or gas mark 4).
  2. In a large mixing bowl using an electric hand mixer, beat the butter until fluffy and light in colour. Add in the all purpose flour (or masa harina), together with the water and continue to mix until just combined.
  3. Add in the corn kernels, cornmeal, sugar, salt, and baking powder, followed by the soy milk. Mix until well combined. Using a spatula, scrape down the sides of the mixing bowl if needed to incorporate any missed dry ingredients.
  4. Pour the batter into a greased 8in x 11in glass baking dish. Spread the batter so that it is evenly distributed and smooth. Cover tightly with foil and place the dish into another baking dish (about 9in x 13in in size) and fill it with water about a third of the way.
  5. Carefully place the dish into the preheated oven and bake for 50 minutes. Once done, remove from the oven and leave it aside to cool down for about 10 minutes.
  6. Slice the cake into 6 equal squares/rectangles. Alternatively, you may use a spoon or an ice cream scoop to dish and serve. Enjoy!

Mexican Sweet Corn Cake

Mexican Sweet Corn Cake

Before I end tonight’s post, I just wanted to give you guys a quick update on how our country has responded to the current global pandemic. We’re currently into Day 58 of Enhanced Community Quarantine here in the Philippines, or as some may jokingly say, Season 3 of ECQ. Our original enhanced quarantine period was only supposed to last a month, from the late afternoon of March 16 until April 15.

Due to the significant increase in positive cases in our country, and the death count being much higher than the recovery count, we were not ready to go out of quarantine. With that ECQ was extended until April 30, and again to May 15. With our numbers still increasing by the hundreds each day, here we are again, under a ‘modified’ enhanced community quarantine until the end of May. On the bright side, at least our recovery rate is much higher than our death counts.

So what have I been up to since we went into quarantine 58 days ago? Well, I’m thankful that I still have a full-time job and that our company was able to carry out a work-from-home set up amidst the pandemic. I don’t go out anymore; only once every two weeks to our local supermarket to stock up on food. We also get our fruits and vegetables delivered to us weekly from a stall just down the road from us; really just to avoid and limit the times we go out of the house.

Other than that, I find myself having more time to do the things I want to do. Even if it means having more time to do nothing at all *cheeky grin* Just kidding! My time in the morning now isn’t being consumed by waking up early to prepare for work, and getting stuck in hour-long traffic going to and coming home from work. In return, I’m less tired during the week, which also means that I don’t find myself having to recover over the weekend. Not having to recover over the weekend also means that I can use my free time more efficiently for recipe research, development, experimentation, and writing for Amcarmen’s Kitchen!

BON APPÉTIT

– Ally xx

myTaste.com

Lemon Sunshine Cake

Lemon Sunshine Cake

Hello Everyone! Yes I am fully aware that it’s Thursday today, which means I’m a day late from my normal upload schedule of every Wednesday night (Philippine time). There’s a reason for this, because:

AMCARMEN’S KITCHEN TURNS SIX TODAY!

For my new followers and friends who don’t know the story behind my blog, before I got it up and running, I already had an interest in cooking. I was already sharing photos of my kitchen adventures on Facebook throughout my first year in university up until my third year. Throughout these years, I kept getting comments and messages from family and friends, encouraging me to start up a blog and share my recipes online.

Finally, after many years of encouragement and pure procrastination, I started what was formerly known as Kitchen Headquarters back in April 16 of 2014. It happened when I was 2 months into my last year of university and in the middle of my mid-semester Easter break; not wanting to tackle the many assignments I had on my to-do list before resuming classes.

Lemon Sunshine Cake

To celebrate today’s occasion, I’ve baked a Lemon Sunshine Cake. It strikes the perfect balance between tart and sweet with homemade lemon curd, a moist lemon cake, and a rich, creamy vanilla buttercream frosting. It’s delicious and sure to brighten your day!

Before we dive into tonight’s recipe, please take the time to check out the original recipe that I drew my inspiration from over at The Simple Sweet Life by Claire.

Lemon Sunshine Cake Ingredients

PREP TIME 2 HOURS & 30 MINS | COOKING TIME 35 MINS | SERVES 10-12

INGREDIENTS

For the lemon curd

  • 60g unsalted butter, cubed
  • 4 free-range egg yolks
  • 1/2 cup white granulated sugar
  • 1/4 cup fresh lemon juice (about 1 large lemon)
  • 1 tbsp lemon zest

For the lemon cake

  • 200g unsalted butter, melted
  • 6 large free-range eggs
  • 3 cups cake flour
  • 1 & 1/2 cup white granulated sugar
  • 1 cup soy milk
  • 6 tbsp fresh lemon juice
  • 2 tbsp lemon zest
  • 4 tsp baking powder

For the vanilla buttercream frosting

  • 500g unsalted butter (cold), cubed
  • 10 free-range egg whites*
  • 2 cups white granulated sugar
  • 10 tbsp water
  • 1 tsp vanilla extract
  • Yellow food colouring (optional)

* Don’t throw away the egg yolks! You can keep them in the fridge for up to two days while you decide what you can make with them. I made an easy Leche Flan (Crème Caramel) recipe. If you’re feeling a little bit creative and inspired, try turning them into Crispy Fried Leche Flan instead!

METHOD

  1. Lemon Curd: Whisk together the sugar, lemon juice and zest, and egg yolks in a heat-proof bowl over a pot of boiling water.
  2. Cook the mixture, stirring occasionally, until it thickens. It should almost have the consistency of a pudding. Once the lemon curd has thickened, carefully remove the bowl from the pot of boiling water and allow to cool for about 10 minutes.
  3. Slowly incorporate the cubed butter into the slightly cooled curd mixture. Cover and then allow for the curd to cool completely in the refrigerator before use.
  4. Lemon Cake: Preheat oven to 180C (350F or gas mark 4).
  5. Add the eggs and sugar in a large mixing bowl. Using a handheld electric mixer on high speed, whip them together until light and fluffy.
  6. Add the dry ingredients (flour and baking powder) and mix on low speed until just combined. Repeat with the remaining ingredients.
  7. Evenly distribute the batter into four 8” parchment paper-lined and greased cake pans. Bake for 22 to 25 minutes or until a toothpick inserted in the centre of the cakes come out clean. Remove from the oven and set aside to cool for about 5 to 10 minutes before turning them out onto a wire rack to cool down completely.
  8. Vanilla Buttercream Frosting: In a small saucepan, combine the water and sugar and bring to a boil over high heat, cooking until the sugar becomes clear.
  9. While the syrup cooks, whip the egg whites in a large mixing bowl until stiff peaks form.
  10. With the mixed running on high, slowly pour the sugar syrup into the egg whites and whip until the mixture has cooled down to room temperature.
  11. Turn the mixer speed down to low and slowly incorporate the butter and vanilla extract. Continue beating until the frosting is thick and smooth.
  12. Assembly: If necessary, level your cakes before layering for assembly. Place one cake layer on a cake board and spread a layer of frosting on top.
  13. Using an offset spatula, carve out an indent in the frosting and fill with the lemon curd. Repeat with the second and third layer and then top with the fourth. Coat the outside with a thin crumb coat and allow for the cake to set in the refrigerator for about 15 to 20 minutes to set.
  14. Optional: Equally divide the remaining frosting into three batches. Tint each batch a different shade of yellow.
  15. Cover the cake with the frosting and use an offset spatula or bench scraper to smoothen the frosting and remove any excess. Feel free to get creative in how you’re going to use the colours to decorate and present your cake.I topped the cake with the remaining lemon curd and added a few slices of baked/dehydrated lemon slices for that finishing touch.
  16. Place in the refrigerator to chill before serving. Enjoy!

Lemon Sunshine Cake

Here are some helpful tips to note when making this Lemon Sunshine Cake:

  1. Make the lemon curd in advance: You can make the lemon curd a week and store it in the refrigerator if you’re looking to save some time when you come around to making this cake.
  2. Crumb coating: Spreading a thin layer of frosting around the sides and top of the cake, and then refrigerating it will lock in any crumbs and keep them from reaching the surface of your frosted cake.
  3. The trick for smooth frosting: You’ll need a rotating cake stand and a bench scraper. Place the small end of the bench scraper on the cake stand, long end against the frosting and turn the table. Once excess frosting is removed, heat the scraper in hot water, wipe and drag around the outside of the cake.
  4. Chill your cake: Cool cake is easier to cut and handle, so chilling your cake for a short while before use will make this process easier.

Lemon Sunshine Cake

Before I end tonight’s post, I want to thank everyone for all the love and support. Of course all the hard work that goes into Amcarmen’s Kitchen wouldn’t have been possible without my #1 supporter, my Mom. I asked my Mom to teach me how to cook after trying to survive off regular takeaway meals from the nearest shop or my attempts at home-cooked food of very poor quality during my first year away from home.

I have my Mom to thank for the days she had to put up with my very little knowledge in the kitchen, and my inability to choose the best produce when she would bring me along to her trips to the market. Thank you Mama for passing down your knowledge and love for food on to me. I know you’re proudly watching over me.

Lastly, I want to thank a very special someone in my life. Since the day we first started talking to each other, you’ve always been very proud and supportive by sharing my recipes each week. And for that, thank you for encouraging and motivating me to continue doing what I love to do!

Lemon Sunshine Cake

BON APPÉTIT

– Ally xx

myTaste.com

Chunky Apple Cake

Chunky Apple Cake

Hello Everyone! So I probably didn’t think this through when I was planning for my recipes for the month of March. As I’ve said many times before, yes we are definitely in the middle of summer right now here in the Philippines, and having a warm Apple Cake just doesn’t seem to fit with the temperatures that we’re currently experiencing this summer.

Not to worry though, when I caught on with the dishes that I’ve been cooking for this month, I went back and had to change some of my recipes for next month. I won’t reveal it to you guys yet so you’ll just have to wait for next Wednesday for it!

Chunky Apple Cake

Nonetheless, you can have this Chunky Apple Cake with some ice cream for a cooling element. I would’ve much preferred a simple vanilla ice cream but I had come cookies and cream flavoured ice cream sitting in the freezer that I could use to go with my cake.

I skipped the butterscotch sauce for this recipe as I still had some leftover apple pie filling sitting in the fridge from when I made my Apple Danish recipe. I used that instead to drizzle over the cakes. In addition, I also used the leftover crumb topping from that recipe to top my cake for another layer of texture.

Before we jump onto the recipe, do check out the original over on Taste of Home. Also, please read some very important comments below after the recipe before the end of tonight’s post!

Chunky Apple Cake Ingredients

PREP TIME 15 MINS | COOKING TIME 40 MINS | SERVES 6-8

INGREDIENTS

For the chunky apple cake

  • 110g unsalted butter, softened
  • 2 cups plain flour
  • 2 cups white granulated sugar
  • 2 large free-range eggs
  • 2 medium-sized (or 1 large) Red Delicious Apples, peeled and chopped
  • 1 & 1/2 tsp ground cinnamon
  • 1 tsp ground nutmeg
  • 1/2 tsp baking soda
  • 1/2 tsp salt
  • 1/2 tsp vanilla extract

For the butterscotch sauce

  • 57g unsalted butter
  • 1/2 cup brown sugar
  • 1/2 cup whipping cream

METHOD

  1. Chunky Apple Cake: Preheat oven to 180C (350F or gas mark 4). Grease a 13in x 9in baking dish with a bit of butter and set aside.
  2. Combine the plain flour, cinnamon, nutmeg, salt and baking soda in a small bowl. Mix well and set aside.
  3. In a large mixing bowl, cream the butter, white sugar, and vanilla extract. Add the eggs one at a time, beating well after each addition.
  4. Gradually add the flour mixture to the creamed mixture and mix well. The batter will be stiff. Stir in the apples until well combined. Spread the mixture onto the prepared baking dish and (optional) top the batter with the crumb topping.
  5. Bake in the oven for 40-45 minutes or until the top is lightly browned and springs back when lightly touched. Once done, cool for 30 minutes before serving.
  6. Butterscotch Sauce: Meanwhile, in a small saucepan, combine the brown sugar and butter. Cook over medium heat until the butter has melted. Gradually add the cream and bring to a slow boil, stirring constantly, about 2-3 minutes. Remove from the heat.
  7. Serving: Once the cake has cooled down, cut them into slices and serve in individual serving plates. Top with the butterscotch sauce and ice cream flavour of your choice. Enjoy!

Chunky Apple Cake

Now, I’ll be honest, the cake turned out to be quite dry, and you can probably tell from the photographs. Here are several reasons on why your cakes turn out dry and crumbly:

  1. Using too much flour. When measuring dry ingredients, gently spoon the flour mixture into a measuring cup for dry ingredients and level off with a flat spatula.
  2. Adding too little shortening/liquid. Measure liquids in a liquid-measuring cup placed on a level surface. Read the liquid measurement at eye level.
  3. Improperly mixed or undermixed. Careful mixing to evenly distribute the ingredients throughout the cake batter will give it a uniform consistency. Be careful not to overmix once the flour is added as this can cause the cake to be tough.
  4. Overbeating or using too many egg whites. Egg whites act as a drying agent. Try using less egg whites if you want to avoid a dry cake.
  5. Too much or too little sugar. Too much sugar can cause a cake to crumble when cut, while too little sugar can make a cake tough. The best cake recipes have a good balance of ingredients.
  6. Pan too big for the amount of batter. Using a pan that is too big for the amount of batter you have can cause it to overbake and become dry. The pan should be filled from half to three-fourths full.
  7. Oven temperature too high. If the temperature is to high, your cake could turn out dry. Overbaking could also be a culprit so check your cake for doneness at the lower end of the baking range.

– from Taste of Home.

I’m most definitely guilty of numbers 3, 5 and 6. I probably undermixed my batter as I creamed the butter and sugar by hand instead of using an electrical mixer (because I still have not bought one)! I also most definitely used too little sugar. I halved the portion of sugar because 2 cups scared me a lot. My Mom’s a diabetic, and because of that we’ve grown up in a household where our intolerance to sugar is quite low due to the fact that we don’t have a lot of sweet things lying around the house. When I read 2 cups of sugar from the original recipe, I felt my non-existent (yet) diabetes rise up. In addition, I definitely used a cake pan too big for the amount of batter I had, and thus lead to overbaking since I did not adjust the time it needed to bake in the oven. Silly rookie mistakes.

Chunky Apple Cake

I did end up with some leftovers, and what my Mom did was steam the cakes the next day for our mid-afternoon snack. The cakes turned out soft and moist, kind of like the texture of a sponge cake.

Anyway, I’ve kept the recipe as is, without adjusting the quantities of sugar just so that I hope for anyone who does try out this recipe, that it won’t be a flop like mine. I’m still posting this recipe anyway for me to learn from it. But to be honest, even one cup of sugar that I used for this recipe was on the verge of being too sweet for me.

BON APPÉTIT

– Ally xx

myTaste.com

Pear & Walnut Cake with Spiced Red Wine Pears

Pear & Walnut Cake with Spiced Red Wine Pears

Hello Everyone! I’ve got a special post for you this evening as today marks 4 years of Amcarmen’s Kitchen! Don’t worry, I’ll still post a Breakfast Smoothie Bowl up for you guys most probably towards the end of the week since I already had the post and pictures prepared for it.

Anyway, technically I started this blog on April 16th, but it wasn’t until 2 days after on the 18th that I posted my very first recipe! You can check it out here: Cheesy Mushroom Omelette with Avocado Mint Greek Yoghurt & Wilted Spinach. Yes, you could say I was less talkative (wordy) for my first few posts, mainly because I had no clue on what else I could write about. When I started this blog out of pure procrastination way back in 2014 during my uni mid-semester break, I didn’t think I would be able to make it this far to be honest! I did slack behind a bit (a lot) towards the end of last year as it wasn’t easy juggling both a very demanding job, this blog, time for family and friends, and wanting some free time to myself as well. I have been doing a better job at keeping up so far, but it’s too early to tell to be honest, since I only just started getting back into this last month.

Pear & Walnut Cake with Spiced Red Wine Pears

I want to say that I promise that I will try to do better this year, but even I know that that’s a promise that I won’t be able to keep, so bear with me my dear followers! I know it is not in any way an obligation for me to share with you guys every single week, but I feel a sense of accomplishment for when I do so, and I don’t ever want this blog to drift away. It’s the only passion that I have going on for me right now because of my busy work schedule, and I don’t want all the hard work I’ve put into this blog for the past now coming 4 years to just become all for nothing.

With that being said, tonight I will be sharing a recipe that I tackled last November actually… For my 26th birthday! I never got around to posting it, and since I literally just got back from Hong Kong last night and had to report straight to work this morning, I’ve had no time to bake a new cake to celebrate Amcarmen’s Kitchen turning 4. So here’s my Pear & Walnut Cake that I drew inspiration from Olivia over on Liv for Cake. The cake itself was moist, not too sweet and had a lovely texture from the soft pear chunks and crunchy toasted walnuts. The honey buttercream was light and fluffy, beautifully contrasted by the deep red pears sitting atop a white-frosted cake.

(Apologies for not having an ingredient shot like how I normally do for almost all my recipe posts, but the photo didn’t turn out so great so I just decided not to post it)

PREP TIME 20 MINS | COOKING TIME 30 MINS | SERVES 8-10

INGREDIENTS

For the pear and walnut cake

  • 2 & 1/4 cups plain flour
  • 1 cup buttermilk, at room temperature
  • 1 cup toasted walnuts, roughly chopped (plus extra to top)
  • 180g unsalted butter, at room temperature
  • 3/4 cup brown sugar
  • 3/4 cup granulated sugar
  • 3 large free range eggs, at room temperature
  • 2 large pears, peeled, cored, and coarsely shredded
  • 2 tsp baking powder
  • 1 & 1/2 tsp vanilla extract
  • 3/4 tsp salt
  • 1/2 tsp ground cinnamon

For the honey Swiss meringue buttercream

  • 4 large free range eggs, whites only
  • 360g unsalted butter, at room temperature
  • 1 cup granulated sugar
  • 1/4 cup honey

Optional: for the spiced red wine poached pears to top

METHOD

  1. Spiced Red Wine Poached Pears: Follow the recipe method provided in the link above.
  2. Pear and Walnut Cake: Preheat oven to 180C (350F or gas mark 4). Grease and flour two 8-inch cake rounds and line with parchment paper.
  3. In a medium-sized bowl, whisk the plain flour, baking powder, ground cinnamon, and salt until well combined. Set aside.
  4. Next, using a stand mixer fitted with a paddle attachment, cream the butter and sugar on medium-high speed until the mixture becomes pale and fluffy (approximately 3 minutes). Reduce the speed and add the eggs in one at a time to allow to fully incorporate after each addition. Add the vanilla extract.
  5. Alternate adding the flour mixture and buttermilk, beginning and ending with flour (3 additions of flour and 2 of milk altogether). Make sure to fully incorporate after each addition. Then, gently fold in the toasted walnuts and shredded pears, and divide the mixture evenly between the two pans.
  6. Bake for 50 to 55 minutes or until a toothpick inserted into the centre of both cakes come out mostly clean. Place the cakes on wire rack to cool for about 10 minutes and then turn out onto the wire rack to cool further.
  7. Honey Swiss Meringue Buttercream: Place the egg whites and sugar into the bowl of a stand mixer, and whisk until combined.* Place the bowl over a double boiler on the stove and whisk constantly until the mixture is hot and no longer grainy to the touch (approximately 3 minutes), or until it registers 70C/160F on a candy thermometre.
  8. Place the bowl back on your stand mixer and whisk on medium-high speed until the meringue is stiff and has cooled (the bowl is no longer warm to the touch (approximately 5 to 10 minutes).
  9. Switch to a paddle attachment and slowly add in the butter (cubed). Mix until smooth.** Add the honey and whip until smooth. Set aside.
  10. Assembly: Place one layer of cake on a cake stand or serving plate. Top with approximately 1 cup of the buttercream and repeat with the remaining layer. Crumb coat the cake and place in the fridge to chill for about 20 minutes.
  11. Continue to frost the top and sides of the cake in a rustic manner. If desired, add toasted walnuts along the bottom and top, and place the poached pears on top. Secure pears in place with toothpicks and drizzle with the poaching syrup.
  12. Serve and enjoy!

* Ensure that there are NO traces of egg yolks in your whites and that your mixer bowl and whisk is completely grease free or your meringue won’t stiffen.

** The buttercream may look like it’s curdled at some point. Keep mixing until it is completely smooth.

Pear & Walnut Cake with Spiced Red Wine Pears

BON APPÉTIT

– Ally xx

myTaste.com

Strawberry Kiwi Lime Yoghurt Cake

Strawberry Kiwi Lime Yoghurt Cake

Hello Everyone! I know the last two posts have been a bit of a downer; let’s just say I’m starting to feel a little bit better and more of myself this week so I hope that I will be back to my chirpy self soon. That aside, tonight’s recipe is actually one that I made just almost 2 months ago for a very special occasion; my sister’s 23rd birthday last August 23rd! We celebrated her birthday with a yummy all-you-can-eat Korean BBQ dinner at Seoul Garden followed by a surprise visit from a family friend which at that time we had offered to look after their two little boys for a week since their helper had to go back to the Philippines and they couldn’t find anyone else under short notice. Overall it was a fun evening spent with lots of food, cake, and little, but great company!

Happy 23rd Birthday Angela!

The cake that I decided to make for my sister was inspired by a recipe that I found online when I was researching ways that I could incorporate some of the ingredients from my blood pressure friendly list that I compiled at the beginning of the year. This recipe, from that list, features kiwis, strawberries, bananas, and fat-free yoghurt, all of which help lower your blood pressure. This cake is simple and easy to put together, yet is still delicious and guilt-free for when you reach out for a second heap of serving or three (or four)… Or you know the whole cake *cheeky grin* Not that I have done this myself before, you know, have a whole cake for no one else but just me, myself, and I. Anyway, onward with the recipe shall we? But before that, just a quick mention that the original recipe can be found over on SkinnyMs.

Strawberry Kiwi Lime Yoghurt Cake Ingredients

PREP TIME 10 MINS | FREEZING TIME 3 HOURS | SERVES 10-12

INGREDIENTS

For the base

  • 1/4 cup hazelnuts, finely ground
  • 1/4 cup walnuts, finely ground
  • 1 tbsp coconut oil, melted
  • 1 tbsp honey
  • 1 tbsp unsalted butter, melted
  • 1/4 tsp salt
  • Honey graham crackers (enough to make about 1 cup of crumbs)

For the filling

  • 2 punnets (2 x 250g) fresh strawberries, sliced thinly
  • 1 tub (500g) fat free all natural yoghurt
  • 1 large banana, mashed
  • 3 tbsp lime juice
  • 2 tbsp honey

For the topping

  • 2 kiwis, peeled and sliced into thin circles
  • Sliced strawberries (about 2-3 from the punnet)
  • Extra honey graham cracker crumbs (optional)

PS: Please ignore the egg in the ingredient shot, I actually didn’t use it at all even though it was in the original recipe. I decided to go with a no-bake base and therefore omitted the egg from my recipe.

METHOD

  1. Prepare an 8.5-inch springform pan by lining the bases with baking paper and greasing the edges with a little bit of butter. Add all of the base ingredients into a medium-sized mixing bowl and mix until well combined. Press half of the mixture over the base of the prepared pan and set aside in the refrigerator for about 10-15 minutes or until firm.
  2. In a separate medium-sized mixing bowl, combine the mashed banana, yoghurt, honey, and lime juice, whisking well until smooth. Set aside.
  3. Arrange half of the strawberry slices on top of the cooled crust then pour over half of the yoghurt mixture on top of the strawberries in an even layer.
  4. Repeat by adding the remaining half of the base over the top of the yoghurt mixture, arranging the strawberries slices, and the pouring the remaining half of the yoghurt mixture.
  5. Top the cake with the kiwi slices and strawberries slices before placing in freezer for about 3 hours or until completely frozen.
  6. Serve and enjoy! Tip: to cut, hold a knife under hot water for 10 seconds, dry and cut the frozen cake wile the knife is still warm!

Strawberry Kiwi Lime Yoghurt Cake

Strawberry Kiwi Lime Yoghurt Cake

BON APPÉTIT

– Ally xx

myTaste.com

Chilli Chocolate & Cinnamon Cake

Chilli Chocolate & Cinnamon Cake

Hello Everyone! Well… Today has been quite an eventful day! For my followers who do not know, today marks my quarter of a century years young! 25 years of achievements and failures has brought me to where I am today.

Round 1 of Birthday Celebrations

My colleagues surprised me with a cake earlier this afternoon – quite funny as the whole morning they kept telling me not to expect anything because they didn’t have a surprise for me, nor did they have cake. By afternoon, my Manager called me to their department, asking me to help her with a design that I had helped her with earlier in the afternoon. Being the gullible person that I am, I went up to her, and that’s when the rest started singing Happy Birthday and brought out the cake (mini tower of cream puffs). So I’d like to take this opportunity to thank everyone in the office who greeted me today – and for the surprise!

Round 2 of Birthday Celebrations

Round 2 of celebrations began earlier tonight as well, with my Mom, Sister, and my Godmother. We had Japanese for dinner and of course, the restaurant staff sang Happy Birthday to me as they brought out the cake that I had baked for myself for my birthday – which is tonight’s recipe! Original recipe can be found over on Dish.

Dense, rich and moist with a little hint of chilli and cinnamon – everything a great chocolate cake should be, and even more delicious when served with candid pepitas. — Claire Aldous.

Chilli Chocolate & Cinnamon Cake Ingredients

PREP TIME 15 MINS | COOKING TIME 20-25 MINS | SERVES 10-12

INGREDIENTS

For the cake:

  • 200g Lindt Chilli Chocolate, roughly chopped
  • 200g unsalted butter, cubed
  • 2 large free range eggs, lightly beaten
  • 1/2 cup caster sugar
  • 2 tbsp plain flour
  • 1 tsp ground cinnamon
  • 1 tsp vanilla extract
  • 1/2 tsp salt
  • 1/4 tsp ground cayenne pepper (optional if you’d like a little more kick to your chilli chocolate cake)

For the glaze:

  • 100g dark chocolate
  • 100ml thickened cream

METHOD

  1. Preheat the oven to 170C (325F or gas mark 3).
  2. Melt the butter and chocolate in a heat-proof bowl in the microwave at 30-second intervals and stirring until the butter and chocolate has melted. Once melted, stir in the sugar and vanilla extract, setting aside to cool for 10 minutes.
  3. Once cooled, gradually stir in the eggs and then fold in the flour, salt, cinnamon, and cayenne pepper. Pour into a buttered cake tin and smoothen the top.
  4. Bake for 20-25 minutes until the centre of the cake is set but not too firm. Once done, transfer to a rack and leave to cool completely in the tin.
  5. While the cake is cooling down, get started on the glaze by melting the dark chocolate in a heat-proof bowl set over a pan of simmering water, stirring occasionally. Do not let the base of the bowl touch the water. Once the chocolate has melted, slowly add in the cream, stirring gently. Remove from the heat.
  6. Transfer the cake to a dish and pour the glass over. Finish with a light dust of confectioners’ sugar and enjoy with family and friends!

Chilli Chocolate & Cinnamon Cake

Chilli Chocolate & Cinnamon Cake

BON APPÉTIT

– Ally xx

myTaste.com

No Bake Strawberry & Coconut Vegan 'Cheesecake'

No Bake Strawberry & Coconut Vegan ‘Cheesecake’

Hello Everyone! Yes I am aware that it is indeed Tuesday and not a Wednesday – but today is a special day which indefinitely deserves a special post too! Today is the middle child’s 22nd Birthday, and since last year (which was the year I came back to Brunei) I’ve been baking cakes for the family. It was the better solution to, I guess, wanting a specific flavour for an affordable price. I cannot stress enough house much I hate store bought cakes – mainly because of their icing; too thick, too sweet, just… Ugh. I’m not much of a baker since I’m more into savoury foods, but I guess baking a cake 4 times a year (at minimum) isn’t too stressful and helps me practice.

Happy 22nd Birthday Angela!
Happy 22nd Birthday Angela! – early dinner at Balkony today after work. The cake not only looked amazing, but it tasted so good as well! I will definitely try out more no bake vegan ‘cheesecakes’ in the upcoming months – maybe for my Birthday in November!

Today’s recipe shall keep in theme with the theme for this month on Amcarmen’s Kitchen, which is, if you haven’t been following, Yes Ve Gan! A month of tribute to animal-free dishes that are sure to tickle your tummies from a different perspective. Before I had the idea of coming up with an animal-free theme for the blog, I wanted to bake a strawberry shortcake for my sister. I then only just changed my mind earlier last week to do a No Bake Strawberry & Coconut ‘Cheesecake’ for her after being inspired and reminded of the cake that Miao made back in March when we gathered for a dinner and catch up session with friends in Singapore. I think I mentioned in the beginning of the month in a post that it was a pretty darn delicious cake and it made me crave for more! So I thought to myself, why do I give a raw vegan cake a try since, like Miao at that time, I have never done one before! It’s super easy to make and you can substitute the strawberries out for your favourites berries such as raspberries, blueberries, blackberries, or boysenberries.

No Bake Strawberry & Coconut Vegan 'Cheesecake'

This ‘cheesecake’ is completely gluten-free, dairy-free, and egg-free! The recipe makes for one 8″ sized cake, but of course you can always double the recipe to make a bigger one if you wish! Mind you, for those who have not read in an earlier post this month, I haven’t stopped eating animals, dairy, or eggs altogether. I still eat my meat, but not as often as I used to, and I still have my daily dose of cow’s milk in the mornings  to accompany my breakfast. I don’t see myself going completely vegan in the next couple of years – but who knows, that may change over time when I make that shift to loving all animals, and most importantly for a healthier lifestyle. For now, it is something that I want to look into and slowly add this way of eating into my daily diet.

No Bake Strawberry & Coconut Vegan 'Cheesecake' Ingredients

PREP TIME 25 MINS | FREEZE TIME min. 4 HOURS* | SERVES 8-10

*preferably overnight to ensure that the cake is set.

INGREDIENTS

For the crust

  • 250g medjool dates, pitted
  • 3/4 cup sliced almonds
  • Pinch of salt

For the filling

  • 1 cup raw cashews, soaked overnight* and drained
  • 1 punnet (25g) fresh or frozen (but thawed) strawberries
  • 2/3 cup full fat coconut milk
  • 4 tbsp coconut oil, liquified
  • 2 & 1/2 tbsp lemon juice
  • 2 tbsp maple syrup
  • Zest of 1 small lemon

For the topping

  • Fresh strawberries
  • Shredded coconut
  • Edible flowers (optional)

*if you are a bit pressed for time, or decided to make your cake today and hadn’t realised that you needed to soak your cashews overnight, then you can soak them in very hot water for about an hour instead of overnight.

METHOD

  1. Crust: Soak the pitted medjool dates in warm water for about 15-20 minutes and then drain. Put almonds in a food processor and pulse until finely chopped. Add the dates and a pinch of salt, and pulse until a paste forms.
  2. Press mixture into an 8-inch springform pan (if you don’t have a springform pan, use a pie tin or a regular cake pan covered with baking paper). Place the crusted pan in the freezer while you prepare the filling.
  3. Filling: Put all ingredients for the filling in a blender and blend on low until mixture is as smooth as possible. Pour the filling into the crust, cover with plastic wrap and freeze for at least 4 hours.
  4. Remove the cake from the pan and leave to thaw in room temperature for about 10-15 minutes before cutting. Top with fresh strawberries, shredded coconut, and edible flowers.

Tip: Run your knife under warm water (and dry off) before cutting, to make a cleaner cut. Let each piece thaw for a few more minutes before serving.

No Bake Strawberry & Coconut Vegan 'Cheesecake'

No Bake Strawberry & Coconut Vegan 'Cheesecake'

BON APPÉTIT

– Ally xx

myTaste.com