Atchara (Pickled Green Papaya)

Atchara (Pickled Green Papaya)

Hello Everyone! One more day until the end of April, which means that this will be my last recipe from the Philippines on our journey through the Flavours of Southeast Asia. I most definitely had fun tackling healthier alternatives of classic and much loved Pinoy dishes, as well as celebrating Amcarmen’s Kitchen turning seven years old!

Tonight, I’ll be sharing a recipe in response to a challenge that my friend brought up in our exclusive interview. It started off with her asking me if there are any ingredients that I would never cook with on my blog, to which I responded with: raisins, cucumber, and cilantro. She then hit me with a surprise challenge which is to make a dish with at least two of the three ingredients that I listed – something that I would have to like and eat!

To quote her:

“…something that you had previously found to be a negative experience, is going to be turned into a positive experience, so I’m changing your life!”

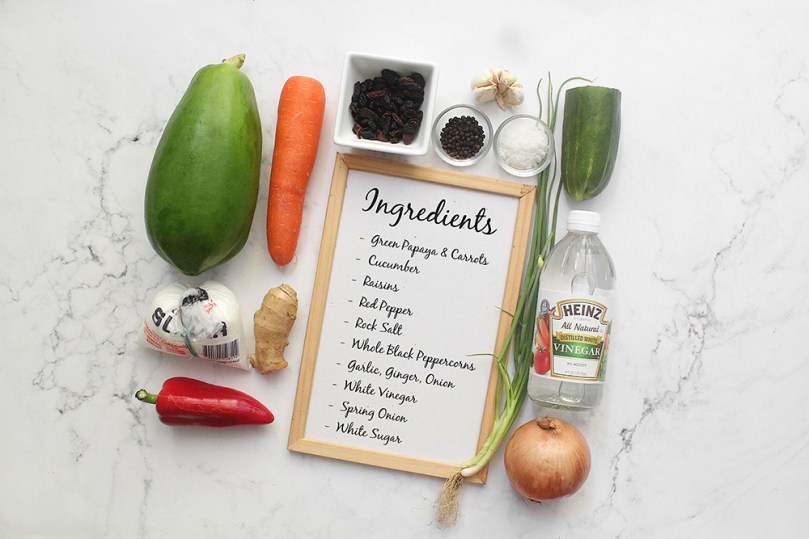
And here’s my response; no twists or a fancy remake of this side dish, just straight up, humble atchara. Atchara (also spelled achara or atsara) is a pickle made typically out of grated unripe papaya. Other vegetables such as carrots, capsicum (bell pepper), onion, garlic, and ginger are also added to make up this pickle. Raisins may also be added, but are optional.

Atchara (Pickled Green Papaya)

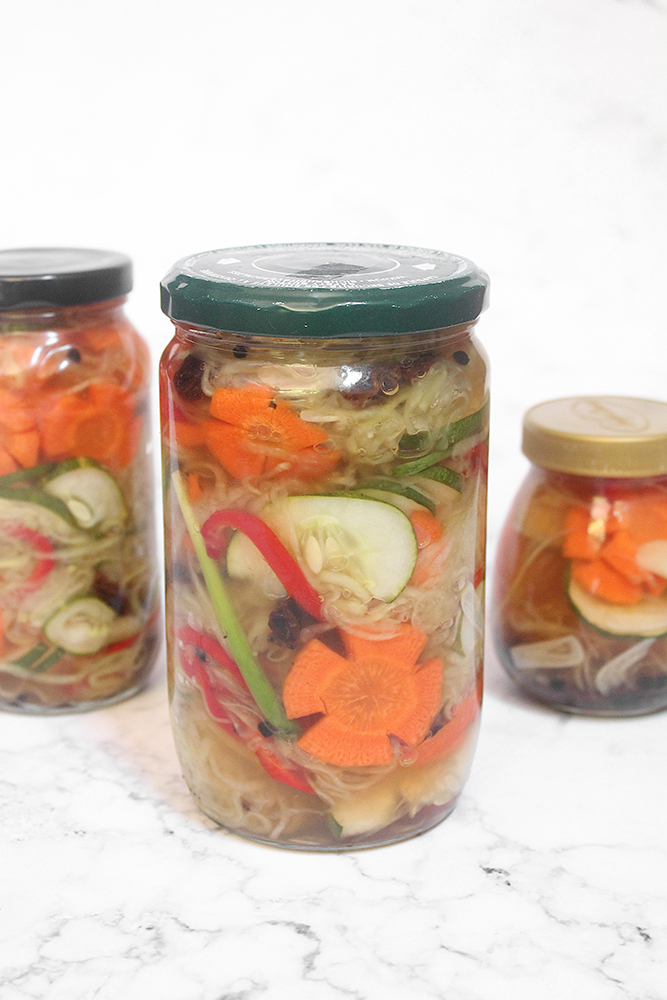
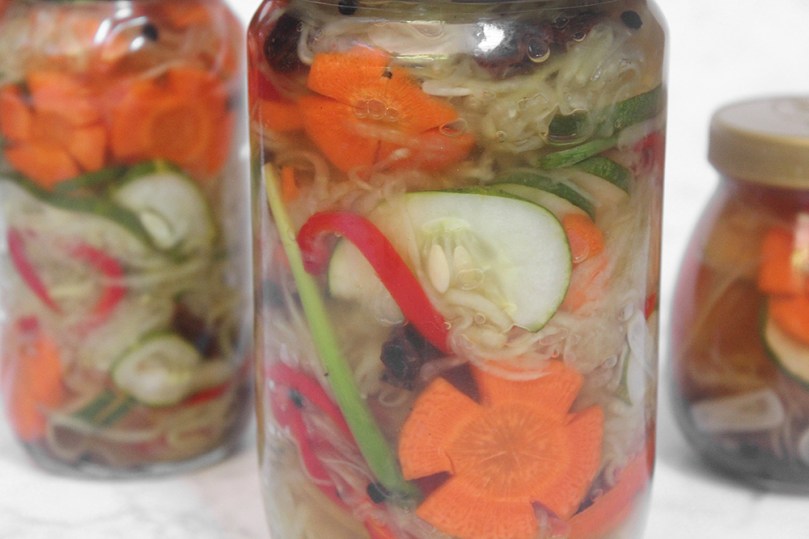
All of these are then mixed together in a solution of vinegar, sugar, and salt. The key is finding the right balance of sourness and sweetness in the pickling solution. It is then placed in airtight jars where it will keep without refrigeration, however once opened it is preferably kept chilled to maintain its flavour. Ideally, you’ll want the atchara to mature for about a week before consuming it, for it to fully develop its flavour. The longer you keep it, the better it tastes. Once opened, you can keep it in the fridge for up to two months.

Atchara is usually served with grilled or fried dishes; I like to have atchara as an accompaniment to fried fish to give it a little more life. Technically it goes well with any meal that is fatty and salty, as the sharpness of the atchara helps cut through that greasy aftertaste in your mouth.

Since the challenge is to make a dish that includes two of the three ingredients that I dislike the most, the atchara that I will be sharing with everyone tonight includes cucumbers and raisins. The Southeast Asian variations of atchara, or as they collectively call it in Indonesia, Malaysia, Singapore, and Brunei, acar, is mainly made of pickling cucumbers together with carrots and shallot, sometimes even daikon. I’ve had this version of acar when I was living in Brunei, and it was actually delicious as an accompaniment to various fried dishes!

Atchara (Pickled Green Papaya) Ingredients

PREP TIME 1 HOUR 30 MINS | COOKING TIME 10 MINS | MAKES 3 JARS*

*I had jars of varying sizes, but if I were to estimate, I think they’d fit into about 3 medium-sized jars.

INGREDIENTS

For the pickle

  • 1 medium unripe papaya, shredded
  • 1 small carrot, sliced
  • 1 small cucumber, sliced
  • 1 small red capsicum, sliced thinly
  • 1 packet (50g) raisins
  • 2 tbsp salt
  • Spring onion stalks

For the pickling solution

  • 1 & 1/2 cups white vinegar
  • 1 cup white granulated sugar
  • 4 garlic cloves, sliced thinly
  • 1 small-sized brown onion, sliced thinly
  • 1 thumb-sized ginger, julienned
  • 1 tbsp whole black peppercorns
  • 1 tsp salt

METHOD

  1. Combine the shredded papaya together with the salt in a medium-sized mixing bowl, setting it aside to sit for about an hour or until the papaya starts to release its liquid. Then place the shredded papaya in a cheesecloth and firmly squeeze to get rid of any excess juices.
  2. Pickling Solution: Meanwhile, in a small-sized saucepan over medium heat, combine the vinegar, sugar, and salt and bring to a simmer. Cook for about 3 to 5 minutes, or until the sugar has completely dissolved. Stir occasionally.
  3. Add the whole black peppercorns ginger, garlic, and onions. Continue to cook for a further 2 to 3 minutes. Once done, set aside to cool down slightly.
  4. Atchara: Combine the shredded papaya together with all the prepared vegetables into a large mixing bowl. Add the warm pickling solution and gently toss to combine. Cover and set aside to completely cool down.
  5. Once cool, transfer the atchara into sterilised jars with tight-fitting lids. You may keep them on the countertop or immediately place them in the fridge for about a week to let the flavours develop before serving.
  6. Serve, cold or at room temperature, with your choice of fried and/or grilled meat/seafood. Enjoy!

1888

The verdict? I definitely loved the pickled cucumbers, in fact I always scoop out for them for every serving. The raisins? I don’t know; there’s just something about them that I don’t like and I can’t explain it. I tried one and after that, I still picked them out.

Atchara (Pickled Green Papaya)

BON APPÉTIT

– Ally xx

myTaste.com

Advertisement
Ropa Vieja con Huevos Rancheros

Ropa Vieja con Huevos Rancheros

Hello Everyone! You guys must be thinking that I’m on a roll here! Three consecutive recipes?! Don’t get used to it because it’s just for this one time to get everything wrapped up for this month so that I can start a new theme for the month of June! I did mention in a couple of posts back that for the month of June, I’ll be switching up my upload schedule day to Mondays, and the reason does indeed correlate to the theme. I’ll keep everyone on their toes for a while longer and come Monday, all will be revealed!

I had lots of fun last night a my friend’s place for sungkai (iftar) and of course to celebrate her daughter turning 1! Tonight’s post is a little later than usual this time around because I literally just came back from another night out for a sungkai catch up dinner with friends. I’ve probably mentioned this before in a post somewhere on this blog, but I’ll mention it again just to clear things up – I’m not a Muslim. I don’t practice ramadhan which then subsequently means that I don’t have to break fast for iftar. Yes I was born and bred in a Muslim country, and even though I have been exposed to these practices for practically my whole life, I wasn’t born into the religion (hint on the ‘Third Culture Foodie’!).

Anyway, tonight’s recipe is sort of another way you can use leftover Ropa Vieja to make similar, but not so Eggs Benny dish. Okay, I mentioned in yesterday’s post about this Latin American café that Jialing and I found during one of our “Fatness Fridays” adventures. While I thought back to this day, I was totally convinced that the Huevos Rancheros dish that I had was a marriage of it and the Ropa Vieja sandwich that Jialing had, but it wasn’t until I scrolled through hundreds of Instagram photos on my feed to recall the dishes to find out that they were two separate things.

Ropa Vieja con Huevos Rancheros

In my last post I said that a Ropa Vieja Eggs Benny came into mind – which it did, but that wasn’t they way I had initially imagined it. In fact, this Ropa Vieja con Huevos Rancheros was how I pictured the ‘Eggs Benny’ dish to look, but in the end I decided to reimagine it just because this didn’t really have the feel of an Eggs Benny dish. However, I didn’t want this dish to end up in my archive of ‘will never get around to posting’ but since this dish is sort of related to the last two I posted, I thought I’d share the recipe with you! I mean, it’s essentially, well practically identical to the last recipe, just a few minor differences, especially with the plating.

Huevos Rancheros, or in English “rancher’s eggs”, is a traditional breakfast dish served as a mid-morning fare on rural Mexican farms – hence its name. The dish is made up of fried eggs that is served atop a lightly fried tortilla (traditionally corn, but other adaptations have used wheat tortillas instead), with a tomato-chilli sauce, refried beans, and slices of avocado or guacamole. You could say that my adaptation to marry Ropa Vieja and Huevos Rancheros together is an amped up version of a humble and traditional Huevos Rancheros brekkie.

Ropa Vieja con Huevos Rancheros Ingredients
Ignore the other ingredients photographed but not mentioned below – the other ingredients are of the ropa vieja dish to accompany this dish!

PREP TIME 5-10 MINS | COOKING TIME 10-15 MINS* | SERVES 3

*Provided that you’ve made your Ropa Vieja ahead of time, i.e. the night before, if not then make sure you allocate yourself 3-4 hours altogether for this recipe

INGREDIENTS

  • Leftover Ropa Vieja
  • 3 super soft flour tortilla wraps
  • 3 large free range eggs
  • 2 large avocados, pitted, peeled, and halved**
  • 1 can (16oz) organic black beans, drained, blanched in hot water, and smashed
  • Chopped spring onions, to garnish
  • Tabasco sauce, to taste

**Squeeze a touch of lemon or lime juice to prevent it from browning

METHOD

  1. If you haven’t pre-made your Ropa Vieja for this recipe, then start of with this before moving on to the other components of the dish. Allocate yourself about 3-4 hours prior.
  2. Heat about a tablespoon of olive oil in a small frying pan. Crack the egg in and fry until the edges start to brown. I personally like my sunny-side up eggs this way – the browned edges gives a nice nutty flavour to the whites which is total yum! Repeat for the remaining eggs.
  3. In a medium-sized non-stick frying pan, lightly heat the tortilla wraps until they start to slightly brown. Remove from the pan and repeat for the remaining wraps.
  4. Place the tortilla wrap on a plate and top with the smashed black beans. Make a nest in the middle and top with the ropa vieja, sunny-side up egg, and halved avocado to the side. Drizzle a bit of tabasco sauce over and sprinkle some chopped spring onions. Serve and enjoy!

Ropa Vieja con Huevos Rancheros

Tune in on Monday for an all new theme and a bunch of yummy recipes!

BON APPÉTIT

– Ally xx

myTaste.com

Ropa Vieja Eggs Benedict

Ropa Vieja Eggs Benedict

Hello Everyone! I’m getting this post up way earlier than I usually do just because I’m about to leave and head on over to a friend’s house to celebrate her daughter turning 1 today! I can’t believe the little munchkin is a year older already – it felt just like yesterday I was holding her in my arms just only being 2 or 3 months old. Gosh how time flies by so quickly! With that being said, I honestly have no idea what time I’ll be back home tonight and thus the early upload.

Tonight’s recipe is a branch off from the Ropa Vieja recipe that I posted just last night. When I was thinking of what other Eggs Benny recipes I could whip up to share with you guys, I immediately thought back to the time Jialing and I had our weekly “Fatness Friday” sessions in-between our classes in search of great food at cafés and/or restaurants that we have yet to explore. One Friday afternoon, we came across a Latin American café in Surry Hills (no, not Cafe con Leche hehe) I don’t actually remember the name of the place. Jailing had the Ropa Vieja sandwich while I had their Huevos Rancheros, and BOOM! A Ropa Vieja Eggs Benedict dish came into mind.

Ropa Vieja Ingredients

PREP TIME 5-10 MINS | COOKING TIME 10-15 MINS* | SERVES 3

*Provided that you’ve made your Ropa Vieja ahead of time, i.e. the night before, if not then make sure you allocate yourself 3-4 hours altogether for this recipe

INGREDIENTS

For the eggs benedict

  • Leftover Ropa Vieja
  • 3 English muffins, halved, slightly toasted, and buttered
  • 3 large free range eggs
  • 1 large avocado, peeled, pitted, and smashed**
  • 1 can (16oz) organic black beans, drained, blanched in hot water, and smashed
  • Chilli flakes, to garnish (optional)
  • Chopped spring onion, to garnish

For the tabasco hollandaise sauce

  • 3 large free range eggs, yolks separated
  • 175g unsalted butter, cut into cubes, at room temperature
  • 2 tbsp water
  • 2 tbsp fresh lemon juice
  • 1 tbsp tabasco sauce, less or more to adjust to your liking
  • Fresh Thyme Leaves
  • Ground salt and black pepper to taste

**Squeeze a touch of lemon or lime juice to prevent it from browning

METHOD

  1. If you haven’t pre-made your Ropa Vieja for this recipe, then start of with this before moving on to the other components of the dish. Allocate yourself about 3-4 hours prior.
  2. Tabasco Hollandaise Sauce: While the balsamic reduction is underway and slowly simmering, start on the Hollandaise sauce. Place a heatproof bowl over a medium saucepan that is quarter-filled with water. Make sure that the bowl should fit snugly into the pan without touching the water (lift the bowl to check and remove some water if it does). Bring the water to a boil over high heat, then reduce heat to very low so the water is barely simmering (there should be almost no movement at all). It is important that the water is barely simmering while making the sauce – if it is too hot, the egg yolks will cook too much and the sauce will curdle.
  3. Place the egg yolks and the 2 tablespoons of water in the heatproof bowl and place over the pan. Whisk the mixture constantly for 3 minutes or until it is thick and pale, has doubled in volume and a ribbon trail forms when the whisk is lifted.
  4. Add the butter a cube at a time, whisking constantly and adding another cube when the previous one is incorporated completely (about 10 minutes to add it all in). If butter is added too quickly, it won’t mix easily with the egg yolks or the sauce may lose volume. At the same time, it is important that the butter is at room temperature and added a cube at a time, so that it doesn’t take too long to be incorporated – if the sauce cooks for too long, it can curdle.
  5. Remove the bowl from the pan and place on a heatproof surface. The cooked sauce should have the consistency of very lightly whisked thickened cream. Whisk in the lemon juice, tabasco sauce, fresh thyme leaves, and season with salt and pepper. Set aside.
  6. Poached Eggs: Bring small saucepan of water to the boil over medium-high heat, then reduce the heat to low-medium – the water should be just simmering. Add in the vinegar and stir. Crack one egg into a small bowl and quickly, but gently pour it into the water. Repeat with the other egg. A really soft poached egg should take around 2 minutes, but if you want it a bit more firm, it will take about 4 minutes. To check if they’re cooked right, carefully remove the egg from the pan with a slotted spoon and give the yolk a gentle push (you can tell just by your instincts if it is under or over – or perfect)!
  7. Assembly: Spread the smashed avocado on the toasted and buttered English muffin half and top with the smashed black beans. Build up with the ropa vieja followed by the poached egg. Drizzle a generous amount of the tabasco hollandaise sauce and sprinkle some chilli flakes and chopped spring onions. Serve and enjoy!

Ropa Vieja Eggs Benedict

Ropa Vieja Eggs Benedict

Next month I’ll start off with a whole new theme so stay tuned for that! To give you guys a clue, I’ll be switching up my upload schedule day to Mondays just for the month of June. Yes, the fact that I’ll be posting on Mondays does correlate to the theme! My loyal and long term followers may know, and to anyone who wants to take a stab and guess, comment down below!

Don’t forget that the overall theme for Amcarmen’s Kitchen for 2018 is Breakfast Eats!

But before that, I have one more recipe that will go up tomorrow night so stay tuned for that to know what else you can do with leftover Ropa Vieja!

BON APPÉTIT

– Ally xx

myTaste.com

Ropa Vieja

Ropa Vieja

Hello Everyone! So if you read last week’s post, you’ll know that tonight is part 1 of the actual recipe that I’ll be sharing tomorrow night. I’ve decided to split it up just for easy future reference, i.e. if you’re just looking for a mouth-watering Ropa Vieja recipe without it being in an Eggs Benny, then this is it! I first came across this dish during my university years in Australia. It wasn’t even the main highlight of the dish, rather a small side to go with the Colombian-style Arepas that was  my absolute favourite brunch dish then *drools just thinking about how much I miss having it in my tummy* It was a little place that Jialing had stumbled upon when she took the wrong bus to uni and got off at a stop that was just opposite Cafe con Leche.

Ropa Vieja is actually a Spanish term that directly translates to “old clothes” as the shredded beef and vegetables that are the main components of the dish resemble a heap of colorful rags. Though the dish dates back to the Middle Ages of Spanish Sephardi, it was then taken to Cuba where the Cubans made it their own. Ropa Vieja is now one of Cuba’s most popular and beloved dishes; in fact, so popular in fact that it is one of the country’s designated national dishes! It is also popular in other areas or parts of the Caribbean such as Puerto Rico and Panama.

The traditional method of braising the meat is in water. However, for this recipe, I am going to release all those flavourful beef juices directly into the sauce together with carrots, celery, bay leaves, onion, and garlic to get all the flavours of a stock going at the same time. This infuses the sauce with some umami-flavour qualities and natural sweetness from the vegetables, making everything of braising by this method super rich and mouth-watering. Do check out the original recipe by Kimberly from The Daring Gourmet.

Ropa Vieja Ingredients

Ignore the avocado, black beans, and the egg in the shot above, that’s for the Eggs Benedict recipe to follow tomorrow!

PREP TIME 15 MINS | COOKING TIME 4 HOURS 30 MINS | SERVES 8-10

INGREDIENTS

  • 1kg tender beef chuck
  • 1 cup beef broth*
  • 1/2 cup dry white wine**
  • 4 chipotle peppers in adobo sauce, sliced
  • 4 garlic cloves, minced
  • 2 dried bay leaves
  • 1 can (16oz) chopped tomatoes with sliced olives
  • 1 brown onion, halved and sliced thinly
  • 1 large carrot, sliced
  • 1 large celery stalk, sliced
  • 1 medium-sized red, yellow, and green capsicum
  • 1 heaped tbsp tomato paste
  • 1 tbsp baby capers, rinsed and drained
  • 2 tsp chilli powder
  • 2 tsp dried oregano
  • 2 tsp ground cinnamon
  • 2 tsp smoked paprika
  • 2 tsp sea salt
  • 1/2 tsp freshly ground black pepper
  • 1/8 tsp ground cloves
  • 1/8 tsp ground nutmeg
  • Chopped spring onion, to garnish

*Or 1 beef bouillon cube dissolved in 1 cup of hot water

**The first time I made this dish, I omitted the dry white wine only because I didn’t have any on my pantry shelf at that moment. For those who are living in, or know about Brunei, it’s not as easy as popping over to the shops to buy a bottle. Anyway, I found that the flavours weren’t really brought out as much as when I attempted this dish for a second time with the wine. It felt flat like that pop or zing was missing from it.

METHOD

  1. Pat the beef dry and rub all over with the dried herbs, spices, and seasoning -dried oregano, chilli powder, ground cinnamon, ground cloves, ground nutmeg, smoked paprika, sea salt and ground black pepper.
  2. Heat about a tablespoon in a slight large Dutch oven over high heat. Once it is very hot and starts to smoke a bit, add the beef and brown generously on all sides. Once done, transfer the beef to a plate. Do not discard the drippings and blackened bits in the pot. They are key to the flavour!
  3. Turn the heat down to medium, then add the minced garlic and cook until slight golden and fragrant. Follow with the sliced onion, cooking until softened before adding the sliced carrots and celery, and the chopped chipotle peppers. Cook for about 15 minutes until caramalised. Deglaze the pot the the dry white wine and bring it to a rapid boil, scraping up the browned bits at the bottom of the pot.
  4. Add the chopped tomatoes, tomato paste, beef broth, and bay leaves. Leave to simmer for about 5 minutes.
  5. Return the beef and bring to a boil. Reduce the heat down to low, then cover and simmer for 3-4 hours or until the beef is fork tender and falls apart easily.
  6. While the beef is slowly simmering away, you can move onto roasting your capsicums. Turn a stovetop burner to its highest setting and place the capsicum directly on the flame. Use a pair of tongs to turn them over until the skin has completely blackened. Put the capsicum in a heat-proof mixing bowl and cover with plastic wrap. The skin will loosen as it steams, and once it has cooled down a bit, you can easily remove the skin with your fingers under running water. Slice thinly.
  7. Once the beef is done, discard the celery, carrots, and bay leaves. Remove the beef from the sauce, transfer to a plate and shred. Return the shredded beef to the pot and stir in the roasted capsicum and baby capers. Season with salt and pepper to taste and leave uncovered to simmer until the sauce has thickened, about a further 15-20 minutes.
  8. Serve the beef in a large serving dish and enjoy! Best served with steamed rice and black beans on the side.

Ropa Vieja

Ropa Vieja

As per Kimberly, for a variation on traditional beef you can also use pork or chicken, bone-in/skin-on for the most flavour, or boneless breast or thighs. I might try this recipe out with succulent pork shoulders next time *already drooling*.

BON APPÉTIT

– Ally xx

myTaste.com

Callos a la Madrileña (Ox Tripe Stew)

Callos a la Madrileña (Ox Tripe Stew)

Hello Everyone! Sadly, we’re nearing the end of our 12 days before Christmas special on the blog. How will you be spending your Christmas Eve tomorrow? I know where I’ll be – in the kitchen whipping up food with my Mom for our Noche Buena; and when I’m not cooking, I’ll most likely be taking a relaxed 2-day off doing absolutely nothing… Maybe. I can’t exactly sit around and do nothing. Heck, I’m evening writing this post while watching The Incredibles on TV and I was just talking to my Mom about how this movie never gets old – I still love watching it to date.

Anyway, time to get off the tangent wagon and get down to tonight’s recipe. It is basically a stew that is common and traditional to Madrid, well known as Callos a la Madrileña, or Callos for short. The stew consists of ox tripe, ox feet (or shank), chickpeas, blood sausage (or chorizo), and red capsicum. The tripe and feet are boiled and simmered until the texture becomes extra tender; this makes eating this dish pleasurable. It is then cooked together with the chickpeas and capsicum.

The extra tender tripe and fat from the ox feet literally melts in your mouth while the luscious taste of chorizo and bacon lingers around – inviting you to try more. Though it looks and sounds enticing (which it does), moderation is still recommended because of the high fat and cholesterol content of this dish. It is good to enjoy food but it is better to enjoy life. — Vanjo Merano from Panlasang Pinoy

Ox feet is rarely found in stores/markets here in Brunei – they’re always sold out even if you go extra early in the morning. My guess is that restaurants who use this part of the cow have already reserved it. Anyway, you can substitute it for veal (beef) shanks, however, you won’t get the same feeling of the melt-in-your-mouth fat as you do from ox feet.

Callos a la Madrileña (Ox Tripe Stew) Ingredients

PREP TIME 15 MINS | COOKING TIME 2 HOURS | SERVES 6-8

INGREDIENTS

  • 500g ox tripe, washed and cleaned
  • 500g beef shank
  • 250g bacon
  • 1 can (240g) chickpeas/garbanzos, drained
  • 6 pcs dried bay leaves
  • 2-3 garlic cloves, minced
  • 2 red bird’s eye chillies (optional)
  • 1 brown onion, diced
  • 1 chorizo sausage, sliced diagonally
  • 1 red capsicum, cut into strips
  • 1 tomato, diced
  • 1 tbsp tomato paste
  • Ground salt and black pepper, to taste
  • Whole black peppercorns

METHOD

  1. Add the beef tripe, 3 bay leaves, salt and a generous pinch of whole black peppercorns to a large pot filled with water. Boil for about an hour and a half, or until tender. Do the same for the beef shank in a separate pot. Once done, turn he heat off and leave the meat in the broth for an extra half hours. Remove from the broth and slice both the meats into bit-sized pieces. Discard the liquids from the tripe, but reserve the beef shank broth for later.
  2. Heat a large frying pan over medium-high and add the bacon in, frying until crisp, about 2-3 minutes per side perhaps (or more). Remove from the pan and set aside to cool down a bit before cutting them into smaller pieces.
  3. If there isn’t enough oil produced from the fat of the bacon when you fried it, add about a tablespoon more of oil and fry the chorizo slices until browned, about a minute or two per side. Once done, remove from the frying pan and set aside on a plate lined with a paper towel to soak up any excess oils.
  4. In the same frying pan, sauté the garlic until fragrant and golden brown. Then, add in the onions and cook until soft, about 2-3 minutes altogether. Follow with the diced tomatoes and cook until soft, a further 3-4 minutes.
  5. Add in the tripe and shank, together with a touch of ground salt and black pepper. Give it a good mix before adding the reserved stock, tomato paste, and chillies. Bring to a boil, and cook for about 10 minutes.
  6. Add in the chickpeas/garbanzos, and carrots and cook for a further 5 minutes before adding in the capsicum, bacon bits, and chorizo slices. Give it one final mix and then turn the heat off. Leave, covered, in the pan for about 5 minutes before serving.
  7. Transfer to a serving dish and enjoy hot!

Callos a la Madrileña (Ox Tripe Stew)

Callos a la Madrileña (Ox Tripe Stew)

BON APPÉTIT

– Ally xx

myTaste.com

Pancit Lucban (Filipino Style Stir-Fried Thick Flour Noodles)

Pancit Lucban (Filipino Style Stir-Fried Thick Flour Noodles)

Hello Everyone! So tonight, I’m sharing with you a dish that I think I over indulged in during my recent trip back to the Philippines earlier on the year in March/April 2015. We spent a ridiculous amount of lunches and meriendas in Buddy’s while we visited our relatives in the provincial City of Lucena. Anyway, the dish, known as Pancit Lucban or Habhab, is a version of pancit that originated in the Quezon province. This noodle dish may draw many resemblances to the traditional Pancit Canton, but there are some apparent differences. The main difference is all in the type of noodles used; Pancit Lucban/Habhab uses dried flour noodles known as miki Lucban which are not the same noodles used to make pancit canton. In addition, miki Lucban noodles that are made fresh also have a much softer texture than that of pancit canton.

Here’s a fun fact for you – well okay, it’s not really a fun fact but it is quite interesting and may be one of the reasons you’d probably go out and have a handful of Pancit Lucban. That’s right, a handful. This version of pancit is traditionally served over a piece of banana leaf and is eaten without any utensils. I know what you’re thinking, how exactly do you eat noodles without any utensils?! Well, imagine eating a sandwich. You will need to grab the banana leaf with the noodles in it and put it directly to you mouth. Don’t eat the banana leaf though! Below is a picture of my cousin and my Mom back in 2008 (I think) having some Pancit Lucban from a street food vendor during a dog show/walk in Lucena:

My Mom & Cousin eating Pancit Lucban the traditional way

It’s probably not the most glamorous way to eat your noodles, but it may be an exciting experience especially to those who find this way of eating very foreign to them. Miki Lucban is unfortunately not commonly found in stores around Brunei, not even in the Filipino section. So instead, we used Pancit Canton which actually makes calling this dish Pancit Lucban a sin! *cheeky grin*

Pancit Lucban (Filipino Style Stir-Fried Thick Flour Noodles) Ingredients

PREP TIME 10 MINS | COOKING TIME 45-50 MINS | SERVES 6-8

INGREDIENTS

  • 450g pancit canton (or miki Lucban if available)
  • 250g tiger prawns, shelled and deveined
  • 100g snow peas, topped and tailed
  • 3-4 dried bay leaves
  • 2-3 garlic cloves, minced
  • 2 pcs thin sliced pork belly, cut into 1cm chunks
  • 1 bunch gai lan (Chinese broccoli)
  • 1 carrot, julienned
  • 1 chicken crown, breasts removed and sliced, bone reserved
  • 1 small red onion, diced
  • 1/2 chayote, peeled and sliced
  • 5 tbsp light soy sauce
  • Ground salt and black pepper to taste
  • Whole black peppercorns

METHOD

  1. Add the reserved chicken bone, dried bay leaves, about a teaspoon or two of whole black peppercorns, and salt to a medium-sized pot filled with about 1.5L of hot/boiling water. Turn the heat up to high and leave to boil for about 30 minutes.
  2. Meanwhile heat a large frying pan over medium-high and add in the chunks of pork belly. Cook until browned. The oils released from the pork belly should be enough to sauté the garlic and cook the onions, but if needed, add a little bit more oil if there isn’t enough. Then add the minced garlic and sauté until fragrant and golden brown, about a minute, then followed by the diced onions. Cook until soft, about 2 minutes in total.
  3. Add in the sliced chicken breasts, and season with a bit of salt and ground black pepper and give it a good mix. Cook for about 5 minutes. Then add in the prawns, followed by the chayote, carrots, and snow peas. Mix well and leave to cook for a further 3-4 minutes. Lastly, add in the gai lan and cook until just slightly wilted. Once done, transfer to a bowl and set aside.
  4. In the same frying pan, add about half of the chicken stock to the pan together with the soy sauce, ground salt, and black pepper. Bring to a boil. Once boiling, add the canton noodles in and cook until all the liquid has evaporated (if the noodles are looking a bit dry, you may add more stock, a ladle at a time). Make sure that while cooking, you mix and untangle them periodically. Altogether this should take about 10-15 minutes. Halfway through, add in half of the cooked meat and vegetables to the noodles and mix well.
  5. Serve immediately topped with the extra meat and vegetables, and with calamansi, or alternatively a lemon wedge. Enjoy! Note: best served with a splash of vinegar!

This slideshow requires JavaScript.

BON APPÉTIT

– Ally xx

myTaste.com

Minestrone Soup

Minestrone Soup

Hello Everyone! Winter Warmer Month is coming to an end this week *sad face* but surely we won’t be saying goodbye to soups forever. I’ll keep today’s post short only because I am actually just writing this now (maybe 30 minutes before this goes up) and I didn’t prepare it in advance or during the day. I’m keeping it short because I’m really tired, but I didn’t want to skip out on posting.

Basically I woke up at 6:30am today, yes that’s actually quite early for me especially since I didn’t sleep well last night, don’t know why. I got up earlier than usual to get ready and head over about an hour out West on the train, to Brendon’s (brendonthesmilingchef) place for a cooking collaboration that had been planning for just about over a month now. We spent the whole morning until late afternoon shopping, cooking, styling, eating, and talking – and overall it was a successful day. I won’t say what we made today because that will be coming up for the month of August!

Minestrone Soup

Okay (again I always do this), I said I’d keep it short but I’m already 200 words in and I haven’t actually talked about today’s recipe – Minestrone Soup. is a thick soup of Italian origin made with vegetables, often with the addition of pasta or rice. Common ingredients include beans, onions, celery, carrots, stock, and tomatoes. There is no set recipe for minestrone, since it is usually made out of whatever vegetables are in season. It can be vegetarian, contain meat, or contain a meat-based broth. I’ve made this soup a couple of times in the past and I used risoni pasta and added bacon chunks to it before. Today, I’m keeping it quite traditional, and used left over angel hair pasta hair that I cut into about 2cm long pieces.

Minestrone Soup Ingredients

PREP TIME 10 MINS | COOKING TIME 65 MINS | SERVES 4-6

INGREDIENTS

  • 375g McKenzie’s Italian Style Soup Mix, washed and drained
  • 150g maple-glazed bacon, cut into bits
  • 1 can (400g) canned diced tomatoes
  • 1 cup angel hair pasta, cut into 2cm long strands
  • 2-3 garlic cloves, minced
  • 2 small carrots, peeled and sliced
  • 1 celery stalk, sliced
  • 1 medium-sized onion, diced
  • 1 large potato, peeled and cut into small chunks
  • Ground salt and black pepper to taste
  • Shaved parmesan cheese
  • Bread of choice

METHOD

  1. Preparing the Beans:
    • Quick method: Put required quantity into a saucepan and cover with water – approximately 3 cups of water for every cup of soup mix. Bring to the boil and simmer for approximately 45 minutes or until cooked, skimming if necessary.
    • Traditional method: Soak soup mix for approximately 6-8 hours (overnight if convenient) before cooking.
  2. Minestrone Soup: Heat oil in a large pot over medium-high. Fry the bacon bits until browned, then sauté the garlic together with the bacon until fragrant and golden brown. The add in the onions and cooking until soft.
  3. Add in the carrots, celery, and potatoes, and season with salt and pepper to taste. Give it a good mix and leave to cooking for about 5 minutes before adding the canned diced tomatoes in. Cook for a further 5 minutes.
  4. Add in the chicken stock and bring to a boil. Once boiling, add in the prepared beans and further simmer for about 10-15 minutes, in the last 4 minutes, add in the angel hair pasta.
  5. Turn the heat off, and divide equally into serving bowls (4 large bowls, or 5-6 small bowls) and top with some shaved parmesan cheese. Serve immediately with some stone-baked Pane di Casa bread.

Minestrone Soup

BON APPÉTIT

– Ally xx

myTaste.com

Breakfast Muffins: Spiced Carrot

Breakfast Muffins: Spiced Carrot

Hello Everyone! Back with another muffin (borderline cupcake) recipe for you! This week, I decided to whip up some lovely spiced carrot muffins while Jialing made some yummy raspberry and white chocolate muffins with a lemon crumb top. I had a bag of about 400g of baby carrots sitting in the fridge, given to me by my housemate Vidhya before she flew off to South Africa. She was telling me how she went out and bought a lot of food, not realising that she’d be jetting off in a few days for a month. So hence why I got the bag of carrots! Now, for those of you who don’t know me that well, I am actually not a fan of carrots. There’s just something about the taste (raw and/or cooked) that I don’t like. I remember how I’d use to add it to my stir-fry just for the colour. I’d eat a slice or two and I’d just be like, no. So when I got this bag of carrots, I had no idea what I was going to do with them. I wanted to give them to Lydia, but I know for a fact that she also does not like carrots. She only eats them because she knows it’s good for your eyes. But other than that, she tries to avoid eating them too.

Breakfast Muffins: Spiced Carrot

Solution? Spiced Carrot Muffins! At least this way I won’t taste much of the carrot… I hope. And I still even have 3-4 baby carrots lying in my fridge! No clue what to do with them next. In the end I think my Spiced Carrot Muffins turned out to be Spiced Carrot Cake Cupcakes because I decided to top the muffins with a yummy cream cheese frosting (I know, so much cream cheese for the past week – for those of you who didn’t see it, I made a Red Velvet Cheesecake on the weekend for my birthday!) I know, this week I was supposed to make savoury muffins as I was unintentionally alternating between sweet and savoury. I feel like it’s a mix? Remove the cream cheese frosting and you have a sort of savoury muffin? Maybe. Please also check out the original recipe over on Williams-Sonoma. The original recipe uses raisins, and if you know me, another thing I don’t like. So add them if you want to (about half a cup), otherwise, I replaced them with roughly chopped walnuts. I also tweaked up the spices by adding ground allspice, cloves, and nutmeg. Much yumminess indeed!

Breakfast Muffins: Spiced Carrot Ingredients

PREP TIME 15 MINS | COOKING TIME 15-18 MINS | MAKES 12 MUFFINS

INGREDIENTS

For the muffin batter

  • 2 cups all-purpose flour
  • 1 & 1/2 cups carrots, peeled and finely shredded (2 large carrots, or 4-5 baby carrots)
  • 2 large free range eggs
  • 1 cup buttermilk or sour cream
  • 2/3 cup firmly packed light brown sugar
  • 1/2 cup walnuts, roughly chopped (optional)
  • 6 tbsp unsalted butter, melted
  • 2 tsp baking powder
  • 1 tsp ground cinnamon
  • 1/2 tsp baking soda
  • 1/2 tsp ground allspice
  • 1/4 tsp ground cloves
  • 1/4 tsp ground nutmeg
  • 1/4 tsp salt

For the cream cheese frosting

  • 250g cream cheese, at room temperature
  • 60g butter, at room temperature
  • 1/3 cup icing sugar, sifted
  • 1/4 tsp vanilla extract

METHOD

  1. Preheat oven to 220C. Line a 12 hole muffin pan with paper cases.
  2. Add the flour, baking powder, baking soda, salt, and spices into a large bowl and stir together until combined. In another bowl, whisk together the eggs and brown sugar until blended. Whisk in the buttermilk, and then butter.
  3. Add the egg mixture to the flour mixture and, using a rubber spatula, stir just until evenly moistened. Fold in the carrots and walnuts just until evenly distributed (reserve some for decorating later).
  4. Spoon the batter into the prepared muffin cups, filling them 3/4 of the way full. Bake for about 15 to 18 minutes, or until the muffins are golden brown and a toothpick inserted into the centre comes out clean. Once done remove from the oven and set aside to completely cool down.
  5. Meanwhile, as the muffins bake in the oven, smooth the butter, cream cheese, and vanilla together using an electric handheld mixer. Fold in the icing sugar, and then use the mixer again to beat it until it is light and fluffy. Place the icing mixture into a piping bag (or a regular zip lock bag if you don’t have one in handy like me, and snip off a corner to allow the frosting through). Frost the muffins/cupcakes, and top with some crumbed walnuts and shredded carrots.

Breakfast Muffins: Spiced Carrot

I think I may have gotten Lydia into a dilemma; she now can’t choose between my Banana and Cinnamon Crumb Top Muffins, my Pumpkin and Cheesecake Muffins, and now these babies!

BON APPÉTIT

– Ally xx

myTaste.com

Honeyed Dutch Carrots

Honeyed Dutch Carrots

Hello Everybody! If you read yesterday’s blog post, I mentioned that I would be posting the recipe to these lovely honeyed Dutch carrots separate from yesterday’s recipe – so here it is now! Don’t worry, I’m not going to write another long-winded post as I have no back story to this. I just wanted some vegetables to go with my steak au poivre yesterday and I looked up some ways that I could make my Dutch carrots a little more fancy than just having them just steamed.

I came across Julie Goodwin’s recipe for honey carrots and they are just divine! Instead of using just regular honey, I decided to go for a fusion by Capliano which is a blend of honey and ginger (recently getting into these honey fusions, if you remember from a few posts I used a honey and maple syrup a couple of time in various recipes). Also, apparently these carrots are in season in Australia around July time (though I am one week into August already), but if you do want to keep on your budget, you can make do with ordinary carrots, just remember to cut them into small batons to cook through well.

PREP TIME 5 MINS | COOKING TIME 12 MINS SERVES 2-3

INGREDIENTS

  •  1 bunch baby Dutch carrots, peeled and tops trimmed to 2cm
  • 10g unsalted butter
  • 1 tbsp Capilano honey and ginger blend
  • Ground salt and pepper to taste

METHOD

  1. Steam (or microwave) the carrots for 3 minutes until tender but not soggy.  The time will depend on how big that carrots as smaller ones may need even less than 3 minutes.
  2. Melt the butter in a medium frypan over medium-high heat. When it starts to froth, add the carrots and cook for about 1-2 minutes, browning the carrots slightly before adding the honey in. Then toss in the pan for 5-6 minutes or until the honey becomes a lovely dark brown in colour.
  3. Season with salt and pepper and serve immediately as an accompaniment to any dish. In my case, I served with yesterday’s Braised Steak au Poivre in Red Wine dish.

Honeyed Dutch Carrots

BON APPÉTIT

– Ally xx

myTaste.com