Spicy Chipotle Vegetarian Mafalde Soup

Spicy Chipotle Vegetarian Mafalde Soup

Hello Everyone! Unfortunately it’s snap back to reality, (oh there goes gravity) for all (some?) of us. I hope everyone enjoyed their Christmas and New Year break, and y’all are ready to tackle what 2020 has in store for you! I’m going to keep the introduction short only because I saved a little something for last in this post for tonight. It has become a tradition that I do every beginning of year on the blog, for you guys to get the chance to know more about me on a personal level. So if you want to go ahead and read it, continue scrolling after you’ve had a read through the recipe of course!

Since towards the end of 2019, I have been slowly cutting down on my meat intake, specifically beef and pork (with very rare cheat/naughty days). I still ate chicken and seafood though and this year I am going to attempt to, if not completely cut out then, at least reduce my intake of chicken. I don’t think I’ll ever be able to fully go vegetarian, ever, but I think I can survive a couple of days a week of being completely vegetarian.

Spicy Chipotle Vegetarian Mafalde Soup

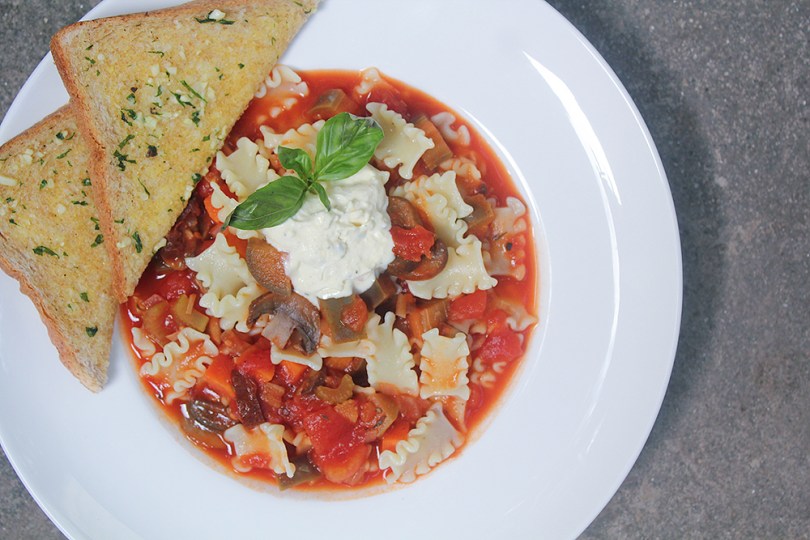
The original recipe by Rachael Ray over on Rachael Ray Mag, that inspired me to make and share this dish with you tonight is far from being vegetarian. I painfully ditched the ground beef and Italian sausages from the recipe and instead loaded the dish up with hearty and flavourful vegetables such as portobello or swiss brown mushrooms, eggplant, celery, and carrots. Just as delicious as Italian sausages *cries internally*! Of course, don’t forget to substitute the chicken stock out for veggie stock instead. However, if you’re a meat lover, then by all means go ahead and follow Rachael Ray’s recipe.

(Apologies, the intro ended up being much longer than I had anticipated when I said that I’d keep it short *cheeky grin*)

Spicy Chipotle Vegetarian Mafalde Soup Ingredients

PREP TIME 15 MINS | COOKING TIME 30 MINS | SERVES 4*

* Serves 4 as a main, 8 as a side dish or starter.

INGREDIENTS

For the soup

  • 250g Mafalde pasta**
  • 250g portobello or swiss brown mushrooms, sliced
  • 1L vegetable stock
  • 1 can (400g) whole tomatoes
  • 2 cups passata or tomato purée
  • 3 chipotle peppers in adobo sauce, sliced or minced
  • 2-3 dried bay leaves
  • 2-3 garlic cloves, minced
  • 1 celery stalk, sliced
  • 1 large Lebanese eggplant, diced
  • 1 small carrot, peeled and diced
  • 1 small red onion, sliced
  • 2 tbsp olive oil
  • 1 tsp dried thyme
  • Salt and freshly ground black pepper, to taste

For the cheese mixture

  • 1 cup mascarpone cheese
  • 1/4 cup heavy cream, or crème fraîche
  • Freshly grated Parmigiano-Reggiano

To garnish & serve with

  • Handful of fresh basil leaves, torn
  • Garlic bread, on the side

** Mafaldine, also known as Reginette or simply Mafalda or Mafalde, is a type of ribbon-shaped pasta. It is flat and wide, usually about 1cm in width, with wavy edges on both sides. It is prepared similarly to other ribbon-based pasta such as linguine and fettuccine. If not available in your local grocers, then by all means you can use lasagna sheets as stated in the original recipe, or any other shaped pasta.

METHOD

  1. Pasta: Bring a large pot of salted water to a boil over high heat. Add the pasta to the boiling water and cook until a few minutes shy of the package directions. In my case, package states 13 minutes, so I cooked them for 10 minutes. Drain, rinse under cold water, and then set aside.
  2. Cheese Mixture: In a medium-sized mixing bowl, mix the mascarpone, parm, and cream together. Season with a touch of salt and then set aside.
  3. Soup: In a soup pot or heavy duty Dutch oven, heat olive oil over medium-high. Sauté the minced garlic until golden brown and fragrant, about 30 seconds. Add the sliced onions and cook until soft, a further 30 to 45 seconds. Add the chopped celery stalks and carrots, and season with salt and pepper to taste. Cook for a further 2 minutes. Add the mushrooms and eggplant in together with the dried thyme, dried bay leaves, and chipotle peppers. Cook for a further minute.
  4. Pour the canned tomatoes, passata, and vegetable stock over the sautéd vegetables, and give it a good stir. Reduce the heat down to medium-low. Cover and leave to simmer for about 15 minutes to allow the flavours to meld. Check and stir occasionally. After about 15 minutes, add the cooked Mafalde pasta to the pot and cook until al dente, about 3 minutes.
  5. Serve: Once done transfer to individual soup bowls. Top each serving with a fat dollop of the cheese mixture and garnish with basil leaves.
  6. Serve with hot, steamy, and crusty garlic bread on the side. I used leftover wholemeal bread slices that was sitting in our pantry and made a garlic-malunggay butter spread for it. Enjoy!

Spicy Chipotle Vegetarian Mafalde Soup

Spicy Chipotle Vegetarian Mafalde Soup

BON APPÉTIT

Now as promised at the beginning of this post:

Most people make resolutions and either keep them or forget about them after the first month. I personally have never made any resolutions ever only because, knowing myself, I’d never stick to them. It was only until recently (two years ago to be exact), that I started living by an intention in mind on how I would go about to tackle the year ahead. Last year, it was to:

Go with the flow. Force nothing. Let it happen.
Trusting that whichever way it goes, it’s for the best.

Sometimes I scare myself for how true my intention played out for the year. I entered 2019 with challenges I hadn’t overcome from the previous year, and in time, with this intention I had set, I overcame those challenges. It may not have turned out the way I had originally planned, but I believe that it was for the best.

You see, when I left my job in Brunei, it was because I had a job waiting for me in Australia. Unfortunately I fell short when it came to acquiring a visa to go and work there. With that, I gave up my opportunity to go to Australia. I decided to just go with the flow and see where I’d go next; maybe Australia wasn’t meant for me. Just yet.

I decided to find work here in the Philippines. It wasn’t easy. I was unemployed for 7-8 months and running on the little savings that I had to support not only myself, but my Mom and my sister. It was hard because we were basically starting from scratch having just moved away for good from Brunei. I was starting to fall into a bad place, mentally. I questioned myself and my abilities. I questioned why I couldn’t land a job. Every interview I went to had such promising things to say, not only about my skills and abilities, but my personality as well. But I always fell short in the end. There was always the better candidate. But by God’s grace, I finally landed a job after more than a hundred applications. Finally someone who believed in my capabilities rather than being threatened by them.

I was finally back on my feet. But nothing, nothing. Nothing could have prepared me for the ultimate challenge that was unexpectedly thrown at me. The heavens gained a warm and kind-hearted angel. That angel is Mother. I’m not going to get into much detail on this topic, but all I can say is that it wasn’t until this that I realised why I ended up not going to Australia for work and landed a job here instead. It was so that I could spend the remaining time my Mom had left in this world with her, by her side, up to her last breath.

Towards the end of 2019 (actually just about 2 weeks ago), I was scrolling through Facebook one day and came across this post that my cousin shared:

2020

It really resonated with me. God did make me strong for the challenges I faced this 2019. Even though losing a loved one, especially a mother, comes with so much pain, He has already blessed me with a very unexpected gift before 2019 ended. So I believe and trust that He will push through with His plans for me, to make me happy for 2020.

And now I also truly believe that ending up here in the Philippines instead of going to Australia, was the for the best.

My goal for 2020 is to be happy, no matter what.

– Ally xx

myTaste.com

Advertisement
Spicy Chipotle Adobo Ribs sa Gata

Spicy Chipotle Adobo Ribs sa Gata

Hello Everyone! Okay I lied… Well not exactly. You see, last week I said that that would be my last Coconut post for the month. Technically it is since it’s already February, but I do have one more Coconut post to share *cheeky grin* The recipe that I’m going to share with you guys tonight was actually not planned at all. I didn’t want this to end up in my already growing archive of recipes that I never get around to posting because it doesn’t fit with the current theme that I have going. Lucky for me tonight’s dish still fits! Let’s just say that this is a special Chinese New Year post to welcome in the Year of the Pig!

I saw a post on Instagram a while back, towards the beginning of the year I believe, of a new dish that Max’s Restaurant put out which is their Adobo Ribs. I haven’t had the chance to try it yet, but it made me want to try it out at home for myself, with my own twists of course – the twists being adding chipotle peppers for a spicy kick and stewing them in coconut milk as well – to fit with the theme of course *cheeky grin*

Spicy Chipotle Adobo sa Gata (Marination Process)

Adobo can mean marinade, sauce, or seasoning. It is a highly popular Filipino dish amongst locals and even foreigners. I remember when I was still studying in Australia, my taxi driver asked me where I was from. I told him that I was born in Brunei, but a Filipino by blood. To which he replied, “Oh I love the Philippines! And I love… What’s that dish called? Chicken Adobo!” Basically any non-Filipino that I’ve talked to throughout the years, Chicken Adobo and Sinigang are their favourite Filipino dishes.

Anyway, the cooking process of adobo is indigenous to the Philippines. Pre-colonial Filipinos often cooked or prepared their food with vinegar and salt to keep them fresh longer in the tropical climates of the country. To make adobo, you start off by marinating any variant of meat, seafood, or vegetables in vinegar, soy sauce, fresh garlic, black peppercorns, and dried bay leaves. It is then simmered in the marinade until the meat is tender. The dish is characteristically salty and sour in taste.

Now adding gata to the classic adobo makes the dish not only hearty, but also rich and creamy. Would you believe me if I said I’ve never had adobo sa gata before? I mean, I’ve had adobo countless of times growing up, but never with gata – until about a few weeks ago when we had lunch out after our Sunday morning mass. It felt like I had discovered a whole new world of adobo!

Spicy Chipotle Adobo sa Gata Ingredients

PREP TIME 1 HOUR | COOKING TIME 45 MINS | SERVES 4

INGREDIENTS

  • 1 kg pork ribs
  • 5-6 dried bay leaves
  • 3 chipotle peppers in adobo sauce, sliced or minced
  • 3 garlic cloves, crushed
  • 2 garlic cloves, sliced thinly
  • 1/2 cup coconut milk (fresh, canned, or frozen)
  • 1/2 cup water
  • 1/2 cup white vinegar
  • 1/4 cup dark soy sauce
  • 1 tbsp whole black peppercorns
  • Red bird’s eye chilli, to garnish

METHOD

  1. In a large cooking pot, add the pork ribs together with the soy sauce, crushed garlic, whole black peppercorns, dried bay leaves, and chipotle peppers. Marinate for a minimum of 20 minutes. If you have time, marinate for an hour for the flavours to really infuse into the meat.
  2. Add the vinegar and water. Cover and cook over medium-high heat for about half an hour. Once done, turn the heat off and leave it aside, covered, for a further half an hour. The residual heat* from the cooking process will further cook and tenderise the meat.

*Residual heat, or residual cooking, or carry-over cooking, is when food continues to cook after it has been removed from a heat source. The heat held within the food itself raises its overall temperature before it starts to cool down.

  1. Meanwhile, heat about 2-3 tablespoons of oil in a small frying pan. Fry the garlic slices until golden brown, about 2-3 minutes. Drain and set aside.
  2. Turn the heat back on again on low and bring it back to a slow simmer. Once simmering, add the coconut milk in. It is important to slowly bring it back up to a simmer to avoid curdling the coconut milk. This happens when it is heated too quickly. Cook for a further 15 minutes.
  3. Once done, turn the heat off and transfer to a serving plate. Garnish with the fried garlic slices and chopped bird’s eye chillies. Serve with steamed jasmine rice and enjoy!

Spicy Chipotle Adobo sa Gata

Spicy Chipotle Adobo sa Gata

And with that, I would like to wish all my Chinese Family, Friends, Followers, and all those who are celebrating, a Happy Chinese New Year! May the Year of the Earth Pig bring you happiness, prosperity, good health, peace and success! 恭喜发财 Gōngxǐ fācái!

BON APPÉTIT

– Ally xx

myTaste.com

Ropa Vieja con Huevos Rancheros

Ropa Vieja con Huevos Rancheros

Hello Everyone! You guys must be thinking that I’m on a roll here! Three consecutive recipes?! Don’t get used to it because it’s just for this one time to get everything wrapped up for this month so that I can start a new theme for the month of June! I did mention in a couple of posts back that for the month of June, I’ll be switching up my upload schedule day to Mondays, and the reason does indeed correlate to the theme. I’ll keep everyone on their toes for a while longer and come Monday, all will be revealed!

I had lots of fun last night a my friend’s place for sungkai (iftar) and of course to celebrate her daughter turning 1! Tonight’s post is a little later than usual this time around because I literally just came back from another night out for a sungkai catch up dinner with friends. I’ve probably mentioned this before in a post somewhere on this blog, but I’ll mention it again just to clear things up – I’m not a Muslim. I don’t practice ramadhan which then subsequently means that I don’t have to break fast for iftar. Yes I was born and bred in a Muslim country, and even though I have been exposed to these practices for practically my whole life, I wasn’t born into the religion (hint on the ‘Third Culture Foodie’!).

Anyway, tonight’s recipe is sort of another way you can use leftover Ropa Vieja to make similar, but not so Eggs Benny dish. Okay, I mentioned in yesterday’s post about this Latin American café that Jialing and I found during one of our “Fatness Fridays” adventures. While I thought back to this day, I was totally convinced that the Huevos Rancheros dish that I had was a marriage of it and the Ropa Vieja sandwich that Jialing had, but it wasn’t until I scrolled through hundreds of Instagram photos on my feed to recall the dishes to find out that they were two separate things.

Ropa Vieja con Huevos Rancheros

In my last post I said that a Ropa Vieja Eggs Benny came into mind – which it did, but that wasn’t they way I had initially imagined it. In fact, this Ropa Vieja con Huevos Rancheros was how I pictured the ‘Eggs Benny’ dish to look, but in the end I decided to reimagine it just because this didn’t really have the feel of an Eggs Benny dish. However, I didn’t want this dish to end up in my archive of ‘will never get around to posting’ but since this dish is sort of related to the last two I posted, I thought I’d share the recipe with you! I mean, it’s essentially, well practically identical to the last recipe, just a few minor differences, especially with the plating.

Huevos Rancheros, or in English “rancher’s eggs”, is a traditional breakfast dish served as a mid-morning fare on rural Mexican farms – hence its name. The dish is made up of fried eggs that is served atop a lightly fried tortilla (traditionally corn, but other adaptations have used wheat tortillas instead), with a tomato-chilli sauce, refried beans, and slices of avocado or guacamole. You could say that my adaptation to marry Ropa Vieja and Huevos Rancheros together is an amped up version of a humble and traditional Huevos Rancheros brekkie.

Ropa Vieja con Huevos Rancheros Ingredients
Ignore the other ingredients photographed but not mentioned below – the other ingredients are of the ropa vieja dish to accompany this dish!

PREP TIME 5-10 MINS | COOKING TIME 10-15 MINS* | SERVES 3

*Provided that you’ve made your Ropa Vieja ahead of time, i.e. the night before, if not then make sure you allocate yourself 3-4 hours altogether for this recipe

INGREDIENTS

  • Leftover Ropa Vieja
  • 3 super soft flour tortilla wraps
  • 3 large free range eggs
  • 2 large avocados, pitted, peeled, and halved**
  • 1 can (16oz) organic black beans, drained, blanched in hot water, and smashed
  • Chopped spring onions, to garnish
  • Tabasco sauce, to taste

**Squeeze a touch of lemon or lime juice to prevent it from browning

METHOD

  1. If you haven’t pre-made your Ropa Vieja for this recipe, then start of with this before moving on to the other components of the dish. Allocate yourself about 3-4 hours prior.
  2. Heat about a tablespoon of olive oil in a small frying pan. Crack the egg in and fry until the edges start to brown. I personally like my sunny-side up eggs this way – the browned edges gives a nice nutty flavour to the whites which is total yum! Repeat for the remaining eggs.
  3. In a medium-sized non-stick frying pan, lightly heat the tortilla wraps until they start to slightly brown. Remove from the pan and repeat for the remaining wraps.
  4. Place the tortilla wrap on a plate and top with the smashed black beans. Make a nest in the middle and top with the ropa vieja, sunny-side up egg, and halved avocado to the side. Drizzle a bit of tabasco sauce over and sprinkle some chopped spring onions. Serve and enjoy!

Ropa Vieja con Huevos Rancheros

Tune in on Monday for an all new theme and a bunch of yummy recipes!

BON APPÉTIT

– Ally xx

myTaste.com

Ropa Vieja Eggs Benedict

Ropa Vieja Eggs Benedict

Hello Everyone! I’m getting this post up way earlier than I usually do just because I’m about to leave and head on over to a friend’s house to celebrate her daughter turning 1 today! I can’t believe the little munchkin is a year older already – it felt just like yesterday I was holding her in my arms just only being 2 or 3 months old. Gosh how time flies by so quickly! With that being said, I honestly have no idea what time I’ll be back home tonight and thus the early upload.

Tonight’s recipe is a branch off from the Ropa Vieja recipe that I posted just last night. When I was thinking of what other Eggs Benny recipes I could whip up to share with you guys, I immediately thought back to the time Jialing and I had our weekly “Fatness Friday” sessions in-between our classes in search of great food at cafés and/or restaurants that we have yet to explore. One Friday afternoon, we came across a Latin American café in Surry Hills (no, not Cafe con Leche hehe) I don’t actually remember the name of the place. Jailing had the Ropa Vieja sandwich while I had their Huevos Rancheros, and BOOM! A Ropa Vieja Eggs Benedict dish came into mind.

Ropa Vieja Ingredients

PREP TIME 5-10 MINS | COOKING TIME 10-15 MINS* | SERVES 3

*Provided that you’ve made your Ropa Vieja ahead of time, i.e. the night before, if not then make sure you allocate yourself 3-4 hours altogether for this recipe

INGREDIENTS

For the eggs benedict

  • Leftover Ropa Vieja
  • 3 English muffins, halved, slightly toasted, and buttered
  • 3 large free range eggs
  • 1 large avocado, peeled, pitted, and smashed**
  • 1 can (16oz) organic black beans, drained, blanched in hot water, and smashed
  • Chilli flakes, to garnish (optional)
  • Chopped spring onion, to garnish

For the tabasco hollandaise sauce

  • 3 large free range eggs, yolks separated
  • 175g unsalted butter, cut into cubes, at room temperature
  • 2 tbsp water
  • 2 tbsp fresh lemon juice
  • 1 tbsp tabasco sauce, less or more to adjust to your liking
  • Fresh Thyme Leaves
  • Ground salt and black pepper to taste

**Squeeze a touch of lemon or lime juice to prevent it from browning

METHOD

  1. If you haven’t pre-made your Ropa Vieja for this recipe, then start of with this before moving on to the other components of the dish. Allocate yourself about 3-4 hours prior.
  2. Tabasco Hollandaise Sauce: While the balsamic reduction is underway and slowly simmering, start on the Hollandaise sauce. Place a heatproof bowl over a medium saucepan that is quarter-filled with water. Make sure that the bowl should fit snugly into the pan without touching the water (lift the bowl to check and remove some water if it does). Bring the water to a boil over high heat, then reduce heat to very low so the water is barely simmering (there should be almost no movement at all). It is important that the water is barely simmering while making the sauce – if it is too hot, the egg yolks will cook too much and the sauce will curdle.
  3. Place the egg yolks and the 2 tablespoons of water in the heatproof bowl and place over the pan. Whisk the mixture constantly for 3 minutes or until it is thick and pale, has doubled in volume and a ribbon trail forms when the whisk is lifted.
  4. Add the butter a cube at a time, whisking constantly and adding another cube when the previous one is incorporated completely (about 10 minutes to add it all in). If butter is added too quickly, it won’t mix easily with the egg yolks or the sauce may lose volume. At the same time, it is important that the butter is at room temperature and added a cube at a time, so that it doesn’t take too long to be incorporated – if the sauce cooks for too long, it can curdle.
  5. Remove the bowl from the pan and place on a heatproof surface. The cooked sauce should have the consistency of very lightly whisked thickened cream. Whisk in the lemon juice, tabasco sauce, fresh thyme leaves, and season with salt and pepper. Set aside.
  6. Poached Eggs: Bring small saucepan of water to the boil over medium-high heat, then reduce the heat to low-medium – the water should be just simmering. Add in the vinegar and stir. Crack one egg into a small bowl and quickly, but gently pour it into the water. Repeat with the other egg. A really soft poached egg should take around 2 minutes, but if you want it a bit more firm, it will take about 4 minutes. To check if they’re cooked right, carefully remove the egg from the pan with a slotted spoon and give the yolk a gentle push (you can tell just by your instincts if it is under or over – or perfect)!
  7. Assembly: Spread the smashed avocado on the toasted and buttered English muffin half and top with the smashed black beans. Build up with the ropa vieja followed by the poached egg. Drizzle a generous amount of the tabasco hollandaise sauce and sprinkle some chilli flakes and chopped spring onions. Serve and enjoy!

Ropa Vieja Eggs Benedict

Ropa Vieja Eggs Benedict

Next month I’ll start off with a whole new theme so stay tuned for that! To give you guys a clue, I’ll be switching up my upload schedule day to Mondays just for the month of June. Yes, the fact that I’ll be posting on Mondays does correlate to the theme! My loyal and long term followers may know, and to anyone who wants to take a stab and guess, comment down below!

Don’t forget that the overall theme for Amcarmen’s Kitchen for 2018 is Breakfast Eats!

But before that, I have one more recipe that will go up tomorrow night so stay tuned for that to know what else you can do with leftover Ropa Vieja!

BON APPÉTIT

– Ally xx

myTaste.com

Ropa Vieja

Ropa Vieja

Hello Everyone! So if you read last week’s post, you’ll know that tonight is part 1 of the actual recipe that I’ll be sharing tomorrow night. I’ve decided to split it up just for easy future reference, i.e. if you’re just looking for a mouth-watering Ropa Vieja recipe without it being in an Eggs Benny, then this is it! I first came across this dish during my university years in Australia. It wasn’t even the main highlight of the dish, rather a small side to go with the Colombian-style Arepas that was  my absolute favourite brunch dish then *drools just thinking about how much I miss having it in my tummy* It was a little place that Jialing had stumbled upon when she took the wrong bus to uni and got off at a stop that was just opposite Cafe con Leche.

Ropa Vieja is actually a Spanish term that directly translates to “old clothes” as the shredded beef and vegetables that are the main components of the dish resemble a heap of colorful rags. Though the dish dates back to the Middle Ages of Spanish Sephardi, it was then taken to Cuba where the Cubans made it their own. Ropa Vieja is now one of Cuba’s most popular and beloved dishes; in fact, so popular in fact that it is one of the country’s designated national dishes! It is also popular in other areas or parts of the Caribbean such as Puerto Rico and Panama.

The traditional method of braising the meat is in water. However, for this recipe, I am going to release all those flavourful beef juices directly into the sauce together with carrots, celery, bay leaves, onion, and garlic to get all the flavours of a stock going at the same time. This infuses the sauce with some umami-flavour qualities and natural sweetness from the vegetables, making everything of braising by this method super rich and mouth-watering. Do check out the original recipe by Kimberly from The Daring Gourmet.

Ropa Vieja Ingredients

Ignore the avocado, black beans, and the egg in the shot above, that’s for the Eggs Benedict recipe to follow tomorrow!

PREP TIME 15 MINS | COOKING TIME 4 HOURS 30 MINS | SERVES 8-10

INGREDIENTS

  • 1kg tender beef chuck
  • 1 cup beef broth*
  • 1/2 cup dry white wine**
  • 4 chipotle peppers in adobo sauce, sliced
  • 4 garlic cloves, minced
  • 2 dried bay leaves
  • 1 can (16oz) chopped tomatoes with sliced olives
  • 1 brown onion, halved and sliced thinly
  • 1 large carrot, sliced
  • 1 large celery stalk, sliced
  • 1 medium-sized red, yellow, and green capsicum
  • 1 heaped tbsp tomato paste
  • 1 tbsp baby capers, rinsed and drained
  • 2 tsp chilli powder
  • 2 tsp dried oregano
  • 2 tsp ground cinnamon
  • 2 tsp smoked paprika
  • 2 tsp sea salt
  • 1/2 tsp freshly ground black pepper
  • 1/8 tsp ground cloves
  • 1/8 tsp ground nutmeg
  • Chopped spring onion, to garnish

*Or 1 beef bouillon cube dissolved in 1 cup of hot water

**The first time I made this dish, I omitted the dry white wine only because I didn’t have any on my pantry shelf at that moment. For those who are living in, or know about Brunei, it’s not as easy as popping over to the shops to buy a bottle. Anyway, I found that the flavours weren’t really brought out as much as when I attempted this dish for a second time with the wine. It felt flat like that pop or zing was missing from it.

METHOD

  1. Pat the beef dry and rub all over with the dried herbs, spices, and seasoning -dried oregano, chilli powder, ground cinnamon, ground cloves, ground nutmeg, smoked paprika, sea salt and ground black pepper.
  2. Heat about a tablespoon in a slight large Dutch oven over high heat. Once it is very hot and starts to smoke a bit, add the beef and brown generously on all sides. Once done, transfer the beef to a plate. Do not discard the drippings and blackened bits in the pot. They are key to the flavour!
  3. Turn the heat down to medium, then add the minced garlic and cook until slight golden and fragrant. Follow with the sliced onion, cooking until softened before adding the sliced carrots and celery, and the chopped chipotle peppers. Cook for about 15 minutes until caramalised. Deglaze the pot the the dry white wine and bring it to a rapid boil, scraping up the browned bits at the bottom of the pot.
  4. Add the chopped tomatoes, tomato paste, beef broth, and bay leaves. Leave to simmer for about 5 minutes.
  5. Return the beef and bring to a boil. Reduce the heat down to low, then cover and simmer for 3-4 hours or until the beef is fork tender and falls apart easily.
  6. While the beef is slowly simmering away, you can move onto roasting your capsicums. Turn a stovetop burner to its highest setting and place the capsicum directly on the flame. Use a pair of tongs to turn them over until the skin has completely blackened. Put the capsicum in a heat-proof mixing bowl and cover with plastic wrap. The skin will loosen as it steams, and once it has cooled down a bit, you can easily remove the skin with your fingers under running water. Slice thinly.
  7. Once the beef is done, discard the celery, carrots, and bay leaves. Remove the beef from the sauce, transfer to a plate and shred. Return the shredded beef to the pot and stir in the roasted capsicum and baby capers. Season with salt and pepper to taste and leave uncovered to simmer until the sauce has thickened, about a further 15-20 minutes.
  8. Serve the beef in a large serving dish and enjoy! Best served with steamed rice and black beans on the side.

Ropa Vieja

Ropa Vieja

As per Kimberly, for a variation on traditional beef you can also use pork or chicken, bone-in/skin-on for the most flavour, or boneless breast or thighs. I might try this recipe out with succulent pork shoulders next time *already drooling*.

BON APPÉTIT

– Ally xx

myTaste.com

Hearty Chicken Chipotle Soup

Hearty Chicken Chipotle Soup

Hello Everyone! Another week, another soup on the blog today! Just three more soupy recipes to go until the end of Winter Warmer Month, and gosh until the end of July as well! I can’t believe time has flown by that fast! It’s making me said because that basically means that I have about 2 weeks left in this beautiful city that I have called home for the past 4 and a half years. It’ll be heartbreaking to leave, but it’s time that I get my career life together and make that transition from uni life to a professional working life.

Hearty Chicken Chipotle Soup

Anyway, enough about how my life is and will be for the next few weeks/months/years, let’s get onto today’s recipe shall we? If you’ve read my previous blog post on my Moroccan Pumpkin Soup, you might remember me going on about how I can’t believe that they don’t sell chipotle peppers in any of the big grocery stores here in Sydney. Well, when I was out doing a quick shopping run at a with my friend Marissa (basically just buying extra ingredients to go with our dinner for that day), I tried my luck to see if the Asian store that we went to sold chipotle peppers. To my surprise, they did, canned and in adobo sauce as well! My reaction was sort of like a what the *bleep* is this for real kind of reaction. I even said to myself that I should’ve popped by this store before I went all Moroccan on my pumpkin soup, and this was honestly like 2 day after I had posted my pumpkin soup recipe. Since they had them in store, and only 4 cans remaining, I decided to buy a can and figure out ow I can use them for another recipe seeing as I practically went cuckoo trying to find these peppers.

Hearty Chicken Chipotle Soup Ingredients

Today I had actually scheduled a recipe for Cauliflower and Stilton Soup, but instead, seeing as I had the chipotle peppers, I decided to do a Hearty Chipotle Chicken Soup. The soup that I made is the exact definition of a Winter Warmer Soup; it had a nice kick to it from the chipotle peppers, and a lovely sweetness to it from the corn, while the beans and the chicken meat bulked the soup up. You can find the original recipe on Taste of Home. I’ve tweaked the method a bit as well as some of the ingredients for my recipe.

For the chicken broth, I bought 2 chicken carcasses from the butcher and boiled it together with some bay leaves, sea salt, black peppercorns, and ginger for about 45 minutes to an hour to get the flavour into the broth. I then shredded the meat from the carcasses and used them to bulk my soup up instead of using chicken breasts as the original recipe used. I also used fresh field grown gourmet tomatoes and roasted them over the gas stove to give it that flame-roasted flavour to them for my soup. Yes I probably picked the most time consuming way to make this soup, but it was all worth it in the end I believe. I completely forgot to deseed the chipotle peppers, as the original recipe stated, before adding them to the soup, but I’m glad I didn’t because, though it gave the soup a good kick, it wasn’t as spicy as I thought it be. If I had deseeded them, I don’t think they give the heat that I had with this dish.

Hearty Chicken Chipotle Soup Ingredients

PREP TIME 10 MINS | COOKING TIME 1 HOUR 20 MINS | SERVES 3-4

INGREDIENTS

  • 3 cups chicken broth
  • 3 small field grown gourmet tomatoes, flame-roasted and cut into chunks
  • 2-3 dried bay leaves
  • 2 large chicken carcasses, washed and cleaned thoroughly
  • 2 chipotle peppers in adobo sauce, sliced or minced
  • 2 ears of corn, cut from the cob
  • 2-3 garlic cloves, minced
  • 1 small red onion, diced
  • 1 can (400g) cannellini beans, drained
  • 2 tsp adobo sauce (from the chipotle peppers)
  • Fresh cilantro or coriander
  • Ground salt and black pepper to taste
  • Thickened cream or sour cream
  • Thumb-sized ginger, sliced
  • Whole black peppercorns

METHOD

  1. Add the chicken carcasses together with the bay leaves, ginger, salt, and whole black peppercorns, to a large pot with enough water to cover the chicken. Boil for about 45 minutes to an hour over medium-high heat. Remove the chicken carcasses from the broth and set aside to cool. Strain the broth into a bowl and discard the bay leaves, ginger, and peppercorns. Set aside for later.
  2. Once the chicken carcasses have cooled down, pull the meat from the chicken carcasses and shred to small pieces. Set aside.
  3. Heat the same pot over medium-high with a little bit of cooking oil. Sauté the garlic until golden brown and fragrant. Then add in the onions and cook until soft. Add in the shredded chicken pieces and season with a bit of salt and pepper. Give it a good mix and follow with the adobo sauce, chipotle peppers, cannellini beans, sweet corn, and tomatoes to the chicken mixture. Give it a good mix and let it cook further for about 5-6 minutes before adding the chicken broth in.
  4. Bring to a boil. Once boiling, bring the heat down to medium-low and let the soup simmer away for a further 10-15 minutes to ensure all the flavours blend together.
  5. Divide the soup equally into serving bowls (3 large bowls, or 4 small bowls) and top with a dollop of whipped thickened cream and fresh cilantro. Serve immediately and enjoy!

Hearty Chicken Chipotle Soup

Anyway, before I end this post, I would just like to share my experiences of how I’ve heard other people try to pronounce chipotle (chee-poat-lay). The very best, and even I still remember until now even if it’s been just about 2 years ago, I’ve heard chip-poh-lah-tay from Jack Harries (jacksgap) on YouTube when he was doing a chilli challenge with Jamie Oliver, also note the way they say jalapeño, jah-lah-pee-nose instead of HAH-lah-pen-yose.

BON APPÉTIT

– Ally xx

myTaste.com