Halo-Halo Cheesecake

Halo-Halo Cheesecake

Hello Everyone! Yes, I am aware that it has only been two days since my last post (I post a new recipe every Wednesday night), but today, the 16th of April 2021 is a very special day because:

AMCARMEN’S KITCHEN TURNS SEVEN!

I know I’ve told this story countless times, every year I think if I’m not mistaken, but this is really more for my new followers and new friends I’ve made in the past year, or even just those who happen to stumble upon this post while searching for recipes or inspiration.

Long before I started Amcarmen’s Kitchen, I was already posting my kitchen adventures on my personal Facebook page when I left for university back in 2011. I started it as a way to document the food that I was eating, you know, being a 19 year old girl who left home with zero experience in cooking. Honestly, the food I was making, super cringe-worthy, but nevertheless, I’m glad I did that because it’s always great to look back and compare yourself to where you are now, especially during times like this. If you want to read more about my journey leading up to when I first started this blog, you can read all about it here: My Kitchen Journey.

Fast forward from 2011 to 2014, I started Amcarmen’s Kitchen exactly seven years ago today, on April 16 of 2014; it was a fine Wednesday afternoon during my fourth year of university. It was the Easter holidays and I had zero willpower to tackle the mountain of assignments I had to complete before the holidays were over. Instead, I decided to explore the world of wordpress, and before I knew it, Amcarmen’s Kitchen (formerly known then as Kitchen Headquarters) was born.

Halo-Halo Cheesecake

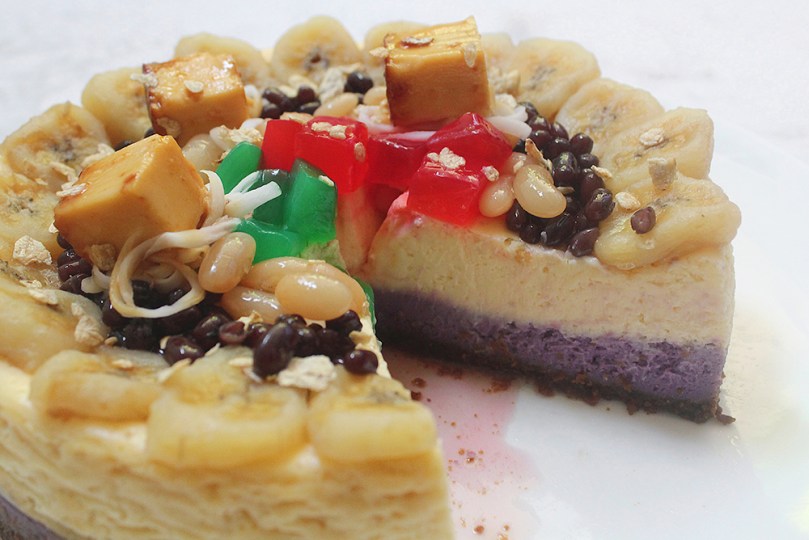
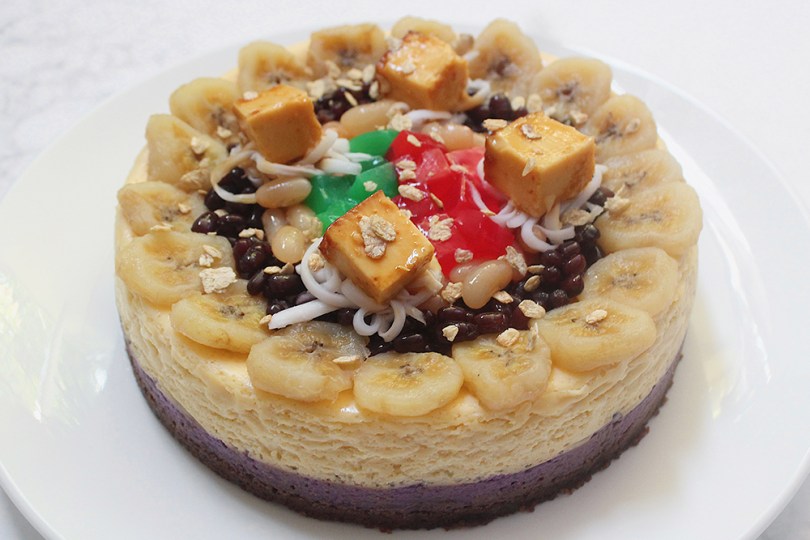
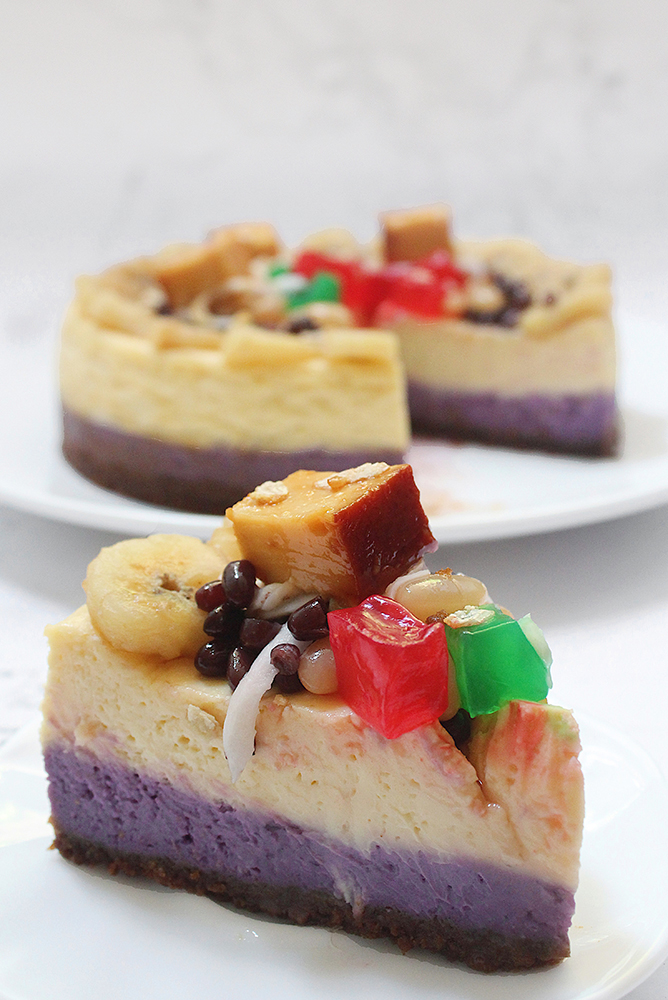
To celebrate today’s occasion, as per tradition on my blog every year, I’ve baked a cheesecake inspired by a very popular dessert here in the Philippines known as Halo-Halo. The word, directly translated actually means ‘mix-mix’ in English, and is essentially a mixture of, but not limited to, crushed ice, evaporated milk or condensed milk, and various ingredients including, ube, sweetened beans, coconut strips, sago, gulaman (agar), pinipig rice, boiled taro or soft yams in cubes, fruit slices, flan, and topped with a scoop of ube ice cream. Though popular all year round, it’s most especially enjoyed during the hot summer days.

I came across the idea of translating this dessert into a cheesecake about a year and a half ago during a work event. A few colleagues of mine and myself took a short break from event rehearsals and stumbled upon a coffee and cakes corner in the lobby of the hotel we were at. While they were ordering coffee, I spotted a Halo-Halo Cheesecake on their cake shelf and was immediately wowed by such an ingenious idea! I unfortunately did not order a slice at that time, only because I was contemplating on whether I should, or shouldn’t (it was a bit pricey think), but when I finally made the decision to order a slice, on a different day, the day of the actual event, they didn’t have any left, or didn’t make a batch that day. So as Amcarmen’s Kitchen’s anniversary drew near, I knew that that was the cake that I was going to make for this special occasion!

Halo-Halo Cheesecake Ingredients

PREP TIME 15 MINS | COOKING TIME 1 HOUR 20 MINS | SERVES 8-10

INGREDIENTS

For the cheesecake mixture

  • 675g (3 packs) cream cheese, softened
  • 250ml all purpose cream, at room temperature
  • 3 large free-range eggs, at room temperature
  • 3/4 cup white granulated sugar
  • 3 tbsp ube jam
  • 1 tsp ube extract
  • 1 tsp vanilla extract

For the crumb base

  • 200g Lotus Biscoff biscuits, crushed
  • 75g unsalted butter, melted
  • 1/2 tsp salt

For the toppings

  • Fresh coconut meat strips
  • Leche flan
  • Nata de coco, red and green
  • Pinipig, lightly toasted
  • Sweetened red beans
  • Sweetened saba bananas
  • Sweetened white beans

METHOD

  1. Preheat oven to 130C (250F or gas mark 1).
  2. Prepare your spring-form pan (about 8” in diameter) and line the bottom and inside with parchment paper, and the outer with aluminium foil. Lightly grease the bottom and sides with a touch of unsalted butter.
  3. Crumb Base: Add the crushed Lotus Biscoff biscuits, salt, and melted butter together in a small mixing bowl. Mix together until well combined.
  4. Press the crumb into the base of your prepared spring-form pan. Set aside in the fridge for about 15 minutes to set while you prepare your cheesecake mixture.
  5. Cheesecake Mixture: Using an electric mixer fitted with a beater attachment, beat, on medium speed, the cream cheese and sugar together in a large bowl until smooth.
  6. With the mixer running, add in the eggs, all purpose cream, and vanilla extract. Mix for a further 2 minutes.
  7. Separate one third of the mixture into another mixing bowl. Add the ube jam and ube extract to the cheesecake mixture and slowly beat until combined.
  8. Pour the ube cheesecake mixture into the prepared spring-form pan, evenly covering the biscuit base. Bake in the oven for about 20 minutes, or until just set.
  9. Once set, remove from the oven and then pour the remaining cheesecake mixture into the spring-form pan. Continue to bake in the oven for another 45 – 50 minutes, or until set.
  10. Remove from the oven and let it cool down completely in its pan before placing it into the refrigerator overnight.
  11. Assemble: Decorate as you wish and serve chilled. Enjoy!

Halo-Halo Cheesecake

As always, before I end tonight’s post, I just want to say a special thank you to my Mom. She was the one who patiently taught me how to cook my favourite dishes when I was growing up. She was my #1 supporter. I lost her in September 2019 due to a fatal stroke which was caused by a sudden rupture of a vein in her brain, but before all that she had underlying illnesses such as diabetes, high blood pressure, and chronic kidney disease. One of the main reasons why I drastically cut out meat such as beef and pork from my diet and started eating healthier (as reflected in my blog for the past 2 years). Thank you Mama for passing down your knowledge and love for food on to me. I know you’re proudly watching from above. I love you.

Lastly, next to my Mom is of course, my very supportive boyfriend. Ever since the day we met, you’ve been proudly sharing my recipes for your family and friends to see. And for that, thank you for your continuous encouragement and for motivating me to continue doing what I love to do! I love you.

Stay tuned tomorrow as I have another special post to share with you all!

Halo-Halo Cheesecake

BON APPÉTIT

– Ally xx

myTaste.com

Advertisement
Num Ansom Chek (Rolled Banana Rice Cake)

Num Ansom Chek (Rolled Banana Rice Cake)

Hello Everyone! February flew by in just the blink of an eye, and before we know it, in a couple of days it’ll be March already! This also means that this will be the last Cambodian recipe that I will be sharing on my blog, for now. There are still so many wonderful recipes that the country has to offer, and maybe one day I’ll revisit the cuisine and discover more dishes that’ll take a liking to my tastebuds.

For our last Cambodian cuisine, I’ll be sharing a popular street snack that is sold across the country, known as Num Ansom Chek, or in English, Rolled Banana Rice Cake. It is a traditional Cambodian snack that is low fat, healthy, and easy to make as it only requires a few ingredients to put together. In many Cambodian snacks, banana is used because of its abundance in the tropical region, and its ritual value. Of course, it is also delicious and sweet!

Num Ansom Chek (Rolled Banana Rice Cake)

Other than bananas, this snack also includes sticky rice and grated coconut. Sometimes, jackfruit is also added, but since I’m not a huge fan of jackfruit, I’ve replaced them with strips of mango instead. You may also add red mung beans or black beans and it can also be sweetened with palm sugar if desired. All of this is then carefully rolled and enclosed in a banana leaf. The resulting cylindrical-shaped snack is then steamed until tender and fragrant.

In Cambodia, this sweet delicacy is traditionally prepared for important celebrations such as Cambodian New Year and the religious festival Pchum Ben (Festival of Souls). With a culture that is heavily influenced by Hinduism and Buddhism, during a festival, it is common practice to offer food to the monks at the temple, and the ghosts of our ancestors, relatives, and friends. One of the foods that they offer is Num Ansom Chek because of their ability to be kept for days without being spoiled. This is due to them being wrapped and steamed in banana leaves.

Before we dive into tonight’s recipe, please take the time to check out the original where I drew my inspiration from over on Vanier Culinary by Thun-Carl Sieu.

Num Ansom Chek (Rolled Banana Rice Cake) Ingredients

PREP TIME 30 MINS* | COOKING TIME 1 HOUR | MAKES 6 ROLLS

*Allow for 6 hours to overnight to soak the glutinous rice.

INGREDIENTS

  • 3 ripe bananas
  • 1 ripe mango (optional)
  • 1 & 1/2 cups sweet glutinous rice, soaked for at least 6 hours or overnight
  • 3/4 cup freshly grated coconut
  • Salt, to taste
  • Banana leaves, 6 of about 15cm x 20cm pieces

METHOD

  1. Drain the water from the soaked rice and mix the grated coconut in with the rice.
  2. Peel and cut the bananas in half and sprinkle a touch of salt over them.
  3. Take a piece of banana leaf and place a small portion of the rice and coconut mixture in a horizontal line along the longer side of the banana leaf. Place a banana half in the centre of the rice and strips of ripe mango if you wish. Top the fruits with more rice, there should be enough to fully surround them.

Num Ansom Chek (Rolled Banana Rice Cake)

  1. Roll the banana leaf tightly around the rice to form a log and fold both edges in to seal. Make sure that the leaf is not loose so that the mixture can use it as a mold. Use string to secure the banana leaf wrapping if needed. Repeat until all of the bananas have been wrapped.
  2. Stack the rolls in a steamer and steam over boiling water for about 60 minutes.
  3. Once done, allow to cool slightly before unwrapping and serving. Enjoy!

Num Ansom Chek (Rolled Banana Rice Cake)

Num Ansom Chek (Rolled Banana Rice Cake)

BON APPÉTIT

– Ally xx

myTaste.com

Num Treap (Sticky Rice with Sesame Seeds)

Num Treap (Sticky Rice with Sesame Seeds)

Hello Everyone! Forget about brownie sundaes, forget about éclairs and chocolate cake; the real desserts, the sinfully sweet and decadent treats, can be found in one region: Southeast Asia. Ingredients in Southeast Asian treats are less traditional than the sweet flavours you typically see in Western desserts. Ingredients like cassava, mung beans, and lotus seeds paired with sticky sweet syrups like coconut cream, palm syrup, and condensed milk are common and no strangers to Cambodian treats. Beyond these ingredients you can also always expect to have at least one fresh fruit added to the mix. Look for favourites like mangoes, rambutan, durian and of course, bananas.

Just as Southeast Asian desserts, Cambodian treats are most frequently enjoyed mid-morning. Instead of being served to cap off a delicious meal, the treats are bought and enjoyed in markets as you are doing your shopping around town. Many of the most popular Khmer treats are sold from mobile street stands. Look out for the crowds of students outside universities and schools, flocked around a stand.

Traditional Cambodian treats, also known as Khmer sweets, also come in the form of custards and puddings; egg-based dishes that are spiced up with a variety of flavours (vanilla and cinnamon are typical favourites). Since rice remains a main staple in current day cuisine, being eaten as often as three times a day, rice-based cakes are also very popular.

Num Treap (Sticky Rice with Sesame Seeds)

Tonight, I will be sharing a Cambodian favoured treat that is simple and super easy to make at home. The best part? You’ll most likely have everything readily available to whip this up in your pantry. Num Treap, or in English, Sticky Rice with Sesame Seeds, is a treat that is basically as the name states, steamed sticky rice mixed in a warm coconut sauce. The mixture is then spread into a baking dish or pan, topped with sesame seeds, and then set aside to cool before cutting into squares and then served. You may serve it as it is, or with fruits on the side. Num in Cambodian means pastry, so it is essentially a sticky rice (bai damnaeb) pastry treat.

This dessert is very much similar to a sweet rice cake that we have here in the Philippines known as Biko. It is also made of coconut milk, brown sugar, and glutinous rice, that is topped with latik (coconut curds) instead of sesame seeds.

Num Treap (Sticky Rice with Sesame Seeds) Ingredients

PREP TIME 60 MINS* | COOKING TIME 45-60 MINS | MAKES 9 SLICES

*Allow for an additional 6 hours (or more) to soak the glutinous rice before cooking.

INGREDIENTS

  • 1 cup sweet glutinous rice, soaked for at least 6 hours or overnight
  • 2/3 cup coconut milk
  • 1/2 cup coconut sugar
  • 3 tbsp sesame seeds, toasted
  • 2 tsp vanilla extract
  • 1/2 tsp salt

METHOD

  1. Rice: Drain the water (no need to shake off the excess water), and evenly arrange the soaked sticky rice in a steamer lined with a greased banana leaf.
  2. Cover and steam for 30-45 minutes. You can check the rice and increase the steaming time if need be. Once done, keep the rice in the steamer or covered to prevent it from drying out until you need to use it.
  3. Coconut Sauce: While the rice is cooking, add the coconut milk, coconut sugar, salt, and vanilla extract in a large saucepan and cook over medium-high heat. Stir frequently until it thickens, about 5 minutes.
  4. Num Treap: Fluff the cooked rice with a fork to separate the grains. With the heat off, add the rice to the saucepan with the coconut sauce and mix well.
  5. Spread the rice mixture into a shallow dish or baking pan, pressing them down with a spatula. Sprinkle sesame seeds on top and cover with plastic wrap. Leave to set and cool for about an hour.
  6. Cut into squares, then serve and enjoy!

Num Treap (Sticky Rice with Sesame Seeds)

Num Treap (Sticky Rice with Sesame Seeds)

BON APPÉTIT

– Ally xx

myTaste.com

Kuih Koci Gula Kelapa (Glutinous Rice Cake with Coconut Filling)

Kuih Koci Gula Kelapa (Glutinous Rice Cake with Coconut Filling)

Hello Everyone! Tonight I will be sharing my last recipe from Brunei. As previously mentioned in a post I shared two weeks ago, I came across this Kuih Koci Gula Kelapa from the same website entitled ‘Brunei’s Traditional Sweet Treats You Must Try’.

To be honest, when I was still living in Brunei, this was a kuih that I barely saw sold in the night markets or road-side stalls – or maybe I was too focused on my favourite kuih-kuih that I failed to notice them amongst the pack. Nevertheless, as with most, if not all, kuih-kuih found in Brunei originate from a different country, and the Kuih Koci Gula Kelapa is no stranger to that. As it turns out, it is actually native to Indonesia.

Pronounced koh-chee, this is a snack/dessert made with a mix of white and black glutinous rice flour, stuffed with sweetened coconut and palm sugar filling, wrapped in banana leaves, and then steamed. The deep purple hue of the kuih comes from the black glutinous rice flour. There are also varieties of this kuih that do not require black glutinous rice flour, in fact a majority of it is made with white glutinous rice flour. The black glutinous rice flour is mainly used to colour the kuih.

Kuih Koci Gula Kelapa (Glutinous Rice Cake with Coconut Filling)

In fact, black glutinous rice flour may be quite difficult to source (depending on where you live). You can actually make your own too by grinding black glutinous rice grains. Place them in a coffee grinder or blender and then grind until really fine. Sieve the flour and then grind again. You need to grind several times until you get a really fine flour, so technically it’s a lot of work too. I managed to source mine online from Indonesia.

The Kuih Koci has a mochi-like texture and is sweet in flavour from the coconut filling inside. Though optional, a slightly salty coconut sauce cuts through the sweetness nicely. Other than just adding a dollop of it atop after the kuih has been steamed, you can also spoon the coconut sauce into the banana leaf, place the dough in, and then steam it with the coconut sauce.

Before we dive into tonight’s recipe, please take the time to check out the original where I drew my inspiration from over on What To Cook Today by Marvellina.

Kuih Koci Gula Kelapa (Glutinous Rice Cake with Coconut Filling) Ingredients

PREP TIME 30 MINS | COOKING TIME 30 MINS | MAKES 6 PCS

INGREDIENTS

For the dough

  • 1 & 1/2 cups white glutinous rice flour
  • 1/3 cup black glutinous rice flour
  • 2/3 cup coconut milk

For the coconut filling

  • 2 cups grated coconut
  • 1/2 cup coconut sugar*
  • 1/4 cup coconut cream
  • 1/4 cup white granulated sugar**
  • 1 tsp cornstarch
  • 1/4 tsp salt

*Gula Melaka (palm sugar) is the choice of sweetener used when it comes to traditional kuih like this, but if you can’t seem to source it, you can always substitute it for coconut sugar like I did.

**Also, I ran out of coconut sugar. It’s supposed to be 1 cup of coconut sugar but I only had half a cup left and therefore mixed it together with a quarter cup of white granulated sugar.

For the coconut sauce (optional)

  • 2/3 cup coconut cream
  • 1 tsp all-purpose flour
  • Pinch of salt, to taste

Wrapping

  • 6 pcs banana leaves (15cm x 20cm)
  • Coconut oil, for brushing

METHOD

  1. Prepare the Banana Leaves: Soak the banana leaves in warm water for 30 minutes. Wipe them dry and brush with coconut oil. Set aside.
  2. Coconut Filling: Meanwhile, add the coconut cream and sugars in a pan over medium heat. Mix until the sugars have melted, then stir in the grated coconut and salt. Mix until well incorporated and then sprinkle the cornstarch over the coconut-sugar mixture. Stir and cook until the mixture thickens. Once done, set aside and let it cool down completely.
  3. Coconut Sauce: Add the coconut cream and a pinch of salt to a small saucepan. Whisk in the all-purpose flour until smooth. Place on the stove and cook over medium heat, whisking continuously until the sauce thickens. Set aside.
  4. Dough: Heat the coconut milk in a small saucepan until it is hot, but not boiling. Add both flours to a large mixing bowl, together with the hot coconut milk. Stir to mix everything, until the dough comes together. It should be pliable and not sticky.
  5. Divide the dough into 6 equal pieces. Flatten the dough with the palm of your hands and place the cool coconut filling in the middle. Wrap around it and roll the dough into a smooth ball. Repeat with the remaining dough.
  6. Wrapping: Take a piece of banana leaf and shape into a cone. Place a dough ball in the cone and gently push it into the leaf. Fold one side over, and then the adjacent side. Then fold the other two sides to make your cone-shaped Kuih Koci.

You may also choose to wrap them into a parcel, or steam them with no wrapping at all! Just place the balls onto a small sheet of banana leaf.

  1. Steaming: Place the wrapped Kuih Koci into a steamer and steam for about 10 -15 minutes.
  2. Serve: Once done, unwrap and serve immediately while hot, topped with the coconut sauce. Enjoy as a light mid-morning or mid-afternoon snack!

Kuih Koci Gula Kelapa (Glutinous Rice Cake with Coconut Filling)

Note: Steamed Kuih Koci can be kept in the refrigerator for up to 3 days. Otherwise, you may freeze the uncooked kuih koci for later consumption. Steam, frozen for, 15-18 minutes.

BON APPÉTIT

– Ally xx

myTaste.com

Black Sticky Rice with Grilled Mango & Blue Coconut Sauce

Black Sticky Rice with Grilled Mango & Blue Coconut Sauce

The combination of mango and black sticky rice is fairly common in Thailand. Black sticky rice, a delicious whole-grain alternative to white rice, is purplish black in colour and has a chewy texture. It is naturally sweet, contains fibre, and is loaded with antioxidants, which makes this dessert all the more healthy and guilt-free to eat!

Black Sticky Rice with Grilled Mango & Blue Coconut Sauce

The black sticky rice is served alongside sliced mango, and a sauce of sweet and salty coconut milk is usually added. I had initially decided to purée the mango, but when I took a photo of the final plate up, I wasn’t happy with how it aesthetically turned out. So the following week, I thought of serving it with fresh mango on the side. It wasn’t until an idea popped into mind when I thought back to my Grilled Pineapple Dessert – I thought, why not grill the mango to further enhance its flavour?

Before we dive into tonight’s recipe, please take the time to check out the original recipe where I drew my inspiration from over on Breakfast With Flowers by Katja. This was where I took the inspiration from into making the coconut sauce for this dish blue by simmering and steeping dried butterfly pea flowers in the coconut milk.

Black Sticky Rice with Grilled Mango & Blue Coconut Sauce Ingredients

PREP TIME 10 MINS* | COOKING TIME 45 MINS | SERVES 6

* Plus 4 hours (or overnight) to soak the rice

INGREDIENTS

For the black sticky rice

  • 2 cups black glutinous rice, pre-soaked
  • 4 & 1/2 cups water
  • Pinch of salt

For the blue coconut sauce

  • 200ml coconut milk
  • 1 tbsp loose dried butterfly pea flowers
  • 2 tbsp white granulated sugar
  • 1/2 tsp salt

To serve with

  • Grilled Mango
  • Shredded fresh coconut
  • Cornflakes (optional)

METHOD

  1. Black Sticky Rice: Wash the black glutinous soaked rice well in several changes of cold water and then drain thoroughly.
  2. Place the rice together with the 4 & 1/2 cups of water and salt in a rice cooker. Let it work its magic. Optional: If available, you can cook the rice with a pandan leaf for fragrance.
  3. Alternatively, you may use a heavy pot with a tight-fitting lid. Bring to a vigorous boil over high heat. Cover, then reduce heat to maintain a gentle simmer and cook until the rice is tender (but still a little chewy in the center) and the liquid is absorbed, about 45 to 50 minutes. Remove from heat and let it stand, covered, for 10 minutes.
  4. Blue Coconut Sauce: While the rice is cooking prepare your coconut sauce. Add the dried butterfly pea flowers to a small saucepan together with the coconut milk, sugar, and salt.
  5. Gently heat on medium-low for about 10 minutes or until you get the hue of blue that you want infused into the coconut milk.
  6. Once done, remove from the heat and strain out the butterfly pea flowers. Press on the flowers to extract more colour out of them.
  7. Serve the black sticky rice together with grilled mango, and shredded fresh coconut. Top the rice with the blue coconut sauce and sprinkle with some crushed cornflakes for that extra added crunch. Enjoy as a warm dessert!

Black Sticky Rice with Grilled Mango & Blue Coconut Sauce

BON APPÉTIT

– Ally xx

myTaste.com

Auguest 2020: Mhyre Virtudazo

Celestial Ice Buko

“If I can make it from scratch, I will make it from scratch. I also try to cook with whole foods as much as possible and eat more vegetables/plant-based meals at least once a week.” — Mhyre Virtudazo

Auguest 2020: Mhyre Virtudazo

When Allison told me her plans for Auguest 2020 and asked if I wanted to be one of her guest contributors, I was immediately onboard! I didn’t hesitate and said yes in a heartbeat! I was very thrilled to hear about this month’s theme which is RAINBOW COLORS!! 🌈 How could I say no to that? I was just so excited that I volunteered to share a recipe for a blue-colored dish.

Fast forward to a couple of months before August, I realized that there’s a challenge to the color I chose. I wanted my dish to represent me. I wanted it to be completely plant-based. I’m trying to incorporate more vegetables and other plant-based products to my meals. I love meat and will not go vegan but this is my way of lessening my carbon footprint. I’ve also been trying to make more Filipino dishes so that’s another thing. The trickiest part is I don’t typically find blue-colored food attractive. I mean I won’t eat blue soup but I can eat a blue dessert.

Celestial Ice Buko

So… I had to come up with a Filipino dish that’s plant-based and visually appealing for my taste. Most importantly, I wanted to consider Allison’s readers and IG followers. I wasn’t only creating this for myself but also I’d like for you guys to try and enjoy what I’ll be sharing.

One afternoon, I was brainstorming by myself (LOL) when I heard an ice cream vendor pass by my house. So I thought, why not dessert? What about ice cream? I can make it blue by using butterfly pea flowers! But then I couldn’t imagine eating blue ice cream cone. I kept on making a list of possible ingredients then I wrote coconut milk on my notebook. That’s when the idea hit me—ice buko! Why not? I mean it brings me happy childhood memories and it meets my complicated requirements! Oh, and I just found out that there’s a Wikipedia entry for it! Haha! Most of all, I could eat it even if it’s colored blue!

I hope you try the recipe. I like how smooth and creamy the texture is even without condensed milk! You’ll also be amazed with how it turns out visually from making it to the final result! It freezes into a soft blue just like the color of the sky while the swirls of white are coconut milk and macapuno strings that look like clouds.

Celestial Ice Buko Ingredients

PREP TIME 10 MINS | COOKING TIME 10 MINS | MAKES 4 ICE LOLLIES

Freezing time: 4 hours

INGREDIENTS

  • 2 cups coconut milk
  • 2 cups of water
  • 2/3 cup white sugar (two 1/3 cups)
  • 1/2 cup macapuno strings (syrup must be drained)
  • 1/4 cup dried butterfly pea flowers
  • 1 tbsp cornstarch (two 1/2 tbsp)

METHOD

  1. In a pot, heat coconut milk and sugar in low heat.
  2. Make slurry using the coconut milk from the pot and some cornstarch. Combine it with the rest of the liquid in the pot.
  3. Stir the liquid gently until sugar has been fully dissolved. Be careful not to bring it to a boil.
  4. Add the dried blue pea flowers. Mix until all the flowers are soaked in coconut milk.
  5. Turn off heat and cover the pot. Steep for 8-10 minutes. Remove the flowers.
  6. Wait for the liquid to cool.
  7. Put a few spoons of macapuno strings in each mold. Pour the liquid, put the lolly holder on top and freeze for about 4 hours.
  8. Admire your beautiful Celestial Ice Buko before devouring them! Enjoy!

Celestial Ice Buko

Here are some conclusions/tips/notes for making this Celestial Ice Buko:

  • Traditional ice buko has red beans. I didn’t include them because it might not go well with the butterfly pea tea. But feel free to experiment!
  • Instead of red beans, I tried rice crispies and loved it! Wanna try it, too? It pretty much follows step 6 but you freeze a teaspoon of rice crispies and a tablespoon of blue liquid first for 30 minutes. The rice crispies will float if you put a large amount of liquid. They will also stick to the lolly holder if you quickly fill the mold up.
  • I wanted to dip my ice buko in melted white chocolate first and then sprinkle it with rice crispies. However, I read on the package that it had dairy in it so I scrapped my plan. If you’re okay with a not so 100% vegan dessert then go ahead and enjoy your ice buko with white chocolate casing. I bet it’s going to be yummy!
  • Another thing you can try is freezing 3/4 coconut milk-blue pea flower mixture in the mold for 2 hours. Fill up the rest of the mold with butterfly pea tea and freeze for another 2 hours. When it freezes, it will have different layers of sky blue and indigo. Just like the galaxy!
  • For another galaxy-looking option, sprinkle blue, pink and purple colored sugar on your ice buko.
  • No ice lolly molds? No worries! You may use paper cups and popsicle sticks. I also made a batch with them. I doubled the quantity and was able to make 11 pieces!
  • Freezing time may vary depending on your freezer. It took overnight for my ice buko to fully solidify in one of the refrigerators I used. (Back story: I made this recipe 8 times in 4 different houses. Therefore, I’ve tried 4 different refrigerators. 😅)

Celestial Ice Buko

Photo Courtesy & Recipe Copyright © 2020 | Mhyre Virtudazo (@acupofjasminerice)

BON APPÉTIT

– Mhyre Virtudazo

myTaste.com

Auguest 2020: Azrina Hidup

Thai Green Curry Mussels

“Cooking feeds the soul, both the cook and the people who are eating. For me, cooking is an act of love, a gift, and a way of sharing. It puts a smile in my heart when I put a lot of thought and care into preparing a dish. At home, cooking symbolizes love and family.” — Azrina Hidup

Auguest 2020: Azrina Hidup

Hello everyone! My name is Azrina Hidup and I am half Filipina and half Bruneian. I would like to thank my beautiful friend, Allison, for the opportunity to be featured on her blog along with other amazing foodies and chefs.

I am always the happiest girl when I get to put my apron on. It was my dream to enter ‘Le Cordon Bleu’ Culinary School, but somehow I ended up doing Political Science. My passion for cooking though, doesn’t stop. Every weekend I will be on my #apronmodeon doing recipe testing and feeding my family with my cooking.

I love creating different dishes. I love travelling for food and what I usually love doing when I travel is to explore and try the local cuisine. I will always try to remember the taste and look of the food so I can recreate them back home for my loved ones to try.

Thai Green Curry Mussels

Most of all, I strongly believe that cooking is more than just an act to fill the empty stomach. Cooking for me is an act of love, a gift, and a way of sharing. It puts a smile in my heart when I put a lot of thought and care into preparing a dish. I grew up with home cooked food, and growing up with my mom’s cooking inspires me a lot to develop my passion for cooking. For me, cooking and home cooked meals symbolize family and love.

For Allison’s Auguest series, I will be sharing my favourite Thai dish which is green curry. Tonight I have made Thai Green Curry Mussels with Homemade Green Curry Paste. Thai green curry is absolutely delicious when served with steamed rice. Nyums!

Thai Green Curry Mussels Ingredients

PREP TIME 30 MINS | COOKING TIME 20-25 MINS | SERVES 4-5

INGREDIENTS

For the green curry paste

  • 15-20 Thai basil leaves
  • 6 Thai green chillies (remove the seeds if you prefer it to be less spicy)
  • 3-4 cloves of garlic
  • 3 long green chillies
  • 2 stalks lemongrass, bottom part only, thinly sliced
  • 1-2 shallots
  • 1 & 1/2 inch size piece of galangal
  • 1 & 1/2 inch size piece of ginger
  • 1 lime
  • 1 tbsp of coconut milk
  • 1-2 tsp of kaffir lime zest
  • 1-2 tsp of shrimp paste (belacan)
  • 1/2 tsp white peppercorns
  • Cilantro leaves and roots
  • Coriander seeds
  • Cumin powder
  • Salt, to taste

Homemade Thai Green Curry Paste

For the Green Curry Mussels

  • Mussels
  • 1 cup fresh coconut water
  • 1 cup seafood stock*
  • 1 can (approx. 440g) coconut milk
  • 3 pieces kaffir lime leaves (torn to smaller pieces)
  • Basil leaves (5-6)
  • Fish sauce, to taste
  • Palm sugar, to taste
  • Squeeze 1-2 fresh limes
  • Thai eggplants
  • Cilantro and basil leaves for garnish (cut/torn to smaller pieces)

* For this recipe, I used homemade prawn stock. You may use any kind of stock as a substitute.

Thai Green Curry Mussels Ingredients

METHOD

  1. Thai Green Curry Paste: Toast coriander seeds simply by heating them in a skillet over medium-high heat. Then, finely grind using a mortar and pestle.
  2. In the same skillet, toast the shrimp paste/belacan and set aside.
  3. Slowly add the rest of the ingredients for the green curry paste to the mortar and pound until fine, adding liquid so that the mixture will become paste-like in texture. For this recipe, I used coconut milk as the liquid.
  4. Taste the curry paste and add season with salt to your preference and add a squeeze of lime juice.

Tip: You may also use an electric blender to speed up the process (and really make your life a little easier), if you prefer. For the coriander seeds, grind them first into a powder with the mortar and pestle. Then use the electric blender to grind all the remaining ingredients together. Similarly, add liquid to get the blender going. Since this will be used for a green curry dish, I highly suggest to use coconut milk as your liquid base.

  1. Thai Green Curry Mussels: Over medium heat, reduce half the can of the coconut milk in a heavy-bottomed pot until it becomes thick.
  2. Add the homemade green curry paste and sauté. Make sure to stir constantly for 2-3 minutes until fragrant/aromatic.
  3. Add the seafood stock, remaining half can of the coconut milk, kaffir lime leaves, and basil leaves. Leave to simmer gently for about 5-10 minutes, keeping the heat on medium.

Tip: You may also blend the basil leaves and some coconut milk into an electric blender to get nice green color soup.

  1. Add palm sugar and fish sauce to taste.
  2. Add coconut water and eggplants. Cover the pot until the eggplants are cooked through, about 3-4 minutes.
  3. Add in the mussels and cover until mussels are cooked, about 5 minutes.
  4. Garnish with chopped basil and cilantro. Add lime juice just before serving. Best to enjoy with steamed rice!

Thai Green Curry Mussels

Thai Green Curry Mussels

Photo Courtesy & Recipe Copyright © 2020 | Azrina Hidup (@azrinoh501)

BON APPÉTIT

– Azrina Hidup

myTaste.com

Auguest 2020: JM de Guzman

Pinais na Hipon at Niyog na may Palapa (Shrimp wrapped in Banana Leaves with Coconut and Green Palapa)

“Food isn’t just something to eat to satisfy an empty stomach or a craving palate. One must know the story about every dish, and celebrate it as a work of art, culture, tradition, custom and beliefs of its creator, and by doing that, we don’t just let them know how we appreciate their food but also honour the people and the nation behind it.” — JM de Guzman

Auguest 2020: JM de Guzman

I’d like to thank Miss Allison, for inviting me once again to do an Auguest post on her blog. I’m also thrilled to share this recipe, which I personally developed for this year’s theme – Colours of Rainbow. The dish I’m about to share was inspired by a traditional Filipino dish ‘Pinais’ and pinais-like dishes (such as Bicol’s pinangat and kinagang). Therefore should I say that this is my take on pinais.

Pinais is a traditional dish from the Southern Tagalog region. While the name refers to the dish itself – it’s actually a cooking process wherein the ingredients (most commonly coconut meat and seafood) are wrapped in banana leaves before steaming. The method of pagpapais effectively seals in the juices and imparts a fresh aroma to the food.

What inspired me to make this take on pinais is my forever obsession about everything coconut and my interest to explore more regional Filipino foods, particularly the foods of the South (Mindanao or Moro Foods). So this dish is inspired by a multitude of cultures, from the flavours of Luzon and Mindanao.

Pinais na Hipon at Niyog na may Palapa

The usual components of pinais are seafood (fish or shellfish), coconut, and aromatics. For my recipe’s seafood component, I used prawns/shrimps. For the coconut, try to look for a matured one (we call it ‘ngalutin’ or chewey here in Bataan). It’s the stage between buko and niyog. However, since I cannot find the specific type of coconut, I just used matured niyog. For the aromatics or flavouring, I used my adaptation of Maranao Palapa, a spice paste mixture of pounded sakurab, ginger/turmeric, and chilies that stands as Maranao all-purpose seasoning. It can be used as a dip, condiment, marinade, or even an appetizer. However for my version, I used siling panigang to produce a greener palapa which is commonly reddish or yellowish from the red chilies and turmeric. I also used the whole sakurab including its green part, dahon ng kabuyaw (kaffir lime leaves), and langkawas (galangal) for a more herbal and aromatic flavour profile. It’s not traditional per se, but this is just my take which I’d like to call “Green Palapa”.

Langkawas and Kabuyaw rather are alien to many Filipinos, and most would have encountered these only with Thai or other Southeast Asian foods, but these are actually native to the Philippines, and in fact Filipino ingredients as well.

Pinais na Hipon at Niyog na may Palapa Ingredients

PREP TIME 30 MINS | COOKING TIME 45-60 MINS | SERVES 5

INGREDIENTS

  • 500g grated coconut meat
  • 500g prawns or large shrimp, peeled and deveined*
  • Banana leaves for wrapping

For the ‘green palapa’

  • 2 & 1/2 cups sakurab, chopped**
  • 1/4 + 1/8 cup cooking oil, divided
  • 8 sprigs of kabuyaw (kaffir lime) leaves, torn***
  • 4 pcs long green chilies, chopped****
  • 1 thumb-sized ginger, chopped
  • 4 tbsp fish sauce
  • 2 & 1/2 tbsp sugar
  • 4 tsp galangal powder or 2 tbsp fresh galangal, chopped*****
  • Salt & pepper, to taste

Ingredient Notes:

* Don’t throw the prawn heads and shells. The flavour is there. Pound it to extract the juice.

** Substitute green onion or scallion if sakurab isn’t available. Sakurab is an allium native to Mindanao and while this is almost synonymous to scallion or green onions it actually isn’t. You can substitute it though but it won’t taste the same. Sakurab is more pungent and for me it has a taste of something in between shallots and garlic.

*** It might be hard to find the kaffir lime leaves, but it is essential for this recipe. I suggest using grated dayap rinds if you can’t find it.

**** Add more chilies if you want a spicier palapa, likewise, deseed the green chilies if you want the palapa less spicy, but I personally don’t mind it getting overly hot.

***** Omit galangal if not available and double the amount of ginger instead.

Not only can you use the “Green Palapa” for this pinais, but also as base for “Ginataans”

Pinais na Hipon at Niyog na may Palapa - Step-by-Step

METHOD

  1. Green Palapa: Add a quarter cup of the oil and all the chopped ingredients for the green palapa into a food processor or blender. Blend until you get a smooth consistency, kind of like pesto.
  2. Over very low heat, add the remaining oil to a pan together with the blended paste and stir continuously. Season with fish sauce, sugar, and black pepper to taste. You’ll know it’s cooked when the colour turns deep green, and the oil seeps out of the mixture. Set aside to cool down. You can remove some of the oil as it cools down.
  3. Pinais: In a large mixing bowl, combine the grated coconut meat, the green palapa, and the extracted prawn juice. You now have a green-coloured coconut meat mixture.
  4. Place a cup of coconut and palapa mixture in the center of a prepared sheet of banana leaf. Place as much prawns as you want on the top. Fold all sides to form a tight wrap.
  5. Line the bottom of a large wok or pan with banana leaf. Place all the wrapped pinais and add two cups of water. Cover and cook over medium heat for 45-60 minutes.
  6. Transfer to individual serving plates, unfold the banana leaf and serve immediately while hot. Enjoy!

Pinais na Hipon at Niyog na may Palapa

Photo Courtesy & Recipe Copyright © 2020 | JM de Guzman (@thecoconutdude)

BON APPÉTIT

– JM de Guzman

myTaste.com

Buko Pandan Ice Cream (No-Churn)

Buko Pandan Ice Cream (No-Churn)

Hello Everyone! A traditional Buko Pandan Salad is made with gulaman (jelly) cubes, tropical palm fruits, and shredded young coconut in sweetened cream. It is rich, creamy, and loaded with pandan flavour – a classic Filipino dessert that is a definite crowd favourite. You can check out my very out-dated recipe for it that I tackled back in 2015 by clicking here.

Buko Pandan Ice Cream (No-Churn)

Tonight however, I won’t be sharing with you another Buko Pandan Salad recipe. I thought you might want to enjoy its delicious flavours with a twist. I’ll be turning the traditional salad into an ice cream that can be enjoyed as both a snack or dessert. It’s rich, creamy, full of coconut flavour, and with an intense pandan taste using fresh screwpine leaves. If you don’t have access to fresh pandan leaves, you may also use pandan extract for this – just skip ahead to step 3 in the recipe below!

The process of homemade, no-churn ice cream is super simple. It’s just a matter of whipping together heavy cream, condensed milk, and adding in your choice of flavour/s. Seriously, the hardest part is waiting for the mixture to freeze! The ice cream comes out rich, creamy, and so much better than store-bought with far fewer ingredients. Oh, and did I mention that it’s a lot cheaper too?

Seriously, you’ll be craving for this all year long, especially during the hot summer days!

Buko Pandan Ice Cream (No-Churn) Ingredients

PREP TIME 4 HOURS* | COOKING TIME | SERVES 4-6

*For freezing time, minimum 4 hours or up to 24 hours.

INGREDIENTS

For the ice cream

  • 8-10 pandan leaves
  • 1 can (300g) sweetened condensed milk
  • 1 cup (250ml) all purpose cream
  • 3/4 cup (200ml) thick coconut milk/cream
  • Green buko pandan food colouring/flavouring (optional)

To serve with (optional)

  • Buko pandan jelly
  • Cornflakes
  • Lychees
  • Shredded coconut meat

METHOD

  1. Place the pandan leaves together with the all purpose cream and coconut milk in a food processor or heavy-duty blender, and blitz/blend for a few minutes until the pandan leaves have been finely puréed.
  2. Pour the blended pandan-infused cream and coconut milk over a fine sieve and into a chilled large mixing bowl. Strain the cream mixture from the pandan leaf pulp, pressing down firmly with the back of a spoon to extract all of the liquid from the pulp. Discard the pandan leaf pulp.
  3. Whip the pandan-infused cream using an electrical hand-held mixer until soft peaks start to form. Add the sweetened condensed milk. You may also add a dash of vanilla extract at this point. Continue to whip to soft peaks, it should be fluffy and mousse-like.
  4. Pour into an airtight container and freeze for 4 hours or up to 24 hours. Check the mixture every 30 minutes and mix (“churn”) using a spoon to avoid it turning into granita (coarse flavoured ice).
  5. Let sit at room temperature for about 15 minutes before scooping and serving as it is or with other elements such as fresh coconut meat, buko pandan jelly, other fruits of choice, and crushed cornflakes for that extra added crunch. Enjoy!

Buko Pandan Ice Cream (No-Churn)

Buko Pandan Ice Cream (No-Churn)

BON APPÉTIT

– Ally xx

myTaste.com

Ondeh-Ondeh (Glutinous Rice Balls with Coconut Sugar Filling)

Ondeh-Ondeh (Glutinous Rice Balls with Coconut Sugar Filling)

Hello Everyone! In Singapore, Malaysia, and even in Brunei, Ondeh-Ondeh refers to a glutinous rice ball kuih (sweet snack or dessert). In Indonesia they call it Klepon. There are two versions of Ondeh-Ondeh. One is made with just plain glutinous rice flour and scented with pandan (screwpine) juice, while the other has a little sweet potato added to the dough.

Ondeh-Ondeh (Glutinous Rice Balls with Coconut Sugar Filling)

Ondeh-Ondeh is made with fresh pandan juice and glutinous rice flour rolled in freshly grated coconut with a little surprise on the inside. The surprise makes these balls of Ondeh-Ondeh oh so fun to eat! Its pandan-flavoured skin wraps semi-melted gula melaka (palm sugar) that would burst upon the first bite, like sweet little bombs as the sweetness explodes in the mouth. The slightly salted grated coconut further enhances the deliciousness of this kuih.

Before we dive into tonight’s recipe, please take the time to check out the original where I drew my inspiration from over on Rasa Malaysia by Bee.

Ondeh-Ondeh (Glutinous Rice Balls with Coconut Sugar Filling) Ingredients

PREP TIME 30 MINS | COOKING TIME 5-10 MINS | MAKES 12-14 BALLS

INGREDIENTS

  • 10 pandan leaves
  • 2 cups glutinous rice flour*
  • 1 cup water
  • 100g freshly grated coconut**
  • Coconut sugar***
  • Pinch of salt

* Using only glutinous rice flour will make the ondeh-ondeh rather soft in texture. Although some do enjoy such consistency, tapioca flour may be added to the dough to make it slightly firmer. You may also substitute tapioca flour with corn flour.

** If you are using desiccated coconut for this recipe, add 1 tablespoon of water and half a teaspoon of salt to half a cup of desiccated coconut. Mix well and steam the mixture for 15 to 20 minutes. The reason for steaming is because you want to achieve a fluffier/softer texture, similar to freshly grated coconut.

*** The amazing taste of ondeh-ondeh comes from the gula melaka, a special palm sugar which has a toffee taste to it. You may substitute this for brown sugar, coconut sugar, or other sweeteners if gula melaka isn’t available. That will, however, change the traditional taste of the ondeh-ondeh.

METHOD

  1. Pandan Juice: Place the pandan leaves together with the water in a food processor or heavy-duty blender, and blitz/blend for a few minutes until the pandan leaves have been finely puréed.
  2. Pour the blended pandan-infused water over a fine sieve and into a small bowl. Strain the liquid from the pandan leaf pulp, pressing down firmly with the back of a spoon to extract all of the juice from the pulp. Discard the pandan leaf pulp.
  3. Dough: In a large mixing bowl, combine the glutinous rice flour with the extracted pandan juice and lightly knead to form a smooth dough. Cover the dough and set aside for about 15 minutes to rest.
  4. Ondeh-Ondeh Balls: Bring a large pot of water to rolling boil. Pinch a thumb-sized piece of dough and flatten lightly and thinly. Fill the centre of the dough with about half a teaspoon of coconut sugar. Roll it in your palms to form a smooth ball and then place each ball on a baking tray lined with lightly greased cling film. Repeat until all the dough is used up.
  5. Bring a large pot of water to a rapid boil. Carefully drop each ball into the boiling water. Do not overcrowd the pot. You may need to work in batches depending on how many balls you managed to make with the dough.
  6. When they float to the surface, remove them with a slotted spoon and shake off the excess water. Coat the ondeh-ondeh balls with the slightly salted grated coconut and serve immediately. Enjoy!

Ondeh-Ondeh (Glutinous Rice Balls with Coconut Sugar Filling)

Notes:

Why does the dough crack?
The dough is too dry. Add some water and knead the dough again. Work in batches and store the dough in a bowl with a piece of damp cloth over it to prevent it from getting dry.

Why does the Ondeh-Ondeh burst while boiling?
Sometimes, the dough may crack during the cooking process. This is due to the thinness of the dough. However, remember not to make the dough too thick either. Wrap it closely around the palm sugar to prevent air from getting in. Otherwise it will burst during the cooking process.

Why did the palm sugar not melt?
The ondeh-ondeh wasn’t cooked long enough. To ensure that the pal sugar has fully melted, simmer them over low heat for another 5 to 10 minutes once they start to float. Also, the trick is to shave the palm sugar with a knife or mandoline or simply chop them into small chunks. This way, they would melt faster. Larger chunks may not melt as quickly as smaller pieces.

How long can ondeh-ondeh last for?
Cooked ondeh-ondeh with grated coconut will only last a day because grated coconut spoils easily. If you would want to prepare them in advance, you may refrigerate shaped ondeh-ondeh for up to 5 days covered with plastic wrap. Shaped ondeh-ondeh can also be frozen for up to 6 months if kept in an airtight container or freezer bag. Simply boil refrigerated or frozen ondeh-ondeh before coating them with shredded coconut.

Ondeh-Ondeh (Glutinous Rice Balls with Coconut Sugar Filling)

Before tackling this recipe, I read up on a few different ones online and gathered that on average, these Ondeh-Ondeh Balls take about 10 minutes to cook. I made mine slightly bigger than those in the recipes I looked at, but no way did it take 15 or 30 minutes to fully cook through. It was already way past the 1-hour mark and the balls were still rock hard. At first, I didn’t know where I went wrong… and then it hit me. I was using rice flour instead of glutinous rice flour. What a rookie mistake *facepalm* Nonetheless, after I got around to picking up some glutinous rice flour from the grocers and tackled the recipe again, it was a success!

BON APPÉTIT

– Ally xx

myTaste.com