Mediterranean Baked Fish

Mediterranean Baked Fish

Hello Everyone! Two days ago I shared a post on my Instagram for an open collaboration that me and two of my foodie friends organised and hosted. It was for National Pack Your Lunch Day (March 10) and out of the three main components that made up my lunchbox, one of them was this Mediterranean Baked Fish.

This recipe is loaded with fresh Mediterranean, Greek flavours of olive oil, lemon, and capers. This combination enhances the flavour of the fish, while still allowing it to shine through as the star! Feel free to switch up the kind of fish that’s not only suitable to your liking, but what’s also fresh and available locally. Choose white fish that’s mild in flavour such as cod, haddock, striped bass, mahi-mahi, or grouper fish. I went with tilapia as that’s what’s affordable and readily available here in the Philippines.

Mediterranean Baked Fish

When it comes to baking fish, you don’t want to over cook it. As soon as the fish starts to flake easily, it’s done! For me, it took between 10 to 12 minutes for my fish to turn out perfect, but there are several factors that can differ the cooking time. For example, everyone’s oven cooks differently. Everyone’s fish fillet may be of a different size, shape, or thickness, and everyone’s baking dish heats up differently. Use your gut feeling when it comes to baking time here!

Mediterranean Baked Fish Ingredients

PREP TIME 10 MINS | COOKING TIME 10-12 MINS | SERVES 4

INGREDIENTS

  • 500g tilapia fillets (skinless and boneless)
  • 3 garlic cloves, thinly sliced
  • 2 tbsp capers
  • 1 tbsp olive oil
  • 1/2 tsp ground black pepper
  • 1/2 tsp ground coriander
  • 1/2 tsp ground paprika
  • 1/2 tsp salt
  • Fresh basil leaves, roughly chopped
  • Juice of half a lemon
  • Lemon slices
  • Zest of 1 lemon

METHOD

  1. Preheat oven to 218C (425F or gas mark 7) and grease a baking dish with a bit of olive oil or butter.
  2. Place the tilapia fillets in the basking dish and rub all the ingredients into the fish, making sure to coat them all. Arrange the fillets in the baking dish and top with the lemon slices. Set aside for about 15 minutes for the spices to infuse into the fish.
  3. Bake in the oven for 10 to 12 minutes, until the fish flakes easily with a fork.
  4. Garnish with more freshly chopped basil and serve with a warm salad or seasonal greens. Enjoy!

Mediterranean Baked Fish

BON APPÉTIT

– Ally xx

Follow me on my social media accounts:
Facebook: Amcarmen’s Kitchen
Instagram: @amcarmenskitchen
TikTok: @amcarmenskitchen

myTaste.com

Advertisement
Bengali Doi Maach (Fish in Yoghurt Curry)

Bengali Doi Maach (Fish in Yoghurt Curry)

Hello Everyone! I’m back with another recipe featuring one of Binda Valley’s products, specifically their Natural Greek Style Yoghurt that I received from Gourmet Direct PH last month. I featured smoothies in my previous posts and tonight I wanted to share a savoury recipe using yoghurt. As far as my knowledge goes, I know that yoghurt is commonly used as a marinade for chicken in savoury Indian dishes, but since I wanted to keep in line with only sharing pescatarian, vegetarian, or vegan recipes for my blog, I had to do further research for this.

Gourmet Direct PH x Binda Valley Yoghurt

I typed ‘fish and yoghurt’ recipes into Google and a recipe for Bengali Doi Maach, or in English, Fish in Yoghurt Curry caught my attention. It is a deliciously thick, subtly spicy, and delicately sour fish curry. The fish is first marinated, lightly fried, and then simmered in a yoghurt-based gravy. The end result is a very tender and flavourful fish having absorbed the wonderful flavours of the gravy. The yoghurt and minimal spices used makes this dish light yet hearty, and is best served with basmati rice for a complete Indian meal.

Bengali Doi Maach (Fish in Yoghurt Curry)

Not only does it come together quickly, making it a perfect weeknight dish, it is also very cost effective. The ingredients for this dish are quite cheap and easy to find. You can use your choice of freshwater fish (the best would be thick, meaty fish) and get it simmering away with pantry staples. I literally had all the ingredients readily available in my pantry, which made me super excited to tackle this Doi Maach!

Bengali Doi Maach (Fish in Yoghurt Curry) Ingredients

PREP TIME 30 MINS | COOKING TIME 30 MINS | SERVES 6

INGREDIENTS

For the fish

  • 1 kg Spanish mackerel (tanigue, in Tagalog), sliced
  • 1 tbsp turmeric powder
  • 1 tbsp cayenne pepper powder
  • 2 tsp salt
  • 1 & 1/2 tsp ground black pepper
  • 1 tbsp coconut oil
  • 2 tbsp calamansi juice (or lemon/lime juice)
  • Cooking oil, for searing

For the yoghurt curry

  • 6 whole cloves
  • 4 red chillies (fresh or dried)
  • 3 green cardamom pods
  • 1-inch cinnamon stick
  • 1 tsp cumin seeds
  • 2 red onions, grated
  • 6 cloves garlic, grated
  • 1/2-inch ginger, grated
  • 1 cup water
  • 1 & 1/2 cups Binda Valley’s Natural Greek Style Yoghurt
  • 2 tsp sugar
  • Salt, to taste
  • Chilli leaves* (optional)

*Normally, this dish would be garnished with some coriander leaves, but if you know me, you know I detest the taste of coriander. So to add a pop of green to this dish, I used chilli leaves instead.

METHOD

  1. Combine all the ingredients for the fish marinade in a large mixing bowl, making sure the fish slices are evenly coated. Cover and set aside to marinate for at least 30 minutes to an hour.
  2. Heat enough oil in a large pan, over high heat and sear the marinated fish slices; work in batches if needed. Once done, remove from the pan and set aside.
  3. Remove any excess oil from the pan, leaving about 2 tablespoons and reduce the heat down to medium. Toast the spices (cloves, chillies, cardamom pods, cinnamon stick, and cumin seeds) until fragrant, before adding the grated onions, garlic, and ginger. Cook for about 30 to 45 seconds.
  4. Add half of the cup of water to the pan to deglaze it, and then add the yoghurt, stirring until it is incorporated into the water and spices mixture.
  5. Season with salt and sugar, and leave to simmer over medium-high heat for about 15 minutes, or until slightly reduced.
  6. Add the fried fish to the pan and cook for a further 10 minutes. In the last cooking minute, add the chilli leaves to the pan and cook until the leaves have just wilted.
  7. Transfer the fish curry to a serving dish and enjoy immediately with freshly steamed rice!

Bengali Doi Maach (Fish in Yoghurt Curry)

Bengali Doi Maach (Fish in Yoghurt Curry)

BON APPÉTIT

– Ally xx

Follow me on my social media accounts:
Facebook: Amcarmen’s Kitchen
Instagram: @amcarmenskitchen
TikTok: @amcarmenskitchen

myTaste.com

Yu Xiang Qie Zi (Spicy Sichuan Eggplant Stir-fry)

Yu Xiang Qie Zi (Spicy Sichuan Eggplant Stir-fry)

Hello Everyone! Back in May of last year, a foodie friend of mine and I started hosting open food collaborations on Instagram under the Foodies United PH group that we co-admin. Most of the food that I featured for the collaborations didn’t end up here on my blog; the reason being was that it didn’t fit with the theme. This is also part of the reason why I decided not to go with a theme for my blog for this year.

International Hot & Spicy Food Day Collaboration by Foodies United PH

This post was supposed to go up on Sunday, but I was having issues with WordPress at that time. Anyway, on Sunday 16 January 2022, we hosted a collaboration for International Hot & Spicy Food Day. I love spicy food, and I would say that my spice tolerance is above average. When I was brainstorming a dish for this collaboration, I had a faint memory of an eggplant dish that I had way back when I was still studying in Australia. I remember it being a spicy dish that I absolutely loved, but unfortunately could not remember what the dish was. So after some research, I think the closest to my vivid memory of the dish is Yu Xiang Qie Zi, or in English, Sichuan Eggplant, which is the dish that I am featuring to celebrate International Hot & Spicy Food Day.

Before we begin, here’s a fun fact: Yu Xiang literally translates to ‘fish-fragrant’ while Qie Zi means ‘eggplant’. Despite the literal translation, this dish does not actually have any fish in it. The term is actually a style of cooking for a particular Sichuan fish dish. Since this eggplant dish uses the same aromatics, sauce, and style of cooking, it was named Yu Xiang, preceding the Qie Zi.

Yu Xiang Qie Zi (Spicy Sichuan Eggplant Stir-fry)

Yu Xiang Qie Zi is essentially a Sichuan chilli garlic eggplant stir-fry, and can be cooked with or with minced pork. The addition of minced pork is to add more flavour to the dish, but you can completely leave this out to make this a vegetarian/vegan friendly dish. I wanted to add mince though for texture to contrast the eggplants. So I decided to try out Veega’s Meat-free Giniling (in English, mince) in place for the minced pork. I’ve been seeing this product all over social media for the past year and have been wanting to try it out, but to my surprise though, their meat-free giniling actually contains egg whites. I’m not sure if their other products also include egg (or derivatives) in them.

I checked to see if they are marketing their brand as vegan, which thankfully they aren’t, but did state they are a vegetarian line, which they should actually properly label as ovo-vegetarian (a person who does not eat meat or dairy products but does eat eggs and egg-derived ingredients) in my opinion. I did also see that they’ve started a vegan line with no egg or dairy in them – so this is something I look forward to trying as well!

Yu Xiang Qie Zi is a quick and easy dish that you can be put together with minimal effort in under 30 minutes, which makes it perfect for a weeknight lunch or dinner.

Yu Xiang Qie Zi (Spicy Sichuan Eggplant Stir-fry) Ingredients

PREP TIME 15 MINS | COOKING TIME 20 MINS | SERVES 5-6

INGREDIENTS

  • 6 long eggplants, halved and then cut into long strips
  • 1 tsp salt, for soaking
  • Cornstarch, for cooking
  • Oil, for frying
  • 200g Veega meat-free giniling (mince)
  • 1 tbsp doubanjiang (chilli bean paste)
  • 3 red chillies, minced
  • 2 dried red chillies, chopped
  • 3 tsp grated ginger
  • Spring onion (white part), chopped
  • 4 garlic cloves, finely minced

For the sauce

  • 1/3 cup water (or veggie stock)
  • 4 tbsp white granulated sugar
  • 3 tbsp black vinegar
  • 3 tbsp cornstarch
  • 2 tbsp light soy sauce
  • 1 & 1/2 tsp sichuan peppercorns, toasted and ground
  • 1/2 tsp salt

To garnish

  • Red chillies, chopped
  • Spring onion (green part), chopped

METHOD

  1. Sauce: Add all the ingredients for the sauce in a small bowl and mix to combine. Set aside.
  2. Eggplant: Soak the eggplant slices in salted water for about 15 minutes. Once done, drain and pat dry.
  3. Evenly coat the individual eggplant slices in cornstarch and shallow fry in a preheated pan over high heat, until browned. Remove and transfer to a plate lined with a paper towel to soak up any excess grease. Work in batches if needed. Set aside.
  4. Turn the heat down to medium and remove some of the oil, leaving behind about a tablespoon’s worth.
  5. Sichuan Eggplant: In the same pan, sauté the garlic, chillies, ginger, and white part of the spring onion until golden and fragrant, about 30 seconds.
  6. Add the meat-free mince and continue to cook, stirring for about 2 to 3 minutes, before adding the chilli bean paste and cooking for a further 3 to 4 minutes.
  7. Add the sauce mixture to the pan and cook until thickened. Turn the heat off.
  8. Immediately stir in the eggplant and then plate up. Garnish with the green part of the spring onion and extra chilli slices (optional). Serve with freshly steamed rice and enjoy!

Yu Xiang Qie Zi (Spicy Sichuan Eggplant Stir-fry)

BON APPÉTIT

– Ally xx

Follow me on my social media accounts:
Facebook: Amcarmen’s Kitchen
Instagram: @amcarmenskitchen
TikTok: @amcarmenskitchen

myTaste.com

Pad Krapow (Thai Basil Tofu)

Pad Krapow (Thai Basil Tofu)

Hello everyone! This will be the last recipe that I will be sharing for the year on our Flavours of Southeast Asia journey. I’ve had to cut our journey short as the holiday season syndrome took over; basically all I wanted to do was just relax and take twice as long to get the things I needed done, actually done – for example this post! I had it up and ready to go two weeks ago but I hadn’t gotten around to editing the video for this to upload on my TikTok account, not until just this afternoon *cheeky grin*. So yes, our Flavours of Southeast Asia journey for 2021 will be ending here in Thailand tonight. Maybe next year I’ll cover some Vietnamese dishes to make up for this.

Tonight’s recipe is actually something I’ve been wanting to share on the blog for a while after coming across a vegetarian/vegan-friendly version of it on Instagram several times. Pad Krapow is a dish that I have tried many times before, but with chicken or pork (this was way back when I used to eat meat), so when I came across a version of it using tofu to make it meat-free, I knew I had to try this out.

There are three main types of basil used in Thai cooking: Thai sweet basil (ใบโหระพา bai horapa), or just referred to as Thai basil, lemon basil (ใบแมงลัก bai maenglak), and holy basil (ใบกะเพรา bai kra prao). Unfortunately it can be challenging to find holy basil outside of Thailand. You can still make this recipe using other basil variants, just be weary that it won’t have the same vibrant peppery flavour that holy basil has to give this dish its authentic Thai flavour profile.

Pad Krapow (Thai Basil Tofu)

Pad Krapow is usually served with steamed rice, but if you want to make it a little fancier without the extra carbs, serve it in a lettuce leaf and top each with a fried quail egg instead. I’ve also seen versions of pad krapow as a spaghetti dish so feel free to get creative when serving this dish up!

Now, I can’t exactly make it 100% vegan because pad krapow isn’t what it is without a fried egg where the edges of the egg white are crispy and browned to give it an added nutty flavour, but the yolk is still runny and creamy. So here’s an ovo-vegetarian Pad Krapow for you!

Pad Krapow (Thai Basil Tofu) Ingredients

PREP TIME 10 MINS | COOKING TIME 15 MINS | SERVES 2-3

INGREDIENTS

For the sauce

  • 2-3 garlic cloves, finely minced
  • 1 dried red chilli, chopped
  • 1 stalk scallion (white part only), chopped
  • 1 tsp grated ginger
  • 1 tbsp light soy sauce
  • 2 tbsp sweet soy sauce

For the tofu

  • 500g firm tofu, mashed
  • 2 tbsp coconut oil
  • 1 red onion, diced
  • 1 red bird’s eye chilli, chopped
  • 1 stalk scallion (white part only), chopped
  • 100g cremini mushrooms, diced
  • Salt and black pepper, to taste
  • 1 bunch Thai basil leaves

To serve with

  • Crispy Thai basil leaves
  • Fried quail eggs
  • Lettuce leaves

METHOD

  1. Sauce: Add all the ingredients for the sauce in a small bowl and mix well to combine. Set aside.
  2. Pad Krapow: Add a tablespoon of the oil into a large pan over medium-high heat. Cook the mashed tofu until dry. Remove from the pan.
  3. Add the remaining oil and the sauté the red onion, chilli, and scallion until fragrant, about 30 seconds, before adding the cremini mushrooms and cooking for a further 30 to 45 seconds.
  4. Add the mashed tofu back into the pan and mix to combine.
  5. Season with salt and black pepper, to taste, and add the sauce mixture to the tofu. Mix until well combined into the tofu, and cook for about 5 minutes.
  6. Add the Thai basil leaves and mix it into the tofu, then remove from the heat.
  7. Add about a tablespoon or more to a piece of lettuce, then top with a fried quail egg and some crispy-fried Thai basil leaves.
  8. Plate up, serve immediately, and enjoy!

Pad Krapow (Thai Basil Tofu)

Pad Krapow (Thai Basil Tofu)

BON APPÉTIT

– Ally xx

Follow me on my social media accounts:
Facebook: Amcarmen’s Kitchen
Instagram: @amcarmenskitchen
TikTok: @amcarmenskitchen

myTaste.com

Goong Ma Kham kab Yum Takrai (Crispy Tamarind Prawns with Spicy Lemongrass Salad)

Goong Ma Kham kab Yum Takrai (Crispy Tamarind Prawns with Spicy Lemongrass Salad)

Hello Everyone! We’re packing our bags and venturing to Thailand on our Flavours of Southeast Asia journey! I don’t know if I’ve mentioned this in one of my previous posts before when I last shared a Thai recipe; I have and aunt who is Thai and I remember when we all used to live back in Brunei, she would teach me how to make Thai dishes such as Som Tam, Tom Yum, Yum Woon Sen, and many more. I’ve also visited Thailand a couple of times and have been to many Thai restaurants in Brunei and Australia.

The dish that I will be making today isn’t actually something I have tried for myself before. I came across it in a Thai cookbook that I purchased when I was still living in Brunei. It was during a work event, where within it we had something called the ‘Thailand Grand Fair’. If I remember clearly, they hosted a Som Tam making competition and had a guest chef come over as a judge and to promote his very first cookbook.

The name of his cookbook was very familiar to me, and then I realised that it was also the name of a Thai restaurant that I used to go to when I was still studying in Australia. Such a small world when I found out that he is actually the owner of it! I had the chance to talk to him a couple of times and I mentioned that I had been to his restaurant a couple of times – I even brought my mom and my sisters to eat there when they visited for my graduation. He was very humble and thankful when I told him that the food was great.

Goong Ma Kham kab Yum Takrai (Crispy Tamarind Prawns with Spicy Lemongrass Salad)

I was browsing through his cookbook one day for inspiration beyond the Thai recipes that I knew how to cook, which are also published on my blog by the way. A recipe for Spicy Lemongrass Salad (Yum Takrai) stood out to me, so did another recipe for Prawns with Tamarind Sauce (Goong Ma Kham), and thus we have a marriage of Crispy Tamarind Prawns with Lemongrass Salad that’s loosely adapted from Sujet Saenkham’s cookbook titled Spice I Am.

According to Chef Sujet, you want to take the time in slicing the lemongrass as thinly as you can otherwise it won’t be all that pleasant to eat. The fragrant and citrusy flavour of the lemongrass pairs very well with the prawns, or with any other seafood as a matter of fact. The tamarind sauce provides a nice balance of sweet, salty, and sour that is absorbed into the flesh of the crispy prawns when topped with it. Put all three together and you’ve got a match made in heaven of flavours and textures! In Chef Sujet’s cookbook, he mentioned that you can also use fish such as red snapper to pair with the lemongrass salad and/or tamarind sauce. I loved this recipe so much with the prawns so I’m definitely going to try this again with fish!

Goong Ma Kham kab Yum Takrai (Crispy Tamarind Prawns with Spicy Lemongrass Salad) Ingredients

PREP TIME 25 MINS | COOKING TIME 10 MINS | SERVES 2-3

INGREDIENTS

For the tamarind sauce

  • 2 tbsp coconut oil
  • 1 dried red chilli, chopped
  • 1 red bird’s eye chilli, chopped
  • 2-3 garlic cloves, minced
  • 1 small red onion, diced
  • 2 tbsp tamarind paste
  • 2 tbsp fish sauce
  • 1/2 tsp salt
  • 4 tbsp coconut sugar
  • 1/3 cup water

For the crispy prawns

  • 6 extra-large tiger prawn, peeled and deveined with tails intact
  • 4 tbsp tapioca flour
  • 4 tbsp rice flour
  • Salt and black pepper, to taste

For the spicy lemongrass salad

  • 3-4 lemongrass stalks (white part only), finely sliced
  • 2 red bird’s eye chillies, chopped
  • 1 bunch Thai basil leaves
  • 1 medium-sized red onion, halved and thinly sliced
  • Handful of cherry tomatoes, halved
  • Juice of 1 lime or lemon

METHOD

  1. Tamarind Sauce: Heat the coconut oil in a small pan. Fry dried chillies, red chillies, and garlic together for about 15 to 20 seconds and then add in the onions. Continue to cook for another 15 to 20 seconds.
  2. Add the tamarind paste, followed by the fish sauce, salt, and coconut sugar. Mix and bring to a simmer.
  3. Once simmering, add the water and then bring it back up to a simmer. Remove from the heat and then set aside.
  4. Crispy Prawns: Combine the flours and season in a medium-sized bowl and mix to combine.
    Coat each prawn with the flour mixture and shallow fry for 3 minutes per side, over high heat.
    Once done, remove from the pan and transfer to a plate lined with a paper towel to soak up the excess grease.
  5. Lemongrass Salad: Combine all the ingredients in a medium-sized mixing bowl and toss to combine.
  6. Transfer the salad to a serving dish and top with the crispy prawns.
  7. If needed, you can reheat the tamarind sauce before spooning it over the prawns. Serve immediately and enjoy!

Goong Ma Kham kab Yum Takrai (Crispy Tamarind Prawns with Spicy Lemongrass Salad)

BON APPÉTIT

– Ally xx

Follow me on my social media accounts:
Facebook: Amcarmen’s Kitchen
Instagram: @amcarmenskitchen
TikTok: @amcarmenskitchen

myTaste.com

Chai Tow Kway (Fried Carrot Cake)

Chai Tow Kway (Fried Carrot Cake)

Hello Everyone! I can’t believe that the year went by so quickly – it’s already the third day of the last month of the year! Before we dive into tonight’s post, I would just like to mention that 5 out of my 6 recipe entries for the month-long King Chef 2021 Challenge over on TikTok that I participated in, made it on the Top 20 list of weekly winners! This was also one of the reasons why I hadn’t been posting on my blog as I was focused and occupied in developing creative and unique recipes for the challenge. I think next year (month), I’ll share those recipes on the blog. In the meantime, you can head on over to my TikTok and watch my video entries for those dishes!

Moving forward, tonight, I will be sharing one last dish from Singapore before we fly off to our second last destination on our Flavours of Southeast Asia journey. The dish is known as Chai Tow Kway, or in English, Fried Carrot Cake. Yes, I can see the looks of confusion for those who don’t actually know this dish – because I had the same confusion when I first heard of it. I imagined an actual carrot cake being fried. Au contraire, despite its name, this Singaporean street food favourite doesn’t contain any carrot at all. It is actually made of white radish (daikon), which is first steamed, and then fried, giving it a crisp exterior while still soft and chewy in the center. The reason why it is called carrot cake is because the word for daikon, can also refer to a carrot because of a loose English from Hokkien translation.

Chai Tow Kway (Fried Carrot Cake)

To make this dish, white radish is grated and then steamed with rice flour and water. It is then cubed and tossed in a wok with eggs, preserved radish, and other seasonings. I opted to add thick sweet/dark soy sauce but you can leave this out. It is a much-loved local comfort food, not only in Singapore, but also in Malaysia, and can be consumed at various times of the day; it goes from being a breakfast dish, to a side dish, to a late-night supper dish.

PREP TIME 25 MINS* | COOKING TIME 1 HOUR | SERVES 2-3

*Allow for additional time to cool the steamed radish and to cool the steamed radish cake in the fridge overnight.

INGREDIENTS

Steamed Radish Cake Ingredients

For the radish cake

  • 600g white radish (daikon), shredded or grated
  • 3 tbsp water
  • 1 & 1/3 rice flour
  • 1/3 cup glutinous rice flour
  • 1 tsp salt
  • 1 tsp white sugar
  • 1 cup water

Chai Tow Kway (Fried Carrot Cake)

For the chai tow kway

  • Radish cake, fried
  • 2 tbsp cooking oil
  • 2-3 garlic cloves, finely minced
  • 2 red chillies, minced
  • 1 red onion, finely diced
  • 1 stalk scallion (light green and white part only), finely sliced
  • 1 tbsp salted (preserved) radish
  • 1 tsp sambal paste
  • 1 tsp fish sauce
  • 1/4 tsp white pepper powder
  • 1 tsp dark soy sauce (optional)
  • 2 large free range eggs
  • Blanched bean sprouts
  • Scallion (green part), shredded

METHOD

  1. Steamed Radish Cake: Combine the shredded radish with 3 tablespoons of water in a medium-sized stainless steel (or heat proof) bowl. Steam until the radish turns translucent, about 25 to 30 minutes on low heat. Once done, remove from the steamer and set aside to cool down.
  2. Add the flours, salt and, and sugar together in a large mixing bowl. Add the water and mix thoroughly to combine, to get rid of any lumps.
  3. Add the cooled radish to the flour mixture and mix well to combine.
  4. Pour the radish flour mixture into a 8-in square cake tin and steam for 30 to 35 minutes over medium-high heat. Once done, remove from the steamer and set aside to completely cool down for a few hours or overnight in the refrigerator. This will allow the cake to firmly set.
  5. Once the cake is firm, remove from the cake tin and cut into smaller chunks.

Steamed Radish Cake

Steamed Radish Cake

  1. Chai Tow Kway: Add cooking oil in a large non-stick pan over medium-high heat. Fry the radish cake (in batches if needed), until the edges are brown and crispy-looking. Remove from the pan and transfer to a plate lined with a paper towel to soak up the excess oil.
  2. In the same pan, sauté the garlic and chillies until fragrant, about 30 seconds. Add the onion and scallion, cooking until soft, before adding the salted radish. Cook for a further 45 to 60 seconds.
  3. Add the sambal paste, followed by the fish sauce, white pepper powder, and dark soy sauce (optional), mixing well to even coat the radish cake.
  4. Push the ingredients to one side of the pan. If your pan is feeling a little bit dry, and a bit more oil and add the eggs in. Stir to scramble and cook, about 30 seconds and then stir fry together with the other ingredients.
  5. With the heat off, add the blanched bean sprouts and shredded scallion. Toss to combine and the plate up.
  6. Top with extra bean sprouts, scallions, and red chillies. Serve immediately and enjoy!

Chai Tow Kway (Fried Carrot Cake)

BON APPÉTIT

– Ally xx

Follow me on my social media accounts:
Facebook: Amcarmen’s Kitchen
Instagram: @amcarmenskitchen
TikTok: @amcarmenskitchen

myTaste.com

Singapore Fish Head Curry

Singapore Fish Head Curry

Hello Everyone! It’s been a while since my last post here on the blog; I’ve been super busy with work since I moved to a new department in the beginning of October, and doing some freelance work on top of that. I’ve also been focusing on creating sponsored content for Instagram and participating in a TikTok Challenge this past month. Now that things have slowed down just a little bit, I finally found the time to sit down and write this post/recipe (just hours before this is going live), to share with everyone!

We still have three more countries to venture through on our Flavours of Southeast Asia before the year ends, so the coming weeks will just be quick stopovers – and first, we’re taking a stroll through the many hawker centers in Singapore for their famous Fish Head Curry!

Singapore Fish Head Curry

The dish is actually of South Indian origins, but has been popularised in countries such as Malaysia and Singapore where it was introduced by the Indian migrants when they moved to the region. Thus, this dish is more commonly found at many Indian eateries across Malaysia and Singapore, served typically as a main to steamed rice.

Of course, there’s no problem in using the whole fish, which is what I did, as opposed to just using the head. The main reason why the fish head is much sought after when making a curry is because the meat found at the jaws, below the gills, and at the back of the neck is the sweetest and most delicate. It is also where it absorbs the flavours of the curry best. The important thing is to use fresh fish, whether sea bream, sea bass, snapper, tilapia, or any other white-fleshed fish, and to not overcook it.

I’ve had this dish many times before during my travels to Singapore and have made it a couple of times before when I was still living in Brunei. This is the first time I am making it again at home after a couple of years. The curry is thick, creamy, aromatic, tangy, and spicy; best served with vegetables such as okra and eggplant to soak up all the gravy goodness.

Note that there are some ingredients that I could not source locally for this dish, eg. brown mustard seeds, fenugreek seeds, fresh galangal, and fish curry paste. The seeds I just left out, and used crushed galangal from a jar, and red curry paste instead.

Singapore Fish Head Curry Ingredients

PREP TIME 30 MINS | COOKING TIME 30 MINS | SERVES 4

INGREDIENTS

  • 1.5 kg red snapper fish, sliced
  • 2 tbsp cooking oil
  • 2 tsp cumin seeds
  • 15 pcs dried curry leaves
  • 3 pcs dried long red chillies
  • 3 tbsp red curry powder (or fish curry powder)
  • 2 tbsp tamarind paste
  • 2 tbsp coconut sugar
  • 200 ml coconut milk (or more if you want it creamier)
  • 2 tsp salt
  • 2 cups water (or fish stock)
  • 1 large tomato, cut into wedges
  • 1 bunch (5 pcs) okra, halved
  • 2 eggplants, halves lengthwise and then cut into 3 horizontally
  • Shredded scallion, to garnish

For the curry paste

  • 6 garlic cloves, peeled and chopped
  • 3 pcs red bird’s eye chillies (more if you want it spicier, or vice versa)
  • 2 stalks lemongrass (white part only), chopped
  • 1 medium-sized red onion, peeled and chopped
  • 1-inch sized ginger, peeled and chopped
  • 1-inch sized turmeric, peeled and chopped
  • 1 & 1/2 tsp crushed galangal paste
  • 1/4 cup water

METHOD

  1. Curry Paste: Pound all the ingredients together for the curry paste, except the water, using a mortar and pestle, until a smooth paste is formed. This should take about 10 to 15 minutes of elbow grease. Mix the water with the paste and then set aside until ready to use. Alternatively, you can place all the ingredients in a blender and blitz them into a smooth paste.
  2. Fish Head Curry: Heat 2 tablespoons of cook oil in a heavy-based pan over high heat. Fry the eggplant slices until browned and tender. Once done, set aside.
  3. Reduce the heat down to medium, and in the same pan toast the cumin seeds, curry leaves, and dried chillies. Cook until fragrant and be careful to not burn them.
  4. Add the curry paste and curry powder, cooking and stirring continuously for about 4 to 5 minutes or until the paste darkens in colour and the oils start to separate.
  5. Add the tamarind paste, coconut sugar, coconut milk, and season with salt. Stir and bring the mixture to a simmer before adding the water and tomato wedges. Bring to a boil.
  6. Once boiling, add the fish head (and fish slices) to the curry mixture. Cover and cook on low heat for 8 – 10 minutes or until the fish is cooked through. In the last minute or so, add the okra to the curry and cook until tender.
  7. Transfer the fish head curry to a serving dish, top with the fried eggplant, and garnish with some shredded scallions. Serve immediately with steamed rice and enjoy!

Singapore Fish Head Curry

Singapore Fish Head Curry

BON APPÉTIT

– Ally xx

Follow me on my social media accounts:
Facebook: Amcarmen’s Kitchen
Instagram: @amcarmenskitchen
TikTok: @amcarmenskitchen

myTaste.com

Htamin Gyaw (Burmese-style Fried Rice)

Htamin Gyaw (Burmese-style Fried Rice)

Hello Everyone! It’s time to pack up our bags and head onto our next destination on our Flavours of Southeast Asia – to Myanmar! Myanmar (Burmese) cuisine is known for the simplicity of its recipes. Essentially, the building blocks to most dishes use shallots, turmeric, and peanut oil. Other ingredients to give a dish more complexity include ginger, garlic, tomatoes, lime, chillies, dried shrimp, and fish sauce.

Out of all the Southeast Asian cuisines, I would have to say that, alongside Cambodia and East Timor, Myanmar too is a cuisine that I am most unfamiliar with. Nevertheless, I’m up for the challenge to share with you some dishes that I have come across during my research.

Htamin Gyaw (Burmese-style Fried Rice)

Htamin Gyaw (Burmese-style Fried Rice)

Htamin Gyaw (don’t ask me how to pronounce it *cheeky grin*), or in English, Fried Rice with Boiled Peas is the traditional Burmese recipe for fried rice. Like with every cuisine, adaptations of this fried rice can be found in different households. A popular plain version consists of rice, boiled peas, onions, garlic, and dark soy sauce. The dish is a common breakfast meal in Myanmar, but it can also be served for lunch and/or dinner. The rice can optionally be topped with a fried egg and served with any leftovers you may have lying around from a meal the night before.

The version that I will be making to share with everyone tonight consists of fried red onions in place of shallots, peas, chillies, and turmeric. I also served it with a side of blanched bok choy, sunny side up egg, and drizzled some sriracha sauce on top. If you want to keep this meal vegetarian or vegan-friendly, then feel free to omit the egg.

Htamin Gyaw (Burmese-style Fried Rice) Ingredients

PREP TIME 10 MINS | COOKING TIME 20 MINS | SERVES 5-6

INGREDIENTS

  • 4 cups day old cooked rice
  • 2 tbsp sesame oil
  • 1 small red onion, diced
  • 1 stalk spring onion (white and light green parts only), finely sliced
  • 1 long green chilli, sliced
  • 1 red bird’s eye chilli, sliced
  • 1/2 tsp turmeric powder
  • 1 cup green peas, fresh or frozen
  • Fried red onions
  • Salt and black pepper, to taste
  • Blanched bok choy
  • Fresh red and green chillies
  • Sunny side up egg
  • Sriracha sauce
  • Lemon or lime wedges

METHOD

  1. Add the sesame oil into a large pan over medium-high heat. Sauté the onions until cooked through, about 3 minutes before adding the sliced spring onion and chillies. Cook for a further 30 seconds and then add in the turmeric powder.
  2. Add the cooked rice and mix well, breaking up any remaining clumps of rice. Season with salt and freshly cracked black pepper, to taste and cook for a further 5 minutes making sure to coat every single grain of rice in the turmeric evenly.
  3. Add the green peas along with the fried red onions and cook for another 5 minutes. Taste and adjust as you go.
  4. Once done, transfer the rice to individual serving bowls and serve with blanched bok choy, a sunny side up egg, and a lemon or lime wedge on the side. Top with extra chillies and fried red onion if you wish, and a drizzle of sriracha sauce. Enjoy!
  5. In Myanmar, this dish would also often be served with a condiment known as ngapi kyaw, which is fried fish paste with shredded fish flakes. Of course, if you want to keep the dish vegetarian/vegan-friendly, you can leave this out. Fresh cucumber strips mixed with chopped onions, green chillies, and vinegar can also be served with this fried rice.

Htamin Gyaw (Burmese-style Fried Rice)

Htamin Gyaw (Burmese-style Fried Rice)

BON APPÉTIT

– Ally xx

myTaste.com

Auguest 2021: Jialing Mew

Vietnamese-inspired Tofu Rolls

“Waste not, want not.” — Jialing Mew

Auguest 2021: Jialing Mew

Let me just preface this year’s recipe by saying that my goal was not to recreate an authentic or traditional Vietnamese dish. Despite having grown up in South East Asia, Vietnamese cuisine was not really something I’d experienced much of until I moved to Sydney (slightly ironic, yes, but Australia is truly a melting pot of cuisines and cultures!). And so, not wanting to butcher any of the already perfect Vietnamese favourites I’ve come to love in my twenties, I decided to instead draw inspiration from some Vietnamese-Australian fusion I’d eaten in Melbourne during one of the brief intermissions between lockdowns.

As with every other Auguest, it was definitely a… journey… for me to get to this recipe. The original game plan was to take advantage of popular local seafood, such as barramundi. But fate had other plans. Due to a highly traumatising incident while pet-sitting for tropical fish (who I now see as the vicious, carnivorous killers they truly are!), my stomach forced me to swear off all forms of fish flesh for the foreseeable future.

Vietnamese-inspired Tofu Rolls Ingredients

Also, having been under pretty strict lockdown for almost as long as I can remember, I’ve had fairly limited access to specialty Asian ingredients. Many servings of banh mi and bowls of bun cha later (you know, for research, and supporting local businesses), I came up with another idea – sausage rolls! Such an iconic Australian food, yet every bakery and home cook has their own special recipe. I dreamt up a great chicken sausage roll recipe packed with aromatics and fresh ingredients reminiscent of my experience with Vietnamese-Australian cuisine.

The recipe was right up my alley, and came together with hardly a hiccup. But then last week my brain decided to remind me that Allison’s blog is now actually kind of pescatarian/vegetarian/vegan – which chicken is not.

Vietnamese-inspired Tofu Rolls

And so I resorted to the last-minute brain scramble I thought I’d gotten past, frantically modifying the recipe I’d perfected at the beginning of the month. So much for preparedness, but it kind of worked out in the end, and to be honest I’m not mad at the vegetarian version (#sorrynotsorry to all the vegans, though).

My recipe is still chicken-based, but I’ve also included some modifications to make a pretty tasty tofu filling, so feel free to choose your own adventure with this recipe!

Unless it’s vegan.

Vietnamese-inspired Tofu Rolls Ingredients

PREP TIME 20 MINS | COOKING TIME 1 HOUR | MAKES 15 ROLLS

INGREDIENTS

  • 3 sheets puff pastry
  • 1 egg, beaten

For the filling

  • 500g firm tofu (or 500g chicken mince)
  • 1 cup (65g) fried scallions
  • 1 stalk fresh lemongrass, ends and outer leaves discarded, pale inner bulb finely minced
  • 4 cloves of garlic, minced
  • 1 tbsp fresh ginger, minced
  • Small bunch of fresh coriander, about 1/4 cup finely chopped
  • 2 red bird’s eye chills, minced
  • 2-3 eggs (1 egg if using chicken)
  • 1 tbsp lime juice
    3 tsp fish sauce (or soy sauce)

For the dipping sauce

  • 1/2 cup ketchup
  • 2 tbsp sriracha

METHOD

  1. Press a 500g block of firm tofu between several layers of paper towels with a flat heavy object on top to remove excess water. Let it sit for about an hour, then use your hands, a large grater, or knife and cutting board to turn the tofu into small crumbled pieces.
  2. Separate 3 sheets of prepared puff pastry, and set aside to thaw. Line two baking sheets with baking paper. Preheat oven to 180C (170C fan forced, 350F, or gas mark 4).
  3. In a blender, pulse the fried scallions until finely crushed – this will be a super flavourful replacement for the breadcrumbs traditionally used in sausage rolls for keeping the filling from shrinking.
  4. In a large bowl, combine the tofu with the fried scallion crumbs and remaining filling ingredients. Mix well. Add up to 3 eggs until mixture binds and holds.
  5. Working with one sheet at a time, use a sharp knife to carefully cut puff pastry into thirds from top to bottom, then left to right, creating 9 even squares. Each of these squares you’ve cut will be used to individually wrap the tofu rolls.
  6. Take approximately 2 tablespoons of the mixture and shape into a log, placing diagonally across each small square of pastry. Brush the entire surface of the mixture and pastry with the beaten egg. To seal the roll, take the exposed top corner and fold across the top of the mince mixture. Take the opposite bottom corner and gently fold and press on top of the first pastry corner. Repeat with remaining filling and puff pastry sheets and arrange folded pastry rolls onto lined baking sheets.
  7. Brush the tops of the pastry with the remaining egg and place into the oven, baking one sheet at a time for 30 minutes, or until the tops of the pastry are golden brown.
  8. Combine the ketchup with sriracha and mix well to create dipping sauce, and serve with the pastry rolls. Enjoy!

Vietnamese-inspired Tofu Rolls

Photo Courtesy & Recipe Copyright © 2021 | Jialing Mew (@jialingmew)

BON APPÉTIT

– Jialing Mew

myTaste.com

Auguest 2021: Mhyre Virtudazo

Vietnamese Rice Paper 3 Ways

“If I can make it from scratch, I will make it from scratch. I also try to cook with whole foods as much as possible and eat more vegetables/plant-based meals at least once a week.” — Mhyre Virtudazo

Auguest 2021: Mhyre Virtudazo

Whenever I see or think of Vietnamese rice paper, Gỏi cuốn (fresh spring roll) and Chả giò (fried spring roll) immediately come to mind. I love these appetizers so much that I eat them as snacks or as my main dish for dinner.

My problem with spring rolls (including the Filipino version Lumpia), however, is the step that involves wrapping. I find it tedious and prone to errors (uneven shapes or rolls with holes). Haha! To prevent that from happening, I have two options: order from a restaurant or “solve the problem”. On extra lazy days, I would choose the former. However, if you know me really well, you’d know that I’d usually go for the latter. And so, I had to do different takes on rice paper and spring roll preparation.

I’ve categorised these into three levels (easy, medium, hard) and I’m hoping you’re up for the game to reach Level 3. Are you ready?

Level 1 – Easy

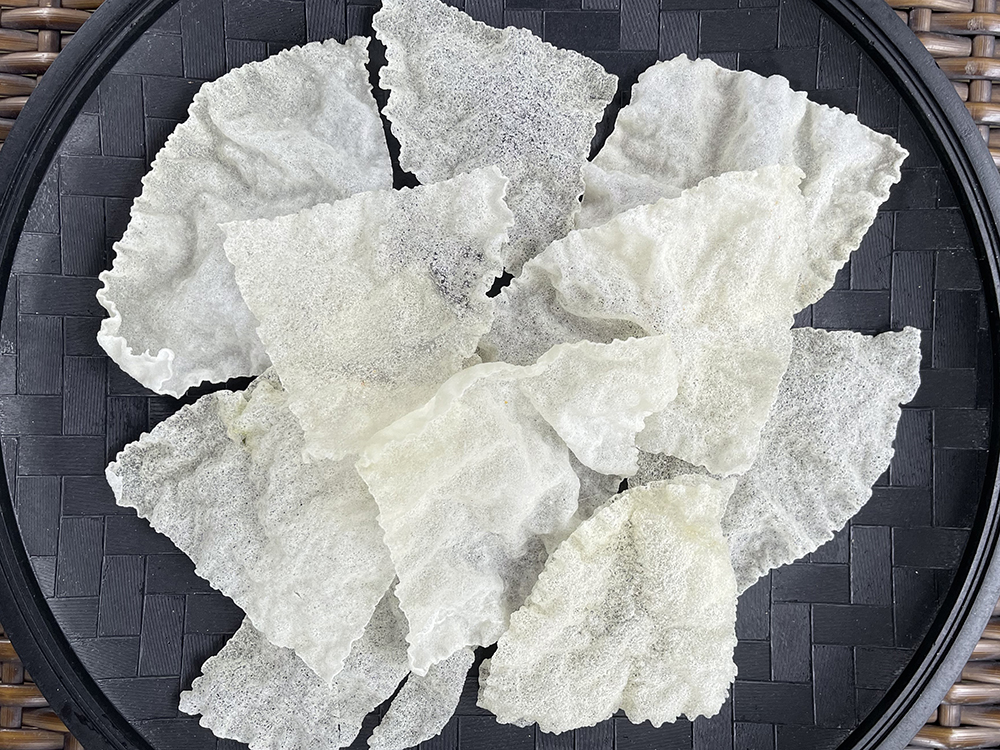
Rice Paper Puffs. Or Fried Rice Paper. This has become quite popular on TikTok. All you need to do is cut 3-4 pieces of rice paper into quarters and deep fry them in hot oil – that’s it! I think rice papers already have a mild sweet and salty taste to it so I prefer to eat them as it is. At the same time, I’ve seen videos where a little bit of salt and pepper, or instant ramen seasoning packets are added at the end. Try it plain first. If it’s too plain for you, then add seasoning.

Vietnamese Rice Paper 3 Ways - Rice Paper Puffs

Level 2 – Medium

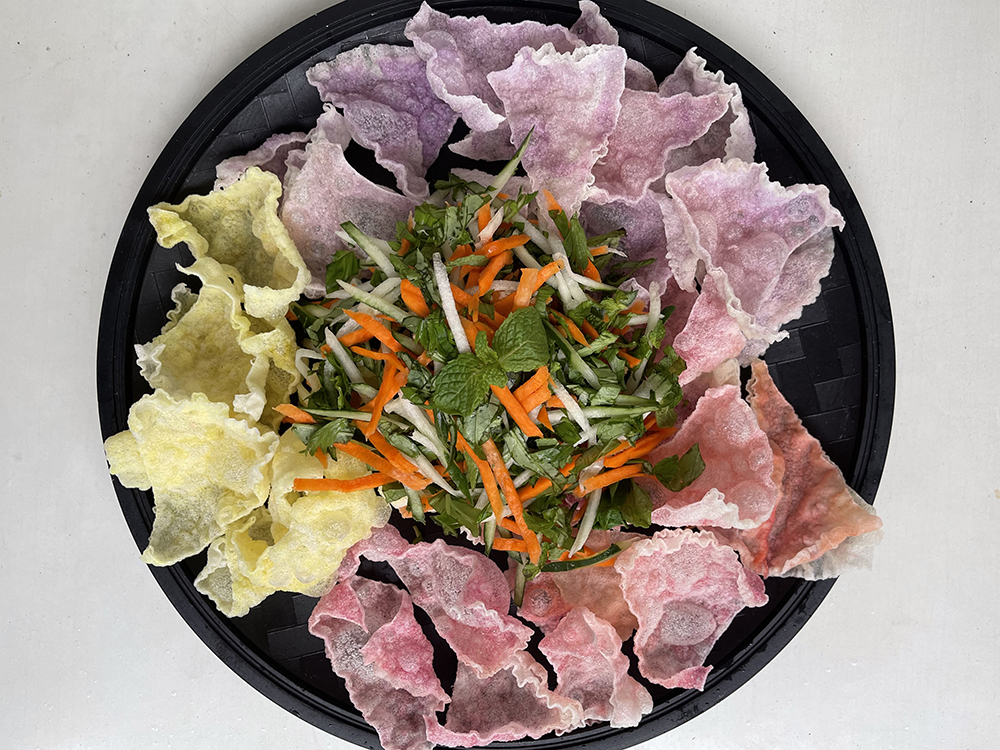
Rice Paper Nacho Salad. We’re following the same procedure with the Rice Paper Puff, except that you cut up the rice papers into smaller pieces. Serve with fresh herbs and julienned carrot and cucumber. How you eat it is like how you eat with nachos. Even if you cut up the rice paper into small triangles, it still puffs up large when fried so you don’t have to worry about falling pieces of vegetables when you eat it (but wouldn’t there always be falling pieces of filling or sauce whenever we eat nachos?). Again, I enjoy them without any seasoning so feel free to add salt and spices to your liking.

Bonus Round – Of course there’s a bonus round!
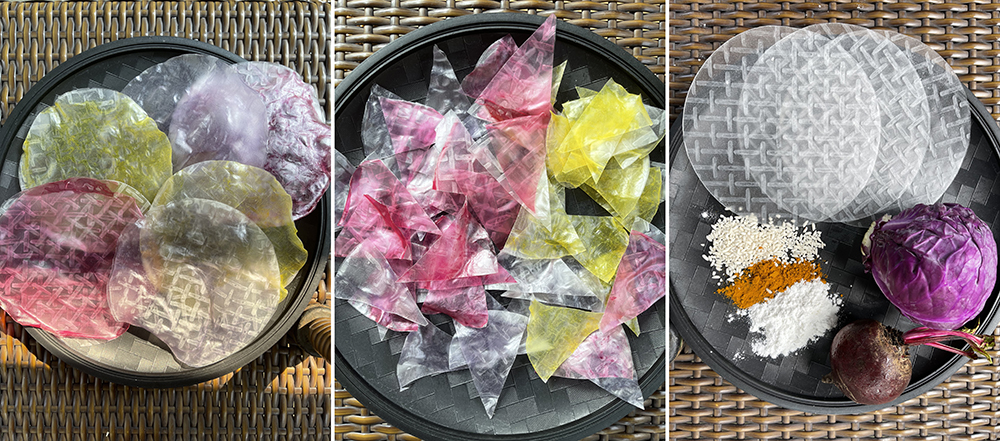
The salad makes the dish colourful enough but NOT ENOUGH for me. Lol. Why not add some colour to the rice paper? For yellow, mix turmeric powder in hot water. For pink, mix red beet slices and a teaspoon of vinegar in hot water. For violet, boil half a head of cabbage (shredded) in 2 cups of water for 30 minutes. Remove the shredded cabbage then add 1/4 teaspoon of baking soda. Your liquid may turn blue which is great, but mine came out violet and I’m still happy with it. Allow for the three liquid colourings to cool before use.

Vietnamese Rice Paper 3 Ways - Rice Paper Nachos

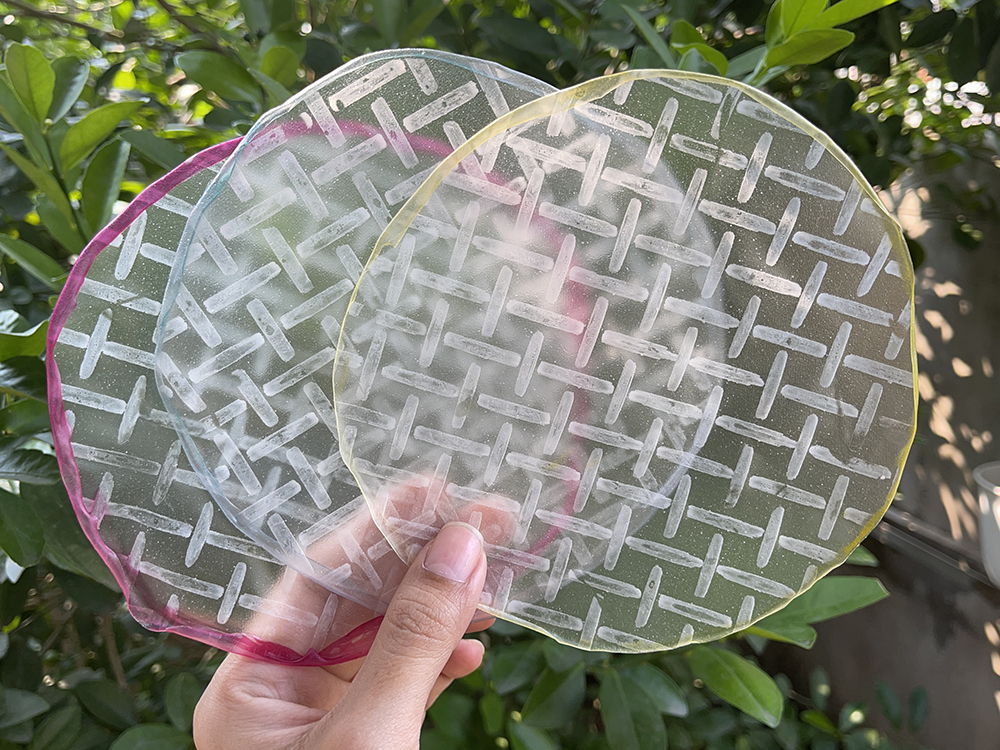
How to colour rice paper is just like how you paint with watercolor! Dip your silicone brush into your liquid colouring, then paint one side of rice paper. As soon as you’ve coated the entire surface, slap another rice paper onto it and hold them firmly until they stick together. Wait for it to dry. Once dry, follow the steps for Level 2.

Level 3 – Hard

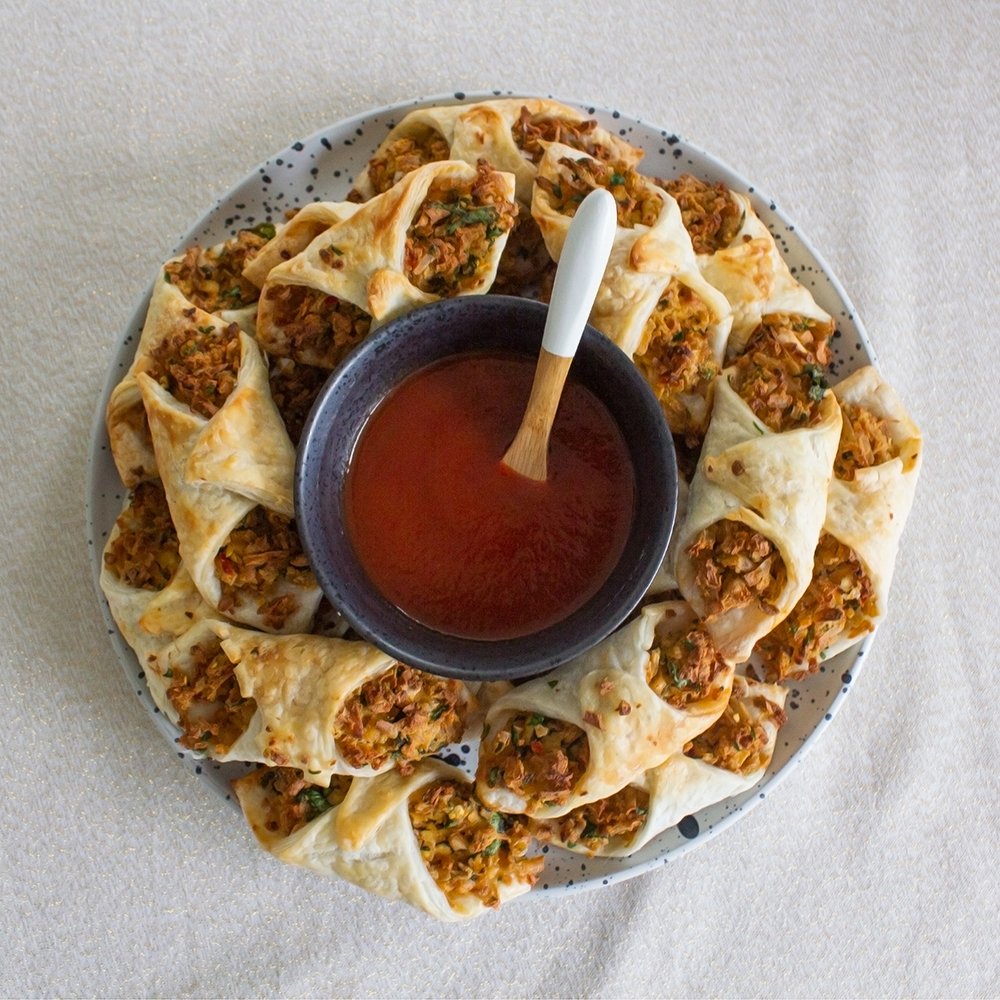
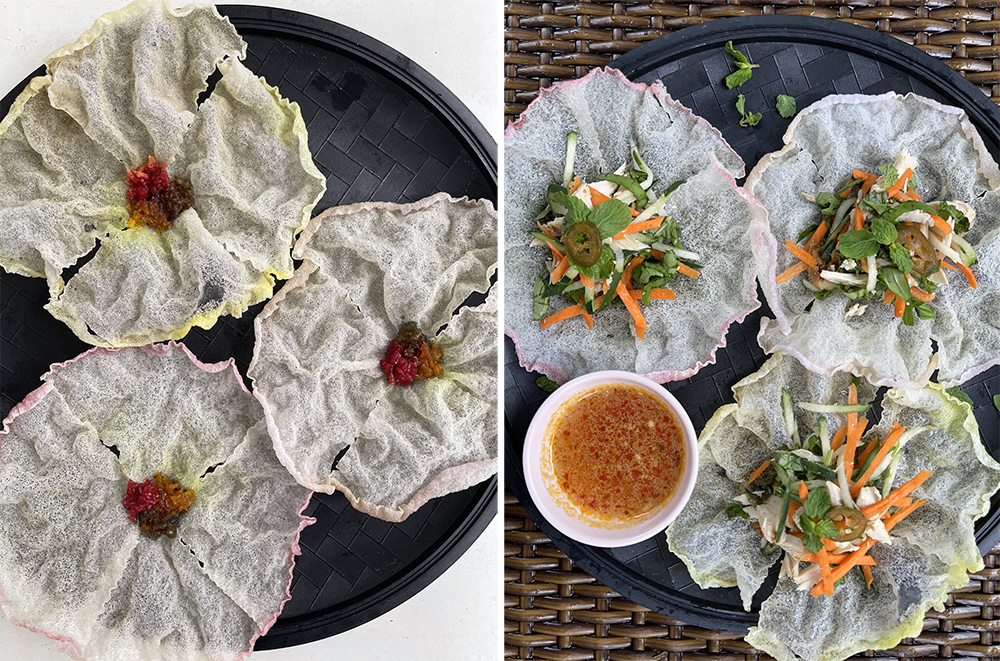
Vietnamese Salad in Rice Paper Flower Cups. This is a simple Vietnamese salad minus vermicelli noodles. The rice paper cups would replace them. The inspiration for this recipe came from YouTube videos I chanced upon last year. Surprisingly, these are Korean recipes that use Vietnamese rice paper. They are called 라이스페이퍼 꽃부각 (Rice Paper Flower) or 라이스페이퍼 튀김 (Fried Rice Paper).

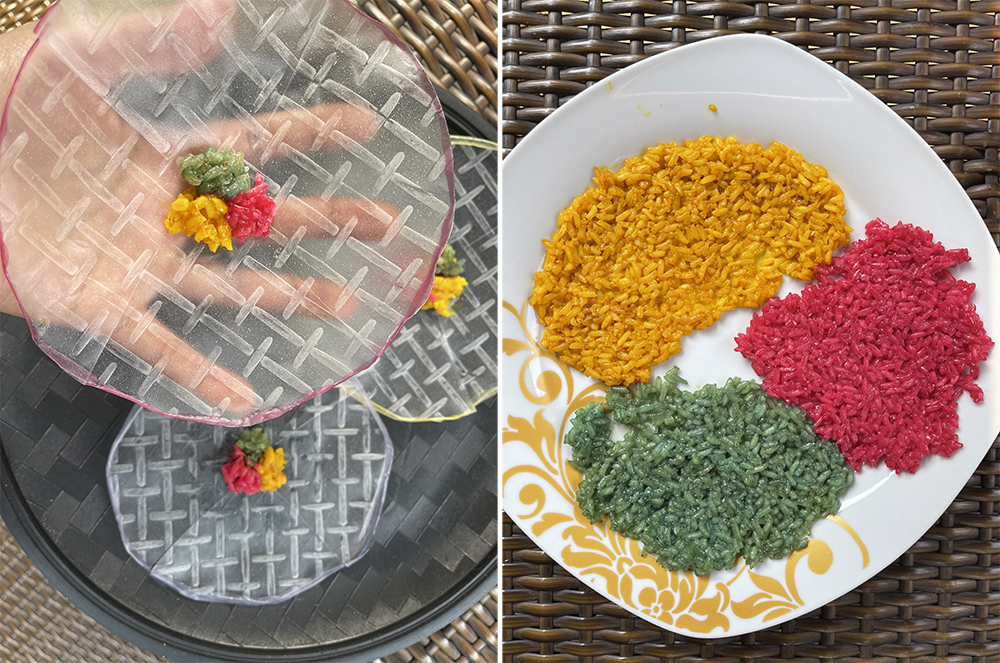
To make rice paper cups, press on a teaspoon or 2 of cooked rice in the middle of the rice paper. Cut the rice paper into 4 up until you reach the center. Deep fry it in hot oil for 10 seconds and drain immediately. Adding cooked rice in the middle prevents the rice paper from curling too much and it will allow it to form a flower shape.

Vietnamese Rice Paper 3 Ways - Vietnamese Salad in Rice Paper Flower Cups

You’ll use the same salad as in Level 2. For the dressing, I recommend the one from Allison’s Magic Vietnamese-style Glass Noodle Salad [https://amcarmenskitchen.com/2020/10/21/magic-vietnamese-style-glass-noodle-salad/] recipe (it’s sooo good!). What I did differently when I took photos for this recipe is that I used calamansi instead of lemon, garlic powder instead of minced garlic, and chili oil instead of minced chili (at that time, I didn’t feel like mincing garlic and chili and I ran out of lemon).

When ready to serve, scoop up some salad and place it in the middle of the rice paper cup. It’s very important that you consider this step. If you put the salad too early, your rice paper cup will be soggy from the moisture of the vegetables and herbs.

Bonus round – Fight!
The rice paper cups will be plain looking without any colour. Boooring! Prettify them by painting the edges with the same liquid coloring you used. Let it dry first before frying. You may also add colour to the rice using the same liquid coloring. I made the rice green by boiling the remaining cabbage liquid for another 15 minutes.

Vietnamese Rice Paper 3 Ways - Vietnamese Salad in Rice Paper Flower Cups

They really look like flowers once deep fried! Let your family or friends marvel at the fried rice paper flowers first then impress them some more with the salad!

Step up your salad game by adding shredded rotisserie chicken and pickled jalapeño slices. You may replace the chicken with steamed or poached shrimp and the pickled jalapeño with a fresh one.

And that’s the end of your kitchen journey. For now! I’m sure you’ll have more adventures as you try all of Allison’s Auguest recipes. I hope you enjoy making and eating rice paper 3 ways!

Here are the main ingredients that you’ll need for the recipes below:

Vietnamese Rice Paper 3 Ways Main Ingredients


Rice Paper Puffs

PREP TIME <5 MINS | COOKING TIME <5 MINS | SERVES 1

INGREDIENTS

  • 3-4 pcs rice paper
  • Oil, for deep frying
  • Salt and black pepper, or seasoning (optional)

METHOD

  1. Cut each rice paper into 4 equal pieces and deep fry in hot oil for about 10 seconds.
  2. Immediately remove from oil and drain in a strainer lined with a paper towel to soak up any extra grease.
  3. Serve and enjoy immediately. Season with salt and pepper or instant ramen seasoning, if you wish.

Vietnamese Rice Paper 3 Ways - Rice Paper Puffs


Rice Paper Nacho Salad

PREP TIME 15 MINS | COOKING TIME 5 MINS | SERVES 3

INGREDIENTS

6 pcs rice paper
Oil, for deep frying
3 cups carrot, julienned
3 cups cucumber, julienned
2 cups fresh herbs (sliced mint, basil, cilantro)

METHOD

  1. Cut each rice paper into 8 pieces and deep fry in hot oil for about 10 seconds.
  2. Immediately remove from oil and drain in a strainer lined with a paper towel to soak up any extra grease. Set aside.
  3. In a large mixing bowl, toss the carrots, cucumber, and fresh herbs together until well combined.
  4. Transfer the salad to a large serving dish and prop the fried rice paper slices around it.
  5. Serve and enjoy immediately. Season the fried rice paper slices with salt and pepper or instant ramen seasoning, if you wish.

Vietnamese Rice Paper 3 Ways - Rice Paper Nacho Salad


Vietnamese Salad in Rice Paper Flower Cups

PREP TIME 20 MINS | COOKING TIME 5 MINS | SERVES 3

INGREDIENTS

  • 3 pcs rice paper
  • 3 tsp cooked rice
  • Oil, for deep frying
  • 3 cups carrot, julienned
  • 3 cups cucumber, julienned
  • 2 cups fresh herbs (sliced mint, basil, cilantro)
  • 1/4 cup water
  • 3 tbsp lemon juice
  • 2 tbsp granulated sugar
  • 1 tbsp sesame oil
  • 2 tsp fish sauce (or more, to taste)
  • 2 garlic cloves, finely minced
  • 2 red bird’s eye chilies, finely minced

METHOD

  1. Press a teaspoon of cooked rice in the middle of the rice paper.
  2. Cut the rice paper into 4 parts up until where the cooked rice is, and deep fry in hot oil for about 10 seconds.
  3. Immediately remove from oil and drain in a strainer lined with a paper towel to soak up any extra grease. Set aside.
  4. In a large mixing bowl, toss the carrots, cucumber, and fresh herbs together until well combined. Set aside.
  5. Add the water, lemon juice, sugar, sesame oil, fish sauce, garlic cloves, and chilies in a jar. Secure the lid and shake vigorously until all ingredients are well combined.
  6. Scoop some salad and place it in the middle of the fried rice paper cups and serve with the dressing in a dipping sauce cup or small ramekin. Enjoy!

Optional: You can add your choice of protein and pickled jalapeño slices to the salad to bulk it up and make it a really filling meal.

Vietnamese Rice Paper 3 Ways - Vietnamese Salad in Rice Paper Flower Cups

As a third time Au-guester, my goal is to not only keep up with the theme, but also share recipes that require less effort than the first 2 recipes I’ve submitted in the previous years. This is why I’ve decided to not include steps on creating the liquid colouring in the recipe method. I’m really into colourful dishes and I’m usually bound to outdo myself every time I create something new. If you did try to add color to your rice paper, please let me and Allison know how it was like for you. We’d be very interested to learn about your kitchen experience!

Photo Courtesy & Recipe Copyright © 2021 | Ferreli “Mhyre” Virtudazo (@acupofjasminerice)

BON APPÉTIT

– Ferreli “Mhyre” Virtudazo

myTaste.com