Malaysian Curry Laksa (Spicy Noodle Soup)

Malaysian Curry Laksa (Spicy Noodle Soup)

Hello Everyone! So, I’ve been told that I don’t write as much as I used to, and that’s only because there’s really nothing much to tell. Well okay, maybe a part of the reason is also that I’m always mentally tired by the end of the day when I get around to writing my blog posts. I try to write them in advance so that I could at least add some enthusiasm to my posts, but I always end up procrastinating – and I’m sorry for that! Just bare with me until the end of the year and hopefully my content will be much better when the New Year kicks in 🙂

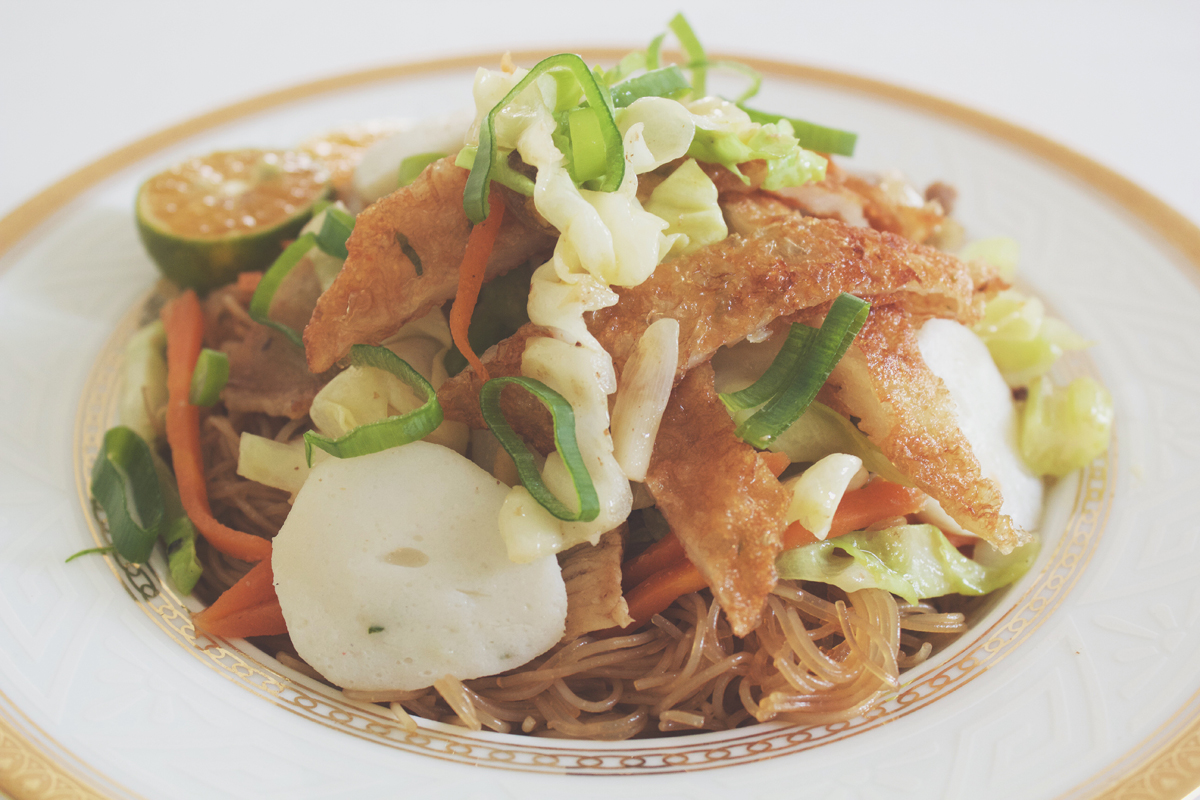
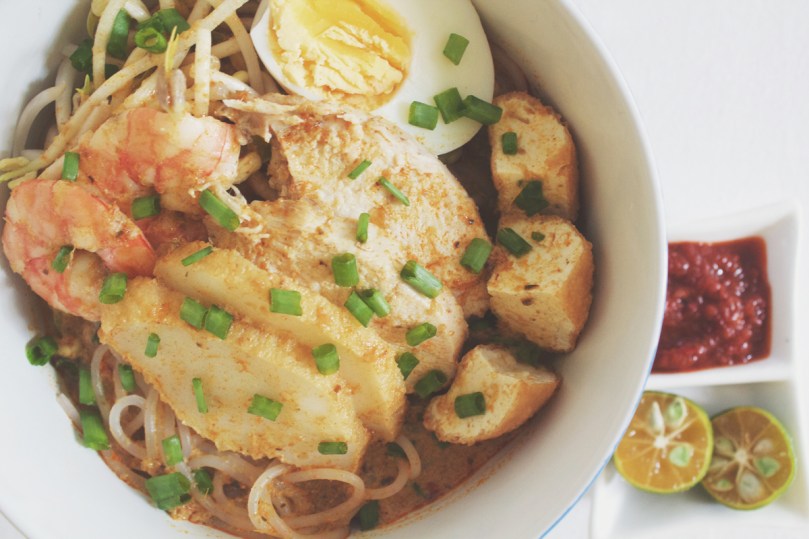
Anyway, let’s get down to business for tonight’s post; the last week of Noodle Month! Again, the month just flew right by! December is just around the corner, and sooner or later it’ll be Christmas and then the New Year! Tonight, I am sharing with you a popular dish in Brunei, Singapore, Indonesia, and Malaysia – Laksa! I wouldn’t say that this dish is at the top of my favourite noodle dish (only because there are many other noodle dishes that I prefer than laksa), but if I want it, I’ll have it!

The plan was to make my own laksa paste from scratch, and I know it’s no excuse, but time was short on my hands and I just made the decision to buy a ready-made, packeted paste from the stores. Also, if I made my own paste, we’d have a lot of left over ingredients (that is, if we didn’t end up using all of it), or a surplus of paste that would’ve ended up sitting in the freezer for a long time, and eventually in the trash since we don’t eat laksa that often at home. However, feel free to make your own paste and just follow the ingredients from the recipe below 🙂

Before I dive into the recipe, I’ll just talk a little bit about what Laksa is for those of you who don’t know what it is. Laksa is actually a combination of Chinese and Malaysian cuisine that consists of rice noodles/vermicelli served as a spicy soup dish with various meats such as chicken, prawn, or fish. The soup is either based on a rich and spicy curry with coconut milk, or a sour tamarind soup. The elements of a curry laksa can be distinguished by the following:

  • Coconut milk is used
  • Curry-like soup (includes curry as one of its ingredients)
  • Except for bean sprouts, no other vegetable is used
  • Bean curd puff is used
  • Served with thick or thin rice vermicelli (usually thick); occasionally served with yellow mee
  • Hard-boiled egg may be added
  • Slices of fish cake and either prawns or chicken is used

The original recipe can be found over on Serious Eats.

Malaysian Curry Laksa (Spicy Noodle Soup) Ingredients


PREP TIME 10 MINS | COOKING TIME 30-45 MINS | SERVES 4-5
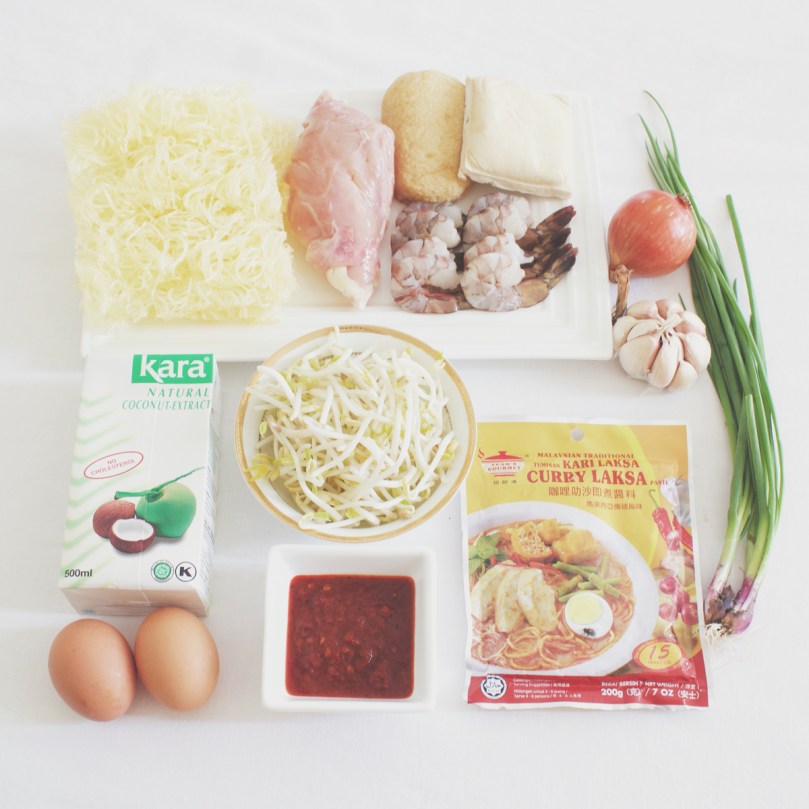
INGREDIENTS

  • 250g thick rice vermicelli noodles
  • 200g coconut milk
  • 100g beansprouts
  • 100g prawns, peeled and deveined
  • 4-5 cups chicken stock
  • 3 pcs dried bay leaves
  • 2-3 garlic cloves, minced
  • 2 large free range eggs, hard-boiled
  • 1 chicken crown, breasts removed and sliced, bone reserved
  • 1 packet (200g) Malaysian Curry Laksa Paste
  • 1 pc firm tofu, deep fried and cut into chunks
  • 1 pc fish cake, sliced diagonally
  • 1 small brown onion, diced
  • Salt
  • Spring onions
  • Whole black peppercorns

To serve

  • Sambal

METHOD

  1. Add the reserved chicken bone, chicken breast dried bay leaves, about a teaspoon or two of whole black peppercorns, and salt to a medium-sized pot filled with about 1.5L of hot/boiling water. Turn the heat up to high and leave to boil for about 30 minutes. After about 15 minutes, remove the chicken breast from the stock and set aside to rest and cool down before slicing into it.
  2. While the stock is boiling away, quickly blanch the sliced fish cakes and prawns in the stock, about 2-3 minutes. Remove and set aside.
  3. Meanwhile, bring a large pot of water to a boil. Once boiling, add the rice vermicelli noodles in and cook according to packet instructions, about 15 minutes for mine.
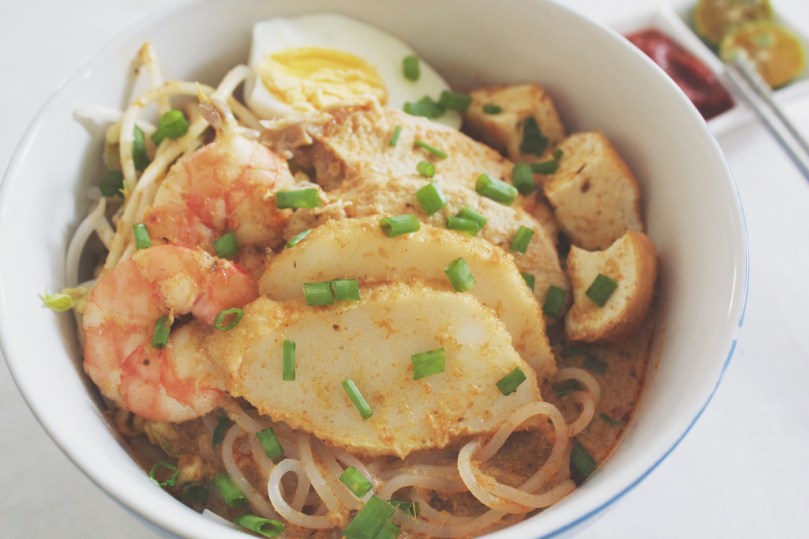
  4. Drain and then divide the noodles equally into 4-5 individual serving bowls. Top with the beansprouts, chicken slices, fish cake slices, fried tofu, hard-boiled egg slices, and prawns. Set aside.
  5. Heat a bit of oil in a medium-sized frying pan over medium-high. Sauté the garlic until fragrant and golden brown, and then add in the onions and cook until soft, about 2-3 minutes in total.
  6. Add the laksa paste and fry for about a minute or two before adding the chicken stock in. Give it a goo mix and then bring to a boil. Once boiling, turn the heat down to a slow simmer and then add in the coconut milk. Leave to simmer for about 15 minutes.
  7. Once the soup is done, ladle it into the prepared bowls and garnish with some spring onion. Serve immediately with some sambal and calamansi on the and enjoy!

Malaysian Curry Laksa (Spicy Noodle Soup)

Malaysian Curry Laksa (Spicy Noodle Soup)

BON APPÉTIT

– Ally xx

myTaste.com

Singapore Mei Fun (Fried Rice Vermicelli Noodles in Curry Powder)

Singapore Mei Fun (Fried Rice Vermicelli Noodles in Curry Powder)

Hello Everyone! Tonight I will be sharing with you another Singaporean dish that I love. What I love about this is the curry powder that is incorporated into this fried noodle dish. When I first tried this noodle dish, I didn’t expect it to be coated in curry powder – well, I mean, it’s not like the name of the dish was a dead giveaway for what’s in it. So it was definitely quite unique to me when I first tried it – and I loved it!

I kind of went with it on my own after indulging in much of it over the past several years, but I did refer to Saucy Spatula for reference. I also learnt a few things from her blog, the main one being that authentic Singapore fried rice vermicelli (or know as fried bee hoon), does not include curry. Unfortunately, the question of where the addition of curry originated from cannot be answered, however many claimed it to have come from Hong Kong. So why isn’t it called Hong Kong fried rice vermicelli? Well, apparently this noodle dish resembles more towards the Singapore fried bee hoon so I guess why argue with that?

Singapore Mei Fun (Fried Rice Vermicelli Noodles in Curry Powder)

PREP TIME 5 MINS | COOKING TIME 25-30 MINS | SERVES 4-5

INGREDIENTS

  • 450g bee hoon (thin rice vermicelli noodles)
  • 250g char siu pork (Chinese BBQ pork)*, sliced
  • 100g beansprouts
  • 2-3 garlic cloves, minced
  • 2 Chinese sausages, sliced diagonally
  • 2 red bird’s eye chillies, sliced
  • 1 large free range egg, beaten
  • 1 small brown onion, diced
  • 1/2 a head of cabbage, sliced
  • Tricolour capsicum (1/4 of each), sliced

For the sauce

  • 1/4 cup light soy sauce
  • 3 tbsp cooking wine
  • 1 & 1/2 tbsp curry powder
  • 1 tsp sugar
  • 1 tsp white pepper powder

*If you can easily buy it at the shops, or even your local Chinese restaurant, then I do recommend that you just buy it if you want your fried noodles now and fast! (It takes a considerate amount of time when you’re making your own char siu pork at home). But, if char siu is not available, you can substitute with ham, bacon, or shredded pork.

METHOD

  1. Start off by bringing a large pot of slightly salted water to a boil. Once boiling, add the rice vermicelli noodles and cook according to packet instructions, about 15 minutes for this brand of noodles. Once the noodles are done, drain and set aside.
  2. While the noodles a boiling away, mix the sauce ingredients in a small bowl. Set aside.
  3. Heat oil in a large frying pan over medium-high. Add the beaten egg and spread around the frying pan until thin. Fry for about a minute per side, remove and set aside to cool. Once cooled, slice them into thin strips.
  4. In the same frying pan, heat a little bit more oil and then sauté the garlic and chillies until fragrant and golden brown. Then add in the onions and cook until soft, about 2 minutes altogether.
  5. Add the Chinese sausage slices and cook for about 2 minutes. Follow with the char siu pork and capsicum, cooking for a further 3-4 minutes. Finally, add in the cabbage and beansprouts, cooking until just about to wilt.
  6. Add in the drained rice vermicelli noodles together with the sauce and give it a good mix, until the noodles are evenly coated with the curry powder mixture. Turn the heat off, garnish the noodles with some spring onions, and top with the sliced fried egg.
  7. Serve immediately with a squeeze of calamansi or a lemon wedge. Enjoy!

Singapore Mei Fun (Fried Rice Vermicelli Noodles in Curry Powder)

Singapore Mei Fun (Fried Rice Vermicelli Noodles in Curry Powder)

BON APPÉTIT

– Ally xx

myTaste.com

Singapore-style Hokkien Mee (Fried Yellow Noodle & Rice Vermicelli)

Singapore-style Hokkien Mee (Fried Yellow Noodle & Rice Vermicelli)

Hello Everyone! I’ll keep this short only because I’ve had such a busy day today and I just want my brain to relax and not have to look at a computer screen any longer (since that’s what I have been doing all say today). Then again, who am I kidding, after I write this post I will most likely end up looking at my computer screen but instead of utilising my brain and trying to get words to flow, I’ll be watching shows or random videos on Youtube until it’s time to go to bed *cheeky grin*

Anyway, enough babbling, tonight’s recipe is a dish I first experienced during one of my many travels to Singapore. When I saw a picture of it on the menu boards at a hawker centre that I was at (can’t remember where exactly), it was different to the Hokkien Mee that I usually ate back in Brunei, which apparently I have only just learnt after doing a quick Google search, is  Malaysian-styled braised in dark soy sauce. I actually quite like both, and though the ingredients are pretty much similar, I much prefer the Singapore-style Hokkien Mee.

The original recipe can be found over on Rasa Malaysia; I have tweaked the recipe slightly in terms of the order in which the ingredients go in and a few of the processes.

Singapore-style Hokkien Mee (Fried Yellow Noodle & Rice Vermicelli)

PREP TIME 10 MINS | COOKING TIME 45 MINS | SERVES 4-6

INGREDIENTS

  • 400g prawns, peeled and deveined
  • 350g squid, cleaned and cut into rings
  • 250g fresh yellow noodles
  • 250g thin rice vermicelli noodles
  • 200g pork shoulder
  • 100g bean sprouts
  • 3 large free range eggs, lightly beaten
  • 3 pcs dried bay leaves
  • 2-3 garlic cloves, minced
  • 1 pc fish cake, sliced diagonally
  • 1 small red onion, diced
  • Salt
  • Spring onions
  • Whole black peppercorns

Seasonings

  • 1/2 tbsp fish sauce, adjust quantity to taste
  • Dash of ground white pepper
  • Dash of sesame oil

To serve

  • Calamansi (or lemon wedge)
  • Sambal

METHOD

  1. Add the pork shoulder, dried bay leaves, about a teaspoon or two of whole black peppercorns, and salt to a large pot filled with about 2L of hot/boiling water. Turn the heat up to high and leave to boil for about 30 minutes or until tender. Once done, remove the pork from the stock and set aside to cool before slicing into it.
  2. Meanwhile, blanch the prawns and squid in the boiling stock, about 30 seconds to a minute. Remove from the stock and set aside. Then add in the rice vermicelli noodles and cook as per packet instructions or until just about tender. Once done, drain and set aside.
  3. Heat oil in a large frying pan, or wok, over medium-high and sauté the garlic until fragrant and golden brown. Add in the onions and cook until soft, about 2 minutes altogether.
  4. Turn up the heat to high and then add in the yellow and rice vermicelli noodles, frying for a few minutes until the noodles just begin to sear. Add in about a third of the pork stock and seasoning, continuing to cook until most of the stock has been absorbed by the noodles. Add another third of the stock and then bring the heat down to medium-low to allow the noodles to braise over a slow simmer, about 5 to 7 minutes.
  5. Add in the egg and give it a good mix before adding in the bean sprouts, prawns, squid, and pork slices. Give it a good toss and fry for about a minute before adding in the remaining stock.
  6. Plate up and garnish with some spring onions on top. Serve with a side of sambal and calamansi. Enjoy!

This slideshow requires JavaScript.

BON APPÉTIT

– Ally xx

myTaste.com

Kolo Mee (Flash-boiled Egg Noodles)

Kolo Mee (Flash-boiled Egg Noodles)

Hello Everyone! Tonight, I’ve got a very popular breakfast/brunch noodle dish to share. I remember when I was growing up, we’d travel at least 20 minutes to our favourite kolo mee place in Brunei for many years! It was kind of like our special Sunday breakfast routine with the whole family before we’d go about and do our grocery shoppings for the week. Since that place closed down a couple of years ago, we barely have kolo mee in our weekly meals – but now that I have my own way of making kolo mee, I can whip it up almost any time I crave for it!

“The secret to amazing kolo mee lies in the use of pork lard. I know this is not very healthy if eaten in large quantities but the reason why it’s used is because it coats each and every strand of the noodles with some seriously delicious meaty flavours.” — The Malay Mail Online, 2013

I guess you could say that my version of Kolo Mee is a little bit healthier (but not entirely) as I use vegetable oil instead of pork lard. Also, traditional kolo mee dishes, especially in restaurants, use quite a significant amount of MSG to enhance the flavour of the dish. The recipe that I will be sharing today doesn’t use MSG at all and is still very tasty! If you want a halal version of this dish, you can substitute the minced pork for minced chicken and just have a generous serving of fish cakes/balls instead of char is pork. You can also get creative and top it with your favourite breakfast must haves like some crispy bacon on the side or topped with a sunny-side up with the runny yolk and all that pizzaz!

Kolo Mee (Flash-boiled Egg Noodles)

PREP TIME 5 MINS | COOKING TIME 20 MINS | SERVES 6-8

INGREDIENTS

  • 450g fresh kolo mee noodles
  • 250g lean minced pork
  • 250g char siu pork (Chinese BBQ pork)*, sliced
  • 2-3 garlic cloves, minced
  • 2 small red onions, diced
  • 1 bunch gai lan (Chinese broccoli), cut into 2″ lengths
  • 1 fish cake, sliced diagonally
  • 1 red bird’s eye chilli, sliced
  • Chilli Oil
  • Ground salt and black pepper to taste
  • Light soy sauce
  • Sesame Oil
  • Spring onion

*Apparently, it takes a considerate amount of time when you’re making your own char siu pork at home that is! If you can easily buy it at the shops, or even your local Chinese restaurant, then I do recommend that you just buy it if you want your kolo mee now and fast!

METHOD

  1. Add about a tablespoon of light soy sauce, and a teaspoon of chilli and sesame oil into about 6-8 individual bowls/deep dishes. Set aside.
  2. In a small frying pan, heat about 3-4 tablespoons of vegetable oil over medium-high. Add the diced onions and frying until browned and crispy. Set aside. In the same frying pan, fry off the fish cake slices, about a minute or two per side. Set aside.
  3. Heat a medium-sized frying pan (or wok if you like) over medium-high. Add about a tablespoon of the oil used to fry the onions and fish cake to the pan and sauté the garlic and chillies until fragrant and golden brown, about a minute or two.
  4. Then add in the minced pork, followed by the ground salt and black pepper. Give it a good mix and leave to cook for about 5 minutes. Add in about 2 tablespoons of light soy sauce and cook for a further five minutes. Remove the pan from the heat and set aside.
  5. Bring a large pot of water to a boil. Once boiling, flash-boil the stalks of the gai lan first, then followed by the leaves until tender and wilted. Remove from the boiling water and set aside.
  6. Flash-boil the kolo mee noodles, in batches if you wish, for about a minute or two.  Once done, divide equally into your prepared bowls with the sauces and give it a good mix. Top with the minced meat, fish cakes, char siu pork, gai lan, fried onions, and spring onions. Serve immediately and enjoy!

Kolo Mee (Flash-boiled Egg Noodles)

BON APPÉTIT

– Ally xx

myTaste.com

Pancit Lucban (Filipino Style Stir-Fried Thick Flour Noodles)

Pancit Lucban (Filipino Style Stir-Fried Thick Flour Noodles)

Hello Everyone! So tonight, I’m sharing with you a dish that I think I over indulged in during my recent trip back to the Philippines earlier on the year in March/April 2015. We spent a ridiculous amount of lunches and meriendas in Buddy’s while we visited our relatives in the provincial City of Lucena. Anyway, the dish, known as Pancit Lucban or Habhab, is a version of pancit that originated in the Quezon province. This noodle dish may draw many resemblances to the traditional Pancit Canton, but there are some apparent differences. The main difference is all in the type of noodles used; Pancit Lucban/Habhab uses dried flour noodles known as miki Lucban which are not the same noodles used to make pancit canton. In addition, miki Lucban noodles that are made fresh also have a much softer texture than that of pancit canton.

Here’s a fun fact for you – well okay, it’s not really a fun fact but it is quite interesting and may be one of the reasons you’d probably go out and have a handful of Pancit Lucban. That’s right, a handful. This version of pancit is traditionally served over a piece of banana leaf and is eaten without any utensils. I know what you’re thinking, how exactly do you eat noodles without any utensils?! Well, imagine eating a sandwich. You will need to grab the banana leaf with the noodles in it and put it directly to you mouth. Don’t eat the banana leaf though! Below is a picture of my cousin and my Mom back in 2008 (I think) having some Pancit Lucban from a street food vendor during a dog show/walk in Lucena:

My Mom & Cousin eating Pancit Lucban the traditional way

It’s probably not the most glamorous way to eat your noodles, but it may be an exciting experience especially to those who find this way of eating very foreign to them. Miki Lucban is unfortunately not commonly found in stores around Brunei, not even in the Filipino section. So instead, we used Pancit Canton which actually makes calling this dish Pancit Lucban a sin! *cheeky grin*

Pancit Lucban (Filipino Style Stir-Fried Thick Flour Noodles) Ingredients

PREP TIME 10 MINS | COOKING TIME 45-50 MINS | SERVES 6-8

INGREDIENTS

  • 450g pancit canton (or miki Lucban if available)
  • 250g tiger prawns, shelled and deveined
  • 100g snow peas, topped and tailed
  • 3-4 dried bay leaves
  • 2-3 garlic cloves, minced
  • 2 pcs thin sliced pork belly, cut into 1cm chunks
  • 1 bunch gai lan (Chinese broccoli)
  • 1 carrot, julienned
  • 1 chicken crown, breasts removed and sliced, bone reserved
  • 1 small red onion, diced
  • 1/2 chayote, peeled and sliced
  • 5 tbsp light soy sauce
  • Ground salt and black pepper to taste
  • Whole black peppercorns

METHOD

  1. Add the reserved chicken bone, dried bay leaves, about a teaspoon or two of whole black peppercorns, and salt to a medium-sized pot filled with about 1.5L of hot/boiling water. Turn the heat up to high and leave to boil for about 30 minutes.
  2. Meanwhile heat a large frying pan over medium-high and add in the chunks of pork belly. Cook until browned. The oils released from the pork belly should be enough to sauté the garlic and cook the onions, but if needed, add a little bit more oil if there isn’t enough. Then add the minced garlic and sauté until fragrant and golden brown, about a minute, then followed by the diced onions. Cook until soft, about 2 minutes in total.
  3. Add in the sliced chicken breasts, and season with a bit of salt and ground black pepper and give it a good mix. Cook for about 5 minutes. Then add in the prawns, followed by the chayote, carrots, and snow peas. Mix well and leave to cook for a further 3-4 minutes. Lastly, add in the gai lan and cook until just slightly wilted. Once done, transfer to a bowl and set aside.
  4. In the same frying pan, add about half of the chicken stock to the pan together with the soy sauce, ground salt, and black pepper. Bring to a boil. Once boiling, add the canton noodles in and cook until all the liquid has evaporated (if the noodles are looking a bit dry, you may add more stock, a ladle at a time). Make sure that while cooking, you mix and untangle them periodically. Altogether this should take about 10-15 minutes. Halfway through, add in half of the cooked meat and vegetables to the noodles and mix well.
  5. Serve immediately topped with the extra meat and vegetables, and with calamansi, or alternatively a lemon wedge. Enjoy! Note: best served with a splash of vinegar!

This slideshow requires JavaScript.

BON APPÉTIT

– Ally xx

myTaste.com

Salted Caramel Popcorn Layered Cake

Salted Caramel Popcorn Layered Cake

Hello Everyone! Today is a special day, and that special day is my birthday! For those who want to know, I am 24 years young today, and another year wider, I mean, wiser, but not another year taller unfortunately. It’s been 4 years since I last celebrated my birthday in Brunei with my family, and friends I grew up and went to high school with. It’s been that long because for the past 4 years I’ve spent my birthday’s in Australia, with my friends from uni. I didn’t really plan anything special, I just organised a dinner party at Villa Mauri last Friday night with some friends; exchanging conversations, laughter, and of course, no gathering is complete without some dirty talk! We’ve all not changed one bit 🙂 I’d just like to take this opportunity to thank those who came that night, and also thank everyone else who has greeted me so far. I am so blessed to have family and friends from all over sending love my way. I know, that sounded a bit cheesy.

24th Birthday Celebrations
Birthday with my high school friends at Villa Mauri (November 6th, 2015)

24th Birthday Celebrations
Birthday with my work friends at 
Patisserie (November 9th, 2015)

I baked this cake yesterday afternoon for my birthday dinner tonight with my mom and my sister. Seriously, I cannot stress out how much I hate frosting – it take so bloody long for me to get it perfect. Well, not so much perfect, but for me to get it to cover the cake. I don’t know if I’m doing it wrong or I should blame the climate, but the buttercream is runny to begin with, so I put it in the freezer to stiffen up a bit before I frost. Then when I start frosting, it quickly becomes runny again to the point that I have to keep placing the cake in and out of the freezer multiple times before I can get the frosting to somewhat cover the cake. But anyway, after much frustration on the eve of my birthday, I managed to get a decent looking cake up I guess (so over it right now – so over baking cakes altogether).

Actually, I think I know the reason (maybe not really) why my frosting was runny. I had a look at the ingredients photo that I took and saw that I had icing sugar in it. At first, I thought that that might’ve been the reason, but when I looked at the original recipe, there was no sign of icing sugar. So why did my frosting go wrong?! 😦 Not enough butter?

24th Birthday Celebrations
Birthday with my family at home (November 9th 2015)

Anyway, I’ve been wanting to make a cake like this for a while; as in the whole salted caramel with caramel popcorn on top kind of cake. I was blown away when I came across it over on La Pêche Fraîche – so beautiful and well photographed. So don’t forget to check out the original recipe over on her blog; she has adapted the different components to making this cake from various recipes (all links have been acknowledged below). Plus, her’s looks much more beautiful, and somehow taller than my cake *cries*.

Salted Caramel Popcorn Layered Cake Ingredients

PREP TIME 20 MINS | COOKING TIME 50-55 MINS | SERVES 8-10

INGREDIENTS

For the yellow butter cake (adapted from Joy of Baking)

  • 120g unsalted butter
  • 4 large free range egg yolks
  • 2 & 1/4 cups plain flour
  • 1 cup sugar
  • 3/4 cup milk
  • 2 & 1/4 tsp baking powder
  • 1 & 1/2 tsp vanilla
  • 1/4 tsp salt

For the salted caramel (adapted from FoodSwoon)

  • 30g unsalted butter
  • 1/2 cup sugar
  • 1/4 cup + 2 tbsp heavy cream
  • 2 tbsp water
  • 1 tbsp corn syrup
  • 1/4 tsp salt

For the salted caramel Italian meringue buttercream (adapted from FoodSwoon)

  • 350g unsalted butter, cut into small chunks
  • 4 egg whites
  • 1 cup sugar
  • 1/4 cup water
  • 1 tsp corn syrup
  • Pinch of salt
  • Half of a batch of salted caramel, cooled, the rest reserved for drizzling (see recipe below)

For the salted caramel popcorn (adapted from the Kitchn)

  • Popped popcorn from about 1 & 1/2 bags of popcorn
  • 130 grams unsalted butter
  • 3/4 cup brown sugar
  • 1/4 tsp baking soda
  • Big pinch salt, plus a little for sprinkling

METHOD

  1. Yellow Butter Cake:
    • Preheat oven to 180C (350F or gas mark 4). Grease 2 x 8.5-inch pans with a little bit of butter.
    • In a medium-sized bowl, whisk together the plain flour, baking powder, and salt together. Set aside.
    • In a large bowl, beat the butter and sugar together until light and fluffy, about 4 minutes altogether. Scrape the sides of the bowl, then add the egg yolks in and beat for a further 2 minutes. Add in the milk and vanilla, stirring gently to combine.
    • Add in the dry ingredients all at once, and stir gently until the batter comes together. Divide the batter evenly between your prepared pans and bake in the oven for 20-25 minutes or until a tooth pick inserted into the centre of the cake comes out clean.
    • Set the cakes aside to cool down completely before frosting.
  2. Salted Caramel:
    • Heat the sugar, water, corn syrup and salt together over medium-low in a small saucepan . Whisk at the beginning until they dissolve. Once dissolved, leave the mixture to caramelise into an amber colour.
    • Once amber, remove from the heat and quickly whisk in the butter and cream. Be careful of any splattering that may occur. Whisk until completely smooth.
    • Set aside to cool down before using it.
  3. Salted Caramel Italian Meringue Buttercream:
    • Place the water, sugar, corn syrup, and salt in a small saucepan. Heat on low until it reaches to about 115C/240F.
    • Meanwhile, as your sugar+water mixture is slowly heating up, place the egg whites in a large bowl and start to beat using a handheld electric mixer. Beat the eggs until soft peaks start to form. Then, slowly stream the water+sugar syrup into the egg whites with the mixer still going.
    • Beat the meringue until cooled to about body temperature, and then beat in the butter about 2 tablespoons (30g) at a time. Continue whipping the buttercream until it is silky before adding half of the caramel mixture in.
    • Set aside in the fridge until it is time to frost your cake.
  4. Salted Caramel Popcorn:
    • Preheat oven to 130C (250F or gas mark 1/2) and line a baking tray with parchment paper.
    • Place the popcorn in a big bowl and make sure not to include any unpinned kernels.
    • In a small saucepan, heat the butter, brown sugar, and salt until they begin to caramelise. Whisk well to combine, and then add in the baking soda. Quickly pour the caramel over the popcorn and toss well to coat.
    • Scrape the popcorn  out onto the baking tray and lightly sprinkle with a touch of salt. Bake in the oven for 30 minutes or until the caramel is completely dry and crunchy. Once done, set aside.
  5. Assembly:
    • Stack your cake on a cake stand and frost it with the buttercream. Drizzle the remaining caramel on the edges of the cake and then top the cake with a mountain of caramel popcorn!
    • Serve, share, and enjoy!

Salted Caramel Popcorn Layered Cake

BON APPÉTIT

– Ally xx

myTaste.com

Pancit Palabok (Filipino Style Noodles with Prawn Gravy)

Pancit Palabok (Filipino Style Noodles with Prawn Gravy)

Hello Everyone! I might keep this section of the blog short (and I say might because I know that even though I’ve said that, my post will always end up being fairly long by the time I finish writing), because I am feeling a bit overworked and tired today – actually I’ve been feeling exhausted since the beginning of the week and it may be due to a mentally challenging Escape Room challenge that I did with a few friends on Monday evening. Small tangent – we all shared the spotlight on dumb blonde moments!

Tanget aside, tonight’s recipe is a dish that I, of course as all dishes I write about, love but isn’t cooked often at home. The only reason I can think of is maybe because it requires a lot of ingredients and preparation I guess. It’s not so much about how long it takes to make the sauce because in the past, my mom would just use a ready-made powdered version of the sauce that you can easily find on the shelves in the Filipino/Asian food section of your local grocers. For tonight’s post though, I will be making the sauce from scratch just because I want to 🙂 This is also the first time that I have tried making the sauce from scratch and it was a huge success! It’s actually quite easy to make, it just requires a lot of time and patience; but I know for sure that I will not be buying ready-made sauce packets ever again! Unless of course, time is not on my side. I mean, if you’re going to use fresh prawns to top your noodles off in the end, then you might as well take an extra step in salvaging the heads and peels to make a delicious sauce, right?

Pancit Palabok (Filipino Style Noodles with Prawn Gravy)

Anyway, before we jump on to the recipe, I followed Trissalicious’ recipe for making the Palabok sauce from scratch so don’t forget to check her blog out too for her take on this delicious dish!

Pancit Palabok (Filipino Style Noodles with Prawn Gravy) Ingredients

PREP TIME 15 MINS | COOKING TIME 1 HOUR | SERVES 8-10

INGREDIENTS

For the prawn stock

  • 500g fresh prawns, heads and peels reserved
  • 1.5L water
  • Ground salt
  • Whole black peppercorns

For the sauce

  • 100g thin sliced pork belly, cut into chunks
  • 3-4 cups prawn stock (see recipe below)
  • 5 garlic cloves, minced
  • 2 small red onions, diced
  • 1 pc firm tofu, finely diced
  • 4 tbsp plain flour
  • 2-3 tbsp fish sauce, adjust quantity to taste
  • 1 tsp achuete powder
  • Ground salt and black pepper, to taste

Noodles and Toppings

  • 500 grams pancit luglug (cornstarch noodles)*
  • Firm tofu, deep fried and cut into chunks
  • Hard boiled egg, sliced
  • Pork crackling (chicharon), crushed
  • Prawns, poached
  • Smoked fish (tinapa), flaked
  • Squid, cut into rings and poached
  • Spring onion

*You may also use bihon (thin rice vermicelli noodles) for this dish

METHOD

  1. Make the prawn stock: Add the prawn heads and peels to a medium-sized pot and cover with about a litre and a half of water. Season with a bit of salt and whole black peppercorns. Bring to a boil over high heat and then turn it down to a slow simmer. Make sure to press down on the heads and peels as it simmers away to extract as much flavour as you can. Leave it to simmer for about 30 minutes. While the stock is simmering away, you can get a head start in preparing your toppings for the dish. I recommend that you leave the poaching of the prawns and squid for last, when you sauce is almost ready.
  2. Make the sauce: Heat a large frying pan over medium-high and add in the chunks of pork belly. Cook until browned. The oils released from the pork belly should be enough to sauté the garlic and cook the onions, but if needed, add a little bit more oil if there isn’t enough. Then add the minced garlic and sauté until fragrant and golden brown, about a minute, then followed by the diced onions. Cook until soft, about 2 minutes in total.
  3. Add in the firm tofu and give it a good mix. Then, add in achuete powder and plain flour, followed by the prawn stock. Make sure to add the stock in a bit at a time as if making a roux and make sure to mix well after each addition. The sauce should be quite thick, resembling the consistency of a béchamel – you may add more water if you want your sauce thinner, or likewise, add more flour if the sauce is feeling a bit thin to your liking. Add the fish sauce and season with some salt and black pepper to taste. Bring the heat down to low and let it slowly simmer away for about half an hour (10-15 minutes if you are impatient); but the longer you leave it on the stove, the tastier the sauce becomes!
  4. Cook the noodles: While your sauce is simmering away, cook the noodles according to the packer instructions, about 15 minutes for the pack of noodles that I got. Once done, drain and divide the noodles equally into individual plates. Also, don’t forget to poach your prawns and squid by this point!
  5. Assemble: Top the noodles with a generous amount of sauce and add your favourite toppings! Serve immediately with a squeeze of calamansi (or lemon) juice and enjoy!

Pancit Palabok (Filipino Style Noodles with Prawn Gravy)

Pancit Palabok (Filipino Style Noodles with Prawn Gravy)

BON APPÉTIT

– Ally xx

myTaste.com

Pancit Bihon Guisado (Filipino Style Stir-Fried Rice Noodles)

Pancit Bihon Guisado (Filipino Style Stir-Fried Rice Noodles)

Hello Everyone! It a whole new month and you already know what that means! A new month on Amcarmen’s Kitchen means a new theme, and for the month of November, I will be sharing with you guys some of my favourite noodle dishes of all time! But before I begin, I’d just like to apologise for my later than usual post – I’ve been super busy for the past three weeks with things I cannot say yet for security reasons, but yes, super busy that I am always mentally drained and find it difficult to just sit down and concentrate on writing for my blog. I’ll probably be able to tell you guys everything somewhere in February next year, but if you really want to know, you can ask me privately. If I don’t tell you, then you’re probably one of the reasons why I can’t talk about why I’ve been busy on any form of social media 😉

Anyway, noodles were first introduced into the Philippines by the Chinese, and since then, noodles have been adopted into local cuisine with endless variations, those popular being pancit bihon guisado, pancit palabok, pancit canton, pancit habhab, etc. The term pancit is actually derived from the Hokkien piān-ê-si̍t (pian i sit) which literally means convenient food. Tonight, I will be kicking it off with a noodle that has been served on our tables countless times over my childhood years up until now – Pancit Bihon Guisado!

Pancit Bihon Guisado (Filipino Style Stir-Fried Rice Noodles)

When one says pancit, it is usually associated with bihon, which is a recipe that uses very thin rice noodles, fried with soy sauce, some citrus, possibly with some fish sauce as well, and some variation of sliced meat and chopped vegetables. The composition of bihon varies quite a lot because it depends on your personal recipe. I can say that the recipe that I will be sharing with you today did even start out like this when my mom first made it for the family – the ingredients have definitely changed over the years! So don’t be afraid to improvise or get creative with the ingredients; s’long as you’ve got the base of the noodles covered with this recipe. You can even take all the meat out and replace the chicken stock with veggie stock for an all vegetarian pancit bihon guisado!

Pancit Bihon Guisado (Filipino Style Stir-Fried Rice Noodles) Ingredients

PREP TIME 15 MINS | COOKING TIME 30-45 MINS | SERVES 8-10

INGREDIENTS

  • 450g bihon noodles
  • 100g fish balls, halved
  • 100g thin fish cake, sliced diagonally
  • 3 pcs dried bay leaves
  • 2-3 garlic cloves, minced
  • 2 celery stalks, sliced
  • 2 pcs thin sliced pork belly, cut into 1cm chunks
  • 1 carrot, julienned
  • 1 chicken crown, breasts removed and sliced, bone reserved
  • 1 small brown onion, diced
  • 1/2 a head of cabbage, sliced
  • 4-5 cups chicken stock
  • 1 tbsp dark soy sauce
  • 1 tbsp fish sauce
  • 1 tbsp oyster sauce
  • Ground black pepper and salt, to taste
  • Spring onions, sliced
  • Whole black peppercorns

METHOD

  1. Add the reserved chicken bone, dried bay leaves, about a teaspoon or two of whole black peppercorns, and salt to a medium-sized pot filled with about 1.5L of hot/boiling water. Turn the heat up to high and leave to boil for about 30 minutes.
  2. Meanwhile heat a large frying pan over medium-high and add in the chunks of pork belly. Cook until browned. The oils released from the pork belly should be enough to sauté the garlic and cook the onions, but if needed, add a little bit more oil if there isn’t enough. Then add the minced garlic and sauté until fragrant and golden brown, about a minute, then followed by the diced onions. Cook until soft, about 2 minutes in total.
  3. Add in the sliced chicken breasts, fish balls, and sliced fish cakes. Season with a bit of salt and ground black pepper and give it a good mix. Cook for about 5 minutes. Then add in the carrots and celery. Mix well and leave to cook for a further 2-3 minutes. Lastly, add in the cabbage and spring onions, and cook until just slightly wilted. Once done, transfer to a bowl and set aside.
  4. In the same frying pan, add the chicken stock to the pan together with the soy sauce, fish sauce, and oyster sauce. Bring to a boil. Once boiling, add the bihon noodles in and cook until all the liquid has evaporated. Make sure that while cooking, you mix and untangle them periodically. Altogether this should take about 10 minutes. Halfway through, add in half of the cooked meat and vegetables to the noodles and mix well.
  5. Serve immediately topped with the extra meat and vegetables, and with calamansi, or alternatively a lemon wedge. Enjoy!

Pancit Bihon Guisado (Filipino Style Stir-Fried Rice Noodles)

Pancit Bihon Guisado (Filipino Style Stir-Fried Rice Noodles)

BON APPÉTIT

– Ally xx

myTaste.com

Halloween Special: Creepy Broken Glass Cupcakes!

Halloween Special: Creepy Broken Glass Cupcakes!

Halloween Special: Creepy Broken Glass Cupcakes!

Hello Everyone! Where do I even begin? Well, how about I start off by wishing everyone a Happy Halloween! So one day, probably about a few weeks ago, I was browsing through my Reader page on WordPress and going through some of the recipes of other bloggers/writers that I follow. I came across a recipe over at Easy Baked which, if I can recall, were for some sort of cupcakes all decked up for Halloween. I really loved the bright purple, orange, and green colours that Ruthanne used to decorated her Halloween-inspired baked goodies. It was from there that I followed a link to her Creepy Broken Glass Cupcakes and I knew from that very moment that I had to tackle that recipe.

I haven’t seen anything quite like that before, and I thought it would be a nice, and fun baking activity on a Sunday afternoon (yes, I actually baked this last Sunday only because I knew I would have time to do so during the week leading up to Halloween, nor on Halloween Day). Also, Ruthanne notes that this is not an original idea of hers as she has seen many examples of these cupcakes online, but rather she made it her goal to create this recipe in the easiest way possible with fewer steps.

Halloween Special: Creepy Broken Glass Cupcakes!

Anyway, this recipe gave me a bit of a headache – well, just the broken glass candy part, and a little bit of the red velvet cupcake as well. Let’s just say that with the red velvet, it did not rise as I had wanted it to or hoped, and it wasn’t very red because of the lack of colouring (I used less because my bottle of red ran out). I had actually attempted to make this recipe 2 weeks ago, but because I was so defeated and tired by the end of the afternoon, I gave up and decided to try it out again the following weekend. At least when I tried that week, I managed to get 50% of the recipe done – the frosting and edible blood. I just kept them in the fridge until the following week when I rebaked my muffins and gave the broken glass candy another go (still was not perfect, but made do with what I had).

Basically, with the glass candy, I couldn’t get the sugar to harden – as in it was mushy as still syrup-like. Apparently, as I read in the comments section of Ruthanne’s blog, another person had the same problem and it was purely because the sugar wasn’t cooked for long enough. So make sure that if you want to try this recipe out, cook it just enough so that you won’t get a mushy mess! But obviously not for too long as it will turn amber in colour which, in this case, is not what you want.

Halloween Special: Creepy Broken Glass Cupcakes! Ingredients

PREP TIME 20 MINS | COOKING TIME 25 MINS | SERVES 12 CUPCAKES

INGREDIENTS

For the cupcake batter

  • 185g butter, at room temperature, plus extra melted, to grease
  • 125ml buttermilk
  • 2 large free range eggs
  • 2/3 cup caster sugar
  • 1/2 cup self-raising flour, sifted
  • 1/4 cup plain flour, sifted
  • 2 tbsp cocoa powder
  • 2 tbsp red food colouring
  • 1/4 tsp baking soda

For the cream cheese frosting

  • 250g cream cheese, at room temperature
  • 60g butter, at room temperature
  • 1/3 cup icing sugar, sifted
  • 1/4 tsp vanilla extract

For the ‘broken glass’

  • 1 cup granulated sugar
  • 1/2 cup light corn syrup
  • 1 tsp clear food flavouring (I used lychee)

For the edible ‘blood’

  • 1 can (395g) sweetened condensed milk
  • 1 tbsp red food colouring
  • 1 tsp clear flavouring (I used lychee)
  • Black food colouring

Halloween Special: Creepy Broken Glass Cupcakes!

Halloween Special: Creepy Broken Glass Cupcakes!

METHOD

A tip before starting off: Make the decorations first, the candy glass and edible blood, as you can keep them in the fridge until just before decorating your cupcakes for your party. They can both keep for several days so you can definitely make them ahead of time.

  1. Broken Glass Candy
    • Cover a baking tray with wax paper and grease it liberally with cooking oil spray, or alternatively you can grease it with some butter if cooking spray is not readily available in your pantry.
    • Place the granulated sugar and corn syrup into a microwave safe bowl and mix them together. Cover the bowl with plastic wrap microwave on high for about 3 minutes. Remove from the microwave and CAREFULLY (beware of the hot steam!) remove the plastic wrap. Stir well and cover again with fresh plastic wrap. Microwave again for another 3 minutes, but check the mixture after about 2 minutes just to make sure that it hasn’t coloured – if you cook the sugar/syrup mixture for too long, it will be amber in colour instead of a nice clear glass you want.
    • CAREFULLY remove the bowl from the microwave and CAREFULLY remove the plastic wrap. The mixture will be very hot and sticky so be cautious as to not touch any of the hot candy! Pour the mixture over the greased wax paper and allow it to sit and harden completely (will take a couple of hours).
    • When the candy has hardened, tap a knife into the ‘glass’ to break it into sharp pieces (do be careful at this point because the pieces are actually quite sharp themselves!), and push the pieces up off the was paper and onto a plate.
    • The glass candy can be kept in a ziplock bag or an airtight container for about a week. Moisture (including the moisture from the frosting on the cupcakes) will eventually start to break the glass candy down.
  2. Edible Blood
    • In a small bowl, add the sweetened condensed milk and mix in the flavouring and red food colouring (a bit at a time) until you get a brilliant red colour. Add a tiny bit of black as the colour can go a long way! Mix and adjust until you get a nice dark red colour.
    • Spoon the ‘blood’ into a ziplock bag and seal tightly. Keep refrigerated until use.
  3. Red Velvet Cake Mix
    • Preheat oven to 180C (350F or gas mark 4). Line a 12 hole muffin pan with black paper cases.
    • Sift the baking soda, cocoa powder, plain flour, self-raising flour into a medium-sized bowl and set aside.
    • Meanwhile in a large bowl, cream the butter and the sugar using an electric handheld mixer. Mix until pale and creamy. Add the eggs and beat on slow speed, making sure that it’s all blended in. Add the flour mixture into egg mixture and gently fold it in. Finally, add in the buttermilk and red food colouring. Mix together.
    • Spoon the batter into the prepared muffin cups, filling them 3/4 of the way and bake in the oven for 20-25 minutes or until cooked through. To check if they are done, insert a toothpick in the centre of the muffin.
    • Once done, remove from the oven and allow to cool down for about 5 minutes, then transfer them out of the muffin pans and onto a wire rack to allow them to cool down completely.
  4. Cream Cheese Frosting
    • Smooth the butter, cream cheese, and vanilla together using an electric handheld mixer. Fold in the icing sugar, and then use the mixer again to beat it until it is light and fluffy.
    • Place the frosting into a ziplock bag and refrigerate until use.
  5. Assembly & Decoration
    • Place some parchment paper on your work surface to protect it from all the red colouring from your edible blood, or alternatively you can use a platter or tray that you will be serving the cupcakes on.
    • Snip off a corner of your ziplock bag of frosting and pipe onto the cooled cupcakes. Press 2 to 3 pieces of the glass candy into the top of each cupcake.
    • Snip off a corner of your ziplock bag of edible blood and drizzle over the top of each cupcake and glass candy, allowing it to drip down the sides of both.
    • Serve the same day after decorating, with plates and forks or else you will have red fingers! Enjoy a bloody delicious dessert and a very Happy Halloween to all my family, friends, and followers!

Cupcakes taste best on the same day, though they may be stored covered tightly at room temperature for 3 days (undecorated) or in the refrigerator for 5 days.

Halloween Special: Creepy Broken Glass Cupcakes!

Once again, a very Happy Bloody Halloween to all my family, friends, and followers! I will be back on Tuesday with a new theme for the month of November so stay tuned!

BON APPÉTIT

– Ally xx

myTaste.com