BR Nina's Itikan & Restaurant - SPECIALITIES: Kalderitik

BR Nina’s Itikan & Restaurant

Hello Everyone and welcome back to an all new Review Sunday! Today’s post is on a restaurant that can be found along the Sta. Clara Bypass Road in Sta. Maria, Bulacan. My cousin first introduced me to this place when we were visiting the Philippines last month. I told her that I wanted to dine at local eateries that are natively special to Bulacan and this is where she took my family and I. If I am not mistaken, itik is quite popular in Bulacan as there are also many balut hatcheries in the area. For those of you who do not know what a balut is, it is basically a developing duck embryo (fertilised duck egg) that is boiled and eaten in the shell.

Anyway, I could not appreciate the atmosphere at the time that we went with my cousin for it was during dinner and although the place was well lit, it felt dark to me. So my mother, my two sisters, and myself decided to come back to this place for lunch and the ambience had a bigger impact on me than it did the first night we dined at BR Nina’s Itikan. I think the fact that we were the only table there as well made a difference for it was less noisy (I mean, excluding the traffic along the bypass) and we had the whole place to ourselves. The place is an outdoor restaurant with a main dining area upon entering, and a few bahay kubos at the back where you could also dine. A bahay cubo is known as the national shelter, native house of the Philippines and is made from using indigenous building materials like bamboo and nipa. Its name is said to have originated from the Spanish word, cubo, which means “cube” because of the bahay kubo‘s rectangular/cubic shape. Nowadays you’ll see many eateries adapting the bahay kubo into small, private eating huts, big enough to seat between 4-8 people.

BR Nina's Itikan & Restaurant - BR NINA’S FIESTA: Crispy Kare-Kare Liempo
BR NINA’S FIESTA: Crispy Kare-Kare Liempo (₱250.00)

When I first had dinner at this place, I was very much intrigued by the ‘crispy’ part of the name of this dish, only because I’ve never had kare-kare before with crispy meat. The sauce, even though for me it felt like it was straying away from a traditional kare-kare, was nice and flavourful. The sauce tasted like it had coconut milk in it and didn’t taste so much like the peanut buttery goodness that I love; it was still creamy though. The vegetables were cooked to perfection, as in it wasn’t overcooked, and though some of the cuts of pork meat was cooked well, some were a bit hard and overdone.

BR Nina's Itikan & Restaurant - SPECIALITIES: Fried Itik
SPECIALITIES: Fried Itik (₱160.00)

The first time we came here we had the fried itik as recommended by my cousin. For me it was just okay, nothing much special to it other than the fact that it’s an itik and that it definitely tastes different than any normal fried chicken. The meat was quite dry and because there was no sauce to go with it either, besides the very basic condiment of soy sauce and calamansi, the overall dish was very dry. If we didn’t have the bulalo soup to pair with it, it would’ve been a very dry meal.

BR Nina's Itikan & Restaurant - SPECIALITIES: Kalderitik
SPECIALITIES: Kalderitik (₱170.00)

Since itik is their speciality here in this restaurant, we decided to order at least more than just one on their specials menu and experience itik cooked in many different ways. The itik was really tender and flavourful. It was so tender that it was fall-off-the-bone perfection. It also had a little bit of spice to it as well. This dish is one that I very much like from their specials, even though it doesn’t look very well presented – but this is pretty much home-style cooking.

BR Nina's Itikan & Restaurant - SPECIALITIES: Adobong Itik
SPECIALITIES: Adobong Itik (₱170.00)

Though it doesn’t look as appetising (let’s face it, pretty much everything you’ll see here doesn’t look appetising), it tastes better than it looks. However, compared to the kalderitik, this dish was quite dry. The sauce came as a side with the dish, but because the itik was deep fried, it was quite dry. Also, I felt that there was a little bit too much garlic on the dish. It did have that adobo flavour to the itik though!

BR Nina's Itikan & Restaurant - SPECIALITIES: Sisig Itik
SPECIALITIES: Sisig Itik (₱170.00)

Sisig is a Filipino dish traditionally made from parts of a pig’s head and liver, seasoned with calamansi and chilli peppers. I love me a good sisig dish. I never fail to have a flavourful sizzling plate of sisig whenever I visit the Philippines. I was drawn to this dish only because I’ve never had itik sisig before, I’ve always and only have ever had pork sisig. This sisg dish is by far my favourite of all sisigs I’ve ever had in the past. The flavour was on point and the addition of fresh chillies on top added that extra kick of heat that the dish, in my opinion, needed.

BR Nina's Itikan & Restaurant - FRIED: Crispy Tawilis with Salted Egg
FRIED: Crispy Tawilis with Salted Egg (₱150.00)

Sardinella tawilis, or known by Filipinos as just tawilis for short, is a small freshwater sardine, reaching up to 15cm and weighing less than 30g. On its own, it doesn’t actually have much flavour to it. But all your really need is the salted egg and tomatoes on the side to go with it and you have a match made it heaven. Even with just a little bit of achara to go with the crispy fried tawilis and you’re pretty much hooked on it. You can eat the fish whole as well, yes, including its head, tail, and bones!


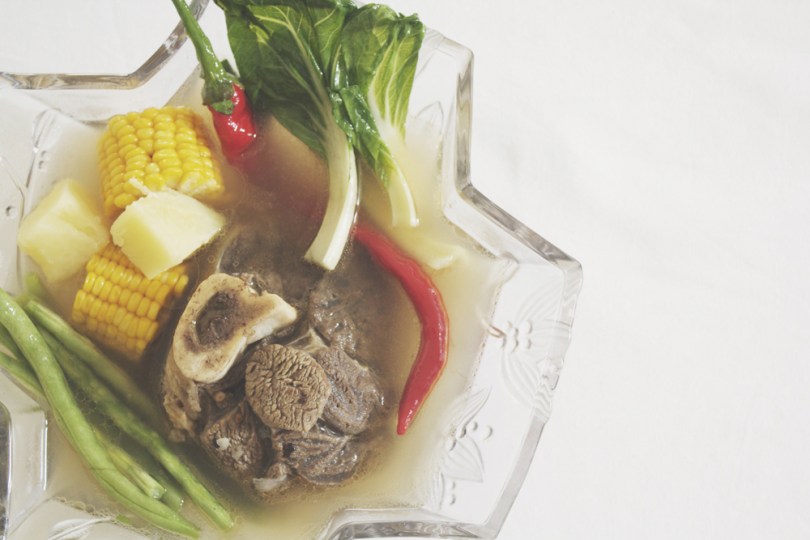
SOUPS: Bulalo (₱220.00)

Besides their specialities, this bulalo soup is by far the tastiest of all bulalo soups I’ve had in the past. The broth is harboured all the flavours from the meat, and what’s good about it also is that the broth doesn’t have a lot of oil in it and isn’t very fatty at all. The meat was very tender and the vegetables still had a bit of crunch to them. It was definitely much better in terms of flavour than the bulalo soup that I cooked myself.

BR Nina’s Itikan have quite a lot to offer on their menu beside their specialities of various itik dishes; many also praise their crispy kare-kares from Facebook comments and reviews that I’ve have seen. Overall, I thought that the food that we’ve had at this place were generally quite good. I haven’t had any major issues with any of the dishes only that the fried itik and the adobong itik itself are quite dry, but other than that, everything else were pretty much on point for me. I love love love their duck sisig, and for that I’d say that their food is a sure 7 out of 10 for me. Ambience 8 out of 10 and service is variable between 7 to 9 out of 10. I say this because there are only two waiters running the floor and serving probably a total of 10 tables. So when the place is packed, it’s quite hard to flag down a waiter when you’re ready to order or wanting to request for more water or tissue for your table – that’s the downside. Otherwise, they’re friendly and always quick on their feet. You’ll see then running around trying to get to every table and fulfilling every customer’s requests. It’s also relatively cheap so therefore a good value for money, where their specialities of itik only costs about AUD$5.00 – a whole duck for just $5.00? Quite impossible ain’t it? That is, if it were sold in Australia.

BR Nina’s Itikan & Restaurant
Bypass Road Sta. Clara
Sta. Maria, Bulacan
Philippines, 3022

– Ally xx

Vermont Maple-Pecan Cake

Vermont Maple-Pecan Cake

Hello Everyone and welcome to a very special post as today officially marks the 1-year anniversary of my food blog! I started up this food blog exactly a year ago during spring break, and instead of slaving away on the many assignments/projects I had at that time, I decided to spontaneously start up a blog, out of pure procrastination really. Since it was quite spontaneous, I didn’t quite put much effort into it in the beginning, as in I wasn’t bothered to purchase my own domain name, and buy a theme and customise it. I wasn’t sure of how long I’d be able to keep up with this blog (because I have tried many times and failed). I am happy that I am able to finally keep one up and running, posting 3 times a week, almost.

Vermont Maple-Pecan Cake

For the next few months or so, I will work on developing an aesthetic and a colour scheme for my blog that reflects who I am as a person – not just one who loves to cook and is passionate about all things food, but also my personality and my design style. The pink and brown was sort of a “yeah that will do for now” because it fit the default theme that I picked (which was more like “I prefer this theme that the others I’ve seen”). Anyway, so to celebrate my blog turning 1 today, I decided to bake a cake for this occasion. I wanted to bake a citrus poppyseed cake at first but for some reason, lemons were nowhere to be found in every supermarket and market that I went to. Instead, I found another recipe that stood out to me – Vermont Maple-Pecan Cake. Why I chose to attempt this cake was because I already had maple syrup in the fridge and CREAM CHEESE; like who could say no to cream cheese?!

The quantities from the original recipe that can be found on Taste of Home, makes two 6-inch round cake layers, but since my baking pans were about 8.5-inches, I decided to double the recipe until I realised that I should’ve tripled it when I poured the batter into the pans; they barely filled halfway. So I made another batch to top them off. Therefore, the quantities below have been tripled from the original to make two 8.5-inch round cake layers. Once again, Happy Anniversary to Amcarmen’s Kitchen!

Vermont Maple-Pecan Cake Ingredients

PREP TIME 20 MINS | COOKING TIME 20-25 MINS | SERVES 8-10

INGREDIENTS

For the cake batter

  • 2 & 1/2 cups plain flour
  • 1 & 1/2 cup buttermilk*
  • 1 cup toasted pecans, roughly chopped
  • 3/4 cup sugar
  • 3/4 cup packed brown sugar
  • 1/2 cup maple syrup
  • 170g unsalted butter, melted
  • 1 & 1/2 tsp baking soda
  • 3/4 tsp salt
  • 3/4 tsp vanilla extract
  • 1/3 cup finely chopped pecans, toasted

For the frosting

  • 1 package (250g) cream cheese, softened
  • 100g unsalted butter, softened
  • 1 & 1/2 cups confectioners’ sugar
  • 4 tbsp maple syrup
  • Toasted pecan halves, to decorate

*I could not find any buttermilk at the supermarket, so I made my own by using a tablespoon of white vinegar for every cup of milk. Set it aside for about 5 minutes for the milk to react to the vinegar. You can also substitute the vinegar for lemon juice.

METHOD

  1. Preheat the oven to 180C (350F or gas mark 4).
  2. Grease two 8.5-inch cake pans with a little butter and set aside
  3. For the cake batter: Combine the plain flour, sugars, baking soda, and salt in a large bowl. In a separate bowl, combine the buttermilk, butter, syrup, and vanilla, and stir into dry ingredients until just combined. Fold in chopped pecans.
  4. Pour into the prepared pans and bake for 20-25 minutes or until a toothpick inserted near the centre comes out clean. Cool for 10 minutes before removing the cakes from the pans to wire racks to cool down completely.
  5. For the frosting: Using an electric handheld mixer, beat the cream cheese, butter, and maple syrup in a small bowl until smooth. Then beat in the confectioners’ sugar.
  6. Assembly: Place one cake layer on a serving plate and spread with about 1/2 cup of frosting. Top with the second layer of cake and frost the top and sides of the cake. Decorate with toasted pecan halves and store in the fridge before serving. Enjoy!

Vermont Maple-Pecan Cake

BON APPÉTIT

– Ally xx

myTaste.com

Turón Plátanos (Banana Spring Rolls)

Turón Plátanos (Banana Spring Rolls)

Hello Everyone! Today’s recipe is one that my mother has been making for a while now and is loved not just by my sisters and myself, but also by my high school friends who have had the lucky chance to indulge in these simple but delicious banana fritters, or also known as Turón Plátanos. For short, it is known in the Philippines as Turón and is a very popular street food snack/meryenda. It is made up of thinly sliced bananas (preferably saba or plantains) and a slice of jackfruit, dusted with brown sugar, rolled in a spring roll wrapper and fried. Since I am not a huge fan of jackfruit, we skipped that ingredient so that I could have some to eat! You can classify it as a dessert as well as others call it a caramel banana spring roll and serve it with ice cream on the side.

Turón Plátanos (Banana Spring Rolls)

Turón Plátanos (Banana Spring Rolls)

One day, I’m guessing probably 5 or 6 years ago, my mom fried these up for breakfast/afternoon tea(?), I actually cannot remember for what meal of the day, and I wanted to dip these spring rolls into something so I took a bottle of ketchup and poured it into a small plate. I then dipped a spring roll into the ketchup, bit into it, and was surprised to find out that it wasn’t a savoury spring roll (because during that time she also made spring rolls that had minced pork filling). The taste was unbearable, as in the pairing of tomato ketchup and banana was just not a good one. I told my mom and sisters about it and they could not stop laughing, and even to this day they would still ask me if I would like some ketchup with my turón.

Here’s a tip that you might want to follow: what my mom does is that she makes a whole bunch of turóns, 40 to be exact, as there are 40 sheets in a pack of spring roll wrappers. Once they have been wrapped, she puts them into a container and freezes them overnight and fries them the next day, straight from the freezer, no defrosting required. She says that this way the rolls are crispier when fried. Also, making them in big batches and freezing them allows you to fry them over a few days/weeks instead of having to make just a few each time  you feel like having some.

Turón Plátanos (Banana Spring Rolls) Ingredients

Turón Plátanos (Banana Spring Rolls)

PREP TIME 24 HOURS* | COOKING TIME 4-5 MINS | MAKES 40 ROLLS

*This includes setting aside the rolls in the freezer overnight before frying.

INGREDIENTS

  • 10 ripe plantains, cut into 4 lengthwise
  • 1 pack (40 sheets) large spring roll wrappers
  • 1 cup brown sugar
  • Cooking oil, for frying

METHOD

  1. Add the brown sugar to a small plate so that you can roll the plantains over it and coat them with enough sugar. Then place the sugar coated plantain on top of a spring roll wrapper and fold, locking the wrapper on each side.
  2. Place in a container and repeat until all the plantains have been sugar coated and wrapped. Freeze overnight.
  3. In a small (or medium, depending on how many you’re going to fry) pan, heat the oil over medium-high. Make sure it is quite hot before adding the wrapped plantains in. Fry until the wrapper turns golden brown.
  4. Drizzle with caramelised sugar (optional) and serve hot for dessert or meryenda – with ice cream on the side if you wish. Enjoy!

Turón Plátanos (Banana Spring Rolls)

BON APPÉTIT

– Ally xx

myTaste.com

Bulalo (Beef Bone Marrow Soup)

Bulalo (Beef Bone Marrow Soup)

Hello Everyone! So today’s dish is also a classic and most favourite Filipino main dish that can be found on, if not all, most menus across the Philippines. Bulalo, as stated in the title above, is a beef bone marrow soup that is light in colour and as the name states, uses beef shanks and marrow bones paired with various vegetables such as bok choy, corn cobs, green beans, etc. Because of the popularity of this dish, many restaurants and eateries across the Philippines specialise in Bulalo. Some of the most famous “Bulalohan” can be found in Tagaytay City (Cavite) and Santo Tomas (Batangas).

It is not a very hard dish to prepare – simple ingredients and simple cooking is all it really takes. In fact, all your really need for this dish is time and patience. The key to preparing this dish though is to choose the appropriate meat, shanks to be specific, and to make it as tender as possible. To achieve this is to simmering the beef for longer periods of time; it also releases all of its flavour. For me, the best tasting bulalo I’ve had to date was at Nina’s Itikan in Santa Clara, Bulacan. Even though they specialise in itik (duck), their bulalo was very rich in flavour. Even my dish that I am going to share with you today cannot match to its flavour!

Bulalo (Beef Bone Marrow Soup) Ingredients

PREP TIME 10 MINS | COOKING TIME 2 HOURS 10 MINS | SERVES 4

INGREDIENTS

  • 1kg beef shank
  • 2L water
  • 3 cloves garlic, crushed
  • 1 corn on a cob, cut into 4 equal parts
  • 1 large potato, cut into chunks
  • 1 long red chilli
  • 1 medium sized onion, quartered
  • 1 small bunch bok choy
  • 1 small bunch green beans, trimmed
  • 1 stalk lemon grass, halved and bruised
  • 2 tsp salt
  • 2 tsp whole black peppercorns

METHOD

  1. Pour water into a large cooking pot together with the salt, peppercorns, and lemongrass. Bring the water to a boil. Once boiling, add the beef shanks in and simmer for about 1 and a half hours; if you are using a pressure cooker then 30 minutes should do the trick.
  2. Then add in the chilli, garlic, and onions, and simmer for a further 30 minutes until the meat is tender. Add in the corn, green beans, and potatoes, and simmer for another 10 minutes, then followed by the bok choy. If broth needs a bit more salt, then add in a few teaspoons of fish sauce to season to taste.
  3. Serve hot with steamed rice and enjoy! A great dish to share during cold, rainy day/night to warm up your insides!

Bulalo (Beef Bone Marrow Soup)

BON APPÉTIT

– Ally xx

myTaste.com

Crispy Pata (Deep-fried Pork Leg)

Crispy Pata (Deep-fried Pork Leg)

Hello Everyone! After spending the past month in the Philippines, I thought that it’d be a good idea to share some of the foods that I came across and ate along the way. A classic dish that I will be sharing with you is the very famous Crispy Pata, or Deep-fried Pork Leg. Crispy Pata can be found in most eating places in the Philippines; one place that we dined at while staying Lucena City specialises in this dish and is even called Bubbles Crispy Pata & Restaurant. I remember the first time I came here with my cousins from the Barrientos side, my cousin JR joked about ordering a crispy para dish EACH. I think we ended up ordering one between two people, which, looking back, in my opinion is still quite a lot to eat between two; but just like me, he loves him some crispy pata. What I love about this very simple dish, is the crispy skin and of course the very tender meat beneath that layer of crispy goodness.

Crispy Pata (Deep-fried Pork Leg) Ingredients

As you probably would’ve already figured out from my description above, and the photographs, Crispy Pata is a famous Filipino pork dish that uses a whole pig’s leg. The leg (or pata) is made tender by simmering in water along with other spices, mainly peppercorns and bay leaves. It is then deep-fried until the texture becomes very crunchy. The dish is then served with various dipping sauces, the main being a soy-vingear sauce with chopped onions, or along with some pickled green papaya known as atchara, served as either a main dish with steamed rice, or as beer food known as pulutan.

Crispy Pata is definitely an easy dish to cook, but be cautious as the process does involve dangerous steps. Deep frying a whole leg can cause the hot oil to be uncontrollable. It is a must to slightly (not fully, as the cover can pop-up due to pressure) cover the cooking pot while frying. What my mom does is that instead of submerging the whole leg in scalding hot oil, she adds enough oil to submerge at least half of the leg and fries it for about 15 minutes or until golden brown. She then cautiously turns the leg and fries the other side for the same amount of time in medium heat until it becomes crispy. This is quite possibly one of the reasons why I only ever have crispy pata at a restaurant or when I’m home and my mom is there to do it for me – I don’t like the frying process!

Crispy Pata (Deep-fried Pork Leg) Ingredients

PREP TIME 24 HOURS* | COOKING TIME 2 HOURS 30 MINS | SERVES 4

*Includes setting aside the boiled pork leg in the fridge overnight to draw out the moisture before deep-frying.

INGREDIENTS

  • 1 whole pig’s leg (about 2 or 2.5kg)
  • 12 to 15 cups water
  • 8 to 12 cups cooking oil
  • 6 pcs dried bay leaves
  • 2 tbsp whole black peppercorns
  • 1 & 1/2 tsp salt

For the soy dipping sauce

  • 1/3 cup dark soy sauce
  • 1 small red onion, diced
  • 1 small tomato, diced
  • Juice of two calamansi**

For the vinegar dipping sauce

  • 1/3 cup white vinegar
  • 3 cloves garlic, crushed
  • 3 red bird’s eye chillies, halved
  • Whole peppercorns

**Calamansi (or calamondin), is a hybrid between a mandarin orange and a kumquat. It is widely cultivated in the Philippines and primarily used in cooking to flavour foods and drinks. If calamansi isn’t available, you may substitute it with lemon or lime, but the taste will not be the same. I can’t say exactly what the difference in taste is, but I think calamansi is a tad more sour than a lemon/lime, and has a slight orange taste to it.

METHOD

  1. Pour water into a large cooking pot along with the bay leaves and peppercorns. Bring to a boil. Once boiling, add in the whole pork leg and simmer under mediumm-high heat until the leg becomes tender (about 1.5 to 2 hours).
  2. Remove the tender leg from the cooking pot, transfer to a plate large enough to fit it and set aside until the temperature goes down. Once it has cooled down, place a clean cloth above the leg and refrigerate overnight. Remove from the fridge a few hours before cooking to bring it back to room temperature. Some recipes I’ve seen don’t require you to refrigerate the meat, I do it so that it draws out excess moisture from the leg.
  3. At this point you may want to rub on some different spices such as garlic powder, ground black pepper, and salt onto the skin. If you do, let it stand for 15 minutes for the leg to absorb the rub. If you don’t want to season it any further, which is what I did, then you can move onto frying.
  4. Heat a clean large cooking pot (preferably with cover), over high heat and pour the cooking oil in. When the oil becomes hot, turn the heat down to medium high. Carefully lower the leg into the hot oil and deep fry. Cook until one side becomes brown and crispy, about 10 to 15 minutes, and then cautiously flip the leg to brown and crisp the other side. Be extra careful in doing this procedure.
  5. Turn the heat off and remove the crispy pork leg. Transfer it to a wide serving plate.
  6. Combine all the ingredients together for the separate dipping sauces dance serve together with the crispy pata!

Crispy Pata (Deep-fried Pork Leg)

BON APPÉTIT

– Ally xx

myTaste.com

Easter Hot Cross Buns

Easter Hot Cross Buns

Hello Everyone! It’s been a while hasn’t it? Bare with me as I get back on track with my posting schedule, but I must warn you once again that I may or may not be travelling back to the Philippines, and as you already know, Internet connection will once again be disrupted, but hopefully for only a week or so. I am aware that it is a Sunday, and on amcarmenskitchen it should in fact be a Review Sunday! But not today for I have a special post for you guys tonight as it is Easter Sunday! I will sort out my reviews from various places that I visited during my month-long trip to the Philippines and get working on them to have one up for next week.

I remember how every bakery in Sydney, be in along the streets, inside a shopping centre, or supermarket, smelled of freshly baked hot cross buns. I definitely miss those chocolate chip flavoured ones from Baker’s Delight! A hot cross bun is a spiced sweet bun made with currants or raisins and marked with a cross on the top, traditionally eaten on Good Friday in most parts of Europe, the United States, and Australia/New Zealand. Apparently, hot cross buns may go on sale in Australia and New Zealand as early as New Year’s Day or even right after Christmas.

Easter Hot Cross Buns

To be honest, I was quite reluctant on whether or not I should post this up because a few things went wrong even though I followed the recipe from Taste very carefully. My buns did not at all look like the photograph and I think it because I under baked the buns (even though I followed the recipe). Okay, I technically didn’t quite follow it because the dough was very wet and quite sticky so I added probably the equivalent of about 1/2 or 3/4 more cups of flour. Maybe this is where it went wrong? I don’t know. Half of the buns deflated when I removed them from the oven (this is why I mentioned that I may have quite possibly under baked them), and they were still pretty pale when they had an extra 15 minutes in the oven. The crosses ended up appearing the same in terms of colour as the bun and didn’t look as evident. Oh the many mishaps; and now you see why I was hesitant to show my fail buns. Anyway, I deserve an A for effort as this is my first time making bread ever! And even still I am showing you my result!

When I reheated the buns again our small electric oven for about 6-8 minutes (for our afternoon snack), the tops browned nicely; and it was only then did I decide that maybe I should post it on my blog even if they don’t look that appetising. However, by this time, having been in the oven for quite some time since the initial baking, the bottoms and even the outside became quite crusty, however, the inside remained soft and dense. The 6 that are missing from the photograph were the deflated ones that we ate, and so I only managed to photograph the remaining 6. I will definitely give this recipe another go some other time.

Easter Hot Cross Buns Ingredients

PREP TIME 2 HOURS 20 MINS | COOKING TIME 20-25 MINS | MAKES 12 BUNS

INGREDIENTS

For the dough

  • 4 cups plain flour
  • 1 & 1/2 cups of raisins (or currents/sultanas)
  • 1 cup milk
  • 1/4 cup caster sugar
  • 40g butter
  • 2 eggs, lightly beaten
  • 2 sachets (7g each) dried yeast
  • 1 & 1/2 tsp mixed spices (I used cinnamon, cloves, & nutmeg)
  • Pinch of salt

For the flour paste

  • 1/4 cup plain flour
  • 3 tbsp water

For the glaze

  • 1/3 cup water
  • 2 tbsp caster sugar
  • Butter to serve

METHOD

  1. Bread Dough: Combine flour, yeast, sugar, mixed spices, and salt in a large bowl.
  2. Melt butter in a small saucepan over medium heat and then add in the milk. Heat for about a minute, or until the mixture is lukewarm. Add warm milk mixture and eggs to flour mixture. Then, using a flat-bladed knife, mix until the dough almost comes together. Use clean hands to finish mixing to form a soft dough.
  3. Turn the dough out onto a floured surface and knead for 10 minutes, or until the dough is smooth. Place the dough into a lightly oiled bowl and cover with plastic wrap. Set aside in a warm, draught-free place for 1 to 1 & 1/2 hours, or until the dough doubles in size.
  4. Punch the dough down to its original size and add the raisins to the dough. Knead with the raisins for about a minute on a lightly floured surface until smooth. Divide into 12 even portions. Shape each portion into a ball. Place balls onto a large tray lined with baking paper, about 1cm apart, and cover with plastic wrap. Set aside in a warm, draught-free place for 30 minutes, or until buns double in size. Meanwhile, preheat the oven to 190C.
  5. Flour Paste: Mix flour and water together in a small bowl until smooth, adding a little more water if paste is too thick. Spoon into a small snap-lock bag and snip off a corner of the bag. Pipe flour paste over tops of buns to form crosses.
  6. Bake for 20 to 25 minutes, or until buns are cooked through.
  7. Glaze: Place water and sugar into a small saucepan over low heat, and stir until the sugar dissolves. Bring to the boil and let it boil for about 3-4 minutes. Then, brush the warm glaze over the hot cross buns. Serve warm or at room temperature.

Easter Hot Cross Buns

Easter Hot Cross Buns

BON APPÉTIT

– Ally xx

myTaste.com

Red Velvet Cheesecake Brownies

Red Velvet Cheesecake Brownies

Hello Everyone! First off, I’d like to apologise for not posting a recipe over the weekend – reason being just that I haven’t had the time to sit down and write one, and even better, my laptop charger decided that it was time for it to die. Also, another heads up, I will be leaving Lucena tomorrow and back to Bulacan where I will once again have no connection, so this will be the last post for March! I will see you again in April when I come back from my vacation!

Red Velvet Cheesecake Brownies

Moving on, today’s recipe is a belated one as it was meant to go up on Valentine’s Day. But for those who have been following for a while, you would’ve known that that was a busy week for me. I spent late morning/early afternoon of Valentine’s Day with a few of my very close friends over brunch at Cuckoo Callay for their Bacon Festival. I spent the rest of the day finalising my packing, moving all my things to a friends house, and having dinner with Vidhya that night. I left Sydney the next day.

I’ve made these a total of 3 times now. The first two were a complete fail and the third time was ALMOST a fail but worked out in the end. The first time I filled my square pan right to the top. I forgot how deep that pan was but nevertheless the brownies were too thick. The top started to brown a lot and it was nowhere close to being halfway done. The second time I tried it, I made the same mistake, but it wasn’t that I didn’t learn from my first mishap, it was another miscalculation on my side. I used a bigger dish this time, but one recipe wasn’t enough to fill it, do I doubled the quantities. It didn’t fill up all the way to the top, but it was still too thick. The brownie cooked about 3/4 of the way and the bottom was still batter. The second time I made it, I had planned on bringing it to office as a treat for my boss and managers, but because I didn’t want to bring in underdone brownies, I waited until my next day off to make the brownies again and finally bring them in on my last day of work.

Red Velvet Cheesecake Brownies

Now for the third batch, I used 1 and a half recipes this time and it was just the right thickness, FINALLY. When I said that it was an almost fail, it was because it was taking three times as long as it should to bake in the oven. The reason is because firstly, the oven at the lodge in Sydney is just unreliable. Secondly, I noticed that the top was starting to brown and the brownies aren’t all the way cooked yet, so I resulted to having to cover the top with foil so that it’d stop browning any further. Anyway, it got there in the end and it was a huge hit in the office! And Vidhya loved it as well, even though the had some from the first batch.

The original recipe can be found on Sally’s Baking Addiction. As stated before, I used 1 and a half recipes (just for the red velvet batter, I stuck to the same quantities for the cheesecake mix) from Sally’s so that my brownies were of the right thickness for my baking dish (about 8″ x 13″). Also, since at that time I was in midst of clearing out my pantry, I only had about a half cup of plain flour left, and quite a bit of self rising. I didn’t want to use self rising because I didn’t want it to rise, and Vidhya wasn’t home so I couldn’t borrow her plain flour. So I ended up using what’s left of Jialing’s wholemeal flour that she left at my place. I don’t exactly know if using wholemeal changes the texture or the taste, but it worked out in the end.

Red Velvet Cheesecake Brownies Ingredients

PREP TIME 15 MINS | COOKING TIME 45 MINS | SERVES 6-8

INGREDIENTS

For the red velvet brownies

  • 1 & 1/2 cups sugar
  • 1 cup wholemeal flour
  • 170g unsalted butter
  • 3 large free range eggs
  • 6 tbsp unsweetened cocoa powder
  • 1 tbsp vanilla extract
  • 1 & 1/2 tbsp liquid or gel red food colouring
  • 1 tsp white vinegar
  • 1/4 teaspoon salt

For the cheesecake mix

  • 8 ounces cream cheese, softened
  • 1 large free range egg, yolk only
  • 1/4 cup sugar
  • 1/2 tsp vanilla extract

METHOD

  1. Preheat oven to 180C. Grease an 8×13 baking dish with a little butter. Set aside.
  2. Red Velvet Brownie Mix: Beat the eggs together in a small bowl and set side. Then melt the butter in a large microwave safe bowl in 30-second increments until fully melted.
  3. Stir in the sugar, vanilla extract, cocoa powder, salt, food coloring, and vinegar, mixing each of the ingredients into the batter in that order.
  4. Whisk in the eggs, then fold in the flour until completely incorporated. Do not overmix.
  5. Pour the brownie batter into prepared baking pan. Leave about 3 or 4 tablespoons to top the mixture later for the top.
  6. Cheesecake Mix: Beat the softened cream cheese, sugar, egg yolk, and vanilla extract in a medium-sized bowl using a hand-held electrical mixer on medium speed. Make sure that the mixture is completely smooth (about a minute or so).
  7. Dollop spoonfuls of the cream cheese mixture on top of the prepared brownie batter and top with the remaining tablespoons of brownie batter. Glide a knife through the layers, creating a swirl pattern.
  8. Bake the brownies for 45 minutes or until a toothpick inserted in the middle comes out clean. Once down, allow the brownies to cool completely before cutting into squares.
  9. Cover the brownies and store at room temperature for 3 days or in the refrigerator for up to 6 days.

Red Velvet Cheesecake Brownies

Red Velvet Cheesecake Brownies

BON APPÉTIT

– Ally xx

myTaste.com

Nutella & Mixed Berries Pizza

Nutella & Mixed Berries Pizza

Hello Everyone! Before I begin, I would like to dedicate this post to my little sister April who would’ve been 17 years old today. She unfortunately showed no signs of life when she was born.

Nutella & Mixed Berries Pizza

Nutella & Mixed Berries Pizza

Today, I am finally ending this short pizza series on a high with this pizza recipe from SORTED Food. I’ve been wanting to give this recipe a go for a very long time and I’m glad that I’ve managed to cross this off my list of things to make, and will continue to make over and over again. So, during the process of making this dessert pizza, there is one step where you have to place the pizza in the oven with the Nutella spread and hazelnuts to bake before adding the berries on top. When I took the pizza out to do this, I saw that the Nutella started caramelising. I stupidly, without thinking, put my finger in the Nutella spread because I wanted to know whether it has hardened… And I burnt my finger. My first reaction (of course) was to quickly put it in my mouth… And thus I also burnt my tongue. Well done Allison. Well done indeed. Other than this little stupidity of mine, the pizza was a success. The flavours were on point and that mascarpone cheese to top it off was pretty amazing.

Nutella & Mixed Berries Pizza

Of course you may use other berries as well, those that are in season wherever you are in the world. Fresh or frozen, it doesn’t matter. I really wanted to try it with boysenberries since I absolutely LOVE them. I saw punnets of them on the shelves at Coles a few times during December-January time. But by the time I came around to making this pizza, the berries were off the shelf and they didn’t even have any frozen ones *sob*.

Nutella & Mixed Berries Pizza Ingredients

PREP TIME 15 MINS | COOKING TIME 8-10 MINS | SERVES 4-5

INGREDIENTS

  • Classic New York Style Pizza Dough Recipe
  • 1 punnet (125g) blackberries
  • 1 punnet (125g) blueberries
  • 1 punnet (125g) raspberries
  • 1 punnet (125g) strawberries, sliced
  • Fresh mint leaves
  • Roasted hazelnuts
  • Mascarpone Cheese
  • Nutella

METHOD

  1. Preheat oven to 220C. Place your pizza stone in the oven as well to heat it up.
  2. Roll out your dough to a circle the same size as your pizza stone on a lightly floured surface as thick or thin as you want.
  3. Brush around the edge with a little water, then create a wall of raspberries all the way around. Fold the edge over the raspberry wall and seal it in by pressing down on the damp dough to form a stuffed crust.
  4. Spread a thin (or if you are that type, a generous) layer of Nutella onto the dough and top with the roasted hazelnuts (place them in to oven for about 5-6 minutes if your hazelnuts are raw). Don’t forget to lick your spoon, or whatever utensil that you used to spread the Nutella with, clean!
  5. Carefully remove the stone from the oven and quickly slide the pizza over the top of the stone. Place it back in the oven and bake for about 3 minutes. Remove from the oven and top the pizza with the berries and bake in the oven for a further 3-4 minutes or until cooked all the way through. It should not take more than 10 minutes in total.
  6. Remove from the oven and top with mascarpone cheese and fresh mint leaves.

Nutella & Mixed Berries Pizza

Nutella & Mixed Berries Pizza

BON APPÉTIT

– Ally xx

myTaste.com

Garlic & Rosemary Pizza

Garlic & Rosemary Pizza

Hello Everyone! Sorry for the lack of updates on the blog! I did say in the last post or so perhaps that I’d be travelling during this time and that I was unsure of whether I’d have, not so much the time, but more the internet connection to be able to post updates for you guys – and that’s exactly what happened! The first week of my trip I was staying in Sta. Maria Bulacan where my grandmother is currently residing has no wi-fi connection. I am now in Lucena at my cousin’s place with internet!

Garlic & Rosemary Pizza Ingredients

3 pizzas down and just 1 more to go after this recipe. I prepared this post and the next even before I left for holidays, but as I said, I didn’t have the connection. Today I have a very simple pizza recipe for you. The first time I had this pizza was back home in Brunei at a restaurant called Fratini’s. I was with my Mom and two younger sisters at that time for a 50% off dinner promotion during the month of fasting for Muslims known as Ramadhan. If I’m not mistaken (since I am talking about several years ago), we ordered their winning dish Linguine Fratini which was quite a hefty dish, but sharing that between 4 people was not enough; just. So we decided that we wanted to order a pizza too, to share, but nothing to hefty as the pasta dish. So the waiter/waitress at the time recommended the garlic and rosemary pizza, which we ended up ordering at the end. When it came to the table, I was actually quite shocked. “Where’s the sauce?” I asked myself. Everything that I knew about what pizza was meant to be, stuffed crust, tomato sauce, and cheesy goodness, all gone. But when I had a slice of that pizza, I was in heaven. It was like garlic bread, but in pizza form. It was delicious that I didn’t even want to share the pizza with anyone else!

My pizza came out a little too tan for my liking, and didn’t really have the same flavour I experienced back then. It was nonetheless still tasty, however I think I overdid the salt a wee-bit too much.

Garlic & Rosemary Pizza Ingredients

PREP TIME 10 MINS | COOKING TIME 8-10 MINS | SERVES 3-4

INGREDIENTS

METHOD

  1. Combine all the ingredients to a small bowl and let it sit for about 30 minutes to an hour for the fresh garlic and rosemary leaves to macerate in the olive oil.
  2. Preheat oven to 220C. Place your pizza stone in the oven as well to heat it up.
  3. Roll out your dough to a circle the same size as your pizza stone on a lightly floured surface as thick or thin as you want. Then drizzle the olive oil mixture over the top of the dough.
  4. Carefully remove the stone from the oven and quickly slide the pizza over the top of the stone. Place it back in the oven and bake for about 8-10 minutes or until cooked all the way through. It should not take more than 15 minutes in total.
  5. Remove from the oven and serve with any sort of pasta dish as a side!

Garlic & Rosemary Pizza

Garlic & Rosemary Pizza

BON APPÉTIT

– Ally xx

myTaste.com

Smoked Salmon Pizza

Smoked Salmon Pizza

Hello Everyone! This pizza was actually the last pizza I made before flying off, so it was basically a pizza with anything I had left in the fridge to top it off with (except for the smoked salmon though, I bought that especially for this pizza). I have a few others up my sleeve but I haven’t had the chance to try them out. Maybe I’ll do another pizza series later on in the year when I get around to making them again.

If you read my very first post on the pizza series, you would’ve read somewhere that I was inspired to make my own pizzas from a DIY pizza night that my friend Tara held for her birthday last year. I made sort of the similar thing as tonights post. What I had planned was to do another stuffed crust pizza recipe, but I realised, once I had lined the walls of the pizza and sealed it, the dough that I rolled out was too thin in the middle. So what I ended up doing was folding the dough back in and instead of it being a stuffed crust pizza base, I incorporated the mozzarella cheese into the dough.

Smoked Salmon Pizza

PREP TIME 10 MINS | COOKING TIME 10-15 MINS | SERVES 3-4

INGREDIENTS

METHOD

  1. Preheat oven to 220C. Place your pizza stone in the oven as well to heat it up.
  2. Roll out your dough to a circle the same size as your pizza stone on a lightly floured surface as thick or thin as you want.
  3. Top with a handful of mozzarella cheese and fold the dough in again to incorporate the cheese into the dough. Or, if you prefer a stuffed crust, brush around the edge with a little water, then create a wall of the mozzarella cheese all the way around. Fold the edge over the mozzarella wall and seal it in by pressing down on the damp dough to form a stuffed crust.
  4. Spread a thin layer of sauce onto the dough. Be very careful not to overdo the sauce; if you use too much sauce, it’ll be too rich and also will bubble over the pizza and burn. A quarter cup to a third is just about right per pizza.
  5. Top the pizza with the bocconcini, capers, and red onion. If these aren’t quite to your fancy, then get creative and top your pizza with your favourite toppings.
  6. Carefully remove the stone from the oven and quickly slide the pizza over the top of the stone. Place it back in the oven and bake for about 5-7 minutes. Remove from the oven and top the pizza with the smoked salmon. Then put it back in the oven for a further 2-3 minutes or until cooked all the way through. It should not take more than 15 minutes in total.
  7. Remove from the oven and top with fresh rocket leaves and chilli flakes before serving.

Smoked Salmon Pizza

Smoked Salmon Pizza

BON APPÉTIT

– Ally xx

myTaste.com