Cinnamon Roll Pancakes

Cinnamon Roll Pancakes

Hello Everyone! So today’s recipe was made a while back, somewhere in November before I travelled to the Red Centre of Australia. The story goes back to my former housemate Lydia. Long story short, after having lunch together and going back to our rooms (or so I thought) I came back down to the kitchen and Lydia was STILL in the kitchen. She was flipping pancakes. I asked her how she was going with them, and she replied “not so good. I actually waited for you to go upstairs so you wouldn’t see my fail pancakes!”

If you’ve read my blog post from somewhere in September, you’d know that Lydia and pancakes do not go well together. Even when she tried to flip them the first time we made them together, life was just being too difficult for her – until we made these pancakes though! She flipped about 3 or even more pancakes successfully! And these pancakes aren’t considered easy for beginners like Lydia I would assume. I didn’t want to just make plain pancakes, we we stepped it up a notch and we (mainly I) decided to try out a recipe for Cinnamon Roll Pancakes.

Cinnamon Roll Pancakes

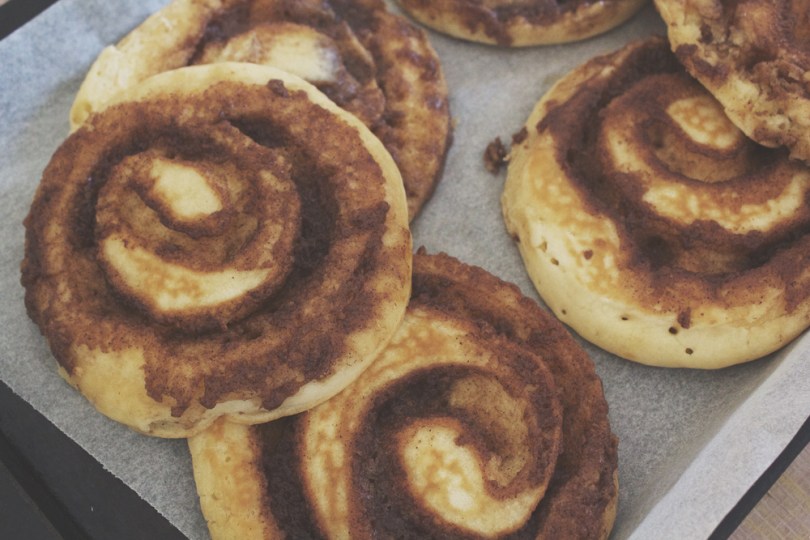
The first pancake I attempted was a slight fail – I didn’t know when to pipe the cinnamon filling onto the pancake. What I did at first was basically wait for the pancake batter to start bubbling on the top and then pipe on the filling. Two things went wrong; firstly the filling was a bit firm so it wasn’t piping out in one smooth squeeze. The second thing, when I flipped the pancake, the filling just went everywhere. The first one was easy to resolve, we basically just let the filling out for a while until it started to soften a bit. The second took a little bit of thinking, but in the end we ended up piping the filling straightaway onto the pancake batter as it hit the pan. 100% success from then on!

Also, this recipe can originally be found on Vegan Yumminess – though I highly doubt that these pancakes that I’ve made are 100% vegan because of the choices of ingredients that I’ve used.

Cinnamon Roll Pancakes Ingredients

PREP TIME 10 MINS | COOKING TIME 45 MINS | MAKES 6-8 PANCAKES

INGREDIENTS

For the pancake batter

  • 40g unsalted butter, melted
  • 1 & 1/2 cup plain flour
  • 1 & 1/2 cup milk
  • 3 tbsp palm sugar
  • 1 tbsp baking powder
  • 1 tbsp cornstarch
  • 1 tsp lemon juice

For the cinnamon filling

  • 60g unsalted butter, slightly softened
  • 5 tbsp brown sugar
  • 1 tbsp ground cinnamon
  • 1 tbsp plain flour

For the cream cheese glaze

  • 100g cream cheese, room temperature
  • 1/2 cup confectioners sugar, sifted
  • 3 tbsp milk, plus more if needed
  • 1 tbsp lemon juice
  • Pinch of salt

METHOD

  1. Preheat oven to 100C. Line a tray with baking paper.
  2. Cinnamon Filling: Place all the ingredients into a zip-lock sandwich bag and seal closed. Knead the ingredients together with your hands until there are no big lumps or chunks of anything. Place the bag in the fridge for at least 10 minutes to allow the mixture to firm up a little bit. The consistency should be similar to that of toothpaste. When you are ready to draw swirls into your pancakes, cut about a 1/3-inch (.8cm) hole in one of the bottom corners of your sandwich bag.
  3. Cream Cheese Glaze: In a medium-sized bowl beat the cream cheese using an electric mixer on medium-high speed until light and fluffy, about 4-5 minutes, scraping down sides of bowl as needed. Add the sugar and beat until combined, about 1 minute. Then add the salt, lemon juice, and milk; mixing on low speed until smooth. If the glaze is too thick to drizzle, add more milk, 1 tbsp at a time.
  4. Pancake Batter: Add the dry ingredients into a large bowl and whisk to combine. Then add in the wet ingredients and whisk until smooth. Heat a nonstick pan on the stove on medium and once heated, turn the heat down to medium-low. Lightly butter the pan and pour about a 1/4 cup of batter. Immediately add your cinnamon filling by gently squeezing your sandwich bag in a circular motion around your pancake to form a swirl. Try not to get too close to the edge of your pancake.
  5. When bubbles have formed towards the centre of your pancake (about 2-3 minutes), flip your pancake quickly in one continuous motion. When the pancake has cooked on the other side for a further 1-3 minutes, remove it from the pan and place on your prepare baking tray and place into the oven to keep warm while you work on the remaining pancake batter. Make sure to wipe your pan clean before starting your next pancake.
  6. Stack your pancakes and drizzle with cream cheese glaze.

Cinnamon Roll Pancakes

Cinnamon Roll Pancakes

BON APPÉTIT

– Ally xx

myTaste.com

Gingerbread Cookies

Gingerbread Cookies

Hello Everyone! I apologise in advance for not posting yesterday as scheduled. Long story short, I didn’t write my post yesterday (I have my reasons) and I just wanted to go to bed when I got home from a work event yesterday. Anyway, if you read my last post on the Gingerbread Muffins, you would’ve know what tonight’s recipe will be about. I wanted to do something nice for my colleagues in the office for my last week before the Christmas/New Year holidays, so I decided to bake batches of Gingerbread Cookies. Actually these cookies inspired me to try out and bake Gingerbread Muffins on Monday to stick to the festive theme. I packed them into little plastic bags and tied them up with Christmas tags that I bought from the Christmas Markets at The Grounds of Alexandria.

Gingerbread Cookies

I think, if not all, most of them loved my cookies. My boss had the best reaction hands down when he saw his bag of goodies on his desk when he came into work; he let out what seemed like a squeal of excitement. I also managed to change my manager’s view on gingerbread – she normally doesn’t like gingerbread, but mine were an exception. I genuinely believe that she wasn’t just saying that because I was there; she apparently went on for about 5 minutes about the cookies to her sister. Also, one of the interns didn’t come in at all so he didn’t get his bag of goodies, so the other manager said that he was tempted to just open his bag for more. Towards the end of the day I saw the bag closer to his desk and opened. Yesterday I asked him if he ate all of the other intern’s cookies, and he said he gave some to his housemates!

Some of my cookies ended up on Instagram as well:

Gingerbread Cookies on Instagram

Like the little gingerbread men that was featured on Tuesday’s post, I made my own cookie cutter using aluminium foil, which meant that each time I pressed it on the rolled out dough, it would slightly deform. I would then reshape it, but that meant that I had men that differed in shape – some were fat, some skinny. Some had one leg longer than the other, one arm higher than the other, big heads, small heads, etc. but to quote Jialing (as well as from the previous post), “everyone is different in their own way and we don’t discriminate!” Also, a special thanks and shoutout to my main girl Jialing for decorating my cookies while I frantically tried to do some many things at once in the kitchen. They look absolutely stunning!

Before I move onto the recipe, please do visit the site where I originally got the recipe from: Food Network. As usual, I used slightly different ingredients only because some I didn’t have on me – or I wasn’t up for buying let’s say a bottle worth $30+ of orange liqueur when I only needed half a teaspoon of it. Making my own orange liqueur crossed my mind, but then I only thought of a week before making these cookies. I still wanted to add a hint of booze to my frosting though, so I ended up getting a tiny bottle of vodka for this. Again, I didn’t want to buy a big bottle of vodka because I don’t drink vodka. If you are making these for the little ones, just remember to exclude the vodka from the frosting!

Gingerbread Cookies Ingredients

Gingerbread Cookies Ingredients

PREP TIME 25 MINS | COOKING TIME 8-10 MINS | MAKES 3 DOZEN

INGREDIENTS

For the gingerbread dough

  • 4 cups plain flour (plus 1/2 cup additional for rolling, if needed)
  • 170g unsalted butter, softened
  • 2 large free range eggs
  • 1 large navel orange, zested
  • 1 lemon, juiced
  • 1 & 2/3 cups caster sugar
  • 1/2 cup dark molasses (or honey in my case)
  • 1/4 cup milk*
  • 1 tablespoon ground dry ginger
  • 2 teaspoons ground cinnamon
  • 1 & 1/2 teaspoons baking powder
  • 1/2 teaspoon baking soda
  • 1/2 teaspoon ground allspice
  • 1/2 teaspoon ground nutmeg
  • 1/2 teaspoon salt
  • 1/4 teaspoon ground cloves

For the easy orange frosting

  • 1 cup soft icing sugar
  • 1 large orange, zested and juiced
  • 1 tsp vodka (optional)

*I don’t know what I did wrong but when I was rolling out my dough after I had chilled it in the fridge for about 15-20minutes, my dough it felt a bit dry and crumbly. I fixed it by adding some milk and putting it back into the fridge before rolling it out again. It seemed to have worked this way! I’m not sure if I did something wrong or just looking at the recipe, maybe the ratio between dry and wet was a bit out of proportion.

METHOD

  1. Preheat oven to 180C. Add the unsalted butter, sugar, and orange zest in a large bowl and beat using an electric mixer fitted with a paddle at medium-high speed until smooth; about 5 to 8 minutes.
  2. Meanwhile, in another bowl, sift together the flour, baking powder, baking soda, dry ginger, nutmeg, allspice, cinnamon, cloves, and salt. Whisk to blend and then set aside. In another bowl, whisk together the eggs, molasses (or honey), and lemon juice.
  3. When the butter and sugar mixture is smooth, lower the speed of the mixer and add the dry ingredients. Then add the egg mixture until well blended. At this point, if you feel your mixture is too dry or crumbly, add the milk in.
  4. Divide the cookie dough in half. Wrap each half with cling wrap and chill in the fridge for about 15 minutes. This step will make it easier to finish rolling out the dough when it has chilled. It will also mean you only have half of the dough getting warm as you roll it.
  5. Lightly flour a flat surface. Use a floured rolling pin to gently roll the first half of the dough about 1/2-inch thick. Lightly flour the cookie cutter(s) and cut the shapes, making as few scraps as possible. Got scraps? Form the scraps into a ball, press it flat and chill in the refrigerator. These cookies may be a little more “tough” because the dough will have been worked a little more than the others.
  6. Transfer the cut out cookies to a tray lined with baking paper. Leave room between the cookies as they can spread a little. You’ll end up having to bake them it batches depending on the size of your cookies and how many can fit into a single baking tray. Bake until brown around the edges; about 8 to 10 minutes. While your first half of your batch of dough is cut and baking/waiting to bake, work on your second half of cookie dough. Once your cookies are done, set them aside to cool down and get started on making your easy orange frosting.
  7. Easy Orange Frosting: In a medium bowl add all of the ingredients and whisk together to combine. If the consistency is too thick, add a touch more orange juice (or vodka if you prefer) to thin it out. Transfer the frosting into a party bag (or if you are like me and don’t have one, you can use a zip lock bag and cut a hold at the tip, OR even use a ketchup bottle as you will see in one of the photographs below).
  8. Work on and decorate the batch of cookies that went into the oven first as these would have had enough time to cool down before the others. The work your way through the batches of cookies.

I guess, if you want it to look more festive you can go with green/red decorations but our local Coles only had blue or pink. Of course, cookies are best served fresh but you can store these cookies in an airtight container for up to 5 days.

Gingerbread Cookies

Gingerbread Cookies

BON APPÉTIT

– Ally xx

myTaste.com

Breakfast Muffins: Gingerbread

Breakfast Muffins: Gingerbread

Hello Everyone! Another Muffin Making Monday recipe post for all of you tonight, and why not bake these not so little, but cute muffins for the kids or maybe even the adults this holiday season? Just remember to exclude that hint of vodka in the orange frosting when serving it up for the little ones! These muffins are moist and packed with a spicy sweet gingerbread flavour with that touch of citrusy goodness; not to mention they also create a beautiful gingery aroma in the kitchen. As usual with all my baking adventures, I always look to Sally’s Baking Addiction. Her recipes are straight forward, easy to follow, and really require minimal work in the kitchen (as far as I know from the recipes I’ve tried). I also always try to tweak the recipe myself, which I have definitely done here to make these muffins a little more special for this festive season.

Besides tonight’s muffin post, I also baked gingerbread cookies yesterday to bring in and share amongst my workmates. The recipe for these gingerbread cookies will be up on Thursday’s post. From the dough I had,  I made little gingerbread men to stuff into my muffins. I also topped the muffins with leftover orange frosting. I shall call these Hot Tub Gingerbread Muffins! I actually got this idea from the front cover of the December issue of Coles Magazine. The featured cupcakes were topped with frosting and little gingerbread man cookies. I pre-baked the little gingerbread men before baking my muffins, and my plan was to stuff the muffins with the men while the tops were still moist before completely cooked. But forgetting that I wanted to do that, Jialing had already frosted and decorated my little men, and putting them into the oven would basically just melt the frosting off. Also it meant that the gingerbread men would potentially over bake in the oven. So what I did was once the muffins were ready and slightly cooled, I cut a slit in the muffins and inserted the little men. They were a bit large for the muffins, so I ended up amputating their legs just so they would fit snuggly. I remember when I brought a muffin into work today, one of the managers noticed that his legs were missing and asked where his legs went. I told her the sad story.

Breakfast Muffins: Gingerbread

I also by the way, did not have any cookie cutters for these, instead I made my own cookie cutter using aluminium foil following this tutorial on wikiHow. I mean, it wasn’t ideal for the foil kept reshaping itself every time I pressed down on it to cut out my cookies, so as you can see from the image above, some were fat, some skinny. Some had one leg longer than the other, one arm higher than the other, big heads, small heads, etc. but as Jialing said, everyone is different in their own way and we don’t discriminate! And of course, being such a professional baker (sarcasm intended), I don’t even own a rolling pin – but who says a bottle of Jack can’t fix the problem and stand in as a makeshift rolling pin?

Breakfast Muffins: Gingerbread

I went ingredient shopping two days before making these muffins, and unfortunately I could not get a hold of molasses which gives the muffins their deep brown colour and rich flavour. I wasn’t able to look at another grocery store on the Sunday because I had my own little adventure kayaking over the Sydney Harbour, overlooking the Sydney Opera House and Harbour Bridge. So I settled with using honey for this recipe, which is one of the various substitutes for molasses. Also, you may notice that the batter is quite thick. Very, very thick. It may make you wonder if you’ve done anything wrong, or if the proportions of this recipe is right. Well, you didn’t do anything wrong, and neither is the recipe wrong. A thick batter helps make a muffin have that beautiful high dome top. So do expect a thick (and lumpy) batter and you’ll be happy with the results of your muffins! In addition, no need to take out your electric mixer for this, because I always dread having to dig for it at the back of the cupboard and cleaning it up afterwards.

Also, just a quick note incase you missed it, the recipe for the gingerbread men will be posted on Thursday – as well as the orange frosting since that came with the gingerbread recipe, so stay tuned for that! Tonight will just be on the Gingerbread Muffins.

Breakfast Muffins: Gingerbread Ingredients

PREP TIME 10 MINS | COOKING TIME 15 MINS | MAKES 12 MUFFINS

INGREDIENTS

  • 3 cups plain flour
  • 115g unsalted butter
  • 1/2 cup dark brown sugar
  • 3/4 cup dark molasses (or honey in my case)
  • 3/4 cup plain or vanilla yoghurt
  • 1/4 cup milk
  • 1 large free rage egg
  • 1 & 1/2 tsp baking soda
  • 1 & 1/2 tsp ground cinnamon
  • 1 & 1/4 tsp ground ginger
  • 1/2 tsp ground cloves
  • 1/4 tsp salt

METHOD

  1. Preheat oven to 220C. Line a 12 hole muffin pan with paper cases.
  2. Add the flour, salt, baking soda, ginger, cinnamon, and cloves in a large bowl and whisk together. Set aside. Add the honey and unsalted butter together in a microwave-safe bowl and heat on high for about 1 minute in the microwave. Stir until thoroughly mixed together. Set aside. In third bowl, whisk together the brown sugar, egg, yogurt, and milk.
  3. Pour the mixture into the into the honey and butter mixture and whisk until everything is incorporated. Then pour the wet ingredients into dry and mix until just combined, careful to not over mix the batter which will be very thick and lumpy.
  4. Fill your muffin cups tins to the very top and bake for about 5 minutes at 220C. Baking them at a higher temperature right at the beginning will help create a burst of steam inside the muffin and rapidly lift the tops. Then reduce the temperature down to 190C and continue to bake for about 15 more minutes. Muffins are finished when a toothpick inserted into the centre comes out clean.
  5. Once done, remove the muffins from the oven and set aside to cool down for a bit. Cut slits into your muffins and insert a gingerbread man in each. Top with a drizzle of orange frosting. Serve!

Muffins taste best eaten the same day, and can be stored in an air-tight container at room temperature.

Breakfast Muffins: Gingerbread

BON APPÉTIT

– Ally xx

myTaste.com

Kangaroo Bolognese

Kangaroo Bolognese

Hello Everyone! So today’s recipe was inspired by a meal that I had while travelling the outback a few weeks ago. It was our first night of the tour and our tour guide Dan was showing us the way to Ewing’s Lookout to have champagne, wine, and crackers while watching the sun set over Ayers Rock and Kata Tjuta. I remember him saying that while we were enjoying the sunset, he’ll be back at the campsite and have “tea” ready for us. Then someone called out “what about dinner?” Dan didn’t hear her though because he was getting out of the 4WD as she said it. I then remember a couple of guys discussing about how they came to book the tour, and I remember him specifically saying “it said that dinner would be provided”. I then chimed in and told them that when Dan said “tea” he meant dinner, to which he responded “that’s so weird, in England tea is just tea, like would you like a cup of tea. But here it’s would you like a cup of dinner?” He was hilarious. But nonetheless, I assured the others that dinner will be served. “Tea” is apparently an Aussie slang for a light late afternoon meal or main meal in the evening.

Kangaroo Bolognese Ingredients

Anyway, tea aside, Dan made Kangaroo Bolognese for dinner that night. I’ve ever only had kangaroo once before during my first year in Sydney. It was my 20th birthday party and one of my friends brought kangaroo patties to throw on the barbie. I’ll be honest and say that I cringed a little bit when I found out that he was cooking kangaroo. Even though I was reluctant to, he made me try a bit. I don’t even remember  what it tasted like; I just knew that I neither loved nor hated it. But ever since then until now, it never crossed my mind to actually purchase kangaroo and consume it. I’ll admit that I was even reluctant to eat it while camping – but i had no choice because I didn’t want to starve during the night and wait for breakfast. After giving kangaroo a second chance, I still had the same feelings of neither loving it nor hating it, but I can safely say that I was leaning more towards liking it.

After returning from the trip, I decided that I would give Kangaroo Bolognese a go and last week Monday was the day I tried out the recipe for myself. I basically just cooked it the way I would normally cook a bolognese with minced beef. It turned out to be pretty good! But I think I got sick of eating it after the 3rd day – I made enough to last me 4 meals, and to those who know me, I actually cannot eat the same meal more than twice in a row otherwise I’d get sick and tired of eating it. I still have half a kilo left in my freezer and I am unsure what to make next. I immediately thought of kangaroo lasagna, but I’ve had various suggestions such as kangaroo pie, Aussie kangaroo burger and even a Roorito (kangaroo burrito). I might give the last one a go just because I like the name of it!

Kangaroo Bolognese Ingredients

PREP TIME 10 MINS | COOKING TIME 30 MINS | SERVES 4

INGREDIENTS

  • 500g kangaroo mince
  • 250g linguine (or any other pasta)
  • 1 can (400g) Italian diced tomatoes
  • 1 sachet (2 tbsp) tomato paste
  • 4-5 dried bay leaves
  • 3 baby carrots, cut into small chunks
  • 3 celery sticks, sliced
  • 3 garlic cloves, crushed then minced
  • 1 medium-sized brown onion, diced
  • 1 red birds-eye chilli, sliced (optional for that added kick of spice)
  • 1 cube vegetable stock dissolved in 1 cup boiling water
  • 2 tsp dried oregano
  • Grated parmesan cheese
  • Ground sea salt and black pepper to taste
  • Parsley

METHOD

  1. Heat about a tablespoon of oil in a large frying pan over medium-high. Sauté the garlic until golden and fragrant, then add the chillies and onions. Sauté until the onions are soft and then add in the kangaroo mince. Season with salt, pepper, and oregano. Cook, stirring, until the meat is no longer pink (about 5-7 minutes).
  2. Add the dried bay leaves, diced tomatoes, tomato paste, and vegetable stock. Give it a good mix and then turn the heat down to low, cover and let it simmer for about 15 minutes to allow the flavours to blend. Finally, add in the carrots and celery, and cook for a further 8-10 minutes.
  3. Meanwhile, cook the linguine according to packet instructions.
  4. Remove the sauce from the heat and serve over the hot pasta. Top with a handful of grated parmesan cheese and fresh parsley.

Kangaroo Bolognese

Fun fact: Australia is the only nation to eat its Coat of Arms – not quite!

I was told that Australia is the only nation to eat kangaroos and emus, both of which are national symbols on the Australian Coat of Arms. After doing some research, it’s not quite true and turns out that there are 20 (or maybe even more) other nations that eat their national symbol. Kangaroo has been historically a staple source of protein for indigenous Australians. Kangaroo meat is high in protein, low in fat (about 2%), and has been attributed with a wide range of health benefits.

BON APPÉTIT

– Ally xx

myTaste.com

Beer-braised Pulled Pork Eggs Benedict

Beer-braised Pulled Pork Eggs Benedict

Hello Everyone! Today’s post will actually consist of two recipes; one leading to the other that is. So I’ve been debating whether I should actually post them as two separate posts but then I thought to myself that I wouldn’t be able to do a proper write up (i.e. a story for Vidhya) if I had just posted the first recipe. She would’ve been so mad at me if I didn’t have a story for her! But I do have a good story to tell about the second, which I kind of already mentioned it to Vidhya briefly when I saw her in the kitchen on Monday afternoon.

Anyway, so what happened was that somewhere during the beginning-mid year, my friends and I went out for brunch on a fine weekend. I suggested that we head on over to John Smith Café in Waterloo specifically because I saw a whole lot of Instagram posts about this heavenly Pulled Pork Cronut with Hollandaise Sauce! I was seriously drooling all over my phone, so naturally I made it my mission to head on over and drag my lovely ladies Jialing and Yvonne along too. We planned to meet for brunch, and but of course brunch turned into late lunch as Jialing and I adjusted our timings to suit Yvonne. When we got to the café the waiter (possibly owner) showed us to the table and said that he had good news and bad news. I honestly forgot what the good news was, but the bad news was indeed BAD news. So bad that I just can’t even. They ran out of pulled pork. I was so devastated that I even told the guy serving us in a sort of like sad little girl voice “but I came specifically here for that!” To which he replied “I am very sorry about that, but here’s a cronut on me!”

Beer-braised Pulled Pork Eggs Benedict

Oh well, at least I got a free cronut. But what I really wanted to say is that I really wanted to go back another time to devour this Pulled Pork Cronut of theirs – but sadly it’s already nearing the end of the year and I have no been back! So I thought to myself, why wait to go back if I can possibly just whip one up of my own at home? Minus the cronut that is; just the pulled pork, eggs benny style. I know it’s not the same thing, but who doesn’t love pulled pork eggs benny for a big Sunday breakfast/brunch/lunch?

First things first, the pulled pork. This recipe for beer-braised pulled pork is just so great. Why I have chosen to braise the pork in beer is because, well I’ve had a 6-pack of Corona lying in my closet for quite possibly 7 months now. For those of you who know me, I don’t drink beer. I just don’t like the taste of it. So why do I have beer in my  closet do you ask? I bought it for a prank video I filmed for my Major Design Project for an anti-binge drinking campaign. So instead of drinking it, or giving it away, I decided the only way I can ‘consume’ it would have to be incorporating it into my cooking – hence the beer-braised pulled pork. So technically you don’t have to follow this pulled pork recipe, you can find another one to use, or if you have one of your own up your sleeve then be my guest!

*Note: my casserole dish was a wee-bit too small for the meat I had. Oops! I didn’t have anything bigger so I ended up using only half of the vegetables and half a bottle of beer. Ideally you would use all! Also, you can find the original recipe for this beer-braised pork shoulder over on The Kitchn. I tweaked the recipe a little bit, and of course to suit my not-so-good oven that jut takes double (sometimes triple) the amount of time to cook anything. I also kept the fat on the pork shoulder – that’s where the goodness is!

Beer-braised Pulled Pork

Beer-braised Pulled Pork Ingredients

PREP TIME 30 MINS | COOKING TIME 5 HOURS | SERVES 4-6

INGREDIENTS

  • 1kg pork shoulder
  • 355ml beer of choice
  • 4 garlic cloves, crushed and minced
  • 2 celery sticks, sliced
  • 2 large tomatoes, diced
  • 1 large brown onion, cut into wedges
  • 1 large carrot, cut into chunks
  • 1 tbsp olive oil
  • 2 tsp brown sugar
  • 1 & 1/2 tsp paprika
  • 1 tsp cumin powder
  • 1 tsp ground rock salt
  • 1 tsp ground black pepper
  • 1 tbsp plain flour

METHOD

  1. Preheat oven to 200C. Combine the brown sugar, cumin powder, paprika, salt, and pepper in a small bowl. Rub the pork with the spice mixture and allow to sit for about 30 minutes.
  2. Heat the olive oil in a large frying pan over medium-high heat. Sear and brown the pork on all sides, about 3 minutes per side. Remove from the pan and transfer to the casserole dish. Sauté the garlic and onions until fragrant. Then add in the tomatoes and cook until soft before adding the carrots and celery. Scrape the bottom of the pan while mixing to bring up any browned bits.Transfer the vegetables to the casserole dish with the pork.
  3. Pour the beer over the meat and vegetables and cover. Cook in the oven for 5 hours, checking once or twice, until the meat is extremely tender. Once done, transfer the pork to a plate and shred using a fork.
  4. Strain juices into a small saucepan and bring to a boil. Once boiling, add the flour in and stir continuously to get rid of any lumps. This will be your gravy to go with your pulled pork eggs benny.

Beer-braised Pulled Pork

Beer-braised Pulled Pork


Pulled Pork Eggs Benedict with Sriracha Hollandaise Sauce

This is where shit gets real. Sriracha Hollandaise Sauce? Yes please! Also, please see the original ideas that I got form Pineapple & Coconut (basically where I got the idea to use English Muffins and Sriracha Hollandaise sauce for this recipe).

Beer-braised Pulled Pork Eggs Benedict Ingredients

PREP TIME 5 MINS | COOKING TIME 15 MINS | SERVES 2

INGREDIENTS

For the Eggs Benny

  • 1 cup pulled pork
  • 3 tbsp pulled pork gravy
  • 2 English muffins, lightly toasted
  • 2 large free range eggs
  • 1/2 avocado, mashed
  • Handful of snow pea shoots
  • Pinch of paprika

For the Sriracha Hollandaise Sauce

  • 3 large free range eggs, yolks separated
  • 175g unsalted butter, cut into cubes, at room temperature
  • 2 tbsp water
  • 2 tbsp fresh lemon juice
  • 1-3 tbsp sriracha sauce (depending on how hot you want it)
  • Ground salt and black pepper to taste

METHOD

  1. Sriracha Hollandaise Sauce: Place a heatproof bowl over a medium saucepan that is quarter-filled with water. Make sure that the bowl should fit snugly into the pan without touching the water (lift the bowl to check and remove some water if it does). Bring the water to a boil over high heat, then reduce heat to very low so the water is barely simmering (there should be almost no movement at all). It is important that the water is barely simmering while making the sauce – if it is too hot, the egg yolks will cook too much and the sauce will curdle.
  2. Place the egg yolks and the 2 tablespoons of water in the heatproof bowl and place over the pan. Whisk the mixture constantly for 3 minutes or until it is thick and pale, has doubled in volume and a ribbon trail forms when the whisk is lifted.
  3. Add the butter a cube at a time, whisking constantly and adding another cube when the previous one is incorporated completely (about 10 minutes to add it all in). If butter is added too quickly, it won’t mix easily with the egg yolks or the sauce may lose volume. At the same time, it is important that the butter is at room temperature and added a cube at a time, so that it doesn’t take too long to be incorporated – if the sauce cooks for too long, it can curdle.
  4. Remove the bowl from the pan and place on a heatproof surface. The cooked sauce should have the consistency of very lightly whisked thickened cream. Whisk in the lemon juice, sriracha sauce, and season with salt and pepper.
  5. Poached Eggs: Bring small saucepan of water to the boil over medium-high heat, then reduce the heat to low-medium – the water should be just simmering. Add in the vinegar and stir. Crack one egg into a small bowl and quickly, but gently pour it into the water. Repeat with the other egg. A really soft poached egg should take around 2 minutes, but if you want it a bit more firm, it will take about 4 minutes. To check if they’re cooked right, carefully remove the egg from the pan with a slotted spoon and give the yolk a gentle push (you can tell just by your instincts if it is under or overcooked – or perfect)!
  6. Assembly: Combine the pulled pork and gravy in a small bowl. Spread each English muffin with mashed avocado and top with the pulled pork. Place the poached egg on each and top with a generous amount of sriracha hollandaise sauce. Crack a a little pepper on top, sprinkle with a bit of paprika, and decorate with  snow pea shoots. Serve immediately!

Beer-braised Pulled Pork Eggs Benedict

Beer-braised Pulled Pork Eggs Benedict

BON APPÉTIT

– Ally xx

myTaste.com

Oxtail Kare-Kare

Oxtail Kare-Kare

Hello Everyone! So I was just browsing through all the posts I’ve uploaded since I got into a regular uploading schedule and I realised that I actually haven’t posted a savoury dish in a while. I’ve been posting about cakes, cookies, and muffins these past few months! The last savoury dish that I blogged about was back in October with The Ultimate Brekkie (for those who have not seen it, click on it and prepare to drool, seriously).

Today’s recipe is a little different, or may be different to some of my readers/viewers. It is one of my most favourite dishes of all time, and only because my mom used to make it on a regular-enough basis to always have this orgasmic sensation with every bite. It may not suit the taste buds for many I feel, but seriously, every person I’ve made this for, well okay 3 people, loved it so much that they’ve even gone and tried to make it for themselves!

There are a few things to cover in this recipe that many may not know about, so I’ll start of with what even is Kare-Kare. Pronounced kah-reh kah-reh, it is a traditional Philippine stew flavoured with ground roasted peanuts or peanut butter, onions, and garlic; creamy, rich, and thick. Traditionally, a palayok (clay cooking pot) is used to cook this dish and it is also used as the serving pot. Typical meats that make the base for this stew include oxtail (sometimes this is the only meat used), pork hocks, calves feet, pig feet, beef stew meat; and occasionally offal, or tripe, rarely goat or chicken. Besides the meat, vegetables are also cooked with the stew and these include a range of (but are not limited to): eggplant, Chinese cabbage (or other leafy greens), long beans, okra (lady fingers), daikon, etc. – usually equaling or exceeding the amount of meat in the dish. The overall dish is then coloured (and flavoured) with annatto seeds, which is extracted by add the seeds in oil or water. Since I didn’t have some in handy, I just left them out – I feel like it didn’t have a significant effect to the overall flavour of the dish.

This dish is often served and eaten with shrimp paste known in a Philippines as bagoong (pronounced ba-go-ong). Sometimes it is spiced with chilli, or sautéed with garlic, onions, tomatoes, and sprinkled with calamansi (small round lime) juice. Bagoong paste varies in appearance, flavour, and spiciness depending on the type. Pink and salty bagoong is marketed as “fresh”, and is essentially the shrimp-salt mixture left to marinate for a few days. I sautéed a whole jar of shrimp paste and only used about a generous tablespoon of it on the side for this dish. The rest I put back into the jar and into the freezer until for later use. There are many other dishes that you can make with the sautéed shrimp paste and it may pop up in my blog a few more times!

I cooked up this dish for our supposed International (Asian) Feast Night that we had been planning for a while. I say “supposed” because instead of having food from 5 different Asian Cuisines, we ended up only having 3 and it turned out to also be Lydia’s farewell dinner. Basically Lydia cooked a dish from China, Vidhya from India, and me from the Philippines. Jialing (who did not show up by the way because she had a staff dinner) was supposed to make a dish from Malaysia, and Marissa, who already went on holiday, was supposed to make a Vietnamese dish. I was seriously so tired that night, I mean first of all, I had just come back from my Outback trip and only felt the tiredness after returning back. Secondly, I worked from 9am-5pm that day, and when I got home, I straightaway went into the kitchen to cook. I was SO tired that I actually seriously fell asleep at the table after dinner, during dessert. Talk about an induced food coma!

So for this night, which by the way happened about 3 days after I got back from the Red Centre, I decided to make my famous Oxtail Kare-kare. I also made a chicken version for Vidhya because the only meat she eats is chicken (and fish). I’ve never actually tried the dish with chicken before; it turned out okay but in my honest opinion, it wasn’t as flavourful as the Oxtail. I have made this dish in the past as well where I used pork hock/leg, pork shoulder, beef shank or gravy beef, and my mom made it a few times with beef tripe – all these cuts of meat work perfectly well with the dish. Some butchers sell oxtail either whole or cut. If your local butcher happens to seek them whole, just kindly ask them to cut it into rounds for you, that’s what I did. I remember as a little kid that I would always love the bigger cuts because they had more meat in them… Until someone ruined it for me saying that “the bigger the cut, the closer it is to its bum!”

Oxtail Kare-Kare Ingredients

PREP TIME 10 MINS | COOKING TIME 1 HOUR 45 MINS | SERVES 4-6

INGREDIENTS

For the stew

  • 1kg oxtail, cut into rounds
  • 2 cups beef stock
  • 5 dried bay leaves
  • 3 garlic cloves, crushed then minced
  • 1 large onion, halved and then sliced
  • 1 tbsp crunchy peanut butter (a very generous tablespoon)
  • 1 tsp rock salt
  • 1 tsp whole black peppercorns
  • Ground salt and pepper
  • Buk Choy, separated
  • Eggplant, sliced diagonally
  • Long beans, cut into 1-inch long strings
  • Okra (lady fingers), whole and then sliced later once cooked

For the sautéed shrimp paste

  • 345g bagoong alamang (shrimp paste)
  • 3 garlic cloves, crushed then minced
  • 2 large tomatoes, diced
  • 1 large onion, halved and then sliced
  • 1 tbsp sugar

METHOD

  1.  Add the oxtail, bay leaves, rock salt and whole peppercorns to a large pot with about a litre of water, or enough to submerge the meat. Boil for about 1 to 1 and a half hours until tender. If you are using a pressure cooker (which I don’t have), 30-35 minutes should do the trick! Once the meat is tender, remove from the heat and set aside. Do not throw away the stock.
  2. While your meat is tenderising, move onto sautéing the shrimp paste. Heat oil in a medium-sized frying pan and sauté garlic and onions until fragrant. Add the tomatoes in and sauté until they have softened. Add the shrimp paste in and give it a good mix. Add in the sugar and let it simmer for about 5 minutes. Turn the heat off and set aside. You may need to heat it up again before serving.
  3. Heat oil over medium-high heat in another pot and sauté the garlic and onions until fragrant. Add the the oxtails, season with ground salt and pepper, and give it a good stir. Add the peanut butter to two cups of the stock and stir until the peanut butter has softened. Add the peanut butter mix to the oxtail and bring the heat to low. Let it simmer for about 8-10 minutes. If you want your stew to be less creamy and thick, add more stock to your liking.
  4. Meanwhile, bring a medium pot of salted water to a boil and cook your vegetables for no longer than 5 minutes. Drain and transfer the cooked vegetables to your oxtail stew just before serving. Serve hot with sautéed shrimp paste and enjoy!

Oxtail Kare-Kare

BON APPÉTIT

– Ally xx

myTaste.com

Breakfast Muffins: Citrus Poppyseed

Breakfast Muffins: Citrus Poppyseed

Hello Everyone! So I think I mentioned that last week was supposed to be Muffin Making Monday, but because I was still travelling the outback, scaling one of the best climbs from that trip, and ever, at Kings Canyon. I do apologise if I happen to bring this up in every single post for the next couple of weeks – I just can’t get over such an amazing trip!

Anyway, so technically Jialing and I had our Muffin Making Monday… on a Sunday. Jialing got called into work just for this Monday, but we still didn’t want to miss out on muffins as to quote Jialing “I didn’t have breakfast for the past two weeks” *insert sad face emoji*. So we then decided to bake on Sunday instead! Jialing again whipped up her Raspberry & White Chocolate with Lemon Streusel Muffins (she actually wanted to do a mixed berry one this time, but gutted that Coles ran out of them when we went to do our groceries together). And as the heading of this post states, I made Citrus Poppyseed Muffins, which Jialing actually made before and tasted so good that I wanted to make them for myself this time around. Please check out the original recipe over on Sally’s Baking Addiction. The original recipe calls for 3 tablespoons of poppyseeds, but because I used what Jialing had leftover from last time. I think I only had about a tablespoon for these so they aren’t quite as evident in the photographs.

Poppyseed fun fact: It takes 2,000,000 of these tiny black polka dots to equal one kilo.

Breakfast Muffins: Citrus Poppyseed Ingredients

PREP TIME 10 MINS | COOKING TIME 15-18 MINS | MAKES 12 MUFFINS

INGREDIENTS

  • 2 & 1/3 cups plain flour
  • 1/2 cup Greek or regular yoghurt
  • 1/2 cup white sugar
  • 1/4 cup brown sugar
  • 115g salted butter, melted
  • 2 large free range eggs
  • Juice and zest of 2 medium-sized lemons
  • Juice and zest of 1 large orange
  • 3 tbsp poppyseeds
  • 2 tsp baking powder
  • 1 tsp vanilla extract
  • 1/2 tsp salt
  • 1/4 tsp baking soda
  • Coarse sugar, for sprinkling

METHOD

  1. Preheat oven to 220C. Line a 12 hole muffin pan with paper cases.
  2. Whisk the flour, white sugar, brown sugar, poppyseeds, baking powder, baking soda, and salt together in a large bowl until well combined. Set aside.
  3. In a medium bowl, whisk the melted butter, lemon juice, lemon zest, orange juice, and orange zest together thoroughly mixed. Then, whisk in the eggs one at a time, and then whisk in the yoghurt and vanilla.
  4.  Pour the wet ingredients into the dry and gently mix together until no pockets of flour remain. Be careful as to not over mix the batter. The consistency of the batter should be quite thick.
  5. Spoon the thick batter into the muffin cups, filling them all the way to the top and sprinkle each with additional lemon and orange zest as well as coarse sugar.
  6. Bake in the oven for 5 minutes at 220C. Then, reduce oven temperature to 190C and continue to bake for 10-13 minutes longer or until tops are lightly golden. To check if they are done, insert a toothpick in the centre of the muffin. If it’s cooked through, the toothpick should come out clean, if not then bake further at 2-3 minute intervals (as to not accidentally over bake them).
  7. Once done, remove from the over and allow to cool for 10 minutes. Muffins stay fresh in an airtight container at room temperature for up to 5 days.

Breakfast Muffins: Citrus Poppyseed

Breakfast Muffins: Citrus Poppyseed

BON APPÉTIT

– Ally xx

myTaste.com

White Chocolate Cheesecake with Mango & Passionfruit (Constructed)

White Chocolate Cheesecake with Mango & Passionfruit

Hello Everyone! Yes I know, it’s only Sunday, but I thought that I’d write up a Sunday Special post to share with everyone. I’ve been resting this past week after what I thought wasn’t such a tiring trip to the Outback, but I think the after effect just came crashing down on me when I got back to Sydney. My body clock hasn’t quite adjusted to my regular sleeping/waking patterns, which kills me because then I feel tired the whole day! Yesterday was somewhat productive but lazy at the same time. Besides an early wake up to send Lydia off at the airport and a gym session with Jialing, I lazed off the whole afternoon/evening. I practically did nothing besides eat and sleep. Hopefully I’ll snap out of this and feel refreshed after the weekend passes – after all, I did not have a weekend for myself as last week I was walking around the base of Uluru and scaling Kata Tjuta (and of course followed by a climb/hike/trek at Kings Canyon on the Monday after that weekend – much tiredness indeed).

Anyway, about a few weeks ago, Lydia asked me to teach her how to make a cake because she wanted to be able to make one for her mother’s birthday when she leaves to go home. She told me she didn’t have an oven though. “Easy!” I said to her as a no-bake cheesecake came into mind. She was a very good student and I am confident that she will be successful in making this for her mother on her birthday!

White Chocolate Cheesecake with Mango & Passionfruit (Constructed)

White Chocolate Cheesecake with Mango & Passionfruit (Deconstructed)

If you’ve been following my blog for a while, or have searched through my archives, you may have seen a post for no-bake mini blueberry cheesecake. So I decided to teach her how to make that but instead with my favourite summer fruit since it’s summertime! I’ve actually made this cake before, 2 years ago I think, when I used to live up in the Lower North Shore together with my old housemate Vanessa. We made this cake together with my friend Edison and Valerie whom we had over for our Annual Easter Dinner. We had a whole leg of lamb and other eats, included this yummy yummy cheesecake. We made a full sized one though, but since I actually only have mini springforms, we decided to make miniature cheesecakes (also easier to eat in small bits and store in a limited space fridge). Before I get onto the recipe, please do take the time to visit food.com where I got the original recipe from.

Besides making whole mini cheesecakes, I also decided to whip up a deconstructed cheesecake and use the stemless wine glasses that I got for free from Coles a while back. At the time, there was a special where if you bought two blocks/tubs of any of the Philadelphia Cream Cheese range, you get a set of 2 stemless wine glasses for free (worth $14.95).

White Chocolate Cheesecake with Mango & Passionfruit Ingredients

PREP TIME 20 MINS* | COOKING TIME  | MAKES 4 CHEESECAKES

*Add 4-5 hours extra (overnight preferably) for chilling time

INGREDIENTS

  • 1 large mango, sliced
  • 2 passionfruit
  • 2 x 250g packets cream cheese, softened
  • 300ml thickened cream, whipped
  • 200g white chocolate chips, melted
  • 100g ginger nut biscuits
  • 60g butter, melted
  • 1/2 cup caster sugar
  • 1/4 cup boiling water
  • 3 tsp gelatin powder

METHOD

  1. Prepare the springform pans by lining the bases with baking paper and greasing the edges with butter. In a food processor, process the ginger nut biscuits until mixture resembles fine breadcrumbs. If you don’t have a food processor handy, add the biscuits into a ziplock bag and use either a metal or wooden spoon to smash the hell out of it! Tip it into a medium sized mixing bowl, add the melted butter a mix until well combined. Press the mixture over the base of the prepared pans. Place in the refrigerator for 20 minutes or until firm.
  2. Next, sprinkle the gelatine powder into a mug and add the boiling water to it. Whisk with a fork until the gelatine powder fully dissolves. Set aside to cool for 15 minutes.
  3. Meanwhile, whip the thickened cream in a small mixing bowl using the electric mixer – be careful as to not over whip the cream otherwise you will end up with a lumpy cheesecake mixture. Set aside. Beat the cream cheese and sugar in a large mixing bowl using the electric mixer until smooth and creamy.
  4. Fold the melted white chocolate and whipped cream into the cheesecake mixture, then, gradually beat in gelatine mixture until combined. Pour the cheesecake mixture into the prepared pans and wrap each with cling film. Place in the fridge for at least 4-5 hours to set (preferably overnight). Top the cheesecakes with the sliced mangoes and passionfruit before serving.

White Chocolate Cheesecake with Mango & Passionfruit (Constructed)

For the deconstructed cheesecake, basically just layer the biscuit base and cheesecake mixture and top with your favourite summer fruits!

White Chocolate Cheesecake with Mango & Passionfruit (Deconstructed)

BON APPÉTIT

– Ally xx

myTaste.com

Vegemite & Tasty Cheese Damper Scrolls

Vegemite & Tasty Cheese Damper Scrolls

Hello Everyone! Sorry for not uploading a post on Tuesday; I did say that I would be in the Outback over the weekend! It was such an amazing trip, one I will never ever forget! The highlight for me was probably climbing Kings Canyon which was altogether probably a 3-4 hour climb/hike/walk with breaks in between. I am quite surprised that I am not aching everywhere after much climbing over the 3 days, but I do feel exhausted. The 4am wake ups were at first unbearable, but rewarded with the sight of the Milkyway covering the early morning sky. It was mesmerising. I even saw shooting stars for the very first time… While sitting on the toilet that faced out into the bush, no doors whatsoever, just sheets of tin that made three walls and a roof. Definitely an experience that no one else can say they’ve had while seeing shooting stars (unless of course my other fellow campers saw what I saw that morning as well)! I have many more stories to tell, but I will probably keep it for some other time and actually for those that do want to know more about my trip to the Red Centre.

Today’s recipe is something quite different, nothing I’ve made before and probably not something I would even attempt; because of a certain ingredient. It actually one of the things I had while camping, and that I actually helped make on our second night in the Outback. Our tour guide Dan from Wayoutback Australia (look them up if you are planning on an outback trip), briefly taught me how to make Vegemite(!) & Tasty Cheese Damper Scrolls. Ah yes, the infamous vegemite that you all either love or hate; I am probably on the latter. For those of you who don’t know, vegemite is like the Australian version of marmite, a popular spread for sandwiches, toast, crumpets, crackers, and as well as a filling for various pastries. It is salty, slightly bitter, and apparently is similar to beef bouillon.

I was honestly a bit reluctant on trying one of these, but for some reason the vegemite taste didn’t quite come through, and maybe it’s because of the lack of vegemite spread or the tasty cheese? Whichever it was, I actually quite enjoyed these damper scrolls – they were a bit rock hard though and I’m not sure why. I didn’t cook them, our tour guide Dan did over the campfire, so I’m not sure if it was the making or cooking process that made it hard. I did a bit of research and looked up a recipe for damper and it says to use butter – could it be the fact that we didn’t use butter in our damper? Dan if you see this (long shot), maybe give this recipe a go!

Damper, for those of you who don’t know is traditionally a simple Australian unleavened bread baked in an iron pot and buried in the hot coals of a campfire. During colonial times it was a staple food in the bush because the dry ingredients could be easily carried and they only needed to add water to make the damper. If you want to know more about damper, and for the original recipe, check it out at All Down Under.

Ps: I apologise for the poor quality of the photographs, they were taken using my phone as I had left my DSLR in the tent that night. I know, I could’ve gone and get it, but my hands were already dirty from making the damper.

PREP TIME 10 MINS | COOKING TIME 30 MINS | MAKES 12 SCROLLS

INGREDIENTS

  • 3 cups self-raising flour
  • 3/4 cups water or milk
  • 80g unsalted butter, chilled and cut into cubes
  • 1 tsp sugar
  • 1/4 tsp salt
  • 1 cup grated tasty cheese
  • 1/2 cup vegemite

METHOD

  1. Mix the flour, salt and sugar together into a bowl. Then rub the butter into the flour with your fingertips until it resembles fine breadcrumbs. Slowly add in the water (or milk) and mix together to form a soft dough. If your mixture is a bit too dry, add a little more liquid.
  2. Turn the dough over onto a lightly floured surface and knead lightly until smooth then roll out the dough into a thin rectangular shape. Spread the vegemite all over the dough and top with the tasty cheese.
  3. Roll up the pastry tightly and cut into equal portions (I cut mine up into 16 scrolls, just enough for one each for every camper), and place them cut-side up into a greased iron pot. Make sure to leave some space between the scrolls to allow room for spreading. Place in your campfire, cover with hot ashes and coals and bake for about 30 minutes or until damper is golden and the cheese has melted. Serve.

If you don’t have a campfire handy right now, you may also bake your scrolls in the oven. Just place them on a tray lined with baking paper and bake in the oven for about 30-40 minutes at 190C. I will probably give this recipe another go (not sure about the vegemite part) but just to see what if we had more vegemite and if the damper was a bit lighter and softer.

Vegemite & Tasty Cheese Damper Scrolls

BON APPÉTIT

– Ally xx

myTaste.com

Double Chocolate Sea Salt Caramel Cookies

Double Chocolate Sea Salt Caramel Cookies

Hello Everyone! Before I dive into today’s recipe, I just want to let you know that I may not be posting up a recipe next week Tuesday as I will be away from Saturday to Tuesday evening (I say ‘may’ only because depending if I can write up a post in advanced or even write one the night I get back, but may be to tired for that). This also means that Jialing and I won’t be having our fortnightly Muffin Making Monday because well, Monday I will be on a road trip back to base camp. I will be heading to the Red Centre of Australia exploring the rugged outback beauty and taking in all the richness in Aboriginal culture. For a person who loves adventure but hates camping, it’s going to be an experience, and I don’t know whether I am looking forward to or will regret looking forward to a weekend of 38-42 degree celsius weather over at Alice Springs/Uluru…

Double Chocolate Sea Salt Caramel Cookies

Anyway, you’ll probably hear more of that on next week’s post I presume, so let’s get back to the point of tonight’s post. So as you know from my previous post, Jialing’s actual birthday was on Tuesday. On Monday she came over and baked herself some birthday cupcakes, gluten free chocolate cupcakes I believe. Anyway, as usual, I didn’t want to just sit around and watch her bake, so I decided to bake too! Just something simple to kill time and something that I could easily take to work because I wasn’t keen on having them all to myself – and so I decided on baking some cookies. I wasn’t sure of what I wanted to make at first, until I stumbled upon Martha Stewart’s recipe for Double Chocolate Chunk Cookies. It was so convenient because I practically had every ingredient in my pantry, except of course the chocolate and I was a little short on cocoa powder as well. When I got to the chocolate/lollies section at Coles, I was unsure of what chocolate to get for the cookies. The original recipe uses milk chocolate, but I personally don’t really like milk chocolate – I like them dark… Just like my men (just kidding)! If you know me, I never fail to finish a sentence, be it my own or a friend’s, like that! Just as how I finish a sentence breaking out into a song if the first part resembles lyrics to a song I know. Anyway, got side tracked there, as I was browsing through the dark chocolates, I came across Lindt’s Sea Salt Caramel Dark Chocolate. I knew instantly that these bad babies are going into my cookies. And I’m glad I got them! They did not overpower the double chocolate flavour of the cookies, but instead they gave just a subtle hit of saltiness and oozy gooey caramel. Soft and moist on the inside, crunchy on the outside. I am actually salivating now just typing that!

Double Chocolate Sea Salt Caramel Cookies Ingredients

PREP TIME 10 MINS | COOKING TIME 15 MINS | MAKES 15 COOKIES

INGREDIENTS

  • 2 large free range eggs
  • 1 cup plain flour
  • 1 cup sugar
  • 1/2 cup cocoa powder
  • 200g Lindt Sea Salt Caramel dark chocolate (or any other kind of chocolate), 100g coarsely chopped, 100g cut into chunks
  • 100g unsalted butter
  • 1 tsp vanilla extract
  • 1/2 tsp baking soda
  • 1/4 tsp salt (optional)*

*The original recipe adds 1/2 tsp of salt, but because I am using a chocolate that already has sea salt in it, I lessened the amount of salt a little bit – or I guess depending you can ignore the salt completely. My cookies did not turn out to be very salty in the end anyway.

METHOD

  1. Preheat oven to 160C.
  2. Add the flour, cocoa powder, baking soda, and salt into a medium bowl and whisk together until combined. Set aside.
  3. Melt coarsely chopped chocolate together with the butter in a small heatproof bowl set over a pan of simmering water, or in the microwave for about 30-45 seconds. Stir to combine the mixture.
  4. In a large bowl, add the sugar, eggs, vanilla, and the chocolate mixture. Using a handheld electric mixer, mix on medium speed until well combined combined. Then reduce the speed to low and gradually mix in the flour mixture. Once combined, fold in chocolate chunks using a spatula.
  5. Scoop the batter onto a baking tray lined with baking paper (as Martha’s recipe goes, I used an ice cream scooper to measure out my cookie batter). Leave about a 2-cm gap between the cookies as they will flatten out while baking in the oven.
  6. Bake until cookies are flat and the surfaces begin to crack (about 15 minutes). Once done, remove from the oven, lift the baking paper from the tray and transfer the cookies to a wire rack. When you remove the cookies from the oven, you will notice that they are a bit soft – this is normal as they will start to firm up when they cool down. So be careful to not assume they are underdone and risk over-baking them.
  7. Let them cool for about 5-10 minutes. Cookies can then be stored in an airtight container at room temperature for up to 3 days.

Double Chocolate Sea Salt Caramel Cookies

Double Chocolate Sea Salt Caramel Cookies

I mean, just look at that caramel goodness trying to peak through the cracks! As I mentioned above, I brought these bad boys into work the next day and they were a crowd pleaser! My boss Max (who by the way, just got back from Bali that day and said he’d have half because he’s on a “diet”), had a whole cookie to himself and was practically having foodgasms. I don’t blame him, they were THAT good. Everyone in the office loved it, but not enough for a second helping, or maybe because they were just so sinful, they couldn’t bring themselves to have another – except for my community manager James. He was quick to ask for another cookie before he stepped into a meeting, and before I left for the day.

If you want to attempt making these cookies – I HIGHLY recommend the sea salt caramel by Lindt! Even if it’s just eating them on their own. Too good!

BON APPÉTIT

– Ally xx

myTaste.com