Num Ansom Chek (Rolled Banana Rice Cake)

Num Ansom Chek (Rolled Banana Rice Cake)

Hello Everyone! February flew by in just the blink of an eye, and before we know it, in a couple of days it’ll be March already! This also means that this will be the last Cambodian recipe that I will be sharing on my blog, for now. There are still so many wonderful recipes that the country has to offer, and maybe one day I’ll revisit the cuisine and discover more dishes that’ll take a liking to my tastebuds.

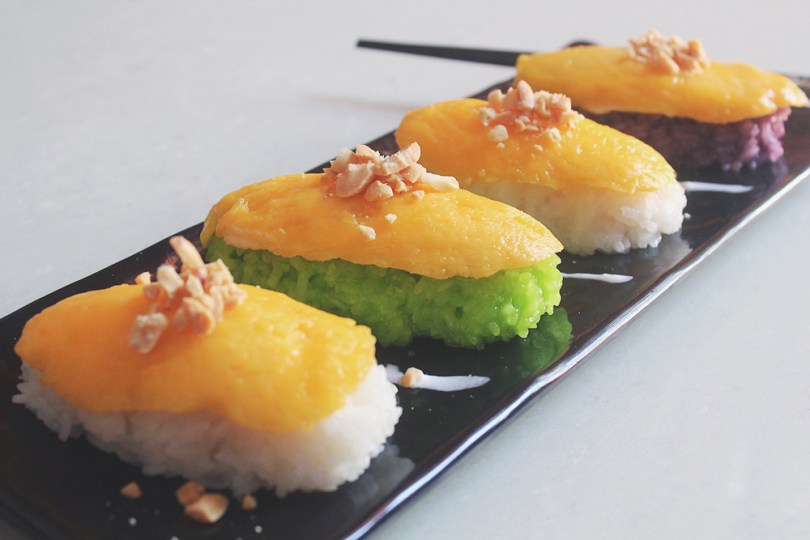
For our last Cambodian cuisine, I’ll be sharing a popular street snack that is sold across the country, known as Num Ansom Chek, or in English, Rolled Banana Rice Cake. It is a traditional Cambodian snack that is low fat, healthy, and easy to make as it only requires a few ingredients to put together. In many Cambodian snacks, banana is used because of its abundance in the tropical region, and its ritual value. Of course, it is also delicious and sweet!

Num Ansom Chek (Rolled Banana Rice Cake)

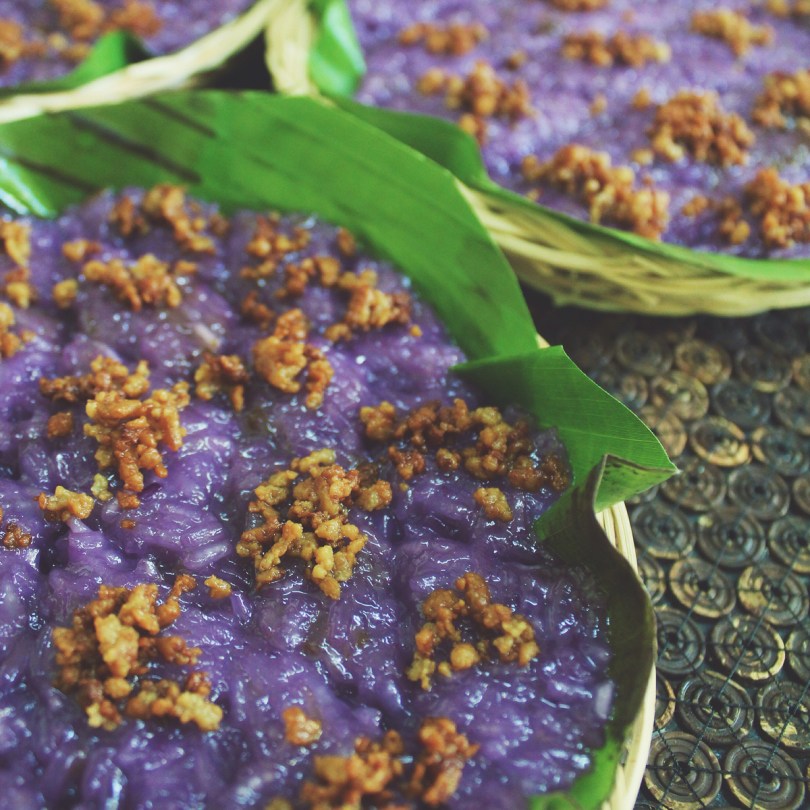
Other than bananas, this snack also includes sticky rice and grated coconut. Sometimes, jackfruit is also added, but since I’m not a huge fan of jackfruit, I’ve replaced them with strips of mango instead. You may also add red mung beans or black beans and it can also be sweetened with palm sugar if desired. All of this is then carefully rolled and enclosed in a banana leaf. The resulting cylindrical-shaped snack is then steamed until tender and fragrant.

In Cambodia, this sweet delicacy is traditionally prepared for important celebrations such as Cambodian New Year and the religious festival Pchum Ben (Festival of Souls). With a culture that is heavily influenced by Hinduism and Buddhism, during a festival, it is common practice to offer food to the monks at the temple, and the ghosts of our ancestors, relatives, and friends. One of the foods that they offer is Num Ansom Chek because of their ability to be kept for days without being spoiled. This is due to them being wrapped and steamed in banana leaves.

Before we dive into tonight’s recipe, please take the time to check out the original where I drew my inspiration from over on Vanier Culinary by Thun-Carl Sieu.

Num Ansom Chek (Rolled Banana Rice Cake) Ingredients

PREP TIME 30 MINS* | COOKING TIME 1 HOUR | MAKES 6 ROLLS

*Allow for 6 hours to overnight to soak the glutinous rice.

INGREDIENTS

  • 3 ripe bananas
  • 1 ripe mango (optional)
  • 1 & 1/2 cups sweet glutinous rice, soaked for at least 6 hours or overnight
  • 3/4 cup freshly grated coconut
  • Salt, to taste
  • Banana leaves, 6 of about 15cm x 20cm pieces

METHOD

  1. Drain the water from the soaked rice and mix the grated coconut in with the rice.
  2. Peel and cut the bananas in half and sprinkle a touch of salt over them.
  3. Take a piece of banana leaf and place a small portion of the rice and coconut mixture in a horizontal line along the longer side of the banana leaf. Place a banana half in the centre of the rice and strips of ripe mango if you wish. Top the fruits with more rice, there should be enough to fully surround them.

Num Ansom Chek (Rolled Banana Rice Cake)

  1. Roll the banana leaf tightly around the rice to form a log and fold both edges in to seal. Make sure that the leaf is not loose so that the mixture can use it as a mold. Use string to secure the banana leaf wrapping if needed. Repeat until all of the bananas have been wrapped.
  2. Stack the rolls in a steamer and steam over boiling water for about 60 minutes.
  3. Once done, allow to cool slightly before unwrapping and serving. Enjoy!

Num Ansom Chek (Rolled Banana Rice Cake)

Num Ansom Chek (Rolled Banana Rice Cake)

BON APPÉTIT

– Ally xx

myTaste.com

Num Treap (Sticky Rice with Sesame Seeds)

Num Treap (Sticky Rice with Sesame Seeds)

Hello Everyone! Forget about brownie sundaes, forget about éclairs and chocolate cake; the real desserts, the sinfully sweet and decadent treats, can be found in one region: Southeast Asia. Ingredients in Southeast Asian treats are less traditional than the sweet flavours you typically see in Western desserts. Ingredients like cassava, mung beans, and lotus seeds paired with sticky sweet syrups like coconut cream, palm syrup, and condensed milk are common and no strangers to Cambodian treats. Beyond these ingredients you can also always expect to have at least one fresh fruit added to the mix. Look for favourites like mangoes, rambutan, durian and of course, bananas.

Just as Southeast Asian desserts, Cambodian treats are most frequently enjoyed mid-morning. Instead of being served to cap off a delicious meal, the treats are bought and enjoyed in markets as you are doing your shopping around town. Many of the most popular Khmer treats are sold from mobile street stands. Look out for the crowds of students outside universities and schools, flocked around a stand.

Traditional Cambodian treats, also known as Khmer sweets, also come in the form of custards and puddings; egg-based dishes that are spiced up with a variety of flavours (vanilla and cinnamon are typical favourites). Since rice remains a main staple in current day cuisine, being eaten as often as three times a day, rice-based cakes are also very popular.

Num Treap (Sticky Rice with Sesame Seeds)

Tonight, I will be sharing a Cambodian favoured treat that is simple and super easy to make at home. The best part? You’ll most likely have everything readily available to whip this up in your pantry. Num Treap, or in English, Sticky Rice with Sesame Seeds, is a treat that is basically as the name states, steamed sticky rice mixed in a warm coconut sauce. The mixture is then spread into a baking dish or pan, topped with sesame seeds, and then set aside to cool before cutting into squares and then served. You may serve it as it is, or with fruits on the side. Num in Cambodian means pastry, so it is essentially a sticky rice (bai damnaeb) pastry treat.

This dessert is very much similar to a sweet rice cake that we have here in the Philippines known as Biko. It is also made of coconut milk, brown sugar, and glutinous rice, that is topped with latik (coconut curds) instead of sesame seeds.

Num Treap (Sticky Rice with Sesame Seeds) Ingredients

PREP TIME 60 MINS* | COOKING TIME 45-60 MINS | MAKES 9 SLICES

*Allow for an additional 6 hours (or more) to soak the glutinous rice before cooking.

INGREDIENTS

  • 1 cup sweet glutinous rice, soaked for at least 6 hours or overnight
  • 2/3 cup coconut milk
  • 1/2 cup coconut sugar
  • 3 tbsp sesame seeds, toasted
  • 2 tsp vanilla extract
  • 1/2 tsp salt

METHOD

  1. Rice: Drain the water (no need to shake off the excess water), and evenly arrange the soaked sticky rice in a steamer lined with a greased banana leaf.
  2. Cover and steam for 30-45 minutes. You can check the rice and increase the steaming time if need be. Once done, keep the rice in the steamer or covered to prevent it from drying out until you need to use it.
  3. Coconut Sauce: While the rice is cooking, add the coconut milk, coconut sugar, salt, and vanilla extract in a large saucepan and cook over medium-high heat. Stir frequently until it thickens, about 5 minutes.
  4. Num Treap: Fluff the cooked rice with a fork to separate the grains. With the heat off, add the rice to the saucepan with the coconut sauce and mix well.
  5. Spread the rice mixture into a shallow dish or baking pan, pressing them down with a spatula. Sprinkle sesame seeds on top and cover with plastic wrap. Leave to set and cool for about an hour.
  6. Cut into squares, then serve and enjoy!

Num Treap (Sticky Rice with Sesame Seeds)

Num Treap (Sticky Rice with Sesame Seeds)

BON APPÉTIT

– Ally xx

myTaste.com

Ube Champorado

Ube Champorado

Hello Everyone! Everything is about ube these days; ube ice cream, cakes, and desserts and all that. ‘New’ recipes are being developed all the time – new meaning adding an ube twist to already classic favourites. The latest ube trend/craze to come out of this quarantine is of course none other than the overrated Ube Cheese Pandesal.

Ube Champorado

Like this Ube Champorado, it is as good as our favourite original chocolate version. Almost two years ago (just shy of a few days actually), I made the classic version of this champorado using tablea chocolate. In that post, I talked about pairing a sweet rice pudding with dried, salted fish. I remember getting messages from friends when I posted a photo of the dish on IG; all with the same “wow, that’s interesting!” reaction. There are a lot of desserts out there that embrace the salty-sweet combination; salted caramel and salted chocolate being the top two favourite bases to endless dessert options!

This Ube Champorado with dried salted fish is no exception. It adds pops of salty surprises to each spoonful of the sweet ube rice porridge that you take. If the combination is off putting for you, then you could get away with adding a pinch of rock salt into your champorado – but it won’t be the same. For all the ube lovers out there, this is an ideal breakfast, snack, or dessert for any occasion!

Ube Champorado Ingredients

PREP TIME 5 MINS | COOKING TIME 25 MINS | SERVES 6

INGREDIENTS

  • 4 cups filtered water
  • 1 cup (250g) white glutinous rice, rinsed
  • 1 cup ube jam/halaya
  • 1/2 cup coconut milk
  • 1 tsp ube extract
  • Pinch of salt

METHOD

  1. Add the rinsed glutinous rice together with the water in a medium-sized stockpot over medium heat. Bring to a boil and then lower the heat down to a simmer. Cook until the rice is almost tender, about 15 minutes. Stir regularly to avoid scorching and sticking. Add more water if necessary to achieve your desired consistency.
  2. Stir in the ube jam/halaya, ube extract, coconut milk, and season with a pinch of salt. Taste and adjust if needed. Cook, still continuously stirring, until tender and the ube is mixed in well with the rice, a further 10 minutes or so.
  3. Once done, ladle the champorado into individual serving bowls and top with a swirl each of the ube condensada and coconut milk. You may also top them with fried boneless dilis if you’re feeling adventurous.
  4. Enjoy immediately while steaming hot on a chilly and crisp morning!

Ube Champorado

You may use fresh/raw ube for this recipe, however, so using store-bought ube jam/halaya, ube extract, or ube powder is just as good; quick and hassle free as how champorado should be. Having to work with fresh Ube will totally ruin that aspect of a no-fuss champorado for me.

Ube Champorado

BON APPÉTIT

– Ally xx

myTaste.com

Pulut Tai Tai (Blue Glutinous Rice Cakes)

Pulut Tai Tai (Blue Glutinous Rice Cakes)

Hello Everyone! Pulut Tai Tai is a Nyonya kuih made of fluffy glutinous rice that is steamed in coconut milk, and tinted with a beautiful natural blue colour from butterfly pea flowers. You can leave it out if you can’t find butterfly pea flowers, as it’s mostly for the colour, but it wouldn’t be as elegant-looking without it.

It is typically served with a coconut-pandan spread where the contrasting colours of green together with the vibrant blue and white of the glutinous rice makes the kuih all the more delightful and pleasing to the eyes of the beholder. In addition to colour, the slight tinge of saltiness of the glutinous rice coupled with the sweetness of the kaya makes this kuih a delight to savour.

Pulut Tai Tai (Blue Glutinous Rice Cakes)

Tai Tai refers to a rich man’s wife who enjoys a life of leisure. It is said that this specific kuih was only served to the wives of rich men back then. This kuih is also known as Pulut Tekan which literally translates to ‘pressed glutinous rice.’

Before we dive into tonight’s recipe, please take the time to check out the original recipe for these Blue Glutinous Rice Cakes over on Bake with Paws by Yeanley.

Before I tackled this recipe, I read that soaking the glutinous rice with the addition of vinegar or lemon juice will reduce the phytic acid found in the grain. It also helps in breaking down the gluten and aids for better absorption of the blue colour from the butterfly pea flowers. Now, while I included lemon in the ingredients shot below, I in fact did not use the lemon at all for one main reason – the addition of acidity to the butterfly pea flower infused water would make it turn violet in colour. Since I am all about sharing blue recipes for this month, that’s definitely not what I want. I found that the glutinous rice absorbed the blue colour well anyway without the need for vinegar or lemon juice.

Pulut Tai Tai (Blue Glutinous Rice Cakes) Ingredients

PREP TIME 20 MINS* | COOKING TIME 30-45 MINS | SERVES 4-6

* Additional 4 hours min. overnight max. for soaking time

INGREDIENTS

  • 2 cups white glutinous rice
  • 1 cup coconut milk
  • 2/3 cups water
  • 3/4 tsp salt
  • 25 pcs dried butterfly pea flowers
  • Banana leaves
  • Pandan (screwpine) leaves
  • Lemon juice (optional)

METHOD

  1. Bring a small saucepan of water and the dried butterfly pea flowers to a boil, over high heat. Let it simmer for a few minutes and then remove from the heat. Cover and leave to steep for 10 minutes before straining. Press down on the flowers to extract the blue colour from the flowers. Set aside to cool.
  2. Wash the glutinous rice until the water is clear. Soak 1/3 of the glutinous rice with the blue-infused water and the remaining 2/3 in water. Soak for at least 4 hours or overnight. After 4 hours or the next day, drain them both separately.
  3. Prepare your steamer by lining with clean banana leaves. Light grease with a touch of coconut oil and top with pandan leaves followed by the glutinous rice; blue rice on one side and white on the other.
  4. Mix the coconut milk and salt together. Pour half of the coconut milk mixture over the rice and mix well. Steam over high heat for 20 minutes. After 20 minutes, remove from the steam and fluff the rice. Add the remaining coconut milk mixture and then return it to the steamer to cook for a further 10 to 15 minutes.
  5. Line a square pan with banana leaves and lightly grease with coconut oil. Transfer the cooked rice to the pan, alternating between the white and the blue rice. Level the surface and cover with more banana leaves. Place another pan on top of it and weigh it down with heavy objects to compress the rice. Set aside to cool.
  6. Cut into small rectangular pieces and serve with some homemade Nyonya-style kaya. Enjoy it as a mid-afternoon snack!

This kuih can be kept for a couple of days if stored in the refrigerator. Before consuming it again, steam or heat it in a preheated oven at 70C for 10 minutes to soften it.

Pulut Tai Tai (Blue Glutinous Rice Cakes)

PS: Before I end tonight’s post, let’s see if a particular someone actually reads my blog from start to finish *cheeky grin* I would like to take this opportunity to wish a special person in my life, a Happy Birthday! I hope you like the little gift I had sent to you earlier this afternoon. I wish you an abundance of happiness, good health, peace, and prosperity in life. To many more birthdays and hopefully I can spend them all with you by your side!

BON APPÉTIT

– Ally xx

myTaste.com

Seri Muka Kuih

Seri Muka Kuih

Hello Everyone! Our last recipe for the month of June is an amazing Malaysian and Nyonya kuih made of glutinous rice, coconut milk, sugar, and pandan leaves. Kuihs (or kuehs) are common snacks of the Hokkien, Teochew and Peranakan cuisine.The terminology is actually a general description for bite-size pastries/nibbles. These traditional delights come in many different forms and are either sweet or savoury snacks/desserts.

Seri Muka literally translates to beautiful face in Malay. It is a two-layered cake that consists of a glutinous rice layer steamed with coconut milk and topped off with a sweet and silky smooth pandan custard layer (hence the green colour). It’s heady with the flavour of coconut milk, a key ingredient used to impart a creamy taste when cooking the glutinous rice and making the custard layer.

Seri Muka Kuih

My fondest memory of Seri Muka would have to be during the festive season of the Islamic New Year. These pretty faces, alongside other kuihs of course, were served at almost every Malay household I would visit during that time of the year. The soft, sticky rice underneath with just a hint of saltiness pairs so deliciously with the decadently sweet pandan custard on top.

Before we dive into tonight’s recipe, please take the time to check out the original where I drew my inspiration from over on Rasa Malaysia by Bee. Seri Muka can also be found in the Indonesian province of South Kalimantan, and is also known as Kuih Putri Salat in Singapore.

Seri Muka Kuih Ingredients

PREP TIME 35 MINS | COOKING TIME 50 MINS | MAKES 14-16 SLICES

INGREDIENTS

For the bottom layer

  • 1 & 1/3 cups glutinous rice, soaked in water for 30 minutes
  • 1 cup thin coconut milk (1/2 cup coconut milk plus 1/2 cup water)
  • 2 pandan leaves
  • 1 tsp salt

For the top layer

  • 1 cup thick coconut milk (or coconut cream)
  • 1/2 cup pandan juice*
  • 1/2 cup white granulated sugar
  • 2 large free-range eggs
  • 2 large free range egg yolks
  • 5 tbsp all purpose flour
  • 2 tbsp cornstarch

*For the pandan juice

  • 8-10 pandan leaves
  • 1/2 cup water

METHOD

  1. Bottom Layer: In a large mixing bowl, combine all the ingredients needed, except for the pandan leaves, to make the bottom layer. Evenly spread onto a lightly greased 8in x 11in rectangular baking dish and add the in pandan leaves, making sure that they are submerged in the rice mixture. Steam over high heat for 20 minutes. Meanwhile, prepare the pandan juice for the top layer.
  2. Pandan Juice: Place the pandan leaves together with the water in a food processor or heavy-duty blender, and blitz/blend for a few minutes until the pandan leaves have been finely puréed.
  3. Pour the blended pandan-infused water over a fine sieve and into a small bowl. Strain the liquid from the pandan leaf pulp, pressing down firmly with the back of a spoon to extract all of the juice from the pulp. Discard the pandan leaf pulp.
  4. Top Layer: Mix all the remaining ingredients for the top layer in a medium-sized heatproof bowl until well combined.
  5. Create a bain-marie (double-boiler) by pouring some water into a pot that is slightly larger than your heat-proof bowl. Very important, check to see if your bowl can sit on top of the pot without any water touching the bottom of the bowl.
  6. Heat your pot of water over low-medium and bring to a slight simmer. Once slightly simmering, place the bowl with the pandan, coconut milk, and egg mixture over it. Cook until the mixture thickens slight, but is still runny enough to pour, about 8-10 minutes.
  7. Seri Muka Kuih: Once the rice layer is done, discard the pandan leaves. Stir and flatten the rice with the back of a spoon, making sure that it is compact. Using a fine sieve, strain the pandan, coconut milk, and egg mixture over the cooked rice. Return to the steamer and steam over medium heat for 30 minutes.
  8. Remove from the steamer once done and leave aside to completely cool down before cutting them into diamond or rectangular-shaped bite-size pieces. Serve with a hot cup of coffee or tea for a lovely mid-afternoon snack. Enjoy!

Seri Muka Kuih

Seri Muka Kuih

BON APPÉTIT

– Ally xx

myTaste.com

Khao Neoo Mamuang (ข้าวเหนียวมะม่วง) Mango Sticky Rice

Khao Neoo Mamuang (ข้าวเหนียวมะม่วง) Mango Sticky Rice

Hello Everyone! Yes, besides sharing mango recipes on the blog for the month, I’ll also be tackling the fruit with a Thai influence. I mentioned in my post last week that Thai food is one of the many favourite cuisines that I enjoy – and let’s be honest here – I’m in the middle of satisfying my insane cravings for it!

Mango Sticky Rice is a traditional Thai dessert where the main ingredients needed are sticky glutinous rice, canned or fresh coconut milk, palm sugar, and mangoes. Although this dessert originated in Thailand, it is highly consumed throughout the Indo-China region of Southeast Asia such as Laos, Cambodia, and Vietnam. Mango Sticky Rice is usually only eaten during the peak mango season, which is during the summer months of April and May. Notable shops in Bangkok famous for their Mango Sticky Rice will only sell this dessert for 4 months per year from February to June.

Khao Neoo Mamuang (ข้าวเหนียวมะม่วง) Mango Sticky Rice

I can’t remember if the first time I had this dish was during a trip to Bangkok way back when, or at a Thai restaurant when I was still in Brunei – but nonetheless, I remember my Aunt (who is Thai) teaching me how to make this dish a couple of years back. At that time I wasn’t interested in cooking or food, so I didn’t realise then how easy it was to put this dish together and that is really only required the pantry essentials to make. Aside from having to get the mangoes from the market when I wanted to make this dish, I already had sugar, peanuts, coconut milk, and sticky rice at home.

To prepare the dish, the glutinous rice is first soaked in water and then cooked by steaming, or cooked in a rice cooker. I cooked mine over a gas stove together with the sugar and kept a very close eye on it. The coconut milk is heated, without boiling, separately with salt and then added to the cooked glutinous rice to flavour it. Mangoes are then peeled and sliced to serve with the rice, and smothered in more salted coconut milk. The result is just heavenly! If you’re a mango lover like me, then you’re definitely going to fall in love with this exotic Thai dessert.

Khao Neoo Mamuang (ข้าวเหนียวมะม่วง) Mango Sticky Rice

Disclaimer: I do apologise to any of my Thai followers, or any who have just stumbled upon my blog, and this post in particular. I’ve seen so many variations of the spelling for Khao Neoo Mamuang and I’m not sure if I’ve picked the right one! *cheeky grin*

Khao Neoo Mamuang (ข้าวเหนียวมะม่วง) Mango Sticky Rice Ingredients

PREP TIME 1 HOUR | COOKING TIME 30 MINS | SERVES 4-6

INGREDIENTS

  • 2 ripe mangoes, peeled and sliced
  • 1 cup sticky glutinous rice
  • 2 cups water
  • 1/2 cup coconut milk (fresh, canned, or frozen)
  • 2 tbsp white granulated sugar
  • 1/2 tsp salt
  • Roasted peanuts, roughly chopped to garnish

METHOD

  1. Sticky Glutinous Rice: Rinse the sticky glutinous rice and then leave to soak for about an hour. Drain was ready to use.
  2. Transfer the rice to a medium-sized non-stick cooking pot together with the 2 cups of water and the sugar. Bring to a slow simmer over low heat, partially covered with a lid (to leave room for steam to escape).
  3. Once simmering, leave to cook for a further 20 minutes or until the water has been absorbed by the rice. Turn the heat off, but leave the rice in the pot with the lid on tight. Allow it to sit for a further 5 to 10 minutes.
  4. Salted Coconut Sauce: While the rice is cooking away, prepare the salted coconut sauce by adding the coconut milk to a small saucepan together with the salt. Bring to a slow simmer over low heat, about 10 minutes. It is important to heat it slowly to avoid curdling the coconut milk. This happens when it is heated too quickly.
  5. Once done, turn the heat off and set aside. If your rice is already done at this point, then add half of the salted coconut sauce to the rice and give it a good mix. Set aside the other half of the sauce for later.

Tips: Experiment with naturally flavouring the sticky rice for another dept of flavour. I used juices from pandan leaves and ube (purple yam) when tackling this recipe. All you have to do is add these flavourings together before cooking the rice.

  1. Shape the sticky rice into logs and place on a serving plate. Top the rice logs with a slice of ripe mango and roasted peanuts.
  2. Drizzle with the remaining salted coconut sauce or use for dipping.
  3. Serve and enjoy while warm!

Khao Neoo Mamuang (ข้าวเหนียวมะม่วง) Mango Sticky Rice

Mango Sticky Rice is usually served differently with one big serving of rice and mango slices on the side. I decided to plate mine up differently after stumbling upon an Instagram post of Mango Sticky Rice “Sushi” hence why they look like nigiri!

BON APPÉTIT

– Ally xx

myTaste.com

Puto Bumbong

Puto Bumbong

Hello Everyone! I’d like to start the last post for the year by wishing everyone a very Merry Christmas! I hope everyone had a splendid eve celebrating, feasting, and continuing tradition with family and loved ones. What are some of your Christmas traditions? I’d love to know in the comments below! We had a simple and quiet Noche Buena at home, and of course watched some Christmas classics such as the Home Alone series. We’re not a family who gives gifts during the season of Christmas because we treat each other throughout the year – be in paying for the entire meal when we eat out as a family, or paying for the tickets and snacks when we go to the cinema together; gifts that allow us to spend time together as a family rather than materialistic things.

That aside, I mentioned in my last post that Christmas or Simbang Gabi would not be complete without this famous breakfast kakanin that is sold alongside Bibingka just outside the church. But, as all the other kakanins out there, you don’t have to wait until the Christmas season to roll around as you can find Puto Bumbong every day of the year at your local market, various street stalls, and in many restaurants and cafés nationwide.

Team Bibingka or Team Puto Bumbong

Puto Bumbong is a type of Filipino steamed rice cake that is traditionally made from a special variety of heirloom sticky (glutinous) rice known as pirurutong which has a distinct purple colour to it. Food colouring is not necessary for this. It is soaked in salted water and then dried overnight. It is then ground in a grinder made of solid stone before it is stuffed into a bamboo tube known as bumbong ng kawayan. It is then steamed until steam rises out of the bamboo tubes, placed onto a pre-cut banana leaf, and topped with margarine (or butter), grated coconut, and muscovado sugar to enhance its flavours.

And so for my last breakfast recipe of the year, I will share two ways in how you can make Puto Bumbong at home, with and without the bamboo tubes – depending if you have bamboo tubes readily available or not to be able to tackle this recipe. Before we dive in, be sure to check out the original recipe that I followed over on Panlasang Pinoy.

Puto Bumbong

PREP TIME 2 DAYS* | COOKING TIME 20 MINS | SERVES 6

*Be sure to allot yourself 2 days before you plan on tackling this recipe, as the rice needs to soak.

INGREDIENTS

For the puto bumbong

  • 6 cups water at room temperature, for soaking the rice
  • 1 & 1/3 cup sticky purple rice
  • 1 & 1/3 cup white glutinous rice
  • 2/3 cup long grain purple rice

For the toppings

  • Freshly grated coconut
  • Muscovado sugar
  • Softened butter or margarine
  • Banana leaves
  • Bamboo tubes

METHOD

  1. Combine all the different types of rice in a large mixing bowl together with the room temperature water. Set aside and leave to soak for at least 2 days.
  2. Drain and place the soaked rice in a large food processor. Pulse and grind until the rice becomes very fine (takes about 8 to 10 minutes to achieve this consistency). If you only have a small food processor handy, then work the rice in batches.

Cooking with Bamboo Tubes

  1. Fill each bumbong (bamboo tube) with the powdered rice mixture, making sure not to compress the rice to allow the steam to pass easily.
  2. Prepare the steamer with enough water for steaming. Once the water has been brought to a boil, arrange each bamboo tube on the steamer. Cook until steam starts coming out of the tubes, about 8 to 10 minutes.
  3. Remove the tubes from the steamer, and carefully remove the puto bumbong from the tube and place over a piece of banana leaf.
  4. Spread with butter or margarine (I chose to leave this out of my serving) and top with freshly grated coconut and muscovado sugar. Serve, share, and enjoy with a hot cuppa!

Cooking without Bamboo Tubes

  1. Add about 2 cups of water to the powered rice mixture and mix together to form a dough. You may need less or more water, depending, so it’s best to add the water in gradually. Knead until smooth.
  2. Pinch off about 2 tablespoons of the dough and, using your hands, make a ball and then roll into a log, about 4 to 5 inches in length. Alternatively you can place the dough into a piping bag and using piping tip #807, pipe the dough onto a heat-proof plate greased with a bit of butter or margarine.
  3. Place the plate into a prepared steamer with a muslin-covered lid to prevent any droplets of water dripping onto the puto bumbong mixture. Steam for about 8 – 10 minutes.
  4. Remove from the steamer and place onto a banana leaf. Top with your preferred toppings and enjoy!

Puto Bumbong

A lot has happened this year, both in my personal and work life, which resulted in me having to put my attention to Amcarmen’s Kitchen on hold for a couple of months collectively. That being said, I’m going to try my best not to take as many breaks as possible for the upcoming year ahead, *fingers crossed*

I usually take the first month of the beginning of the year off to properly plan for the upcoming year ahead and to get a head start on experimenting in the kitchen for recipes to share with you guys. But since I haven’t been working since August of this year (still continuing to look for a job as I write this), I’ve had time to plan ahead and I’m excited to share with you what I have in store for the upcoming year! You’ll just have to wait until next week to find out the theme for the year ahead – which technically is in another week I just realised!

So for now, I would like to wish all my family, friends, and followers a Happy & Prosperous New Year! May the New Year bring you happiness, health, wealth, and peace!

BON APPÉTIT

– Ally xx

myTaste.com

Bikò (Sweet Sticky Rice Cake with Coconut Curd Toppings)

Bikò (Sweet Sticky Rice Cake with Coconut Curd Toppings)

Hello Everyone! Day 05 of 12 is here and I have another dessert to share with all the sweet tooth’s out there. If you are following my Instagram page (@amcarmenskitchen), I posted a picture of the ingredients and made mention that you essentially only need 4 ingredients (actually 3 because you can omit one of the ingredients) to make this yummy and definitely filling dessert! All you really need it glutinous rice, white sugar, coconut milk, and a bit of violet food colouring. You can omit the food colouring and substitute the white sugar for brown to colour your bikò, which is actually how it’s traditionally done. I only picked up the idea of using violet colouring from my Mom’s relative when we visited their whole family in Canada back in the Summer of 2007. Adding the violet colouring doesn’t do anything for the taste (duh), but it definitely makes the dish a whole lot more attractive and inviting.

For those of you who don’t know, bikò, or otherwise known simply as a Filipino Sticky Rice Cake, served during special occasions such as birthday parties, family reunions, town fiestas, and of course, for Noche Buena. It’s not a tedious process, it’s just hard on the arm because of all the mixing that needs to be done.  It is then garnished with latík, which is basically just cooked coconut milk residue, set at the centre of each slice, and is traditionally served over a banana leaf in a bilao, which is basically just a round woven bamboo tray.

Bikò (Sweet Sticky Rice Cake with Coconut Curd Toppings) Ingredients

PREP TIME 10 MINS | COOKING TIME 40 MINS | SERVES 6-8

INGREDIENTS

  • 2 cups glutinous rice, washed and drained
  • 2 cups water
  • 2 packs (200ml each) coconut milk
  • 1 cup white sugar
  • 2 tsp violet food colouring
  • Banana leaves
  • Bilao

METHOD

  1. Add the glutinous rice, water, and violet for colouring in a large pot. Mix and then place over high heat, leaving the rice to cook for about 15 minutes or when the rice is about half-done.
  2. When the rice is half-done, add in one of the packs of coconut milk and mix well. Leave it to cook for another 15 minutes or until the oil starts to separate from the coconut milk. At this point, you want to reduce your heat down to about medium-low to avoid the rice sticking to the bottom of your pot.
  3. Meanwhile add the other pack of coconut milk in a separate pan and cook until the oil separates from the milk and turns golden brown. Drain from the oil and then set aside.
  4. Prepare the banana leaves by lightly heating it over the stovetop burner to make it pliable and easy to handle. Then, place the the banana leaves over the bilao and set aside.
  5. Crank up the heat to about medium-high and add the sugar into the glutinous rice mixture. Mix and allow the sugar to caramelised, about 10 minutes. Once done, turn the heat off.
  6. Assemble by spreading the sweet sticky rice cake mixture onto the prepare bilaos lined with banana leaves. Flatten evenly. Cut the rice cakes into diagonals and top the centres of each diagonal with some latík.
  7. Serve, share, and enjoy warm! This recipes makes for about 4 palm-sized bilaos.

Bikò (Sweet Sticky Rice Cake with Coconut Curd Toppings)

ps: apologies for only posting one picture of this dish (as you know it’s unlikely of me to only post one picture of the final dish), but I made this a while back, 2 years ago to be exact, and this was the only picture that I could find *sad face* at least it is a good picture!

BON APPÉTIT

– Ally xx

myTaste.com

Auguest 2015: Josephine Geronimo

Ginataang Munggo (Roasted Mung Beans & Sticky Rice in Coconut Milk)

Hello Everyone! Alas, we’ve come to the end of my mini collaboration series for this month! My last post for this Auguest that my Mom has kindly shared with us is another mung bean recipe that she grew up eating during her childhood years.

Ginataang Munggo (Roasted Mung Beans & Sticky Rice in Coconut Milk)

If you haven’t read Wednesday’s post, my Mom mentioned there that once a year when her whole family went to visit the province that they were from, they would always bring back one 50kg sack of munggo (mung beans) to the city, where they lived, from their farm. Everyday, Munggo Guisado (Sautéed Mung Bean Soup) was what they had for lunch and dinner, and for merienda, they’d have mung beans as well – there was no escaping the wrath of the mung beans – whether savoury or sweet! After lunch, everyone would take a 2-hour break before they’d be back in the kitchen, preparing and cooking Ginataang Munggo for merienda at 3pm.

Ginataang Munggo (Roasted Mung Beans & Sticky Rice in Coconut Milk) Process

Ginataang Munggo is basically roasted or toasted mung beans cooked in coconut milk together with some glutinous rice. It is a simple Filipino dish that can be eaten for either merienda (light afternoon meal or an afternoon snack) or dessert that is best served warm. toasted Mung beans and sticky rice are cooked in coconut milk. Though this dish has been a part of my Mom’s family tradition way back when she was still in her younger years back in the Philippines, today is the first time my Mom cooked this dish and served it to my sister Angela and I. Now that my Mom has passed on her two favourite mung bean recipes from her childhood, she said to me that it is but right that I pass them on to my children to be and keep tradition going – hopefully my children won’t be as fussy as I was before when I used to hate munggo!

Ginataang Munggo (Roasted Mung Beans & Sticky Rice in Coconut Milk) Ingredients

PREP TIME 15 MINS | COOKING TIME 30 MINS SERVES 6-8

INGREDIENTS

  • 1.5L boiling water water
  • 1 can (400ml) coconut milk
  • 1 cup glutinous rice
  • 1/2 cup mung beans
  • 1/2 cup white sugar

METHOD

  1. First, heat up a medium-sized frying pan over medium-high and add the mung beans. Toast until browned, about 8-10 minutes. Be careful as to not over toast them otherwise they will become bitter. Likewise, you can roast the mung beans in the oven for about 10 minutes at 200C.
  2. Turn the heat off and set the mung beans aside to cool down.
  3. Once the mung beans have cooled down slightly, crack the toasted mung beans using a mortar and pestle, or as my Mom prefers, by using a rolling pin. Set aside.
  4. Add the boiling water and sugar to a large pot over medium-high heat and dissolve the sugar. Once dissolved, add the coconut milk and bring to a boil.
  5. Once boiling, add the glutinous rice and mung beans, then give it a good stir. Turn the heat down to low and cook for 15 to 20 minutes or until the coconut milk is almost absorbed, stirring once a while to make sure that the rice doesn’t stick to the bottom of the pot.
  6. Once done, turn the heat off and let it sit in the post for a further 5-10 minutes. Then,transfer to individual serving plates.
  7. Share and enjoy! You may serve this either hot or cold. I prefer having this hot with a pinch of salt on top to further enhance the flavours.

Ginataang Munggo (Roasted Mung Beans & Sticky Rice in Coconut Milk)

Ginataang Munggo (Roasted Mung Beans & Sticky Rice in Coconut Milk)

And that about wraps up guest blogging month for this year! Many thanks to Jialing, Brendon, Marissa, and my Mom for participating in my very first Auguest series. I’m actually pretty happy with how this all came together in the end. It was hectic at first trying to find the how ever so many bloggers I had in mind for this collaboration series, but then narrowing it down made it much more simpler and much easier to communicate with my friends and fellow bloggers. If you enjoyed this mini collaboration of mine, let me know in the comments section below and I’ll see to organising this into a yearly series 🙂

My Mom and I at Bondi Beach, Australia 2015
my Mom and I at Bondi Beach, July 2015

PS: Back in the day in the 70s, canned coconut milk was not a thing yet and so my Mom had to buy a whole matured coconut and manually grate it. From the grated coconut, she then had to squeeze the milk out of it for this dish. This dish was a lot of hard work for her back in the day, which is why she was so confused as to why this dish took no effort at all for her to make, and then she realised it was because we already had coconut milk readily available.

BON APPÉTIT

– Ally xx

myTaste.com