Salsa Verde

Salsa Verde

Salsa Verde

Hello Everyone! A new month means a new theme on the blog – and I’m sorry to start off on a negative note but I had plans to do a month-full of recipes that emphasise mangoes as the hero of the dish since it’s been in season for a while now here in Brunei. However, if you’re a regular reader on my blog, you’ll know that I have been working for the past 4 Sunday’s (which is basically my only time to enjoy myself in the kitchen), and because of that, I haven’t actually prepared any dishes for the theme that I had planned for my blog. I also haven’t been cooking any other dishes since my last free Sunday back in April, and so I decided that for this month, there will be no theme for the blog. Do not fret though! I will still be posting recipes, but they will be recipes that I have cooked up in the past – some taking us back towards the end of last year – that I didn’t get around to posting or fitting into a theme every month.

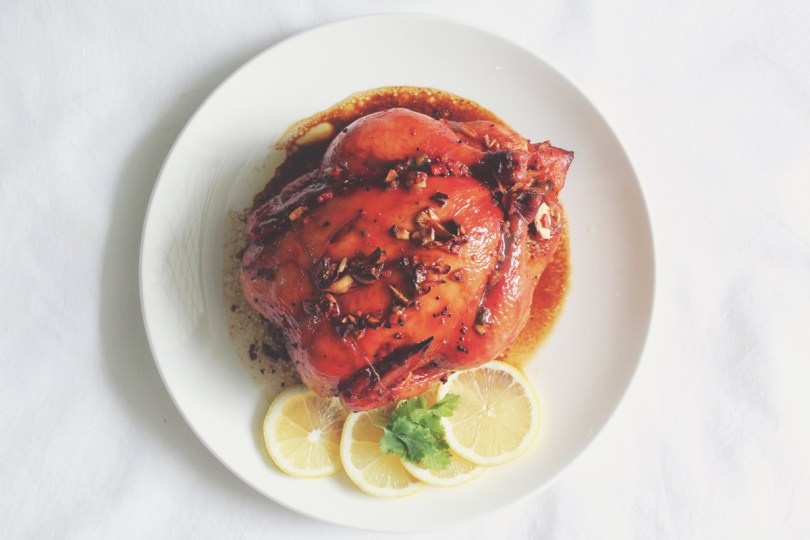
Tonight, I will be sharing with you, a recipe that I came across when I was exploring the Sydney Fish Markets for the nth time. Most of the fresh seafood stores there provide mini recipe cards to encourage the public to purchase their fresh catch. Every time I visited, I would always grab a recipe card, and one of the recipes that I was interested in was for Seared Tuna with Salsa Verde – and that’s what I’ll be sharing with you today, a recipe for an easy, simple, yet yummy Salsa Verde with pan-fried salmon in my case, but it’s completely up to you on what type of fish you’d like to pair it with!

For those of you who don’t know, Salsa Verde literally just means green sauce that contains mainly herbs, common in Italian, French, German, Spanish, and Mexican cuisines, each with their own twists and variants. The recipe that I will be sharing tonight gears more towards Mexican  where it is typically made up of puréed cooked or raw tomatillos, with jalapeños or other chili peppers, white onion, cilantro, and sometimes lime to enhance the taste. Salsa verde can range in spiciness from mild to mouth-searing. It may be served warm or cold, as a condiment – a dip for tortilla chips and served with tacos, or paired with grilled pork, grilled meats, and even fish.

Salsa Verde Ingredients

PREP TIME 10 MINS | COOKING TIME — MINS | SERVES 250ml

INGREDIENTS

  • 1/2 cup grapeseed oil
  • 1 bunch basil leaves
  • 1 bunch flat-leaf parsley leaves
  • 7 anchovy fillets
  • 4 garlic cloves
  • 2 tbsp baby capers in brine, rinsed
  • Juice of 1 lemon

METHOD

  1. Combine all the ingredients in a food processor or blender and process until smooth.
  2. Serve and enjoy as a condiment with your choice of dish (a dip for tortilla chips and served with tacos, or paired with grilled pork, grilled meats, and even fish). This recipe makes enough sauce to fill about a 250ml sized jar and can be kept in the fridge for up to a week.

Salsa Verde

Salsa Verde with Pan-fried Salmon

BON APPÉTIT

– Ally xx

myTaste.com

Roast Barbecued Chicken

Roast Barbecued Chicken

Roast Barbecued Chicken

Hello Everyone! As of today I have been working 24 days straight – 3 Sundays of work, and another to look forward to this weekend. I cannot wait for a public holiday coming up next week, and then two Sundays off before I head back into another 2 Sundays of work towards the end of May. I know, I shouldn’t be complaining since I only work for about 2-3 hours on Sundays, but I guess it’s the fact that I have to get up early and do work in humid and ventilation-challenged areas makes it a depressing start to the ONLY weekend I have. Yeap, this is my life now. Anyway! Sorry to start off all moody and what nots; I have been feeling a little burnt out and just not in the mood these past couple of days – I’m hoping that I can change that with a little bit of rest… Hopefully.

Tonight’s recipe is one that I have been hesitant of sharing on my blog because it’s my Mom’s special barbecue marinade recipe. We finally came around to a decision to share it on the blog, and so I will be sharing her ever so deliciously finger-licking good marinade for a whole roast chicken. We usually fire up the barbecue for this recipe, but recently we have been roasting the meat in the oven for a healthier option to charcoal-barbecued chicken. You can also use this marinade for pork or lamb. I once brought some yummy pork bellies to a barbecue party that my colleague hosted a few months back. It was a great hit amongst my other colleagues and so I believe that they’ll be overly happy to know that I am posting the recipe for my Mom’s special barbecue marinade on the blog.

Roast Barbecued Chicken Ingredients

PREP TIME 20* MINS | COOKING TIME 1 HOUR 35 MINS | SERVES 6

*plus 4-6 hours of marination, or preferably overnight

INGREDIENTS

  • 2kg whole chicken, washed and cleaned thoroughly
  • 1 bulb garlic, peeled and crushed
  • 1 tbsp brown sugar
  • 1 heaped tbsp hot & spicy UFC Banana Catsup
  • 1 heaped tbsp light soy sauce
  • 1 heaped tbsp oyster sauce
  • Ground salt and black pepper, to taste
  • Juice of 5 calamansi
  • Cooking twine

METHOD

  1. Combine all the ingredients in a large mixing bowl. Mix well until combined. Coat your chicken in the marinade and then leave in the fridge to marinate for about 4-6 hours (or preferably overnight). Remove chicken from the fridge 45-60 minutes before roasting to bring it back to room temperature.
  2. Preheat oven to 230C (450F or gas mark 8). Line a baking tray with aluminium foil and place a rack above it.
  3. Start by making a loop with the twine and fastening it around the stub of the neck. Bring it around the sides and tie a knot at the cavity, then pull it tight around the breast. Now, loop the twine around the drumsticks and tie another knot, tightening it until the legs cross.
  4. Place the chicken on the rack and into the preheated oven for 10-15 minutes. The lower the heat down to 175C (350F or gas mark 4) and continue roasting for an hour and 20 minutes more until cooked all the way through.
  5. Once done, remove the oven and set aside to rest for about 10 minutes before serving. Enjoy!

Roast Barbecued Chicken

Roast Barbecued Chicken

BON APPÉTIT

– Ally xx

myTaste.com

Chilli, Paprika, Tarragon, & Worcestershire Roast Chicken

Chilli, Paprika, Tarragon, & Worcestershire Roast Chicken

Chilli, Paprika, Tarragon, & Worcestershire Roast Chicken

Hello Everyone! A new month means a new theme on the blog! If you have been following my blog on a weekly basis, you’ll probably know that two months ago I did a series on Healthy Eating, Salad Edition. During that time, I always paired my salads with a yummy roast chicken on the side. So for this month, I thought I’d share with you 4 different marinade recipes that are sure to bring your love for roast chicken to another level!

Tonight, I’ll be sharing a recipe that I kind of just threw together in a few minutes only with the items that I had in my fridge and pantry at that time. I was about to head over to a friend’s house, and I promised that I would cook something for him while he used my face as a canvas to practice his make-up skills. I had no idea what to bring over because I know that he is quite a healthy person. So I decided to roast some chicken breast fillets for us. The chicken I had to buy though because I don’t really eat the breast parts, so I walked over to the grocers and got a fillet each for the two of us. Then when I got home, I basically grabbed some herbs, spices, and basically whatever else I could find that I knew would/could make a nice flavour combination. I didn’t even use any measurements for this as well, I just dabbed in a whole lot of Worcestershire sauce, olive oil, chilli, paprika, and the works. I initially used fresh thyme leaves at the time since that was what I had in the fridge.

Chilli, Paprika, Tarragon, & Worcestershire Roast Chicken Ingredients

To be honest, I wasn’t sure what this would taste like. When we had these breasts fillets (after only having marinated them for about an hour or so), it was simply delicious! My friend really loved it and wanted to grab the recipe off from me too. I remember how he had a hard time trying to pronounce Worcestershire, so he ended up calling it the “Wot-shit-shit” sauce. When he went to the grocers one time, he called me up to ask which section was the sauce shelved at and I told him to ask one of the staff. He didn’t want to only because he didn’t want to ask “excuse me, where is you wot-shit-shit sauce?” Haha! Ever since then, I’ve made this recipe a couple of times for dinner gatherings with friends when I was still living in Sydney – and I’ve also made it for myself to pair with my salads. This was the first time that I had made it for my family and they too love it. I switch out the fresh thyme for fresh tarragon only because the grocers had that instead of thyme – but it tastes just as good!

Chilli, Paprika, Tarragon, & Worcestershire Roast Chicken Ingredients

PREP TIME 10 MINS* | COOKING TIME 1 HOUR 35 MINS | SERVES 6

*plus 4-6 hours of marination, or preferably overnight

INGREDIENTS

  • 2kg whole chicken, washed and cleaned thoroughly
  • 4-5 sprigs of fresh tarragon
  • 1/2 bulb garlic, minced
  • 3 tbsp olive oil
  • 2 tbsp Worcestershire sauce
  • 2 tsp chilli flakes
  • 2 tsp smoked paprika
  • Juice of 1 lemon
  • Butter for basting
  • Cooking twine

METHOD

  1. Combine all the ingredients, except for the butter, in a large mixing bowl. Mix well until combined. Coat your chicken in the marinade and then leave in the fridge to marinate for about 4-6 hours (or preferably overnight). Remove chicken from the fridge 45-60 minutes before roasting to bring it back to room temperature.
  2. Preheat oven to 230C (450F or gas mark 8). Line a baking tray with aluminium foil and place a rack above it.
  3. Start by making a loop with the twine and fastening it around the stub of the neck. Bring it around the sides and tie a knot at the cavity, then pull it tight around the breast. Now, loop the twine around the drumsticks and tie another knot, tightening it until the legs cross.
  4. Place the chicken on the rack and into the preheated oven for 10-15 minutes. The lover the heat down to 175C (350F or gas mark 4) and continue roasting for an hour and 20 minutes more. Baste the chicken with a little bit of butter at every 20 minute intervals.
  5. Once done, remove the oven and set aside to rest for about 10 minutes before serving. Enjoy!

Chilli, Paprika, Tarragon, & Worcestershire Roast Chicken

BON APPÉTIT

– Ally xx

myTaste.com

Quinoa, Avocado, & Grapefruit Salad with Lemon and Thyme Roast Chicken

Quinoa, Avocado, & Grapefruit Salad with Lemon and Thyme Roast Chicken

Hello Everyone! Hope everyone had a good weekend! I’m finally feeling better than I did last week, but my voice is still a bit husky. I can’t hit the high notes to a song whenever I’m performing in the shower, so I know I’ve still got a bit more of getting better to do. Other than that, things have been pretty chill at work – but I know it’s going to be hectic soon! There are two event coming up within the next 3 months, so I pray that I will have enough strength to persevere through! Over the weekend, my very first Uni friend from COFA (or now known as UNSWAD) visited me here in Brunei! It was so surreal as I never thought that we would meet… in Brunei! He is currently working on a project in KL and he had a free weekend to spare to come over for a visit! We toured him around a few places in Brunei, and we also caught up on work life, love life, and just anything else in general. I cannot believe that it had been exactly a year since we last saw each other in Sydney! It was definitely a great weekend.

Anyway! It’s week 3 of healthy eating month and I’ve got another quinoa recipe to share with you guys. As you already know, or not if you haven’t been following my blog on a week to week basis, quinoa (pronounced as KEEN-wah) is very beneficial to our health. It is incredibly nutritious as its fibre content is much higher than most grains. It is also very high in protein, containing the essential amino acids that we need . Quinoa contains a great amount of minerals – minerals that we other do not get enough of, especially magnesium, potassium, and zinc. If you would like to read up more on the health benefits of quinoa, click here. Pair it with some heart-healthy monounsaturated fatty acid avocados, grapefruit and orange segments, and you’ve got yourself a salad that is packed with minerals and vitamins such as: calcium, copper, fibre, folate, iron, magnesium, phosphorus, potassium, protein, zinc, and vitamins A, B5,B6, C, E, and K, and the list goes on.

Quinoa, Avocado, & Grapefruit Salad with Lemon and Thyme Roast Chicken Ingredients

PREP TIME 20 MINS* | COOKING TIME 40 MINS | SERVES 5-6

*Plus 4-5 hours waiting time to marinate the chicken.

INGREDIENTS

For the Salad

  • 100g feta cheese
  • 2 cups chicken stock*
  • 1 cup quinoa
  • 1 avocado, sliced
  • 1 grapefruit, segmented
  • 1 orange, segmented
  • 1 packet (250g) rocket leaves

For the lemon & thyme roast whole chicken legs

  • 500g whole chicken legs, washed and cleaned
  • 4-5 garlic cloves, minced
  • 2-3 springs of fresh thyme
  • 2 tsp smoked paprika
  • Juice of 1 lemon

*You can make you own stock by boiling chicken carcasses for about half an hour, together with whole black peppercorns, bay leaves, and salt. Or you can use the store bought ones, again, whatever tickles your fancy.

METHOD

  1. Combine all the roast whole chicken leg ingredients in a large baking dish. Leave to marinate for about 4-5 hours. Preheat oven to 190C. Sprinkle the chicken legs with paprika and place the baking dish in the oven and roast chicken for about 40 minutes or until done.
  2. Bring the quinoa and chicken stock to a boil in a medium-sized saucepan. Once boiling, reduce heat down to low, cover, and then simmer until tender and most of the liquid has been absorbed, about 15 to 20 minutes. Once done, fluff with a fork and transfer to a large mixing bowl.
  3. Add the sliced avocado, feta cheese together with the herbed olive oil, grapefruit, orange, and rocket leaves into the large mixing bowl together with the quinoa. Give it a good toss until well combined.
  4. Transfer to a serving dish together with a piece of lemon and thyme roast chicken leg.
  5. Serve and enjoy!

Quinoa, Avocado, & Grapefruit Salad with Lemon and Thyme Roast Chicken

Quinoa, Avocado, & Grapefruit Salad with Lemon and Thyme Roast Chicken

BON APPÉTIT

– Ally xx

myTaste.com

Avocado, Chickpea, & Roasted Capsicum Salad

Avocado, Chickpea, & Roasted Capsicum Salad

Hello Everyone! I hope everyone has had a relaxing CNY long weekend unlike me – well, it was relaxing as I stayed home all day on Sunday doing nothing, but it was also because I was sick over the long weekend *sad face*. I think I got sick from fatigue which resulted in a painful dry cough, a very high temperature, and muscle aches especially in my back, shoulders, and thigh regions. I’m feeling a little bit better with thanks to the long weekend as I get to rest up for 3 days after a straight 13 days of working from an average of 8am-11pm. Yes you read that right, I’m officially employed! I actually started working in late October in Brunei’s leading Advertising Agency known as D’Sunlit Sdn. Bhd. as a Graphic Designer for the Marketing Team. I was under a 3-month probation contract, and last Friday I was able to sign a permanent contract! Oh and the 13 days of straight working, that was because I was involved in an event known as the 17th Consumer Fair. I worked from Monday-Sunday two weeks ago, and last week I worked Monday-Saturday (yes no rest in between for working on that Sunday). So I guess that’s where my fatigue came from. I was actually already starting to feel under the weather last Thursday, but it only came into full effect on Saturday morning. I guess it didn’t quite help as well that I was surrounded by sick colleagues, and a sick mom and sister at home too. My sister got sick first, then me, and lastly my mom. I today in the office, I learnt that I may have made a few other colleagues sick too. How am I ever going to recover?!

Anyway, let’s move on to the recipe shall we? It’s week two of healthy eating, and I’ve got a yummy salad for you that you can pair up with any kind of meat be it beef, chicken, or lamb – whatever tickles your fancy that is! If you’re like me, and you can’t go without meat in your diet, then whip up your favourite roast chicken to go with your salad – we roasted some whole chicken legs with my Mom’s secret and special BBQ marinade. Otherwise, you can keep the dish vegetarian or vegan friendly. We all know that avocados are loaded with heart-healthy monounsaturated fatty acids known as oleic acid. Oleic acid has been linked to reduced inflammation and has been shown to have beneficial effects on genes linked to cancer. Not only does it contain this fatty acid, it also contains minerals and vitamins such as: fibre, folate, potassium, and vitamins B5,B6, C, E, and K.

Chickpeas, also called garbanzo beans, belong to the legume family, which includes a variety of beans, peanuts, soybeans and lentils. Opting for legumes over foods high in saturated fat might lower your risk of heart disease. Chickpeas also offer specific health benefits, and consuming them regularly boosts your intake of a few key nutrients such as: protein, fibre, manganese, and folate. The mineral manganese helps support bone development and wound healing and also helps carry out chemical reactions important to your metabolism. Folate, or vitamin B-9, aids in new cell growth and brain cell communication and protects against genetic mutations that contribute to cancer development.

Avocado, Chickpea, & Roasted Capsicum Salad Ingredients

PREP TIME 10 MINS | COOKING TIME 10 MINS | SERVES 5-6

INGREDIENTS

  • 2 avocados, peeled, pitted, and thinly sliced
  • 2 brown onions, peeled and quartered
  • 1 can (400g) chickpeas in water, drained
  • 1 packet (250g) mixed salad greens
  • 1 packet (150g) semi-dried tomatoes, halved, oil reserved
  • 1 yellow capsicum
  • Balsamic vinegar
  • Ground salt and black pepper, to taste
  • Olive Oil

METHOD

  1. Rub the yellow capsicum with a little bit of oil and place directly on open flame of gas stove. Rotate occasionally so that the capsicum blisters and chars on all sides. Once done, set aside to cool down. Peel the skin off and cut into strips once it has cooled down enough to handle. Add to a large mixing bowl.
  2. Blanch the chickpeas in boiling water for about 5 minutes. Drain and add to the large mixing bowl together with the roast capsicum strips.
  3. Heat olive oil in a small frying pan over medium-high. Add the onions and cook until soft and caramelised. Once done, transfer to the large mixing bowl.
  4. Add the semi-dried tomatoes together with its herbed oil, mixed salad greens, and balsamic vinegar. Season with a touch of ground salt and black pepper and give it a good toss until well coated. Transfer to a serving dish and top with the sliced avocados.
  5. Serve and enjoy!

Avocado, Chickpea, & Roasted Capsicum Salad

Avocado, Chickpea, & Roasted Capsicum Salad with Roast BBQ Chicken

BON APPÉTIT

– Ally xx

myTaste.com

Paella de Marisco (Seafood Paella)

Paella de Marisco (Seafood Paella)

Hello Everyone! Maligayang Pasko! Joyeux Noël! ¡Feliz Navidad! Vrolijk Kerstfeest! And a very Merry Christmas to my family, friends and followers from all around the world! It’s weird knowing that Christmas  Day is coming to an end, and that the New Year is just around the corner! The year definitely went by real quick! Anyway, tonight will by my last post for the year (maybe) and it is also the very last post for my Festive Filipino Foods series for the blog. Day 12 of 12 is finally here and I have definitely saved the best for last!

If you weren’t able to guess from the hints I dropped in yesterday’s post, tonight’s dish is a Valencian rice dish with ancient roots that originated in its modern form in the mid-19th century near Albufera lagoon on the east coast of Spain adjacent to the city of Valencia. The dish is highly regarded as Spain’s National Dish with various types ranging from Vegetarian/Vegan Paella (Paella de Verduras), Seafood Paella (Paella de Marisco), Mixed Paella (Paella Mixta), and many, many more variants! From the name of this blog, you’ll already know what type of Paella I’ll be covering tonight, but now that I look back and think about my dish, it can actually be a Paella Mixta because what I will be sharing with you tonight is a free-style combination of land animals (well mainly processed pork in the form of a chorizo sausage), seafood, and vegetables.

According to tradition in Valencia, Paella is cooked over an open fire, fueled by orange and pine branches along with pine cones. This produces an aromatic smoke which infuses the Paella. It is cooked in a special wide-flat pan called a Paellera, and dinner guests traditionally eat directly out of the pan as well. Since paellera’s aren’t commonly found, or if you don’t have one handy, the recipe method below will show you how you can still make paella in a normal cooking pot. The last time I made Paella was back in 2012 if I’m not mistaken. I cooked it up together with my then housemate Vanessa and shared it with a friend of mine and her mother one cold wintery evening. We cooked it in a large frying pan and even served it up in that pan!

Paella de Marisco (Seafood Paella) Ingredients

Paella de Marisco (Seafood Paella) Ingredients

PREP TIME 20 MINS | COOKING TIME 30-40 MINS | SERVES 8-10

INGREDIENTS

  • 2 cups plain medium-grain rice, washed and drained
  • 1 cup glutinous rice, washed and drained
  • 1 cup frozen green peas
  • 300g fresh or frozen mussels
  • 200g fresh prawns, peeled and deveined, peels and heads reserved
  • 150g fresh or frozen baby clam meat
  • 100g squid, cleaned and cut into rings
  • 4-5 garlic cloves, minced
  • 2-3 dried bay leaves
  • 1 brown onion, diced
  • 1 chorizo sausage, sliced diagonally
  • 1 large tomato, diced
  • 1 lemon, cut into wedges
  • 1 yellow capsicum, sliced
  • 1 tbsp smoked paprika
  • Ground salt and black pepper, to taste
  • Pinch of Saffron threads
  • Whole black peppercorns

METHOD

  1. Start by making the broth to flavour your paella by adding the prawn heads and peels to a medium-sized pot and cover with about a litre and a half of water. Season with a bit of salt, bay leaves, and whole black peppercorns. Bring to a boil over high heat and then turn it down to a slow simmer. Make sure to press down on the heads and peels as it simmers away to extract as much flavour as you can. Leave it to simmer for about 30 minutes. Once done, turn the heat off and set aside.
  2. Heat about 2-3 tablespoons of oil in a large pot over medium-high, and panfry the chorizo slices until browned, about a minute per side. Remove and transfer to a plate lined with a paper towel to soak up any excess oil.
  3. In the same pot, sauté the garlic until fragrant and golden brown. Add in the onions and cook until soft, about 2-3 minutes altogether. Follow with the diced tomatoes and cook until soft, a further 3-4 minutes.
  4. Add in the rice, paprika, saffron threads, and season with and bit of ground salt and black pepper. Give it a good mix before adding about 3 cups of the prawn stock. Cover and leave it to cook without stirring – at this point, you may want to turn your heat down to medium to avoid the rice sticking to the bottom of the pan. Leave it alone for about 15 minutes or once the rice has absorbed most of the liquid.
  5. Turn the heat down to low, and add the seafood (if you are going to serve it up in the pot you cooked it in, then I suggest that you arrange your seafood in a presentable way, if not, then you can just chuck them in and arrange it later when you transfer your paella to a serving dish). Cover and leave it to cook/bake for a further 15 minutes, or until the seafood is cooked through. Add the vegetables and chorizo slices and cook for a further 5 minutes, after which you can turn the heat off and leave it in the pot for a further 5-10 minutes before serving.
  6. Serve immediately with a fresh squeeze of lemon, and enjoy amongst family and friends!

Paella de Marisco (Seafood Paella)

Paella de Marisco (Seafood Paella)

Paella de Marisco (Seafood Paella)

BON APPÉTIT

– Ally xx

ps: I may or may not actually post up two more festive recipes, depending if I have time to write them up from tomorrow onwards before the New Year kicks in.

myTaste.com

Penang Char Kway Teow (Stir-fried Rice Cake Strips)

Penang Char Kway Teow (Stir-fried Rice Cake Strips)

Penang Char Kway Teow (Stir-fried Rice Cake Strips)

Hello Everyone! First off, I just want to say that this is the last noodle dish for the month of November! There’ll be one more post going up on Sunday on one of my designs, and after that I’ll be taking a 2-week break from blogging. There’s no particular reason for it – well okay, I guess you can say it’s for me to take a short break since I have been complaining for the past however so many posts about being mentally tired. It’s also mainly to go with the theme I have planned for next month; more will be revealed after my 2-week break 🙂

Okay, so before I dive into the recipe for tonight, I’d like to say sorry for a later than usual upload – I just came home from an evening with friends. We met up and did an escape room challenge together; well we split into two teams and did a different room from each other, CSI and Prison Break. Sadly I was in the losing team but they did say that CSI was definitely harder than the other one. Anyway, it was a fun night altogether but we didn’t get to talk much about our experiences over dinner because we didn’t want to ruin it for each other. Instead we vaguely talked about what we encountered and then all unanimously decided to go back again next week and do the rooms that we didn’t get to do tonight. All I can say that our brains were frazzled and scrambled after we got out of the CSI room – but in the end, we all had a great time. (I actually still can’t believe that I’m still mentally capable to write this post after a long day, and then a difficult escape room challenge).

Anyway! Back to tonight’s recipe – I don’t actually eat this dish that often, be it ordering it at a restaurant or making it at home. It’s not that I don’t like this dish, I actually enjoy it but not as much as the other noodle dishes. Char Kway Teow literally means stir-fried rice cake strips and is a national favourite in Malaysia and Singapore.

Here’s a fact that some of you may not know (I didn’t know myself too until I did my research), Char Kway Teow has a reputation of being unhealthy due to its high saturated fat content. It is this way because it made it attractive, in terms of it being a cheap source of energy and nutrients, to labourers since it was mainly served to them. When the dish was first served, it was sold by fishermen farmers and cockle-gathers who doubled as char kway teow hawkers in the evening to supplement their income.

Over time, the dish became increasingly popular and many cooks have developed their own interpretations while still using the same basic ingredients of ricecake strips/flat rice noodles fried with anything from eggs (chicken or duck), onions, garlic, prawns, cockles, Chinese sausage, chives, etc. Pork fat was predominately used to stir-fry char kway teow, but over the years, ordinary cooking oil is now used for health or religious reasons.

I based this recipe from Rasa Malaysia, so go check out the original recipe if you get the chance to!

Penang Char Kway Teow (Stir-fried Rice Cake Strips)

PREP TIME 10 MINS | COOKING TIME 15 MINS | SERVES 4-6

INGREDIENTS

  • 400g kway teow noodles (rice cake strips)
  • 250g prawns, peeled and deveined
  • 100g baby clam meat
  • 100g beansprouts
  • 4-6 large free range eggs, sunny side-up
  • 2-3 garlic cloves, minced
  • 2 Chinese sausages, sliced diagonally
  • 1 small brown onion, diced
  • Chilli paste
    • 30g dried red chillies, seeded and soaked in water until soft
    • 3 small shallots, diced
    • 2 fresh red chilies, seeded
    •  1 tsp oil
    • Pinch of salt
  • Spring onions

Sauce Mix

  • 5 tbsp soy sauce
  • 2 dashes white pepper powder
  • 1 & 1/2 tbsp dark soy sauce
  • 1 tbsp sugar
  • 1/2 tsp fish sauce
  • 1/2 tsp salt

METHOD

  1. Grind all the ingredients of the chilli paste together using a mini food processor until fine. Heat about a teaspoon of oil in a small frying pan, over medium-high. Stir-fry the chili paste until aromatic, about 3-5 minutes and then transfer to a heatproof bowl. Set aside.
  2. Mix all the ingredients for the sauce together in a small bowl and set aside.
  3. Next, heat up about a tablespoon or two of oil in a large frying pan, or wok, over medium-high. Sauté the garlic until fragrant and golden brown, then add in the onions and cook until soft, about 2 minutes altogether.
  4. Add in the Chinese sausage slices and cook until you can smell the aroma coming from the sausages. Then, add in your prawns and cook until they start to change colour, about 5 minutes altogether.
  5. Add in the baby clam meat, followed by a half portion of the beansprouts and give it a quick mix. The add in the rice cake strips, making sure that you untangle the clumps when you’re adding them to the pan, followed by the sauce mix and chilli paste. Give it a good stir and make sure that all the noodles are covered with the sauce.
  6. Turn the heat off, and then mix in the rest of the beansprouts and the spring onions. Serve immediately with or without a sunny side-up egg on top. Enjoy!

Penang Char Kway Teow (Stir-fried Rice Cake Strips)

Penang Char Kway Teow (Stir-fried Rice Cake Strips)

BON APPÉTIT

– Ally xx

myTaste.com

Malaysian Curry Laksa (Spicy Noodle Soup)

Malaysian Curry Laksa (Spicy Noodle Soup)

Hello Everyone! So, I’ve been told that I don’t write as much as I used to, and that’s only because there’s really nothing much to tell. Well okay, maybe a part of the reason is also that I’m always mentally tired by the end of the day when I get around to writing my blog posts. I try to write them in advance so that I could at least add some enthusiasm to my posts, but I always end up procrastinating – and I’m sorry for that! Just bare with me until the end of the year and hopefully my content will be much better when the New Year kicks in 🙂

Anyway, let’s get down to business for tonight’s post; the last week of Noodle Month! Again, the month just flew right by! December is just around the corner, and sooner or later it’ll be Christmas and then the New Year! Tonight, I am sharing with you a popular dish in Brunei, Singapore, Indonesia, and Malaysia – Laksa! I wouldn’t say that this dish is at the top of my favourite noodle dish (only because there are many other noodle dishes that I prefer than laksa), but if I want it, I’ll have it!

The plan was to make my own laksa paste from scratch, and I know it’s no excuse, but time was short on my hands and I just made the decision to buy a ready-made, packeted paste from the stores. Also, if I made my own paste, we’d have a lot of left over ingredients (that is, if we didn’t end up using all of it), or a surplus of paste that would’ve ended up sitting in the freezer for a long time, and eventually in the trash since we don’t eat laksa that often at home. However, feel free to make your own paste and just follow the ingredients from the recipe below 🙂

Before I dive into the recipe, I’ll just talk a little bit about what Laksa is for those of you who don’t know what it is. Laksa is actually a combination of Chinese and Malaysian cuisine that consists of rice noodles/vermicelli served as a spicy soup dish with various meats such as chicken, prawn, or fish. The soup is either based on a rich and spicy curry with coconut milk, or a sour tamarind soup. The elements of a curry laksa can be distinguished by the following:

  • Coconut milk is used
  • Curry-like soup (includes curry as one of its ingredients)
  • Except for bean sprouts, no other vegetable is used
  • Bean curd puff is used
  • Served with thick or thin rice vermicelli (usually thick); occasionally served with yellow mee
  • Hard-boiled egg may be added
  • Slices of fish cake and either prawns or chicken is used

The original recipe can be found over on Serious Eats.

Malaysian Curry Laksa (Spicy Noodle Soup) Ingredients


PREP TIME 10 MINS | COOKING TIME 30-45 MINS | SERVES 4-5

INGREDIENTS

  • 250g thick rice vermicelli noodles
  • 200g coconut milk
  • 100g beansprouts
  • 100g prawns, peeled and deveined
  • 4-5 cups chicken stock
  • 3 pcs dried bay leaves
  • 2-3 garlic cloves, minced
  • 2 large free range eggs, hard-boiled
  • 1 chicken crown, breasts removed and sliced, bone reserved
  • 1 packet (200g) Malaysian Curry Laksa Paste
  • 1 pc firm tofu, deep fried and cut into chunks
  • 1 pc fish cake, sliced diagonally
  • 1 small brown onion, diced
  • Salt
  • Spring onions
  • Whole black peppercorns

To serve

  • Sambal

METHOD

  1. Add the reserved chicken bone, chicken breast dried bay leaves, about a teaspoon or two of whole black peppercorns, and salt to a medium-sized pot filled with about 1.5L of hot/boiling water. Turn the heat up to high and leave to boil for about 30 minutes. After about 15 minutes, remove the chicken breast from the stock and set aside to rest and cool down before slicing into it.
  2. While the stock is boiling away, quickly blanch the sliced fish cakes and prawns in the stock, about 2-3 minutes. Remove and set aside.
  3. Meanwhile, bring a large pot of water to a boil. Once boiling, add the rice vermicelli noodles in and cook according to packet instructions, about 15 minutes for mine.
  4. Drain and then divide the noodles equally into 4-5 individual serving bowls. Top with the beansprouts, chicken slices, fish cake slices, fried tofu, hard-boiled egg slices, and prawns. Set aside.
  5. Heat a bit of oil in a medium-sized frying pan over medium-high. Sauté the garlic until fragrant and golden brown, and then add in the onions and cook until soft, about 2-3 minutes in total.
  6. Add the laksa paste and fry for about a minute or two before adding the chicken stock in. Give it a goo mix and then bring to a boil. Once boiling, turn the heat down to a slow simmer and then add in the coconut milk. Leave to simmer for about 15 minutes.
  7. Once the soup is done, ladle it into the prepared bowls and garnish with some spring onion. Serve immediately with some sambal and calamansi on the and enjoy!

Malaysian Curry Laksa (Spicy Noodle Soup)

Malaysian Curry Laksa (Spicy Noodle Soup)

BON APPÉTIT

– Ally xx

myTaste.com

Singapore Mei Fun (Fried Rice Vermicelli Noodles in Curry Powder)

Singapore Mei Fun (Fried Rice Vermicelli Noodles in Curry Powder)

Hello Everyone! Tonight I will be sharing with you another Singaporean dish that I love. What I love about this is the curry powder that is incorporated into this fried noodle dish. When I first tried this noodle dish, I didn’t expect it to be coated in curry powder – well, I mean, it’s not like the name of the dish was a dead giveaway for what’s in it. So it was definitely quite unique to me when I first tried it – and I loved it!

I kind of went with it on my own after indulging in much of it over the past several years, but I did refer to Saucy Spatula for reference. I also learnt a few things from her blog, the main one being that authentic Singapore fried rice vermicelli (or know as fried bee hoon), does not include curry. Unfortunately, the question of where the addition of curry originated from cannot be answered, however many claimed it to have come from Hong Kong. So why isn’t it called Hong Kong fried rice vermicelli? Well, apparently this noodle dish resembles more towards the Singapore fried bee hoon so I guess why argue with that?

Singapore Mei Fun (Fried Rice Vermicelli Noodles in Curry Powder)

PREP TIME 5 MINS | COOKING TIME 25-30 MINS | SERVES 4-5

INGREDIENTS

  • 450g bee hoon (thin rice vermicelli noodles)
  • 250g char siu pork (Chinese BBQ pork)*, sliced
  • 100g beansprouts
  • 2-3 garlic cloves, minced
  • 2 Chinese sausages, sliced diagonally
  • 2 red bird’s eye chillies, sliced
  • 1 large free range egg, beaten
  • 1 small brown onion, diced
  • 1/2 a head of cabbage, sliced
  • Tricolour capsicum (1/4 of each), sliced

For the sauce

  • 1/4 cup light soy sauce
  • 3 tbsp cooking wine
  • 1 & 1/2 tbsp curry powder
  • 1 tsp sugar
  • 1 tsp white pepper powder

*If you can easily buy it at the shops, or even your local Chinese restaurant, then I do recommend that you just buy it if you want your fried noodles now and fast! (It takes a considerate amount of time when you’re making your own char siu pork at home). But, if char siu is not available, you can substitute with ham, bacon, or shredded pork.

METHOD

  1. Start off by bringing a large pot of slightly salted water to a boil. Once boiling, add the rice vermicelli noodles and cook according to packet instructions, about 15 minutes for this brand of noodles. Once the noodles are done, drain and set aside.
  2. While the noodles a boiling away, mix the sauce ingredients in a small bowl. Set aside.
  3. Heat oil in a large frying pan over medium-high. Add the beaten egg and spread around the frying pan until thin. Fry for about a minute per side, remove and set aside to cool. Once cooled, slice them into thin strips.
  4. In the same frying pan, heat a little bit more oil and then sauté the garlic and chillies until fragrant and golden brown. Then add in the onions and cook until soft, about 2 minutes altogether.
  5. Add the Chinese sausage slices and cook for about 2 minutes. Follow with the char siu pork and capsicum, cooking for a further 3-4 minutes. Finally, add in the cabbage and beansprouts, cooking until just about to wilt.
  6. Add in the drained rice vermicelli noodles together with the sauce and give it a good mix, until the noodles are evenly coated with the curry powder mixture. Turn the heat off, garnish the noodles with some spring onions, and top with the sliced fried egg.
  7. Serve immediately with a squeeze of calamansi or a lemon wedge. Enjoy!

Singapore Mei Fun (Fried Rice Vermicelli Noodles in Curry Powder)

Singapore Mei Fun (Fried Rice Vermicelli Noodles in Curry Powder)

BON APPÉTIT

– Ally xx

myTaste.com

Kolo Mee (Flash-boiled Egg Noodles)

Kolo Mee (Flash-boiled Egg Noodles)

Hello Everyone! Tonight, I’ve got a very popular breakfast/brunch noodle dish to share. I remember when I was growing up, we’d travel at least 20 minutes to our favourite kolo mee place in Brunei for many years! It was kind of like our special Sunday breakfast routine with the whole family before we’d go about and do our grocery shoppings for the week. Since that place closed down a couple of years ago, we barely have kolo mee in our weekly meals – but now that I have my own way of making kolo mee, I can whip it up almost any time I crave for it!

“The secret to amazing kolo mee lies in the use of pork lard. I know this is not very healthy if eaten in large quantities but the reason why it’s used is because it coats each and every strand of the noodles with some seriously delicious meaty flavours.” — The Malay Mail Online, 2013

I guess you could say that my version of Kolo Mee is a little bit healthier (but not entirely) as I use vegetable oil instead of pork lard. Also, traditional kolo mee dishes, especially in restaurants, use quite a significant amount of MSG to enhance the flavour of the dish. The recipe that I will be sharing today doesn’t use MSG at all and is still very tasty! If you want a halal version of this dish, you can substitute the minced pork for minced chicken and just have a generous serving of fish cakes/balls instead of char is pork. You can also get creative and top it with your favourite breakfast must haves like some crispy bacon on the side or topped with a sunny-side up with the runny yolk and all that pizzaz!

Kolo Mee (Flash-boiled Egg Noodles)

PREP TIME 5 MINS | COOKING TIME 20 MINS | SERVES 6-8

INGREDIENTS

  • 450g fresh kolo mee noodles
  • 250g lean minced pork
  • 250g char siu pork (Chinese BBQ pork)*, sliced
  • 2-3 garlic cloves, minced
  • 2 small red onions, diced
  • 1 bunch gai lan (Chinese broccoli), cut into 2″ lengths
  • 1 fish cake, sliced diagonally
  • 1 red bird’s eye chilli, sliced
  • Chilli Oil
  • Ground salt and black pepper to taste
  • Light soy sauce
  • Sesame Oil
  • Spring onion

*Apparently, it takes a considerate amount of time when you’re making your own char siu pork at home that is! If you can easily buy it at the shops, or even your local Chinese restaurant, then I do recommend that you just buy it if you want your kolo mee now and fast!

METHOD

  1. Add about a tablespoon of light soy sauce, and a teaspoon of chilli and sesame oil into about 6-8 individual bowls/deep dishes. Set aside.
  2. In a small frying pan, heat about 3-4 tablespoons of vegetable oil over medium-high. Add the diced onions and frying until browned and crispy. Set aside. In the same frying pan, fry off the fish cake slices, about a minute or two per side. Set aside.
  3. Heat a medium-sized frying pan (or wok if you like) over medium-high. Add about a tablespoon of the oil used to fry the onions and fish cake to the pan and sauté the garlic and chillies until fragrant and golden brown, about a minute or two.
  4. Then add in the minced pork, followed by the ground salt and black pepper. Give it a good mix and leave to cook for about 5 minutes. Add in about 2 tablespoons of light soy sauce and cook for a further five minutes. Remove the pan from the heat and set aside.
  5. Bring a large pot of water to a boil. Once boiling, flash-boil the stalks of the gai lan first, then followed by the leaves until tender and wilted. Remove from the boiling water and set aside.
  6. Flash-boil the kolo mee noodles, in batches if you wish, for about a minute or two.  Once done, divide equally into your prepared bowls with the sauces and give it a good mix. Top with the minced meat, fish cakes, char siu pork, gai lan, fried onions, and spring onions. Serve immediately and enjoy!

Kolo Mee (Flash-boiled Egg Noodles)

BON APPÉTIT

– Ally xx

myTaste.com