Karipap (Malay-style Curry Puffs)

Karipap (Malay-style Curry Puffs)

Hello Everyone! Before I proceed to tonight’s post and back to regular programming on Amcarmen’s Kitchen, I would just like to say a very special thank you to this year’s batch of Auguesters for sharing their creative and innovative takes on Southeast Asian cuisine. I know it’s already September, but I still have one more guest to feature when I get all the materials from them.

Pressing on, before we fly off into another country on our Flavours of Southeast Asia journey, I’ll be picking up from where I left off back in July when we were roaming around Malaysia. I had made these back then, but life got in the way as things started to get hectic at work. I didn’t want this to go in my archive bank and so I’m sharing this now.

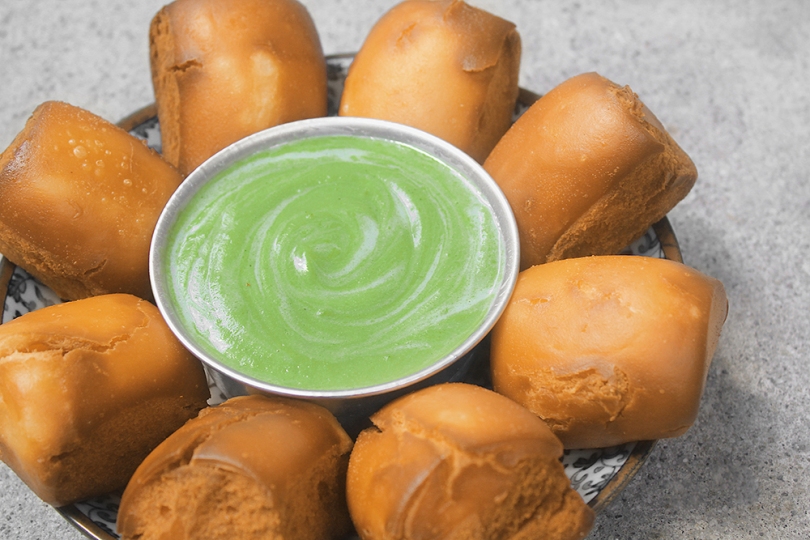
I remember being obsessed with these curry puffs at one point in my life. It was a couple of years ago when I was still working in Brunei. Someone from the office would always bring a box of Old Klang Road curry puffs for everyone in our department to share. Shamelessly, I would always help myself to two or three of them in one go. I always thought that these curry puffs originated from Malaysia, but apparently they were local to Brunei. The man behind these curry puffs named his shop after a lane known as Old Klang Road which he really liked from his travels to Malaysia. Soon after, he wanted the locals to know that his curry puffs were Brunei made and rebranded his shop as ‘The Curry Puff Factory’.

Karipap (Malay-style Curry Puffs)

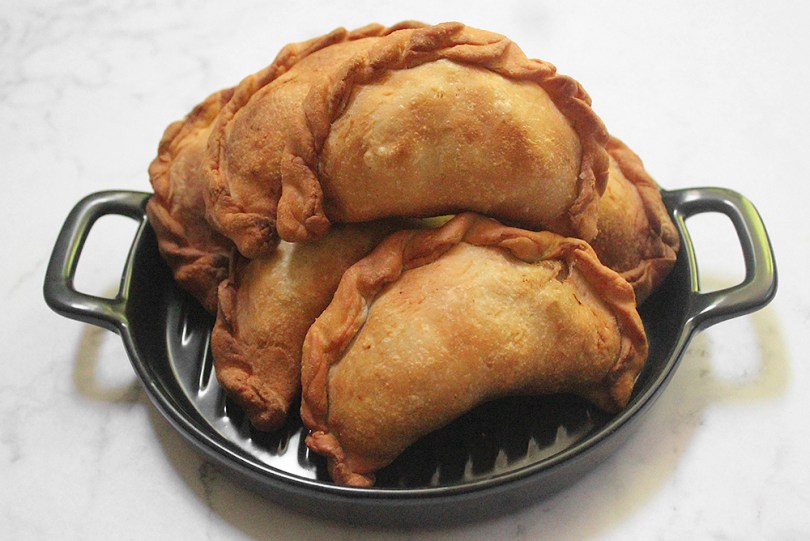
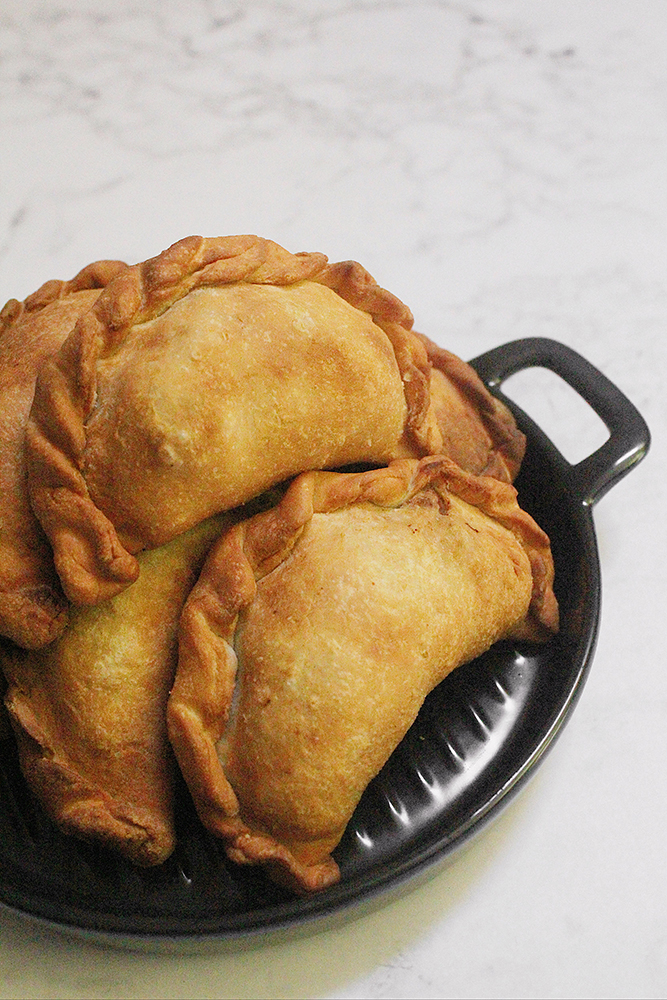
Nonetheless, the recipe that I will be sharing is for a Malaysian-style curry puff. In Malaysia, curry puffs are commonly known as Karipap and sold freshly fried at many Malay, Chinese, and Indian food stalls and even at trendy cafés. These curry puffs are filled with potatoes, onions, and other vegetables such as green peas, carrots, and corn. The sauce/gravy has to be thick in consistency. This is to prevent it from oozing out of the puffs and potentially burning your tongue and lips when biting into a piping hot curry puff.

Boiled eggs and chicken are also usually added for extra protein, and you can also find curry puffs with sardines in it too, but to keep this recipe vegetarian/vegan-friendly, I omitted the meat and used more potatoes instead.

Also, just a little disclaimer, this is the first time I’ve made curry puffs from scratch, so please excuse the terrible folds *cheeky grin*

Karipap (Malay-style Curry Puffs) Ingredients

PREP TIME 45 MINS | COOKING TIME 30 MINS | MAKES 20 PUFFS*

*Depending on the size of the curry puffs

INGREDIENTS

For the dough

  • 2 cups all purpose flour
  • 1/2 tsp salt
  • 113g margarine
  • 1/2 cup cold water

For the filling

  • 500g potatoes, cut into small cubes
  • 1 large brown onion, diced
  • 100g frozen mixed vegetables
  • 1 tbsp cooking oil
  • 2 tbsp curry powder
  • 1 tbsp chilli powder
  • 1/4 cup water (or vegetable broth)
  • Salt and black pepper, to taste
  • 1/4 tsp sugar
  • 2 tbsp all purpose flour
  • Oil, for deep frying

METHOD

  1. Filling: Heat oil in a large pan over medium-high. Sauté the onions until cooked through, about 3 to 4 minutes. Add the potatoes, followed by the mixed vegetables, curry powder, and chili powder. Season with salt and freshly cracked black pepper, to taste, and add the sugar. Continue to cook for about 5 minutes.
  2. Add the water (or vegetable broth) and the cover. Let it simmer on medium heat for about 5 minutes or until the potatoes are tender.
  3. Uncover and continue to cook the potato mixture until the liquid has mostly evaporated.
  4. Sprinkle the all purpose flour into the potato mixture and then continue to cook until the mixture ‘glues’ together. Taste and adjust the seasoning as needed.
  5. Remove from the heat and set aside to let it cool down completely before wrapping.
  6. Dough: In a large mixing bowl, combine the all purpose flour, salt, and margarine, mixing with a spatula until just combined. Slowly incorporate the water a little at a time and knead to form a soft, non-sticky dough (you may not need the full 1/2 cup of water).
  7. Tip the dough onto a clean work surface and continue to knead for about 3 to 4 minutes until smooth. Form the dough into a ball and place it back into the bowl. Set aside, covered with a kitchen towel to allow it to rest, about 15 minutes.
  8. Tip the rested dough onto your clean, lightly floured work surface, and roll into a log. Cut the dough into 20 equal portions. Keep them covered and work with one dough at a time.
  9. Curry Puffs: Flatten a portion of the dough with the palm of your hands and then use a rolling pin to roll it out into a circle that is about 5 to 6 inches in diameter.
  10. Place one portion (about a tablespoon) of the potato filling in the middle of the dough.
  11. Fold the dough into half to create a half circle and seal the edge by pinching and folding down. You can watch my TikTok video on how I did this (terribly).
  12. Repeat with the rest of the dough and filling to make 20 curry puffs.
  13. In a large frying pan, add enough oil for deep frying over medium heat. Fry the curry puffs in small batches until they are golden brown in colour.
  14. Remove from the oil and transfer to a cooling rack lined with a paper towel to absorb any excess oil. You can also keep them warm in the oven at 90C (or 200F) if you like. The fried curry puffs stay crispy for hours at room temperature too!
  15. Serve immediately while hot, and enjoy!

1978

Notes:

  • If you don’t want to fry a whole batch at one go, you can also keep them in the freezer and fry them in the succeeding days. You do not have to thaw them prior. You’ll just have to fry them for longer since it’s frozen. Control the heat so the outside won’t burn while the filling is still cold.
  • If you have some leftover filling, you can keep them in the fridge for 3-5 days. Either make more dough or make a potato curry out of them by adding some veggie stock to it. That’s what I did and then served it as a side with some crispy and flaky paratha for breakfast the next day!

BON APPÉTIT

– Ally xx

myTaste.com

Mee Goreng Mamak (Mamak-style Stir-Fried Noodles)

Mee Goreng Mamak (Mamak-style Stir-Fried Noodles)

Hello Everyone! We’re venturing forward on our Flavours of Southeast Asia journey through Malaysia with a dish that’s very close to my heart. Now, you probably already know that there are countless recipes for mee goreng (fried noodles), that vary depending on its country or region of origin, but tonight in particular, I will be sharing a Mamak-style mee goreng dish; a staple of ours that we would always order when my family and I were at our favourite roti canai eatery.

Mee Goreng Mamak (Mamak-style Stir-Fried Noodles)

Mamak is a local word used to describe people of Indian-Muslim origins in Malaysia; and thus with these two cultures merging together created a unique dish known as Mee Goreng Mamak, or in English, Mamak-style Stir-Fried Noodles. It is normally made with fresh egg noodles, boiled potatoes, fried tofu, and Chinese greens of choice that is tossed in a delicious sauce, but you can also bulk it up with other proteins such as chicken, squid, or seafood. Pork and beef are typically avoided for obvious reasons.

If you’re looking for a way to change up your weeknight noodle meals, then this is a recipe you should definitely try out. It’s quick, easy, and made with ingredients that you can easily source at your local market or grocer. Mee Goreng Mamak is a delicious blend of spicy, savoury, sweet, tangy, smoky (from all that wok hay), and sticky flavours in a single dish. The recipe that I will be sharing tonight is perfect for ovo-vegetarians.

Mee Goreng Mamak (Mamak-style Stir-Fried Noodles) Ingredients

PREP TIME 15 MINS | COOKING TIME 30 MINS | SERVES 4

INGREDIENTS

For the sauce

  • 1/2 cup water
  • 2 tbsp ketchup
  • 2 tbsp light soy sauce
  • 1 tbsp curry powder
  • 1 tbsp dark soy sauce
  • 1 tbsp sambal paste
  • 2 tsp white granulated sugar

For the noodles

  • 2 x 500g packs fresh yellow noodles, washed and drained*
  • 4 pcs firm tofu, fried and cut into chunks
  • 2 medium-sized cooked potatoes, peeled and cut into chunks
  • 2-3 garlic cloves, minced
  • Spring onion
  • 2 large free-range eggs
  • Handful of celery leaves
  • 1/2 cup bean sprouts
  • Oil, for cooking
  • Chinese cabbage, blanched
  • Red pepper, sliced
  • Lemon wedges, optional

*Fresh yellow noodles are usually oiled. Rinse it in cold water to loosen up the threads and remove part of the oil, or you can quickly blanch it in hot water and drain before using.

METHOD

  1. Sauce: In a medium-sized bowl, mix all the ingredients together until well combined. Set aside until ready to use.
  2. Mee Goreng Mamak: Add oil in a large pan over high heat. Add the garlic and white/light green part of the spring onion and sauté until the garlic is lightly golden and fragrant, about 30 seconds.
  3. Add the yellow noodles and fry for about a minute or two. Push the noodles to the side and add the eggs. Let the eggs cook a little to set and then mix it into the noodles.
  4. Add the fried tofu, cooked potatoes, celery leaves, and the sauce mixture to the noodles. Toss until the noodles are evenly coated with the sauce, frying for about 3 to 4 minutes. Try not to mix too hard or it will break up the noodles into tiny threads.
  5. Add the remaining spring onion and bean sprouts. Give it another quick toss, about a minute or so for the bean sprouts to cook.
  6. Once done, transfer to individual serving plates and serve with red peppers and Chinese cabbage (or any greens of your choice). Garnish with a squeeze of fresh lemon juice and enjoy immediately while hot!

1933

1934

BON APPÉTIT

– Ally xx

myTaste.com

Assam Pedas Ikan

Assam Pedas Ikan

Hello everyone! A new month means we’ve ventured onwards to our next Southeast Asian destination, and tonight we’re kicking off our journey through Malaysia! Having lived in Brunei for 26 years of my life, and Bruneian food being so heavily influenced by the cuisine of its neighbouring country, Malaysia, it’s no wonder that it’s a cuisine that’s very close to my heart and that I love so much on top of everything else that I seem to love when it comes to food *cheeky grin*

Assam Pedas Ikan

Assam Pedas Ikan, or literally translated as Sour Spicy Fish in English, is a classic Malaysian dish that’s undoubtedly sour, fiery hot, and super satisfying! Special ingredients such as tamarind peel, ginger torch flower, and Vietnamese coriander (laksa leaves) are key in achieving the flavour profile and aroma of Assam Pedas. However, while these ingredients may be difficult to source in certain countries, the sourness is the important component; and you can use tamarind pulp or paste for this. I guess that it’s also safe to say why everyone has their own take on this favourite Malaysian dish; the adaptations are endless! Ultimately, a good balance of sourness, saltiness, sweetness, and spiciness is all you need to make a good Assam Pedas dish.

Tonight, I’ll be sharing the way I remember how my Mom used to make it when we were still living in Brunei. It’s been a while since I’ve had this dish and I was actually surprised by how quick and easy it is to make, as well as how readily available all the ingredients are, for the version that I will be making of course. Instead of using water for my version, I used my own homemade fish broth from fish scraps to give the Assam Pedas more depth in flavour. Traditionally, locals would use ikan tenggiri (Spanish mackerel), or ikan pari (stingray), but my Mom and I prefer to use pomfret fish (pampano in Tagalog) for its delicate white flesh, subtle non-fishy and sweet taste, as well for its firm texture.

Assam Pedas Ikan Pedas

PREP TIME 30 MINS | COOKING TIME 10 MINS | SERVES 4

INGREDIENTS

For the spice paste

  • 8-10 pcs dried red chillies, roughly chopped
  • 1 garlic clove, roughly chopped
  • 1 small red onion, diced
  • 1 stalk lemongrass (white part only), roughly chopped
  • 1/2 tbsp sambal belacan paste

For the assam pedas ikan

  • 2 large pomfret fish
  • 2 tbsp cooking oil
  • Spice Paste
  • 1 tsp fish curry powder
  • 1 tbsp coconut sugar
  • 2 tbsp tamarind paste
  • 2 cups fish broth
  • 2 tomatoes, quartered
  • 1 small red onion, quartered
  • 1 thumb-sized ginger, sliced
  • Spring onion, white part
  • 10 pcs okra
  • Salt, to taste
  • Spring onion (green part), to garnish

METHOD

  1. Spice Paste: Using a mortar and pestle, pound all the ingredients for the spice paste together, or you may also use a food processor to do so. Set aside.
  2. Assam Pedas Ikan: Heat cooking oil to a large pot over medium-high. Add the spice paste and fry for about 2 minutes or until fragrant before adding the curry powder, coconut sugar, and tamarind paste. Fry for a further 2 minutes.
  3. Add the fish broth, followed by the tomatoes, red onion, ginger slices, and white parts of the spring onion, and leave to simmer for about 5 minutes or until the tomatoes have softened.
  4. Add the pomfret fish and cook for 20 minutes or until the fish is cooked through. Add the okra and cook for a further 5 minutes, or until the okra is tender.
  5. Serve immediately while hot and enjoy with freshly steamed white rice!

Assam Pedas Ikan is best served with plain steamed white rice. You may also serve it with noodles, kind of like a laksa, if you’re using boneless fish. Rice noodles would be the go-to choice as they take on the flavour of the Assam Pedas best.

Assam Pedas Ikan

Assam Pedas Ikan

BON APPÉTIT

– Ally xx

myTaste.com

Kuih Kosui (Rice Cakes with Grated Coconut)

Kuih Kosui (Rice Cakes with Grated Coconut)

Hello Everyone! The Bruneian traditional kuih (or kueh) is similar to many traditional cakes from around the region, such as in Singapore, Malaysia, and Indonesia. Nobody knows where the true origins of each traditional kuih came from in Brunei, but we know it all started from the water village – Kampong Ayer many decades ago. Back in the day, due to limited supply of resources, Bruneian cake makers would make use of natural elements and materials to prepare the cakes, such as wrapping with leaves, and making use of all parts of a coconut or palm tree.

Today, Bruneian kuih-kuih (plural for kuih) are still as popular as ever due to the nostalgia and historical heritage that it carries with every bite. Upon researching traditional kuih-kuih native to Brunei, I came across a website entitled ‘Brunei’s Traditional Sweet Treats You Must Try’. Kuih Kosui was amongst the list, but as it turns out, it is actually native to Malaysia, as most kuih-kuih are.

Kuih Kosui is a saucer-shaped rice cake that is flavoured with either pandan (screwpine leaves) juice or gula melaka (palm sugar). It is also known as Kue Lumpang in native Indonesian language, and is actually very similar to what we have closer to home here in the Philippines, known as kutsinta.

Kuih Kosui (Rice Cakes with Grated Coconut)

Kuih Kosui is very economical to make. The kuih is characterised by its ‘dimple’ in the middle of the cake, lightly sweet taste, soft, yet wobbly and slightly bouncy in texture. They are then topped with a slightly salted, grated coconut topping to give that extra layer of flavour with the classic sweet-salty combination.

Unlike with a traditional kutsinta recipe, the soft, wobbly, and bouncy texture of Kuih Kosui can be achieved without having to add any alkaline water. You just need the right combination of flours and you can still achieve its distinct chewy texture and dimples.

Before we dive into tonight’s recipe, please take the time to check out the original where I drew my inspiration from over on What To Cook Today by Marvellina.

Kuih Kosui (Rice Cakes with Grated Coconut) Ingredients

PREP TIME 15 MINS | COOKING TIME 15-20 MINS | MAKES 14 CAKES

INGREDIENTS

  • 1/2 cup + 1 tbsp + 1 & 3/4 tsp rice flour
  • 2 tsp wheat starch
  • 2 tsp cornstarch
  • 1/4 tsp salt

For pandan flavour

  • 2/3 & 1/4 cup boiling water (cooled for 15 minutes)*
  • 1/2 cup white granulated sugar
  • 1/3 cup pandan-infused water**

For coconut sugar flavour

  • 1 & 1/4 cup boiling water (cooled for 15 minutes)*
  • 1/4 cup coconut sugar
  • 1 tsp white granulated sugar

For the topping

  • Freshly grated coconut
  • Pinch of salt

Notes:

  • *Bring water to a boil and let it cool down for 15 minutes so it should feel lukewarm after that. The warm water will stabilize the starch/flour and they won’t separate when you steam. Make sure not to use boiling hot water as this will cook the starch/flour into a dough.
  • **Place the pandan leaves and water into a blender. Blend until the leaves are chopped very finely. Pour contents through a fine sieve and press against it using a spoon to draw out any extra juice. Discard the leaves.
  • Flour and starch measurements are for one recipe per flavour. If you want to make both flavours at the same time, make sure to measure out another set of flour and starch ingredients.

METHOD

  1. Topping: Add the pinch of salt together with the grated coconut and give it a good mix. Steam over high heat for 10 minutes and set aside once done.
  2. Kuih Kosui: Bring the water in the steamer to a boil and place the empty cups in the steamer. Allow them to heat up for about 5 minutes while you are preparing the batter This step is important to prevent the starch/flour from separating when steaming your rice cakes.
  3. Add the three different types of flour and starches, together with the salt, into a medium-sized mixing bowl. Depending on your chosen flavour, add the sugars, (then the pandan-infused water if making pandan flavour Kuih Kosui), and then the lukewarm water. Stir into a smooth batter until the sugars have dissolved.
  4. Pour the batter into the preheated cups, about 3/4 of the wall full and steam over high heat for 12-15 minutes (18 minutes if your cups are larger).

If your steamer cannot fit all the cups/batter in at the same time, work in batches. Do not pour the mixture into the remaining cups ahead of time and let them sit. The flour and starch mixture tends to settle at the bottom after a while. This is important otherwise your Kuih Kosui won’t turn out right.

  1. After steaming, remove the cups from the steamer and let them cool down for about 5 minutes. They can be easily removed by running a small rubber spatula around the edges to lift them up.
  2. Repeat with the next batch of batter. Make sure the steaming water is back to a rolling boil before steaming. Stir the batter first before pouring into the preheated cups.
  3. Once done, sprinkle with the prepared grated coconut topping. Serve and enjoy as an afternoon snack! Should make around 14 kuih-kuih.

Kuih Kosui (Rice Cakes with Grated Coconut)

If you ever happen to find yourself travelling through Brunei on your next travel adventure, drop by any day or night markets and you’re bound to come across this kuih and many others. If you’re lucky enough, you can even catch the vendor making them fresh on the spot for you.

The best time to find all the local snacks and kuih-kuih in one place is during the holy month of Ramadhan at various food markets. You can find a plethora of local and traditional goodies for you to try. Alternatively, you can also get these at the Gadong Night Market or Tamu Kianggeh throughout the year and more often the vendors would be more than happy to describe each one to you!

BON APPÉTIT

– Ally xx

myTaste.com

Pulut Tai Tai (Blue Glutinous Rice Cakes)

Pulut Tai Tai (Blue Glutinous Rice Cakes)

Hello Everyone! Pulut Tai Tai is a Nyonya kuih made of fluffy glutinous rice that is steamed in coconut milk, and tinted with a beautiful natural blue colour from butterfly pea flowers. You can leave it out if you can’t find butterfly pea flowers, as it’s mostly for the colour, but it wouldn’t be as elegant-looking without it.

It is typically served with a coconut-pandan spread where the contrasting colours of green together with the vibrant blue and white of the glutinous rice makes the kuih all the more delightful and pleasing to the eyes of the beholder. In addition to colour, the slight tinge of saltiness of the glutinous rice coupled with the sweetness of the kaya makes this kuih a delight to savour.

Pulut Tai Tai (Blue Glutinous Rice Cakes)

Tai Tai refers to a rich man’s wife who enjoys a life of leisure. It is said that this specific kuih was only served to the wives of rich men back then. This kuih is also known as Pulut Tekan which literally translates to ‘pressed glutinous rice.’

Before we dive into tonight’s recipe, please take the time to check out the original recipe for these Blue Glutinous Rice Cakes over on Bake with Paws by Yeanley.

Before I tackled this recipe, I read that soaking the glutinous rice with the addition of vinegar or lemon juice will reduce the phytic acid found in the grain. It also helps in breaking down the gluten and aids for better absorption of the blue colour from the butterfly pea flowers. Now, while I included lemon in the ingredients shot below, I in fact did not use the lemon at all for one main reason – the addition of acidity to the butterfly pea flower infused water would make it turn violet in colour. Since I am all about sharing blue recipes for this month, that’s definitely not what I want. I found that the glutinous rice absorbed the blue colour well anyway without the need for vinegar or lemon juice.

Pulut Tai Tai (Blue Glutinous Rice Cakes) Ingredients

PREP TIME 20 MINS* | COOKING TIME 30-45 MINS | SERVES 4-6

* Additional 4 hours min. overnight max. for soaking time

INGREDIENTS

  • 2 cups white glutinous rice
  • 1 cup coconut milk
  • 2/3 cups water
  • 3/4 tsp salt
  • 25 pcs dried butterfly pea flowers
  • Banana leaves
  • Pandan (screwpine) leaves
  • Lemon juice (optional)

METHOD

  1. Bring a small saucepan of water and the dried butterfly pea flowers to a boil, over high heat. Let it simmer for a few minutes and then remove from the heat. Cover and leave to steep for 10 minutes before straining. Press down on the flowers to extract the blue colour from the flowers. Set aside to cool.
  2. Wash the glutinous rice until the water is clear. Soak 1/3 of the glutinous rice with the blue-infused water and the remaining 2/3 in water. Soak for at least 4 hours or overnight. After 4 hours or the next day, drain them both separately.
  3. Prepare your steamer by lining with clean banana leaves. Light grease with a touch of coconut oil and top with pandan leaves followed by the glutinous rice; blue rice on one side and white on the other.
  4. Mix the coconut milk and salt together. Pour half of the coconut milk mixture over the rice and mix well. Steam over high heat for 20 minutes. After 20 minutes, remove from the steam and fluff the rice. Add the remaining coconut milk mixture and then return it to the steamer to cook for a further 10 to 15 minutes.
  5. Line a square pan with banana leaves and lightly grease with coconut oil. Transfer the cooked rice to the pan, alternating between the white and the blue rice. Level the surface and cover with more banana leaves. Place another pan on top of it and weigh it down with heavy objects to compress the rice. Set aside to cool.
  6. Cut into small rectangular pieces and serve with some homemade Nyonya-style kaya. Enjoy it as a mid-afternoon snack!

This kuih can be kept for a couple of days if stored in the refrigerator. Before consuming it again, steam or heat it in a preheated oven at 70C for 10 minutes to soften it.

Pulut Tai Tai (Blue Glutinous Rice Cakes)

PS: Before I end tonight’s post, let’s see if a particular someone actually reads my blog from start to finish *cheeky grin* I would like to take this opportunity to wish a special person in my life, a Happy Birthday! I hope you like the little gift I had sent to you earlier this afternoon. I wish you an abundance of happiness, good health, peace, and prosperity in life. To many more birthdays and hopefully I can spend them all with you by your side!

BON APPÉTIT

– Ally xx

myTaste.com

Auguest 2020: Jiemei Sisters

Nasi Kerabu

“The kitchen is the heart of the home” — Jiemei Sisters

Auguest 2020: Jiemei Sisters

Looking back on my childhood, I am flooded with memories of the kitchen: our pantry in which we would sneak into to get little chewy sweets called sugus, sitting at the kitchen counter and having a cup of Milo and some biscuits after school, opening the fridge and exclaiming in disgust after sniffing an opened can of beer. As we grew older, we would stand in the kitchen and help our mom with menial tasks such as mincing garlic, chopping onions, cooking rice (ok, this one is not so menial) and other things.

Without fail, every night our family would have dinner together. Sitting around the dinner table, chatting about our day, what we did at school, and what we might want to do during the weekend – food was something that kept our family bond tight.

After I left home, it would take about 8 years before I would be reunited with my sisters in the same city. This time, while chatting about anything and everything in the kitchen, we started cooking dishes that are nostalgic to us.

We grew up partly in Brunei and partly in Malaysia. Our parents were well travelled and adventurous with food (a trait that they passed down to us). We like to try and cook everything from scratch (as much as we can), to try and replicate that taste of our childhood. That taste that brings back memories of our warm kitchen, with the black countertops and white cabinets, the pantry with the treasure trove of goodies, and the feeling of warm familial love.

Nasi Kerabu is a dish that we used to get only during Ramadan and Hari Raya. I don’t know if it was sold frequently at other times, but this was the time during the year where our mom would, after an exhausting day at work, pick us up from school and stop at a “gerai” (malay stall) on the way home. Nasi Kerabu was always a favourite. It reminds me of a salad. But, a good salad. None of that wilting leaves drenched in balsamic vinegar and oil. A good hearty salad with substance. The blue rice, fragrant herbs, refreshing vegetables, topped with the Kerisik Ikan (fish floss), accompanied by a good sambal sauce, along with keropok (fish crackers) – oh man. This dish is To. Die. For.

Last year, I moved away from the city I called home for the last 10 years. So, when my sisters came to visit, we couldn’t pass up the opportunity to cook together. Because I live in the interior, we were not able to hunt down some of the Southeast Asian herbs that are essential to the dish, but we made do. And it was still so very good.

Nasi Kerabu Ingredients

PREP TIME 20 MINS | COOKING TIME 1 HOUR | SERVES 2-3

INGREDIENTS

For the nasi kerabu

  • 10 pieces butterfly blue pea flower (this is to give the rice its beautiful blue hue)
  • 3 pandan leaves
  • 3 cups hot water
  • 2 cups Jasmine rice

For the kerisik ikan

  • 1 mackerel fillet (we used the salted fillets that are popular in Korean grocery stores)
  • 1 cup unsweetened coconut flakes
  • 1/3 cup dried shrimp

For the kuah sambal

  • 1/2 cup coconut milk
  • 1/4 cup plus 1 tbsp oil
  • 8 dried chilies (boiled in water for about 10 minutes)
  • 5 garlic cloves
  • 2 large red chilies
  • 2 shallots
  • 3 tbsp water
  • 2 tbsp lemongrass
  • 2 tbsp tamarind juice
  • 1 tbsp sugar
  • Salt, to taste

For the grilled fish

  • Mackerel (we love mackerel in this household, but feel free to use whatever fish you like)
  • 1 tbsp turmeric powder
  • 2 tsp oil
  • Salt, to taste

To garnish

  • Bean sprouts, cut in half
  • Cabbage, diced
  • Cucumber, sliced
  • Keropok
  • Mint, finely sliced
  • Salted Egg
  • Snake beans, finely diced

Other garnishes, if available, kaffir lime leaves, torch ginger flower, banana flower, and daun kesum. These are more herbs that you can add. We had to omit them due to the lack of variety in the small town I live in.

METHOD

  1. Kerisik Ikan: Broil the mackerel fillet in the oven on high heat for 8 minutes. Let it cool down before removing the skin and bones.
  2. Toast coconut flakes in a pan over medium heat, stirring constantly until golden brown.
  3. Toast dried shrimp separate from the coconut flakes, in a pan over medium heat, stirring constantly until fragrant.
  4. Pound ingredients separately with a mortar and pestle until finely shredded. Mix everything in a bowl and set aside.
  5. Nasi Kerabu: Steep blue pea flowers in hot water for about 10 minutes.
  6. While waiting for the pea flower water to cool down, wash your rice. Clean the pandan leaves and tie it up in a bundle.
  7. When the pea flower water has cooled down, combine rice, pea flower water, and pandan leaves together and put it in the rice cooker and let it do its magic.
  8. Kuah Sambal: Blend shallots, garlic, chilies, lemongrass, 3 tbsp water and 1 tbsp of oil in a blender until it turns into a nice paste.
  9. Heat the 1/4 cup of oil in a pan and pour in the chili paste. Simmer over medium heat, stirring constantly for the first 3 minutes, and then every 2-3 minutes. Do this for about 10 to 15 minutes.
  10. The paste will start to pecah, which means “to break” in Malay. You’ll know it’s ready when the oil starts to separate from the paste. Sometimes it takes longer than 15 minutes. Your best indication to know when it’s ready is the separation of oil and paste.
  11. Add in the tamarind juice, sugar, and salt to taste. Then add in the coconut milk and let simmer for another 5 minutes. Take it off the heat and set aside, in the pan, once done.
  12. Grilled Fish: Marinate the fish with oil, turmeric, and salt.
  13. Broil on high for about 8 minutes. Note: this timing is for a fillet of mackerel. You will need to adjust accordingly if you use a different type of fish.
  14. Plating: Scoop the rice onto the middle of the plate. Surround the rice mound with your garnishes and grilled fish and top rice with kuah sambah and kerisik ikan. Serve and enjoy!

Nasi Kerabu

Like I mentioned above, this dish reminds me of a salad. Mix your garnishes and rice together. Top your spoonful of “salad” with a piece of fish and a little bit of the salted egg, and take a bite of the fragrant, harmonious, refreshing dish that is Nasi Kerabu.

Photo Courtesy & Recipe Copyright © 2020 | Jiemei Sisters (@jiemei.sisters)

BON APPÉTIT

– Jiemei Sisters

myTaste.com

Ondeh-Ondeh (Glutinous Rice Balls with Coconut Sugar Filling)

Ondeh-Ondeh (Glutinous Rice Balls with Coconut Sugar Filling)

Hello Everyone! In Singapore, Malaysia, and even in Brunei, Ondeh-Ondeh refers to a glutinous rice ball kuih (sweet snack or dessert). In Indonesia they call it Klepon. There are two versions of Ondeh-Ondeh. One is made with just plain glutinous rice flour and scented with pandan (screwpine) juice, while the other has a little sweet potato added to the dough.

Ondeh-Ondeh (Glutinous Rice Balls with Coconut Sugar Filling)

Ondeh-Ondeh is made with fresh pandan juice and glutinous rice flour rolled in freshly grated coconut with a little surprise on the inside. The surprise makes these balls of Ondeh-Ondeh oh so fun to eat! Its pandan-flavoured skin wraps semi-melted gula melaka (palm sugar) that would burst upon the first bite, like sweet little bombs as the sweetness explodes in the mouth. The slightly salted grated coconut further enhances the deliciousness of this kuih.

Before we dive into tonight’s recipe, please take the time to check out the original where I drew my inspiration from over on Rasa Malaysia by Bee.

Ondeh-Ondeh (Glutinous Rice Balls with Coconut Sugar Filling) Ingredients

PREP TIME 30 MINS | COOKING TIME 5-10 MINS | MAKES 12-14 BALLS

INGREDIENTS

  • 10 pandan leaves
  • 2 cups glutinous rice flour*
  • 1 cup water
  • 100g freshly grated coconut**
  • Coconut sugar***
  • Pinch of salt

* Using only glutinous rice flour will make the ondeh-ondeh rather soft in texture. Although some do enjoy such consistency, tapioca flour may be added to the dough to make it slightly firmer. You may also substitute tapioca flour with corn flour.

** If you are using desiccated coconut for this recipe, add 1 tablespoon of water and half a teaspoon of salt to half a cup of desiccated coconut. Mix well and steam the mixture for 15 to 20 minutes. The reason for steaming is because you want to achieve a fluffier/softer texture, similar to freshly grated coconut.

*** The amazing taste of ondeh-ondeh comes from the gula melaka, a special palm sugar which has a toffee taste to it. You may substitute this for brown sugar, coconut sugar, or other sweeteners if gula melaka isn’t available. That will, however, change the traditional taste of the ondeh-ondeh.

METHOD

  1. Pandan Juice: Place the pandan leaves together with the water in a food processor or heavy-duty blender, and blitz/blend for a few minutes until the pandan leaves have been finely puréed.
  2. Pour the blended pandan-infused water over a fine sieve and into a small bowl. Strain the liquid from the pandan leaf pulp, pressing down firmly with the back of a spoon to extract all of the juice from the pulp. Discard the pandan leaf pulp.
  3. Dough: In a large mixing bowl, combine the glutinous rice flour with the extracted pandan juice and lightly knead to form a smooth dough. Cover the dough and set aside for about 15 minutes to rest.
  4. Ondeh-Ondeh Balls: Bring a large pot of water to rolling boil. Pinch a thumb-sized piece of dough and flatten lightly and thinly. Fill the centre of the dough with about half a teaspoon of coconut sugar. Roll it in your palms to form a smooth ball and then place each ball on a baking tray lined with lightly greased cling film. Repeat until all the dough is used up.
  5. Bring a large pot of water to a rapid boil. Carefully drop each ball into the boiling water. Do not overcrowd the pot. You may need to work in batches depending on how many balls you managed to make with the dough.
  6. When they float to the surface, remove them with a slotted spoon and shake off the excess water. Coat the ondeh-ondeh balls with the slightly salted grated coconut and serve immediately. Enjoy!

Ondeh-Ondeh (Glutinous Rice Balls with Coconut Sugar Filling)

Notes:

Why does the dough crack?
The dough is too dry. Add some water and knead the dough again. Work in batches and store the dough in a bowl with a piece of damp cloth over it to prevent it from getting dry.

Why does the Ondeh-Ondeh burst while boiling?
Sometimes, the dough may crack during the cooking process. This is due to the thinness of the dough. However, remember not to make the dough too thick either. Wrap it closely around the palm sugar to prevent air from getting in. Otherwise it will burst during the cooking process.

Why did the palm sugar not melt?
The ondeh-ondeh wasn’t cooked long enough. To ensure that the pal sugar has fully melted, simmer them over low heat for another 5 to 10 minutes once they start to float. Also, the trick is to shave the palm sugar with a knife or mandoline or simply chop them into small chunks. This way, they would melt faster. Larger chunks may not melt as quickly as smaller pieces.

How long can ondeh-ondeh last for?
Cooked ondeh-ondeh with grated coconut will only last a day because grated coconut spoils easily. If you would want to prepare them in advance, you may refrigerate shaped ondeh-ondeh for up to 5 days covered with plastic wrap. Shaped ondeh-ondeh can also be frozen for up to 6 months if kept in an airtight container or freezer bag. Simply boil refrigerated or frozen ondeh-ondeh before coating them with shredded coconut.

Ondeh-Ondeh (Glutinous Rice Balls with Coconut Sugar Filling)

Before tackling this recipe, I read up on a few different ones online and gathered that on average, these Ondeh-Ondeh Balls take about 10 minutes to cook. I made mine slightly bigger than those in the recipes I looked at, but no way did it take 15 or 30 minutes to fully cook through. It was already way past the 1-hour mark and the balls were still rock hard. At first, I didn’t know where I went wrong… and then it hit me. I was using rice flour instead of glutinous rice flour. What a rookie mistake *facepalm* Nonetheless, after I got around to picking up some glutinous rice flour from the grocers and tackled the recipe again, it was a success!

BON APPÉTIT

– Ally xx

myTaste.com

Seri Muka Kuih

Seri Muka Kuih

Hello Everyone! Our last recipe for the month of June is an amazing Malaysian and Nyonya kuih made of glutinous rice, coconut milk, sugar, and pandan leaves. Kuihs (or kuehs) are common snacks of the Hokkien, Teochew and Peranakan cuisine.The terminology is actually a general description for bite-size pastries/nibbles. These traditional delights come in many different forms and are either sweet or savoury snacks/desserts.

Seri Muka literally translates to beautiful face in Malay. It is a two-layered cake that consists of a glutinous rice layer steamed with coconut milk and topped off with a sweet and silky smooth pandan custard layer (hence the green colour). It’s heady with the flavour of coconut milk, a key ingredient used to impart a creamy taste when cooking the glutinous rice and making the custard layer.

Seri Muka Kuih

My fondest memory of Seri Muka would have to be during the festive season of the Islamic New Year. These pretty faces, alongside other kuihs of course, were served at almost every Malay household I would visit during that time of the year. The soft, sticky rice underneath with just a hint of saltiness pairs so deliciously with the decadently sweet pandan custard on top.

Before we dive into tonight’s recipe, please take the time to check out the original where I drew my inspiration from over on Rasa Malaysia by Bee. Seri Muka can also be found in the Indonesian province of South Kalimantan, and is also known as Kuih Putri Salat in Singapore.

Seri Muka Kuih Ingredients

PREP TIME 35 MINS | COOKING TIME 50 MINS | MAKES 14-16 SLICES

INGREDIENTS

For the bottom layer

  • 1 & 1/3 cups glutinous rice, soaked in water for 30 minutes
  • 1 cup thin coconut milk (1/2 cup coconut milk plus 1/2 cup water)
  • 2 pandan leaves
  • 1 tsp salt

For the top layer

  • 1 cup thick coconut milk (or coconut cream)
  • 1/2 cup pandan juice*
  • 1/2 cup white granulated sugar
  • 2 large free-range eggs
  • 2 large free range egg yolks
  • 5 tbsp all purpose flour
  • 2 tbsp cornstarch

*For the pandan juice

  • 8-10 pandan leaves
  • 1/2 cup water

METHOD

  1. Bottom Layer: In a large mixing bowl, combine all the ingredients needed, except for the pandan leaves, to make the bottom layer. Evenly spread onto a lightly greased 8in x 11in rectangular baking dish and add the in pandan leaves, making sure that they are submerged in the rice mixture. Steam over high heat for 20 minutes. Meanwhile, prepare the pandan juice for the top layer.
  2. Pandan Juice: Place the pandan leaves together with the water in a food processor or heavy-duty blender, and blitz/blend for a few minutes until the pandan leaves have been finely puréed.
  3. Pour the blended pandan-infused water over a fine sieve and into a small bowl. Strain the liquid from the pandan leaf pulp, pressing down firmly with the back of a spoon to extract all of the juice from the pulp. Discard the pandan leaf pulp.
  4. Top Layer: Mix all the remaining ingredients for the top layer in a medium-sized heatproof bowl until well combined.
  5. Create a bain-marie (double-boiler) by pouring some water into a pot that is slightly larger than your heat-proof bowl. Very important, check to see if your bowl can sit on top of the pot without any water touching the bottom of the bowl.
  6. Heat your pot of water over low-medium and bring to a slight simmer. Once slightly simmering, place the bowl with the pandan, coconut milk, and egg mixture over it. Cook until the mixture thickens slight, but is still runny enough to pour, about 8-10 minutes.
  7. Seri Muka Kuih: Once the rice layer is done, discard the pandan leaves. Stir and flatten the rice with the back of a spoon, making sure that it is compact. Using a fine sieve, strain the pandan, coconut milk, and egg mixture over the cooked rice. Return to the steamer and steam over medium heat for 30 minutes.
  8. Remove from the steamer once done and leave aside to completely cool down before cutting them into diamond or rectangular-shaped bite-size pieces. Serve with a hot cup of coffee or tea for a lovely mid-afternoon snack. Enjoy!

Seri Muka Kuih

Seri Muka Kuih

BON APPÉTIT

– Ally xx

myTaste.com

Kaya (Malaysian Pandan Coconut Egg Jam) with Fried Mantou

Nyonya-style Kaya (Malaysian Pandan Coconut Egg Jam)

Hello Everyone! Try something new on your morning toast! If you’re looking to change up your breakfast condiment selection from the everyday jams and jellies, try this Pandan Coconut Egg Jam. It will transport you to the tropics with its flavourful, rich, and sweet taste!

Kaya (Malaysian Pandan Coconut Egg Jam) with Fried Mantou

Kaya in the Malay language means “rich”, with reference to the texture of this jam. It is a sweet coconut egg jam that is rich, thick and custard-like in texture, and flavoured with pandan, giving it a fun green colour.

There are two well-known varieties of kaya:

  • Nyonya, which is green in colour
  • Hainanese, which is darker brown in colour and often sweetened with honey

The colour variation depends on the number of eggs, the caramelisation of the sugar, and the amount of pandan leaves used. In the Philippines, a variation of this jam is known as matamís sa báo, but it does not contain eggs and is less thick in texture. In Thailand, it is known as sangkhaya.

Kaya (Malaysian Pandan Coconut Egg Jam) with Fried Mantou

This version of kaya that I will be sharing with you guys tonight is the Nyonya-style one, which gets its aromatic fragrance and natural green colour from the pandan leaf. The idea of treating it as a dip rather than a spread or a filling was inspired from my trip to Thailand a couple years back, in 2013. We (my family and I) were at a roadside stall for dinner and on their menu they had steamed thick-sliced bread with a kaya and condensed milk dip. I decided to recreate this dish to share with you guys tonight, but instead of serving it with steamed bread, I fried some mantou buns for that extra-added crunch on the outer layer while still keeping the inside of the buns soft.

Before we dive into tonight’s recipe, please take the time to check out the original where I drew my inspiration from over on Curious Cuisiniere by Michelle Wong.

Kaya (Malaysian Pandan Coconut Egg Jam) Ingredients

PREP TIME 5 MINS | COOKING TIME 15 MINS | MAKES 1 SMALL JAR

INGREDIENTS

  • 4-5 pandan (screwpine) leaves
  • 200ml coconut milk
  • 4 large free range eggs
  • 1/2 cup coconut sugar

Optional (to serve with)

  • Condensed milk
  • Fried mantou buns

METHOD

  1. Place the pandan leaves together with the coconut milk in a food processor or heavy-duty blender, and blitz/blend for a few minutes until the pandan leaves have been finely puréed.
  2. Pour the blended pandan-infused coconut milk over a fine sieve and into a large bowl. Strain the coconut milk from the pandan leaf pulp, pressing down firmly with the back of a spoon to extract all of the coconut milk from the pulp. Discard the pandan leaf pulp.
  3. In a separate heat-proof bowl, beat together the eggs and sugar, until frothy. Then, add the pandan-infused coconut milk to the egg and sugar mixture.
  4. Create a bain-marie (double-boiler) by pouring some water into a pot that is slightly larger than your heat-proof bowl. Very important, check to see if your bowl can sit on top of the pot without any water touching the bottom of the bowl.
  5. Heat your pot of water over low-medium and bring to a slight simmer. Once slightly simmering, place the bowl with the coconut milk and eggs over it and gently whisk for 10-15 minutes, ensuring no water escapes from the bottom pot. It’s important to keep a low simmer or else the eggs can curdle quickly (refer to notes).
  6. Once done, transfer the kaya to a small serving dish and add just a touch of condensed milk (just enough that it doesn’t become overly sweet) and serve with your choice of steamed or fried bread. Whatever tickles your fancy! Enjoy!

Kaya (Malaysian Pandan Coconut Egg Jam) with Fried Mantou

Transfer the remaining kaya into a sterilised and clean jar. Let it cool before storing in the refrigerator for up to two weeks. Kaya is eaten as a condiment spread on bread or toast, usually as breakfast.

Kaya (Malaysian Pandan Coconut Egg Jam)

Notes:

  • If you don’t have access to fresh pandan leaves, you may be able to find pandan extract which comes in a small bottle or pandan leaf powder, which will work perfectly fine with the recipe.
  • If your eggs curdle during the cooking process, not to fret! Continue to cook for the full 15 minutes, and then transfer the mixture to a blender. Blend until the kaya is smooth.

Growing up in Brunei, Nyonya-style kaya was my go-to choice of spread (together with peanut butter or just butter) on the waffles that you’d get at the local supermarket (Hua Ho) in the snack corner. Their freshly made kaya-filled pancakes, or even the kaya buns on their shelves were also my go-to choice. Also not forgetting the Hainanese kaya-filled cakoi (Chinese youtiao fried dough) from a nearby roadside stall from my workplace that my then workmates and I used to drive to our lunch breaks, and the kaya-buttered toast from a popular Chinese kopitiam known as Chop Jing Chew. These are, if not all, then some of my fondest memories of kaya.

BON APPÉTIT

– Ally xx

myTaste.com