Herb & Caper-crusted Salmon

Herb & Caper-crusted Salmon

Hello Everyone and happy first of July! If you’re a little pressed for time when it comes to preparing and cooking, this should be one of your go-to, quick yet healthy and light weeknight dinner recipes. The salmon is full of fresh flavours, tang, and heat! It could not be any simpler to make and goes from fridge to table in 20 minutes, even including all the sides you need to make this a complete meal! Simply chop up your herbs and capers, slather it onto your salmon filets, then bake. Easy peasy lemon squeezy right?

Herb & Caper-crusted Salmon

Salmon is one of the most nutritious foods you can find. This popular fatty fish is loaded with nutrients and may reduce risk factors for several diseases. It’s also super tasty, versatile, and widely available. Salmon is rich in long-chain omega-3 fatty acids, which have been shown to reduce inflammation, lower blood pressure and decrease risk factors for disease. Salmon is also rich in high-quality protein, which is needed to heal, protect bone health, and prevent muscle loss, among other benefits. The list goes on.

Before we dive into tonight’s recipe, please take the time to check out the original where I drew my inspiration from over on Iowa Girl Eats by Kristin. The original recipe crusts the salmon with a caper and dill-infused gremolata – which is just a fancy name for chopped parsley, lemon zest, and garlic. I used basil and green onions/scallions in place of the dill and parsley only because I could not find those herbs at the grocers. I think it worked well with the herb substitutes that I used, so don’t be afraid to mix up your herbs for the crust to what’s readily available at your local grocers.

Herb & Caper-crusted Salmon Ingredients

PREP TIME 10 MINS | COOKING TIME 7-9 MINS | SERVES 4

INGREDIENTS

  • 4 salmon filets, about 150g per filet
  • 2-3 garlic cloves, minced
  • 2 red bird’s eye chillies, minced
  • 2 stalks green onion, roughly chopped
  • 1 & 1/2 tbsp capers, drained, rinsed, and roughly chopped
  • Olive Oil
  • Salt and freshly ground pepper, to taste
  • Zest of 1 lemon

METHOD

  1. Preheat oven to 200C (400F or gas mark 4), and line a baking sheet with foil. Grease with a little bit of oil or butter and set aside.
  2. Mix the chopped/minced basil, green onions, chillies, capers, lemon zest, garlic, salt, and black pepper to the centre of a large plate. Squeeze a bit of lemon juice into the mixture to moisten.
  3. Rub the salmon filets with olive oil and then season generously with salt and freshly ground black pepper. Press the top and sides of each filet into the herb and caper mixture to create an even crust.Place the filets onto the prepared baking sheet and bake for 7-9 minutes. Be careful and do not over bake them!
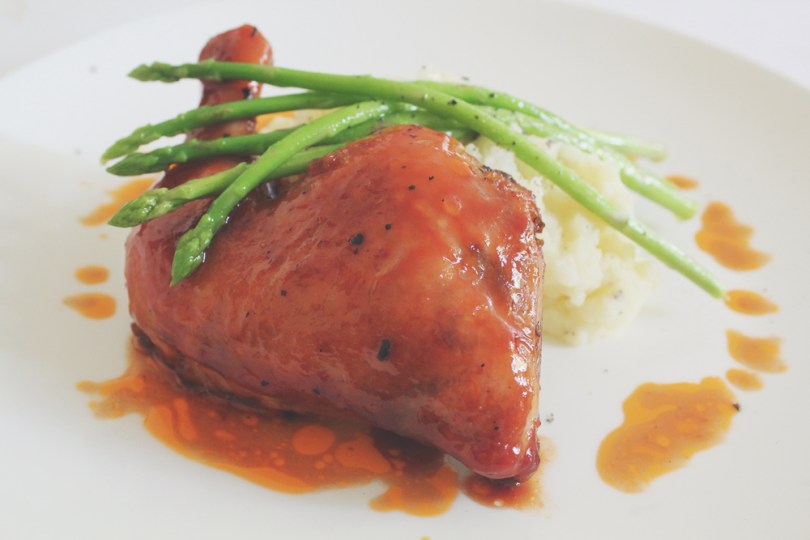
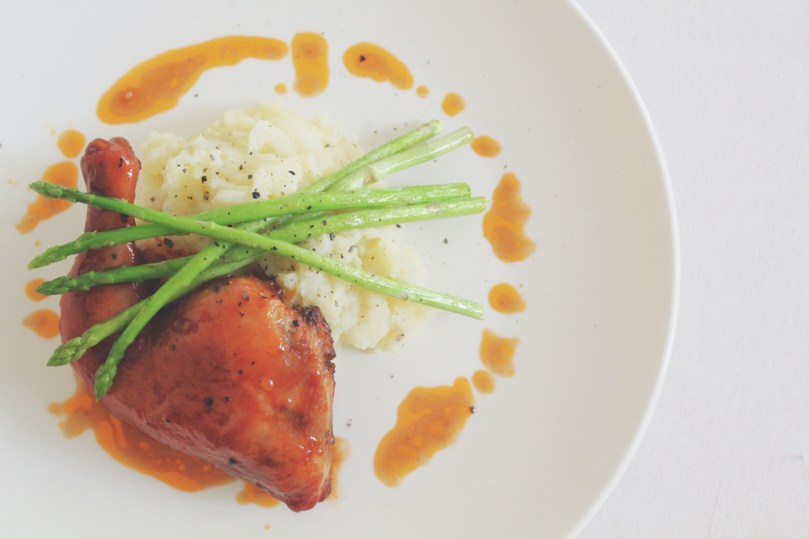
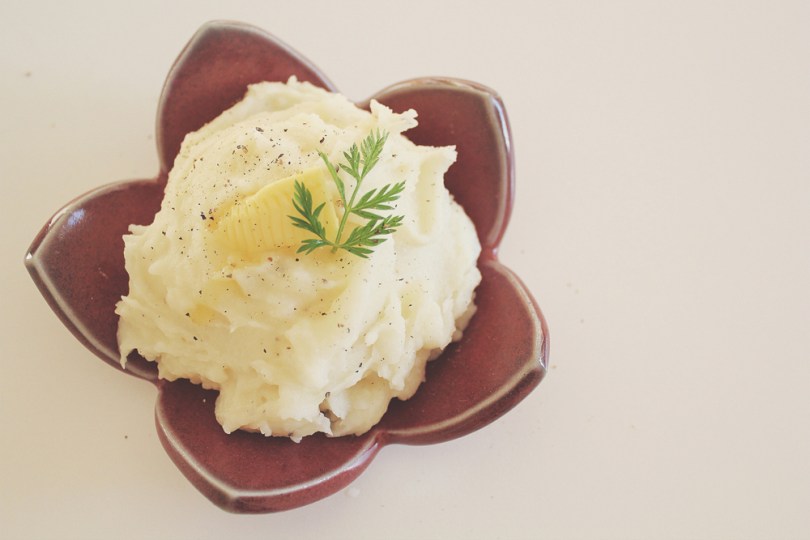
  4. Once done, transfer the salmon filets to individual serving plates. Serve with a squeeze of fresh lemon juice on the salmon fillets, and some creamy mashed potatoes on the side with blanched asparagus or any other greens of choice. Enjoy!

Herb & Caper-crusted Salmon

Herb & Caper-crusted Salmon

BON APPÉTIT

– Ally xx

myTaste.com

Advertisement
Cinnamon-Apple Pork Chops

Cinnamon-Apple Pork Chops

Hello Everyone! We’re on our third Apple recipe for the month of March, which means that we’re close to yet another month flying by so quickly! I’ll keep tonight’s post short – and no it’s not because I’m pressed for time to get this post up for you guys by tonight, but rather, I believe I don’t have much of a back story to this post, nor do I have anything personal to share with you guys for this week.

Cinnamon-Apple Pork Chops

With that being said, do check out the original recipe that I followed to make these juicylicious Cinnamon-Apple Pork Chops from Taste of Home. It’s a very quick and easy autumn-inspired dish to put together for a delicious mid-week dinner! Yes I am aware that it is summer in the Philippines (where I am currently residing at), but like I’ve said in previous posts, it’s autumn somewhere around the world!

Cinnamon-Apple Pork Chops Ingredients

PREP TIME 5 MINS | COOKING TIME 15 MINS | SERVES 6

INGREDIENTS

  • 6 bone-in pork chops, about 1/2-inch thick slices
  • 2 large Red Delicious Apples, washed and wedged
  • 3 tbsp brown sugar
  • 2 tbsp unsalted butter, divided
  • 2 tbsp walnuts, roughly chopped
  • 1 tsp ground cinnamon
  • 1/2 tsp ground nutmeg
  • 1/4 tsp salt

METHOD

  1. In a small bowl, mix the brown sugar, cinnamon, nutmeg, and salt together. Set aside.
  2. In a large skillet, heat 1 tablespoon of the unsalted butter over medium heat. Add the pork chops and cook about 3-4 minutes per side or until browned. If your skillet isn’t large enough to fit all the chops at once, work in batches. Once done, remove and set aside in the oven (heat off) to keep warm.
  3. In the same skillet, add the remaining butter together with the brown sugar mixture, chopped walnuts, and wedged apples. Cook and stir until the apples are tender, about 5 minutes.
  4. Serve with the chops along with some creamy mashed potatoes and blanched green French beans on the side to complete your meal. Enjoy!

Cinnamon-Apple Pork Chops

BON APPÉTIT

– Ally xx

myTaste.com

Bourbon & Maple Glazed Chicken

Bourbon & Maple Glazed Chicken

Hello Everyone! I really want to start of with a Green Day classic, but I realised just how lame it is and how overdone the joke is in the past years. For the non-Green Day fans or just those that have been living under a rock, Green Day released a song on their 2004 American Idiot album, a song titled Wake Me Up When September Ends – and I was going to go on this tangent about how it’s already October and that I wasn’t woken up when September ended. I told you it was lame *cheeky grin*

Anyway, mini tangent aside; as per usual, a new month calls for a new theme on the blog! This month, I will be sharing recipes that incorporate the use of alcohol into the dishes. Okay, how I came up with this theme was because I have a full bottle of Jack that has been sitting in the living room collecting dust for almost 3 years now, and I also brought back a bottle of red wine from my recent trip to the Philippines. For those of you who know me personally, you’ll know that I am not a drinker – so why do I have these beverages lying around the house if I don’t drink? Well, I mean the fact that my bottle of whisky has been sitting around for years speaks for itself. I don’t even know why I bought it in the first place; the only reason I could think of was so that I could use it in my cooking – and here we are now! I guess, with these two alcoholic beverages, you can tell when the month is going to predominantly feature *cheeky grin*

Bourbon & Maple Glazed Chicken

Tonight’s recipe was one that I whipped up a while back, during the long weekend in the middle of September. I brought it for lunch in the office the next day back, and my colleague asked me what I had brought in for lunch today. I replied “Bourbon and Maple-glazed Chicken with Chunky Mash and Pan-fried Asparagus.” She then laughed and continued to say “it sounds so Masterchef – like usually if you ask any locals what they had for lunch, they will just say ‘Buttermilk Chicken’.” I too laughed when she said that, referring to the fact that one would normally have a simply-named dish for lunch, but not me apparently. My lunch’s name was Masterchef worthy hahaha – yes, just the name, the overall dish is still maybe a bit too simple for Masterchef level. Maybe if I cooked it in liquid nitrogen to give it the Heston Blumenthal touch then I could be in it to win it… As if hahaha! Anyway, the original recipe for tonight can be found over on Simply Recipes.

Bourbon & Maple Glazed Chicken Ingredients

PREP TIME 5 MINS | COOKING TIME 1 HOUR | SERVES 6

INGREDIENTS

  • 6 pcs chicken whole legs, cleaned thoroughly
  • 3-4 garlic cloves, minced
  • 2-3 sprigs of fresh rosemary (or about 2-3 tsp of dried rosemary)
  • 1 small red onion, finely diced
  • 3/4 cup maple syrup
  • 1/2 cup bourbon whisky
  • 2 tbsp tomato paste
  • 1 tbsp unsalted butter
  • 1/4 tsp ground black pepper
  • 1/4 tsp salt

METHOD

  1. Preheat oven to 180C (350F or gas mark 4). Prepare the chicken by placing them skin side up in a oven-proof dish. Set aside.
  2. Bourbon Maple Glaze: Heat a medium-sized saucepan over medium-high and melt the butter until melted. Add in the minced garlic and cook until fragrant, about 1 minute, and then add the diced onions, cooking for about 2 to 3 minutes further.
  3. Add the bourbon whisky together with the maple syrup, tomato paste, rosemary, and season with salt and pepper. Whisk to combine and bring the glaze to a low simmer.
  4. Coat chicken with glaze and roast: Pour half of the glaze mixture over the pre-prepared chicken and toss to coat well. Place in the oven, and then roast the for about 30 minutes, then turn the chicken over and roast for a further 12-15 minutes, or until nicely browned. Lower the heat or remove from the oven if the chicken whole legs start getting too dark.
  5. Simmer remaining glaze until thickened: Meanwhile, as the chicken roasts away, simmer the remaining sauce in the medium-sized saucepan until it thickens slightly and can coat the back of a spoon. Once done, remove from the heat and then set aside. Tip: if it is taking too long for the sauce to reduce, pour it into a wide shallow pan and bring to a boil. The wider pan will make sauce evaporate more easily.
  6. Coat cooked chicken in glaze: When the whole legs are done, remove from oven and dip them into the saucepan with the reduced glaze.
  7. Serve on a bed of chunky roasted garlic mashed potatoes and some pan-fried baby asparagus stalks – of course, whatever you fancy with your chicken will do the trick. Enjoy!

Bourbon & Maple Glazed Chicken

BON APPÉTIT

– Ally xx

myTaste.com

Mashed Potatoes

Mashed Potatoes

Hello Everyone! Another simple recipe for you that has already probably come up in a few recipes as an accompaniment to a main dish, but I thought that I’d separate the recipe from a post I did two days ago. I love mashed potatoes. I still even remember the time I “made” them – a cringe-worthy experience I must say! I was THAT inexperienced that I “made” mashed potatoes by simply buying those pre-packed ones where you would just add water and violà! Can’t believe I did that for a year.

And you may think that mashed potatoes are simple and easy to make? Well somehow I still managed to stuff them up one time – it had a glue-like texture to it… It was just awful in texture but at least the taste was somewhat still there. I seriously had NO idea how that happened until I came across a Masterchef Australia’s Masterclass on TV where Gary showed how to make the perfect mashed potatoes. I then understood where my mistakes were and they were mainly to do with temperatures and process of mashing (I used to use a potato masher, but for a smoother consistency…you’ll find out below). Nonetheless, I can say that I’m pretty much there with my mashed potatoes – some days more creamy and some days more fluffy because I pretty much just eyeball the amount of milk and butter. Also always inconsistent with the number of potatoes that I use. So for this recipe, just adjust the amount of milk and butter to your liking.

PREP TIME 5 MINS | COOKING TIME 15-20 MINS SERVES 3-4

INGREDIENTS

  • 4 medium-sized white potatoes, peeled and cut into small chunks
  • 1/2 cup milk, warmed but not boiling
  • 10g unsalted butter
  • Ground salt and pepper to taste

METHOD

  1. Steam the potatoes for about 15-20 minutes or until tender (check by piercing a fork into the chunks of potatoes). Drain and pass the potatoes through a sieve back into the pot with the heat turned off. Work in batches if needed.
  2. Add the warmed milk, potatoes and ground salt and pepper, and mix until a smooth and creamy texture. Serve as an accompaniment to a main dish.

Mashed Potatoes

Also note the waterlily bowl that I used to hold my mashed potatoes in! If you’re a new follower or have not seen my blog before, head on to a post I did a while back on my Lovelily Tableware Collection where I hand-built plates and bowls for my introduction to ceramics course as part of my degree elective.

BON APPÉTIT

– Ally xx

myTaste.com

Braised Steak au Poivre in Red Wine

Braised Steak au Poivre in Red Wine

Hello Everyone! So last night, if you follow me on Facebook or Instagram, you would’ve known that I posted I few images of this dish and apologised for not being able to post the recipe on the same day (just had a lot of course reading material to get through and prepare for class the next day). Anyway, here is the recipe! And an early upload as well than my usual upload time.

So a couple of weeks (maybe 1 or 2 weeks back I guess) I was searching for a slow-cooked beef in red wine recipe as I had a lovely gravy beef steak waiting to be cooked and a bottle of red wine that was given to me by a friend. I don’t usually drink wine so that’s why I figured, why not cook with it instead?

Braised Steak au Poivre in Red Wine

Please check out the original recipe here. I changed mainly the quantities because of the amount of meat I had, but otherwise I kept to the recipe and added a few veggies to the dish. I completely forgot to add in the crème fraîche when I photographed the dish (but I remembered when I was halfway through eating), so I do apologise if the dish is looking a bit dark!

Au Poivre, for those of you who don’t know, is a French dish which translated just means steak (traditionally a filet mignon) prepared or served with a generous amount of coarsely ground black pepper. The peppercorns form a crust on the steak when cooked and provide a pungent but complementary counterpoint to the rich flavor of the high-quality beef.

Braised Steak au Poivre in Red Wine Ingredients

Braised Steak au Poivre in Red Wine Ingredients

PREP TIME 10 MINS | COOKING TIME 4 HOURS 10 MINS SERVES 3-4

INGREDIENTS

  • 450g beef shank, cut into 3 large chunks
  • 220ml red wine
  • 250g small cup mushrooms
  • 3 tbsp olive oil
  • 2 tbsp crème fraîche
  • 1 tbsp plain flour
  • 2 tsp whole black peppercorns
  • 1 large onion, finely chopped
  • 1 clove garlic, finely chopped
  • 1 small zucchini, cut into 1-inch long strips
  • 2 bay leaves
  • 1 sprig fresh thyme (or a tsp of dried thyme leaves)
  • Ground salt and pepper to taste

METHOD

  1. Preheat oven to 180C. Crush the peppercorns coarsely with a mortar and pestle. Mix the ground peppercorns together with the flour on a plate. Then coat the pieces of meat into this mixture, pressing it well in on all sides.
  2. Heat 2 tablespoons of the olive oil over high heat in a casserole dish (make sure it is really hot), and quickly brown the pieces of meat on all sides, and then transfer them to a plate.
  3. Keeping to a high heat, add the remaining olive oil to the pan and brown the onions, about 3-4 minutes. Then add in the garlic and cook for another minute. Add in any remaining flour and pepper left on the plate to the pan, stirring well to soak up the juices. Pour the red wine in a little at a time, continuing to stir to prevent any lumps forming, and scraping in any crusty residue from the bottom and edge of the pan. Bring to a simmer.
  4. Once simmering, add the meat to the sauce, season it with salt, then pop in the bay leaves and thyme. Bring it back to a simmer.
  5. Once simmering again, put a lid on the casserole and transfer it to the middle shelf of the oven to cook for 4 hours or until the meat is tender. During the last hour of cooking, add in the cup mushrooms and zucchini strips.
  6. When you’re ready to serve, remove the herbs, add the crème fraîche, stir it in well, then taste to check for seasoning before serving. Serve on a bed of mashed potatoes and a side of honeyed Dutch carrots (optional, open to creativity).

Braised Steak au Poivre in Red Wine

I will post the recipes for honeyed Dutch carrots and mashed potatoes in a separate post so stayed tuned for those two in the next two days!

BON APPÉTIT

– Ally xx


myTaste.com

Pan-fried Salmon with Mashed Potatoes & Wilted Spinach

Pan-fried Salmon with Mashed Potatoes & Wilted Spinach

Yesterday I whipped up a simple lunch. I don’t really have a back story for this, or some long winded explanation of a foreign ingredient, so today’s post will be short and straight to the point.

PREP TIME 10 MINS | COOKING TIME 25-30 MINS SERVES 2

INGREDIENTS

  • 2 salmon portions, skin on
  • 3 large golden potatoes, wash, peeled and cut into small chunks
  • 1 cup loose leaf baby spinach
  • 1/2 cup milk
  • Ground sea salt and pepper
  • Knob of unsalted butter
  • 1 tbsp Red Rock Deli-Style Dip, Sundried Tomato, Chargrilled Eggplant & Pinenuts (optional)

METHOD

  1. Place the potatoes in a medium-sized pot filled with salted water. Boil the potatoes for 15-20 minutes or until potatoes are tender. During the last 5 minutes, add the milk to a small saucepan and warm, do not boil.
  2. Meanwhile, press salmon filets between paper towels to dry surfaces thoroughly. Season on all sides with salt and pepper. Heat a knob of butter in a frying pan over medium-high heat. Add salmon filets skin side-down. Immediately reduce heat to medium-low. Cook, pressing gently on the back of the fillets to ensure good contact with skin, until skin is rendered and crisp, about 6 minutes. If skin shows resistance when attempting to lift with a spatula, allow it to continue to cook until it lifts easily. Flip salmon and cook on second side, about 1 to 1 and a half minutes longer, for medium-rare to medium. Transfer salmon to a plate lined with a paper towel to soak up any excess oils, and allow to rest. In the same pan, wilt spinach leaves.
  3. Remove the potatoes from the heat and drain. Working quickly, push the potatoes through a sieve using a rubber spatula, back into the pot. Add the milk and butter and fold. Season with salt and pepper to taste. Transfer to a serving plate together with the wilted spinach, salmon and deli dip.

Pan-fried Salmon with Mashed Potatoes & Wilted Spinach

BON APPÉTIT

– Ally xx

myTaste.com