Pineapple Coconut Braised Pork Ribs

Pineapple & Coconut Braised Pork Ribs

I am Justine Michael (JM) De Guzman. A 26-year old Information System Developer and a very passionate home cook from the humble town of Limay, from the province of Bataan. I worked at a Government agency as a System Developer, had a break due to burnout, and that’s when I started focusing on my kitchen (which will soon be a little less, because I’m about to get back on my career track).

How did I get into cooking and food? Well I don’t exactly know when, but all I can remember was ever since I was a little boy, I used to lurk around with my mom, aunties, and Lola in the kitchen. While other kids of my age play outside, I on the other hand was busy buzzing around my mom’s kitchen staff. I used to ask a lot of questions about how our food was done. I would always insist on chopping and slicing the ingredients for our lunch. And I would be the first to ‘tikim’ (taste) my Lola’s dish. Yeah, since childhood, I was into food and cooking. I’m always present when and wherever there’s food.

Though I never really had the opportunity to pursue my passion in cooking until I graduated college, my parents wouldn’t allow me to enroll into culinary or any related program because it’s ‘mahal’ (expensive). We were financially unstable during those times. My mom had cancer, and thank God she’s a very lucky and blessed survivor up to this moment. Going back to the story, it was actually my dentist who became my stepping stone on getting into the real world of cooking. Long story short, she has a sister, who happened to be a celebrity chef who resides in Manila, who is also a lecturer at a premier culinary institution in the country. She endorsed me to her for a scholarship grant given by the said school. So I got in, studied, and trained for months. Voilà!

After my culinary training, an opportunity came, not in the cooking industry though, so I still haven’t really experienced cooking for a living. That’s when I started my career in my field of profession (information system). I worked at the office, but my passion, or should I say obsession for cooking never faded. I’ve been known by my colleagues as the guy who cooks and the guy who has baon (packed food) 🙂 Food became my motivation for work. I always wonder what to cook for dinner when I get home, and for my baon for tomorrow’s lunch.

I began exploring different cuisines, by researching through the web, books (I started collecting books about food), food channels, etc. Aside from food and cooking, my other fascinations include history (Asian history), linguistics, society, and culture. I started to appreciate our food, Filipino food – Southeast Asian food, and those are great factors that shaped up my style and way in cooking. I developed my standards, philosophy, and list of ‘musts’ in my cooking. I rarely cook foods these days that are Western in my point of view. I’m so patriotic. Ingredients should always be fresh and sourced by me. LOL. Ingredients that can be made from scratch must never be substituted with industrially manufactured ones (I hate sinigang mix!). You’ll never see stuff like tomato sauce, sinigang mix, and stew mix, etc. in my pantry.

Pineapple & Coconut Braised Pork Ribs

If I remember it right, I started following Amcarmen’s Kitchen’s IG posts since last year. I really love her content and I frequently visited her blog as well. It was on the first day of May this year when I received a message from her asking about my interest in being part of her Auguest series.

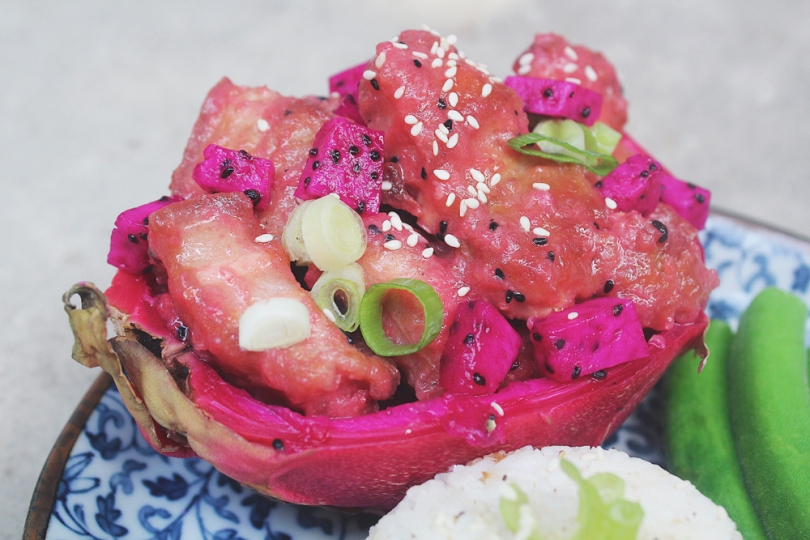
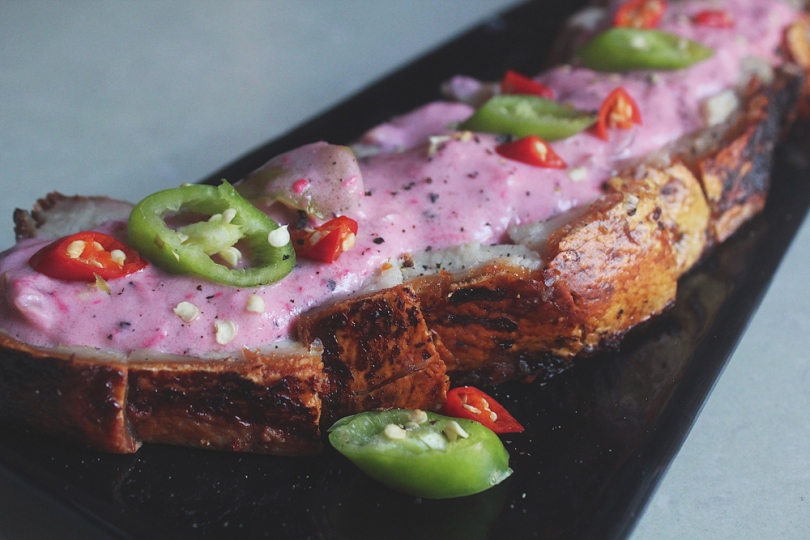
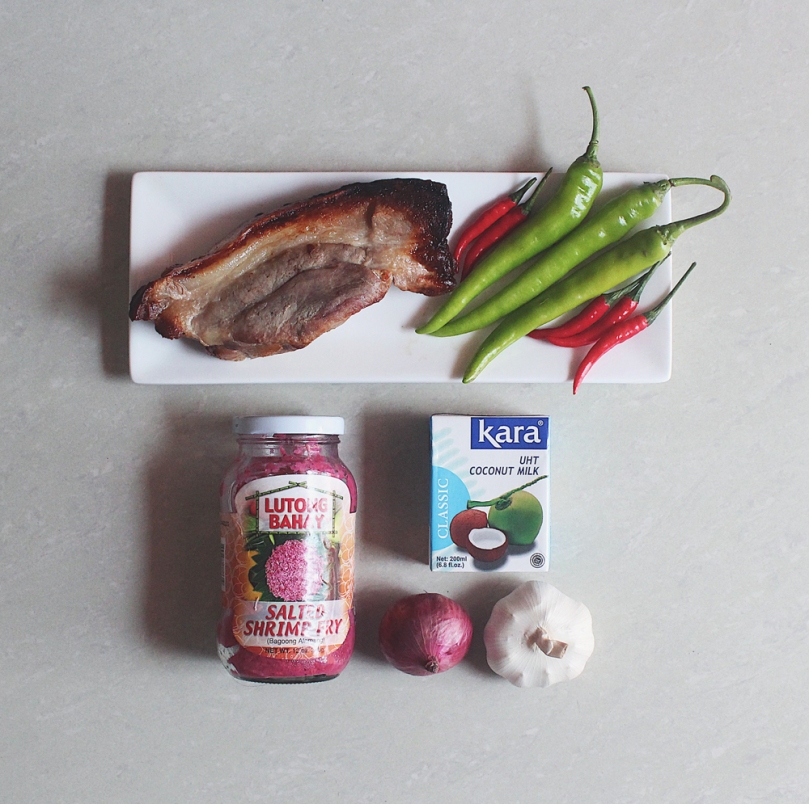
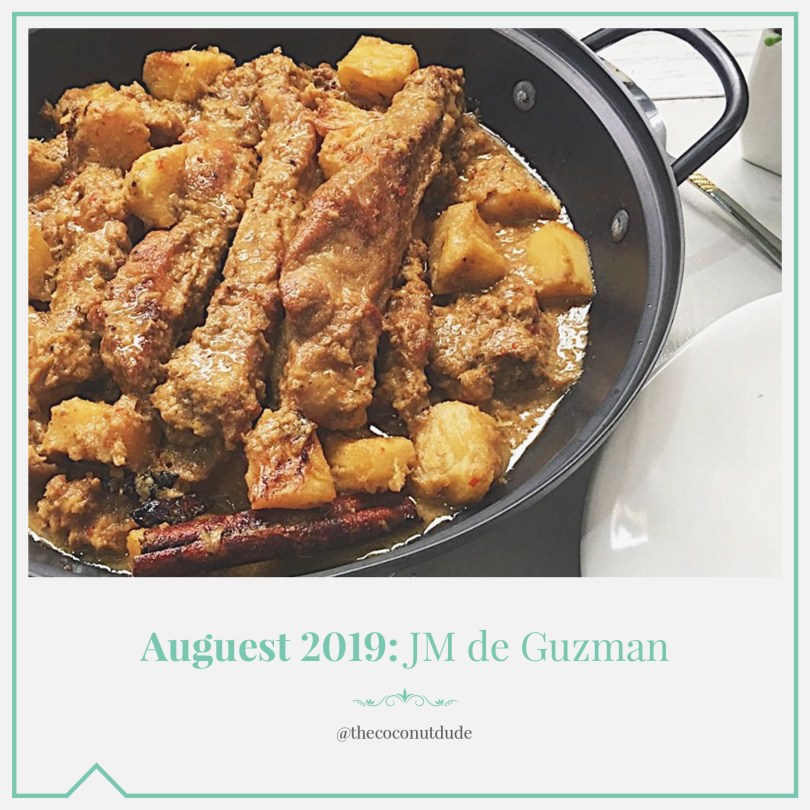
The dish I’m sharing is of my own creation That said, this isn’t a traditional and commonly home cooked dish in most Filipino households. I’ll just call it Pineapple and Coconut Braised Pork Ribs. Before diving into the recipe, let me share some insights about this dish. As I’ve mentioned before, I have these so called “standards, philosophy, and musts” in my cooking. As much as I can, I don’t use industrially manufactured ingredients, so this dish uses fresh pineapple (but you guys can use the canned one, it’s just me. LOL.).

My philosophy in cooking:

You shouldn’t cook or eat food just to survive or satisfy your hunger. For me food must be respected, consumed, and celebrated every time, along with the stories it underlies with. That’s why it’s important for me to know the background and the story behind one dish. Like why this is cooked this way, why these ingredients are used, etc.

Fun fact, I have this odd habit, just before we eat at home, I first gather the attention of everyone. I weirdly and literally discuss the dish we have on the table, the name, and the ingredients, how I cooked it, what’s its origin (if it’s a traditional dish), my reasons and inspiration of coming up with the dish if I just made it out of creativity and imagination, the taste profile, etc. Just like you do it in a culinary school. Only after that will then they’re allowed to eat. LOL. It’s weird right?! But it’s true. No kidding aside.

Again, this is not a traditional Filipino food per se, but I still call it Filipino food. When we say Filipino cuisine, we’re basically dealing with food that’s been shaped by various factors. Culture, beliefs, traditions, religion, local and indigenous ingredients, influences locally, and internationally. Pinoy foods’ characteristics show strong Southeast Asian/Malay, Chinese, Spanish, and Indigenous influences. I always use them in reference whenever I’m developing a dish, just so that I could come up with a more meaningful one. Like, when I think of an ingredient(s) to be used for my dish, I always make sure, it has to be significant to one’s culture or tradition. I wouldn’t use jalapeño or habanero pepper for my Bicol express, simply because it’s not native nor a traditional Filipino ingredient. You get my point, right? LOL 🙂 I always make sure that each ingredient used is there for a reason; it’s not just there because I want it to be there.

So, Pineapple and Coconut Braised Pork Ribs. As the name implies it’s pork braised in a sauce base with pineapple and coconut cream. Why pork ribs? Well, we Filipinos love our pork. Right? Who doesn’t love pork ribs! Pineapple is my hero ingredient. This is a very common ingredient used in Filipino cooking, and I’ve seen lots of traditional dishes that use it as the base or just a “sahog” (topping). My mom would add juice from a pineapple in her caldereta and hamonado dishes, and fresh chunks in her curry. Then we have coconut. What represents Southeast Asian/Pinoy food more than coconut? I’m a huge fan of gata, and I often cook dishes with gata as its base. It is a shared ingredient among ASEANs. The aromatics I used were shallots, garlic, and ginger – the Filipino mirepoix 2.0 as I call it, as 1.0 being the forever trinity of tomatoes, shallots, and garlic. I added spices into it, which is not a very common practice among Filipino cooking, aside from our ultimate spice known as “black pepper” to give it the curry-like flavour profile – black peppercorn, chillies, coriander, star anise, bay leaves, and cinnamon. For the seasoning, I used a balance of both fish sauce and soy sauce. In addition, since this is a sweet-tangy-savoury dish, I added “panutsa” or unrefined block sugar (but seriously brown sugar’s fine).

Pineapple & Coconut Braised Pork Ribs Ingredients

PREP TIME 30 MINS | COOKING TIME 45-60 MINS | SERVES 5-6

INGREDIENTS

  • 1 & 1/2 kg pork spare ribs, cut into individual ribs
  • 1 whole large fresh pineapple, divided
  • 200ml (approx. 3/4 cup) juice from half of the pineapple
  • 4 & 1/2 cups coconut cream
  • 6 red bird’s eye chili, finely minced
  • 6 shallots, finely minced
  • 2 bay leaves
  • 2 star anise
  • 1 cinnamon stick (or alternatively, 1 tbsp cinnamon powder)
  • 1/2 bulb garlic, finely minced
  • 6 tbsp panutsa or brown sugar
  • 4 tbsp ginger, finely minced
  • 1 & 1/2 tbsp coriander powder
  • Fish sauce, to season
  • Salt & pepper, to taste
  • Soy sauce, to season

METHOD

  1. In a large wok (kawa) over high heat, sear the ribs until browned and develops a crust on all sides. Set aside.
  2. Turn the heat down to low and add a portion of the coconut cream (about 1/4 cup) into the wok. Simmer until the coconut oil separates from its curd.
  3. In the now separated coconut oil, sauté the finely minced aromatics (shallots, garlic, and ginger) altogether. Sauté until aromatics are translucent.
  4. Turn the heat up to high. Return the seared pork ribs back to the wok and then pour in the pineapple juice, remaining coconut cream, all the spices, soy sauce, and fish sauce.
  5. Cover, bring to a medium boil, and then immediately turn the heat down to low.
  6. Meanwhile, in a medium heated pan, sear the cubed pineapples until browned and caramelized.
  7. For the last 15 minutes of simmering, add in the seared pineapple. Simmer the dish uncovered, just until the pineapple has absorbed the sauce. Season with salt and pepper to taste.
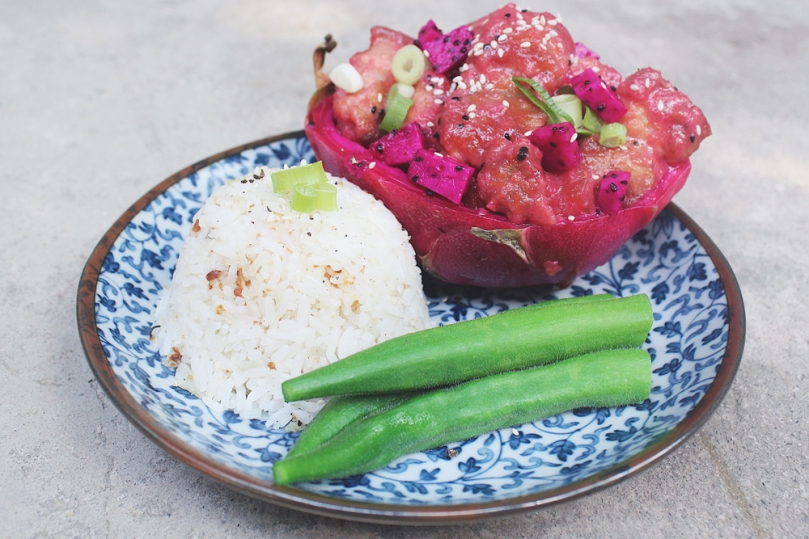
  8. Serve with steamed white rice. A little bowl of patis (fish sauce) with crushed chilies is a good accompaniment to this. Enjoy!

Pineapple & Coconut Braised Pork Ribs

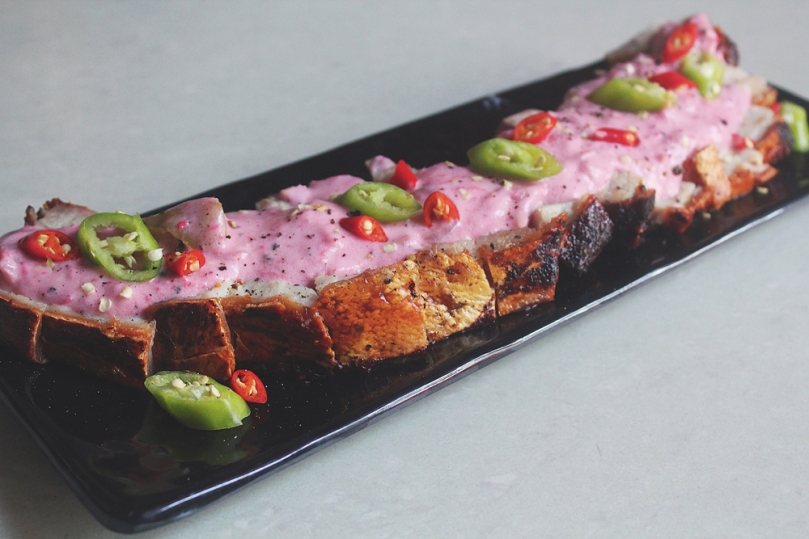
You can technically call this dish “ginataan”, and you might also find resemblance with hamonado because of its “fruitful” ingredient – pineapple and a hint of “curry-ness” from the added dry spices.

I hope you’ll like this recipe.

Photo Courtesy & Recipe Copyright © 2019 | JM de Guzman

BON APPÉTIT

– JM de Guzman

myTaste.com

Advertisement
Dragon & Lychee Pork

Dragon & Lychee Pork

Hello Everyone! It’s insane just thinking about how we’re already three-quarters of the way through the middle of the year! Have you achieved some of the things on your New Year’s Resolution that you set out at the beginning of the year? I personally don’t make resolutions, only because I never end up ticking off the things I set out to do, or I stop doing them after the first month. Exercise more? Sure. Goes on a morning run for a week, then decides sleeping in is way better than going for a run!

Instead of making resolutions, I set a motto to live by for the year. I entered the year with a few challenges that I brought in with me from 2018, and I said that with these, and the challenges ahead for 2019, that whatever happens, happens. I’ll tackle every challenge and obstacle with a go with the flow mindset. With that being said, before I leap into that mindset, I still have to be proactive in finding solutions to the challenges I face; it’s more of applying this motto to whatever the result may be, positive or negative. I can safely say that this mindset has helped me in overcoming a bulk of my challenges that I brought in from 2018; thankfully positive in its own way. It may not have turned out as I had originally planned in the timeframe I gave myself – but in the end, I got there with Plan B.

Dragon & Lychee Pork

Alas, tangent aside, before we move on to the recipe for tonight, please go and check out the original recipe by Chun Rong over on XLBCR: Singapore Food & Travel Guide Blog. I guess you could say that my dish is nowhere as near as Chun Rong’s dish – in terms of look, but I can assure you that taste-wise, it definitely hit the mark. This Dragon & Lychee Pork dish is similar to the infamous and very much loved Classic Sweet and Sour Pork.

The dish itself was to die for – succulent and crispy pork paired with a sticky sweet sauce? Yes please. However, there was one thing about the dish that played tricks with my mind – and I guess this is something that only Filipinos will understand. The dish – because of its colours – reminded me of binagoongan, and because of this, with every mouthful that I took, I expected a pop of salty flavours to dance in my mouth. So in my head, I thought that this was just a very badly seasoned binagoongan dish. I had to keep telling myself that it’s not meant to be salty!

Dragon & Lychee Pork Ingredients

PREP TIME 30 MINS | COOKING TIME 45 MINS | SERVES 6

INGREDIENTS

For the pork marinade

  • 500g pork belly (liempo), cut into thick chunks
  • 1 large free-range egg, lightly beaten
  • 1/4 cup cornstarch
  • 2 tbsp light soy sauce
  • 1 tbsp sesame oil

For the sauce

  • 3/4 cup dragon fruit and lychee jam*
  • 2 tbsp water
  • 2 tbsp white granulated sugar
  • 2 tbsp white vinegar

To garnish

  • Chopped scallions
  • Sesame seeds

To serve with

  • Garlic fried rice
  • Blanched okra

*For the dragon fruit and lychee jam (Recipe adapted from Linda’s Cravings)

  • 1 medium-sized dragon fruit (about 600g in weight), cut into chunks
  • 1 can (255g) lychees in syrup, drained and roughly chopped
  • 1 cup white granulated sugar
  • Juice of 1 lemon
  • Lemon rind

Dragon & Lychee Pork

METHOD

  1. Dragon Fruit & Lychee Jam: Add the dragon fruit, lemon rind, lemon juice, and sugar in a medium-sized sauce pot. Bring to a boil over high heat. While boiling, press down on the lemon rind to extract its natural pectin. Turn the heat down to medium and continue to simmer for about 30 to 45 minutes or when the mixture has thickened. Add the lychees in at the last 20 minutes or so. When done, remove from the heat and set aside.
  2. Dragon Fruit & Lychee Sauce: Mix 3/4 cup of the dragon fruit and lychee jam together with the water, sugar, and white vinegar. Set aside.

Tip: If you have any leftover jam left, transfer to a sterilised glass jar and seal. Great on wholemeal toast with ricotta cheese for a delectable breakfast. Just be sure to consume the jam within 2 weeks.

  1. Fried Pork: In a large mixing bowl, marinate the pork chunks in soy sauce, sesame oil, and egg. Set aside in the fridge for at least 15 minutes to half an hour. Add in the cornstarch to mix, just before frying. You may opt to deep or shallow fry the pork – I personally don’t like deep frying so I opted for the latter. Of course cooking times will vary.
  2. If shallow frying, add about 3 tablespoons of cooking oil in a large frying pan over medium-high heat. Lay the pork chunks into the frying pan and fry until golden brown and crisp, about 4 to 5 minutes per side. You may or may not have to work in batches for this. Once done, remove from the pan and set aside.
  3. Dragon and Lychee Pork: In the same frying pan, discard any excess oil. Over medium low heat, add the dragon fruit and lychee sauce. Taste and adjust first according to your liking. Add the fried pork, lightly tossing and coating the sauce over and then you’re done!
  4. Transfer to a serving plate, or serve in the casing of a hollowed out dragon fruit half. Garnish with chopped scallions, sesame seeds, and diced dragon fruit.
  5. Serve with garlicky fried rice and blanched okra for a full meal. Enjoy!

Dragon & Lychee Pork

BON APPÉTIT

– Ally xx

myTaste.com

Crispy Pork Bicol Express

Crispy Pork Bicol Express

Hello Everyone! I can’t believe that this is the last recipe for my Coconut series on the blog – time sure does fly by in the wink of an eye. I’ve enjoyed cooking up a coconut storm in the kitchen for the past month, though I’ve realised that all my recipes (expect for one) focused on using Coconut Milk instead of the actual fruit itself *whoops* Nevertheless, I still covered the brief for the month… Hopefully. I did say in my very first post of the year that I will be “cooking with fruits or their… Derivatives“.

For my last Coconut recipe of the month, I will be sharing with you the ultimate Filipino Comfort Food (well let’s face it, almost every Filipino dish is worthy of the ‘ultimate’ title), known as Bicol Express.

Now, I can get into the whole in-depth history of its origins and disputes, but I honestly have no mental power right now to paraphrase the information I’ve read up on. For those who are interested, here’s an article on Market Manila I stumbled upon while trying to figure out why this dish is named ‘Bicol Express’ – which by the way until now remains a mystery to me. Other than it being a catchy name, it’s name is also derived from an overnight passenger train service from Manila to the Bicol region; a region in the Philippines that is famous for their spicy cuisine.

Crispy Pork Bicol Express

Bicol Express is a dish made from pork, bagoong (salted shrimp fry), coconut milk, and lots and lots of chillies that is of course adjustable to your tolerance of spice. Bicol Express is traditionally cooked by stewing the ingredients altogether while crisping up the pork first is just another creative way of enjoying the dish. I prefer it this way just because I love a nice crisp skin when it comes to pork. Roasting it rather than deep-frying it also makes me feel a little less guilty *cheeky grin* but unfortunately, truth be told that this dish is not exactly waist-friendly. Succulent pork belly cubes and a creamy coconut sauce does come with a price to pay!

Crispy Pork Bicol Express Ingredients

PREP TIME 10 MINS* | COOKING TIME 50 MINS | SERVES 4

*Allow of 24 hours of resting time in the fridge for the pork belly after boiled.

INGREDIENTS

For the lechon kawali

  • 1 kg pork belly
  • 6 dried bay leaves
  • 1 tsp ground salt
  • 1 tsp whole black peppercorns
  • Extra salt, for roasting

For the Bicol Express sauce

  • 2 cups coconut milk (fresh, canned, or frozen)
  • 1/2 cup pork stock (from boiling the pork)
  • 5 red bird’s eye chillies, sliced
  • 3 long green chillies, sliced
  • 2-3 cloves garlic, minced
  • 1 small red onion, roughly chopped
  • 3 tbsp bagoong alamang (salted shrimp fry)
  • Ground black pepper, to taste

METHOD

  1. Lechon Kawali: Score the pork belly skin with a very sharp knife. Place the meat in a large pot with water, 1 tsp of the whole peppercorns and half of the bay leaves. Boil for 20 minutes. Remove from the heat and drain, placing in a large bowl and let to cool to room temperature.

Tip: Do not throw out the remaining pork stock. Reserve the pork stock to make other dishes or to use as a soup base. Keep in the fridge for up to 5 days or in the freezer for up to 1 month.

  1. Once the meat has cooled down, refrigerate uncovered for at least 24 hours for a better result. Refrigerating the meat will help to draw out any remaining moisture. Remove from the refrigerator and bring back to room temperature prior to roasting in the oven.
  2. Preheat oven between 220-240C (425-475F or gas mark 7-9). Rub oil and plenty of salt into the scored skin, really getting it into the slits of the score marks. The fat under the skin will react to the salt and that is what makes the skin puff up and crisp up.
  3. Roast in the oven for 20 minutes and then bring the temperature down to 160C (325F or gas mark 3) and roast for another 10 minutes. Remove from the oven and let the meat rest for 20 minutes. Then cut the pork into chunks and plate.
  4. Bicol Express Sauce: While the pork is roasting in the oven, prepare the Bicol Express sauce by heating about a tablespoon of oil over medium-high in a medium-sized cooking pot. Sauté the minced garlic until golden brown and fragrant, about 30 seconds, and then add in the onions. Cook until soft, a further minute or so.
  5. Add the salted shrimp fry and cook for about 3-4 minutes before adding the coconut milk and pork stock. Lower the heat down and bring to a slow boil. It is important to bring it back to a boil slowly to avoid curdling the coconut milk. This happens when it is heated too quickly.
  6. Season the sauce with ground black pepper and add in the sliced red and green chillies (reserve some for garnishing later). Continue to cook the sauce until it starts to thicken and reduce by half, about 10-15 minutes further on low heat.
  7. Once the sauce is done, pour over the plated crispy pork belly chunks and garnish with the fresh chillies.
  8. Serve with steamed jasmine rice and pair with some sautéed long beans in garlic (or any other favourite vegetable dish of yours) to balance out the richness of the Bicol Express. Enjoy!

Crispy Pork Bicol Express

Before I end tonight’s post, I just want to say that next week I will be back with a new fruit to hero with my upcoming recipes to share so stay tuned for that!

BON APPÉTIT

– Ally xx

myTaste.com

Svenska Köttbullar (Swedish Meatballs)

Svenska Köttbullar (Swedish Meatballs)

Hello Everyone! We’re finally into the last month for 2016! Gosh how time flies by so quickly! Anyway, I won’t go into another sentimental tangent on how the year is almost up and all that jazz, and I’ll just get right into it! Like I said on Instagram, I won’t reveal what the theme for December will be for Amcarmen’s Kitchen – instead I will have you guys guess what the theme is. You don’t have to guess right away, and I think the theme will only be a little more clear by the second or third week.

Svenska Köttbullar (Swedish Meatballs)

So, I first came across this dish, not through my travels to Sweden, but through the many adventures I’ve had when, as stereotypical as this will sound, visiting IKEA. Yes, IKEA – whether it was when I was still living in Australia, or travelling through Singapore, you’d definitely see me at their food court for either lunch, or dinner, depending on the time of day I visited there, with a plate of köttbullar. If you were to ask ten different Swedes about making köttbullar, you will most indefinitely get ten different answers. Sure they would be similar in some way or another, but most Swedes will have their own way of making köttbullar and so everyone will use a bit more or a bit less of this or that ingredient. Apparently, köttbullar is Sweden’s national dish, which some do question as it is not a particular exciting dish that speaks for the whole Swedish cuisine. Nonetheless, I think most real Swedes would agree that these meatballs are pretty good.

Svenska Köttbullar (Swedish Meatballs)

I can’t get over how deliciously amazing the gravy that accompanied my meatballs were. I think I probably ate half of it by the time every element for the dish was done, and I definitely drowned my balls in the gravy after. In southern Sweden many people prefer their ground meat with a little more fat, but the further north you go, the less pork you will find in the meatball mixture. However, bread or crumbs allowed to swell in milk are as important as the lingonberries on the side. They give Swedish meatballs their special soft consistency. I had some leftover herbed focaccia bread lying in the fridge from the week before and so I decided to cut them up into about 1cm cubes, drizzle them with a bit of olive oil and then toast them in the oven until browned and crisp. I then added the toasted bread into a food processor and pulsed until crumbed. Before we dive into the recipe, please check out the original recipe for Classic Swedish Meatballs over on BBC Good Food.

Also, you may notice that once you go through to the recipe that I mentioned about ‘blanching’ the balls before browning them. The reason why I decided to blanch the balls first is to maintain it’s round shape and therefore I shall not encounter a lifetime of sadness when it come to browning them after. I cannot express how much sadness I’ve experienced when making meatballs. Every time I fry them, the go flat on one side, and of course, when I try to flip them, they somehow get ruined, and when that happens, my day is ruined.

Svenska Köttbullar (Swedish Meatballs) Ingredients

Svenska Köttbullar (Swedish Meatballs)

PREP TIME 15 MINS | COOKING TIME 20 MINS | MAKES 20 MEATBALLS*

*My balls were about slightly smaller than a ping pong ball and I managed to make 20 of them. You could probably make 30-35 balls if they are slightly smaller than mine.

INGREDIENTS

For the meatballs

  • 400g lean pork mince
  • 1/3 cup bread crumbs
  • 1 large free range egg, beaten
  • 1 small brown onion, finely chopped
  • 1 tbsp finely chopped parsley, plus extra to serve
  • Ground salt and black pepper, to taste

For the gravy

  • 3 cups beef or pork stock**
  • 50g unsalted butter
  • 3 tbsp plain flour
  • Ground salt and black pepper, to taste

Optional to serve

  • Chunky mashed potatoes
  • 2-4 tbsp of Lingonberry (otherwise red currant, raspberry, or cranberry jelly), less or more to taste

**I made my own pork stock by boiling a few pork bones with black peppercorns, salt, and dried bay leaves.

METHOD

  1. In a large bowl, combine all the ingredients for the meatballs and mix until well incorporated. Then, form the pork mince mixture into meatballs to the size that you want.
  2. Bring a large pot of salted water to a boil and the drop each meatball in one by one and ‘blanch’ for about a minute to a minute and a half before removing them from the pot. You may need to do this in batches if your pot is not big enough. Once removed, drain.
  3. Heat a large frying pan with about 2 tbsp of olive oil over medium-high. Add in the meatballs and brown all over, about 5 minutes altogether. Again, you may need to do this in batches. Once browned, transfer to a dish lined with a paper towels to absorb any excess oil from the meatballs.
  4. To make the sauce/gravy, first make a roux by heating the butter in the same frying pan on medium heat until melted and slightly browned. Then, slowly whisk in the flour, stirring until smooth. Continue to stir for several minutes as this allows the flour mixture to cook, until the roux is the colour of coffee-with-cream.
  5. When the roux has cooked to a lovely shade of light brown, slowly add the stock to the roux, stirring as you add the stock. The stock will sputter at first and the roux may seize up, but keep adding the stock slowly and keep stirring. Eventually the sauce will loosen and become silky.
  6. Serve the meatballs on a bed of chunky mashed potatoes, topped with the gravy and an optional of lingonberry on the side. Enjoy with family and friends!

Svenska Köttbullar (Swedish Meatballs)

Svenska Köttbullar (Swedish Meatballs)

BON APPÉTIT

– Ally xx

myTaste.com

Hamonado (Pork Rolls Stewed in Pineapple Juice)

Hamonado (Pork Rolls Stewed in Pineapple Juice)

Hello Everyone! First of all, apologies for a later than usual post. I just got back home about an hour ago and yes, I am still writing this post – I didn’t manage to get around to writing this in advance knowing that I wouldn’t get home until later than I usually do. Oh well! Anyway, we’re halfway through our 12 days before Christmas Special on Amcarmen’s Kitchen, and I want to know, which of the ones that have been posted are your favourites? Let me know in the comments section below 🙂 Anyway, tonight’s recipe is just as simple in terms of the ingredients used to make such lavish looking dish, and delicious of course, for Noche Buena. However, the dish is not limited to the Christmas season as it can also be found on tables on an everyday basis.

In a nutshell, Hamonado is simply, thinly sliced pork (like tapa style) sweetened in pineapple juice. It resembles sliced ham but is often thick, juicy, and exceptionally sweet. What makes this dish quite interesting is due to it’s simplicity – here are the three very basic steps: marinating, pan-frying, and simmering. What makes this dish right on the money is because of the balance of flavours – you’ve got the sweetness from the pineapple juice and sugar mixture that penetrated through a lovely pork shoulder from the marinating process, while you get a hit of salt from the salted egg that is stuff in between the meat when it is rolled up.

Hamonado (Pork Rolls Stewed in Pineapple Juice)

From doing some research on this dish, I’ve found multiple recipes that skip the process of having to roll up the meat into a log, which is also okay to do so as the flavours still remain the same. If you wish to go down this path, then I suggest you cut your pork shoulder into chunks instead of slicing it thinly and flattening it out. This is actually the easiest way of cooking pork hamonado for the novice cooks to take a stab at. I think what my Mom ended up doing was that she rolled up about 1/2 of the pork, and the other half she just stewed it in the marinade.

Hamonado (Pork Rolls Stewed in Pineapple Juice) Ingredients

PREP TIME 20 MINS* | COOKING TIME 30-45 MINS | SERVES 10-12

*Does not include marinating  process which is a minimum of 3 hours, or preferably overnight. Plan your time according by taking this into account.

INGREDIENTS

  • 3kg pork shoulder, sliced thinly
  • 4 salted eggs, hard boiled, and cut into 4 wedges
  • 2 cups sugar
  • 2 bulbs garlic, minced
  • 1 can (1360ml) Del Monte pineapple juice
  • 1 can (340g) pineapple slices
  • 1 tbsp achuete powder
  • Ground salt and pepper, to taste,

METHOD

  1. Combine the thin slices of pork in a large mixing bowl together with the pineapple juice, sugar, and achuete powder. Give it a good mix until the sugar has dissolved. Cover with plastic wrap and leave it in the refrigerator to marinate for a minimum of 3 hours, overnight preferred to soak up more of the flavours (my Mom marinated it for three days).
  2. Remove the pork from the marinade (do not discard), and place the slice on a flat surface and arrange the salted egg in the centre of the slice. Roll and form into a log. Secure the roll by tying cooking string around the log, making sure that it is tight enough to hold the roll.
  3. Heat about 2-3 tablespoons of oil in a large pot over medium-high. Sauté the garlic until fragrant and golden brown, about 1-2 minutes. Follow with the rolls of pork, searing it until all sides are golden brown, approximately 5-8 minutes. Pour in about half of the marinade juices and leave to simmer for about 30-40 minutes, or until the sauce thickens. You will need to flip the pork rolls from side to side every 15 minutes.
  4. Once done and the sauce has thickened, remove the pork rolls  and place it on a platter. Carefully remove the cooking string and slice into serving pieces.
  5. Pour the sauce over the pork hamonado rolls and serve, and enjoy with pineapple slices and any extra  wedges of salted egg. Usually eaten with steamed rice.

Hamonado (Pork Rolls Stewed in Pineapple Juice)

Hamonado (Pork Rolls Stewed in Pineapple Juice)

BON APPÉTIT

– Ally xx

myTaste.com

Singapore Mei Fun (Fried Rice Vermicelli Noodles in Curry Powder)

Singapore Mei Fun (Fried Rice Vermicelli Noodles in Curry Powder)

Hello Everyone! Tonight I will be sharing with you another Singaporean dish that I love. What I love about this is the curry powder that is incorporated into this fried noodle dish. When I first tried this noodle dish, I didn’t expect it to be coated in curry powder – well, I mean, it’s not like the name of the dish was a dead giveaway for what’s in it. So it was definitely quite unique to me when I first tried it – and I loved it!

I kind of went with it on my own after indulging in much of it over the past several years, but I did refer to Saucy Spatula for reference. I also learnt a few things from her blog, the main one being that authentic Singapore fried rice vermicelli (or know as fried bee hoon), does not include curry. Unfortunately, the question of where the addition of curry originated from cannot be answered, however many claimed it to have come from Hong Kong. So why isn’t it called Hong Kong fried rice vermicelli? Well, apparently this noodle dish resembles more towards the Singapore fried bee hoon so I guess why argue with that?

Singapore Mei Fun (Fried Rice Vermicelli Noodles in Curry Powder)

PREP TIME 5 MINS | COOKING TIME 25-30 MINS | SERVES 4-5

INGREDIENTS

  • 450g bee hoon (thin rice vermicelli noodles)
  • 250g char siu pork (Chinese BBQ pork)*, sliced
  • 100g beansprouts
  • 2-3 garlic cloves, minced
  • 2 Chinese sausages, sliced diagonally
  • 2 red bird’s eye chillies, sliced
  • 1 large free range egg, beaten
  • 1 small brown onion, diced
  • 1/2 a head of cabbage, sliced
  • Tricolour capsicum (1/4 of each), sliced

For the sauce

  • 1/4 cup light soy sauce
  • 3 tbsp cooking wine
  • 1 & 1/2 tbsp curry powder
  • 1 tsp sugar
  • 1 tsp white pepper powder

*If you can easily buy it at the shops, or even your local Chinese restaurant, then I do recommend that you just buy it if you want your fried noodles now and fast! (It takes a considerate amount of time when you’re making your own char siu pork at home). But, if char siu is not available, you can substitute with ham, bacon, or shredded pork.

METHOD

  1. Start off by bringing a large pot of slightly salted water to a boil. Once boiling, add the rice vermicelli noodles and cook according to packet instructions, about 15 minutes for this brand of noodles. Once the noodles are done, drain and set aside.
  2. While the noodles a boiling away, mix the sauce ingredients in a small bowl. Set aside.
  3. Heat oil in a large frying pan over medium-high. Add the beaten egg and spread around the frying pan until thin. Fry for about a minute per side, remove and set aside to cool. Once cooled, slice them into thin strips.
  4. In the same frying pan, heat a little bit more oil and then sauté the garlic and chillies until fragrant and golden brown. Then add in the onions and cook until soft, about 2 minutes altogether.
  5. Add the Chinese sausage slices and cook for about 2 minutes. Follow with the char siu pork and capsicum, cooking for a further 3-4 minutes. Finally, add in the cabbage and beansprouts, cooking until just about to wilt.
  6. Add in the drained rice vermicelli noodles together with the sauce and give it a good mix, until the noodles are evenly coated with the curry powder mixture. Turn the heat off, garnish the noodles with some spring onions, and top with the sliced fried egg.
  7. Serve immediately with a squeeze of calamansi or a lemon wedge. Enjoy!

Singapore Mei Fun (Fried Rice Vermicelli Noodles in Curry Powder)

Singapore Mei Fun (Fried Rice Vermicelli Noodles in Curry Powder)

BON APPÉTIT

– Ally xx

myTaste.com

Singapore-style Hokkien Mee (Fried Yellow Noodle & Rice Vermicelli)

Singapore-style Hokkien Mee (Fried Yellow Noodle & Rice Vermicelli)

Hello Everyone! I’ll keep this short only because I’ve had such a busy day today and I just want my brain to relax and not have to look at a computer screen any longer (since that’s what I have been doing all say today). Then again, who am I kidding, after I write this post I will most likely end up looking at my computer screen but instead of utilising my brain and trying to get words to flow, I’ll be watching shows or random videos on Youtube until it’s time to go to bed *cheeky grin*

Anyway, enough babbling, tonight’s recipe is a dish I first experienced during one of my many travels to Singapore. When I saw a picture of it on the menu boards at a hawker centre that I was at (can’t remember where exactly), it was different to the Hokkien Mee that I usually ate back in Brunei, which apparently I have only just learnt after doing a quick Google search, is  Malaysian-styled braised in dark soy sauce. I actually quite like both, and though the ingredients are pretty much similar, I much prefer the Singapore-style Hokkien Mee.

The original recipe can be found over on Rasa Malaysia; I have tweaked the recipe slightly in terms of the order in which the ingredients go in and a few of the processes.

Singapore-style Hokkien Mee (Fried Yellow Noodle & Rice Vermicelli)

PREP TIME 10 MINS | COOKING TIME 45 MINS | SERVES 4-6

INGREDIENTS

  • 400g prawns, peeled and deveined
  • 350g squid, cleaned and cut into rings
  • 250g fresh yellow noodles
  • 250g thin rice vermicelli noodles
  • 200g pork shoulder
  • 100g bean sprouts
  • 3 large free range eggs, lightly beaten
  • 3 pcs dried bay leaves
  • 2-3 garlic cloves, minced
  • 1 pc fish cake, sliced diagonally
  • 1 small red onion, diced
  • Salt
  • Spring onions
  • Whole black peppercorns

Seasonings

  • 1/2 tbsp fish sauce, adjust quantity to taste
  • Dash of ground white pepper
  • Dash of sesame oil

To serve

  • Calamansi (or lemon wedge)
  • Sambal

METHOD

  1. Add the pork shoulder, dried bay leaves, about a teaspoon or two of whole black peppercorns, and salt to a large pot filled with about 2L of hot/boiling water. Turn the heat up to high and leave to boil for about 30 minutes or until tender. Once done, remove the pork from the stock and set aside to cool before slicing into it.
  2. Meanwhile, blanch the prawns and squid in the boiling stock, about 30 seconds to a minute. Remove from the stock and set aside. Then add in the rice vermicelli noodles and cook as per packet instructions or until just about tender. Once done, drain and set aside.
  3. Heat oil in a large frying pan, or wok, over medium-high and sauté the garlic until fragrant and golden brown. Add in the onions and cook until soft, about 2 minutes altogether.
  4. Turn up the heat to high and then add in the yellow and rice vermicelli noodles, frying for a few minutes until the noodles just begin to sear. Add in about a third of the pork stock and seasoning, continuing to cook until most of the stock has been absorbed by the noodles. Add another third of the stock and then bring the heat down to medium-low to allow the noodles to braise over a slow simmer, about 5 to 7 minutes.
  5. Add in the egg and give it a good mix before adding in the bean sprouts, prawns, squid, and pork slices. Give it a good toss and fry for about a minute before adding in the remaining stock.
  6. Plate up and garnish with some spring onions on top. Serve with a side of sambal and calamansi. Enjoy!

This slideshow requires JavaScript.

BON APPÉTIT

– Ally xx

myTaste.com

Pancit Lucban (Filipino Style Stir-Fried Thick Flour Noodles)

Pancit Lucban (Filipino Style Stir-Fried Thick Flour Noodles)

Hello Everyone! So tonight, I’m sharing with you a dish that I think I over indulged in during my recent trip back to the Philippines earlier on the year in March/April 2015. We spent a ridiculous amount of lunches and meriendas in Buddy’s while we visited our relatives in the provincial City of Lucena. Anyway, the dish, known as Pancit Lucban or Habhab, is a version of pancit that originated in the Quezon province. This noodle dish may draw many resemblances to the traditional Pancit Canton, but there are some apparent differences. The main difference is all in the type of noodles used; Pancit Lucban/Habhab uses dried flour noodles known as miki Lucban which are not the same noodles used to make pancit canton. In addition, miki Lucban noodles that are made fresh also have a much softer texture than that of pancit canton.

Here’s a fun fact for you – well okay, it’s not really a fun fact but it is quite interesting and may be one of the reasons you’d probably go out and have a handful of Pancit Lucban. That’s right, a handful. This version of pancit is traditionally served over a piece of banana leaf and is eaten without any utensils. I know what you’re thinking, how exactly do you eat noodles without any utensils?! Well, imagine eating a sandwich. You will need to grab the banana leaf with the noodles in it and put it directly to you mouth. Don’t eat the banana leaf though! Below is a picture of my cousin and my Mom back in 2008 (I think) having some Pancit Lucban from a street food vendor during a dog show/walk in Lucena:

My Mom & Cousin eating Pancit Lucban the traditional way

It’s probably not the most glamorous way to eat your noodles, but it may be an exciting experience especially to those who find this way of eating very foreign to them. Miki Lucban is unfortunately not commonly found in stores around Brunei, not even in the Filipino section. So instead, we used Pancit Canton which actually makes calling this dish Pancit Lucban a sin! *cheeky grin*

Pancit Lucban (Filipino Style Stir-Fried Thick Flour Noodles) Ingredients

PREP TIME 10 MINS | COOKING TIME 45-50 MINS | SERVES 6-8

INGREDIENTS

  • 450g pancit canton (or miki Lucban if available)
  • 250g tiger prawns, shelled and deveined
  • 100g snow peas, topped and tailed
  • 3-4 dried bay leaves
  • 2-3 garlic cloves, minced
  • 2 pcs thin sliced pork belly, cut into 1cm chunks
  • 1 bunch gai lan (Chinese broccoli)
  • 1 carrot, julienned
  • 1 chicken crown, breasts removed and sliced, bone reserved
  • 1 small red onion, diced
  • 1/2 chayote, peeled and sliced
  • 5 tbsp light soy sauce
  • Ground salt and black pepper to taste
  • Whole black peppercorns

METHOD

  1. Add the reserved chicken bone, dried bay leaves, about a teaspoon or two of whole black peppercorns, and salt to a medium-sized pot filled with about 1.5L of hot/boiling water. Turn the heat up to high and leave to boil for about 30 minutes.
  2. Meanwhile heat a large frying pan over medium-high and add in the chunks of pork belly. Cook until browned. The oils released from the pork belly should be enough to sauté the garlic and cook the onions, but if needed, add a little bit more oil if there isn’t enough. Then add the minced garlic and sauté until fragrant and golden brown, about a minute, then followed by the diced onions. Cook until soft, about 2 minutes in total.
  3. Add in the sliced chicken breasts, and season with a bit of salt and ground black pepper and give it a good mix. Cook for about 5 minutes. Then add in the prawns, followed by the chayote, carrots, and snow peas. Mix well and leave to cook for a further 3-4 minutes. Lastly, add in the gai lan and cook until just slightly wilted. Once done, transfer to a bowl and set aside.
  4. In the same frying pan, add about half of the chicken stock to the pan together with the soy sauce, ground salt, and black pepper. Bring to a boil. Once boiling, add the canton noodles in and cook until all the liquid has evaporated (if the noodles are looking a bit dry, you may add more stock, a ladle at a time). Make sure that while cooking, you mix and untangle them periodically. Altogether this should take about 10-15 minutes. Halfway through, add in half of the cooked meat and vegetables to the noodles and mix well.
  5. Serve immediately topped with the extra meat and vegetables, and with calamansi, or alternatively a lemon wedge. Enjoy! Note: best served with a splash of vinegar!

This slideshow requires JavaScript.

BON APPÉTIT

– Ally xx

myTaste.com

Pancit Palabok (Filipino Style Noodles with Prawn Gravy)

Pancit Palabok (Filipino Style Noodles with Prawn Gravy)

Hello Everyone! I might keep this section of the blog short (and I say might because I know that even though I’ve said that, my post will always end up being fairly long by the time I finish writing), because I am feeling a bit overworked and tired today – actually I’ve been feeling exhausted since the beginning of the week and it may be due to a mentally challenging Escape Room challenge that I did with a few friends on Monday evening. Small tangent – we all shared the spotlight on dumb blonde moments!

Tanget aside, tonight’s recipe is a dish that I, of course as all dishes I write about, love but isn’t cooked often at home. The only reason I can think of is maybe because it requires a lot of ingredients and preparation I guess. It’s not so much about how long it takes to make the sauce because in the past, my mom would just use a ready-made powdered version of the sauce that you can easily find on the shelves in the Filipino/Asian food section of your local grocers. For tonight’s post though, I will be making the sauce from scratch just because I want to 🙂 This is also the first time that I have tried making the sauce from scratch and it was a huge success! It’s actually quite easy to make, it just requires a lot of time and patience; but I know for sure that I will not be buying ready-made sauce packets ever again! Unless of course, time is not on my side. I mean, if you’re going to use fresh prawns to top your noodles off in the end, then you might as well take an extra step in salvaging the heads and peels to make a delicious sauce, right?

Pancit Palabok (Filipino Style Noodles with Prawn Gravy)

Anyway, before we jump on to the recipe, I followed Trissalicious’ recipe for making the Palabok sauce from scratch so don’t forget to check her blog out too for her take on this delicious dish!

Pancit Palabok (Filipino Style Noodles with Prawn Gravy) Ingredients

PREP TIME 15 MINS | COOKING TIME 1 HOUR | SERVES 8-10

INGREDIENTS

For the prawn stock

  • 500g fresh prawns, heads and peels reserved
  • 1.5L water
  • Ground salt
  • Whole black peppercorns

For the sauce

  • 100g thin sliced pork belly, cut into chunks
  • 3-4 cups prawn stock (see recipe below)
  • 5 garlic cloves, minced
  • 2 small red onions, diced
  • 1 pc firm tofu, finely diced
  • 4 tbsp plain flour
  • 2-3 tbsp fish sauce, adjust quantity to taste
  • 1 tsp achuete powder
  • Ground salt and black pepper, to taste

Noodles and Toppings

  • 500 grams pancit luglug (cornstarch noodles)*
  • Firm tofu, deep fried and cut into chunks
  • Hard boiled egg, sliced
  • Pork crackling (chicharon), crushed
  • Prawns, poached
  • Smoked fish (tinapa), flaked
  • Squid, cut into rings and poached
  • Spring onion

*You may also use bihon (thin rice vermicelli noodles) for this dish

METHOD

  1. Make the prawn stock: Add the prawn heads and peels to a medium-sized pot and cover with about a litre and a half of water. Season with a bit of salt and whole black peppercorns. Bring to a boil over high heat and then turn it down to a slow simmer. Make sure to press down on the heads and peels as it simmers away to extract as much flavour as you can. Leave it to simmer for about 30 minutes. While the stock is simmering away, you can get a head start in preparing your toppings for the dish. I recommend that you leave the poaching of the prawns and squid for last, when you sauce is almost ready.
  2. Make the sauce: Heat a large frying pan over medium-high and add in the chunks of pork belly. Cook until browned. The oils released from the pork belly should be enough to sauté the garlic and cook the onions, but if needed, add a little bit more oil if there isn’t enough. Then add the minced garlic and sauté until fragrant and golden brown, about a minute, then followed by the diced onions. Cook until soft, about 2 minutes in total.
  3. Add in the firm tofu and give it a good mix. Then, add in achuete powder and plain flour, followed by the prawn stock. Make sure to add the stock in a bit at a time as if making a roux and make sure to mix well after each addition. The sauce should be quite thick, resembling the consistency of a béchamel – you may add more water if you want your sauce thinner, or likewise, add more flour if the sauce is feeling a bit thin to your liking. Add the fish sauce and season with some salt and black pepper to taste. Bring the heat down to low and let it slowly simmer away for about half an hour (10-15 minutes if you are impatient); but the longer you leave it on the stove, the tastier the sauce becomes!
  4. Cook the noodles: While your sauce is simmering away, cook the noodles according to the packer instructions, about 15 minutes for the pack of noodles that I got. Once done, drain and divide the noodles equally into individual plates. Also, don’t forget to poach your prawns and squid by this point!
  5. Assemble: Top the noodles with a generous amount of sauce and add your favourite toppings! Serve immediately with a squeeze of calamansi (or lemon) juice and enjoy!

Pancit Palabok (Filipino Style Noodles with Prawn Gravy)

Pancit Palabok (Filipino Style Noodles with Prawn Gravy)

BON APPÉTIT

– Ally xx

myTaste.com

Mr. Crackles

Hello Everyone and welcome back to an all new Review Sunday! Just a little heads up, next week Sunday will the the last Sunday that I will be doing reviews. I’ve come to a point where I’ve pretty much covered all of the places I’ve been to when I was in Sydney and haven’t been to restaurants, cafés, and/or eateries around Brunei – well I have, but I haven’t been in a I-need-to-take-a-picture-of-this-so-I-can-review-it-for-later kind of mood lately. Don’t fret! I will still be posting on Sundays, they just won’t be reviews. Instead, I will be sharing with you some of my design works since I believe that the last time I posted anything design related on my blog was about a year ago; so you’ve got that to look forward to!

Back on topic, today I will be reviewing one of the best places, in my opinion, to get a fairly priced roll of tender, succulent, crispy-skinned pork crackling. Excuse me for a second while I wipe the drool that just dribbled down my chin as I typed that. Only kidding, but seriously, if you’re ain’t watching your calories, this is where you need to be at every opportunity you get! I’ve passed this place so many times before as it’s within probably a 10-minute walk away from campus, but I’ve never really gone inside and tried their rolls until August of last year I think (and I had been living in Sydney since 2011)! My high school friend (and still friends now) Andrew was visiting from Brunei/UK and I decided to take him here for lunch before his flight back to Melbourne, and then Brunei, eventually to the UK. Of course Jialing was with us too; no food adventure would be complete with my partner in crime.

The second time I came here was the Christmas of 2014 I believe, and that was when I saw my friend Marissa post a photo of their special Christmas roll; apple sauce and cranberry relish paired with crispy pork?! Hells yes! Of course I went back with Jialing; she indulged in her Sticky BBQ Pork again. I think I may have gone back a couple times more before I introduced this place to my family when they were over for my graduation in June. Everyone, and of course myself included, loved this place, and how I wish that a Mr. Crackles existed on one of the side streets of Brunei. I’d be their number 1 customer hands down!

ROLLS

Mr. Crackles: Crackles Christmas Roll
ROLL OF THE MONTH (DECEMBER 2014)
Crackles Christmas Roll: Crispy pork, apple sauce, cranberry relish, and herb crumb ($13.50)

As mentioned above, I could not resist saying no to this little gem. I think what got me was the apple sauce and cranberry relish; first, you can’t go wrong with crispy pork crackling being paired with some apple sauce. Secondly, the cranberry relish to really pull the idea of Christmas together in this man-sized roll. The pork was, as always, cooked perfectly; tender, juicy meat with a satisfying crispy crackling for that crunch we all look for in a great roast pork. Everything else complimented the roll nicely.

Mr. Crackles: Braised Beef Cheek
ROLL OF THE MONTH (MAY 2015)
Braised beef cheek, parmesan mash, and gremolata crumble in a soft bun ($13.50)

I mean, I know the presentation of this roll is less enticing and extravagant than that of the other rolls, but trust me when I say that this is one pretty amazing combination of tender braised beef cheeks and parmesan mash in a soft bun. I had actually forgotten that there was mash in this bun when I came around to eating it. This was only because the mash isn’t actually visible when you first look at the bun; it was hidden below the braised beef cheeks. When I took a bite and realised that there was in fact parmesan mash in it, it was a nice surprise indeed. If this special ever comes around again, be sure not to miss out on it!

Mr. Crackles: Sticky BBQ Pork
STICKY BBQ PORK
Smokey bbq, ranch, salad, and onion rings in a soft bun ($13.50)

I must say that amongst the other rolls, this was by far the best looking one out of the bunch. I mean, I still love and prefer a nice crispy pork on my roll, but this was just something else. Onion rings in your bun? Don’t mind if I do! Smokey, sticky, check! A bit messy to eat if you’re biting into it instead of being posh and using cutlery, but who cares really.

Mr. Crackles: Crackles Classic
CRACKLES CLASSIC
Crisp skinned slow roast 5 spiced pork belly served with Vietnamese salad in a roll ($13.00)

You’ve heard me talk about the crispy pork before in the Crackles Christmas Roll, so it’s basically that, tender, juicy meat with a satisfying crispy crackling, with a nice touch of fresh Vietnamese salad to compliment the meat.

Mr. Crackles: Manwich
MANWICH
Twice the meat and half the salad on any of our famous rolls ($17.00)

Its like their Crackles Classic Roll only twice as much meat on it for a man-sized bite, but who says women can’t have it too?

SIDES

Mr. Crackles: Crispy Pork Nacho Fries
CRISPY PORK NACHO FRIES ($12.00)

This would’ve been flawless for me if it weren’t for the tomato sauce(?) in the nachos. I can’t quite put my finger on what it tasted like to me, but all I know was that it was a bit strong and acidic for my liking. I had to pick out the fries that were least covered in the sauce as I did not want it to go to such a shameful waste. In the end, I ended up leaving about a third of the fries behind, but still eating all of the yummy crispy pork of course!

Mr. Crackles: Buffalo Wings with Blue Cheese Dip
BUFFALO WINGS ($9.00) + blue cheese dip ($1.00)

The chicken packed just the right amount of heat in them and let’s be real here, you can’t possibly go wrong with buffalo wings AND blue cheese dip! These were delicious indeed.

Mr. Crackles: Cup of Crackling
CUP OF CRACKLING ($5.00)

When I first saw these cups of magical cracklings, I knew I needed to devour one. To be honest, I was a bit disappointed with them as they weren’t quite what I had imagined them to be. They were a bit too salty for my liking, hard, and dry. I prefer the crackling on top of those pieces of meat on their rolls than this crackling.

Mr. Crackles is like a Western take on a classic Vietnamese pork roll. Overall, if you want your daily fix of crispy pork crackling, be it in a roll, salad, or topped with your nacho fries, then Mr. Crackles is the place for you. I’d say that their rolls are reasonable priced for the size you get, therefore I’d give value for money an 8/10. For those who haven’t been to Mr. Crackles on Oxford Street just somewhat opposite Taylor Square, you’ll notice that they have very limited seating – 8 seats to be exact. Every time I go there though, I still manage to snag a seat and that’s only because everyone that goes there gets their rolls to go. I guess I can’t really judge the ambience of the place seeing as it’s more of a place where you’d grab your food and eat elsewhere, but if you do end up sitting down at the place to have your food, it’s quite loud from all the traffic noise on Oxford Street. It can also get a wee bit crowded if you go during peak hour, which is usually lunch and dinner I’m guessing. I saw crowded because you’ve got a lot of people lining up and waiting around for their order. If I were to give the place a rating, I’d say 7/10 as it’s alright as a takeaway place, but I’d give it a 4/10 for a sit down place. Besides that, I’m pretty sure you all know that I’m definitely going to give the food a sure 10 for the rolls. The sides had some minor issues with me, but nothing too big that would make me take it out on the rest of the menu. You can’t fault a perfectly great roast pork like that from Mr. Crackles! If you can, than you are not my friend.

Mr. Crackles
155 Oxford Street
Darlinghurst, New South Wales
Australia, 2010

– Ally xx