Pichi-Pichi (Steamed Cassava Cakes)

Pichi-Pichi (Steamed Cassava Cakes)

Hello Everyone! Christmas is in five days! I hope that those who are on holidays right now are enjoying every bit of it and making the most of the festive season. Well, we’ve reached the end of the first week of our 12 days before Christmas! Another 5 more recipes to go until I wrap things up for Amcarmen’s Kitchen – yes, after Christmas, you won’t be hearing from me until the weekend of the first week of January. I’ll be spending the festive season here in Brunei with my family with endless feastings and, of course, getting fat as usual.

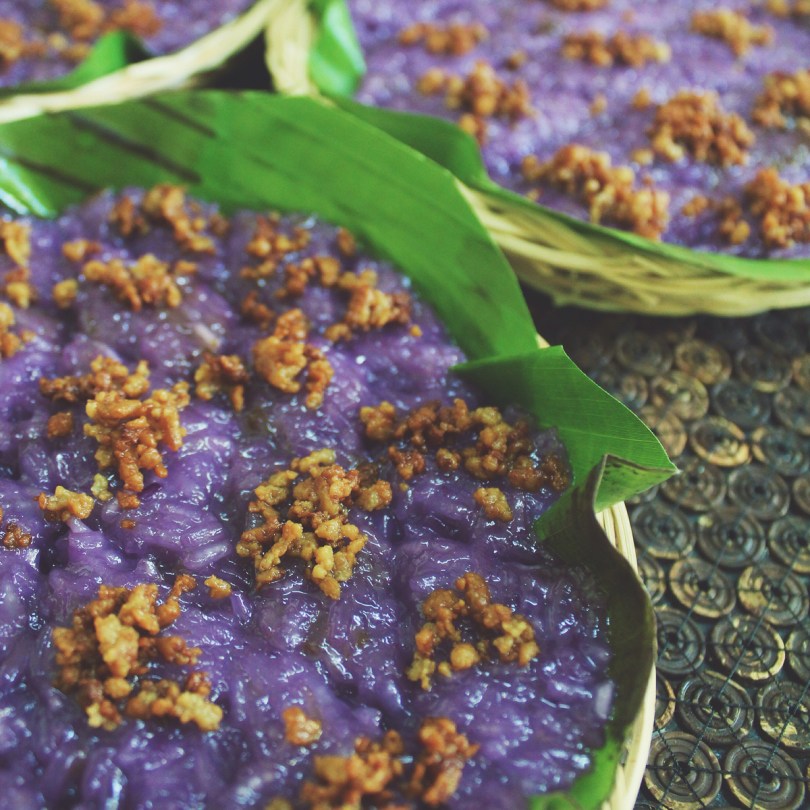
Anyway, tonight, I will be sharing with you another recipe that I picked up from my travels with my Mom to Canada back in the Summer of 2007. Pichi-Pichi (pronounced pee-chee pee-chee) is one of the delicious cakes enjoyed by many Filipinos during special occasions such as Noche Buena, but is not limited to just festive celebrations. It is a gelatinous dessert, or even a heavy mid-afternoon snack, made from grated cassava (or locally known to Filipinos as Kamoteng Kahoy) and freshly grated coconut. The mixture is poured into a mould, then steamed until it forms a sticky-gelatinous texture, and finally coated in grated coconut for an extra added flavour.

Cassava Root (Kamoteng Kahoy)
Cassava (kamoteng kahoy) before and after it is peeled

To prepare the cassava, first wash the root to get rid all the dirt; then, peel off the brown and white silky outer skin. Using a fine grater grate cassava, removing the hard stems in the middle and discard. Keep on grating until you’re done with all your cassava. My Mom and I went to the wet market in the morning to get it grated – much quicker as they have a machine to do it for us, and just for a dollar per kilo grated. Just as an extra precaution, cassava is considered a dangerous food if consumed raw, or it is not prepared properly. The consequences are fatal. If prepared incorrectly, the cassava plant can produce cyanide, a deadly compound when consumed, and if you are allergic to latex rubber, you may want to consider a different dessert (source: Time Magazine). Just make sure that when you are working with cassava, make sure that you prepare it properly!

Pichi-Pichi (Steamed Cassava Cakes) Ingredients

PREP TIME 10 MINS | COOKING TIME 20-30 MINS | SERVES 6-8
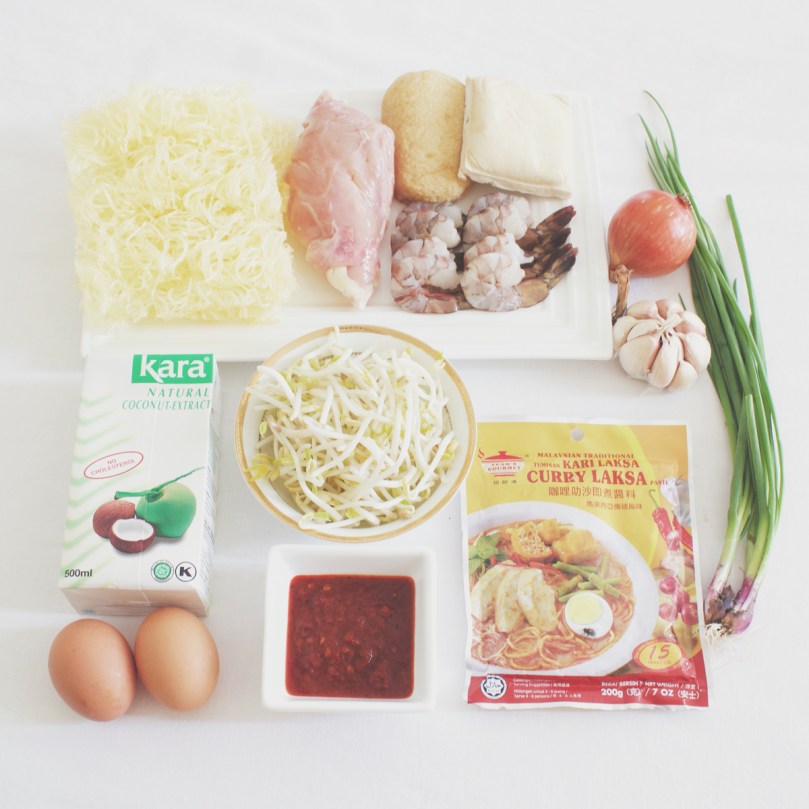
INGREDIENTS

  • 1 & 1/2 cups cassava, grated
  • 1 cup warm water
  • 1 cup white sugar
  • 1/2 tsp lye water
  • 1/2 tsp pandan extract*
  • Freshly grated coconut
  • Red, yellow, and green food colouring

*You can use bottled pandan extract, or you can extract your own from pandan leaves. Here’s how you can do it: Place the pandan leaves and water into a blender (1 bunch (12 leaves) to about a half cup of water). Blend until the leaves are chopped very finely. Pour contents through a fine sieve and press against it using a spoon to draw out any extra juice. Discard the leaves. Tip: if you keep the extract in a sealed bottle, you can keep it for up to one week in the fridge. Do not freeze though.

METHOD

  1. Add the sugar, pandan extract, and warm water in a large mixing bowl. Mix until the sugar has completely dissolved. Once dissolved, add the grated cassava, together with the lye water, to the sugar mixture and give it a good mix.
  2. Divide the mixture equally into three moulds. Add a few drops of red food colouring into one of the moulds, then yellow, and green in the remaining two. Mix well until the colour is fully blended into the cassava mixture.
  3. Cover each mould with foil and place it in your steamer. Steam for about 15 to 20 minutes or until translucent. Once done, remove from the steamer and set aside to cool down.
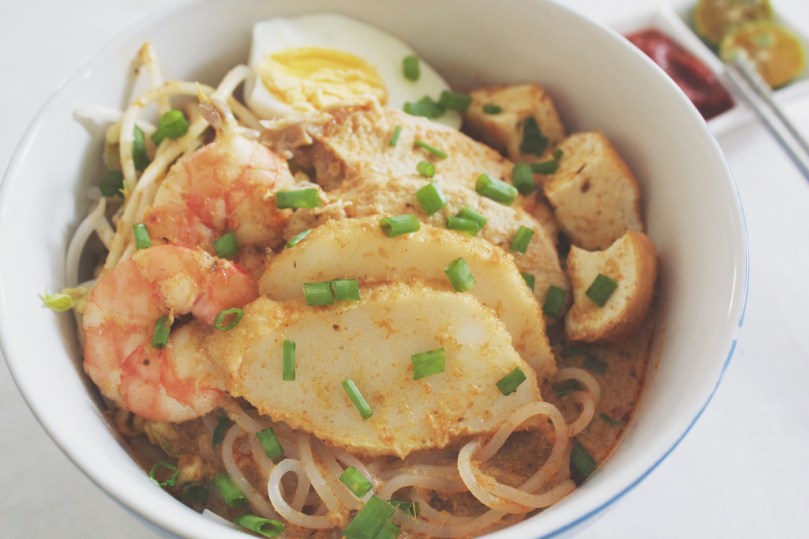
  4. Once cooled, cut the pichi-pichi into bite-sized chunks. Coat each chunk with the freshly grated coconut and serve immediately. Share and enjoy!

Pichi-Pichi (Steamed Cassava Cakes)

BON APPÉTIT

– Ally xx

myTaste.com

Hamonado (Pork Rolls Stewed in Pineapple Juice)

Hamonado (Pork Rolls Stewed in Pineapple Juice)

Hello Everyone! First of all, apologies for a later than usual post. I just got back home about an hour ago and yes, I am still writing this post – I didn’t manage to get around to writing this in advance knowing that I wouldn’t get home until later than I usually do. Oh well! Anyway, we’re halfway through our 12 days before Christmas Special on Amcarmen’s Kitchen, and I want to know, which of the ones that have been posted are your favourites? Let me know in the comments section below 🙂 Anyway, tonight’s recipe is just as simple in terms of the ingredients used to make such lavish looking dish, and delicious of course, for Noche Buena. However, the dish is not limited to the Christmas season as it can also be found on tables on an everyday basis.

In a nutshell, Hamonado is simply, thinly sliced pork (like tapa style) sweetened in pineapple juice. It resembles sliced ham but is often thick, juicy, and exceptionally sweet. What makes this dish quite interesting is due to it’s simplicity – here are the three very basic steps: marinating, pan-frying, and simmering. What makes this dish right on the money is because of the balance of flavours – you’ve got the sweetness from the pineapple juice and sugar mixture that penetrated through a lovely pork shoulder from the marinating process, while you get a hit of salt from the salted egg that is stuff in between the meat when it is rolled up.

Hamonado (Pork Rolls Stewed in Pineapple Juice)

From doing some research on this dish, I’ve found multiple recipes that skip the process of having to roll up the meat into a log, which is also okay to do so as the flavours still remain the same. If you wish to go down this path, then I suggest you cut your pork shoulder into chunks instead of slicing it thinly and flattening it out. This is actually the easiest way of cooking pork hamonado for the novice cooks to take a stab at. I think what my Mom ended up doing was that she rolled up about 1/2 of the pork, and the other half she just stewed it in the marinade.

Hamonado (Pork Rolls Stewed in Pineapple Juice) Ingredients

PREP TIME 20 MINS* | COOKING TIME 30-45 MINS | SERVES 10-12

*Does not include marinating  process which is a minimum of 3 hours, or preferably overnight. Plan your time according by taking this into account.

INGREDIENTS

  • 3kg pork shoulder, sliced thinly
  • 4 salted eggs, hard boiled, and cut into 4 wedges
  • 2 cups sugar
  • 2 bulbs garlic, minced
  • 1 can (1360ml) Del Monte pineapple juice
  • 1 can (340g) pineapple slices
  • 1 tbsp achuete powder
  • Ground salt and pepper, to taste,

METHOD

  1. Combine the thin slices of pork in a large mixing bowl together with the pineapple juice, sugar, and achuete powder. Give it a good mix until the sugar has dissolved. Cover with plastic wrap and leave it in the refrigerator to marinate for a minimum of 3 hours, overnight preferred to soak up more of the flavours (my Mom marinated it for three days).
  2. Remove the pork from the marinade (do not discard), and place the slice on a flat surface and arrange the salted egg in the centre of the slice. Roll and form into a log. Secure the roll by tying cooking string around the log, making sure that it is tight enough to hold the roll.
  3. Heat about 2-3 tablespoons of oil in a large pot over medium-high. Sauté the garlic until fragrant and golden brown, about 1-2 minutes. Follow with the rolls of pork, searing it until all sides are golden brown, approximately 5-8 minutes. Pour in about half of the marinade juices and leave to simmer for about 30-40 minutes, or until the sauce thickens. You will need to flip the pork rolls from side to side every 15 minutes.
  4. Once done and the sauce has thickened, remove the pork rolls  and place it on a platter. Carefully remove the cooking string and slice into serving pieces.
  5. Pour the sauce over the pork hamonado rolls and serve, and enjoy with pineapple slices and any extra  wedges of salted egg. Usually eaten with steamed rice.

Hamonado (Pork Rolls Stewed in Pineapple Juice)

Hamonado (Pork Rolls Stewed in Pineapple Juice)

BON APPÉTIT

– Ally xx

myTaste.com

Bikò (Sweet Sticky Rice Cake with Coconut Curd Toppings)

Bikò (Sweet Sticky Rice Cake with Coconut Curd Toppings)

Hello Everyone! Day 05 of 12 is here and I have another dessert to share with all the sweet tooth’s out there. If you are following my Instagram page (@amcarmenskitchen), I posted a picture of the ingredients and made mention that you essentially only need 4 ingredients (actually 3 because you can omit one of the ingredients) to make this yummy and definitely filling dessert! All you really need it glutinous rice, white sugar, coconut milk, and a bit of violet food colouring. You can omit the food colouring and substitute the white sugar for brown to colour your bikò, which is actually how it’s traditionally done. I only picked up the idea of using violet colouring from my Mom’s relative when we visited their whole family in Canada back in the Summer of 2007. Adding the violet colouring doesn’t do anything for the taste (duh), but it definitely makes the dish a whole lot more attractive and inviting.

For those of you who don’t know, bikò, or otherwise known simply as a Filipino Sticky Rice Cake, served during special occasions such as birthday parties, family reunions, town fiestas, and of course, for Noche Buena. It’s not a tedious process, it’s just hard on the arm because of all the mixing that needs to be done.  It is then garnished with latík, which is basically just cooked coconut milk residue, set at the centre of each slice, and is traditionally served over a banana leaf in a bilao, which is basically just a round woven bamboo tray.

Bikò (Sweet Sticky Rice Cake with Coconut Curd Toppings) Ingredients

PREP TIME 10 MINS | COOKING TIME 40 MINS | SERVES 6-8

INGREDIENTS

  • 2 cups glutinous rice, washed and drained
  • 2 cups water
  • 2 packs (200ml each) coconut milk
  • 1 cup white sugar
  • 2 tsp violet food colouring
  • Banana leaves
  • Bilao

METHOD

  1. Add the glutinous rice, water, and violet for colouring in a large pot. Mix and then place over high heat, leaving the rice to cook for about 15 minutes or when the rice is about half-done.
  2. When the rice is half-done, add in one of the packs of coconut milk and mix well. Leave it to cook for another 15 minutes or until the oil starts to separate from the coconut milk. At this point, you want to reduce your heat down to about medium-low to avoid the rice sticking to the bottom of your pot.
  3. Meanwhile add the other pack of coconut milk in a separate pan and cook until the oil separates from the milk and turns golden brown. Drain from the oil and then set aside.
  4. Prepare the banana leaves by lightly heating it over the stovetop burner to make it pliable and easy to handle. Then, place the the banana leaves over the bilao and set aside.
  5. Crank up the heat to about medium-high and add the sugar into the glutinous rice mixture. Mix and allow the sugar to caramelised, about 10 minutes. Once done, turn the heat off.
  6. Assemble by spreading the sweet sticky rice cake mixture onto the prepare bilaos lined with banana leaves. Flatten evenly. Cut the rice cakes into diagonals and top the centres of each diagonal with some latík.
  7. Serve, share, and enjoy warm! This recipes makes for about 4 palm-sized bilaos.

Bikò (Sweet Sticky Rice Cake with Coconut Curd Toppings)

ps: apologies for only posting one picture of this dish (as you know it’s unlikely of me to only post one picture of the final dish), but I made this a while back, 2 years ago to be exact, and this was the only picture that I could find *sad face* at least it is a good picture!

BON APPÉTIT

– Ally xx

myTaste.com

Lengua Estofado (Ox Tongue Braised in Tomato Sauce)

Lengua Estofado (Ox Tongue Braised in Tomato Sauce)

Hello Everyone! We’re a third of the way into our 12 days of Festive Filipino Foods, and tonight I will be sharing something a little bit unusual, and when I say unusual, I mean it’s not something that I would think to buy in the stores and cook it myself. It is rather foreign and exotic for some, where adjectives such as gross or yucky is used to describe a dish where tongue is used. I don’t recall ever having lengua before – actually, now that I’ve said that, I have had it before, but only the ones that have been sliced very thinly and  grilled at a Korean BBQ Restaurant in Sydney. If you don’t think about the fact that you are eating tongue, it actually feels like you’re having beef brisket.

Upon doing further research, I have found that many different cuisine and cultures are accustomed to ox tongue. For example, it is a major ingredient in the making of what is called tongue toast in North America, where it is used in an open-faced sandwich served for either breakfast, lunch, dinner, or as an hors d’œuvre. In Mexico, it is widely used in their burritos and tacos. Tongue is also widely prepared, and considered a delicacy in many parts of South America, Asia, and European countries including Belgium, France, Italy, Portugal, Germany, and Poland to name a few.

Ox (beef) tongue is often prepared by boiling the meat first in various spices, and only after that is the skin removed. It is then cooked further by either braising it in a sauce, grilling, or roasting it in the oven. Tonight, I will be sharing with you a recipe for ox tongue braised in tomato sauce, and served with some mushrooms, olives, and potatoes on the side. Estofado is a Filipino method of cooking based on Spanish influences where it involves the braising or stewing of meat like beef or pork knuckles. Sugar, garlic, soy sauce and a bay leaf are among the other ingredients added into the pot during this process. Lengua Estofado is of a Hispanic origin and has been adapted to suit the palates of Filipinos due to centuries of Spanish colonisation. Despite initial impressions of the dish being gross and yucky, it is quite a popular dish during family gatherings, especially for Noche Buena.

Lengua Estofado (Ox Tongue Braised in Tomato Sauce) Ingredients

PREP TIME 10-15 MINS | COOKING TIME 1 HOUR 35 MINS | SERVES 4-5

INGREDIENTS

  • 1kg ox tongue
  • 1 punnet (250g) cup mushrooms, sliced
  • 125g green olives stuffed with feta
  • 3 red bird’s eye chillies
  • 2-3 dried bay leaves
  • 2-3 garlic cloves, minced
  • 1 large potato, washed and sliced thinly
  • 1 large tomato
  • 1 small brown onion, diced
  • 1 tbsp tomato paste
  • Ground salt and black pepper, to taste
  • Knob of butter
  • Whole black peppercorns

METHOD

  1. Add the ox tongue, bay leaves, whole peppercorns, and salt to a large pot filled with water. Boil the ox tongue for about an hour until tender. Once done, remove from the pot and set aside to cool down a bit after which you can then peel the skin off the tongue and then slice the meat into about 1-cm thick slices. Don’t forget to reserve some of the stock for when we braise it later.
  2. Heat oil a large frying pan over medium-high and sauté the minced garlic until fragrant and golden brown. Then add in the tomatoes and cook until soft, about 2 minutes altogether. Follow with the tomatoes and cook until soft, a further 3-4 minutes.
  3. Next, add the slices of lengua and season it with a bit of ground salt and black pepper. Give it a good mix before adding about a cup and a half of the reserved stock. Bring to a boil. Once boiling, add in the tomato paste and chillies. Stir, and leave to braise for a further 30 minutes.
  4. While the tongue is braising away, heat a couple of tablespoons of oil in a medium-sized pan and fry the potato slices until golden and crispy. Transfer to a dish lined with a paper towel to absorb and excess oils. Work in batches if necessary.
  5. Remove the oil from the pan and melt the knob of butter. Add the mushroom slices in and sauté until the mushrooms are soft.
  6. Once the long is done, plate up accordingly and serve immediately. Share with the family and enjoy!

Lengua Estofado (Ox Tongue Braised in Tomato Sauce)

Lengua Estofado (Ox Tongue Braised in Tomato Sauce)

BON APPÉTIT

– Ally xx

myTaste.com

Puto (Steamed Rice Cakes)

Puto (Steamed Rice Cakes)

Hello Everyone! So this is kind of unrelated, but related at the same time – I typed puto into Google because I wanted to know the English name for it (well I knew what they were in English, I just needed confirmation). To my surprise, Urban Dictionary was the first result. Puto is a Spanish word used to describe a male prostitute and is sometime’s offensive for homosexuals. In Mexico, the word is used for cowards and traitors. Anyway! Sorry but this post will not be about male prostitutes, but instead, it’ll be of a recipe for a steamed rice cakes. Before I begin, if from this point onwards you see me write put instead of puto, it’s because my laptop automatically autocorrects it to put. I have tendency to just keep typing without going back and reviewing what I’ve written.

Anyway, here’s an interesting fact about puto that I myself did not know until I did some research for this post. Puto is believed to have been derived from from Indian puttu of Tamil origin. These steamed rice cakes are usually eaten as a dessert, but most Filipinos much prefer to have them for breakfast with coffee or hot chocolate, or for a mid-afternoon snack with dinuguan (blood stew). The recipe that I will be sharing today is not, in a sense, the traditional puto you’d find in the Philippines. It is non-traditional because, self-raising flour is used instead of rice flour. Texture wise, it has more bite and is less airy than what I’ve had before. To be very honest, these are the best-tasting putos I’ve ever had and I am glad that I came across this recipe.

Puto (Steamed Rice Cakes)
the photo above was taken when I made these cakes for a family dinner in Brisbane. The silicone moulds I used here were a bit smaller so I think I was able to make a good 4 dozen mini cakes that time

I actually learnt this recipe from my Mom’s high school friend when we visited her and her family in Melbourne a few months back in early June. She runs her own catering business, together with her mother and sister, and while spending time at hers, I learnt how to make these delicious non-traditional putos. I think I made quite a hefty batch over the two days that they needed to be made, and I missed out on making a hundred of them for a special order because that was the day my family and I left and flew over to Brisbane.

I’ve made these rice cakes numerous times after having learnt from my Mom’s friend. I’ve made them for a family gathering in Brisbane and they were a big hit! I’ve also made them for a few family friends here in Brunei and they too loved it. The last time I made these, which was for this blog post as well, was a big hit when I shared them amongst my friends too. I’m pretty sure that you’ll love these cakes too when you get around to making them. If you for some reason don’t like them, then I’m sorry, but we can’t be friends *cheeky grin*.

Puto (Steamed Rice Cakes) Ingredients

PREP TIME 5 MINS | COOKING TIME 1 HOUR* | SERVES 2 DOZEN**

*Cooking time depends on how big a steamer you have. Mine is quite small and therefore I had to work in 3 batches to steam all cakes for this recipe.

**Serving size depends on the size of the moulds that you use – as stated above, when I used smaller moulds, I could easily get about twice the serving size from the bigger moulds that I used for this recipe post

INGREDIENTS

  • 2 cups self-raising flour
  • 1 cup caster sugar
  • 1 cup fresh milk
  • 3/4 cup desiccated coconut
  • 3-4 pcs sliced cheese, cut into thin strips
  • 3 large free range eggs, well beaten
  • 2 tbsp butter (I used olive butter)
  • 1 tbsp mayonnaise
  • 1 tbsp vanilla extract

METHOD

  1. Prepare your steamer by wrapping the lid with cloth and tie it in place around the handles. This will catch the water vapours from dripping onto you cakes and prevent them from getting wet and soggy.
  2. Add water to a pot and bring it to a boil.
  3. Combine all the dry ingredients in a large mixing bowl and whisk it together until combined. Next and in the butter and mayonnaise, and using the whisk, mash it into the flour mixture until moist crumbs form. Next, add in the milk, eggs, and vanilla extract, and mix until well combined.
  4. Line your moulds in the steamer and carefully pour the batter into the moulds and top, making an X, with the sliced cheese strips (see photo above).
  5. Carefully place the steamer over the top of that pot and cover with the cloth-wrapped lid. Steam for about 20 minutes.
  6. Once done, remove the steamer from the pot and place on a heat-proof surface. Remove the cooked rice cakes and repeat steps 4-6 for a fresh batch (because my steamer is quite small, I had to do three batches altogether).
  7. Leave the cakes in their moulds aside until they have cooled down slightly. Once they are quite cool, they will easily pop out from their moulds.
  8. Transfer to a serving dish and serve warm – either for breakfast, dessert, or an afternoon snack. Share and enjoy!

Puto (Steamed Rice Cakes)

Puto (Steamed Rice Cakes)

BON APPÉTIT

– Ally xx

myTaste.com

Arroz a la Valenciana (Valencian Rice)

Arroz a la Valenciana (Valencian Rice)

Hello Everyone! Festive Filipino Foods Day 02 of 12 is here with a Latin American dish known as Arroz a la Valenciana, also considered as a part of Filipino cuisine, to share. Arroz a la Valenciana is quite commonly known as a poor man’s paella as the ingredients used to make this is is far less lavish than that of paella, where wine is used for a flavourful Spanish rice dish and a lot of seafood ingredients. The main ingredients in Arroz a la Valenciana consists of glutinous (sticky rice), regular rice, tomatoes, tomato paste, potatoes, carrots, capsicum, chicken, and chorizo – a complete meal, a one-dish meal of meat, rice, and vegetables. It is a great dish for Noche Buena, Christmas, Fiestas, weddings, birthdays, and family get-togethers.

Well, that’s pretty much all I can talk about for this dish, so let’s move on to the recipe shall we?

Arroz a la Valenciana (Valencian Rice) Ingredients

PREP TIME 10 MINS | COOKING TIME 30-45 MINS | SERVES 6-8

INGREDIENTS

  • 3 cups water
  • 2 cups plain rice, half-cooked*
  • 1 cup glutinous rice, half-cooked**
  • 1/4 cup raisins
  • 12 pcs chicken wings, cut into 3 (drumette, mid-wing, and tip)
  • 2-3 garlic cloves, minced
  • 1 brown onion, diced
  • 1 carrot, peeled and sliced diagonally
  • 1 chorizo sausage, sliced diagonally
  • 1 potato, cut into chunks
  • 1 tomato, diced
  • 1/4 red, yellow, and green capsicum, sliced
  • 1 tbsp tomato paste
  • 1 tsp achuete powder
  • 1 tsp chicken stock powder
  • Ground black pepper, to taste

*/**Cook the rice together in a rice cooker; what I usually do for every one cup of rice, I add one cup of water. But in this instance, you want your rice to still be a bit tough and half-done because it will absorb the sauce from when you sauté your chicken.

METHOD

  1. Heat about 2-3 tablespoons of vegetable oil in a large pot over medium-high. Fry the chorizo slices, about a minute per side until slightly browned. Remove from the pot and transfer to a plate lined with a paper towel.
  2. In the same pot, sauté the garlic until fragrant and golden brown. Next add in the onions and cook until soft, about 2 minutes altogether. Add in the tomatoes and then cook until soft, about a further 2-3 minutes.
  3. Add the chicken and season with chicken stock powder and ground black pepper. Give it a good mix and then leave your chicken to cook for about 5 minutes.
  4. Dissolve the achuete powder in a cup of hot water, then add this into the chicken together with the other two cups of water. Stir in the tomato paste and let the chicken cook for a further 5 minutes.
  5. Add in the potatoes and carrots and allow to cook for a further 5 minutes. Once done, remove the chicken, potatoes, and carrots, leaving the sauce in the pot, and set aside.
  6. Add the half-cooked rice into the pot and give it a good mix until it is well coated in the sauce. Leave to cook further, until all the sauce has been absorbed.
  7. Lastly, add the raisins and capsicum and cook for a further 2 minutes. Turn the heat off and then return the chicken, potatoes, and carrots, together with the chorizo sausage sliced you fried earlier, to the pot and give it a good mix.
  8. Transfer to a serving dish; serve, share, and enjoy!

Arroz a la Valenciana (Valencian Rice)

Arroz a la Valenciana (Valencian Rice)

BON APPÉTIT

– Ally xx

myTaste.com

Filipino-style Chicken Macaroni Salad

Filipino-style Chicken Macaroni Salad

Hello Everyone! It’s been a while since my last post – but if you are a regular reader, you would’ve picked up from my last post that I’d be taking a short break. It’s not because I needed some time to recover from my mental exhaustion (because let’s face it, I’m still always mentally drained by the end of a long day), but more for the theme for this month’s recipes. From today onwards, you will be expecting a recipe every single day leading up to Christmas – you read that right! I will be sharing with you Festive Filipino Dishes that can be found on the tables of a Filipino family during Noche Buena, some of the recipes that I will be sharing have been influenced by Spanish cuisine. So let’s kick off Day 01 of 12 days to Christmas with a sweet (or savoury?) one: Filipino-style Chicken Macaroni Salad.

First off, for those of you who don’t know, Noche Buena is the Spanish word for the night of Christmas Eve. In Latin American cultures, including Spain and the Philippines, Noche Buena is an annual traditional family feast. The traditional dinner is celebrated at midnight after attending the late evening Mass known as Misa de Gallo. In the Philippines, a whole roasted pig known as lechón, is the centre of all dishes during the feast. It is believed that the tradition dates back to the 15th century when Caribbean colonists hunted down pigs and roasted them whole as the family gathered for Christmas Eve. However, a whole roasted pig isn’t always served in other cultures. For example, in Peru, a large juicy turkey is the star for Noche Buena while in Venezuela, hallacas are quite popular. Actually, I think I may have explained what Noche Buena is in a post last Christmas? I’m not sure. Oh well!

Tonight’s dish is one of the many that can be found on the table during Noche Buena, but it doesn’t stop there. This dish is also typically served during Filipino fiestas and also during family outings and picnics. It is actually a very simple dish that doesn’t require a lot of cooking and complicated steps. The main “cooking” is basically cooking the macaroni until tender, and the chicken to be boiled and shredded. When those core ingredients are ready, all you have to do next is toss all the ingredients together and voilà! Chill it in the fridge for a couple of hours and you’ve got a tasty chicken macaroni salad.

Filipino-style Chicken Macaroni Salad Ingredients

PREP TIME 15 MINS | COOKING TIME 30 MINS | SERVES 10-12

INGREDIENTS

  • 500g macaroni*
  • 1 jar (400g) Nata de Coco, drained
  • 300ml dollop cream
  • 250g chicken breast
  • 100ml condensed milk
  • 1 cup cheddar cheese, diced
  • 1 cup fresh pineapple, diced
  • 3/4 cup carrots, minced
  • 3/4 cup mayonnaise
  • 1/4 cup raisins
  • Ground salt and pepper to taste

*Aside from macaroni, you can use other types of short cut pasta. Here are some examples: Mostaccioli, Penne, Rigatoni, Cellentani, Rotini, Cavatappi, Fideuà, and Maccheroncelli.

METHOD

  1. Bring a medium-sized pot of salted water to a boil. Once boiling, add in the chicken breasts and cook for about 15 minutes, or until cooked all the way through depending on the size of your breasts (yes I meant to say it that way *cheeky grin*). Once done, drain and set aside to completely cool down.
  2. Meanwhile, mix the condensed milk, cream, mayonnaise, salt, and pepper in a large mixing bowl. Taste and adjust accordingly to your liking. Set aside.
  3. Then, bring a large pot of salted water to a boil. Once boiling, add the macaroni and cook according to packet instructions (mine was about 10-11 minutes). Once done, drain and transfer to a large mixing bowl together with the dressing.
  4. When the chicken breasts have completely cooled down, shred the chicken meat and add it into the mixing bowl together with the macaroni.
  5. Add all the other remaining ingredients and toss thoroughly until well combined. Cover the bowl with cling wrap and refrigerate for about and hour or two before serving.
  6. Serve chilled and enjoy!

Filipino-style Chicken Macaroni Salad

Filipino-style Chicken Macaroni Salad

BON APPÉTIT

– Ally xx

myTaste.com

Penang Char Kway Teow (Stir-fried Rice Cake Strips)

Penang Char Kway Teow (Stir-fried Rice Cake Strips)

Penang Char Kway Teow (Stir-fried Rice Cake Strips)

Hello Everyone! First off, I just want to say that this is the last noodle dish for the month of November! There’ll be one more post going up on Sunday on one of my designs, and after that I’ll be taking a 2-week break from blogging. There’s no particular reason for it – well okay, I guess you can say it’s for me to take a short break since I have been complaining for the past however so many posts about being mentally tired. It’s also mainly to go with the theme I have planned for next month; more will be revealed after my 2-week break 🙂

Okay, so before I dive into the recipe for tonight, I’d like to say sorry for a later than usual upload – I just came home from an evening with friends. We met up and did an escape room challenge together; well we split into two teams and did a different room from each other, CSI and Prison Break. Sadly I was in the losing team but they did say that CSI was definitely harder than the other one. Anyway, it was a fun night altogether but we didn’t get to talk much about our experiences over dinner because we didn’t want to ruin it for each other. Instead we vaguely talked about what we encountered and then all unanimously decided to go back again next week and do the rooms that we didn’t get to do tonight. All I can say that our brains were frazzled and scrambled after we got out of the CSI room – but in the end, we all had a great time. (I actually still can’t believe that I’m still mentally capable to write this post after a long day, and then a difficult escape room challenge).

Anyway! Back to tonight’s recipe – I don’t actually eat this dish that often, be it ordering it at a restaurant or making it at home. It’s not that I don’t like this dish, I actually enjoy it but not as much as the other noodle dishes. Char Kway Teow literally means stir-fried rice cake strips and is a national favourite in Malaysia and Singapore.

Here’s a fact that some of you may not know (I didn’t know myself too until I did my research), Char Kway Teow has a reputation of being unhealthy due to its high saturated fat content. It is this way because it made it attractive, in terms of it being a cheap source of energy and nutrients, to labourers since it was mainly served to them. When the dish was first served, it was sold by fishermen farmers and cockle-gathers who doubled as char kway teow hawkers in the evening to supplement their income.

Over time, the dish became increasingly popular and many cooks have developed their own interpretations while still using the same basic ingredients of ricecake strips/flat rice noodles fried with anything from eggs (chicken or duck), onions, garlic, prawns, cockles, Chinese sausage, chives, etc. Pork fat was predominately used to stir-fry char kway teow, but over the years, ordinary cooking oil is now used for health or religious reasons.

I based this recipe from Rasa Malaysia, so go check out the original recipe if you get the chance to!

Penang Char Kway Teow (Stir-fried Rice Cake Strips)

PREP TIME 10 MINS | COOKING TIME 15 MINS | SERVES 4-6

INGREDIENTS

  • 400g kway teow noodles (rice cake strips)
  • 250g prawns, peeled and deveined
  • 100g baby clam meat
  • 100g beansprouts
  • 4-6 large free range eggs, sunny side-up
  • 2-3 garlic cloves, minced
  • 2 Chinese sausages, sliced diagonally
  • 1 small brown onion, diced
  • Chilli paste
    • 30g dried red chillies, seeded and soaked in water until soft
    • 3 small shallots, diced
    • 2 fresh red chilies, seeded
    •  1 tsp oil
    • Pinch of salt
  • Spring onions

Sauce Mix

  • 5 tbsp soy sauce
  • 2 dashes white pepper powder
  • 1 & 1/2 tbsp dark soy sauce
  • 1 tbsp sugar
  • 1/2 tsp fish sauce
  • 1/2 tsp salt

METHOD

  1. Grind all the ingredients of the chilli paste together using a mini food processor until fine. Heat about a teaspoon of oil in a small frying pan, over medium-high. Stir-fry the chili paste until aromatic, about 3-5 minutes and then transfer to a heatproof bowl. Set aside.
  2. Mix all the ingredients for the sauce together in a small bowl and set aside.
  3. Next, heat up about a tablespoon or two of oil in a large frying pan, or wok, over medium-high. Sauté the garlic until fragrant and golden brown, then add in the onions and cook until soft, about 2 minutes altogether.
  4. Add in the Chinese sausage slices and cook until you can smell the aroma coming from the sausages. Then, add in your prawns and cook until they start to change colour, about 5 minutes altogether.
  5. Add in the baby clam meat, followed by a half portion of the beansprouts and give it a quick mix. The add in the rice cake strips, making sure that you untangle the clumps when you’re adding them to the pan, followed by the sauce mix and chilli paste. Give it a good stir and make sure that all the noodles are covered with the sauce.
  6. Turn the heat off, and then mix in the rest of the beansprouts and the spring onions. Serve immediately with or without a sunny side-up egg on top. Enjoy!

Penang Char Kway Teow (Stir-fried Rice Cake Strips)

Penang Char Kway Teow (Stir-fried Rice Cake Strips)

BON APPÉTIT

– Ally xx

myTaste.com

Malaysian Curry Laksa (Spicy Noodle Soup)

Malaysian Curry Laksa (Spicy Noodle Soup)

Hello Everyone! So, I’ve been told that I don’t write as much as I used to, and that’s only because there’s really nothing much to tell. Well okay, maybe a part of the reason is also that I’m always mentally tired by the end of the day when I get around to writing my blog posts. I try to write them in advance so that I could at least add some enthusiasm to my posts, but I always end up procrastinating – and I’m sorry for that! Just bare with me until the end of the year and hopefully my content will be much better when the New Year kicks in 🙂

Anyway, let’s get down to business for tonight’s post; the last week of Noodle Month! Again, the month just flew right by! December is just around the corner, and sooner or later it’ll be Christmas and then the New Year! Tonight, I am sharing with you a popular dish in Brunei, Singapore, Indonesia, and Malaysia – Laksa! I wouldn’t say that this dish is at the top of my favourite noodle dish (only because there are many other noodle dishes that I prefer than laksa), but if I want it, I’ll have it!

The plan was to make my own laksa paste from scratch, and I know it’s no excuse, but time was short on my hands and I just made the decision to buy a ready-made, packeted paste from the stores. Also, if I made my own paste, we’d have a lot of left over ingredients (that is, if we didn’t end up using all of it), or a surplus of paste that would’ve ended up sitting in the freezer for a long time, and eventually in the trash since we don’t eat laksa that often at home. However, feel free to make your own paste and just follow the ingredients from the recipe below 🙂

Before I dive into the recipe, I’ll just talk a little bit about what Laksa is for those of you who don’t know what it is. Laksa is actually a combination of Chinese and Malaysian cuisine that consists of rice noodles/vermicelli served as a spicy soup dish with various meats such as chicken, prawn, or fish. The soup is either based on a rich and spicy curry with coconut milk, or a sour tamarind soup. The elements of a curry laksa can be distinguished by the following:

  • Coconut milk is used
  • Curry-like soup (includes curry as one of its ingredients)
  • Except for bean sprouts, no other vegetable is used
  • Bean curd puff is used
  • Served with thick or thin rice vermicelli (usually thick); occasionally served with yellow mee
  • Hard-boiled egg may be added
  • Slices of fish cake and either prawns or chicken is used

The original recipe can be found over on Serious Eats.

Malaysian Curry Laksa (Spicy Noodle Soup) Ingredients


PREP TIME 10 MINS | COOKING TIME 30-45 MINS | SERVES 4-5

INGREDIENTS

  • 250g thick rice vermicelli noodles
  • 200g coconut milk
  • 100g beansprouts
  • 100g prawns, peeled and deveined
  • 4-5 cups chicken stock
  • 3 pcs dried bay leaves
  • 2-3 garlic cloves, minced
  • 2 large free range eggs, hard-boiled
  • 1 chicken crown, breasts removed and sliced, bone reserved
  • 1 packet (200g) Malaysian Curry Laksa Paste
  • 1 pc firm tofu, deep fried and cut into chunks
  • 1 pc fish cake, sliced diagonally
  • 1 small brown onion, diced
  • Salt
  • Spring onions
  • Whole black peppercorns

To serve

  • Sambal

METHOD

  1. Add the reserved chicken bone, chicken breast dried bay leaves, about a teaspoon or two of whole black peppercorns, and salt to a medium-sized pot filled with about 1.5L of hot/boiling water. Turn the heat up to high and leave to boil for about 30 minutes. After about 15 minutes, remove the chicken breast from the stock and set aside to rest and cool down before slicing into it.
  2. While the stock is boiling away, quickly blanch the sliced fish cakes and prawns in the stock, about 2-3 minutes. Remove and set aside.
  3. Meanwhile, bring a large pot of water to a boil. Once boiling, add the rice vermicelli noodles in and cook according to packet instructions, about 15 minutes for mine.
  4. Drain and then divide the noodles equally into 4-5 individual serving bowls. Top with the beansprouts, chicken slices, fish cake slices, fried tofu, hard-boiled egg slices, and prawns. Set aside.
  5. Heat a bit of oil in a medium-sized frying pan over medium-high. Sauté the garlic until fragrant and golden brown, and then add in the onions and cook until soft, about 2-3 minutes in total.
  6. Add the laksa paste and fry for about a minute or two before adding the chicken stock in. Give it a goo mix and then bring to a boil. Once boiling, turn the heat down to a slow simmer and then add in the coconut milk. Leave to simmer for about 15 minutes.
  7. Once the soup is done, ladle it into the prepared bowls and garnish with some spring onion. Serve immediately with some sambal and calamansi on the and enjoy!

Malaysian Curry Laksa (Spicy Noodle Soup)

Malaysian Curry Laksa (Spicy Noodle Soup)

BON APPÉTIT

– Ally xx

myTaste.com

Singapore Mei Fun (Fried Rice Vermicelli Noodles in Curry Powder)

Singapore Mei Fun (Fried Rice Vermicelli Noodles in Curry Powder)

Hello Everyone! Tonight I will be sharing with you another Singaporean dish that I love. What I love about this is the curry powder that is incorporated into this fried noodle dish. When I first tried this noodle dish, I didn’t expect it to be coated in curry powder – well, I mean, it’s not like the name of the dish was a dead giveaway for what’s in it. So it was definitely quite unique to me when I first tried it – and I loved it!

I kind of went with it on my own after indulging in much of it over the past several years, but I did refer to Saucy Spatula for reference. I also learnt a few things from her blog, the main one being that authentic Singapore fried rice vermicelli (or know as fried bee hoon), does not include curry. Unfortunately, the question of where the addition of curry originated from cannot be answered, however many claimed it to have come from Hong Kong. So why isn’t it called Hong Kong fried rice vermicelli? Well, apparently this noodle dish resembles more towards the Singapore fried bee hoon so I guess why argue with that?

Singapore Mei Fun (Fried Rice Vermicelli Noodles in Curry Powder)

PREP TIME 5 MINS | COOKING TIME 25-30 MINS | SERVES 4-5

INGREDIENTS

  • 450g bee hoon (thin rice vermicelli noodles)
  • 250g char siu pork (Chinese BBQ pork)*, sliced
  • 100g beansprouts
  • 2-3 garlic cloves, minced
  • 2 Chinese sausages, sliced diagonally
  • 2 red bird’s eye chillies, sliced
  • 1 large free range egg, beaten
  • 1 small brown onion, diced
  • 1/2 a head of cabbage, sliced
  • Tricolour capsicum (1/4 of each), sliced

For the sauce

  • 1/4 cup light soy sauce
  • 3 tbsp cooking wine
  • 1 & 1/2 tbsp curry powder
  • 1 tsp sugar
  • 1 tsp white pepper powder

*If you can easily buy it at the shops, or even your local Chinese restaurant, then I do recommend that you just buy it if you want your fried noodles now and fast! (It takes a considerate amount of time when you’re making your own char siu pork at home). But, if char siu is not available, you can substitute with ham, bacon, or shredded pork.

METHOD

  1. Start off by bringing a large pot of slightly salted water to a boil. Once boiling, add the rice vermicelli noodles and cook according to packet instructions, about 15 minutes for this brand of noodles. Once the noodles are done, drain and set aside.
  2. While the noodles a boiling away, mix the sauce ingredients in a small bowl. Set aside.
  3. Heat oil in a large frying pan over medium-high. Add the beaten egg and spread around the frying pan until thin. Fry for about a minute per side, remove and set aside to cool. Once cooled, slice them into thin strips.
  4. In the same frying pan, heat a little bit more oil and then sauté the garlic and chillies until fragrant and golden brown. Then add in the onions and cook until soft, about 2 minutes altogether.
  5. Add the Chinese sausage slices and cook for about 2 minutes. Follow with the char siu pork and capsicum, cooking for a further 3-4 minutes. Finally, add in the cabbage and beansprouts, cooking until just about to wilt.
  6. Add in the drained rice vermicelli noodles together with the sauce and give it a good mix, until the noodles are evenly coated with the curry powder mixture. Turn the heat off, garnish the noodles with some spring onions, and top with the sliced fried egg.
  7. Serve immediately with a squeeze of calamansi or a lemon wedge. Enjoy!

Singapore Mei Fun (Fried Rice Vermicelli Noodles in Curry Powder)

Singapore Mei Fun (Fried Rice Vermicelli Noodles in Curry Powder)

BON APPÉTIT

– Ally xx

myTaste.com