Chunky Apple Cake

Chunky Apple Cake

Hello Everyone! So I probably didn’t think this through when I was planning for my recipes for the month of March. As I’ve said many times before, yes we are definitely in the middle of summer right now here in the Philippines, and having a warm Apple Cake just doesn’t seem to fit with the temperatures that we’re currently experiencing this summer.

Not to worry though, when I caught on with the dishes that I’ve been cooking for this month, I went back and had to change some of my recipes for next month. I won’t reveal it to you guys yet so you’ll just have to wait for next Wednesday for it!

Chunky Apple Cake

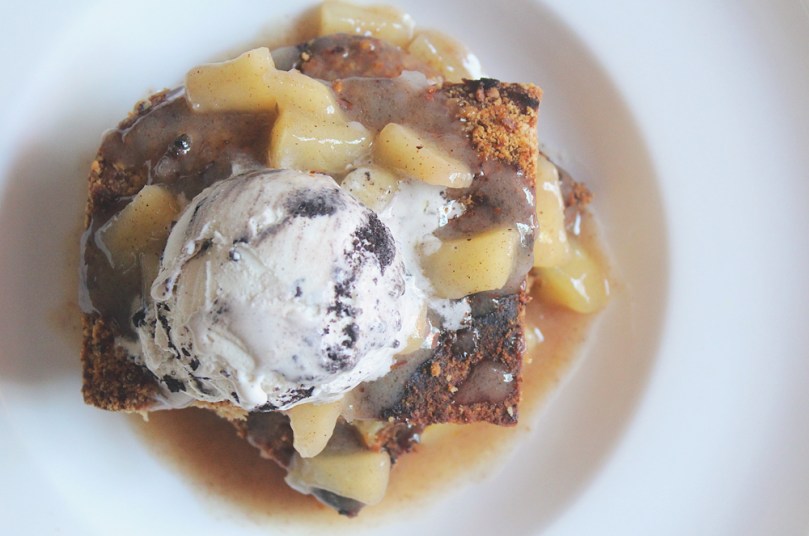
Nonetheless, you can have this Chunky Apple Cake with some ice cream for a cooling element. I would’ve much preferred a simple vanilla ice cream but I had come cookies and cream flavoured ice cream sitting in the freezer that I could use to go with my cake.

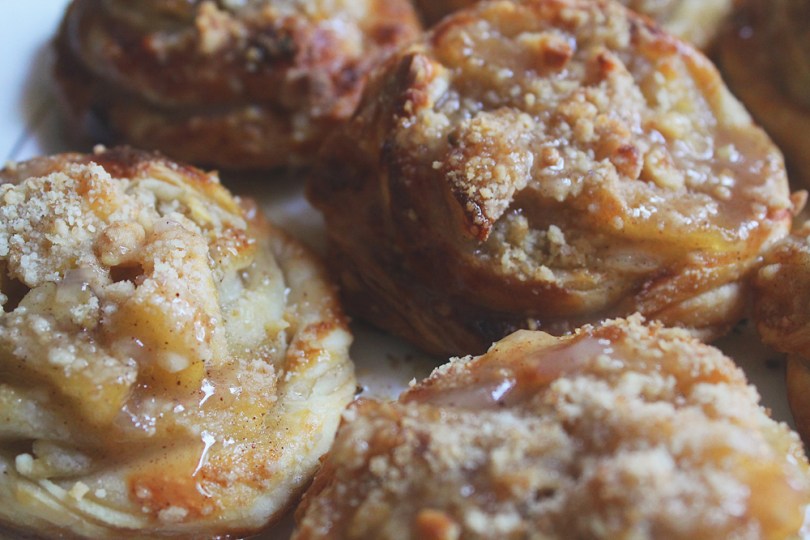
I skipped the butterscotch sauce for this recipe as I still had some leftover apple pie filling sitting in the fridge from when I made my Apple Danish recipe. I used that instead to drizzle over the cakes. In addition, I also used the leftover crumb topping from that recipe to top my cake for another layer of texture.

Before we jump onto the recipe, do check out the original over on Taste of Home. Also, please read some very important comments below after the recipe before the end of tonight’s post!

Chunky Apple Cake Ingredients

PREP TIME 15 MINS | COOKING TIME 40 MINS | SERVES 6-8

INGREDIENTS

For the chunky apple cake

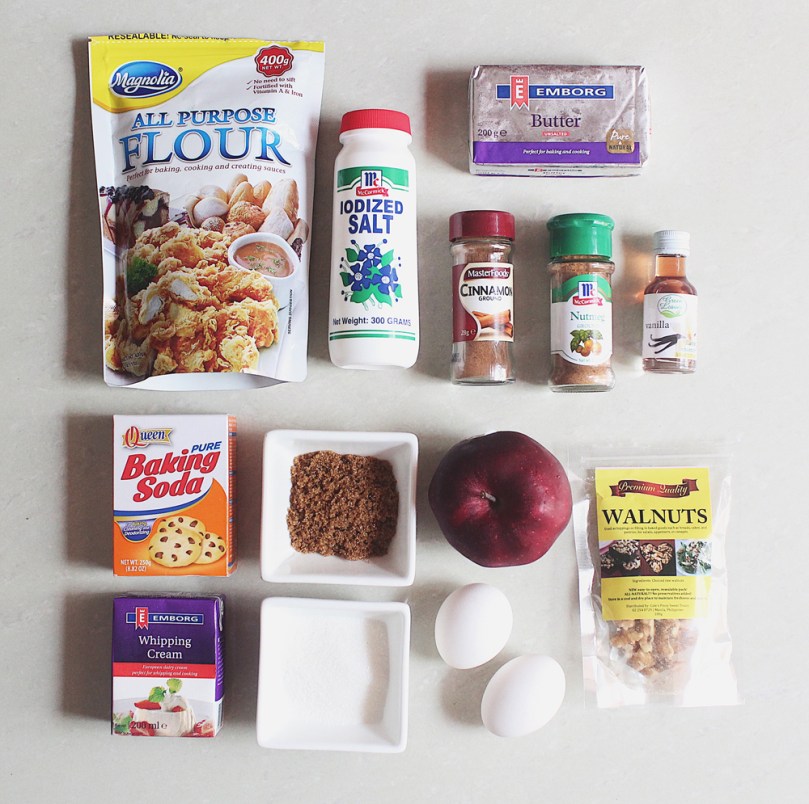
  • 110g unsalted butter, softened
  • 2 cups plain flour
  • 2 cups white granulated sugar
  • 2 large free-range eggs
  • 2 medium-sized (or 1 large) Red Delicious Apples, peeled and chopped
  • 1 & 1/2 tsp ground cinnamon
  • 1 tsp ground nutmeg
  • 1/2 tsp baking soda
  • 1/2 tsp salt
  • 1/2 tsp vanilla extract

For the butterscotch sauce

  • 57g unsalted butter
  • 1/2 cup brown sugar
  • 1/2 cup whipping cream

METHOD

  1. Chunky Apple Cake: Preheat oven to 180C (350F or gas mark 4). Grease a 13in x 9in baking dish with a bit of butter and set aside.
  2. Combine the plain flour, cinnamon, nutmeg, salt and baking soda in a small bowl. Mix well and set aside.
  3. In a large mixing bowl, cream the butter, white sugar, and vanilla extract. Add the eggs one at a time, beating well after each addition.
  4. Gradually add the flour mixture to the creamed mixture and mix well. The batter will be stiff. Stir in the apples until well combined. Spread the mixture onto the prepared baking dish and (optional) top the batter with the crumb topping.
  5. Bake in the oven for 40-45 minutes or until the top is lightly browned and springs back when lightly touched. Once done, cool for 30 minutes before serving.
  6. Butterscotch Sauce: Meanwhile, in a small saucepan, combine the brown sugar and butter. Cook over medium heat until the butter has melted. Gradually add the cream and bring to a slow boil, stirring constantly, about 2-3 minutes. Remove from the heat.
  7. Serving: Once the cake has cooled down, cut them into slices and serve in individual serving plates. Top with the butterscotch sauce and ice cream flavour of your choice. Enjoy!

Chunky Apple Cake

Now, I’ll be honest, the cake turned out to be quite dry, and you can probably tell from the photographs. Here are several reasons on why your cakes turn out dry and crumbly:

  1. Using too much flour. When measuring dry ingredients, gently spoon the flour mixture into a measuring cup for dry ingredients and level off with a flat spatula.
  2. Adding too little shortening/liquid. Measure liquids in a liquid-measuring cup placed on a level surface. Read the liquid measurement at eye level.
  3. Improperly mixed or undermixed. Careful mixing to evenly distribute the ingredients throughout the cake batter will give it a uniform consistency. Be careful not to overmix once the flour is added as this can cause the cake to be tough.
  4. Overbeating or using too many egg whites. Egg whites act as a drying agent. Try using less egg whites if you want to avoid a dry cake.
  5. Too much or too little sugar. Too much sugar can cause a cake to crumble when cut, while too little sugar can make a cake tough. The best cake recipes have a good balance of ingredients.
  6. Pan too big for the amount of batter. Using a pan that is too big for the amount of batter you have can cause it to overbake and become dry. The pan should be filled from half to three-fourths full.
  7. Oven temperature too high. If the temperature is to high, your cake could turn out dry. Overbaking could also be a culprit so check your cake for doneness at the lower end of the baking range.

– from Taste of Home.

I’m most definitely guilty of numbers 3, 5 and 6. I probably undermixed my batter as I creamed the butter and sugar by hand instead of using an electrical mixer (because I still have not bought one)! I also most definitely used too little sugar. I halved the portion of sugar because 2 cups scared me a lot. My Mom’s a diabetic, and because of that we’ve grown up in a household where our intolerance to sugar is quite low due to the fact that we don’t have a lot of sweet things lying around the house. When I read 2 cups of sugar from the original recipe, I felt my non-existent (yet) diabetes rise up. In addition, I definitely used a cake pan too big for the amount of batter I had, and thus lead to overbaking since I did not adjust the time it needed to bake in the oven. Silly rookie mistakes.

Chunky Apple Cake

I did end up with some leftovers, and what my Mom did was steam the cakes the next day for our mid-afternoon snack. The cakes turned out soft and moist, kind of like the texture of a sponge cake.

Anyway, I’ve kept the recipe as is, without adjusting the quantities of sugar just so that I hope for anyone who does try out this recipe, that it won’t be a flop like mine. I’m still posting this recipe anyway for me to learn from it. But to be honest, even one cup of sugar that I used for this recipe was on the verge of being too sweet for me.

BON APPÉTIT

– Ally xx

myTaste.com

Advertisement
Cinnamon-Apple Pork Chops

Cinnamon-Apple Pork Chops

Hello Everyone! We’re on our third Apple recipe for the month of March, which means that we’re close to yet another month flying by so quickly! I’ll keep tonight’s post short – and no it’s not because I’m pressed for time to get this post up for you guys by tonight, but rather, I believe I don’t have much of a back story to this post, nor do I have anything personal to share with you guys for this week.

Cinnamon-Apple Pork Chops

With that being said, do check out the original recipe that I followed to make these juicylicious Cinnamon-Apple Pork Chops from Taste of Home. It’s a very quick and easy autumn-inspired dish to put together for a delicious mid-week dinner! Yes I am aware that it is summer in the Philippines (where I am currently residing at), but like I’ve said in previous posts, it’s autumn somewhere around the world!

Cinnamon-Apple Pork Chops Ingredients

PREP TIME 5 MINS | COOKING TIME 15 MINS | SERVES 6

INGREDIENTS

  • 6 bone-in pork chops, about 1/2-inch thick slices
  • 2 large Red Delicious Apples, washed and wedged
  • 3 tbsp brown sugar
  • 2 tbsp unsalted butter, divided
  • 2 tbsp walnuts, roughly chopped
  • 1 tsp ground cinnamon
  • 1/2 tsp ground nutmeg
  • 1/4 tsp salt

METHOD

  1. In a small bowl, mix the brown sugar, cinnamon, nutmeg, and salt together. Set aside.
  2. In a large skillet, heat 1 tablespoon of the unsalted butter over medium heat. Add the pork chops and cook about 3-4 minutes per side or until browned. If your skillet isn’t large enough to fit all the chops at once, work in batches. Once done, remove and set aside in the oven (heat off) to keep warm.
  3. In the same skillet, add the remaining butter together with the brown sugar mixture, chopped walnuts, and wedged apples. Cook and stir until the apples are tender, about 5 minutes.
  4. Serve with the chops along with some creamy mashed potatoes and blanched green French beans on the side to complete your meal. Enjoy!

Cinnamon-Apple Pork Chops

BON APPÉTIT

– Ally xx

myTaste.com

Apple Danish

Apple Danish

Hello Everyone! My sincere apologies for last week’s post being very bland and uninformative like my recent posts from the beginning of this year. Those who have read my post last week will know the reason for the lack of depth. But moving on, I am hopfully back on track and will not disappoint for tonight’s post. I do have a little bit to say at the end of this post so make sure you read all the way to the end, for those interested/curious that is.

So I did mention in last week’s post that I’d be specifically working with Red Delicious Apples for the month because they were on sale at Rustan’s Supermarket. After doing some research, I realised that these apples are not at all recommended for the way I’m working with them, whoops!

Red Delicious Apples are crunchy in texture and mildly sweet in taste. It is apparently the world’s favourite snacking apple and shines through in cool, crisp salads. They are in season basically all year round and no suggested for pies, sauces, baking, and freezing – oops. I totally used them for baking in last week’s recipe and technically tonight’s recipe. I will use them for a sauce and for baking again for the coming recipes as well *face palm* Oh well, but to be honest, I haven’t come across any dire problems with baking or saucing Red Delicious Apples. After doing some research, Honeycrisp, Granny Smith, and Golden Delicious Apples are the best for pies, baking, and making a sauce out of them. I’ll remember this for next time!

Apple Danish Process

I probably made too much filling and crumb topping for this recipe, even though I had initially halved the recipe that I followed by Melanie Dueck over on The Recipe Critic. If you do end up with leftovers, use another pastry sheet to make more Danishes, which was what I should have done but was too impatient to thaw another sheet, or make mini Apple Crumbles out of them! I would have done the latter, but then I still have another sweet apple recipe to do to complete my month of apple for recipes and I can totally use the leftovers for it!

The only reason why I have opted for the glaze to be optional in this recipe is because I don’t have any confectioners’ sugar lying around in my pantry. If you have read my previous post (can’t remember which specific one it was), I mentioned that I have this habit of buying ingredients that I rarely use. Eventually those ingredients end up sitting on the pantry shelf until its expiration date. The same applies to confectioners’ sugar. I rarely bake nowadays, or when I do bake, I never really need to use confectioners’ sugar regularly, and so if I am just going to use it for this recipe, I have decided to leave it out for mine, but if you do happen to have it lying around, go for it! It tastes good with or without anyway! What I did instead was drizzled a bit of the juices from the apple filling on top of the baked Danishes.

Apple Danish Ingredients

PREP TIME 20 MINS | COOKING TIME 25 MINS | SERVES 8 DANISHES

INGREDIENTS

  • 2 puff pastry sheets, thawed

For the apple filling

  • 1 large Red Delicious apples, peeled and diced
  • 25g unsalted butter
  • 1/8 cup water
  • 3 tbsp white granulated sugar
  • 2 tsp cornstarch
  • 1/4 tsp ground cinnamon
  • 1/4 tsp ground nutmeg
  • Pinch of salt

For the crumb topping

  • 1/4 cup plain flour
  • 25g unsalted butter (cold), cut into little cubes
  • 2 tbsp brown sugar
  • 1/4 tsp ground cinnamon
  • Handful of roughly chopped walnuts

For the egg wash

  • 1 large free-range egg
  • 1 tbsp water

Optional: for the glaze

  • 1/4 cup confectioners’ sugar
  • 1 tbsp heavy whipping cream or milk
  • 1/8 tsp vanilla extract

METHOD

  1. Apple Filling: Combine all the apple filling ingredients together, except for the apples, in a medium-sized saucepan. Melt altogether over medium heat and bring to a boil. Boil for about 2 minutes, stirring frequently.
  2. Add the peeled and diced apples into the saucepan and bring back to a boil over medium-high heat. Cook for 5 minutes, stirring often, until the apples have softened, but still holds it shape.
  3. Remove from the heat and set aside to cool.
    Crumb Topping: Meanwhile, mix all the crumb topping ingredients in a small mixing bowl that has been chilled in the freezer for about 10 minutes.
  4. With your fingertips, quickly mix the ingredients together until it looks like rough breadcrumbs. Set aside.

Tip: Pre-chilling your mixing bowl in the freezer helps keep the butter chilled when making the crumb topping. Likewise, if your mixture is too warm, put the bowl into the freezer for 10 to 15 minutes and start again when it has chilled.

  1. Apple Danish: Preheat oven to 200C (400F or gas mark 6). Line a baking sheet with parchment paper (I used foil for mine because I only realised just as I was about to prepare my sheet that I had none left!).
  2. Unfold one thawed puff pastry sheet at a time and roll it out to about 10”x10” sheet. Use a pizza cutter to cut 16 even strips. Connect four strips together by overlapping about a half-inch and pressing it down together. Twist the strip into a ribbon and snail it around itself to create a rose-shaped pastry. Press the end down to the rest of the dough. Repeat for the remaining dough, should make at least 8 pastries.

Apple Danish Process

  1. Place the prepared pastry dough on the parchment-lined baking sheet and press the middle down. Place a spoonful of apple filling in the wells of the pastry.
  2. In a small bowl, combine the egg and water together and brush it over the pastry dough. Sprinkle the crumb topping over the tops of each Danish and then bake for about 16 to 18 minutes or until the edges are golden.
  3. Remove from the oven and leave aside to cool before glazing.
  4. Glaze (Optional): Mix all the glaze ingredients together in a small bowl then drizzle over the warm apple Danishes. Serve immediately and enjoy!

Apple Danish

This is probably not the best time to have a warm dessert in the Philippines as it’s getting hotter by the minute as the Summer season rolls in. But hey! It’s getting cooler in some parts of the world right? So this would be the perfect snack/dessert for it!

I could have probably plated these delicious Danishes a little better – but I promise that they taste absolutely amazing! Better than they actually look! The flaky and crisp pastry crust, apple pie filling, and crumb topping make them irresistible. In seconds upon placing them on the dining table for our mid-afternoon snack, they were all gone! The three of us (my Mom, my sister, and myself) even fought over who wouldn’t get a third piece since there were only 8 Danishes.

Apple Danish

Before I end tonight’s post I would also just like to say a few things. I didn’t want to say this at the beginning of this post because I didn’t want to start off negatively. I have recovered from my irritable bowel syndrome, but despite that, I haven’t been feeling in the mood to work on my blog since my recovery.

I mean it’s practically normal to have off days – we’re all human after all – but I just can’t shake off the feeling of letting my followers down and letting myself down when it comes to Amcarmen’s Kitchen. I don’t get paid for running this blog, so everything that I do for Amcarmen’s Kitchen is purely for my passion and love for food, and to be able to share it with the few followers I have is just enough for me to continue doing what I love to do.

This is a very reason why I try so hard to stay on top of everything and make sure that I have dishes and recipes lined up in advance so that I can just hit the publish button every Wednesday night without having to stress about editing photographs and writing everything up all on the upload day itself. I probably put too much pressure on myself for this, hence why the sudden lack of determination for the past week.

I know deep down that no one really cares about all this – but I just needed to get this off my chest, even if it just means that I am talking to my blog.

BON APPÉTIT

– Ally xx

myTaste.com

Apple Chicken Bake

Apple Chicken Bake

Hello Everyone! March is here which can only mean one thing for Amcarmen’s Kitchen. That’s right! A new month means a new fruit to play with and we’re all about Apples this March! More specifically we’re going to be playing around with Red Washington Apples only because they were on sale at Rustan’s Supermarket for only P28 apiece! I think they were originally priced at like P35 or something. I know it’s not much of a difference but other supermarkets have them priced at P230 or something per kilo, which is crazy!

Apple Chicken Bake

I’ll keep my introduction short tonight, as I am not feeling well today – the creative writing juices aren’t flowing at the moment, apologies for that. I didn’t want to start off my post in saying what happened, but you can read more about it at the end of the post.

Before we dive right into the recipe, please head on over to Taste of Home for the original recipe where I drew my inspiration.

Apple Chicken Bake Ingredients

PREP TIME 5 MINS* | COOKING TIME 30 MINS | SERVES 3

*Allow for up to 4-6 hours to marinate the chicken, or even better, overnight in the fridge. Remove from the fridge about an hour before baking to bring the meat back to room temperature.

INGREDIENTS

  • 3 whole chicken legs (about 1/2 kg)
  • 1 large brown onion, peeled and wedged
  • 1 large Red Washington Apple, washed and wedged
  • Freshly cracked black pepper

For the marinade

  • 5 whole cloves
  • 2-3 garlic cloves, peeled and crushed
  • 1 cinnamon bark
  • 1/3 cup Hickory BBQ sauce
  • 1/4 cup apple juice
  • 1 tbsp honey
  • 1/4 tsp ground nutmeg
  • 1/4 tsp salt
  • 1/4 tsp whole black peppercorns

Apple Chicken Bake Process

METHOD

  1. Combine the marinade ingredients in a small bowl. Dip the chicken whole legs into the marinade and then place skin side down into an oven-safe Pyrex dish.
  2. Pour the remaining marinade into the Pyrex dish, cover with cling wrap and then set aside in the fridge to marinate for about 4-6 hours or overnight.
  3. When ready to bake, remove from the fridge and turn the chicken legs over skin side up. Leave aside to bring to room temperature, about an hour.
  4. Preheat oven to 200C (400F or gas mark 6). Scatter the wedged apples and onions onto the Pyrex dish, and season with a touch of freshly cracked black pepper. Bake in the oven for 30 minutes.
  5. Once done, turn the heat off. Drain the sauce into a small saucepan and place the chicken back into the oven to keep warm.
  6. Bring the sauce to a boil over medium-high heat. Once boiling, add slurry of cornstarch to the sauce to thicken it. Once thickened, turn the heat off.
  7. Serve with any sides of your choice. I served mine with a side of salad with cherry tomatoes and French beans, and corn on a cob.

Apple Chicken Bake Process

Apple Chicken Bake

Before I end tonight’s post, I would just like to say that it’s been one heck of a crazy week! So busy that I haven’t even had the time to plan and cook my dishes for this month ahead of time, which is what I usually do to stay on top of things. This is one of the reasons why tonight’s post isn’t as informative as my previous posts. The reason for that being is that I’m also suffering from piercing stomach pains and an irritable bowel syndrome, quite possibly due to food poisoning. I’m confined at home and hydrating lots. Hopefully I’ll be all good in the coming days and I can get back on track with my cooking and writing by the weekend or early next week!

BON APPÉTIT

– Ally xx

myTaste.com