Assam Pedas Ikan

Assam Pedas Ikan

Hello everyone! A new month means we’ve ventured onwards to our next Southeast Asian destination, and tonight we’re kicking off our journey through Malaysia! Having lived in Brunei for 26 years of my life, and Bruneian food being so heavily influenced by the cuisine of its neighbouring country, Malaysia, it’s no wonder that it’s a cuisine that’s very close to my heart and that I love so much on top of everything else that I seem to love when it comes to food *cheeky grin*

Assam Pedas Ikan

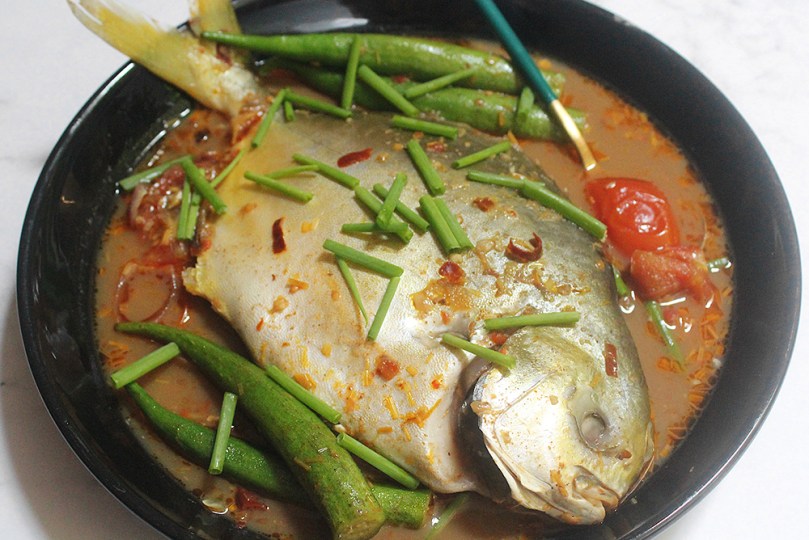
Assam Pedas Ikan, or literally translated as Sour Spicy Fish in English, is a classic Malaysian dish that’s undoubtedly sour, fiery hot, and super satisfying! Special ingredients such as tamarind peel, ginger torch flower, and Vietnamese coriander (laksa leaves) are key in achieving the flavour profile and aroma of Assam Pedas. However, while these ingredients may be difficult to source in certain countries, the sourness is the important component; and you can use tamarind pulp or paste for this. I guess that it’s also safe to say why everyone has their own take on this favourite Malaysian dish; the adaptations are endless! Ultimately, a good balance of sourness, saltiness, sweetness, and spiciness is all you need to make a good Assam Pedas dish.

Tonight, I’ll be sharing the way I remember how my Mom used to make it when we were still living in Brunei. It’s been a while since I’ve had this dish and I was actually surprised by how quick and easy it is to make, as well as how readily available all the ingredients are, for the version that I will be making of course. Instead of using water for my version, I used my own homemade fish broth from fish scraps to give the Assam Pedas more depth in flavour. Traditionally, locals would use ikan tenggiri (Spanish mackerel), or ikan pari (stingray), but my Mom and I prefer to use pomfret fish (pampano in Tagalog) for its delicate white flesh, subtle non-fishy and sweet taste, as well for its firm texture.

Assam Pedas Ikan Pedas

PREP TIME 30 MINS | COOKING TIME 10 MINS | SERVES 4
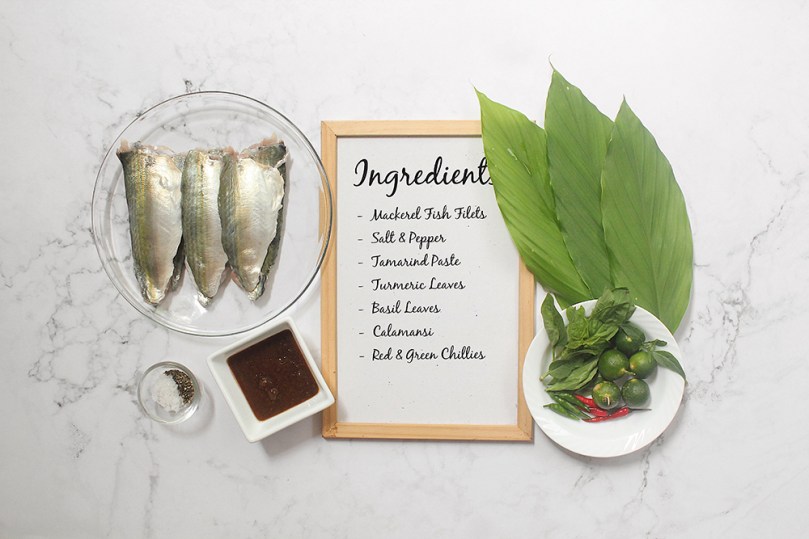
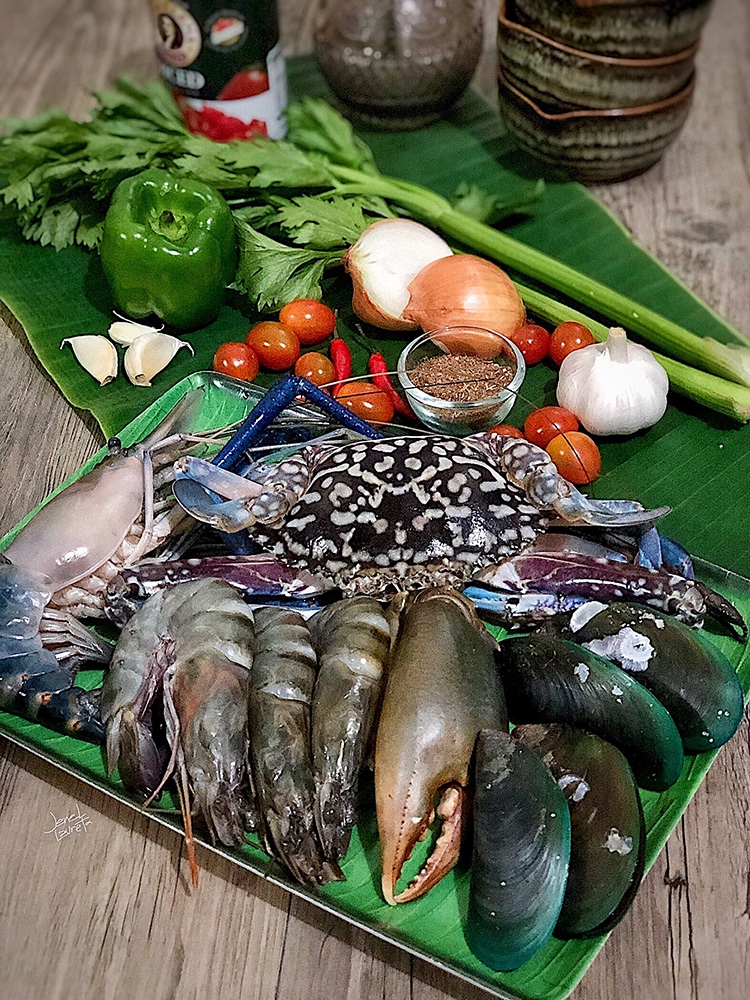
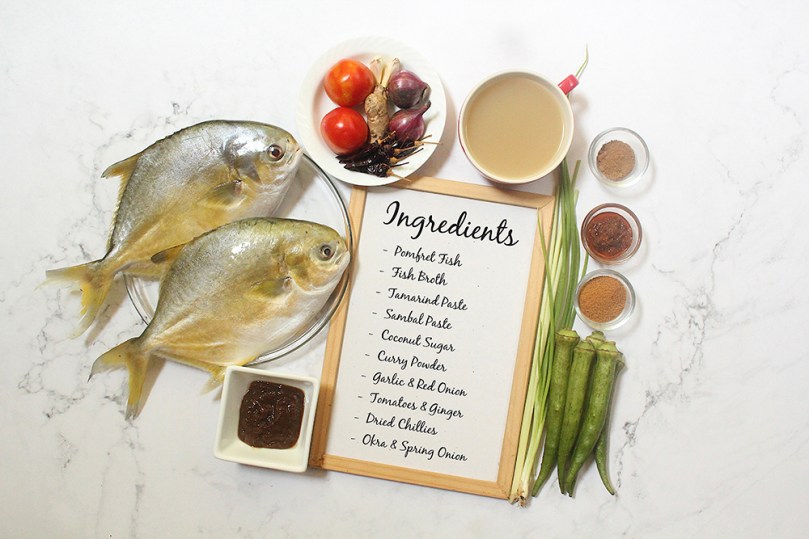
INGREDIENTS

For the spice paste

  • 8-10 pcs dried red chillies, roughly chopped
  • 1 garlic clove, roughly chopped
  • 1 small red onion, diced
  • 1 stalk lemongrass (white part only), roughly chopped
  • 1/2 tbsp sambal belacan paste

For the assam pedas ikan

  • 2 large pomfret fish
  • 2 tbsp cooking oil
  • Spice Paste
  • 1 tsp fish curry powder
  • 1 tbsp coconut sugar
  • 2 tbsp tamarind paste
  • 2 cups fish broth
  • 2 tomatoes, quartered
  • 1 small red onion, quartered
  • 1 thumb-sized ginger, sliced
  • Spring onion, white part
  • 10 pcs okra
  • Salt, to taste
  • Spring onion (green part), to garnish

METHOD

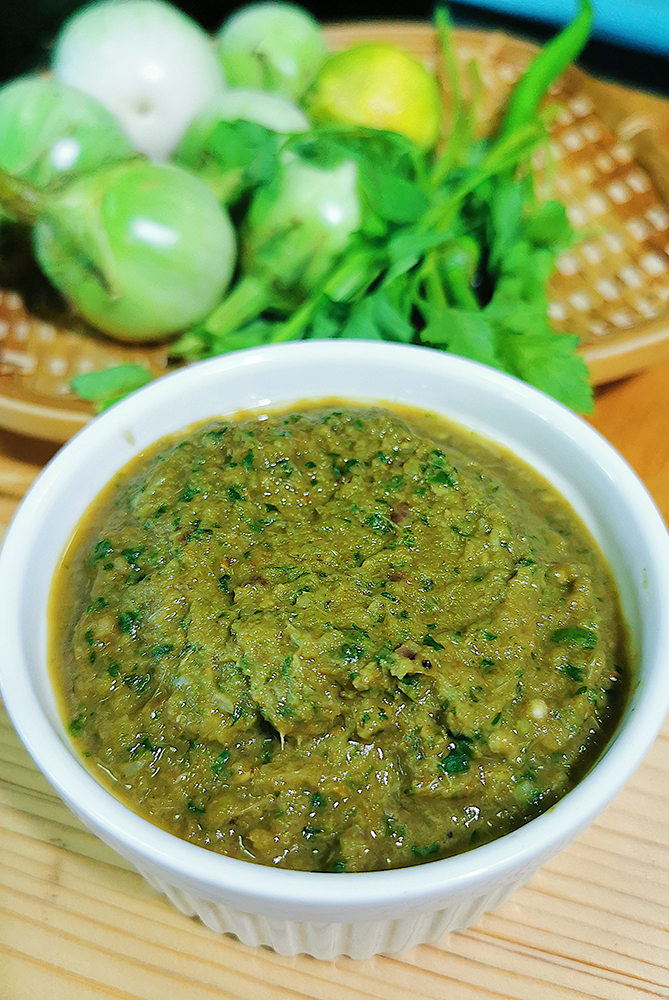
  1. Spice Paste: Using a mortar and pestle, pound all the ingredients for the spice paste together, or you may also use a food processor to do so. Set aside.
  2. Assam Pedas Ikan: Heat cooking oil to a large pot over medium-high. Add the spice paste and fry for about 2 minutes or until fragrant before adding the curry powder, coconut sugar, and tamarind paste. Fry for a further 2 minutes.
  3. Add the fish broth, followed by the tomatoes, red onion, ginger slices, and white parts of the spring onion, and leave to simmer for about 5 minutes or until the tomatoes have softened.
  4. Add the pomfret fish and cook for 20 minutes or until the fish is cooked through. Add the okra and cook for a further 5 minutes, or until the okra is tender.
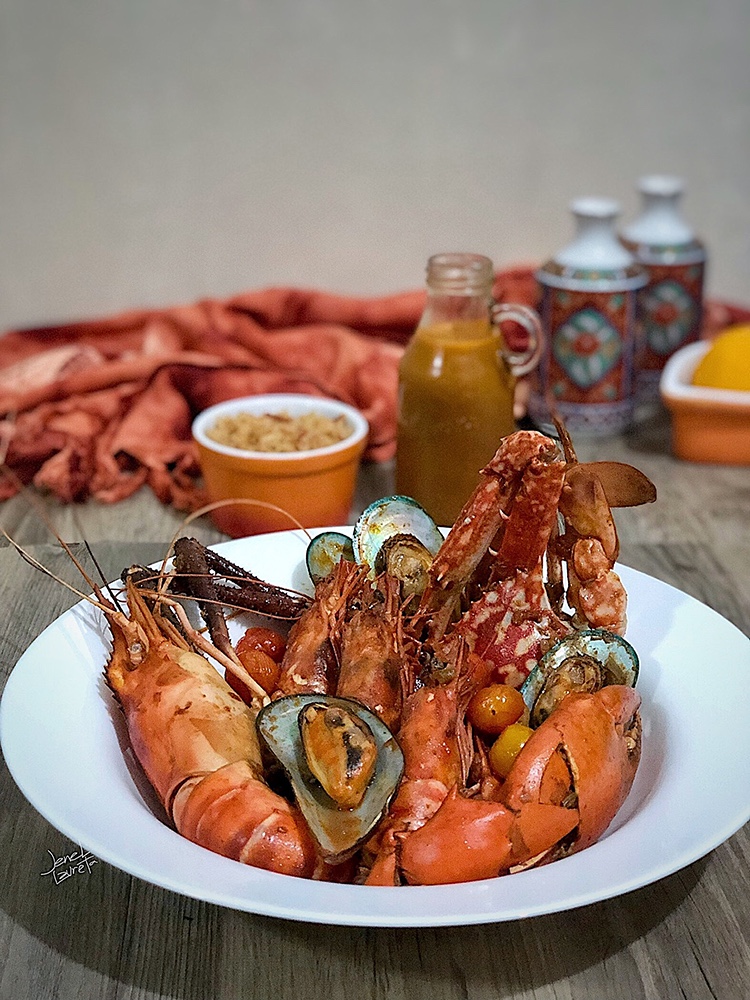
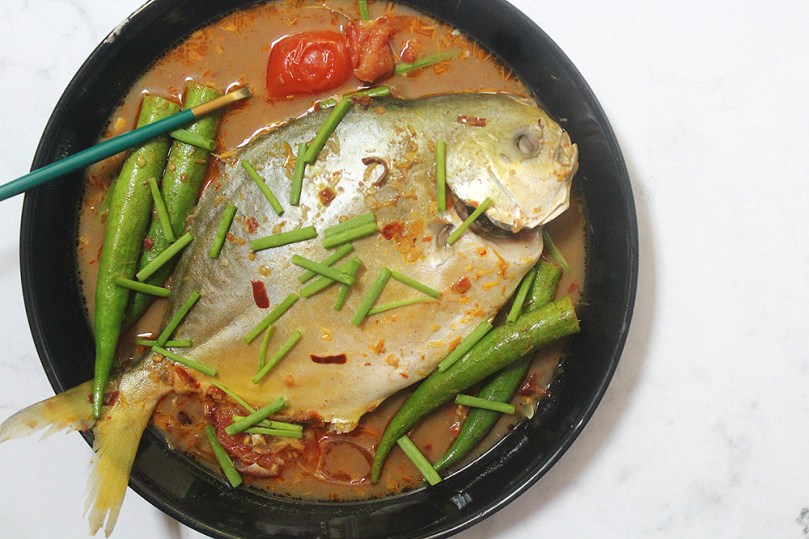
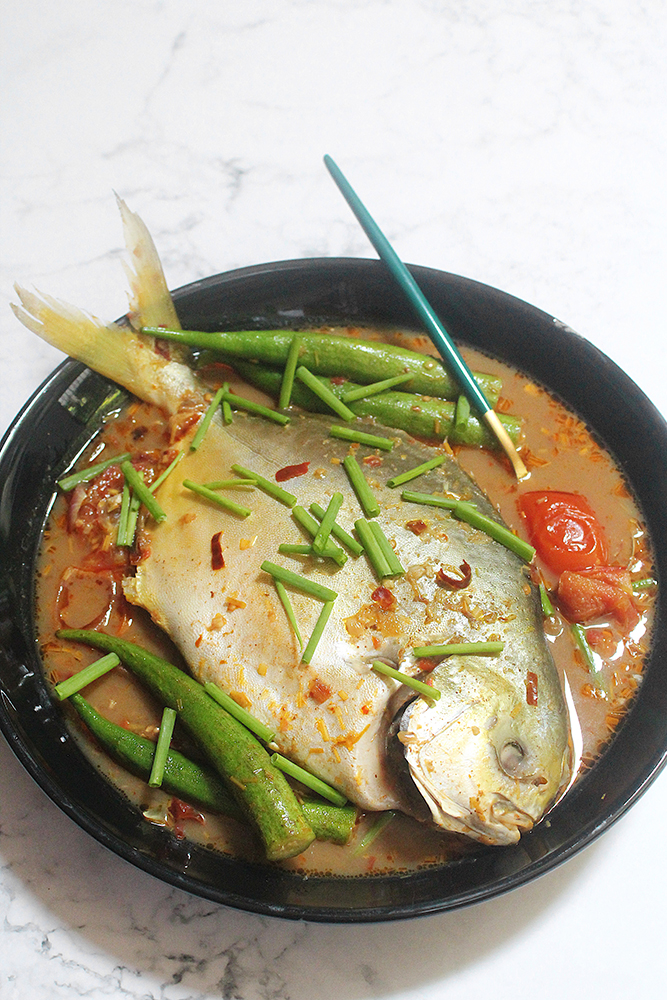
  5. Serve immediately while hot and enjoy with freshly steamed white rice!

Assam Pedas Ikan is best served with plain steamed white rice. You may also serve it with noodles, kind of like a laksa, if you’re using boneless fish. Rice noodles would be the go-to choice as they take on the flavour of the Assam Pedas best.

Assam Pedas Ikan

Assam Pedas Ikan

BON APPÉTIT

– Ally xx

myTaste.com

Advertisement

Prawn Sinigang Orzo

Hello Everyone! Last week was a busy week for Amcarmen’s Kitchen; I uploaded three posts, two of which were recipes and the other was an exclusive interview to celebrate my blog turning seven years old last April 16! If you want to have a read of that interview, I’ve linked it above. Just a fair warning, it’s quite a long article and also contains a 6-minute video where I talked about one of the recent dishes I’ve shared on my blog.

Anyway, tonight I will be sharing a classic Filipino dish that is close to every Filipino’s heart. It’s a dish I grew up with and is always a regular on my meal plans. Even when I was living in Australia for my university studies, this was my go-to winter warmer dinner after a long day on campus and braving the cold, crisp winds on my walk back home.

That dish is none other than Sinigang. It is a Filipino soup or stew that is characterised by its sour and savoury taste. It is most commonly associated with sampalok (tamarind) as its souring agent, but other fruits such as bayabas (guava), kamias (bilimbi), calamansi (Philippine lime), and unripe mango to name a few can also be used to make the broth sour and acidic; similar to but differentiated from paksiw (which uses vinegar).

Prawn Sinigang Orzo

Other than the souring agent, the soup base is also made by stewing onions, tomatoes, ginger (if using seafood), and long green chillies to enhance the taste and add a little spicy kick to the soup base. Pork, beef, fish, and prawns are the main proteins used in the making of sinigang, accompanied by various vegetables such as, but not limited to, okra, taro, white radish, water spinach, yardlong beans, and eggplant.

Of course, I’m not just going to share another sinigang recipe as I already have two posts on my blog for it: Pork Spare Ribs Sinigang and Sinigang na Bangús. I’m putting a little twist to this sinigang dish by turning it into a risotto! Though this isn’t something particularly new, inventive, nor innovative on my side since the two words Sinigang and Risotto together already coexist – I just can’t remember where I had seen or heard the term before – I knew that this was a recipe that I wanted to try out for myself. I’m one to always drown my rice with the sinigang soup, and I’m sure most do the same too! So why not, instead of cooking the rice separately, cook it in the broth?

Just to make things a little different, I used risoni/orzo pasta instead of arborio rice. I tossed it in a pan with unsalted butter to toast before cooking it in the sinigang soup base to give it a nutty taste and a golden colour.

Prawn Sinigang Orzo Ingredients

PREP TIME 10 MINS | COOKING TIME 50-55 MINS | SERVES 4-6

INGREDIENTS

For the prawn sinigang broth

  • 500g medium to large-sized prawns
  • 100g prawn heads* (optional)
  • 8 cups (approx. 2L) water
  • 2 packets (2 x 11g) sinigang sa sampalok original mix
  • 3 tbsp fish sauce
  • 2 long green chillies, halved
  • 2 medium-sized tomatoes, quartered
  • 1 medium-sized red onion, quartered
  • 1 thumb-sized ginger, peeled and sliced

For the orzo

  • 300g risoni or orzo pasta
  • 25g unsalted butter
  • Sinigang broth
  • Salt and freshly ground black pepper, to taste

For the toppings

  • 1 bunch water spinach, leaves separated from the stems, and stems cut into short lengths
  • 1 medium-sized daikon (white radish), peeled and sliced
  • Handful of cherry tomatoes, pan-fried
  • Long green chilli, sliced and pan-fried

*I always have prawn heads and peels lying around in my freezer from a previous batch of prawns that I bought. The reason is so that I can make soup bases like this or use them for flavouring other dishes. If you don’t have any prawn heads readily available, you may substitute with a prawn (or seafood) bouillon cube.

METHOD

  1. Prawn Sinigang Broth: Fill a large stockpot with the water along with the red onion, tomatoes, chillies, ginger, and prawn heads. Bring to a boil over medium-high heat and leave to simmer for about 10 to 15 minutes.
  2. After 10-15 minutes, turn the heat down to medium-low and remove the prawn heads with about half a cup of the broth. Using a mortar and pestle, pound the prawn heads together with the broth to extract the flavours from them. Strain and then return the extraction to the stockpot.
  3. Turn the heat back up to medium-high and add the sinigang sa sampalok mix. Give it a good stir and then season the broth with fish sauce. Add according to your taste buds; I added about 3 tablespoons in total.
  4. Next, add the sliced daikon and cook for about 5 to 8 minutes. Then add in the prawns and cook for a further 5 to 8 minutes. Once done, remove the prawns and daikon from the stockpot and set them aside.
  5. Add the water spinach stalks to the broth and cook until slightly tender, about a minute. Then add in the leaves and blanch for about 30 seconds. Remove from the broth and then set aside.
  6. Strain the sinigang broth and set aside as well.
  7. Prawn Sinigang Orzo: Melt butter in a large pan over medium-high heat. Once melted, add in the uncooked orzo pasta and toast until slightly golden brown in colour, about 5 to 7 minutes in total.
  8. Once toasted, lower the heat down to medium and then add about 4 cups of the broth to the pan. Season with freshly ground pepper, to taste.

I didn’t add any more salt since I already seasoned the broth with fish sauce, but feel free to do so according to your taste.

  1. Cover and cook for about 10 minutes, constantly checking and stirring to ensure that the liquid doesn’t evaporate too quickly and to prevent the orzo sticking to the bottom of the pan. Make sure to reserve at least a cup of the sinigang broth for later.
  2. Add more liquid if needed until the pasta is thoroughly al dente and the liquid is absorbed, about 10 to 15 minutes in total. Once done, remove from the heat.
  3. Reheat the prawns and vegetables in the reserved broth before plating up.
  4. Plate up accordingly and serve immediately while hot! Enjoy!

Prawn Sinigang Orzo

Prawn Sinigang Orzo

BON APPÉTIT

– Ally xx

myTaste.com

Ikan Sabuko (Grilled Tamarind Fish)

Ikan Sabuko (Grilled Tamarind Fish)

Hello Everyone! It’s the last day of the month and also my last East Timorese recipe! I’m not going to lie, I did have a difficult time researching the country’s most popular dishes, but despite that, I enjoyed the dishes that I came across – easy, humble, yet delicious meals that you can add to your weekly meal plan!

As we all know, East Timor’s cuisine is heavily influenced by the countries that they were once colonized by. The dish that I will be sharing tonight, known as Ikan Sabuko, or in English, Grilled Tamarind Fish, draws on the flavours of Portugal. Along with other fish species, mackerel is a very common fish to eat in Portugal, sometimes on toast, for special occasions, or even a staple weeknight meal.

Ikan Sabuko (Grilled Tamarind Fish)

Ikan Sabuko is a specialty dish made of Spanish mackerel that is marinated in tamarind paste, grilled with basil and chillies for a kick of heat, and then optionally served with a budu sauce to tie all the flavours together. Budu is essentially a fermented anchovy sauce mixed with a squeeze of calamansi juice, red and green chillies, and some sliced red onions. You can add other ingredients as well such as mint leaves and cherry tomatoes for extra flavour.

This dish really only needs a few ingredients, but it’s packed with lots of strong and bold flavours. You don’t have to use mackerel fish in particular, use whatever fish is readily available at your local fish market. Add this to your list of dishes to try and I promise you, it won’t disappoint!

Ikan Sabuko (Grilled Tamarind Fish) Ingredie

PREP TIME 45 MINS | COOKING TIME 10-15 MINS | SERVES 3

INGREDIENTS

  • 6 mackerel fish filets
  • 2 tbsp tamarind paste
  • Juice of 3 small-sized calamansi
  • Salt and pepper, to taste
  • Turmeric leaves
  • Basil leaves
  • Red & green Thai chillies

METHOD

  1. In a medium-sized bowl, add the fish filets together with the salt, pepper, calamansi juice, and tamarind paste. Give it a good mix and set it aside to marinate for about 45 minutes.
  2. Line a grill pan with aluminium foil (about twice the length of your grill pan) and the turmeric leaves. Place the fish filets on top of the leaves, skin side up, and fold the aluminium foil over the top of the fish to enclose it.
  3. Cook over medium-high heat for about 10 to 15 minutes, or until done to your liking.
  4. Once done, plate up and garnish with some freshly chopped basil leaves and some red and green chillies too (optional).
  5. Serve with freshly cooked rice and a simple budu sauce on the side. Enjoy!

Ikan Sabuko (Grilled Tamarind Fish)

Ikan Sabuko (Grilled Tamarind Fish)

BON APPÉTIT

– Ally xx

myTaste.com

Magic Salmon Sushi Bake

Magic Salmon Sushi Bake

Sushi Bake is one of the latest gastronomic trends to pop up during the community quarantine period. It is basically a deconstructed version of the original Japanese rolled sushi; a quick and easy way to make in a large batch.

Hand making sushi rolls requires special skills to do, but this sushi bake recipe takes the hard work and time out of rolling each piece individually. With sushi bake, all you have to do is scoop a portion of it and wrap it in a small sheet of roasted seaweed, and then eat; making it a great option for larger parties or gatherings.

The basic ingredients you need to make this dish is sushi rice (or short/medium-grained rice), Japanese mayonnaise, cream cheese, sriracha for heat, ebiko (shrimp roe), Furikake, and your choice of seafood from salmon, to kani (imitation crab sticks), to tuna, or even unagi (eel). Furikake is a mixture of dry ingredients that is used as seasoning and sprinkled on top of cooked rice, fish, and vegetables. Since the sushi bake wave hit, it’s relatively easy to find Furikake in stores, online, or from small local businesses. If you can’t seem to find Furikake, then you can easily make it at home with roasted sesame seeds, Korean roasted seaweed flakes, salt, and sugar.

Magic Salmon Sushi Bake

Being a person who doesn’t immediately hop on the trendy bandwagon, here is my take on it four months later. For the sushi bake that I will be sharing tonight, I decided to add a little twist to it since this month is all about cooking with or showing off the colour blue. I threw in some dried butterfly pea flowers into the rice cooker to give the sushi rice a blue (almost violet) hue. Thus, my Magic Salmon Sushi Bake!

I sourced my salmon, Furikake bonito, ebiko (shrimp roe), and roasted nori sheets from seabites.ph. They basically have all the sushi bake needs including mirin and Japanese mayonnaise that you can get as a kit. I just happen to have the latter already in my pantry as well as the other ingredients to support my dish. Bottom line, go and support small local businesses especially during this pandemic!

Magic Salmon Sushi Bake Ingredients

PREP TIME 30 MINS | COOKING TIME 40-55 MINS | SERVES 6-8

INGREDIENTS

For the sushi rice

  • 2 cups white sushi-grade rice (short or medium-grained rice will also do)
  • 2 cups water
  • 1 tbsp loose dried butterfly pea flowers
  • 1 tbsp red wine vinegar
  • 2 tsp light brown sugar
  • 1 tsp salt

For the creamy topping

  • 100g cream cheese, softened
  • 1/2 cup Japanese mayonnaise, plus extra
  • 1/2 cup sriracha, plus extra
  • 1 tbsp Furikake bonito

For the topping

  • 500g sashimi-grade salmon, sliced
  • Ebiko (shrimp roe)
  • Furikake bonito
  • Korean roasted nori sheets

METHOD

  1. Sushi Rice: Rinse the rice with cold water to wash away the excess starch, until the water runs clear, and then drain. Soak the rice in 2 cups of its cooking water for about 20-30 minutes. This is said to give the rice extra time to moisten and cook more evenly. Place it into your rice cooker and let it work its magic.
  2. Once done, set aside to cool down slightly. Remove the butterfly pea flowers and then season the rice with the red wine vinegar, salt, and sugar. Mix well and set aside until ready to use.
  3. Preheat oven to 200C (400F or gas mark 6).
  4. Creamy Topping: In a medium-sized mixing bowl, combine the cream cheese, Japanese mayonnaise, sriracha, and the Furikake bonito. Optional: dice some of the salmon slices and then add them into the bowl too. Mix well and then set aside.
  5. Magic Salmon Sushi Bake: In a heat-proof rectangular baking dish, spread the sushi rice evenly then lightly press down. Sprinkle a thin layer of the Furikake bonito on top of rice until fully covered.
  6. Spread the creamy topping on top of the rice, and top with the sliced salmon. Top with more Furikake bonito, ebiko, extra Japanese mayonnaise, and extra sriracha.
  7. Bake for 15 to 20 minutes or until the top just starts to brown and bubble.
  8. Scoop and serve immediately with a sheet of roasted nori. Enjoy!

Magic Salmon Sushi Bake

Notes:

  • How do I store sushi bake?
    If you happen to have leftovers it is best stored in an airtight container in the refrigerator.
  • How long does sushi bake last?
    About 3 days in an airtight container in the refrigerator.
  • How can I reheat my leftover sushi bake?
    You can easily reheat your sushi bake in the microwave or oven until heated through.

Magic Salmon Sushi Bake

BON APPÉTIT

– Ally xx

myTaste.com

Auguest 2020: Azrina Hidup

Thai Green Curry Mussels

“Cooking feeds the soul, both the cook and the people who are eating. For me, cooking is an act of love, a gift, and a way of sharing. It puts a smile in my heart when I put a lot of thought and care into preparing a dish. At home, cooking symbolizes love and family.” — Azrina Hidup

Auguest 2020: Azrina Hidup

Hello everyone! My name is Azrina Hidup and I am half Filipina and half Bruneian. I would like to thank my beautiful friend, Allison, for the opportunity to be featured on her blog along with other amazing foodies and chefs.

I am always the happiest girl when I get to put my apron on. It was my dream to enter ‘Le Cordon Bleu’ Culinary School, but somehow I ended up doing Political Science. My passion for cooking though, doesn’t stop. Every weekend I will be on my #apronmodeon doing recipe testing and feeding my family with my cooking.

I love creating different dishes. I love travelling for food and what I usually love doing when I travel is to explore and try the local cuisine. I will always try to remember the taste and look of the food so I can recreate them back home for my loved ones to try.

Thai Green Curry Mussels

Most of all, I strongly believe that cooking is more than just an act to fill the empty stomach. Cooking for me is an act of love, a gift, and a way of sharing. It puts a smile in my heart when I put a lot of thought and care into preparing a dish. I grew up with home cooked food, and growing up with my mom’s cooking inspires me a lot to develop my passion for cooking. For me, cooking and home cooked meals symbolize family and love.

For Allison’s Auguest series, I will be sharing my favourite Thai dish which is green curry. Tonight I have made Thai Green Curry Mussels with Homemade Green Curry Paste. Thai green curry is absolutely delicious when served with steamed rice. Nyums!

Thai Green Curry Mussels Ingredients

PREP TIME 30 MINS | COOKING TIME 20-25 MINS | SERVES 4-5

INGREDIENTS

For the green curry paste

  • 15-20 Thai basil leaves
  • 6 Thai green chillies (remove the seeds if you prefer it to be less spicy)
  • 3-4 cloves of garlic
  • 3 long green chillies
  • 2 stalks lemongrass, bottom part only, thinly sliced
  • 1-2 shallots
  • 1 & 1/2 inch size piece of galangal
  • 1 & 1/2 inch size piece of ginger
  • 1 lime
  • 1 tbsp of coconut milk
  • 1-2 tsp of kaffir lime zest
  • 1-2 tsp of shrimp paste (belacan)
  • 1/2 tsp white peppercorns
  • Cilantro leaves and roots
  • Coriander seeds
  • Cumin powder
  • Salt, to taste

Homemade Thai Green Curry Paste

For the Green Curry Mussels

  • Mussels
  • 1 cup fresh coconut water
  • 1 cup seafood stock*
  • 1 can (approx. 440g) coconut milk
  • 3 pieces kaffir lime leaves (torn to smaller pieces)
  • Basil leaves (5-6)
  • Fish sauce, to taste
  • Palm sugar, to taste
  • Squeeze 1-2 fresh limes
  • Thai eggplants
  • Cilantro and basil leaves for garnish (cut/torn to smaller pieces)

* For this recipe, I used homemade prawn stock. You may use any kind of stock as a substitute.

Thai Green Curry Mussels Ingredients

METHOD

  1. Thai Green Curry Paste: Toast coriander seeds simply by heating them in a skillet over medium-high heat. Then, finely grind using a mortar and pestle.
  2. In the same skillet, toast the shrimp paste/belacan and set aside.
  3. Slowly add the rest of the ingredients for the green curry paste to the mortar and pound until fine, adding liquid so that the mixture will become paste-like in texture. For this recipe, I used coconut milk as the liquid.
  4. Taste the curry paste and add season with salt to your preference and add a squeeze of lime juice.

Tip: You may also use an electric blender to speed up the process (and really make your life a little easier), if you prefer. For the coriander seeds, grind them first into a powder with the mortar and pestle. Then use the electric blender to grind all the remaining ingredients together. Similarly, add liquid to get the blender going. Since this will be used for a green curry dish, I highly suggest to use coconut milk as your liquid base.

  1. Thai Green Curry Mussels: Over medium heat, reduce half the can of the coconut milk in a heavy-bottomed pot until it becomes thick.
  2. Add the homemade green curry paste and sauté. Make sure to stir constantly for 2-3 minutes until fragrant/aromatic.
  3. Add the seafood stock, remaining half can of the coconut milk, kaffir lime leaves, and basil leaves. Leave to simmer gently for about 5-10 minutes, keeping the heat on medium.

Tip: You may also blend the basil leaves and some coconut milk into an electric blender to get nice green color soup.

  1. Add palm sugar and fish sauce to taste.
  2. Add coconut water and eggplants. Cover the pot until the eggplants are cooked through, about 3-4 minutes.
  3. Add in the mussels and cover until mussels are cooked, about 5 minutes.
  4. Garnish with chopped basil and cilantro. Add lime juice just before serving. Best to enjoy with steamed rice!

Thai Green Curry Mussels

Thai Green Curry Mussels

Photo Courtesy & Recipe Copyright © 2020 | Azrina Hidup (@azrinoh501)

BON APPÉTIT

– Azrina Hidup

myTaste.com

Auguest 2020: JM de Guzman

Pinais na Hipon at Niyog na may Palapa (Shrimp wrapped in Banana Leaves with Coconut and Green Palapa)

“Food isn’t just something to eat to satisfy an empty stomach or a craving palate. One must know the story about every dish, and celebrate it as a work of art, culture, tradition, custom and beliefs of its creator, and by doing that, we don’t just let them know how we appreciate their food but also honour the people and the nation behind it.” — JM de Guzman

Auguest 2020: JM de Guzman

I’d like to thank Miss Allison, for inviting me once again to do an Auguest post on her blog. I’m also thrilled to share this recipe, which I personally developed for this year’s theme – Colours of Rainbow. The dish I’m about to share was inspired by a traditional Filipino dish ‘Pinais’ and pinais-like dishes (such as Bicol’s pinangat and kinagang). Therefore should I say that this is my take on pinais.

Pinais is a traditional dish from the Southern Tagalog region. While the name refers to the dish itself – it’s actually a cooking process wherein the ingredients (most commonly coconut meat and seafood) are wrapped in banana leaves before steaming. The method of pagpapais effectively seals in the juices and imparts a fresh aroma to the food.

What inspired me to make this take on pinais is my forever obsession about everything coconut and my interest to explore more regional Filipino foods, particularly the foods of the South (Mindanao or Moro Foods). So this dish is inspired by a multitude of cultures, from the flavours of Luzon and Mindanao.

Pinais na Hipon at Niyog na may Palapa

The usual components of pinais are seafood (fish or shellfish), coconut, and aromatics. For my recipe’s seafood component, I used prawns/shrimps. For the coconut, try to look for a matured one (we call it ‘ngalutin’ or chewey here in Bataan). It’s the stage between buko and niyog. However, since I cannot find the specific type of coconut, I just used matured niyog. For the aromatics or flavouring, I used my adaptation of Maranao Palapa, a spice paste mixture of pounded sakurab, ginger/turmeric, and chilies that stands as Maranao all-purpose seasoning. It can be used as a dip, condiment, marinade, or even an appetizer. However for my version, I used siling panigang to produce a greener palapa which is commonly reddish or yellowish from the red chilies and turmeric. I also used the whole sakurab including its green part, dahon ng kabuyaw (kaffir lime leaves), and langkawas (galangal) for a more herbal and aromatic flavour profile. It’s not traditional per se, but this is just my take which I’d like to call “Green Palapa”.

Langkawas and Kabuyaw rather are alien to many Filipinos, and most would have encountered these only with Thai or other Southeast Asian foods, but these are actually native to the Philippines, and in fact Filipino ingredients as well.

Pinais na Hipon at Niyog na may Palapa Ingredients

PREP TIME 30 MINS | COOKING TIME 45-60 MINS | SERVES 5

INGREDIENTS

  • 500g grated coconut meat
  • 500g prawns or large shrimp, peeled and deveined*
  • Banana leaves for wrapping

For the ‘green palapa’

  • 2 & 1/2 cups sakurab, chopped**
  • 1/4 + 1/8 cup cooking oil, divided
  • 8 sprigs of kabuyaw (kaffir lime) leaves, torn***
  • 4 pcs long green chilies, chopped****
  • 1 thumb-sized ginger, chopped
  • 4 tbsp fish sauce
  • 2 & 1/2 tbsp sugar
  • 4 tsp galangal powder or 2 tbsp fresh galangal, chopped*****
  • Salt & pepper, to taste

Ingredient Notes:

* Don’t throw the prawn heads and shells. The flavour is there. Pound it to extract the juice.

** Substitute green onion or scallion if sakurab isn’t available. Sakurab is an allium native to Mindanao and while this is almost synonymous to scallion or green onions it actually isn’t. You can substitute it though but it won’t taste the same. Sakurab is more pungent and for me it has a taste of something in between shallots and garlic.

*** It might be hard to find the kaffir lime leaves, but it is essential for this recipe. I suggest using grated dayap rinds if you can’t find it.

**** Add more chilies if you want a spicier palapa, likewise, deseed the green chilies if you want the palapa less spicy, but I personally don’t mind it getting overly hot.

***** Omit galangal if not available and double the amount of ginger instead.

Not only can you use the “Green Palapa” for this pinais, but also as base for “Ginataans”

Pinais na Hipon at Niyog na may Palapa - Step-by-Step

METHOD

  1. Green Palapa: Add a quarter cup of the oil and all the chopped ingredients for the green palapa into a food processor or blender. Blend until you get a smooth consistency, kind of like pesto.
  2. Over very low heat, add the remaining oil to a pan together with the blended paste and stir continuously. Season with fish sauce, sugar, and black pepper to taste. You’ll know it’s cooked when the colour turns deep green, and the oil seeps out of the mixture. Set aside to cool down. You can remove some of the oil as it cools down.
  3. Pinais: In a large mixing bowl, combine the grated coconut meat, the green palapa, and the extracted prawn juice. You now have a green-coloured coconut meat mixture.
  4. Place a cup of coconut and palapa mixture in the center of a prepared sheet of banana leaf. Place as much prawns as you want on the top. Fold all sides to form a tight wrap.
  5. Line the bottom of a large wok or pan with banana leaf. Place all the wrapped pinais and add two cups of water. Cover and cook over medium heat for 45-60 minutes.
  6. Transfer to individual serving plates, unfold the banana leaf and serve immediately while hot. Enjoy!

Pinais na Hipon at Niyog na may Palapa

Photo Courtesy & Recipe Copyright © 2020 | JM de Guzman (@thecoconutdude)

BON APPÉTIT

– JM de Guzman

myTaste.com

Auguest 2020: Jenel Laureta

Deconstructed Spicy Seafood Jambalaya

“Learn as much as you can through reading cookbooks, watching cooking shows, attending short cooking classes, and from other people. Then try to incorporate all these in your daily cooking.” — Jenel Laureta

Auguest 2020: Jenel Laureta

I was greatly influenced by my paternal grandfather to love food and cooking! Hands down, he was a great cook because there was not a dish I didn’t like. All his dishes were simply delicious. His cooking was not by-the-book and he had no recipes to follow. He cooked by taste and with utmost passion.

In my Lolo Pepe’s kitchen, I began with peeling garlic and onions for homemade atchara. We were busiest in the kitchen during town fiestas. Lolo Pepe would whip up his specialties: Asadong Manok, Mechadong Baka, and Adobong Hito to name a few. I would linger in the kitchen to smell the bubbling sauces and of course to get a taste of each cooked dish.

From him, I also learned how to appreciate good food. We weren’t rich but he wouldn’t settle for less than the best. I remember that he would always buy our butter from a PX store and we would always travel to a nearby city to eat good food.

A great part of my childhood memory is about food and cooking, and this may be the reason why until now I love to eat and cook! In my kitchen now, I try to replicate Lolo Pepe’s cooking. Although I do not have any recipes to follow, I just try to remember the smell, the taste, and the look of a certain dish!

Deconstructed Spicy Seafood Jambalaya

Jambalaya is a popular dish of West African, French (especially in Provençal cuisine), Spanish and Native American influence; similar to, but distinct from, other rice-and-meat dishes known in Louisiana cuisine.

An easy Jambalaya recipe is pure comfort food filled to the brim with flavor. A soffritto-like trinity of onion, bell peppers and celery are also included, along with rice, chilies, cajun spice, other seasonings, and broth. Jambalaya is a quintessential one pot recipe, usually cooked together until the rice is done, but since this is a recipe for a deconstructed Jambalaya, we’re going to need a pot/pan more or two.

Deconstructed Spicy Seafood Jambalaya Ingredients

PREP TIME 10 MINS | COOKING TIME 45 MINS | SERVES 1-2

INGREDIENTS

  • 1 pc river prawn
  • 1 pc blue swimmer crab
  • 1 pc crab claw
  • 3 pcs large prawns
  • 4 pcs mussels
  • 2 stalks celery, sliced
  • 1 whole green bell pepper, cubed
  • 1 medium-sized white onion, minced
  • 5 cloves garlic, minced
  • 1-2 pcs red chili, diced (optional)
  • 1 & 1/2 to 2 cups seafood broth or water
  • 1 to 1 & 1/2 tbsp cajun spice
  • 1 can (approx. 400g) diced tomatoes
  • Olive oil
  • Salt, to taste
  • 2 cups cooked rice
  • Cherry tomatoes, lightly fried, for garnish

METHOD

  1. Jambalaya Stew: Add olive oil in a shallow pan and start sautéing in this order: green bell pepper, celery, white onion, and then garlic. Add cajun spice and continue cooking for a further 2 minutes.
  2. Pour the can of diced tomatoes and let it cook until softened before adding a cup of seafood broth or water. Bring to a boil.
  3. Add assorted seafood and cover until cooked. Add more seafood broth or water as needed and leave to simmer, seasoning with salt according to your taste.
  4. Once the assorted seafood is cooked through, fish out into a bowl and set aside.
  5. Jambalaya Rice: In a separate pan, sauté the garlic until golden and fragrant.
  6. Ladle about a cup of the jambalaya stew and add it to the pan with sautéed garlic. Leave to simmer to allow the flavors to concentrate.
  7. Add the cooked rice and mix well. Season with salt and pepper to taste, and allow the rice to absorb all the stew.
  8. Jambalaya Soup: Add half a cup of seafood broth to the remaining jambalaya stew and simmer.
  9. Season with salt and pepper, to taste. Optional, if you want an intense jambalaya flavor, you can add a half teaspoon more of cajun spice.
  10. Purée the stew in a blender and pass it through a fine sieve.
  11. Pour soup in a bottle and keep warm.
  12. Assembly: Arrange the assorted seafood in a large shallow plate and garnish with lightly fried cherry tomatoes.
  13. Pour the warm jambalaya soup over the assorted seafood and serve with jambalaya rice. Enjoy!

Deconstructed Spicy Seafood Jambalaya

Deconstructed Spicy Seafood Jambalaya

Photo Courtesy & Recipe Copyright © 2020 | Jenel Laureta (@jenel.laureta)

BON APPÉTIT

– Jenel Laureta

myTaste.com

King Mackerel Halang Halang (Visayan Spicy Mackerel Stewed in Coconut Milk)

King Mackerel Halang Halang (Visayan Spicy Mackerel Stewed in Coconut Milk)

Hello Everyone! I remember the first time I came across this dish; I was on the phone with my Dad asking him what he would like to eat for the upcoming week before his trip back here to the Philippines. He doesn’t get to eat much home-cooked Filipino food in Indonesia so every time he’s back home, I make sure to include in our weekly menu the things that he wants to eat, even if it is against his diet *facepalm*

One of the dishes he mentioned was Chicken Halang Halang. “What?” I said in confusion as I have never heard of this dish before. The way my dad explained it to me was “it’s like the Visayan version of Chicken Adobo.” But it is actually far from that. This dish more closely represents a cross between Tinolang Manok and Ginataang Manok.

King Mackerel Halang Halang (Visayan Spicy Mackerel Stewed in Coconut Milk)

Halang Halang is a Visayan dish where your choice of meat is stewed in a spicy coconut milk sauce. The word halang when directly translated to English, means spicy because of the use of chillies as one of the main ingredients in this dish. So essentially, the dish is called, in English, “Spicy Spicy” *cheeky grin* The coconut milk maintains the creaminess and richness of the dish while it tempers the spiciness of the chillies. It also has a hint of lemongrass, making the dish amazingly aromatic and taste super fresh.

Like most dishes, there are endless possibilities in making Halang Halang. I decided to attempt this dish using fresh King Mackerel steaks that I bought at the markets before we went into Enhanced Community Quarantine. It is definitely an exceptional dish that you can serve at home on a regular basis.

Delicious, no fuss, and easy to make.

King Mackerel Halang Halang (Visayan Spicy Mackerel Stewed in Coconut Milk) Ingredients

PREP TIME 10 MINS | COOKING TIME 25 MINS | SERVES 6

INGREDIENTS

For the king mackerel steaks

  • 6 large King Mackerel steaks
  • 3 tbsp coconut oil
  • 1 tsp ground black pepper
  • 1 tsp ground turmeric
  • 1 tsp salt
  • 1 tsp yellow curry powder

For the halang halang gravy

  • 5 garlic cloves, minced
  • 3 stalks lemongrass, lightly pounded
  • 2 small red bird’s eye chilli, sliced
  • 1 large green chilli, sliced
  • 1 small red onion, diced
  • 1 thumb-sized ginger, julienned
  • 1 thumb-sized turmeric, julienned
  • 1 can (400ml) coconut milk
  • 3 tbsp fish sauce
  • Handful of chilli leaves

METHOD

  1. Combine the seasonings and spices in a small bowl. Generously rub the spices into the fish steaks, making sure to cover all sides. Leave to sit for about 10 minutes.
  2. In a large frying pan, heat 3 tablespoons of coconut oil over medium high. Make sure that the pan is scorching hot, but not smoking, before putting the fish in as this will prevent the steaks from sticking to the pan.
  3. Carefully place the steaks into the pan and fry for about 3 minutes per side, or until lightly browned to seal in all the flavours. Depending on the size of your frying pan, or the size of your steaks, you may need to work in batches. Once done, transfer to a plate lined with a paper towel to soak up any excess grease.
  4. Turn the heat down to medium. In the same frying pan, sauté the garlic, onion, ginger, turmeric, and chillies until golden and fragrant, about a minute or two.
  5. Slowly pour in half of the coconut milk into the pan and add the lemongrass stalks. Cover the pan and leave to simmer for about 20 minutes. Check and stir occasionally to avoid curdles from forming.
  6. Pour the remaining coconut milk into the pan and slowly return the king mackerel steaks to the pan. Cover and bring back up to a rapid simmer. Once simmering, turn the heat off and add the chilli leaves.
  7. Transfer to a serving plate and top with extra slices of red and green chillies for an extra kick of spice. Serve with hot steamed rice and enjoy!

King Mackerel Halang Halang (Visayan Spicy Mackerel Stewed in Coconut Milk)

This dish is guaranteed to tempt you to increase your rice intake. If you plan to stick with just a cup of rice – or just half like myself – make sure that you condition yourself beforehand because there’s a high chance that you’ll give in to the temptation. I know because I did. Oops.

BON APPÉTIT

– Ally xx

myTaste.com

Orange-glazed Salmon with Tarragon

Orange-glazed Salmon with Tarragon

Hello Everyone! As I stated in my very first post for the year 2020, I mentioned that I would not be revealing the theme for the year as I want to give you guys a chance to guess. I also mentioned that it might not be obvious for the first few months. But as a new month dawns upon us, this means that it’s time to change it up a little bit; to make it start to look a little clearer on where the journey of Amcarmen’s Kitchen will take us this 2020.

Tonight’s recipe is perfect for an easy weeknight meal, yet also fancy enough to impress your guests on the weekend! What’s even better is that it’s ready in under 30 minutes! It’s full of vibrant orange flavour and pairs well with the fresh tarragon. Actually, a little side note – the recipe uses fresh rosemary to pair with the salmon. I had a hard time sourcing rosemary the weekend I wanted to whip this dish up and so I ended up using the next best thing I could find – tarragon!

Orange-glazed Salmon with Tarragon

This Orange-glazed Salmon is a hearty and filling dish packed with fresh flavours and healthy fats. Sear the salmon first so that you get that delicious and slightly crisped golden-brown exterior with a tender, fall-apart interior. As this dish makes quite a bit of sauce, it is best served with a side of rice or couscous to soak up all that yummy goodness. Don’t forget a side of veggies too for some added fibre to your diet!

Before we dive into tonight’s recipe, please check out the original where I drew my inspiration from, another recipe from Jaclyn over on Cooking Classy.

Orange-glazed Salmon with Tarragon Ingredients

PREP TIME 10 MINS | COOKING TIME 15 MINS | SERVES 4

INGREDIENTS

  • 4 salmon portions (1-inch thick, skin on)
  • 2/3 cup fresh orange juice (about 2 small Navel oranges)
  • 2-3 garlic cloves, minced
  • 1/4 shrimp bouillon cube, dissolved in 5 tbsp of water
  • 1 & 1/2 tbsp honey
  • 1 & 1/2 tbsp orange zest
  • 1 tbsp fresh lemon juice
  • 2 & 1/2 tsp cornstarch
  • 2 & 1/2 tsp fresh tarragon, minced
  • 2 tsp olive oil
  • Salt and freshly ground black pepper, to taste
  • Tarragon sprigs, to serve

To serve

  • Blanched vegetables of choice
  • Navel orange wedges/slices
  • Steamed plain rice or couscous

METHOD

  1. Heat olive oil in a large non-stick frying pan or skillet over medium-high. Make sure that it is hot enough, but not too hot that it starts smoking.
  2. Season both sides of the salmon with salt and freshly ground black pepper before adding to the pan. Cook, skin side down first before flipping, about 3-4 minutes per side or until browned and cooked through. Once done, transfer the salmon to a plate lined with a paper towel to soak up any excess grease.
  3. With the same oil in the pan, add the garlic and minced tarragon. Sauté for about 20 seconds, taking care not to burn them, and then add 4 tablespoons of the shrimp bouillon cube dissolved in water. Simmer until mostly reduced. Stir in the orange zest, orange juice, lemon juice, and honey.
  4. In a small bowl, whisk together the remaining tablespoon of the shrimp bouillon cube dissolved in water with the cornstarch. Pour into the pan and whisk until thickened. Season the sauce with salt and freshly ground black pepper to taste. Allow to simmer for about a minute while constantly whisking.
  5. Return the salmon to the pan and spoon the sauce over. Remove from the heat.
  6. Serve with vegetables of choice, in this case I used mustard leaves, on the side with extra slices of fresh oranges and steamed rice (optional). Enjoy!

Orange-glazed Salmon with Tarragon

Orange-glazed Salmon with Tarragon

BON APPÉTIT

– Ally xx

myTaste.com

Singapore Chilli Crab with Fried Mantou

Singapore Chilli Crab with Fried Mantou

Hello Everyone! As I said in my very first post for the year, I wanted to see how many of you will be able to guess the theme for this year. As of now, you probably have enough information for an idea, and to be honest, it’ll only get clearer (maybe) in April. So for now, I’ll keep you guys guessing!

Chilli Crab is a Southeast Asian seafood dish, popularised and promoted in Singapore as its national dish. The dish dates back to 1956 where a husband and wife started selling an improvised recipe of stir-fried crabs mixed with bottled chilli and tomato sauce from a pushcart.

Despite its name, it is actually not a very spicy dish at all. It is a dish where mud crabs, or any other species of crab, are stir-fried in a semi-thick, sweet and savoury tomato and chilli based sauce. The sauce is described as sensuous, sweet yet savoury, and fluffy in texture.

Singapore Chilli Crab with Fried Mantou

When it comes to eating Chilli Crab, forget about cutlery. It is traditionally eaten with bare hands as a means to savour the juicy crab meat. Restaurants that serve this each often provide wet towels or a small washing bowl with lime for diners to clean their hands after their meal. Additionally, don’t be shy. Ask for a bib. Or wear a bib when eating at home. Seriously. It will keep your clothes free from stains and sauce drops.

Chilli Crab is commonly ordered with a side dish of plain or fried rice, vegetables, or other seafood dishes such as fish. Regardless of those, there’s one thing that can’t be left out when you order Chilli Crab that contrasts so deliciously with the sauce: Bright Golden Pillows. Or simply, fried mantou buns. These crispy and greasy little nuggets are used to soak up the sauce from the Chilli Crab. They are sweet, soft, and sinful.

Before we dive into tonight’s recipe, check out the original recipe over on Serious Eats by Yvonne Ruperti.

Singapore Chilli Crab Ingredients

PREP TIME 15 MINS | COOKING TIME 10-12 MINS | SERVES 3-4

INGREDIENTS

  • 2 whole Mud or Dungeness Crabs (about 600g – 800g in weight for each)*
  • 6 garlic cloves, minced
  • 3 red bird’s eye chillies, minced
  • 1 half-inch knob ginger, grated
  • 1 large free-range egg, beaten
  • 1 small red onion, minced
  • 1 stalk green onions, thinly sliced
  • 1 shrimp bouillon cube
  • 2 cups water
  • 1/4 cup tomato paste
  • 1/2 cup hot-sweet chilli sauce
  • 4 tbsp olive oil
  • 1 tbsp cornstarch, mixed with 2 tbsp of water to make a slurry
  • Salt and freshly ground black pepper, to taste

To serve on the side

  • Steamed rice
  • Fried mantou (Chinese Buns)**

* Check out this YouTube video by Sydney Fish Market on how to choose, clean, and prepare your crabs; best to keep the fat and creamy part inside the top shell for the extra crab flavour that it’ll lend to the dish.
** You can make your own mantou buns by following this recipe over on China Sichuan Food. Alternatively, you may also find them at your local grocer or supermarket, if available.

Frozen Mantou Buns

METHOD

  1. In a large wok or Dutch oven, heat olive oil over medium until shimmering. Add in the garlic, onion, ginger, and chillies. Cook until lightly browned and fragrant for about a minute.
  2. Add the crab pieces, water, and shrimp bouillon cube. Increase the heat to medium-high, cover loosely, and bring to a gentle boil. Decrease the heat if necessary. Cook for about 6 minutes, until the crab has turned red and is nearly cooked through.
  3. Stir in the tomato paste and chilli sauce. Simmer for about a minute and then season to taste with salt and freshly cracked black pepper. Stir in the cornstarch slurry and bring back to a boil for the sauce to thicken.
  4. Remove from the heat and stir in beaten egg. Transfer to a serving dish and top with sliced green onions and fresh chillies.
  5. Serve with steamed rice and/or fried mantou buns. Take care when eating the sauce – it may have bits of shell in it from the crab. Enjoy!

Singapore Chilli Crab with Fried Mantou

BON APPÉTIT

– Ally xx

myTaste.com