Pad Krapow (Thai Basil Tofu)

Pad Krapow (Thai Basil Tofu)

Hello everyone! This will be the last recipe that I will be sharing for the year on our Flavours of Southeast Asia journey. I’ve had to cut our journey short as the holiday season syndrome took over; basically all I wanted to do was just relax and take twice as long to get the things I needed done, actually done – for example this post! I had it up and ready to go two weeks ago but I hadn’t gotten around to editing the video for this to upload on my TikTok account, not until just this afternoon *cheeky grin*. So yes, our Flavours of Southeast Asia journey for 2021 will be ending here in Thailand tonight. Maybe next year I’ll cover some Vietnamese dishes to make up for this.

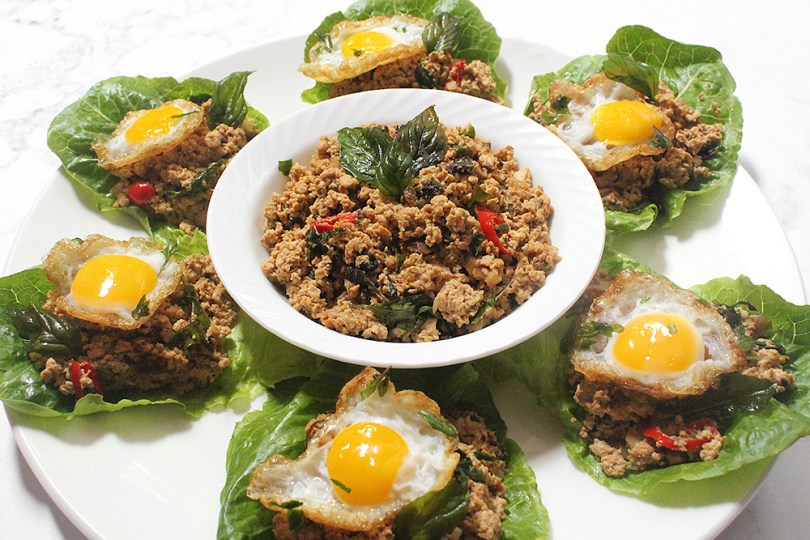
Tonight’s recipe is actually something I’ve been wanting to share on the blog for a while after coming across a vegetarian/vegan-friendly version of it on Instagram several times. Pad Krapow is a dish that I have tried many times before, but with chicken or pork (this was way back when I used to eat meat), so when I came across a version of it using tofu to make it meat-free, I knew I had to try this out.

There are three main types of basil used in Thai cooking: Thai sweet basil (ใบโหระพา bai horapa), or just referred to as Thai basil, lemon basil (ใบแมงลัก bai maenglak), and holy basil (ใบกะเพรา bai kra prao). Unfortunately it can be challenging to find holy basil outside of Thailand. You can still make this recipe using other basil variants, just be weary that it won’t have the same vibrant peppery flavour that holy basil has to give this dish its authentic Thai flavour profile.

Pad Krapow (Thai Basil Tofu)

Pad Krapow is usually served with steamed rice, but if you want to make it a little fancier without the extra carbs, serve it in a lettuce leaf and top each with a fried quail egg instead. I’ve also seen versions of pad krapow as a spaghetti dish so feel free to get creative when serving this dish up!

Now, I can’t exactly make it 100% vegan because pad krapow isn’t what it is without a fried egg where the edges of the egg white are crispy and browned to give it an added nutty flavour, but the yolk is still runny and creamy. So here’s an ovo-vegetarian Pad Krapow for you!

Pad Krapow (Thai Basil Tofu) Ingredients

PREP TIME 10 MINS | COOKING TIME 15 MINS | SERVES 2-3

INGREDIENTS

For the sauce

  • 2-3 garlic cloves, finely minced
  • 1 dried red chilli, chopped
  • 1 stalk scallion (white part only), chopped
  • 1 tsp grated ginger
  • 1 tbsp light soy sauce
  • 2 tbsp sweet soy sauce

For the tofu

  • 500g firm tofu, mashed
  • 2 tbsp coconut oil
  • 1 red onion, diced
  • 1 red bird’s eye chilli, chopped
  • 1 stalk scallion (white part only), chopped
  • 100g cremini mushrooms, diced
  • Salt and black pepper, to taste
  • 1 bunch Thai basil leaves

To serve with

  • Crispy Thai basil leaves
  • Fried quail eggs
  • Lettuce leaves

METHOD

  1. Sauce: Add all the ingredients for the sauce in a small bowl and mix well to combine. Set aside.
  2. Pad Krapow: Add a tablespoon of the oil into a large pan over medium-high heat. Cook the mashed tofu until dry. Remove from the pan.
  3. Add the remaining oil and the sauté the red onion, chilli, and scallion until fragrant, about 30 seconds, before adding the cremini mushrooms and cooking for a further 30 to 45 seconds.
  4. Add the mashed tofu back into the pan and mix to combine.
  5. Season with salt and black pepper, to taste, and add the sauce mixture to the tofu. Mix until well combined into the tofu, and cook for about 5 minutes.
  6. Add the Thai basil leaves and mix it into the tofu, then remove from the heat.
  7. Add about a tablespoon or more to a piece of lettuce, then top with a fried quail egg and some crispy-fried Thai basil leaves.
  8. Plate up, serve immediately, and enjoy!

Pad Krapow (Thai Basil Tofu)

Pad Krapow (Thai Basil Tofu)

BON APPÉTIT

– Ally xx

Follow me on my social media accounts:
Facebook: Amcarmen’s Kitchen
Instagram: @amcarmenskitchen
TikTok: @amcarmenskitchen

myTaste.com

Advertisement
Goong Ma Kham kab Yum Takrai (Crispy Tamarind Prawns with Spicy Lemongrass Salad)

Goong Ma Kham kab Yum Takrai (Crispy Tamarind Prawns with Spicy Lemongrass Salad)

Hello Everyone! We’re packing our bags and venturing to Thailand on our Flavours of Southeast Asia journey! I don’t know if I’ve mentioned this in one of my previous posts before when I last shared a Thai recipe; I have and aunt who is Thai and I remember when we all used to live back in Brunei, she would teach me how to make Thai dishes such as Som Tam, Tom Yum, Yum Woon Sen, and many more. I’ve also visited Thailand a couple of times and have been to many Thai restaurants in Brunei and Australia.

The dish that I will be making today isn’t actually something I have tried for myself before. I came across it in a Thai cookbook that I purchased when I was still living in Brunei. It was during a work event, where within it we had something called the ‘Thailand Grand Fair’. If I remember clearly, they hosted a Som Tam making competition and had a guest chef come over as a judge and to promote his very first cookbook.

The name of his cookbook was very familiar to me, and then I realised that it was also the name of a Thai restaurant that I used to go to when I was still studying in Australia. Such a small world when I found out that he is actually the owner of it! I had the chance to talk to him a couple of times and I mentioned that I had been to his restaurant a couple of times – I even brought my mom and my sisters to eat there when they visited for my graduation. He was very humble and thankful when I told him that the food was great.

Goong Ma Kham kab Yum Takrai (Crispy Tamarind Prawns with Spicy Lemongrass Salad)

I was browsing through his cookbook one day for inspiration beyond the Thai recipes that I knew how to cook, which are also published on my blog by the way. A recipe for Spicy Lemongrass Salad (Yum Takrai) stood out to me, so did another recipe for Prawns with Tamarind Sauce (Goong Ma Kham), and thus we have a marriage of Crispy Tamarind Prawns with Lemongrass Salad that’s loosely adapted from Sujet Saenkham’s cookbook titled Spice I Am.

According to Chef Sujet, you want to take the time in slicing the lemongrass as thinly as you can otherwise it won’t be all that pleasant to eat. The fragrant and citrusy flavour of the lemongrass pairs very well with the prawns, or with any other seafood as a matter of fact. The tamarind sauce provides a nice balance of sweet, salty, and sour that is absorbed into the flesh of the crispy prawns when topped with it. Put all three together and you’ve got a match made in heaven of flavours and textures! In Chef Sujet’s cookbook, he mentioned that you can also use fish such as red snapper to pair with the lemongrass salad and/or tamarind sauce. I loved this recipe so much with the prawns so I’m definitely going to try this again with fish!

Goong Ma Kham kab Yum Takrai (Crispy Tamarind Prawns with Spicy Lemongrass Salad) Ingredients

PREP TIME 25 MINS | COOKING TIME 10 MINS | SERVES 2-3

INGREDIENTS

For the tamarind sauce

  • 2 tbsp coconut oil
  • 1 dried red chilli, chopped
  • 1 red bird’s eye chilli, chopped
  • 2-3 garlic cloves, minced
  • 1 small red onion, diced
  • 2 tbsp tamarind paste
  • 2 tbsp fish sauce
  • 1/2 tsp salt
  • 4 tbsp coconut sugar
  • 1/3 cup water

For the crispy prawns

  • 6 extra-large tiger prawn, peeled and deveined with tails intact
  • 4 tbsp tapioca flour
  • 4 tbsp rice flour
  • Salt and black pepper, to taste

For the spicy lemongrass salad

  • 3-4 lemongrass stalks (white part only), finely sliced
  • 2 red bird’s eye chillies, chopped
  • 1 bunch Thai basil leaves
  • 1 medium-sized red onion, halved and thinly sliced
  • Handful of cherry tomatoes, halved
  • Juice of 1 lime or lemon

METHOD

  1. Tamarind Sauce: Heat the coconut oil in a small pan. Fry dried chillies, red chillies, and garlic together for about 15 to 20 seconds and then add in the onions. Continue to cook for another 15 to 20 seconds.
  2. Add the tamarind paste, followed by the fish sauce, salt, and coconut sugar. Mix and bring to a simmer.
  3. Once simmering, add the water and then bring it back up to a simmer. Remove from the heat and then set aside.
  4. Crispy Prawns: Combine the flours and season in a medium-sized bowl and mix to combine.
    Coat each prawn with the flour mixture and shallow fry for 3 minutes per side, over high heat.
    Once done, remove from the pan and transfer to a plate lined with a paper towel to soak up the excess grease.
  5. Lemongrass Salad: Combine all the ingredients in a medium-sized mixing bowl and toss to combine.
  6. Transfer the salad to a serving dish and top with the crispy prawns.
  7. If needed, you can reheat the tamarind sauce before spooning it over the prawns. Serve immediately and enjoy!

Goong Ma Kham kab Yum Takrai (Crispy Tamarind Prawns with Spicy Lemongrass Salad)

BON APPÉTIT

– Ally xx

Follow me on my social media accounts:
Facebook: Amcarmen’s Kitchen
Instagram: @amcarmenskitchen
TikTok: @amcarmenskitchen

myTaste.com

Auguest 2021: Chamaine

Spicy Purple Sweet Potato Soup

“Happiness is Homemade. Real cooking is more about following your heart than following recipes. Fresh is always better.” — Chamaine

Auguest 2021: Chamaine

Hello Everyone! Chamaine here taking over Amcarmen’s Kitchen tonight to bring you a Thai-inspired dish for the Flavours of Southeast Asia journey on this blog for this year’s Auguest theme. I am so grateful to be part of this series as, through this, I have learnt to explore other cuisines and dishes from countries outside of my home country and knowledge.

I believe that Happiness is Homemade. My favourite thing to do at home is COOK, and I season everything with LOVE. For me, cooking is an ART. I plate like an ARTIST and invent recipes like a SCIENTIST.

Spicy Purple Sweet Potato Soup

Thai cuisine has proven to be quite a challenge for me since I am not so familiar with it. Some ingredients are unusual to me, but since I am eager to learn something new, I accepted this challenge. Upon my research, I found this recipe for Sweet Potato Soup rather intriguing. All my life, I have known sweet potatoes to be used as a snack and finger food; I never thought that it could potentially be used to make a starter or appetizer in the form of a soup.

For this dish, I substituted some of the ingredients as I could not source some of them, but don’t worry, I have the best options in our pantry. If you do have these original ingredients readily available for you, then by all means stick to using them:

  • Kaffir lime leaves to bay leaves
  • Lime juice to calamansi juice
  • Coriander seeds to oregano
  • Red curry paste to red chillies

As a result, I can say this dish is absolutely appetizing. With its tangy, savoury, and creamy flavour, plus the slightly sour and sweet taste, everything complimented each other so well!

Spicy Purple Sweet Potato Soup

PREP TIME 10 MINS | COOKING TIME 25 MINS | SERVES 4

INGREDIENTS

  • 3 medium-sized purple sweet potatoes, peeled and cut into small chunks
  • 1 tbsp olive oil
  • 1 tsp fresh ginger, finely chopped
  • 1 red onion, finely chopped
  • 1 bay leaf
  • 2 red chillies, roughly chopped
  • 1 tbsp fish sauce*
  • 1 vegetable stock cube
  • 2 cups water
  • 1 cup coconut milk
  • 1 tbsp calamansi juice
  • 1 stalk spring onion
    A pinch of oregano

*Replace with salt for a fully vegetarian/vegan alternative

METHOD

  1. In a large frying pan over medium-high, heat the olive and sauté the ginger and onions until lightly golden and fragrant, about 30 seconds.
  2. Add the sweet potatoes, bay leaf, red chillies, fish sauce and toss, cooking for a few minutes.
  3. Pour in the coconut milk and water, and add a vegetable stock cube. Bring to a boil then reduce the heat to bring it down to a simmer. Continue to cook until the sweet potatoes are tender.
  4. Once done, remove the bay leaf, and then transfer everything into a food processor and blend until smooth and creamy.
  5. Add the calamansi juice and gently mix into the soup.
  6. Transfer to individual serving dishes and garnish with more chopped chillies, spring onions, calamansi juice, and a sprinkle of oregano. Serve and enjoy!

1957

Spicy Purple Sweet Potato Soup

Photo Courtesy & Recipe Copyright © 2021 | Chamaine (@chamaine_homemade)

BON APPÉTIT

– Chamaine

myTaste.com

Yam Pla Duk Fu (ยำปลาดุกฟู) Crispy Fish with Green Mango Salad

Yam Pla Duk Fu (ยำปลาดุกฟู) Crispy Fish with Green Mango Salad

Hello Everyone! Tonight’s dish branches out from the first recipe I shared with you guys at the beginning of this month. If you haven’t been able to check that recipe out, here it is again: Som Tam Mamuang (ส้มตำมะม่วง) Green Mango Salad.

Yam Pla Duk Fu (ยำปลาดุกฟู), or in English, Crispy Fish with Green Mango Salad, is a classic and much loved Thai “drinking food” of all time. The combination of a crispy exterior with moist fish meat on the inside, paired with a spicy, tart green mango salad is truly a match made in heaven. For all my alcohol-loving Filipino family, friends, and followers out there, give the sisig a rest and opt for a lighter and maybe healthier alternative to your pulutan and pair this humble fish dish with your beer. On the flip side, don’t think that you can limit this dish just for happy hour; it is also best paired with a cup of steamed rice for a delicious lunch or dinner.

Yam Pla Duk Fu (ยำปลาดุกฟู) Crispy Fish with Green Mango Salad

Traditionally, Thai charcoal-grilled catfish (pla duk) is used to make this dish, as it is widely available on the streets of Thailand. The fish is first grilled whole. Its flesh is then fluffed (fu) into tiny cotton-like flakes, and then deep-fried until crispy and golden brown. A simple green mango salad (yam) is then served alongside the crispy fluffy fish flakes.

You can see that the ingredients and process of making this dish literally translates into its name – Yam Pla Duk Fu. Since I’m not using catfish for this recipe, nor have I really paid attention to the ‘fluffing’ of the fish meat, my rendition of this dish can simply be called Yam Pla, just Salad Fish *cheeky grin*

Yam Pla Duk Fu (ยำปลาดุกฟู) Crispy Fish with Green Mango Salad

As I did further research into this dish, many restaurants in Thailand have opted to use other variants of fish. I’ve also seen various images of the dish where a whole fish is used instead of it being fluffed into flakes. At least I know I won’t be cursed for using a fish other than the traditional Thai catfish. I did find a rather angry blog post about why people are still insistent on calling the dish by its traditional name of Yam Pla Duk Fu when ‘duk fish’ isn’t even used. So before I too get bombed about titling this post by its traditional name where it’s far from it, just note that I did this just so that I could touch on the back-story of this dish.

This dish would otherwise be named, Yam Pla (ยำปลา) Fish Salad: My Rendition of the Traditional Yam Pla Duk Fu (ยำปลาดุกฟู) Crispy Fish with Green Mango Salad. That’s one heck of a long-ass title – reminds me of the days of how Fall Out Boy used to title their songs back in the day! One of my favourites: I’m Like a Lawyer with the Way I’m Always Trying to Get You Off (Me & You).

Yam Pla Duk Fu (ยำปลาดุกฟู) Crispy Fish with Green Mango Salad Ingredients

PREP TIME 15-20 MINS | COOKING TIME 10-12 MINS | SERVES 4

INGREDIENTS

For the Green Mango Salad

  • Som Tam Mamuang (ส้มตำมะม่วง) Green Mango Salad Recipe

For the Crispy Fish

  • 2 large tilapia fish (about 700g – 800g per fish), gutted and scaled
  • Ground salt and pepper, to taste

METHOD

  1. Prepare the Green Mango Salad according to the recipe (link provided above). Set aside.
  2. Season the fish with a touch of salt and ground black pepper on both sides and fry until browned and crispy, about 5-6 minutes per side. Once done, transfer to a serving dish.
  3. Top with the Green Mango Salad and serve with steamed jasmine rice, or a cold bevy of your choice.

Tip: We usually rub about a tablespoon of turmeric powder when frying fish for added flavour. I completely forgot to pick some up when grocery shopping hence why we’ve left it out, but if you do happen to have it lying around, use it!

Yam Pla Duk Fu (ยำปลาดุกฟู) Crispy Fish with Green Mango Salad

I know the recipe says 2 tilapia fish, but in the final shots of the dish there’s only one. It’s only because we had this dish for lunch and dinner for the day and instead of frying both for lunch, we fried the other when it came to dinner time so that it’d be hot and crispy for then!

Disclaimer: Again, like in last week’s post, I do apologise to any of my Thai followers, or any who have just stumbled upon my blog, and this post in particular. I’ve seen so many variations of the spelling for Yam Pla Duk Fu and I’m not sure if I’ve picked the right one! *cheeky grin*

BON APPÉTIT

– Ally xx

myTaste.com

Khao Neoo Mamuang (ข้าวเหนียวมะม่วง) Mango Sticky Rice

Khao Neoo Mamuang (ข้าวเหนียวมะม่วง) Mango Sticky Rice

Hello Everyone! Yes, besides sharing mango recipes on the blog for the month, I’ll also be tackling the fruit with a Thai influence. I mentioned in my post last week that Thai food is one of the many favourite cuisines that I enjoy – and let’s be honest here – I’m in the middle of satisfying my insane cravings for it!

Mango Sticky Rice is a traditional Thai dessert where the main ingredients needed are sticky glutinous rice, canned or fresh coconut milk, palm sugar, and mangoes. Although this dessert originated in Thailand, it is highly consumed throughout the Indo-China region of Southeast Asia such as Laos, Cambodia, and Vietnam. Mango Sticky Rice is usually only eaten during the peak mango season, which is during the summer months of April and May. Notable shops in Bangkok famous for their Mango Sticky Rice will only sell this dessert for 4 months per year from February to June.

Khao Neoo Mamuang (ข้าวเหนียวมะม่วง) Mango Sticky Rice

I can’t remember if the first time I had this dish was during a trip to Bangkok way back when, or at a Thai restaurant when I was still in Brunei – but nonetheless, I remember my Aunt (who is Thai) teaching me how to make this dish a couple of years back. At that time I wasn’t interested in cooking or food, so I didn’t realise then how easy it was to put this dish together and that is really only required the pantry essentials to make. Aside from having to get the mangoes from the market when I wanted to make this dish, I already had sugar, peanuts, coconut milk, and sticky rice at home.

To prepare the dish, the glutinous rice is first soaked in water and then cooked by steaming, or cooked in a rice cooker. I cooked mine over a gas stove together with the sugar and kept a very close eye on it. The coconut milk is heated, without boiling, separately with salt and then added to the cooked glutinous rice to flavour it. Mangoes are then peeled and sliced to serve with the rice, and smothered in more salted coconut milk. The result is just heavenly! If you’re a mango lover like me, then you’re definitely going to fall in love with this exotic Thai dessert.

Khao Neoo Mamuang (ข้าวเหนียวมะม่วง) Mango Sticky Rice

Disclaimer: I do apologise to any of my Thai followers, or any who have just stumbled upon my blog, and this post in particular. I’ve seen so many variations of the spelling for Khao Neoo Mamuang and I’m not sure if I’ve picked the right one! *cheeky grin*

Khao Neoo Mamuang (ข้าวเหนียวมะม่วง) Mango Sticky Rice Ingredients

PREP TIME 1 HOUR | COOKING TIME 30 MINS | SERVES 4-6

INGREDIENTS

  • 2 ripe mangoes, peeled and sliced
  • 1 cup sticky glutinous rice
  • 2 cups water
  • 1/2 cup coconut milk (fresh, canned, or frozen)
  • 2 tbsp white granulated sugar
  • 1/2 tsp salt
  • Roasted peanuts, roughly chopped to garnish

METHOD

  1. Sticky Glutinous Rice: Rinse the sticky glutinous rice and then leave to soak for about an hour. Drain was ready to use.
  2. Transfer the rice to a medium-sized non-stick cooking pot together with the 2 cups of water and the sugar. Bring to a slow simmer over low heat, partially covered with a lid (to leave room for steam to escape).
  3. Once simmering, leave to cook for a further 20 minutes or until the water has been absorbed by the rice. Turn the heat off, but leave the rice in the pot with the lid on tight. Allow it to sit for a further 5 to 10 minutes.
  4. Salted Coconut Sauce: While the rice is cooking away, prepare the salted coconut sauce by adding the coconut milk to a small saucepan together with the salt. Bring to a slow simmer over low heat, about 10 minutes. It is important to heat it slowly to avoid curdling the coconut milk. This happens when it is heated too quickly.
  5. Once done, turn the heat off and set aside. If your rice is already done at this point, then add half of the salted coconut sauce to the rice and give it a good mix. Set aside the other half of the sauce for later.

Tips: Experiment with naturally flavouring the sticky rice for another dept of flavour. I used juices from pandan leaves and ube (purple yam) when tackling this recipe. All you have to do is add these flavourings together before cooking the rice.

  1. Shape the sticky rice into logs and place on a serving plate. Top the rice logs with a slice of ripe mango and roasted peanuts.
  2. Drizzle with the remaining salted coconut sauce or use for dipping.
  3. Serve and enjoy while warm!

Khao Neoo Mamuang (ข้าวเหนียวมะม่วง) Mango Sticky Rice

Mango Sticky Rice is usually served differently with one big serving of rice and mango slices on the side. I decided to plate mine up differently after stumbling upon an Instagram post of Mango Sticky Rice “Sushi” hence why they look like nigiri!

BON APPÉTIT

– Ally xx

myTaste.com

Som Tam Mamuang (ส้มตำมะม่วง) Green Mango Salad

Som Tam Mamuang (ส้มตำมะม่วง) Green Mango Salad

Hello Everyone and welcome to an all new theme on Amcarmen’s Kitchen for the month of February! Well okay, it’s not exactly a new theme, but more like we get to play around with a new fruit for this month! In my very first post for the year I mentioned that it’s going to be a FRUITFUL year on the blog. Last month we went nuts for Coconuts and now we’re moving onto Mangoes!

From what I know, mango season here in the Philippines isn’t until March but you can already spot an abundance of mangoes at the markets for a reasonable price (well they are cheaper than a couple of months ago when they weren’t in season), and since they’re here early, I’ve been non-stop playing around with them for the dishes that I will be sharing with you guys over the next couple of weeks.

Also, just to note, I’m going to stray away from Filipino food for a while since I’ve been sharing dishes from that cuisine for the past 4 months on the blog ever since I’ve been back here. It’s not that I have anything against it (quite the opposite actually), it’s just that I want to continue exploring and enhancing my skills and techniques in other cuisines. Amcarmen’s Kitchen is afterall, A Third Culture Foodie.

Som Tam Mamuang (ส้มตำมะม่วง) Green Mango Salad Process

Thai food is one of the many favourite cuisines that I enjoy. It is also a cuisine that I’m constantly craving for from time to time, whether it’s heading to my favourite Thai restaurant or cooking up a Thai storm in the kitchen. I think my tolerance for spice was developed from this cuisine, though I am definitely not at their level of tolerance. Every time I order a Thai dish, I keep forgetting to tell the waiter to make it “less spicy” or to only add 1 chilli. I then end up tearing up, sniffling endlessly and needing to extinguish my mouth, followed by fiery trips to the bathroom after. I remember when I used to have Som Tam everyday for lunch from a food stall during events that I worked and forgot to tell the lady to make it less spicy – she ended up adding 10-15 pieces of chillies into the dish. The following day, I asked her to make it less spicy, but for them less spicy was still about 5-6 chillies in. I ended up having to tell her to only add 1 chilli the day after that and she looked at me weirdly.

Even though there are many recipes online that you can follow, I’ve had the opportunity to be taught by my Thai Aunt, and also learnt a few dishes from Chef Sujet Saenkham of Spice I Am, Australia, who I met last year in Brunei during an event I worked for the Thailand Grand Fair. Tonight’s dish is one I learnt from him, but I’ve replaced the green papaya for green mango instead. Note that, it’s not so much about how green the mango is – as long as it’s sour!

Som Tam Mamuang (ส้มตำมะม่วง) Green Mango Salad Ingredients

PREP TIME 15-20 MINS | COOKING TIME | SERVES 4-6

INGREDIENTS

  • 2 green mangoes, peeled and julienned
  • 3 pcs long green beans, cut into 1-inch long stalks
  • 2-3 red bird’s eye chillies, seeds in and roughly chopped (more if you want a spicier kick to your palette)
  • 2 small tomatoes, roughly chopped
  • 1 garlic clove, roughly chopped
  • 1 small red onion, roughly chopped
  • 2 tbsp dried salted shrimp
  • 2 tbsp roasted peanuts
  • 1 & 1/2 tbsp fish sauce
  • 1 & 1/2 tbsp fresh lime or lemon juice
  • 1 tbsp palm sugar
  • Spring Onions, to garnish

METHOD

  1. Lightly crush the garlic and chillies large and deep mortar and pestle.
  2. Add the dried salted shrimp together with the long green beans. Pound a few times to slightly bruise the beans. Add in the roasted peanuts and lightly crush.
  3. Next, add in the fish sauce, lime/lemon juice, and palm sugar. Lightly grind until the sugar has dissolved into the mixture.

Tip: At this point, taste the mixture to see if the balance of flavours is to your liking. Add more fish sauce if it needs more salt, or add more lime juice if it needs more acidity. Add more palm sugar if the other flavours are too overpowering. Want more spice? Crush more chillies!

  1. Add in the chopped tomatoes and lightly crush to bruise them a bit, followed by the julienned green mango and softly pound. Use a spoon to mix all the ingredients around while pounding. Be careful as to not over pound, grind, or crush the ingredients.
  2. Garnish with a spring onion and serve as a main or side dish. Enjoy!

Som Tam Mamuang (ส้มตำมะม่วง) Green Mango Salad

BON APPÉTIT

– Ally xx

myTaste.com

Tom Yum Gài Tôt (ต้มยำ ไก่ทอด)

Tom Yum Gài Tôt (ต้มยำ ไก่ทอด)

Hello Everyone! So, if you have been following my blog recently over the past few weeks, you will have noticed some changes to the theme of blog. If you head on over to the About section of my blog, you can read about the reasons for the changes there.

Tom Yum Gài Tôt (ต้มยำ ไก่ทอด)

Back when we were still in Brunei, before we set off to travel Australia, I wanted to make fried chicken wingettes for the family. I used the basic fried chicken batter that I always used, and before I added in the dried chilli flakes to give it a little kick, I remembered that I had made my own tom yum paste the day before. So I decided to experiment and added just about a teaspoon and a half of the paste to the batter. Marinated it for at least an hour or two, and then got my mom to fry the wingettes. It tasted really, really good! It had just the right amount of spice, and we even had some sweet chilli sauce on the side for the wingettes.

It was so good that I even made a second batch before we flew off, and the even more batches from my friends in Sydney (with store-bought paste since I was not really bothered to make my own paste at that time). The taste of the tom yum didn’t quite shine through and I’m guessing it’s because it didn’t have much of a kick of heat in the paste, and I couldn’t really taste the freshness of the galangal, lemongrass, lime leaves, etc. Nonetheless, the wingettes were still succulent and juicy.

Tom Yum Gài Tôt (ต้มยำ ไก่ทอด) Ingredients

Tom Yum Gài Tôt (ต้มยำ ไก่ทอด) Process

PREP TIME 1 HOUR* | COOKING TIME 15 MINS | SERVES 4

*Includes marination time

INGREDIENTS

  • 500g chicken wingettes, wash and cleaned
  • 8 tbsp water
  • 6 tbsp cornflour
  • 6 tbsp plain flour
  • 3 tsp sesame oil
  • 1 & 1/2 tsp salt
  • 1-2 tsp Homemade Tom Yum Paste
  • Dash of ground black pepper

METHOD

  1. Combine all the marinade ingredients in a large bowl and mix the chicken around until well coated. Cover the bowl with cling wrap and leave to marinade for 1 hour (I usually leave it for about 4 hours minimum to let the flavour of the tom yum infuse into the chicken. Do not refrigerate it to bring the meat down to room temperature before cooking.
  2. Preheat oven to 180C (350F or gas mark 4). Heat up oil in a large frying pan an working in batches, shallow fry the chicken until skin is crispy and golden (about 5-6 minutes per side).
  3. Remove from the heat and place on a baking tray lined with aluminium foil. Place the wings in the oven for a further 8-10 minutes to finish off in the oven.
  4. Serve the wings with thai sweet chilli sauce on the side. Enjoy!

Tom Yum Gài Tôt (ต้มยำ ไก่ทอด)

I think you can try and experiment with other pastes if you wish. When I get around to, I will attempt to make my own green curry paste and try some green curry friend chicken wings!

BON APPÉTIT

– Ally xx

myTaste.com