Ginataang Halo-Halo (Binignit)

Ginataang Halo-Halo (Binignit)

Hello Everyone! For some reason I felt that the week went by so slowly, yet so fast at the same time. Has anyone ever had this feeling before? Maybe it’s because I’m growing bored of being home all week for the past several months. For those of you just tuning in, I quit my job back in Brunei last August 2018 and until present day have yet to find a new job to keep me busy. I’ve applied to many places and attended a handful of interviews, but none have been successful so far. I’m hoping to find a job soon – my savings are slowly deteriorating away…

Ginataang Halo-Halo (Binignit)

Anyway, small tangent aside, Ginataang Halo-Halo, or also known as Binignit in some parts of the Philippines, is a popular Filipino dessert dish. Aside from it being a dessert, it is also widely served as a mid-afternoon snack.

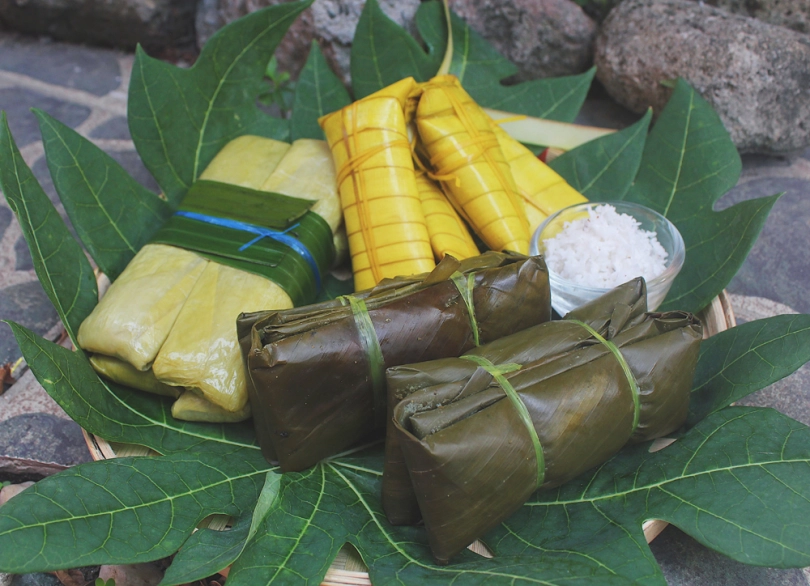
As mentioned in previous posts, Ginataan is a cooking process that involves stewing in coconut milk/cream. Halo-Halo, when directly translated into English means mix mix, is referred to the combination of different ingredients that are used to complete the dish – a mix mix of various root vegetables such as sweet potatoes, yams, and taro, plantains, tapioca pearls, and glutinous rice balls (bilo-bilo) are simmered in coconut milk. Bilo-bilo are glutinous rice balls simply made from a mixture of glutinous rice flour and water. You don’t have to add any colouring to them, I just made mine purple to add colour to the dish.

Ginataang Halo-Halo (Binignit) Bilo-Bilo

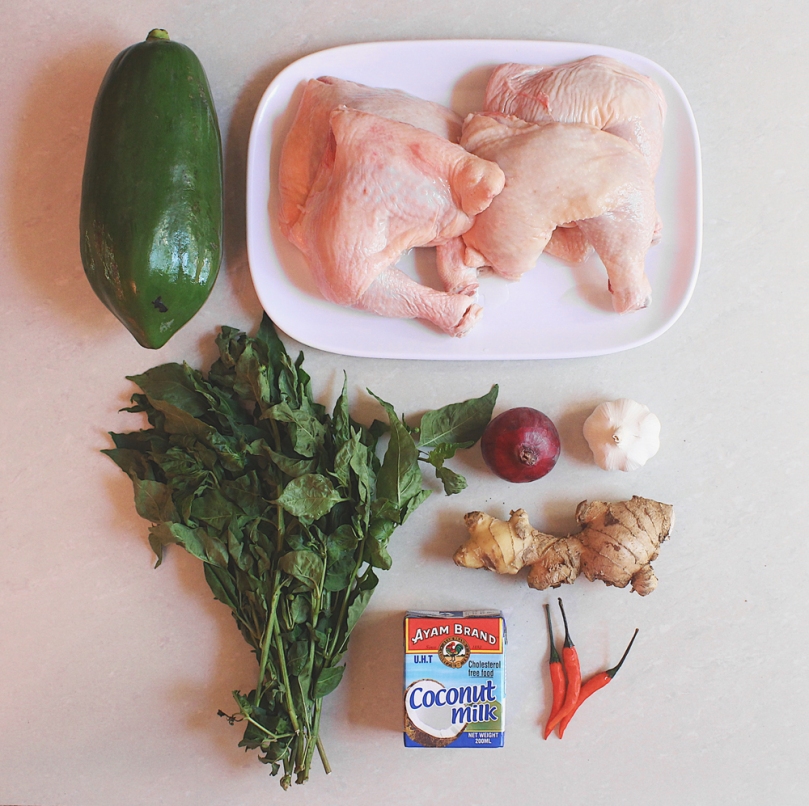
Most, or all recipes I guess of Ginataang Halo-Halo have shredded langka (jackfruit) in them. I personally don’t like langka, which is why I’ve omitted them from my recipe. Instead, I wanted to replace them with shredded young coconut flesh which I didn’t end up adding to the dish because they went off in the fridge having kept them in there for a few days before using it *whoops*

Ginataang Halo-Halo (Binignit) Ingredients

PREP TIME 25 MINS | COOKING TIME 2 HOURS | SERVES 6-8

INGREDIENTS

  • 3 cups coconut milk (fresh, canned, or frozen)
  • 2 cups water
  • 1 cup young coconut flesh, shredded
  • 3/4 cup white granulated white sugar
  • 2 tsp vanilla extract or essence
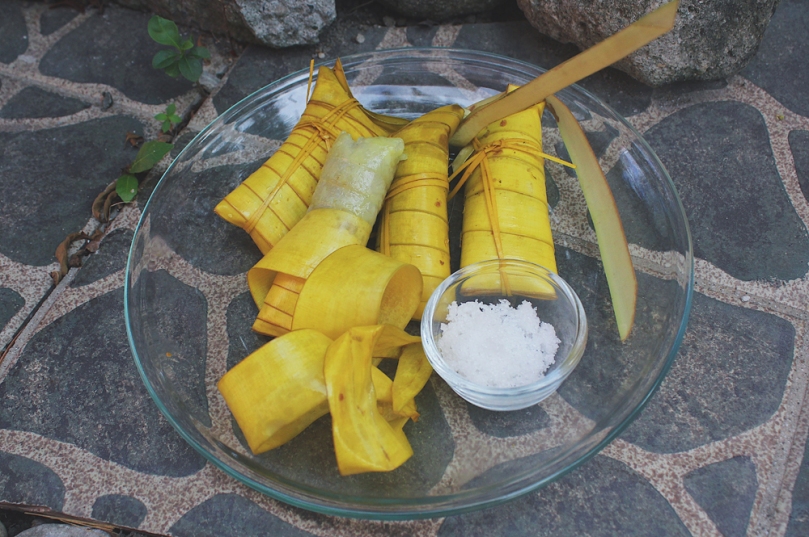
  • 3-4 pcs ripe plantains (saba), sliced
  • Medley of sweet potatoes (I used 1 medium-sized each of orange, yellow, and white), diced

For the bilo-bilo (makes about 20-24 balls)

  • 1 cup glutinous rice flour
  • 1/2 cup water
  • 1 tbsp purple food colouring (optional)

For the tapioca pearls

  • 1 cup big tapioca pearls (sago)
  • 6 cups water

METHOD

  1. Tapioca Pearls: Add the water to a large cooking pot and bring to a boil over high heat. Add in the tapioca pearls. Turn the heat down to medium, cover, and leave to boil for about 50 minutes. Check and stir every 10 minutes. Add more water if needed to prevent the pearls from sticking to the bottom of the pot and burning. Once done, turn the heat off and set aside.

Tip: For better results, leave the pearls in the cooking pot until it reaches back to room temperature. One hour of boiling will completely cook the pearls, but the core will still be slightly opaque. Leaving the pearls in the cooking pot for several hours (with the heat turned off) gives them a chance to absorb more water. Which makes the core translucent overtime.

  1. Bilo-bilo: Combine the purple food colouring and water together and add to the glutinous rice flour. Mix thoroughly – a soft yet sticky mixture should take form.
  2. Scoop about 1 & 1/2 to 2 teaspoons of the mixture and roll into a ball shaped figure using the palm of your hands. Wet your palms with a bit of water to prevent the mixture from sticking to your hands.
  3. Place the balls on a plate or container that has been dusted with a bit of glutinous rice flour to prevent them from sticking to the plate. Set aside.
  4. Ginataang Halo-Halo: Add the 2 cups of water to a large cooking pot and bring to a boil over medium-high heat. Add 3/4 cup of the coconut milk and bring to a slow boil. It is important to bring it back to a boil slowly to avoid curdling the coconut milk. This happens when it is heated too quickly.
  5. Once boiling again, add in the sweet potatoes and simmer for about 8 minutes.
  6. Pour in the remaining coconut milk together with the sugar, and glutinous rice balls. Stir and simmer for a further 5-7 minutes. Then add in the sliced plantains and simmer for an additional 2 minutes.
  7. Add in the young coconut flesh together with the cooked tapioca pearls. Stir for about a minute and then turn the heat off.
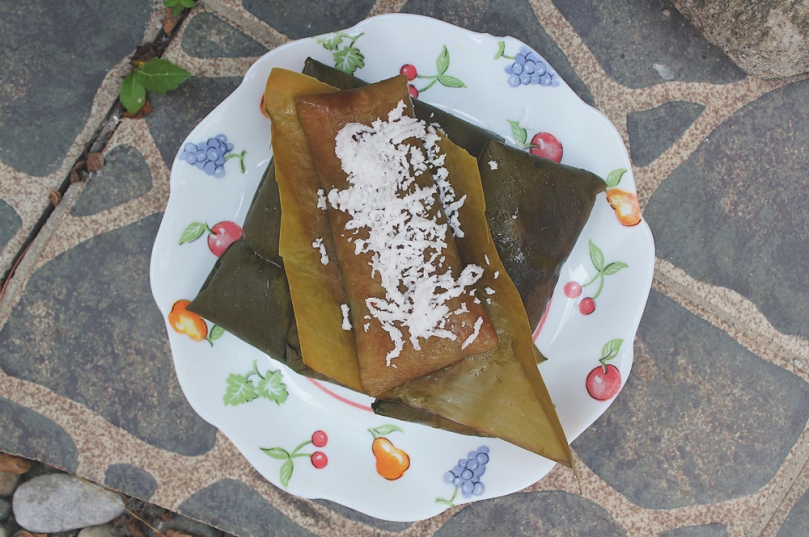
  8. Transfer to a large serving dish, or individual bowls. Serve either hot or cold and enjoy!

Ginataang Halo-Halo (Binignit)

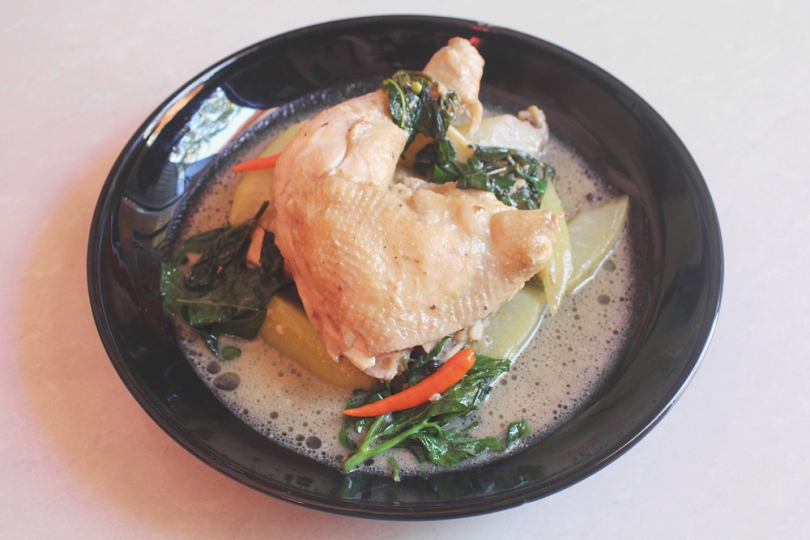
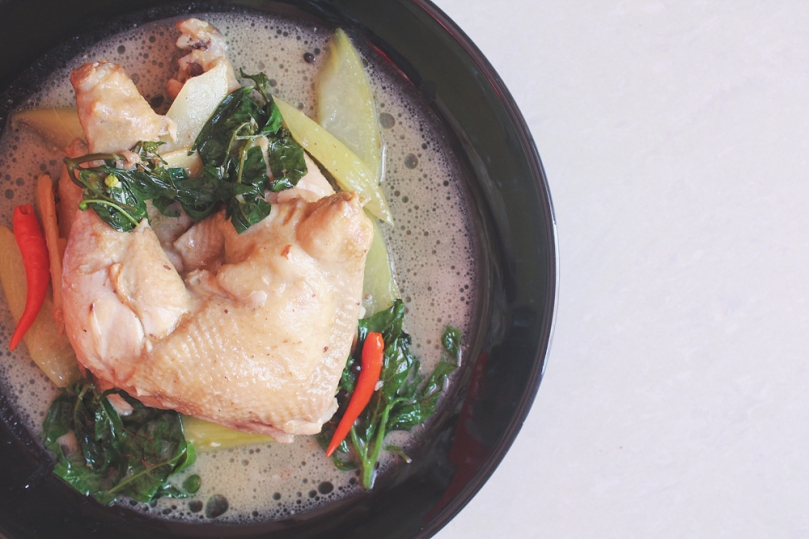
I definitely prefer to have this dish warm for an afternoon snack. To have this right after a main meal might be too heavy for a dessert – just my opinion! And no! You don’t need basil leaves for this dish. It just so happens that I had some lying around from a dish I made for lunch that day and used a sprig of it to add some green for photography purposes only *cheeky grin*

BON APPÉTIT

– Ally xx

myTaste.com

Salmon Belly Paksiw sa Gata (Stewed in Vinegar & Coconut Milk)

Salmon Belly Paksiw sa Gata (Stewed in Vinegar & Coconut Milk)

Hello Everyone! I find it hard to believe that it’s already the middle of the month – oh how time flies by so quickly! I don’t have a long-winded tangent to go on about tonight so this post will most likely be shorter than the previous two.

Paksiw sa Gata is a Filipino cooking procedure that involves two cooking styles – Paksiw (stewed in vinegar), and Ginataan (stewed in coconut milk/cream). This cooking procedure is a quick and easy way of preparing a fish dish; a staple amongst Filipino families.

Salmon Belly Paksiw sa Gata (Stewed in Vinegar & Coconut Milk)

You can use other cuts of salmon such as the heads, tails, and the flesh itself. Likewise, you can also use other types of fish such as Threadfin Bream (Bisúgo) and this unnamed White/Silver Fish that my mom used to get from the markets in Brunei for her paksiw (without the gata) dishes that we grew up on. The only reason why it’s unnamed is because I don’t actually know the name of it *cheeky grin*

Besides the protein, it is also an easy dish to incorporate greens into. Bitter melon (ampalaya) leaves are most common, but not restricted to. I absolutely detest bitter melon and its leaves, and so I opted to use malunggay leaves for this dish. Other common/favourite alternatives include spinach, water spinach (kangkong), and chilli leaves.

Salmon Belly Paksiw sa Gata (Stewed in Vinegar & Coconut Milk) Ingredients

PREP TIME 10 MINS | COOKING TIME 20 MINS | SERVES 6

INGREDIENTS

  • 1 kg salmon belly, washed, scaled and, cut into large chunks
  • 1 cup coconut milk (fresh, canned, or frozen)
  • 1 cup water
  • 1/2 cup spicy vinegar*
  • 3 long green chillies
  • 3 red bird’s eye chillies**
  • 2-3 garlic cloves, crushed
  • 1 small red onion, quartered
  • 1 bunch malunggay leaves
  • Thumb-sized ginger, peeled and sliced
  • 1 tsp whole black peppercorns
  • Salt, to taste

*Or you can always use normal white vinegar if you don’t sit well with spice

**Optional – only if you want your paksiw sa gata to have a spicy kick to it or not

METHOD

  1. Add the ginger, garlic, onions, chillies, black peppercorns, vinegar, and water into a medium-sized cooking pot. Heat over medium-high and bring to a brisk boil. Continue boiling for about 10 minutes to allow the vinegar to cook and for the aromatics to infuse into the liquid.
  2. Turn the heat down to low, and slowly stir in the coconut milk in and season with a touch of salt. Bring to a slow boil. It is important to bring it back to a boil slowly to avoid curdling the coconut milk. This happens when it is heated too quickly.
  3. Add in the salmon belly chunks and allow to cook for a further 5-7 minutes before adding the malunggay leaves in. Turn the heat off and cover for about 30-60 seconds to allow the malunngay leaves to wilt.
  4. Transfer to a serving plate and enjoy with steamed jasmine rice. Paksiw and Ginataan dishes are always best eaten with rice!

Salmon Belly Paksiw sa Gata (Stewed in Vinegar & Coconut Milk)

This only just came into mind as I was finishing this post off. I thought back to popular (highly viewed) dish that I made a while back that also uses Salmon Belly (Pan-fried Salmon Bellies).

The next time I make this dish, I’m going to pan-fry my salmon bellies to get it nice and crisp. Then, cook the vinegar and coconut milk sauce separately and just pour it over the pan-fried bellies. There’s nothing I love more than a mouthful of crispy yet melt-in-the-mouth belly fat!

BON APPÉTIT

– Ally xx

myTaste.com

Buko Salad Crumble

Buko Salad Crumble

Hello Everyone! I hope you all had a smooth-running first week of the New Year and resolutions haven’t been broken yet. I stopped making resolutions a very long time ago because I never follow them anyway. Instead, I always like to set an intention for the New Year. Read further after the recipe to find out more.

Last week we (as in my family and I) hosted a potluck lunch on New Years Day. Our relative brought over a TON of food. Even though I asked them in advance what they would be bringing so that we wouldn’t double up on the same dishes, it was the quantity of each dish that went beyond my expectations. Amongst the dishes that they brought over was Buko Salad.

Buko Salad

Buko Salad, or in English, Sweet Young Coconut Salad, is a mainstay dessert dish served in every, or any special occasions such as fiestas or birthday parties. The main ingredient of this dessert is definitely freshly shredded young coconut meat, accompanies by fruit cocktail from a can, sugar palm fruit, coconut gel (nata de coco), condensed milk, and fresh cream. Some (i.e. me) like to add little chunks of cheese into it as well.

With an abundance of it from our potluck party, I could do two things:

Continue eating it as it is, or

Make another dessert out of it.

Which did I choose? Well both obviously! I continued to eat it as it is, and also shook things up with it. I already had the intention of making a Buko Pie Crumble for my series of Coconut Recipes for this month, and when I was eating a bowl of this Buko Salad while watching a teleseyre the day after the potluck, a light bulb flashed. I could totally use this Buko Slad mixture for my crumble instead!

Buko Salad Crumble

So just to let you know, my measuring cups and spoons were nowhere to be found. I mean, they are probably in a box that I have yet to unpack since moving back to the Philippines – but I wasn’t about to go look for them when I had the oven already preheating and the Buko Salad already in their cocottes. I followed my Peach Crumble recipe to make the crumble, but I ended up just eyeballing all the measurements. Still turned out good though! If not, even better than the one I made for my Peach Crumble.

I ended up having about half of the crumble mixture left over *cheeky grin* so I placed the extra mixture into the freezer and then made another crumble the next day with the apples we had sitting on our table from our 12 Round Fruits for the New Year.

Buko Salad Crumble Ingredients

PREP TIME 10 MINS | COOKING TIME 20-25 MINS | SERVES 4

INGREDIENTS

For the crumble topping

  • 100g salted butter (cold), cut into little cubes
  • 1 cup plain flour
  • 2/3 cup white granulated sugar
  • 1/3 cup walnuts, roughly chopped
  • Ube Ice cream, optional

*Or you can always make a fresh batch to make this crumble.

METHOD

  1. Preheat oven to 190C (375F or gas mark 5).
  2. Divide the buko salad equally into 4 mini-cocottes, filling about half or three-quarters of the way. Set aside.
  3. Add the sugar together with the butter, flour, and walnuts in a medium sized mixing bowl that has been chilled in the freezer for about 10 minutes (this is to help keep the butter chilled when making the crumbled).
  4. With your fingertips, quickly mix the ingredients together until looks like rough breadcrumbs. If your mixture is too warm, put the bowl into the refrigerator for 15 minutes and start again when it has chilled.
  5. Top the buko salad with about 2-3 tablespoons of the crumble mixture.
  6. Place the mini cocottes on a baking tray and into the oven. Bake for 20 minutes, uncovered.
  7. If your crumble topping is still towards the blonde side, turn the grill on and bake for a further 5 minutes or until the crumble starts to brown.
  8. Serve hot out of the oven or at room temperature with ube ice cream (optional).

Buko Salad Crumble

Buko Salad Crumble


So, I initially wrote the following up at the beginning of the post, not knowing that I would be getting personal with two long paragraphs. I didn’t want to start my post of with this so I moved it for after the recipe for those who want to read on.

I mentioned in the beginning that I’m not one to make resolutions. Instead, I set an intention. Last year I tackled things with a “there is a difference between giving up and knowing when you’ve had enough” mindset and it definitely worked. The two things that bothered me when I entered the New Year last year were:

My Job, and

A Man/Men in general.

I hit a low point with my job. I wasn’t enjoying what I was doing anymore and to make things even worse, the environment and the toxicity of the people that surrounded me really affected my work and the way I worked. It also affected the way I interacted with my family and friends outside of the workplace – I was always grumpy and always avoided socialising with my friends. For 3 years I put up with this environment, and I let it consume me because I didn’t want to show others that I was weak for letting the people at work get to me. I didn’t want to give up. I wanted to fight. I reminded myself that: there is a difference between giving up and knowing when you’ve had enough. I didn’t give up. I knew that I definitely had enough. I put my foot down and filed for resignation early that year and I’ve never looked back.

Towards the second half of 2017, I met a man and we both fell in love with each other. It was a bit difficult seeing as he was all the way in the States and I was still working in Brunei at that time. We talked everyday. Made future plans together. Heck even made a bucket-list of things we’d do together. Shortly after, things started to die down. He started talking to me less and less each day even though I still tried just to keep things going. Eventually he stopped. He disappeared. He ghosted me as if I never existed at all. I stopped trying. I realised in time that we never really loved each other; we both just fell in love with the idea of falling in love. Did I give up on him? No. I just knew that I had enough trying to convince him and myself that it was love. After him, I had enough with men in general. I stopped looking for love and reminded myself that it’ll come when it comes.

So what is my intention for 2019? To be honest I haven’t thought much about it, but I looked at myself and where I am in life right now. What do I want to achieve by the end of the year? And this is it:

Go with the flow. Force Nothing. Let it happen.

Trusting that whichever way it goes, it’s for the best.

Happy New Year once again to all!

Buko Salad Crumble

BON APPÉTIT

– Ally xx

myTaste.com

Ginataang Manok (Chicken Stewed in Coconut Milk)

Ginataang Manok (Chicken Stewed in Coconut Milk)

Hello Everyone and a very Happy New Year to all! It just came to my attention as I was about to write this post that I should probably prepared a much more distinctive dish to welcome for the first post of the Year – but oh well.

Before I dive into the recipe, let me take up this paragraph to reveal the theme for Amcarmen’s Kitchen for this 2019 – it’s gonna be a FRUITFUL Year! That’s right! This year will be all about cooking with fruits or their… Derivatives? I’m not sure if that is the correct word I am looking for, but what I’m trying to say is for example milk from a coconut or juice from an orange and not the actual fruit itself. Let me know in the comments below what the word for this is!

So to kick start the year, I’ll be featuring Coconut and their… derivatives *insert crying laughing emoji* in all the dishes that I will be sharing for the month of January – both the sweet and the savoury!

Ginataan is one of the most basic cooking processes in the Philippines where ingredients are cooked/stewed in coconut milk. Dishes can vary from savoury dishes such as tonight’s recipe of Ginataang Manok to dessert and snacks such as Ginataang Halo-Halo.

Ginataang Manok (Chicken Stewed in Coconut Milk)

Ginataang Manok, or in English, Chicken Stewed in Coconut Milk, is basically the process of cooking Tinolang Manok (Chicken & Green Papaya Soup) with the addition of coconut milk.

Short tangent, I went back an had a quick read of my Tinolang Manok post that I shared back in 2015 and I would just like to address a few things that may confuse some of you – heck it confused me a little bit so I’m sure it’s bound to raise questions, especially if you aren’t a regular follower of Amcarmen’s Kitchen.

First things first, I had cooked up the dish when I was in Australia. I had already completed my Bachelor’s Degree in Design, and had graduated just a month before I posted it. Anyway, so on my post I mentioned that I tried to look for malunggay leaves and/or chilli leaves, and to be told by the farmers that no one at the market sells them in Australia. On the other hand here in the Philippines, malunggay and chilli leaves are abundantly sold in markets and supermarkets nationwide. You can even pluck some malunggay leaves from your neighbour’s tree! Just thought I had to clear this up as I am currently back in the Philippines and may confuse some of my new followers from the Philippines in regards to this statement.

Secondly, and lastly I guess – I wrote about my apparent hate for green papaya in Tinolang Manok and my preference for using chayote instead. I did state that maybe there was something off in the particular green papaya that I had picked out – and 3 years later, after having Tinolang Manok with green papaya on a weekly basis ever since being back here in the Philippines, I can finally confirm that there was definitely something off with the one I had picked out from the markets back in Australia. For me, now, green papaya definitely overthrows chayote!

Okay apologies, 3 paragraphs isn’t exactly a short tangent, but now that that’s cleared up and out of the way, on with the recipe!

Ginataang Manok (Chicken Stewed in Coconut Milk) Ingredients

PREP TIME 10 MINS | COOKING TIME 20-25 MINS | SERVES 4

INGREDIENTS

  • 1kg chicken whole legs, chop each into 3
  • 200ml coconut milk (fresh, canned, or frozen)
  • 1 small green papaya, peeled, seeds removed and cut into wedges
  • 3 red bird’s eye chillies*
  • 2-3 garlic cloves, minced
  • 1 small red onion, diced
  • 1 bunch chilli leaves
  • Thumb-sized ginger, peeled and sliced thinly
  • 1 tsp whole black peppercorns
  • Salt, to taste

*Optional – only if you want your ginataang to have a spicy kick to it or not

METHOD

  1. Heat about a tablespoon of oil in a large pot over medium-high. Add the sliced ginger and sauté until fragrant. Add in the garlic and continue sautéing until golden brown, followed by the onions, cooking until they are soft and translucent.
  2. Add the chopped chicken in the chicken and season with a touch of salt. Give it a good mix, then cover the pot and let it cook for about 5-8 minutes.
  3. Add in about 1.5 litres of water together with the whole black peppercorns. Bring to a boil. Once boiling, add in the coconut milk, papaya wedges, and red chillies (optional). Cover and leave to cook on low heat for about 15 minutes or until the papayas are tender. Taste and if needed, season with a bit more salt; adjust to your liking.
  4. Add in the chilli leaves and give it a good mix. Turn the heat off and serve immediately with steamed rice. Enjoy!

Ginataang Manok (Chicken Stewed in Coconut Milk)

Now that I think about it, I wonder if this should’ve been a Papaya dish rather than a Coconut dish? Thoughts?

BON APPÉTIT

– Ally xx

myTaste.com

Puto Bumbong

Puto Bumbong

Hello Everyone! I’d like to start the last post for the year by wishing everyone a very Merry Christmas! I hope everyone had a splendid eve celebrating, feasting, and continuing tradition with family and loved ones. What are some of your Christmas traditions? I’d love to know in the comments below! We had a simple and quiet Noche Buena at home, and of course watched some Christmas classics such as the Home Alone series. We’re not a family who gives gifts during the season of Christmas because we treat each other throughout the year – be in paying for the entire meal when we eat out as a family, or paying for the tickets and snacks when we go to the cinema together; gifts that allow us to spend time together as a family rather than materialistic things.

That aside, I mentioned in my last post that Christmas or Simbang Gabi would not be complete without this famous breakfast kakanin that is sold alongside Bibingka just outside the church. But, as all the other kakanins out there, you don’t have to wait until the Christmas season to roll around as you can find Puto Bumbong every day of the year at your local market, various street stalls, and in many restaurants and cafés nationwide.

Team Bibingka or Team Puto Bumbong

Puto Bumbong is a type of Filipino steamed rice cake that is traditionally made from a special variety of heirloom sticky (glutinous) rice known as pirurutong which has a distinct purple colour to it. Food colouring is not necessary for this. It is soaked in salted water and then dried overnight. It is then ground in a grinder made of solid stone before it is stuffed into a bamboo tube known as bumbong ng kawayan. It is then steamed until steam rises out of the bamboo tubes, placed onto a pre-cut banana leaf, and topped with margarine (or butter), grated coconut, and muscovado sugar to enhance its flavours.

And so for my last breakfast recipe of the year, I will share two ways in how you can make Puto Bumbong at home, with and without the bamboo tubes – depending if you have bamboo tubes readily available or not to be able to tackle this recipe. Before we dive in, be sure to check out the original recipe that I followed over on Panlasang Pinoy.

Puto Bumbong

PREP TIME 2 DAYS* | COOKING TIME 20 MINS | SERVES 6

*Be sure to allot yourself 2 days before you plan on tackling this recipe, as the rice needs to soak.

INGREDIENTS

For the puto bumbong

  • 6 cups water at room temperature, for soaking the rice
  • 1 & 1/3 cup sticky purple rice
  • 1 & 1/3 cup white glutinous rice
  • 2/3 cup long grain purple rice

For the toppings

  • Freshly grated coconut
  • Muscovado sugar
  • Softened butter or margarine
  • Banana leaves
  • Bamboo tubes

METHOD

  1. Combine all the different types of rice in a large mixing bowl together with the room temperature water. Set aside and leave to soak for at least 2 days.
  2. Drain and place the soaked rice in a large food processor. Pulse and grind until the rice becomes very fine (takes about 8 to 10 minutes to achieve this consistency). If you only have a small food processor handy, then work the rice in batches.

Cooking with Bamboo Tubes

  1. Fill each bumbong (bamboo tube) with the powdered rice mixture, making sure not to compress the rice to allow the steam to pass easily.
  2. Prepare the steamer with enough water for steaming. Once the water has been brought to a boil, arrange each bamboo tube on the steamer. Cook until steam starts coming out of the tubes, about 8 to 10 minutes.
  3. Remove the tubes from the steamer, and carefully remove the puto bumbong from the tube and place over a piece of banana leaf.
  4. Spread with butter or margarine (I chose to leave this out of my serving) and top with freshly grated coconut and muscovado sugar. Serve, share, and enjoy with a hot cuppa!

Cooking without Bamboo Tubes

  1. Add about 2 cups of water to the powered rice mixture and mix together to form a dough. You may need less or more water, depending, so it’s best to add the water in gradually. Knead until smooth.
  2. Pinch off about 2 tablespoons of the dough and, using your hands, make a ball and then roll into a log, about 4 to 5 inches in length. Alternatively you can place the dough into a piping bag and using piping tip #807, pipe the dough onto a heat-proof plate greased with a bit of butter or margarine.
  3. Place the plate into a prepared steamer with a muslin-covered lid to prevent any droplets of water dripping onto the puto bumbong mixture. Steam for about 8 – 10 minutes.
  4. Remove from the steamer and place onto a banana leaf. Top with your preferred toppings and enjoy!

Puto Bumbong

A lot has happened this year, both in my personal and work life, which resulted in me having to put my attention to Amcarmen’s Kitchen on hold for a couple of months collectively. That being said, I’m going to try my best not to take as many breaks as possible for the upcoming year ahead, *fingers crossed*

I usually take the first month of the beginning of the year off to properly plan for the upcoming year ahead and to get a head start on experimenting in the kitchen for recipes to share with you guys. But since I haven’t been working since August of this year (still continuing to look for a job as I write this), I’ve had time to plan ahead and I’m excited to share with you what I have in store for the upcoming year! You’ll just have to wait until next week to find out the theme for the year ahead – which technically is in another week I just realised!

So for now, I would like to wish all my family, friends, and followers a Happy & Prosperous New Year! May the New Year bring you happiness, health, wealth, and peace!

BON APPÉTIT

– Ally xx

myTaste.com

Big Breakfast Bilao

Big Breakfast Bilao

Hello Everyone! Only 2 more days to Christmas and just one more sleep until Noche Buena! I know it’s only a Sunday but I would just like to share a Christmas Special with everyone for a Christmas morning breakfast idea for the table.

I first came across a small single serving of a ‘Breakfast Bilao’ while scrolling through the world of Instagram and then an idea clicked into mind. What if I went BIG with the idea of a Breakfast Bilao? From there I also added a small twist to it, based on creative presentation that I drew inspiration from a couple that I have been following on Instagram for about 3 years now known as @symmetrybreakfast. If you haven’t heard of them before, please do take the time to check out their beautiful feed and give them a follow! (Not sponsored) *cheeky grin* Anyway, I know my Breakfast Bilao may seem very far away from being precisely symmetrical, but that’s where I drew my inspiration from.

Big Breakfast Bilao

So what is a bilao? Well traditionally it is used in the Philippines for winnowing rice, tossing and turning the grains for the purpose of removing unwanted particles such as dirt and small stones. These days, you’re more likely to see a bilao used as a food container lined with banana leaves where food is arranged.

Of course, feel free to get even more creative with your own version of a Breakfast Bilao – the combinations are endless! I put my Breakfast Bilao together after our weekly market day with freshly bought ingredients, but you can most definitely also whip this up with leftover ingredients lying around in your fridge or pantry.

Big Breakfast Bilao Ingredients

PREP TIME 20-30 MINS | COOKING TIME 30-45 MINS | SERVES 4

INGREDIENTS

For the corned beef

  • 250g fresh corned beef
  • 2-3 garlic cloves, minced
  • 1 small potato, diced
  • 1 small red onion, halved and sliced
  • Ground salt and pepper, to taste

For the eggplant omelette

  • 2 medium-sized Lebanese eggplants
  • 2 large free range eggs
  • Ground salt and pepper, to taste

For the garlic fried rice

  • 3 cups of day old cooked rice
  • 3-4 cloves garlic, minced
  • Ground salt and pepper, to taste

For the lato salad

  • 1/2 kg green caviar seaweed (lato)
  • 2 salted eggs, cooked and roughly chopped
  • 2 tomatoes, roughly chopped
  • Fish sauce, to taste
  • Fresh calamansi juice, to taste
  • Freshly ground black pepper, to taste
  • 2 large free range eggs
  • 2 pcs dried salted fish (tuyo)
  • 2 pcs smoked salted fish (tinapang tuyo)
  • 1 bunch lady fingers (okra), rinsed and trimmed
  • Assorted longganisa (I used Vigan and sliced tocino longganisa)
  • Assorted fruits such as mangoes and oranges

Condiments

  • Dark soy sauce with calamansi
  • Spicy vinegar with fresh chillies, garlic, and peppercorns
  • Sweet chilli sauce
  • Banana leaves

METHOD

Get ready for some more one-pan action!

  1. Preheat oven to 90C (190F) just hot enough to keep each element of the dish warm as we work through each one of them individually.
  2. Prepare the banana leaves by wiping them down with a damp cloth. Quickly pass them over an open flame to make the leaves soft and pliable so that they are easier to work with. Arrange them over the top of your bilao and set aside.
  3. Eggplant Omelette: Grill the eggplants until the colour of skin turns almost black. Let the eggplants cool for a while before peeling off the skin. Set aside.
  4. While waiting for the eggplants to cool down, you can prepare the condiments for your dish.
  5. Crack one egg per grilled eggplant into a deep dish and beat. Add the eggplant to the beaten egg mixture and flatten using a fork.
  6. Heat a large frying pan over medium-high heat with about a tablespoon of oil. Pour the egg mixture together with the eggplant into the pan and fry for about 4 to 5 minutes per side. Once done, place on a heat-proof plate and set aside in the oven.
  7. Fried Egg: Pour and heat a little bit of oil if needed in the same frying pan. Crack the eggs gently into the pan to keep the yolks intact. Don’t overcrowd the pan, so if needed, fry the eggs in batches.
  8. Cook until the tops of the whites are set, but the yolk is still runny. Browned and crispy on the edges with a golden liquidy yolk is how I like my fried eggs! Transfer to a heat-proof plate and set aside in the oven.
  9. Tinapa & Tuyo: In the same pan once again, add a little bit more oil if needed. Heat until the oil is hot, but not smoking. Place the dried fish into the pan and fry until its scales are crisp and start separating from each other, about 2 to 3 minutes per side.
  10. Remove from the heat and transfer to a heat-proof plate lined with a paper towel to soak up any excess oils. Set aside in the oven.
  11. Longganisa: Wipe down the pan with a kitchen towel tissue and place the longganisa in the pan. Add about a quarter cup of water to the pan and bring to a boil. Roll and flip the longganisa occasionally and continue to boil until the water in the pan evaporates.
  12. When the water has fully evaporated, let the longganisa fry in its own oil. Continue to fry the longganisa for about 5 minutes while constantly rolling or flipping them around to cook evenly on all sides.
  13. When the longganisa is slightly crisp on the outside, it’s done! Set aside on a heat-proof plate lined with a paper towel to absorb any excess oil. Place in the oven to keep warm.
  14. Corned Beef: Wipe down the same pan, and add about a tablespoon of oil. Sauté the minced garlic until fragrant and golden brown, about 30 seconds. Add in the onions and cook until soft for about 1 minute before adding in the corned beef.
  15. Continue to cook for 5 to 6 minutes, seasoning with a touch of fragrant and golden brown, about 30 seconds. Add in the diced potatoes and cook further until the potatoes are soft, about 2 to 3 minutes. Once done, place in a small heat-proof bowl and set aside in the oven.
  16. Garlic Fried Rice: Wipe down the pan once again and heat about a tablespoon of oil. Add the minced garlic and sauté until fragrant and golden brown, about 30 seconds.
  17. Add the cooked rice and season with salt and ground pepper to taste. Give it a good mix and continue mixing for about 4-5 minutes to avoid the rice sticking to the bottom of the pan and burning. Turn the heat off and cover to keep warm.
  18. Lato Salad: In a large bowl, combine the tomatoes, salted egg, and lato.
  19. Toss through the fish sauce, calamansi juice, and season with freshly ground black pepper. Adjust to your liking. Set aside for at least 10 minutes before serving.
  20. Okra: In a small saucepan, combine water, okra, and season with a touch of salt. Bring to a boil over high heat. Once boiling, leave the okra to cook for 3 to 4 minutes, or until tender. Drain and set aside.
  21. Plate Up: Remove all the cooked elements from the oven and plate up accordingly – feel free to get creative with your plating. As I mentioned above, I drew my inspiration from @symmetrybreakfast eventhough it’s not a clean-cut symmetrical. Serve with coffee or any hot beverage of your choice and there you have it!

Big Breakfast Bilao

Big Breakfast Bilao

Note: You may end up having this Breakfast Bilao for brunch (depending on what time you get up in the morning) as it may take a while to whip together.

Now, I also know that this is hardly festive or Christmassy for a Christmas special, but I had whipped this up a few weeks back and I really wanted to share this with everyone. I didn’t want it to go into my archive file of recipes that may (will) never get posted because it does not suit with theme. Since we’re still all about Breakfast until the end of the year, why not? Maybe you can whip this up for a delightful Christmas morning while the kids are busy opening their gifts. If you don’t have kids, then make it for yourself!

I’ll see everyone again on Christmas Day with the last recipe for the year so stay tuned for that. Hint: Christmas/Simbang Gabi would not be complete without the recipe I’ll be sharing on Wednesday!

For now, I would like to wish my family, friends, visitors, and loyal followers of Amcarmen’s Kitchen a very Merry Christmas!

Big Breakfast Bilao

Big Breakfast Bilao

Big Breakfast Bilao

BON APPÉTIT

– Ally xx

myTaste.com

Bibingkute (Mini Bibingka)

Bibingkute (Mini Bibingka)

Hello Everyone! Only less than a week left to Christmas! How will you and your family be spending the festivities? Though my family and I are back in the Philippines, we’re used to just spending a quiet night at home and that’s probably how we’ll be spending our Christmas this year again. I honestly am not all about spending money that I don’t have on gift giving. Please don’t judge me, as I am definitely not a cold-hearted Grinch – I just don’t see why we have to go such great lengths to please other people. Christmas is about celebrating the birth of our Saviour Jesus Christ – and not about what I have just mentioned above.

Tangent/mini rant aside, this festive kakanin known as Bibingka, or in English, Filipino Coconut Rice Cake, is usually eaten for breakfast especially during the Christmas season, typically sold alongside Puto Bumbong. Just like other kakanins, this treat can be enjoyed all year round and not just during the festive season. They can be found on the streets, in the markets and even in cafés and restaurants.

Bibingka

Bibingka is a round rice cake that is traditionally cooked in banana-lined clay pots and baked over pre-heated live coals, but more commericalised bibingkas can also be baked in the oven. Now, I’m not entirely sure that ‘Bibingkute’ is the actual term used for mini bibingkas – I just came across it during my research for a recipe. I think the name came from this statement on Kawaling Pinoy:

“And to increase the cute factor, I used muffin pans to bake the cakes.”

Quite a creative name I might add.

Bibingka is traditionally made with galapong, which is milled glutinous rice as the main ingredient. Nowadays you can easily buy glutinous rice flour and use that instead of milling your own rice. The cakes are also full of carbohydrates which makes it a breakfast favourite enjoyed with a strong serving of coffee to get one going through their morning commute to school or work. Other ingredients in bibingka include coconut milk, margarine, cheese, salted egg, and sugar.

Bibingkute (Mini Bibingka)

PREP TIME 15 MINS | COOKING TIME 15-25 MINS | SERVES 12 MINI CAKES

INGREDIENTS

For the bibingka batter

  • 2 cups rice flour
  • 1 & 1/2 cups coconut milk (fresh, canned, or frozen)
  • 3/4 cup granulated white sugar
  • 5 free range eggs, beaten
  • 2 tbsp baking powder
  • 2 tbsp unsalted butter, melted
  • 1/2 tsp salt

For the toppings

  • 2 salted duck eggs, cooked and sliced
  • Granulated white sugar
  • Grated and sliced cheese
  • Grated mature coconut (niyog)
  • Margarine, softened
  • Banana leaves

METHOD

  1. Preheat oven to 180C (350F or gas mark 4).
  2. Banana Leaves: Prepare the banana leaves by rinsing them under warm water. Trim away the thick edges and cut the leaves into about 5 or 6-inch diameter rounds, large enough to cover the bottom and sides of a single muffin cup.
  3. Quickly pass and heat the banana leaves over stove flames for a few seconds, just until the leave if soften and pliable to work with. Line a 12-hole muffin pan with the prepared banana leaves. Make sure the leaves are intact with no rips. Set aside.
  4. Bibingkute: Combine the rice flour, sugar, baking powder and salt in a medium-sized mixing bowl. Whisk the ingredients together until well dispersed.
  5. In another large mixing bowl, combine the coconut milk and melted butter. Stir until well blended before adding in the rice flour mixture. Stir gently until the batter is smooth. Add the beaten eggs and combine until well blended.
  6. Pour and divide the batter equally into the prepared muffin pan, filling only about 3/4 of the way. Top each with a slice of salted egg and a slice of cheese.
  7. Bake: Place in the oven for about 15 to 25 minutes or until golden and a toothpick inserted in the middle of the cakes come out clean.
  8. Optional, if desired, place under the broiler for about 1 minute or until nicely charred.
  9. Remove from the oven and spread with margarine on top. Garnish with grated coconut or grated cheese and sprinkle with sugar to taste.
  10. Serve and enjoy hot for breakfast or merienda.

Bibingka

BON APPÉTIT

– Ally xx

myTaste.com

Sapin-Sapin

Sapin-Sapin

Hello Everyone! Only 13 more days to Christmas!

Before I start, I’m going to make this post short a sweet. I’ve had a busy day of designing to meet a 9-hour deadline so I’m pretty much mentally drained at this point – apologies in advance.

Anyway, in my previous post that I shared last week, I talked about how a much-loved part of the Simbang Gabi tradition during the Christmas season amongst Filipinos is the various local delicacies served just outside of the churches. Last week I shared all about Suman, and tonight I will be sharing a favourite with you, Sapin-Sapin.

Sapin-Sapin is a Filipino sticky rice cake that is made from glutinous rice and coconut milk that is traditionally composed of layers with different colours and flavour profiles that compliment each other. Sapin-Sapin can be made of 4, 3 or 2 layers, or even enjoyed just on its own single slab. The most common flavours are coconut, ube, and jackfruit. It is then topped with a toasted residue of coconut milk known as latik.

Sapin-Sapin

PREP TIME 15 MINS | COOKING TIME 45 MINS | SERVES 10

INGREDIENTS

For the sapin-sapin

  • 4 cups coconut milk (fresh, canned, or frozen)
  • 2 cups glutinous rice flour
  • 1 cup granulated white sugar
  • 3/4 cup ube (purple yam), cooked and mashed
  • 1/2 cup ripe jackfruit
  • 1/4 cup latik*
  • 30ml condensed milk
  • 1 tbsp coconut oil
  • 1/2 tsp pure vanilla extract
  • 1/4 tsp ube extract
  • Violet food colouring
  • Yellow food colouring

*For the latik

  • 1 cup coconut milk

METHOD

  1. Latik: Pour the coconut milk into a small saucepan and bring to a boil over medium-high heat. Continuously stir until most of the liquid evaporates. This will take about 12 to 15 minutes per cup of coconut milk.
  2. When the texture of the milk turns gelatinous, lower the heat and continue to stir. By this time the oils should start separating from the milk. Keep stirring until brownish residues are formed.
  3. Turn the heat off and place the latik on a small plate lined with a paper towl to soak up the excess oil. Set aside. At this point you can store the latik in a container and in the fridge for up to a week or use it immediately to top various rice cakes.
  4. Sapin-Sapin: Combine the glutinous rice flour and sugar in a large mixing bowl. Then, pour in the condensed milk, coconut milk, and vanilla extract, mixing well until the texture of the mixture is smooth.
  5. Divide the mixture into 3 equal parts into smaller mixing bowls.
  6. Add the mashed purple yam, ube extract, and violet food colouring into one of the mixtures. Stir thoroughly and then set aside.
  7. Shred the jackfruit (without the seeds) in a food processor. Add the shredded jackfruit into another mixture along with the yellow food colouring. Set aside.
  8. Leave the last mixture as it is.
  9. Grease a 9in round baking pan by brushing a bit of coconut oil and pour in the plain coconut mixture into the pan. Make sure that the mixture settles. Cover the baking pan with cheesecloth and then steam for about 12 to 16 minutes.
  10. Once done, remove the baking pan and then pour over the ube mixture. Use a spatula to spread it evenly on top of the coconut mixture. Remove excess water from the cheesecloth by squeezing it. Place it back on top of the baking pan, and into the steamer to steam for another 12 to 16 minutes.
  11. Repeat step 10 again for the jackfruit mixture and then steam for a further 15 to 20 minutes. If you think your mixture is still a tad bit runny, steam for a further 5 minutes. Remove of the steamer and set aside.
  12. Serve: Place a clean banana leaf over a wide serving plate and brush a bit of coconut oil over the leaf.
  13. Gently run the side of the baking pan using a spatula brushed with coconut oil. Turn the baking pan over onto the banana leaf and let the cooked sapin-sapin fall out of the pan on its own. Therefore make sure that the colour that you want on top is the bottom layer in the pan when being cooked.
  14. Brush some coconut oil on top of the sapin-sapin and sprinkle generously with latik.
  15. Serve for breakfast, merienda, or dessert with a hot cup of coffee. Share and enjoy!

Sapin-Sapin

Unfortunately, most commercial sapin-sapin delights that you find in large supermarket chains omit the use of natural flavours such as the ube and jackfruit to reduce costs. In fact, if you see, red is also often used in the making of sapin-sapin. When I was researching the flavours, I found out that the red layer actually has no flavouring to it, just the plain coconut from the initial mixture.

Before I end tonight’s post, what are some of your favourite traditional Christmas treats? I’d love to hear about the different food traditions from around the world! Comment down below!

BON APPÉTIT

– Ally xx

myTaste.com

Suman Malagkit, Suman sa Lihiya / Sumang Magkayakap, and Suman sa Ibos

Suman 3 Ways

Hello Everyone! Just 20 more days until Christmas, which means that Simbang Gabi is just around the corner! Simbang Gabi is a well-loved holiday tradition amongst Filipino Catholic devotees who attend mass at 4am. It is a series of 9 Novena Masses that commences on the morning of December 16 and culminates with the Misa de Gallo on Christmas Eve.

Apart from the Mass itself, another much loved part of the Simbang Gabi tradition that many look forward to are the local delicacies served just outside of the churches. You’ll find many vendors selling local Christmas favourites such as Suman, Puto Bumbong, Bibingka, Sapin-Sapin, and plenty more! Nowadays, these yummy treats, also known as kakanins, can be found in many establishments nationwide all year around so you don’t have to wait for Christmas to have your fill of them.

For the last month of the year, I will be sharing recipes for these traditional Filipino Christmas breakfast delights with you. And I’m going to kick it off with a popular favourite – Suman 3 ways!

Glutinous Rice (Malagkit) is a type of rice that is famous throughout Asia for its culinary use, especially in many variations of sweets. Here in the Philippines, one of the MANY most loved ways to cook glutinous rice is to wrap it in a banana leaf and then steamed. It is very easy to make, however time consuming. Filipinos take pride in doing it and many households have their own secret way to making this sweet and sticky rice delicacy.

Suman Malagkit

Suman Malagkit

In its simplest and most basic form is the Suman Malagkit, or translated, Sticky Rice Roll in a Banana Leaf.

PREP TIME 4 HOURS | COOKING TIME 2 HOURS | SERVES 20 PCS

INGREDIENTS

  • 2 cups glutinous rice, uncooked
  • 2-3 cups coconut milk (fresh, canned, or frozen)
  • 1 tsp salt
  • Banana leaves for wrapping

METHOD

  1. Malagkit Mixture: In a large bowl, soak the glutinous rice for 2 to 3 hours to soften, and strain when ready to cook.
  2. Place the strained glutinous rice in a large pot together with the coconut milk and salt. Bring to a brisking boil.
  3. Once boiling, immediately turn the heat down to low until the rice and coconut milk mixture comes down to a slow simmer. Give it a good stir and then simmer for about 20 to 30 minutes. Stir occasionally to keep the rice from sticking to the bottom of the pot.
  4. Turn the heat off, and leave the mixture for a further 15 to 30 minutes, covered, to allow the rice to finish cooking and cool down.
  5. Wrapping: While waiting for the rice to finishing cooking, prepare the banana leaves by quickly passing them over an open flame to make the leaves soft and pliable so that they are easier to work with when wrapping. This method also releases the natural aroma of the leaves.
  6. Cut the leaves into equal sizes, depending on the size of the suman roll that you want to make.
    Scoop about 2 to 3 heaping tablespoons of the rice onto the prepared banana leaf and shape into a log, leaving about 1 inch on the sides. Roll the banana leaf tightly around the rice to form a log and fold both edges in to seal.
  7. Repeat until all of the rice has been wrapped, yields about 20 pieces.
  8. Cook: Stack the suman rolls in a steamer and steam over boiling water for about 30 to 60 minutes. Make sure that they are tender before removing them from the steamer.
  9. Serve: Allow to cool slightly before unwrapping. Serve with fresh grated coconut, brown sugar, or my absolute favourite – with sweet ripe mangoes! They can also be enjoyed on its own without any accompaniments.

Suman sa Lihiya / Sumang Magkayakap

Suman sa Lihiya / Sumang Magkayakap

This is basically the same as Suman Malagkit, but is treated with lihiya (lye water) which gives the suman its yellowish colour, a delicacy from the southern part of Luzon, especially in the Batangas Region.

It is also known as Sumang Magkayakap because of how it is served – two rice cakes tied together appearing as if they are embracing/hugging (magkayakap) each other.

PREP TIME 4 HOURS | COOKING TIME 2 HOURS | SERVES 24 PCS

INGREDIENTS

  • 3 cups glutinous rice, uncooked
  • 1 tbsp lye water
  • Banana leaves for wrapping
  • Food-safe cotton string

METHOD

  1. Rice Mixture: In a large bowl, soak the glutinous rice for 2 to 3 hours to soften. Strain the water and then mix in the lye water together with the drained rice until it turns yellow in colour.
  2. Wrapping: Prepare the banana leaves by quickly passing them over an open flame to make the leaves soft and pliable so that they are easier to work with when wrapping. Cut the leaves into equal sizes, depending on the size of the suman roll that you want to make.
  3. Scoop about 3 heaping tablespoons of the rice onto the prepared banana leaf and shape into a log, leaving about 1 inch on the sides. Roll the banana leaf tightly around the rice to form a log and fold both edges in to seal.
  4. Take two of the wrapped rice rolls, with the folded sides facing each other, and tie them together using the cotton string.
  5. Repeat until all of the rice has been wrapped, yields about 24 pieces or 12 pairs of Sumang Magkayakap.
  6. Cook: Arrange the suman rolls in a large cooking pot. Pour enough water (room temperature) to cover them. Bring to a boil over low heat for about 2 hours or until done.
  7. Serve: Allow to cool slightly before unwrapping. Serve with fresh grated coconut or a sweet latik sauce.

Suman sa Ibos

Suman sa Ibos

A native delicacy known simply as Ibos (or also spelt as Ibus) by Ilonggos that is wrapped in palm or buri leaves. This is the counterpart of banana leaves, which is commonly used in many other suman recipes. They are mostly grouped and sold in bundles be it on the streets, in markets, mall stalls, and even restaurants.

The challenge with Suman sa Ibos is not the in cooking processing, but in preparing the ‘container’. You will need to swirl the palm leaves over a mold and locked properly to make individual containers to hold the glutinous rice mixture.

PREP TIME 3 HOURS | COOKING TIME 2 HOURS | SERVES 20 PCS

INGREDIENTS

  • 2 cups glutinous rice, uncooked
  • 2-3 cups coconut milk (fresh, canned, or frozen)
  • 1 tsp salt
  • Palm or buri leaves for wrapping

METHOD

  1. Preparation: In a large bowl, soak the glutinous rice for 2 to 3 hours to soften.
  2. While waiting for the rice, prepare the ibos (palm leaf) container/wrapper. The leaves should be about 1.5 inches in width. Fold the bottom edge of the palm leaf into a triangle. Swirl the leaf in an overlapping manner to create a cylindrical mold. To secure the tube, you can lock the leaf using a small piece of wooden pick. Prepare about 20 containers.
  3. Once the rice is done, drain the excess water and mix the coconut milk and salt in thoroughly. Set aside to stand for about 10 minutes.
  4. Fill the ibos container 3/4 of the way with the glutinous rice mixture. Seal the container by using the strips of the palm leaves.
  5. Cook: Arrange the suman containers in a large cooking pot. Pour enough water (room temperature) to cover them. Bring to a boil over low heat for about 2 hours or until done.
  6. Serve: Allow to cool slightly before unwrapping.Best paired with muscovado sugar or regular white sugar. Also best eaten with ripe mangoes or native tsokolate/tablea.

And there you have it! 3 ways in which you can make Suman! Of course there are many others way in which you can make suman that is native to the province of which they originate from. Two favourites of mine, which I have not included in this post, are Tupig native to Pangasinan and Ilocos Norte, and Suman Pinipig from Bulacan. These two are a little more complicated than the basic ones that I’ve shared in this post. You can find Suman Pinipig in many mall stalls across Metro Manila, however I still have yet to find Tupig around here.

With these rice cakes, you don’t necessarily have to eat it the moment you finish cooking it. It does however; definitely taste better when it’s not chilled. If you need to keep it in the fridge and indulge in them the day after, you can easily steam them again for 10 minutes before serving.

BON APPÉTIT

– Ally xx

myTaste.com

Full Pinoy Breakfast

Full Pinoy Breakfast

Hello Everyone! I can’t believe that we’re nearing the end of November! The month went by so quickly and before we know it, the year will be over too. I’m not going to say that tonight will be the last of my Filipino breakfast series because expect more for the month of December. The only twist is that I will be sharing Filipino Christmas Breakfast treats, so stay tuned for that! I will also be sharing with you a Noche Buena Special next month be sure to so look out for that too!

Tonight’s recipe is a dish that draws inspiration from a Full English Breakfast – but with a Filipino twist to it. I’m not sure if this has been done before (I’m sure it has), but nevertheless, I’ve swapped out traditional English Breakfast ingredients with its Filipino counterpart i.e. sausages for longganisa, toast for pandesal, and so on. I came across this idea while researching the top favourite Filipino Breakfast dishes and it clicked into mind: “what if I substitute the ingredients from a Full English Breakfast and make a Filipino version of it?”

The end result definitely put a smile on my face, and I’m sure it will do the same for you.

Full Pinoy Breakfast Ingredients

PREP TIME 10 MINS | COOKING TIME 20 MINS | SERVES 4

INGREDIENTS

  • 250g fresh corned beef
  • 250g oyster mushrooms*
  • 12 Vigan longganisa**
  • 8 freshly baked malunggay pandesal***
  • 4 large free range eggs
  • 4 slices of pineapple-marinated holiday ham****
  • 4-5 garlic cloves, minced
  • 1 small potato, diced
  • 1 small red onion, halved and sliced
  • Knob of unsalted butter
  • Salt and freshly ground black pepper, to taste

To garnish

  • Lettuce leaves
  • Tomatoes, sliced

*Or any other type such as button, cup, or Portobello, whichever is readily available and fresh at your local market or grocers. In my case, the oyster mushrooms were the freshest from the rest.

**Quantity depends on the size and type, more if you get the smaller ones.

***You can bake your own pandesal or you can pop over to your nearest pandesal stall (ours is just a 2 minute walk from our house) and buy at 3 pesos a piece of freshly baked malunggay pandesal.

Malunggay Pandesal

****Since Christmas is nearing, Hamon de Bola (Ham Ball or Holiday Ham) can now be found in every grocery store nationwide! Since this is our first time being back in the Philippines for good, we’ve been scouting around for the best tasting Holiday Ham by just buying slices of the various brands out there before buying the whole ball to serve for our upcoming Noche Buena Feast next month.

METHOD

Get ready for some one-pan action!

  1. Preheat oven to 90C (190F) just hot enough to keep each element of the dish warm as we work through each one of them individually. Place your store-bought pandesal into the oven.
  2. Fried Egg: Heat a large frying pan over medium-high heat with about a tablespoon of oil. Crack the eggs gently into the pan to keep the yolks intact. Don’t overcrowd the pan, so if needed, fry the eggs in batches.
  3. Cook until the tops of the whites are set, but the yolk is still runny. Browned and crispy on the edges with a golden liquidy yolk is how I like my fried eggs! Transfer to a heat-proof plate and set aside in the oven.
  4. Garlic Sautéed Mushies: In the same pan, add half of the minced garlic and sauté until fragrant and golden brown, about 30 seconds. Add in the mushrooms and cook until softened, about 3 minutes.
  5. Add a knob of unsalted butter, and season with a touch of salt and freshly ground black pepper. Give it one good stir to combine and transfer to a small heat-proof bowl. Set aside in the oven.
  6. Corned Beef: Add about a tablespoon of oil to the pan and sauté the remaining minced garlic until fragrant and golden brown, about 30 seconds. Add in the onions and cook until soft for about 1 minute before adding in the corned beef.
  7. Continue to cook for 5 to 6 minutes, seasoning with a touch of fragrant and golden brown, about 30 seconds. Add in the diced potatoes and cook further until the potatoes are soft, about 2-3 minutes. Once done, set aside in a small heat-proof bowl and set aside in the oven.
  8. Longganisa: Wipe down the pan with a kitchen towel tissue and add about a quarter cup of water to the pan together with the longganisa. Bring the water to a boil. Roll the longganisa occasionally and continue to boil until the water in the pan evaporates.
  9. When the water has fully evaporated, let the longganisa fry in its own oil. Continue to fry the longganisa for about 5 minutes while constantly rolling them around to cook evenly on all sides. When the longganisa is slightly crisp on the outside, it’s done! Set aside on a heat-proof plate lined with a paper towel to absorb any excess oil. Set aside in the oven to keep warm.
  10. Holiday Ham: Again, wipe down the pan with a kitchen towel tissue and add about a tablespoon of oil. Add the ham slices to the pan and fry until golden brown both sides. Set aside on a single plate lined with a paper towel to absorb any excess oil.
  11. Plate Up: Remove all the cooked elements from the oven and plate up accordingly into four individual serving plates. Garnish with fresh lettuce leaves and fresh sliced tomatoes. Serve with coffee or any hot beverage of your choice and here you have it! Enjoy a Full Filipino Breakfast for the upcoming weekend!

Full Pinoy Breakfast

Full Pinoy Breakfast

BON APPÉTIT

– Ally xx

myTaste.com