Raw Gingerbread Balls

Raw Gingerbread Balls

Hello Everyone! 2016 is coming to a close real soon and I would just like to take this opportunity to be thankful for what the past year has brought, not only for me, but for my family and my friends as well. Inevitably, life if not always perfect, it has its ups and downs, and for all the times where I felt down or put down but others, I can only say that – as cliché as this sounds – it has made me become a stronger person. I have been thrown under the bus countless of times by people around me and have had people say bad things about me behind my back – to all these people, you can go shove it where the sun don’t shine. You’ve made me realise how easy it can be for me to just shut you out because I don’t need that kind of toxicity in my life. Arrivederci.

Well, that escalated quickly haha! From being thankful to talking about the poisonous people is my life. Anyway, this will be the last recipe that I will be sharing on Amcarmen’s Kitchen for the year 2016. I hope that all my family, friends, and followers have had a good read and have cooked up a storm in their own kitchens with my recipes. Don’t forget to use the hashtag #amcarmensrecipes when you create a dish from my blog so I can share them on all my social media mediums. I will be back in February with a whole new concept to my recipes so please stay tuned! Yes, I will be taking a break in January as I have quite a full plate with work for the month and I might be able to spend time in the kitchen. I will also be planning content for Amcarmen’s Kitchen during my time off to ensure that everything runs smoothly for the upcoming year! Look out though for a post coming in mid-January as an introduction and hint to the recipes ahead for 2017!

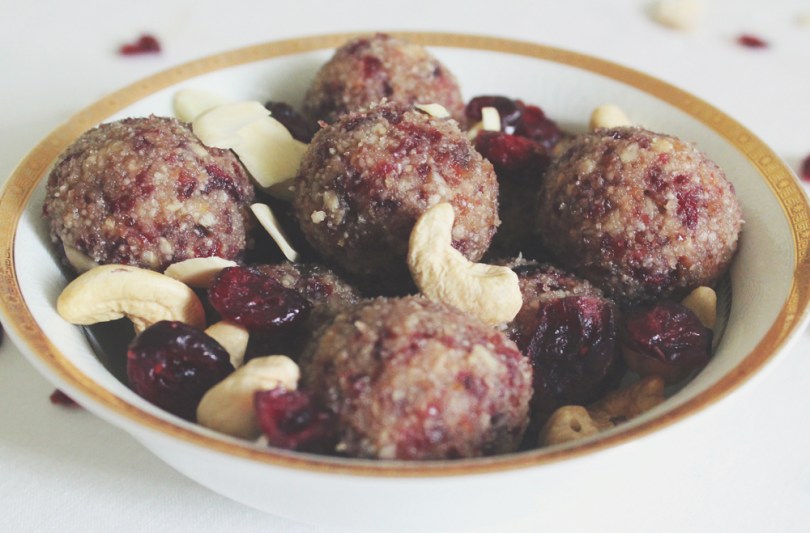
Since Christmas passed not to long ago, I decided whip up these tasty raw vegan gingerbread balls as part of my ball-balls theme for December to keep with the Christmas-spirit.The only slight change I made to this recipe was replacing the buckwheat groats with more almonds just because I have no clue where to find buckwheat groats here in Brunei! Before we jump into the recipe for tonight, please check out the original recipe from Amanda over on Rawmanda.

Raw Gingerbread Balls Ingredients

PREP TIME 10 MINS | COOKING TIME  | SERVES 15 BALLS

INGREDIENTS

  • 1 & 1/4 cup pitted dates, roughly chopped
  • 3/4 cup gluten-free rolled oats
  • 1/4 cup almond meal
  • 1/4 cup buckwheat groats*
  • 3/4 cup gluten-free rolled oats
  • 1 tbsp ground cinnamon
  • 1 tsp ground ginger
  • 1/2 tsp nutmeg
  • 1/4 tsp ground cloves
  • 1/4 tsp vanilla extract

Optional

  • 1 tbsp coconut sugar

*If you’re like me and can’t seem to find buckwheat groats at your local grocers, you can substitute 1/4 cup of buckwheat groats for 3 tablespoons of almond flour. Alternatively, for nut-free balls, you can substitute 1/4 cup of almond meal for 1/4 cup + 1 tablespoon of buckwheat groats.

METHOD

  1. Place all the ingredients, except for the coconut sugar and dates in a high-speed blender or food processor until you get a flour-like consistency from the ingredients.
  2. Add half of the dates into the blender/food processor and pulse until well combined. Then add in the remaining dates until you have a uniform dough formed.
  3. Scoop the dough out of the blender/food processor, at about a tablespoon in size, and roll it into a ball (or flatten with a rolling pin and use a cookie cutter to make desired shapes). Repeat for the remaining dough. Optional: Roll the balls into coconut sugar or sprinkle on top of cookies.
  4. Share and enjoy as a light snack. Store the gingerbread balls or cookies in an air-tight container at room temperature for a 2-3 days or in the refrigerator for a week.

Raw Gingerbread Balls

BON APPÉTIT
– Ally xx

myTaste.com

Buffalo Cauliflower & Quinoa "Meatballs"

Buffalo Cauliflower & Quinoa “Meatballs”

Hello Everyone! Before I begin, I would like to check in with everyone and see if you all were able to guess the theme for this month. I’m pretty sure that by this post, you’ll have an idea of a recurring theme, but nevertheless, I will share it with you guys right here, right now! Drumroll please!

BALL BALLS! Yes, you read that right, ball balls, and here is a little back story to the name – so there was one day, back when I was still living in Australia for my university studies, my then roommate and I were talking about Christmas I guess, well I actually don’t remember the root of our conversation but it was more like I misunderstood, or I didn’t quite hear the pronunciation of the word “baubles” when my roommate had said it. At that time, I assumed that she said “ball balls” and that, that was what those round Christmas ornaments were called. Fast forward to another time, I was correct by someone (sorry I can’t remember who) that it was actually baubles and not ball balls. I was so disappointed at the time because I thought ball balls was such an epic name to call these Christmas ornament. Just recently, and when I say recently I mean like about a year ago or so, Jialing shared with me a folder name in their office server and it was titled BALL BALLS, to which I replied to her “SEE I TOLD YOU THEY ARE CALLED BALL BALLS!” I was just overly excited at the fact that I wasn’t the only dumb one to call them ball balls.

Buffalo Cauliflower & Quinoa "Meatballs"

Jialing has been quite helpful this year in a way that she has helped me with some blog themes for this year. At first, she asked me what the theme of my blog would be for the month of December, and we both came up with the idea of doing ball-shaped food as we recalled our “ball balls” story. So, as I do not have a backstory for this particular recipe since I just came across it while browsing through Pinterest, I will just get right in to the recipe. Before you do, check out the original recipe by Erin over on The Almond Eater.

“Add a spicy kick to meatless meatballs with these vegan Buffalo Cauliflower Quinoa Meatballs. With simple ingredients, like cauliflower, quinoa, garlic, and breadcrumbs, they’re sure to be a hit for the whole family!” — Erin, The Almond Eater.

Buffalo Cauliflower & Quinoa "Meatballs" Ingredients

Buffalo Cauliflower & Quinoa "Meatballs"

PREP TIME 30 MINS | COOKING TIME 40 MINS | SERVES 24 BALLS

INGREDIENTS

For the cauliflower quinoa ‘meatballs’

  • 1 cauliflower head, roughly chopped
  • 1 cup quinoa
  • 3/4 cup breadcrumbs
  • 2 garlic cloves, minced
  • 1-2 tbsp flour (whole wheat, all purpose or oat)
  • 1/2 tsp dried oregano

For the buffalo sauce

  • 1/2 cup hot sauce
  • 60g unsalted butter
  • 1 garlic clove, minced
  • 1/4 tsp chilli flakes

For the blue cheese-yoghurt dip

  • 3/4 cup greek yoghurt
  • 1/4 cup blue cheese, crumbled
  • 1 garlic clove, minced
  • 2 tbsp mayonnaise
  • 1 tbsp milk
  • Juice of 1/2 a lemon
  • Ground salt and pepper, to taste

METHOD

  1. Preheat oven to 190C (375F or gas mark 5). Line a baking tray with aluminium foil and set aside.
  2. Cook the quinoa in a small sauce pot according to the packet instructions (about 12-15 minutes). While the quinoa is cooking away, steam or boil the cauliflower in a separate medium-sized pot at the same time until they are tender (about 15 minutes).
  3. Meanwhile, prepare the buffalo sauce by melting the unsalted butter in a heat-proof bowl, in the microwave (or over a stove as well). Once melted, stir in the hot sauce, minced garlic, and chilli powder. Set aside.
  4. Combine the yoghurt, blue cheese, mayonnaise, garlic, milk, and lemon juice in a medium-szied bowl and whisk together until combined but still chunky. Season with salt and pepper. Cover and refrigerate until ready to serve.
  5. Once the quinoa is done cooking, turn the heat off and set aside. Once the cauliflower is done cooking as well, drain (if boiled) and place half the cauliflower, along with the minced garlic, into the food processor or blender and pulse for about 10-15 seconds. Remove and transfer the cauliflower into a large bowl before adding the second half of cauliflower to the food processor/blender and repeat the process.
  6. Stir in the cooked quinoa, breadcrumbs, dried oregano, and half of the buffalo sauce together with the cauliflower and then place the bowl in the refrigerator for 10-15 minutes, allowing everything to cool off a bit.
  7. After 15 minutes, remove from the refrigerator and, using your hands, form the mixture into golf ball-sized balls (or smaller, depending on your preferred size), placing the balls directly onto the prepared baking tray. If the mixture is too wet, add additional flour, 1 tablespoon at a time as needed.
  8. Drizzle about a tablespoon of olive oil over the balls and bake for 15-20 minutes and golden brown and crispy on the outside.
  9. Once done, remove from the oven, Pour a small amount of the rest of the buffalo sauce over the top of each ball, making sure they all get covered with the sauce but without drowning them otherwise they will get soggy.
  10. Serve with the blue cheese-yoghurt dip and share with family and friends!

Buffalo Cauliflower & Quinoa "Meatballs"

Buffalo Cauliflower & Quinoa "Meatballs"

Buffalo Cauliflower & Quinoa "Meatballs"

BON APPÉTIT

– Ally xx

myTaste.com

Cranberry Vanilla Energy Bites

Cranberry Vanilla Energy Bites

Hello Everyone! Hopefully tonight’s recipe will be able to get your brains going to have a guess on what the theme for December on Amcarmen’s Kitchen is. Like I said in the previous post, it may be obvious to some after this, or maybe you’ll have to wait until next week to make the connections. My best friend Jialing actually planted the idea in my head, and when I came up with the final theme, even she was excited to know that I’d be doing this for December. I’ll give you guys a slight clue – it definitely is Christmas-related.

Cranberry Vanilla Energy Bites

Anyway, I’m going to keep tonight’s post short and only because I don’t have a long-winded back story to tell about who I came across these energy bites in the past and here I am having a go at my own version – because that isn’t the case here. I merely just browsed the World Wide Web in search for recipes that I could try out specifically for this month’s theme. I came across this recipe on Pinterest a while back, and I thought I’d give this one a go seeing as it is simple (that’s right, only 5 ingredients!) to make and deliciously energising indeed! Just a heads up, they may be a bit too sweet for some who are intolerant to anything sweet because of the dates, but nonetheless, they are pretty darn good! Check out the original recipe by Danae over on Recipe Runner.

Cranberry Vanilla Energy Bites Ingredients

PREP TIME 15 MINS | COOKING TIME  | MAKES 12 BALLS

INGREDIENTS

  • 1/2 cup dried cranberries (unsweetened if you want them to be paleo)
  • 1/2 cup medjool dates (about 6-7 dates), roughly chopped
  • 1/2 cup raw almonds (or almond meal)
  • 1/2 cup raw cashews
  • 1/2 teaspoon vanilla extract
  • Pinch of salt

METHOD

  1. Using a high-speed blender or a food processor, pulse the almonds and cashews and almonds until they are finely ground, but be careful as to not turn them into nut butter.
  2. Add in all the remaining ingredients to the blender or food processor and blend/pulse until everything starts to come together. When needed, scrape down the sides of the blender or food processor several times, and then add up to 2 tablespoons of water to the blended mixture. You may need to remove the mixture from the blender or food processor and place it into a bowl, mashing it together with your hands or a spatula.
  3. Form the mixture into approximately 12 balls at about a tablespoon each.
  4. Store the energy bites in an airtight container in the refrigerator or freezer. Enjoy as a snack when you feel that afternoon slump starting to kick in!

Cranberry Vanilla Energy Bites

Cranberry Vanilla Energy Bites

BON APPÉTIT

– Ally xx

myTaste.com

Svenska Köttbullar (Swedish Meatballs)

Svenska Köttbullar (Swedish Meatballs)

Hello Everyone! We’re finally into the last month for 2016! Gosh how time flies by so quickly! Anyway, I won’t go into another sentimental tangent on how the year is almost up and all that jazz, and I’ll just get right into it! Like I said on Instagram, I won’t reveal what the theme for December will be for Amcarmen’s Kitchen – instead I will have you guys guess what the theme is. You don’t have to guess right away, and I think the theme will only be a little more clear by the second or third week.

Svenska Köttbullar (Swedish Meatballs)

So, I first came across this dish, not through my travels to Sweden, but through the many adventures I’ve had when, as stereotypical as this will sound, visiting IKEA. Yes, IKEA – whether it was when I was still living in Australia, or travelling through Singapore, you’d definitely see me at their food court for either lunch, or dinner, depending on the time of day I visited there, with a plate of köttbullar. If you were to ask ten different Swedes about making köttbullar, you will most indefinitely get ten different answers. Sure they would be similar in some way or another, but most Swedes will have their own way of making köttbullar and so everyone will use a bit more or a bit less of this or that ingredient. Apparently, köttbullar is Sweden’s national dish, which some do question as it is not a particular exciting dish that speaks for the whole Swedish cuisine. Nonetheless, I think most real Swedes would agree that these meatballs are pretty good.

Svenska Köttbullar (Swedish Meatballs)

I can’t get over how deliciously amazing the gravy that accompanied my meatballs were. I think I probably ate half of it by the time every element for the dish was done, and I definitely drowned my balls in the gravy after. In southern Sweden many people prefer their ground meat with a little more fat, but the further north you go, the less pork you will find in the meatball mixture. However, bread or crumbs allowed to swell in milk are as important as the lingonberries on the side. They give Swedish meatballs their special soft consistency. I had some leftover herbed focaccia bread lying in the fridge from the week before and so I decided to cut them up into about 1cm cubes, drizzle them with a bit of olive oil and then toast them in the oven until browned and crisp. I then added the toasted bread into a food processor and pulsed until crumbed. Before we dive into the recipe, please check out the original recipe for Classic Swedish Meatballs over on BBC Good Food.

Also, you may notice that once you go through to the recipe that I mentioned about ‘blanching’ the balls before browning them. The reason why I decided to blanch the balls first is to maintain it’s round shape and therefore I shall not encounter a lifetime of sadness when it come to browning them after. I cannot express how much sadness I’ve experienced when making meatballs. Every time I fry them, the go flat on one side, and of course, when I try to flip them, they somehow get ruined, and when that happens, my day is ruined.

Svenska Köttbullar (Swedish Meatballs) Ingredients

Svenska Köttbullar (Swedish Meatballs)

PREP TIME 15 MINS | COOKING TIME 20 MINS | MAKES 20 MEATBALLS*

*My balls were about slightly smaller than a ping pong ball and I managed to make 20 of them. You could probably make 30-35 balls if they are slightly smaller than mine.

INGREDIENTS

For the meatballs

  • 400g lean pork mince
  • 1/3 cup bread crumbs
  • 1 large free range egg, beaten
  • 1 small brown onion, finely chopped
  • 1 tbsp finely chopped parsley, plus extra to serve
  • Ground salt and black pepper, to taste

For the gravy

  • 3 cups beef or pork stock**
  • 50g unsalted butter
  • 3 tbsp plain flour
  • Ground salt and black pepper, to taste

Optional to serve

  • Chunky mashed potatoes
  • 2-4 tbsp of Lingonberry (otherwise red currant, raspberry, or cranberry jelly), less or more to taste

**I made my own pork stock by boiling a few pork bones with black peppercorns, salt, and dried bay leaves.

METHOD

  1. In a large bowl, combine all the ingredients for the meatballs and mix until well incorporated. Then, form the pork mince mixture into meatballs to the size that you want.
  2. Bring a large pot of salted water to a boil and the drop each meatball in one by one and ‘blanch’ for about a minute to a minute and a half before removing them from the pot. You may need to do this in batches if your pot is not big enough. Once removed, drain.
  3. Heat a large frying pan with about 2 tbsp of olive oil over medium-high. Add in the meatballs and brown all over, about 5 minutes altogether. Again, you may need to do this in batches. Once browned, transfer to a dish lined with a paper towels to absorb any excess oil from the meatballs.
  4. To make the sauce/gravy, first make a roux by heating the butter in the same frying pan on medium heat until melted and slightly browned. Then, slowly whisk in the flour, stirring until smooth. Continue to stir for several minutes as this allows the flour mixture to cook, until the roux is the colour of coffee-with-cream.
  5. When the roux has cooked to a lovely shade of light brown, slowly add the stock to the roux, stirring as you add the stock. The stock will sputter at first and the roux may seize up, but keep adding the stock slowly and keep stirring. Eventually the sauce will loosen and become silky.
  6. Serve the meatballs on a bed of chunky mashed potatoes, topped with the gravy and an optional of lingonberry on the side. Enjoy with family and friends!

Svenska Köttbullar (Swedish Meatballs)

Svenska Köttbullar (Swedish Meatballs)

BON APPÉTIT

– Ally xx

myTaste.com

White Chocolate Snickerdoodle Blondies

White Chocolate Snickerdoodle Blondies

Hello Everyone! Wow! I can’t believe that it’s the last day of November today! Once again, another month managed to slip right under our noses! Christmas is nearing, and in the blink of an eye, it will be 2017! Anyway, I’m not going to give a brief recap of my year just yet – I’ll probably save that for sometime in December – I’ll just give you a recap of my week as it was indeed a busy one! Firstly, I have been home alone for the past 5 nights as my Mom and my sister flew off on Friday to visit the other sibling over in Singapore. Secondly, I had two back-to-back events that I helped with the event decorations for, one was Phantom of the Opera themed (but very minimal/close to none on the decorations that actually resembled anything from Phantom of the Opera), and the other was an Alice and Wonderland/Enchanted Forest themed Staff Appreciation Night. I had loads of fun designing the initial proposal for the decorations, and of course helping with execution of the decorations onsite.

My next task, in terms of event decoration is to propose and present to the client, the theme ‘The Chronicles of Narnia; The Lion, The Witch, and The Wardrobe’ for a corporate 25th Anniversary Dinner coming up in mid-January. The presentation will be on Friday and I’m both excited and nervous at the same time; fingers-crossed that they will like my idea and that they see the underlying meaning of the chosen theme. Other than work, I scored VIP tickets from my Boss to watch Coreyah and JinJo Crew perform at The Rhythm of Korea on Saturday night. It was a free event hosted by the Korean Embassy here in Brunei as a sort of launching of their moving in to their new Embassy which will happen sometime in December if I’m not mistaken – so yes, this was an early celebration for the general public.

White Chocolate Snickerdoodle Blondies

A cross between a chewy blondie and moist butter cake, these blondies are studded with white chocolate chips and ribboned with sweet cinnamon sugar! — Sally’s Baking Addiction

But enough of the long-winded, personal life stories and let’s move on to tonight’s recipe shall we? So, I think you guys can probably tell that this is another recipe followed and adapted from none other than Sally’s Baking Addiction. I honestly think that the theme for this November shouldn’t have been ‘Cooking with Chocolate’ but rather Sally-themed instead haha! Anyway, I don’t actually have much to say for this recipe as it was kind of just a I-need-to-bake-something-for-my-blog-but-what-should-I-bake kind of moment early on the Sunday morning before I went grocery shopping to make sure I had all the ingredients. I came across this recipe while browsing and I thought that it’d be interesting to make.

White Chocolate Snickerdoodle Blondies Ingredients

PREP TIME 15 MINS | COOKING TIME 30-35 MINS | SERVES 12-15 BARS

INGREDIENTS

For the blondies

  • 2 & 1/3 cups plain flour
  • 1 cup white chocolate chips
  • 3/4 cup granulated sugar
  • 3/4 cup packed light brown sugar
  • 3/4 cup unsalted butter, softened to room temperature
  • 2 large free range eggs, room temperature
  • 2 tsp vanilla extract
  • 1 & 1/4 tsp baking powder
  • 1/2 tsp salt

For the cinnamon-sugar filling

  • 1/3 cup granulated sugar
  • 2 tsp ground cinnamon

METHOD

  1. Preheat oven to 180C (350F or gas mark 4). Line a 9×9, 11×7, or 9×13 inch baking pan with parchment paper, leaving enough overhang on the sides to easily pull the blondies out of the pan and cut once done.
  2. Combine the plain flour, baking powder, and salt in a small bowl, then set aside. Beat the unsalted butter on high speed using a hand or stand mixer fitted with a paddle attachment, in a large bowl. Beat for at least 1 minute until creamy, and then add in the granulated and brown sugars, beating for 2 full minutes on high speed until light and fluffy. Scrape down the sides and bottom of bowl when needed.
  3. Beat in the eggs and vanilla on high speed, scraping down the sides and bottom of the bowl as needed. On low speed, beat in dry ingredients until just combined. With a large wooden spoon or rubber spatula, fold in the white chocolate chips.
  4. Spoon half the batter into pan. It will be a relatively thin layer, but try to spread it across the pan evenly. Combine the cinnamon and sugar and sprinkle on top of them bottom layer, reserving 1 tbsp for the top. Spread the remaining batter over top. Some of the cinnamon-sugar will mix into the top layer as you spread it, which is fine. Sprinkle the top with remaining cinnamon-sugar.
  5. For a 9×9 or 11×7 baking pan, bake for 30-35 minutes or until golden brown and a toothpick inserted in the centre comes out clean. For a 9×13, bake 22-26 minutes or until golden brown and toothpick inserted in centre comes out clean. Cool completely for about 1 hour.

White Chocolate Snickerdoodle Blondies

These bars can be made 3 days in advance and kept in an airtight container at room temperature until ready to serve. Bars freeze well, up to 3 months. Simply thaw overnight in the refrigerator and bring to room temperature before serving. Leftover bars can be stored in an airtight container in the refrigerator or at room temperature for up to 1 week.

BON APPÉTIT

– Ally xx

myTaste.com

White Chocolate & Macadamia Red Velvet Cookies

White Chocolate & Macadamia Red Velvet Cookies

Hello Everyone! I don’t think I ever mentioned it in the past 3 posts for the month of November, but I’m pretty sure that most of you who follow my blog are smart little ducklings and have already probably figured out that the theme for Amcarmen’s Kitchen this month is all about Procrastibaking – well, really, not really. The theme isn’t just centred around baking, but it is most definitely about baking with… CHOCOLATE! How did I come up with this month’s theme you ask (well if you didn’t ask then read ahead hehe), I wanted to bake a Chocolate cake for my birthday this month, and I had two chocolate-linked recipes sitting in my archives waiting to be post up on my blog, and so… Baking with Chocolate came into play!

Or you could probably just say that I’ve been lazy and haven’t been in the mood to cook on Sundays for the past few weeks – which is partially true. It’s not that I was being lazy – it was more like I wanted to have a Sunday to myself doing whatever I want, meaning doing nothing actually *cheeky grin* instead of slaving away in the hot kitchen the whole afternoon. I’ve probably mentioned this in a post before, but for those of you who don’t know, I work 6 days a week from 8am to 5pm. By Sunday, all I want to do is just sit back and do nothing, however, if I did do that, I wouldn’t be able to keep up with Amcarmen’s Kitchen any longer.

White Chocolate & Macadamia Red Velvet Cookies

Anyway, enough of my rants, let’s move on to tonight’s recipe – an adaptation from none other than my favourite baker out there, Sally’s Baking Addiction. You can find the original recipe for these cookies over on her blog. If you went over to visit her blog, you’d notice that they are actually Red Velvet Chocolate Chip Cookies, but I decided to do a little twist and use white chocolate chips instead and pair them with macadamia nuts! The perfect combination in my opinion! I’d like to take this opportunity to share a recipe by a friend of mine, also known as Brendon The Smiling Chef, for his “I Love You This Much” Giant Red Velvet Cookie. I remember the time we met up and cooked together for my Auguest series last year, Brendon baked a Giant Chocolate Chip Cookie from the left over cookie dough he had from his “Cookies & Cream” inspired dessert. I think I might bake a Giant Cookie for next week actually!

White Chocolate & Macadamia Red Velvet Cookies Ingredients

White Chocolate & Macadamia Red Velvet Cookies

PREP TIME 1 HOUR 10 MINS* | COOKING TIME 10 MINS | SERVES 18 COOKIES

*Includes chilling time

INGREDIENTS

  • 1 & 1/2 cups + 1 tbsp plain flour, spooned and leveled
  • 1 cup semi-sweet white chocolate chips (plus a few extra for after baking)
  • 3/4 cup packed light (or dark) brown sugar
  • 1/2 cup raw macadamia nuts, roughly chopped
  • 1/4 cup granulated sugar
  • 1/4 cup unsweetened natural cocoa powder
  • 115g unsalted butter, softened to room temperature
  • 1 large free range egg, room temperature
  • 1 & 1/2 tbsp red food colouring
  • 1 tbsp milk
  • 2 tsp vanilla extract
  • 1 tsp baking soda
  • 1/4 tsp salt

METHOD

  1. In a medium-sized bowl, whisk together the flour, cocoa powder, baking soda, and salt together until incorporated well. Set aside.
  2. In a large bowl, beat the softened butter using a handheld or stand mixer with a paddle attachment on high speed until creamy, about 1 minute. When necessary, scrape down the sides and the bottom of the bowl. Add in the brown and granulated sugar, beating until combined and creamy, about another minute. Then, beat in the egg, milk, and vanilla extract, scraping down the sides and bottom of the bowl as needed. Once mixed, add the food colouring and beat until combined.
  3. Turn the mixer off and pour the dry ingredients into the wet ingredients. Turn the mixer on and slow beat on low speed until a very soft dough is formed. Beat in more food colouring if you’d like the dough to be a brighter red.
  4. Add in the white chocolate chips, and roughly chopped macadamia nuts and use a spatula to combine with the dough mixture. At this point, the dough will be sticky.
  5. Cover the dough tightly with aluminum foil or plastic wrap and chill for at least 1 hour (and up to 3 days). Chilling is mandatory.
  6. Preheat the oven to 180C (350F or gas mark 4) (177°C). Line two large baking trays with parchment paper or silicone baking mats and set aside.
  7. Scoop about 1 and 1/2 tablespoons of dough and roll into a ball, as pictured above. Place 9 balls onto each baking sheet and bake each batch for about10-11 minutes. The cookies may have only spread slightly and that’s ok. Simply press down on the warm cookies to slightly flatten and form crinkles. Stick a few chocolate chips into the tops of the warm cookies (optional and only for looks).
  8. Allow the cookies to cool on the cookie sheet for 5 minutes before transferring to a wire rack to cool down completely. Enjoy and share with family and friends!

White Chocolate & Macadamia Red Velvet Cookies

White Chocolate & Macadamia Red Velvet Cookies

BON APPÉTIT

– Ally xx

myTaste.com

Double Chocolate Crinkle Cookies

Double Chocolate Crinkle Cookies

Hello Everyone! For those who follow me on my personal social media pages will most definitely know that I’ve probably celebrated my turning of a quarter of a century one too many times that I guess an average person would celebrate their birthday. To quote a friend “[I] only turn 25 once” I think she meant that in a way that I probably had too many celebrations – but of course I’m going to take that as yes, I only turn 25 once so I’m going to go all out and use my birthday as an excuse to eat all the cake and food without feeling guilty *cheeky grin* Okay, so it’s been exactly a week now since I turned 25 so I guess it’s only fair to put a cease to the celebrations and start hitting the gym to burn off all the cake (3 cakes in total to be honest).

That aside, tonight’s recipe that I will be sharing is one that I whipped up last year for Christmas. I baked a batch of soft, chewy Double Chocolate Crinkle Cookies long with some traditional Sugar Cookies to take to the office with me on Boxing Day, to share with my colleagues – I know right. I’m so nice. Anyway, you might realise  in the photos that the cookies may look like they have a hint of red to them – well, I tried adding a little bit of red food colouring (what I had left of it anyway) to make it look like a red velvet crinkle cookie, but I guess I didn’t have enough coloring for it to really shine through.

Double Chocolate Crinkle Cookies IngredientsOh you know – just my little owly friend that also happens to be one of my measuring spoons basking in a bowl of flour mixture.

Anyway! Before I head onto the recipe, please take the time to check out the original over on Sally’s Baking Addiction. I think I have said this before, but nonetheless, I will say it again. Sally’s recipes are definitely spot on and easy to follow. I don’t think that I’ve ever screwed up a recipe of hers when in the kitchen myself. Somewhere in the past, I attempted to bake crinkle cookies after seeing my Aunt post her cookies on her Facebook page. I followed a recipe, not Sally’s of course and they ended being a total FAIL. I was so sad because I had baked them to share with friends – which I did anyway, and I think they were just being nice and said that the cookies were ‘still’ good haha.

Double Chocolate Crinkle Cookies Ingredients

PREP TIME 3 HOURS 30 MINS* | COOKING TIME 10 MINS | SERVES 20 COOKIES

*Includes chilling time – it is highly recommended that you chill the cookie dough for at least 3 hours. The longer, the better! Chilling helps the flavors to develop, prevents spreading, and makes the otherwise sticky cookie dough easy to handle.

INGREDIENTS

  • 1 cup all-purpose flour, levelled
  • 1 cup confectioners’ sugar, for rolling
  • 1/2 cup & 2 tbsp unsweetened cocoa powder
  • 1/2 cup granulated sugar
  • 1/2 cup packed light or dark brown sugar
  • 180g Belgian dark chocolate, roughly chopped
  • 115g unsalted butter, softened to room temperature
  • 1 large free range egg, at room temperature
  • 1 tsp baking soda
  • 1 tsp pure vanilla extract
  • 1/8 teaspoon salt

METHOD

  1. Using a hand-held electric mixer, beat the butter in a large mixing bowl for about 1 minute on medium speed until completely smooth and creamy. Then, add in the granulated sugar and brown sugar, continuing to beat on medium-high speed until fluffy and light in colour. Beat in the egg and vanilla extract on high speed. Scrape down the sides and bottom of the bowl as needed. Set aside.
  2. In a separate medium-sized bowl, whisk the flour, cocoa powder, baking soda, and salt together until combined. On low speed, slowly mix into the wet ingredients until combined. The cookie dough will be quite thick. Switch to high speed and beat in the roughly chopped Belgian chocolate. At this point, the cookie dough will be sticky. Cover dough tightly with aluminum foil or plastic wrap and chill for at least 3 hours and up to 3 days. Chilling is mandatory for this cookie dough.
  3. Remove the cookie dough from the refrigerator and allow it to sit at room temperature for about 20 minutes; if the cookie dough was chilled longer than 3 hours, then let it sit at room temperature for about 30 minutes. This makes the cookie dough easier to scoop and roll.
  4. Preheat oven to 180C (350F or gas mark 4). Line two large baking sheets with parchment paper or silicone baking mats, and then set aside.
  5. Scoop and roll the dough, about 1.5 tbsp of dough each, into balls. Roll each ball generously in the confectioners’ sugar and place them on the prepared baking sheets.
  6. Bake the cookies for about 8-9 minutes. The baked cookies will look extremely soft in the centers when you remove them from the oven. Allow them to cool for 5 minutes on the cookie sheet; they will slightly deflate as you let them cool. Transfer to a cooling rack to cool completely. Once cooled, enjoy and share with family and friends!

Double Chocolate Crinkle Cookies

Double Chocolate Crinkle Cookies

Cookies stay fresh covered at room temperature for up to 1 week. Baked cookies freeze well – up to three months. Unbaked cookie dough balls (that are not coated in confectioners’ sugar) freeze well – up to three months. Coat the frozen cookie dough balls in confectioners’ sugar, then bake for about 10 minutes. No need to thaw them.

BON APPÉTIT

– Ally xx

myTaste.com

Chilli Chocolate & Cinnamon Cake

Chilli Chocolate & Cinnamon Cake

Hello Everyone! Well… Today has been quite an eventful day! For my followers who do not know, today marks my quarter of a century years young! 25 years of achievements and failures has brought me to where I am today.

Round 1 of Birthday Celebrations

My colleagues surprised me with a cake earlier this afternoon – quite funny as the whole morning they kept telling me not to expect anything because they didn’t have a surprise for me, nor did they have cake. By afternoon, my Manager called me to their department, asking me to help her with a design that I had helped her with earlier in the afternoon. Being the gullible person that I am, I went up to her, and that’s when the rest started singing Happy Birthday and brought out the cake (mini tower of cream puffs). So I’d like to take this opportunity to thank everyone in the office who greeted me today – and for the surprise!

Round 2 of Birthday Celebrations

Round 2 of celebrations began earlier tonight as well, with my Mom, Sister, and my Godmother. We had Japanese for dinner and of course, the restaurant staff sang Happy Birthday to me as they brought out the cake that I had baked for myself for my birthday – which is tonight’s recipe! Original recipe can be found over on Dish.

Dense, rich and moist with a little hint of chilli and cinnamon – everything a great chocolate cake should be, and even more delicious when served with candid pepitas. — Claire Aldous.

Chilli Chocolate & Cinnamon Cake Ingredients

PREP TIME 15 MINS | COOKING TIME 20-25 MINS | SERVES 10-12

INGREDIENTS

For the cake:

  • 200g Lindt Chilli Chocolate, roughly chopped
  • 200g unsalted butter, cubed
  • 2 large free range eggs, lightly beaten
  • 1/2 cup caster sugar
  • 2 tbsp plain flour
  • 1 tsp ground cinnamon
  • 1 tsp vanilla extract
  • 1/2 tsp salt
  • 1/4 tsp ground cayenne pepper (optional if you’d like a little more kick to your chilli chocolate cake)

For the glaze:

  • 100g dark chocolate
  • 100ml thickened cream

METHOD

  1. Preheat the oven to 170C (325F or gas mark 3).
  2. Melt the butter and chocolate in a heat-proof bowl in the microwave at 30-second intervals and stirring until the butter and chocolate has melted. Once melted, stir in the sugar and vanilla extract, setting aside to cool for 10 minutes.
  3. Once cooled, gradually stir in the eggs and then fold in the flour, salt, cinnamon, and cayenne pepper. Pour into a buttered cake tin and smoothen the top.
  4. Bake for 20-25 minutes until the centre of the cake is set but not too firm. Once done, transfer to a rack and leave to cool completely in the tin.
  5. While the cake is cooling down, get started on the glaze by melting the dark chocolate in a heat-proof bowl set over a pan of simmering water, stirring occasionally. Do not let the base of the bowl touch the water. Once the chocolate has melted, slowly add in the cream, stirring gently. Remove from the heat.
  6. Transfer the cake to a dish and pour the glass over. Finish with a light dust of confectioners’ sugar and enjoy with family and friends!

Chilli Chocolate & Cinnamon Cake

Chilli Chocolate & Cinnamon Cake

BON APPÉTIT

– Ally xx

myTaste.com

Death by Chocolate Cupcakes

Death by Chocolate Cupcakes

Hello Everyone! It’f finally November which means, other than a new theme on the blog as usual, it is also my birthday month! I’ll be 25 in exactly a week and I’ve got a few get-togethers planned with family, friends, and colleagues. I actually baked these cupcakes last year for my Manager’s birthday. The week before her birthday I shared the leftover red velvet cupcakes that I had baked for halloween with my colleagues. When I offered her the cupcakes, she told me that she didn’t like red velvet, and that chocolate was more her thing. So, my colleagues told me that I should bake her some chocolate cupcakes for her birthday. I’m not sure if she liked them, but my colleagues and I definitely did!

Death by Chocolate Cupcakes

These cupcakes  are not overly sweet, but rather deep and intense in pure chocolate flavour. They are dark chocolate cupcakes with a thick dark chocolate frosting on top and sprinkled with dark chocolate shavings. The mixture of melted chocolate and cocoa powder to make these cupcakes ultra fudgey, rich, and moist. Are you salivating yet? Well, if you aren’t then please go away – if you can’t salivate over fudgey dark chocolate cupcakes then we cannot be friends *cheeky grin*

Today is actually her birthday, and we tried to surprise her today which ended up being a massive fail. Well, it’s hard to surprise someone who already expects a surprise – my colleague was right, we should’ve just not surprised her as that would’ve been the ultimate surprise. She’ll probably get mad at us for forgetting, but then again she’ll definitely know that we didn’t forget and still expect a surprise in some way or another. Maybe that will be the plan for next year?

Anyway, Please take the time to check out the original recipe over on Sally’s Baking Addiction. Anyway, I don’t want to take you guys on a massive tangent so let’s move on to the recipe for tonight!

Death by Chocolate Cupcakes Ingredients

PREP TIME 12 MINS | COOKING TIME 18 MINS | SERVES 12 CUPCAKES

INGREDIENTS

For the dark chocolate cupcakes

  • 3/4 cup (95g) all-purpose flour
  • 1/2 cup buttermilk*
  • 1/2 cup granulated sugar
  • 1/2 cup unsweetened cocoa powder
  • 1/4 cup light brown sugar
  • 115g unsalted butter
  • 60g semi-sweet baking chocolate
  • 2 large eggs, at room temperature**
  • 1 tsp vanilla extract
  • 3/4 tsp baking powder
  • 1/2 tsp baking soda
  • 1/4 tsp salt

For the dark chocolate frosting

  • 2 & 3/4 cup confectioners’ sugar
  • 2/3 cup unsweetened cocoa powder
  • 95ml heavy cream
  • 90g unsalted butter, softened to room temperature
  • 1 tsp vanilla extract

Optional

  • Semi-sweet chocolate chips or shaved dark chocolate for decoration

*Room temperature eggs are required for this recipe. To bring eggs to room temperature quickly, put them in a glass of warm water for 5-10 minutes.

**Buttermilk is required for this recipe. If you do not have buttermilk, make your own by mixing 2 teaspoons white vinegar or lemon juice with 1/2 cup milk. Stir and let sit for 5 minutes.

METHOD

  1. Preheat the oven to 180C (350F or gas mark 4). Line a 12-cup cupcake/muffin pan with cupcake liners and set aside.
  2. For the cupcakes: Melt the butter and chocolate together in the microwave at 30-second intervals, stirring between each time until smooth. Once smooth, set aside to slightly cool. You may also melt the butter and chocolate over low heat on the stovetop.
  3. In a medium-sized bowl, combine the cocoa powder, flour, baking soda, baking powder, and salt together, and then set aside.
  4. In a large bowl, whisk the eggs, sugar, brown sugar, and vanilla together until smooth. Then, add in the cooled butter and chocolate mixture, whisking until smooth. Add half of the flour mixture, then half of the buttermilk. Repeat until everything is added, stirring until just combined; be careful to not over mix otherwise the batter will be very thick like pudding. Fill the cupcake liners about 2/3 of the way full with batter.
  5. Bake for 18 minutes, or until a toothpick inserted into the centre of the cupcake comes out clean. Allow to cool completely before frosting.
  6. For the frosting: Sift the confectioners’ sugar and cocoa powder together to assure there are no lumps, and then set aside.
  7. With a handheld or stand mixer fitted with a paddle attachment, beat the butter on medium speed until creamy – about 2 minutes. Gradually add the sifted sugar and cocoa powder mixture alternately with the heavy cream and vanilla extract. Beat on low speed after each addition. Once all added, beat on high speed until creamy and combined for at least 2 minutes. Add a pinch of salt if frosting is too sweet.
  8. Frost the cooled cupcakes and top with chocolate chips or shaved dark chocolate as desired. Cupcakes stay fresh at room temperature in an airtight container for up to 4 days. Store covered in the refrigerator is desired for up to 1 week.
  9. Share and enjoy amongst family and friends!

Death by Chocolate Cupcakes

Death by Chocolate Cupcakes

BON APPÉTIT

– Ally xx

myTaste.com

Red Wine & Rosemary Braised Lamb Shanks

Red Wine & Rosemary Braised Lamb Shanks

Hello Everyone! I know, I say this every time we come to an end of a blog series – but sometimes it actually does come to quite a bit of a shock when the realisation hits you that another month has passed by and we are that much closer to Christmas and the New Year! It really does at times make me wonder, where did the year go? How was it that it felt like only a few months ago that I was complaining about it being a long way to go before the end of the year, and suddenly in the blink of an eye it will be November soon. I also have that same feeling when it comes to the day after my birthday – where I think about how I have to wait another 364 days until I have a reason to celebrate another year of life – and now look! I’ll be 25 in exactly two weeks!

Anyway, tangent aside, tonight’s recipe has been one that I have been wanting to make for a very long time. I can’t stress enough how much it saddens me when I have such high expectations for a lamb shank dish whenever I order it off a menu. Don’t get me wrong, flavours were nice, and definitely fall-off-the-bone tender, but, my expectations dissipate when a tiny piece of lamb shank hits the table, knowing that it’s definitely not worth the price. So how do I fix this? Well, why not I buy a worthy enough size of a lamb shank that will only cost me $8.00 max. and cook it myself? Not to mention, I can throw in a whole bottle of red wine too to really bring out the flavour *cheeky grin* For my readers who aren’t from Brunei, or aren’t Muslim, you can’t find lamb shanks that have been braised in red wine here in Brunei as if not all, but most Western Restaurants here are Halal. Actually – don’t pour in the whole bottle of wine for your shanks, reserve some for a glass or two to drink while devouring the lamb!

Before I move on to the recipe, please check out the original over on Taste Australia.

Red Wine & Rosemary Braised Lamb Shanks Ingredients

PREP TIME 10 MINS | COOKING TIME 1 HOUR 30 MINS | SERVES 3

INGREDIENTS

  • 4 cups chicken stock
  • 2 cups red wine
  • 2 x 400g cans Italian diced tomatoes
  • 3 lamb shanks, french trimmed
  • 3-4 garlic cloves, minced
  • 3-4 rosemary sprigs
  • 2 brown onions, roughly chopped
  • 1 tbsp olive oil
  • Ground salt and black pepper, to taste.

METHOD

  1. Preheat oven to 170C (325F or gas mark 3). Heat the olive oil in a large flame-proof casserole dish over medium-high. Season your shanks with salt and pepper. Depending on how big your casserole dish is, cook your lamb shanks if batches if needed, for 5 minutes or until browned all over. Transfer to a plate and repeat with the remaining shanks. Set aside.
  2. Add the garlic and sauté until golden and fragrant, about 30 seconds, and then add in the onions. Cook, stirring, for 5 minutes or until the onions soften. Return the lamb shanks to the dish and pour over the red wine, deglazing the brown residue at the bottom of the pan for extra flavour. Bring to a boil, cooking for 4-5 minutes, or until wine reduces by half.
  3. Remove from heat and add the canned tomatoes and rosemary sprigs to the dish, seasoning with salt and pepper. Transfer to the oven and bake, covered, for 1 & 1/2 hours or until lamb is almost falling off the bone.
  4. Serve the lamb shanks on a generous bed of rosemary & roasted garlic chunky mashed potatoes and some pan-fried baby asparagus. Enjoy!

Red Wine & Rosemary Braised Lamb Shanks

Red Wine & Rosemary Braised Lamb Shanks

BON APPÉTIT

– Ally xx

myTaste.com