

Hello Everyone and welcome back to an all new Review Sunday! I’ve got three more places from the Philippines that I want to touch on before I start reviewing a couple of places here in Brunei. I’ve actually visited quite a number of places in the Philippines, but I feel like I haven’t had the full dining experience yet in terms of what their menu has to offer. Then there are some other places that I was thinking of writing about, but when I look back at their food, it was all too similar and nothing special really.
Anyway, what I realised when dining out in the Philippines, food is always the same no matter where I go. For example, dishes like sisig, crispy pata, kare-kare, sinigang, laing, buko pandan, leche flan, and many other classic and famous Filipino dishes, though I imagine cooked slightly different to separate themselves from others, all taste quite similar no matter where we have it. In tagalog, I would normally say “nakakasawa”, if you eat the same food over and over you will say or have that feeling nakakasawa, but maybe its because I’ve been eating in the wrong places.
Mesa caught my eye as I was roaming around SM North Edsa with my sisters while my Mom was somewhere along Quezon Avenue doing medical checkups. We were looking for new places to eat, and when a saw ‘new’ I just mean nothing like Barrio Fiesta or Gerry’s Grill – not places that we have been to over and over again every time we visit the Philippines. I had never heard or encountered Mesa in my pervious trips, and what intrigued me was the modernity and interpretation of classic traditional Filipino dishes. I was definitely intrigued when I saw Ostrich on their menu even though I didn’t have any.

SISIG: Sisig in a pouch
Savoury pork sisig wrapped in a pouch (₱190.00)
As mentioned probably in a previous review, sisig is a dish that I never fail to have whenever I visit the Philippines. I was attracted to this dish because I’ve never had sisig this way before. It was a perfect way to start out our lunch at Mesa; the pouches had a very nice golden brown finish to them, and it gave each bite a nice crunch to the sisig filling inside. It was paired nicely with a side of spicy vinegar as well.

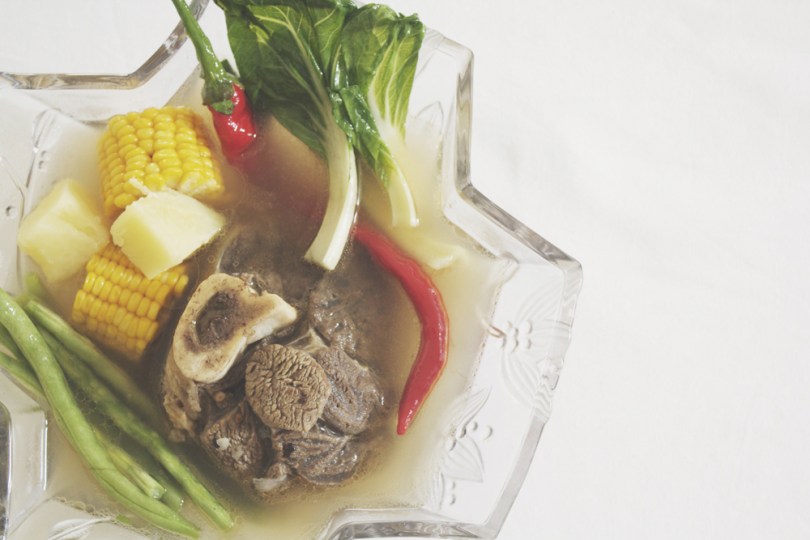
SOUP: Sinigang na baboy in guava and pineapple
Pork simmered in broth with guava and fresh pineapple; serves 4-5 (₱290.00)
What caught my eye with this dish as I was browsing the menu was the guava and pineapple part. I’ve never had sinigang with these two fruits before so I was indeed very intrigued to know how the strong flavours would blend together. It actually worked quite well to an extent. I say ‘extent’ because there was one time I had a whole heap of guava flavour in my spoon of soup and the taste overkilled. Nevertheless, an enjoyable dish.

FRESH CATCH: Hito
Crispy boneless with mangga salad (₱340.00)
The only thing that concerned me about this dish was where’s the mango salad? If you’re going to make mention “with” mango salad, I expect it to be of reasonable portioning as a side dish and not just “topped” over the fried fish. Slightly disappointing.

FRESH CATCH: Tilapia
Crispy boneless served with four sauces (₱340.00)
Well, just like the crispy boneless hito, nothing quite special about the four sauces that went with fried fish that in my opinion had not much flavour in the flesh itself. Verging on being overcooked? Quite possibly.

VEGETABLES: Laing 2 ways
Taro leaves, pork, shrimp paste, and coconut cream topped with adobo flakes, served original and crispy (₱170.00)
The taro, or also known as gabi in the Philippines, is low in saturated fat, sodium, and cholesterol, and in contrast, high in dietary fibre, vitamin E, vitamin B6, potassium, and manganese. The leaves, stems, and corms are all consumed and form part of the local cuisine, a dish known as Laing. Laing originated from the Bicol region, and no matter where you have it at, and no matter the way it is cooked, it always ends up looking like a pile of… 🙂 I’ve had my fair share from many eateries, and even home-cooked laing, and it always looks like this. But I assure you that it tastes so much better than it looks. I like how Mesa served this dish two ways – basically one with sauce and the other without. Both tasted pretty good and the adobo flakes on top added that extra flavour and crunch to the dish.

MEAT: Pinatayong Manok
“Standing” whole chicken carved right at your table (₱415.00)
Quite possibly one of the reasons why I stopped in front of the restaurant and had a look at their menu; I saw a picture of this dish and I immediately knew I wanted to eat that. It was basically a whole roasted chicken that didn’t particularly have any special taste to it in my opinion, but what I enjoyed was the way it was served to us. It was brought to our table “standing” and carved for us at our table. The chicken was cooked well and was very tender.

MEAT: Pork Binagoongan
Pan fried pork belly sautéed in shrimp paste (₱190.00)
This dish I enjoyed because I love the pairing of a well-cooked pork belly, shrimp paste, and grilled eggplant. This dish did not disappoint at all unlike the others.

DESSERT: Pandan Macapuno Rumble (₱75.00)
I was intrigued to know what modern twist they would put on a classic buko pandan dessert. Nothing special to be honest except the fact that the coconut meat was set with the jelly? That’s all that I could point out that seemed different to the classic ones I’ve had multiple times. Other than that, flavour was good.

DESSERT: Crispy Leche Flan (₱70.00)
This was the dessert that I was most looking forward to only to be disappointed in the end – small, not so crispy rolls of flan that didn’t quite taste like flan in my opinion and more like steamed egg. I was disappointed only because I had a much better first experience with crispy leche flan when I was travelling the city of Lucena just a couple of days before I visited Mesa again.
Mesa Filipino Moderne is definitely a place to visit if you want to experience modern Filipino cooking at an affordable price. I say that it is affordable because the pricing of their dishes are quite reasonable for the portions you get, so definitely a good value for money indeed. But as I have mentioned in another review before, these prices are not very affordable for the average Filipino, so I guess the value for money on a more general scale wouldn’t be so good. The food I would rate no more than a 6 to be honest – at first glance I was very excited to experience modern Filipino cuisine, but after having dined and looked back at the dishes that I’ve had, I can’t say I was left excited to go back for more. The only dish that I really enjoyed was the pork sisig in a pouch. Everything else was mediocre. Service 8 out of 10; it was exceptional nor was it bad, and the ambience is a sure 10 for me.
Now that I look back at all the dishes that I’ve had and my small disappointments with each of the dishes I ordered, I wonder how they were able to achieve the Best Food Retailer award. I may be jumping into conclusions a bit early as I’ve only tried probably an eighth of the dishes they have on offer, but if I am off to a non-promising start with their menu, I can’t be sure on how the rest will unfold if I visited a few more times and trying other dishes. Anyway, my opinion is my opinion; it may be biased, it may be not. You may agree with me, you may not, that is, if you’ve dined at Mesa.
I’m not sure if there are other restaurants that are much better at modern Filipino cuisine, but this is the first step of my journey to finding out how far we can modernise classic dishes. There is one place I have yet to visit, but have been closely following their Instagram page, and it’s called Sarsá Kitchen+Bar. I must say that their Sinigang Fried Chicken looks very enticing. Maybe on my next adventure to the Philippines I’ll be able to drag some family members over to have some eats.
Mesa Filipino Moderne
3/F SM City North EDSA, Main Building
EDSA corner North Avenue
Quezon City, Metro Manila
Philippines
– Ally xx


