Spaghetti alle Vongole

Spaghetti alle Vongole

Spaghetti alle Vongole (basically ‘spaghetti with clams’ in Italian) is one of my all time favourite seafood pasta, alongside with probably almost ALL seafood pastas out there to be honest. I cooked this up over the weekend but hadn’t found the time to upload it then, so here it is now. It is a dish that is highly popular throughout the central regions of Italy, including Rome, as well as further south in Campania. Italians prepare the dish in two ways:

  • in bianco: with oil, garlic, parsley, and sometimes a splash of white wine; or
  • in rosso: like the former but with tomatoes and fresh basil, the addition of tomatoes being more frequent in the south.

Cheese and cream are sometimes added to the dish in most Italian-American recipes. However, these ingredients are quite alien to the spirit of Italian cooking. In the true spirit of Italian cooking, cheese is never added to this dish, accentuating the simple flavours of the clams and of good quality olive oil.

PREP TIME 5 MINS | COOKING TIME 10 MINS SERVES 2-3

INGREDIENTS

  • 1kg NZ Westhaven Vongole
  • 300g angel hair pasta
  • 2 cloves garlic, crushed and finely chopped
  • 2 red bird’s eye chill, sliced
  • 1 punnet (250g) cherry tomatoes, quartered
  • 1/4 cup extra virgin olive oil
  • 3/4 cup fish stock*
  • 3/4 cup Chardonnay
  • 1/2 cup fresh Italian parsley, chopped
  • Ground salt

*I would usually go for clam juice, but I couldn’t find any at the supermarkets.

METHOD

  1. In a large saucepan over medium heat, sauté the garlic and chillies in the olive oil until fragrant and the garlic is golden brown, about a minute. Then add the clams, fish stock, and wine. Cover and simmer over medium heat, shaking the pan occasionally until all the clams open. Add in the cherry tomatoes and remove from the heat.
  2. While the clams are simmering, bring a large pot of salted water to a boil. Add the pasta and cook, stirring frequently, until al dente (read packet instructions, 4-5minutes for angel hair pasta). Drain the pasta and transfer to the saucepan and toss well with the clam sauce and parsley. Serve immediately.

Spaghetti alle Vongole

BON APPÉTIT

– Ally xx
myTaste.com

Banana, Blueberry & Peanut Butter Teddy Toasts

Banana, Blueberry & Peanut Butter Teddy Toasts

Good afternoon everyone! Maybe still morning for others, even maybe early morning or late evening. Today’s post is very simple, no method needed really. I made this a while back and was inspired by an Instagram photo that my sister tagged me in. A creative fix to shake away the Monday Blues! That’s really all I have to say today 🙂

PREP TIME 5 MINS | COOKING TIME  SERVES 1

INGREDIENTS

  • 3 slices of Wholemeal Omega-3 Chia Bread, from Baker’s Delight
  • 1 large banana
  • 1 punnet (125g) fresh blueberries
  • Crunchy peanut butter
  • Honey & maple syrup blend, to drizzle

I just realised when writing the ingredient list out, how stupid it looked when I first wrote “9 slices of bananas” and “9 blueberries” 😛

Banana, Blueberry & Peanut Butter Teddy Toasts

BON APPÉTIT

– Ally xx
myTaste.com

Oatmeal Shortbread with Raspberry Compote

Oatmeal Shortbread with Raspberry Compote

Mother's Day 2014“We laugh, we cry, we make time fly. We are best friends, my Mom and I.” – (The photo above was taken back in December during our family trip to Thailand at the Chiang Mai Zoo, it was the most recent one I could find of the both us where we actually looked decent).

Happy Mother’s Day to all mothers and moms-to-be out there in the world, especially to a woman so dear to me, Mama G. Thank you for always being there for me. I should tell you how much a love you every single day, but I don’t. So here it is: I LOVE YOU.

So for today’s recipe, I decided to make oatmeal shortbread with a raspberry compote to commemorate Mother’s Day. If you have read my previous post last week on my Mother’s Birthday, you’ll know that a) she’s actually in another country, 2 hours behind, and b) she’s a diabetic. So today’s recipe is diabetic-friendly, and again she won’t be here to actually eat it, but maybe next year when I’m definitely back home for her birthday and Mother’s Day, I’ll whip it up for her again. For now, she’ll just have to enjoy looking at the pictures.

Note, I followed Martha Stewart’s Oatmeal Shortbread recipe for this so please check out the original on Yummly. The original recipe uses confectioners sugar, and I went online to see if there are any substitutes for this and I came across this website: Fitday. Basically you mix an artificial sweetener, such as Equal or Splenda, and cornstarch, and grind it in a blender.

PREP TIME 5 MINS | COOKING TIME 30-35 MINS SERVES 3-4

INGREDIENTS

For the Oatmeal Shortbread

  • 1/2 cup plus 2 tbsp extra old-fashioned rolled oats (not quick-cooking)
  • 3/4 cup plain flour, levelled
  • 1/3 cup confectioners sugar substitute (see above)
  • 1/2 tsp ground salt
  • 120g unsalted butter, cubed

For the Raspberry Compote

  • 1 punnet (125g) fresh raspberries
  • 1 tbsp granulated sugar substitute (I used Equal in this case)
  • 1 tbsp fresh lemon juice
  • 1/4 tsp cornstarch

METHOD

  1. Meanwhile, combine all the raspberry compote ingredients in a small saucepan. Simmer for 10 minutes over medium-low heat, stirring occasionally. Once the raspberries fall apart and the sauce is thickened, remove from heat. Allow it to cool down to room temperature before serving.
  2. Combine the flour, sugar, salt, and 1/2 cup of the cooled oats in a food processor. Process for about 1 minute or until finely ground. Then add in the butter. Pulse until the mixture’s consistency is of a coarse meal. Transfer to an 8-inch square baking pan and press firmly into bottom. Sprinkle remaining oats on top, and press gently.
  3. Bake for about 30-35 minutes until firm and lightly browned. Using a paring knife, immediately score shortbread into squares, and then score each square diagonally into 2 triangles. Place the baking pan on a wire rack and allow to cool on a wire rack. Gently invert, and break along scored lines. Serve with the raspberry compote.

Oatmeal Shortbread with Raspberry Compote

BON APPÉTIT

– Ally xx

myTaste.com

Eggciting Herb Garden

Eggciting Herb Garden

“I was wondering why you have a carton of eggs on the ground!” said a fellow housemate while I was out back in the yard with a camera around my neck ready to photograph the above. I shall explain in detail below:

Hello everyone! Today I want to share with you a project (or part of a project I might say) that I have been working on as part of my Introduction to Ceramics course at uni. I said ‘part of a project’ only because it is actually one of the processes that my tutor demonstrated and talked about in one of our tutorials – and that process is called Slipcasting.

Slipcasting is basically a mass-production technique used in pottery especially for shapes that are not easily made on the wheel. Liquid clay (known as slip) is poured into a plaster mould and then removed one the clay is set solid. For a hollow piece, the liquid is poured out of the mould once the plaster has absorbed most of the liquid from the outer layer of the clay.

Our tutor also showed us how we can dip porous objects into slip. She demonstrated by dipping a sponge into the slip, had it fired and the result was just amazing. Basically what happens is that when the slipped object goes into the kiln at mid-fire glaze, the object burns out from the high temperatures and leaves the outer shell of the object. So you can imagine how a sponge turned out, it was so fragile and aesthetically beautiful as well.

So that’s what I did here, I completely submerged an egg carton in slip and let it to dry. I then did another coat of slip because the first layer started to crack while it was drying. I had the carton fired and it came out looking really great! I then applied layers and layers of oxide glazes (cobalt, chrome and china blue) and dipped the whole carton in a clear glaze. It was then fired again and this was the result:

Eggciting Herb Garden

I got the initial idea of slipcasting an egg carton through images I saw online while searching for inspiration for the first project for my ceramics course (which is ‘botanica’, basically nature-inspired). I saw images of egg cartons being used as planters, as well as pot holders for eggshell pots. So decided, why not make a permanent egg carton holder?

Eggciting Herb Garden

As you can see from the image above, the eggs don’t quite nicely sit in the hole. This is because when objects get fired in the kiln they tend to shrink a bit (and I’m guessing the two layers of slip ate a bit of space too). So my extra large eggs that I originally had saved could not fit at all, I had to buy new eggs that were smaller in size just so they could kind-of fit.

Eggciting Herb Garden

Hope you enjoyed reading and viewing this post. Please stayed tuned as well for when I actually finish making what I am supposed to make for my Botanica project. I will be making a set of plates inspired by water lilies and lily pads! The second project for this course is to make a vessel and I was thinking of stemming from project 1 and creating a centrepiece to tie the whole project together. So yes, look out for that in the next month and a half!

– Ally xx

Three-ingredient Pancakes

Three-ingredient Pancakes

A very good morning to all! Well, it’s like past 10am here in Sydney (almost 11am probably by the time I get this post up), but probably only just about past midnight in parts of the world, or maybe just a few hours behind/ahead depending where you are really. Anyway, today, I managed to get out of bed by 8am (I usually wake up at 8 but laze around until 9-9:30), maybe because it wasn’t as cold as the previous days that made me just want to snuggle in my thick warm blanket. Who I am kidding? I got out of bed because I was hungry and I wanted to do something about my overripe bananas sitting in the corner of my room. I then remembered a friend of mine posting a photo (probably a month ago or so) on Instagram about his ‘failed’ two-ingredient pancakes – well more like when he tried to flip it, it tore. And it was slightly burnt.

Anyway, so this magical two-ingredient pancake is gluten and dairy free – basically two eggs per large banana. But I decided to put a little twist to my two-ingredient pancake and make it my very own three-ingredient pancake (I’m pretty sure someone out there thought about it already, but who cares). I decided to add a spoonful (or two) of crunchy peanut butter to the mix. YUM. I love peanut butter, especially the crunchy ones. I also added a touch of vanilla and more than I should’ve added, ground cinnamon. I also love me some cinnamon. You can never go overboard with it – I guess?

PREP TIME 5 MINS | COOKING TIME 15-20 MINS SERVES 4 PANCAKES

INGREDIENTS

  • 1 large ripe banana, mashed
  • 2 large free range eggs
  • 2 tbsp crunchy peanut butter
  • Dash of vanilla extract
  • Dash of ground cinnamon
  • Honey & maple syrup blend, to drizzle
  • 1 tbsp vegetable oil

METHOD

  1. Add the peanut butter and eggs in a medium-sized bowl and beat together. Add in the mashed bananas, vanilla extract and cinnamon. Mix until well combined. (Tip: if you are pressed for time, use a blender to mix all the ingredients together).
  2. Heat a small pan (nonstick or cast-iron) over medium heat. Fold a sheet of paper towel in half, and moisten with the vegetable oil and carefully rub the pan with the oiled paper towel. Ladle the batter onto the pan, using the back of the ladle to spread the batter into a round shape. Cook until the surface of the pancake starts to bubble, about 2-3 minutes. Flip carefully with a spatula, and cook until browned on the underside, about 1-2 minutes more (I am actually unsure about the timings so please don’t accurately follow them, I just used my eyes and instincts to tell whether they are cooked through or not).
  3. Continue with more oil and remaining batter (makes about 4 pancakes). Serve warm, with desired toppings.

Three-ingredient Pancakes

BON APPÉTIT

– Ally xx

myTaste.com

Scallops with Bacon and Beet Purée

Scallops with Bacon and Beet Purée

Happy Tuesday everyone! Beetroot is making an appearance in today’s post (from the leftover purée I had from the Beetroot Gnocchi recipe I posted last week). So, as you all probably know if you read that post, beetroot isn’t quite to my liking and I have no valid reason as to why I don’t particularly like it. As I said, can’t quite put my finger on it, might be the taste but I honestly have no idea. However, I did not want to waste such good produce so I decided to make something that goes with beet purée, and I found this recipe online that appealed a lot to me, mainly because I love scallops and I rarely get to eat them, or even cook with them because it’s a little bit over the ‘student’ budget (but today I will make an exception).

The original recipe garnishes the dish with goat cheese, and I would’ve added the goat cheese in if I hadn’t actually forgotten about it – yeah, it’s now sitting in my fridge and I’m trying to think of a dish that can incorporate this so I don’t have to store it in the fridge for a long time and eventually forget about it and then throw it out. But enough chitter-chatter, time to get on with the recipe (check out the original recipe here)! Also, before I continue, my scallops weren’t as thick as the ones in this recipe, so it looked a bit flat on the dish for me, but nonetheless, flavour was definitely there.

PREP TIME 5 MINS | COOKING TIME 10 MINS SERVES 2

INGREDIENTS

  • 1 dozen sea scallops
  • 1/2 cup roasted beet purée*
  • 1 bacon strip (in this case I used hickory-smoked bacon), diced
  • 1/4 red onion, minced
  • 1/2 cup Chardonnay
  • 1/4 cup thickened cream
  • Ground sea salt and pepper to taste
  • Fresh Italian parsley, chopped
  • Knob of butter
  • Fresh goat cheese

*See my Beetroot Gnocchi recipe on how to roast beets if you don’t have any ready at hand.

METHOD

  1. Melt butter in a medium-sized frying pan and cook the bacon over medium-high heat until crisp. Transfer the bacon to paper towels to drain off any excess oils. Pour out any excess oil from the pan leaving a bit behind, then add in the onions and sauté over medium heat until soft and caramelised (about 2 minutes).
  2. Add the Chardonnay and boil until reduced by half, scraping up any browned bits, about 1 minute. Add the cream and beet purée. Simmer until a thick purée is formed. Season to taste with salt and pepper. Remove from the heat.
  3. Meanwhile, pat the scallops dry and sprinkle with salt and pepper. Melt a knob of butter in a small frying pan and then add the scallops and cook until they’re brown, about 30 seconds to a maximum of 45 seconds per side (they will be slightly translucent in the centre).
  4. Spoon the beet purée onto a serving plate, spreading in a circular motion. Top with the scallops, drizzling any juices from the plate over the top. Spoon small dollops of the goat cheese, and sprinkle with bacon and fresh Italian parsley.

Scallops with Bacon and Beet Purée

BON APPÉTIT

– Ally xx

myTaste.com

Persian Lunch

Persian Lunch

May the 4th be with you.

About a month ago or so (I actually cannot remember) I saw a post on the UNSW Food Lovers Society page that linked to a Facebook page called mamaCOOKoo. As intrigued as I was to know more about it, I clicked on their page and found out that they are a community that “connects amazing home cooks with hungry locals”. I then went onto their website to find out more about what they do. I read up on the story of how mamaCOOKoo came to be and found it interesting, and smart. Basically, husband and wife, both terrible at cooking, wanted to find a cost-effective solution to their troubles, and thus the birth of mamaCOOKoo, food that reminds us of home, mamas and grandmas, and their magic in the kitchen. You could register as a foodie, or as an amazing home cook. Torn between the two, I decided to sign up as a foodie as a craved for delicious home-cooked meals and mainly because I am curious to know about and experience the different cuisines out there in my area. I mean, yeah my cooking is good, but I don’t know about the ‘amazing’ part, just yet.

So about 2 weeks ago I got an email from Rumana, the founder of mamaCOOKoo, inviting me to eat Persian food. When I read the menu, I was on board immediately. Also, I’ve never really had Persian food before so I was really interested to taste authentic home-cooked Persian food. I feel that if you really want to experience a new cuisine, authentic, home-cooked is always the way to go first. I feel that restaurants today, especially in Australia, rarely have that authentic taste, and is always in some way tweaked and fused with a bit of a western touch. The really authentic restaurants are often difficult to find as well.

I got to experience authentic, home-cooked Persian food today and I definitely have no regrets.The food, AMAZING. And of course the people that we shared the meal with were also amazing. I invited my fellow food buddy Jialing and her boyfriend Zargham. We met Rumana and her husband Nilesh, Aadil and of course Arash who was our home cook for the day. We also got to know his wife who came in just as we were about to have dessert (not Persian, but still amazing with the ‘scotch-butter’ sauce). Lots of fun talking about random things I might add, from experiences with fire alarms, to cats and dogs (and of course which of the two were better, dogs hands down), and just all things food in general. We also got to know Arash, about his inspirations and how he started cooking by learning from his mom.

Here are some shots of the food that we had today:

Persian Lunch: Mirza Ghosayme
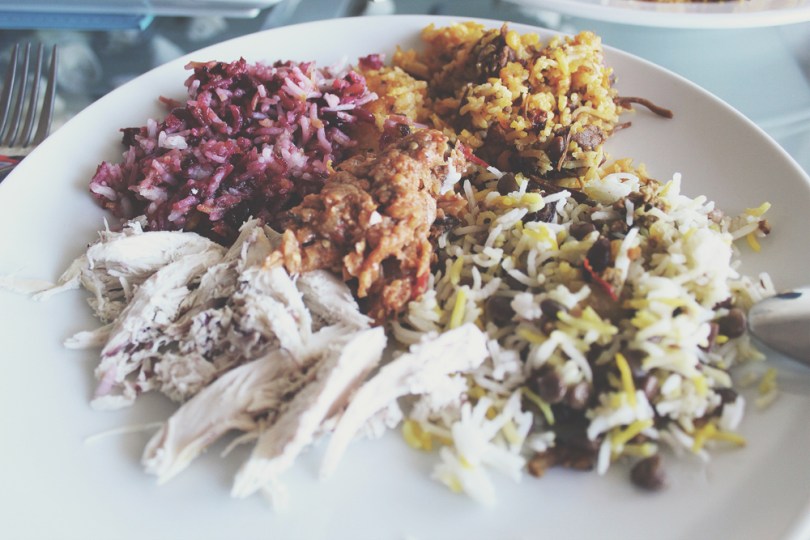
Mirza Ghosayme – Smoked bbq eggplant with eggs, garlic and tomatoes; this was a winner for me! I could just eat this all day, everyday!

Persian Lunch: Albaloo Pollo
Albaloo Pollo – Sour cherry rice; I am generally not a fan of cherries (probably scarred from those horrible preserved cherries in a jar), but this changed my view on cherries! Such a creative and vibrant dish and definitely something I’ve not seen in restaurants before!

Persian Lunch: Adas Pollo
Adas Pollo – Lentils, sultana, nuts (almond, pistachio) and rice; again, sultanas aren’t my thing but it felt like it wasn’t even there, the dish was just so good. SO good.

Persian Lunch: Gaymeh Pollo
Gaymeh Pollo – Slow cooked lamb, saffron, tomatoes, split peas, potato and rice; perfection on a plate.

Persian Lunch: Fesunjun
Fesunjun – Slow cooked chicken breast with pomegranate and walnuts; so tender and YUM.

Persian Lunch: Dolmeh
Dolmeh – Eggplant and capsicum stuffed with mushrooms, beans and rice, cooked in a tomato and tarragon sauce; just WOW.

Persian Lunch: Poached Pear with a 'scotch-butter' sauce and a dollop of cream
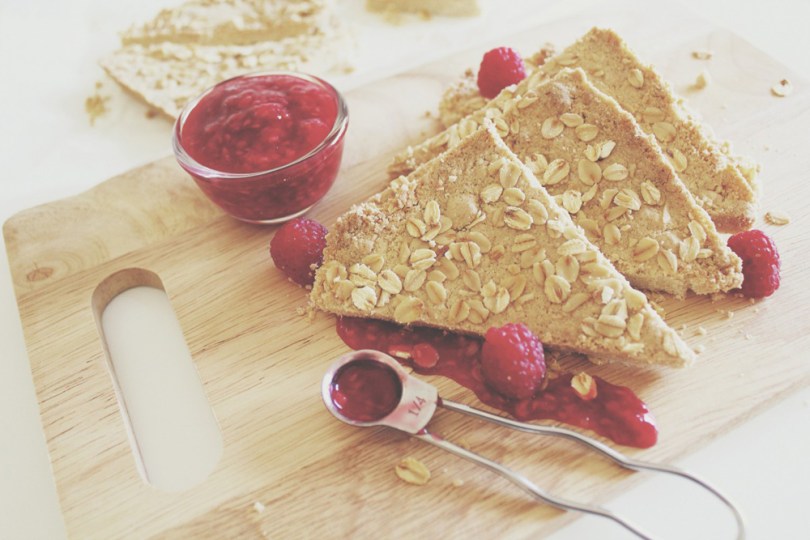
and lastly our not-so-Persian dessert (more French-inspired), Poached Pear with a ‘scotch-butter’ sauce and a dollop of cream; scotch-butter is in fact just butterscotch sauce, but Arash calls in scotch-butter because he couldn’t pronounce it at first. We love us some scotch-butter!

Overall, an amazing experience, both the food and the company. I’m glad that I came across mamaCOOKoo and I’m glad that they have started up this community. The only downside to this is that I probably will have to start running/walking again after such a full-on breakfast/lunch/dinner all in one go (I didn’t have breakfast because I believed that it would ruin my Persian lunch experience, and I was obviously too full to have dinner afterwards). But hey, if you have not experienced this feeling before, then I have news for you. You are NOT a true foodie at heart.

Also, if you are based in NSW, you can order the food that you see in this blog if you don’t have time to cook, or don’t like to cook at all, and are after a nice home-cooked meal. You can also order food for parties! I recommend that you register with mamaCOOKoo so you can find out more about home cooks around your area. Or hey! If you are an amazing home cook then do get in touch with Rumana! Links below:

– Ally xx

Beetroot Gnocchi

Beetroot Gnocchi

Yesterday (30th April) was the 10-year anniversary of the iconic and always quotable click flick Mean Girls. I cannot even begin my obsession over this movie (okay, I’m not that obsessed, I just love it so much that I can quote it all day long). Leading up to this day, I planned a Mean Girls themed party and since its anniversary fell on a Wednesday, we had to bring in a pink dish to share, and of course wear pink as to quote Karen Smith, “On Wednesdays we wear pink”. If you want to skip ahead to the recipe, scroll down, otherwise enjoy reading about my DIY Mean Girls shirt:

Mean Girls Day: DIY Shirts

I was initially going to buy a shirt off eBay but it was a bit too expensive – well that was one of the reasons, the other reasons were the font not being right, not the right shade of pink, etc. Yes, the designer in me kicked in. And then I thought, yeah I’m a designer, why not I just make my own t-shirt? And so I did! I bought a pink tank top from Esprit and can I just say what a snatch! Originally priced at $14.95 and was down to $7.95 – and then a further 50% off from that price! With the help of my lovely friend Tara who does textiles as one of her majors for her degree, she taught me how to screen print using the photo-emulsion technique. Yeap, making my own screen printed shirt was the way to go, literally costed me less than $5 but a bit of time and effort. At least it was something that I am happy with and it turned out so great! “YOU CAN’T SIT WITH US!”

Mean Girls Day: DIY Shirts


So for the pink dish that I made to share with everyone, I made Beetroot Gnocchi. I’ve never made gnocchi before so I was a bit nervous as I didn’t want to screw up and have nothing for my guests to eat, but as always, beginner’s luck was on my side once again. They turned out really well and I would like to say that they taste really good (and I’m sure they do), I’m just not a very big fan of beetroot. It’s just something about the taste of it that I can’t really put my finger on. But as I said, I’m sure they would be so fetch for beetroot lovers.

Beetroot Gnocchi

PREP TIME 30 MINS | COOKING TIME 30 MINS SERVES 5-6

INGREDIENTS

For the beetroot purée

  • 1 bunch beetroot, cleaned and scrubbed (if the greens are still attached, cut them off, wash them, and reserve them for another use such as for salads)
  • Extra virgin olive oil
  • 2 sprigs rosemary

For the beetroot gnocchi dough

  • 3/4 cup roasted beetroot purée
  • 2 cups plain flour, divided
  • 1 cup ricotta cheese
  • 3/4 cup grated parmesan cheese
  • 1 large egg
  • 1 tsp salt
  • 1/2 tsp black pepper

To garnish

  • Juice and zest of one lemon
  • Rosemary sprigs

METHOD

  1. Preheat the oven to 250C. Place the beets in a large piece of aluminium foil. Coat the beets with the olive oil and sprinkle rosemary leaves over. Feel free to use plenty of olive oil as we will then use the beet-infused oil to dress the gnocchi. Fold the foil over and crimp the sides closed. This helps keep the beets moist, and also contains all the juices. Place in the oven and roast until tender. Smaller beets take about 25 minutes while larger and older beets can take up to an hour. You can check its tenderness by piercing a fork through them. Once done, remove the beets from the oven and set aside so that it is cool enough to handle. Once cool, you can use your fingers to to rub off the their peels. Transfer the beet-infused oil into a small bowl and reserve for later.
  2. Cut the beets into chunks and place them into a blender. Blend until smooth. Take 3/4 cup of the beet purée and place it into a medium bowl. If you have any extra puréed beets, place them into a container and refrigerate. You can use them for other dishes. Stir in the ricotta and parmesan cheese, eggs, salt, and pepper. Then mix in 1 & 1/2 cups of flour (the dough can be made a day ahead, just keep it refridgerated).
  3. Place the remaining 1/2 cup of flour in a bowl. Lightly dust a baking sheet with flour. Scoop the dough into rounds and transfer to the bowl with flour. Then with the tinges of a fork, press down into the dough and then transfer to baking sheet.
  4. Working in batches, cook the gnocchi in a large pot of simmering salted water. Cook for about 2 minutes or until when the gnocchi starts to float to the surface. Cook the gnocchi for a further 1 & 1/2 minutes longer. Then, using a slotted spoon, transfer gnocchi to a serving dish. Drizzle with the beet-infused oil and top with lemon zest, a few squeezes of lemon juice and fresh rosemary leaves.

Beetroot Gnocchi

Beetroot Gnocchi

BON APPÉTIT

– Ally xx

myTaste.com

Diabetic-friendly Chocolate Lava Cake

Diabetic-friendly Chocolate Lava Cake

Happy Birthday Mom!
Here’s to another year. Happy Birthday to the strongest woman I know; my chef, my role model, my bestfriend, my queen, Mama G. Thank you for making me into the person that I am today. Thank you for supporting me in my decisions. Thank you for being kind and generous to my sisters and myself. Thank you for feeding me and most of all thank you for teaching me how to cook! Thank you for everything. I love you ❤

Today (May 1st) as you can see, is my mother’s birthday. Unfortunately for the past four years, I have not been able to celebrate with her and the family back home being away for university. But today I decided to bake her a cake, a chocolate lava cake. A diabetic-friendly chocolate lava cake. For her birthday. Even though she’s not here to eat it.

I initially looked at this recipe by theurbanbaker but changed the portions slightly to make 2 chocolate lava cakes (I had to eat them all in the end since my Mom isn’t actually here to eat it with me, and 4 seemed a bit too much to handle for me).

Diabetic-friendly Chocolate Lava Cake

PREP TIME 10 MINS | COOKING TIME 6-7 MINS | MAKES 2 CAKES

INGREDIENTS

  • 3 tbsp unsalted butter, plus extra for greasing the ramekins
  • 50g Nestlé 70% cocoa dark chocolate for cooking, chopped
  • 1 large egg
  • 1 egg yolk
  • 1 tbsp granulated sugar substitute (in this case I used Equal)
  • 1 tsp plain flour
  • Unsweetened cocoa powder for dusting

METHOD

  1. Preheat oven to 230C. Grease the ramekins with room temperature butter and light dust with sifted cocoa powder.
  2. Add the chocolate and butter to a small bowl. Melt in the microwave for about a minute. Stir until smooth.
  3. In a medium bowl beat the egg, egg yolk and sugar substitute together until lightened in colour and thickened. Add the chocolate mix and stir until smooth and combined. Stir in the flour and divide between the ramekins.
  4. Bake for about 6-7 minutes. The sides will be cooked but the centre will be soft.
  5. Invert onto a plate and wait 10 seconds before sliding the ramekin off. The cake will fall into place. Light dust with confectioners sugar, garnish with a strawberry and serve with a glass of chilled St. Andrew’s Pink Moscato (optional).

Diabetic-friendly Chocolate Lava Cake

BON APPÉTIT!

– Ally xx

myTaste.com

Big Breakfast for One

Big Breakfast for One

The most wonderful thing about life when it comes to food is breakfast. I always look forward to breakfast, but I think 90% of the time I actually go without having a proper breakfast, or no breakfast at all – which does sadden me a bit. This is either because I get up too late for breakfast and just skip to brunch, or when I do get up early, I’m rushing off to Uni and usually grab a banana or whatever fruit I have lying around on my way out (which also rarely happens so I just end up waiting until class is over and then packed left-over lunch it is).

What makes me happy though is that I can have Breakfast for Lunch or Breakfast for Dinner. Breakfast all day everyday (please excuse my apparent over-excitement over breakfast). Today, I had my breakfast for lunch, and man it was so good. Who doesn’t love bacon and eggs for lunch?

Big Breakfast for One

PREP TIME 5 MINS | COOKING TIME 10-15 MINS SERVES 1

INGREDIENTS

  • 1 slice of wholemeal bread, toasted, buttered & cut diagonally in half
  • 2 slices of gourmet tomatoes, grilled
  • 2 fresh free range eggs at room temperature, poached
  • 3 slices of rindless bacon, grilled
  • Handful of loose leaf baby spinach, wilted
  • 1 tbsp white vinegar
  • Knob of unsalted butter
  • Ground salt and pepper to taste

METHOD

Poaching the eggs:

  1. Bring small saucepan of water to the boil over medium-high heat, then reduce the heat to low-medium – the water should be just simmering. Add in the vinegar and stir.
  2. Crack one egg into a small bowl and quickly, but gently pour it into the water. Repeat with the other egg. A really soft poached egg should take around 2 minutes, but if you want it a bit more firm, it will take about 4 minutes. To check if they’re cooked right, carefully remove the egg from the pan with a slotted spoon and give the yolk a gentle push (you can tell just by your instincts if it is under or overcooked – or perfect)!

I honestly think that the rest is pretty self-explanatory.

Big Breakfast for One

BON APPÉTIT

– Ally xx

myTaste.com