Strawberry & Mascarpone Dessert Pizza

Strawberry & Mascarpone Dessert Pizza

Hello Everyone! For the month of February, I’ll be sharing some sweet dishes to celebrate the month of love! Though in my opinion, I believe love should be celebrated every day. No, I don’t mean that you should buy gifts and whip up something special in the kitchen every single day, but you should always make your significant other feel loved, whether big or small the gesture.

Strawberry & Mascarpone Dessert Pizza

For tonight’s recipe, forget chocolate dipped strawberries. Here’s a dish that takes the classic combination of Strawberries and Chocolates to the next level and is sure to impress your significant other for Valentine’s Day. I originally had a different recipe planned for tonight, but I was inspired by someone special to make this dessert pizza and share it with you guys.

Also, check out this recipe that I made a couple of years back if you wish to try out a different take on a berry dessert pizza: Nutella & Mixed Berries Pizza.

PREP TIME 10 MINS* | COOKING TIME 10 MINS | SERVES 3-4

* When you plan to tackle this recipe, make your dough ahead of time as needs to be refrigerated overnight before using.

INGREDIENTS

  • Classic New York Style Pizza Dough Recipe
  • 2 punnets (600g) fresh strawberries, washed, hulled, and sliced
  • 250g Mascarpone Cheese
  • 1/2 cup balsamic vinegar
  • 1/4 cup nuts, roughly chopped
  • 5 tsp Nutella
  • Handful of fresh basil leaves

METHOD

  1. Preheat oven to 220C (245F or gas mark 7). Place your pizza stone in the oven as well to heat it up.
  2. Roll out your dough to a circle about the same size as your pizza stone on a lightly floured surface as thick or thin as you want. Transfer the rolled-out dough onto a sheet of parchment paper. This will easily help you transfer your pizza onto the preheated stone.
  3. Brush around the edges with a little bit of water, then spread a thick wall of Nutella all the way around the edges. Fold, or roll the edges over the wall of Nutella and seal it in by pressing down on the damp dough to form a stuffed crust.
  4. Carefully remove the pizza stone from the oven. Transfer the dough onto the hot stone and bake in the oven for about 3-4 minutes.
  5. While the pizza is baking, heat the balsamic vinegar in a small non-stick saucepan over medium-high heat. Simmer, continuously stirring to check on the consistency of the glaze, until the vinegar is reduced to a thick sauce, about 5 minutes, Remove from the heat and leave to cool down for a bit.
  6. Remove the pizza from the oven. Spread a thin (or if you are that type, a generous) layer of mascarpone cheese onto the dough and, top with the sliced strawberries and the nuts. Place it back into the oven with the grill setting on and grill for a further 3-4 minutes or until cooked all the way through. It should not take more than 10 minutes in total.
  7. Remove from the oven and top with fresh basil leaves and drizzle with the balsamic reduction. Serve and enjoy immediately!

Strawberry & Mascarpone Dessert Pizza

Strawberry & Mascarpone Dessert Pizza

BON APPÉTIT

– Ally xx

myTaste.com

Sweet Purple Sweet Potato Toasts (3 ways)

Sweet Purple Sweet Potato Toasts (3 ways)

Hello everyone! Apologies for not getting this post up last week as it was supposed to – I feel like I’ve been repeating myself in every post so far but yes, things have been hectic. Amongst the hecticness I speak of, my sister also arrived back from Singapore last week. Other than that, nothing exciting has happened over the past week – the week ahead though will definitely be one to remember.

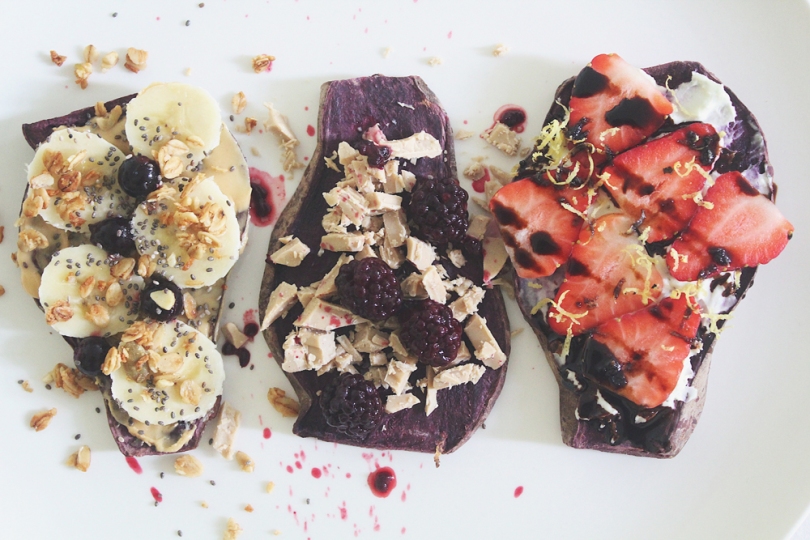
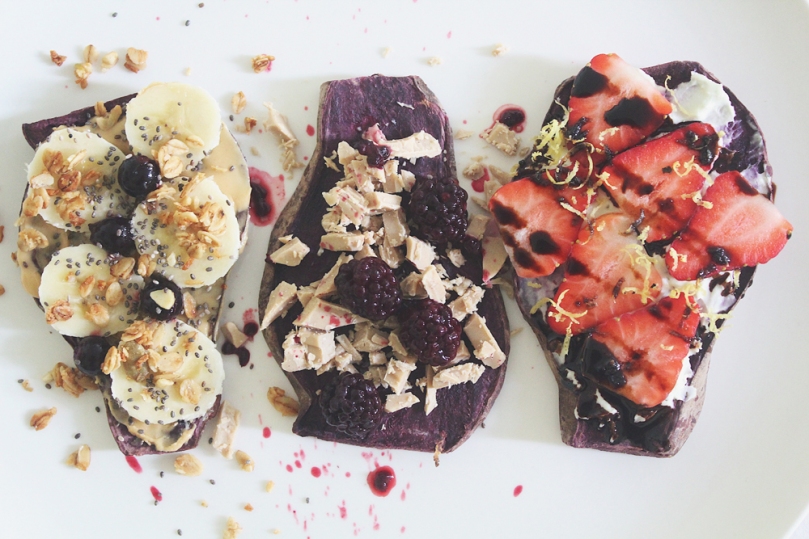
Anyway, I’ll keep tonight’s introduction short and just dive straight into the recipe. To recap, the theme for this month on Amcarmen’s Kitchen is to hero Sweet Potatoes for breakfast! At the beginning of he month, I shared Savoury Orange Sweet Potato Toasts 3 Ways for you, and tonight I’m going to share you a Sweet Purple Sweet Potato Toasts 3 Ways for those who prefer a sweet option rather than savoury to kick start their mornings!

Sweet Purple Sweet Potato Toasts (3 ways)

Preparing your Sweet Potato Toasts

PREP TIME 10 MINS | COOKING TIME 20 MINS* | MAKES 5 SLICES**

*Baking time time will vary depending on the size and thickness of your sweet potato slices.
**Or how-ever-so-many slices you can get from a single sweet potato

INGREDIENTS

  • 1 large purple sweet potato, wash and dried

METHOD

  1. Preheat oven to 180C (350F or gas mark 4). Place a wire rack on a large rimmed baking sheet.
  2. Trim both ends from the sweet potato using a knife and slice them lengthwise into 1/4-inch thick slabs using a knife or mandolin slicer.
  3. Arrange the slabs in a single layer on the wire rack and bake for about 15-20 minutes or until the potatoes are tender, but not fully cooked.
  4. Remove the potatoes from the oven and allow them to cool on wire rack completely before transferring to a storage container. They can be stored in the fridge for up to 4 days.

When it’s go-time simply add the desired number of slices to your toaster and toast away. Setting it on the highest setting takes only one toasting cycle to get them how I like them (warm, bubbly and crispy on the edges). Just be wary that yours may need more or less depending on the toaster that you are using. Adjust to your liking!

Notes/Tips:

    • Look for sweet potatoes that are relatively shaped like a tube so that they’re easier to slice.
    • Don’t remove the skin because fibre in it is good and it helps the slices hold up better during storage.
    • Using a mandolin slicer gives you uniform slices of sweet potatoes, and is easier and safer than using a big knife.
    • Allow them to cool completely after baking before stacking them in a container or they’ll get sweaty and will definitely take longer to toast when you’re ready to eat them.

Now the fun starts – you get to add toppings! The possibilities are pretty much endless but these three are my absolute favourite combinations for a yummy start to my day – the sweet edition!


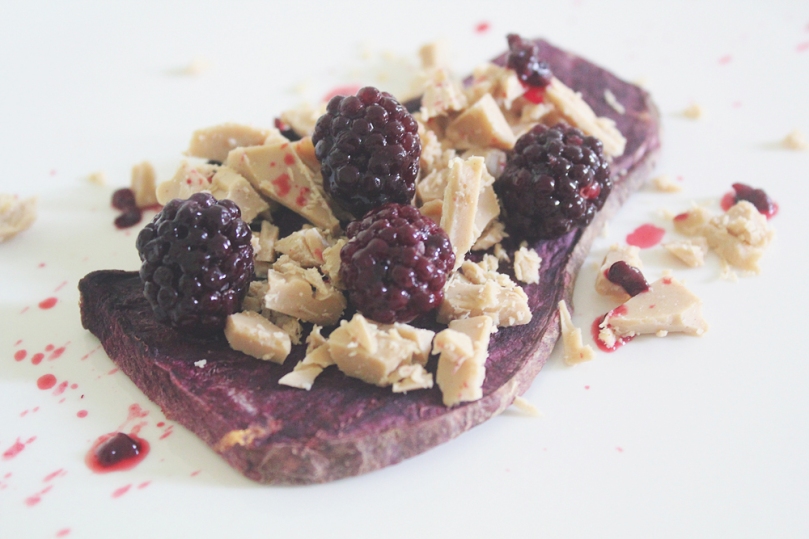
Blackberries & Buttermilk Caramelised White Chocolate

Sweet Purple Sweet Potato Toasts (3 ways): Blackberries & Buttermilk Caramelised White Chocolate

PREP TIME 5 MINS | COOKING TIME 5-10 MINS | SERVES 1

INGREDIENTS

  • Blackberries, fresh or frozen (thawed)
  • Sweet potato slice(s)
  • Whittaker’s West Coast Buttermilk Caramelised White Chocolate (Artisan Collection), roughly chopped

METHOD

  1. Place the sweet potato slices into a toaster and toast on the highest setting until warm, bubbly and crispy on the edges.
  2. Top with the above garnishes and enjoy!

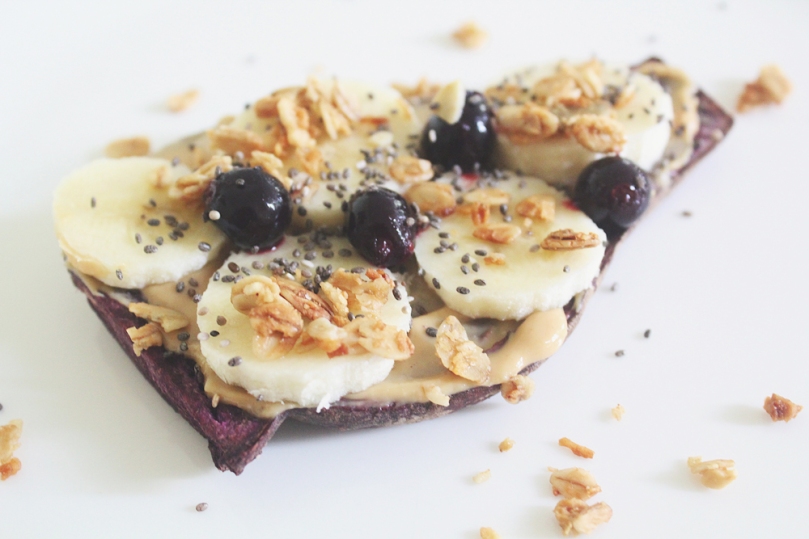
Banana, Blueberries & Peanut Butter

Sweet Purple Sweet Potato Toasts (3 ways): Banana, Blueberries & Peanut Butter

PREP TIME 5 MINS | COOKING TIME 5-10 MINS | SERVES 1

INGREDIENTS

  • Banana slices
  • Blueberries, fresh or frozen (thawed)
  • Chia seeds
  • Granola
  • Peanut butter
  • Sweet potato slice(s)

METHOD

  1. Place the sweet potato slices into a toaster and toast on the highest setting until warm, bubbly and crispy on the edges.
  2. Top with the above garnishes and enjoy!

Strawberries & Goats Cheese with Balsamic Reduction

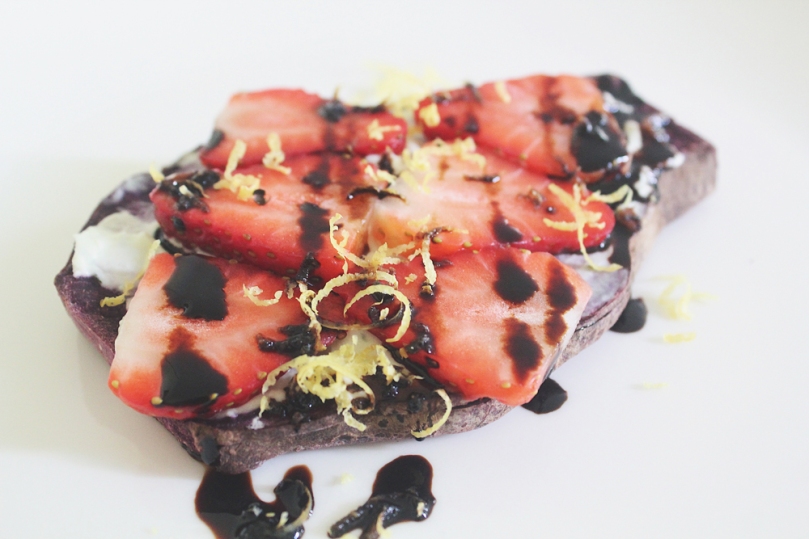
Sweet Purple Sweet Potato Toasts (3 ways):Strawberries & Goats Cheese with Balsamic Reduction

PREP TIME 5 MINS | COOKING TIME 5-10 MINS | SERVES 1

INGREDIENTS

  • Balsamic reduction
  • Goats Cheese
  • Lemon zest
  • Strawberry slices, fresh
  • Sweet potato slice(s)

METHOD

  1. Place the sweet potato slices into a toaster and toast on the highest setting until warm, bubbly and crispy on the edges.
  2. Top with the above garnishes and enjoy!

And there you have it – three simple ways you can make you mornings sweeter, brighter, full of colour, healthier, and energising altogether! I’ll TRY to get the last post for the month up, if not on Wednesday night, then on Thursday night hopefully – fingers crossed!

BON APPÉTIT

– Ally xx

myTaste.com

Savoury Orange Sweet Potato Toasts (3 Ways)

Savoury Orange Sweet Potato Toasts (3 ways)

Hello Everyone! Firstly, I would like to apologise for getting this post up TWO days late (compensating by posting earlier in the day today). I’ve been hibernating for the past few days after mentally and physically tiring days and nights of work. I don’t want to get into a long winded description of why since I’m not a 100% in the mood to write, so I’ll just hop on forward to tonight’s recipe. Hopefully I’ll be in a better mood to write next week. Apologies once again! It’s nothing serious by that way, it just that while I’m writing this, my mind seems to doze off and my eyelids just keep getting heavier and heavier, making it hard for me to concentrate even the slightest bit.

But of course I won’t just leave you guys with a less than mediocre introduction – it is a new month after all on Amcarmen’s Kitchen and I have yet to introduce to you the theme for this month! So just a little bit of inside information, probably about a year ago, I saw these beautifully colourful sweet potato toasts in a Coles Magazine spread and instantly knew I had to give these a go. Fast forward a year (or more) later, and I’ve finally decided to whip up Three Savoury Sweet Potato Toasts for you. They are definitely not as aesthetically pleasing as those you’d find on Pinterest though so don’t hate it these toasts look… Underwhelming. I think my toppings were WAY too massive for the potato slices I had, hence an imbalance proportions. I don’t know – the photographs just look weird to me *insert cold sweat emoji*.

So yes, as you can already see, I’m a bit late on the then hot and trendy sweet potato toasts, but that won’t stop me from sharing them with you guys. Sweet potato toast is basically toast, but without the toast. Skeptics question how can it be called toast without the actual toast? Well, if you’re gluten-free, want a little more fiber in your diet, or are tired of bread for toast, then sweet potatoes are a great option as a substitute. In addition, sweet potatoes contain beta-carotene that gets converted into vitamin A in our body – just like carrots and other orange-coloured fruits and vegetables. Vitamin A is important for hair, skin, nails, vision, and plays a key role in immune function.

Savoury Orange Sweet Potato Toasts (3 Ways)

Preparing your Sweet Potato Toasts

PREP TIME 10 MINS | COOKING TIME 20 MINS* | MAKES 5 SLICES**

*Baking time time will vary depending on the size and thickness of your sweet potato slices.
**Or how-ever-so-many slices you can get from a single sweet potato

INGREDIENTS

  • 1 large orange sweet potato, wash and dried

METHOD

  1. Preheat oven to 180C (350F or gas mark 4). Place a wire rack on a large rimmed baking sheet.
  2. Trim both ends from the sweet potato using a knife and slice them lengthwise into 1/4-inch thick slabs using a knife or mandolin slicer.
  3. Arrange the slabs in a single layer on the wire rack and bake for about 15-20 minutes or until the potatoes are tender, but not fully cooked.
  4. Remove the potatoes from the oven and allow them to cool on wire rack completely before transferring to a storage container. They can be stored in the fridge for up to 4 days.

When it’s go-time simply add the desired number of slices to your toaster and toast away. Setting it on the highest setting takes only one toasting cycle to get them how I like them (warm, bubbly and crispy on the edges). Just be wary that yours may need more or less depending on the toaster that you are using. Adjust to your liking!

Notes/Tips:

    • Look for sweet potatoes that are relatively shaped like a tube so that they’re easier to slice.
    • Don’t remove the skin because fibre in it is good and it helps the slices hold up better during storage.
    • Using a mandolin slicer gives you uniform slices of sweet potatoes, and is easier and safer than using a big knife.
    • Allow them to cool completely after baking before stacking them in a container or they’ll get sweaty and will definitely take longer to toast when you’re ready to eat them.

Now the fun starts – you get to add toppings! The possibilities are pretty much endless but these three are my absolute favourite combinations for a yummy start to my day!


Avocado, Beetroot & Goats Cheese

Savoury Orange Sweet Potato Toasts: Avocado, Beetroot & Goats Cheese

PREP TIME 5 MINS | COOKING TIME 5-10 MINS | SERVES 1

INGREDIENTS

  • Avocado slices
  • Beetroot slices
  • Freshly ground black peppercorns
  • Goats cheese, crumbled
  • Lemon zest
  • Spring onion, chopped
  • Sweet potato slice(s)

METHOD

  1. Place the sweet potato slices into a toaster and toast on the highest setting until warm, bubbly and crispy on the edges.
  2. Top with the above garnishes and enjoy!

Smashed Avo, Crispy Bacon & Poached Egg

Savoury Orange Sweet Potato Toasts: Smashed Avo, Crispy Bacon & Poached Egg

PREP TIME 5 MINS | COOKING TIME 5-10 MINS | SERVES 1

INGREDIENTS

  • Bacon slices
  • Balsamic reduction
  • Poached egg
  • Smashed avocado
  • Sweet potato slice(s)

METHOD

  1. Crispy Bacon: Heat a medium size non-stick frying pan over high heat. Add the bacon strips and cook for about 3-4 minutes per side. Place on a dish lined with paper towels to drain the excess oils. Next add the tomatoes and fry in the bacon fat for about 3-4 minutes per side as well. Set aside in an oven to keep warm before serving.
  2. Balsamic Reduction: Next, pour the 1/2 cup of balsamic vinegar in a small saucepan over medium heat. Bring the vinegar to a boil, then turn down the heat down so that the boil reduces to a simmer. Stir occasionally and allow to simmer until the vinegar has reduced by at least half (for a thinner reduction) or more (for a more syrup-like consistency). If you have impatient tendencies like me when it comes to food, do not increase the heat at this point! Your reduction may burn and you will be left with a stiff, hardened mess.
  3. Poached Eggs: Bring small saucepan of water to the boil over medium-high heat, then reduce the heat to low-medium – the water should be just simmering. Add in the vinegar and stir. Crack one egg into a small bowl and quickly, but gently pour it into the water. Repeat with the other egg. A really soft poached egg should take around 2 minutes, but if you want it a bit more firm, it will take about 4 minutes. To check if they’re cooked right, carefully remove the egg from the pan with a slotted spoon and give the yolk a gentle push (you can tell just by your instincts if it is under or over – or perfect)!
  4. Place the sweet potato slices into a toaster and toast on the highest setting until warm, bubbly and crispy on the edges.
  5. Top with the above garnishes and enjoy!

Beet & Salt-cured Salmon

Savoury Orange Sweet Potato Toasts: Beet & Salt-cured Salmon

PREP TIME 5 MINS | COOKING TIME 5-10 MINS | SERVES 1

INGREDIENTS

***Or store-bought smoked salmon will do just fine as well.

METHOD

  1. Crispy Salmon Skin: Preheat oven to 190C (375F or gas mark 5). Line a baking sheet with parchment paper, and lightly brush olive oil and sprinkle some salt on both sides of the salmon skin. Place the salmon skin, shiny side up, on the baking sheet and bake for 10 minutes or until the skin is crisp. Allow the salmon skin to cool before eating.
  2. Place the sweet potato slices into a toaster and toast on the highest setting until warm, bubbly and crispy on the edges.
  3. Top with the above garnishes and enjoy!

And there you have it! Three simple Savoury Sweet Potato Toasts for a great fix of a seriously nutrient-packed brekkie! What do you think about sweet potato toast? Have you tried it for yourself, and if you have what did you think?

BON APPÉTIT

– Ally xx

myTaste.com

Bacon Eggs Benedict

Bacon Eggs Benedict

Hello Everyone and welcome to an all new theme for the month of May on Amcarmen’s Kitchen! For the month of May, I will be sharing recipes and renditions of a classic go-to foolproof Eggs Benedict! The thing I love about a good ol’ Eggs Benedict dish is its versatility – if you like pork, then go for a Beer-braised Pulled Pork Eggs Benedict accompanied with a Sriracha hollandaise sauce *drools* Or maybe you prefer beef, chicken, lamb, or seafood? The options are endless! You can even take a vegetarian spin to this and go meatless if you prefer. Get creative with the classic hollandaise sauce that makes an Eggs Benedict what it is. Fuse cuisines and cultures.

All this will be covered on the blog this month so do stay tuned on how you can tackle the endless possibilities to make your Eggs Benny experience one to remember! Tonight, I will be starting off with a classic with a slight twist, and as the month progresses, we’ll delve deep into creative fusions that have been inspired from my café adventures back when I was still studying in Australia.

Bacon Eggs Benedict

Now forgive me if I’m giving out false information as I am relying on the world of Wikipedia here. I guess my teachers from high school and uni haven’t taught me well enough to not source from wiki *cheek grin* but anyway, though there seemed to be conflicting recounts on the exact origins of the Eggs Benedict, this one in particular speaks out to me:

Lemuel Benedict, a retired Wall Street stock broker, said that he had wandered into the Waldorf Hotel in 1894 and, hoping to find a cure for his morning hangover, ordered “buttered toast, poached eggs, crisp bacon, and a hooker of hollandaise”. Oscar Tschirky, the maître d’hôtel, was so impressed with the dish that he put it on the breakfast and luncheon menus but substituted ham for the bacon and a toasted English muffin for the toast — “Talk of the Town”. The New Yorker. December 19, 1942.

Therefore, you could safely say (I guess) that the original main ingredients found in a classic Eggs Benedict dish are eggs, bacon, hollandaise sauce, and an English muffin – popularised by Oscar Tschirky. Okay well, when I said that it speaks out to me, I don’t mean in a sense that I’ve ever been hungover, but that this is what I imagined a morning-after hangover meal would be.

Bacon Eggs Benedict Ingredients

Before we dive in, there’s a slight twist to the classic recipe that I will be sharing with you guys tonight – and the twist is basically just a few extra ingredients to bulk it up and add some zing and tang to it. Tanginess from the balsamic reduction and a slight zing from the chimichurri sauce!

PREP TIME 15 MINS | COOKING TIME 25 MINS | SERVES 3

INGREDIENTS

For the eggs benedict

  • 6 slices of streaky bacon
  • 3 English muffins, halved, slightly toasted, and butter
  • 3 large free range eggs
  • 1 large avocado, peeled, pitted, and smashed*
  • 1 large tomato, sliced
  • Chilli flakes, to top

*Squeeze a touch of lemon or lime juice to prevent it from browning

For the hollandaise sauce

  • 3 large free range eggs, yolks separated
  • 175g unsalted butter, cut into cubes, at room temperature
  • 2 tbsp water
  • 2 tbsp fresh lemon juice
  • Fresh Thyme Leaves
  • Ground salt and black pepper to taste

For the chimichurri sauce (by Karina from Cafe Delites)

  • 1/4 cup olive oil
  • 1/4 cup parsley, finely chopped
  • 3-4 garlic cloves, finely minced
  • 2 red bird’s eye chillies, deseeded and finely chopped
  • 1 tbsp white wine vinegar
  • 1/2 teaspoon dried oregano
  • Ground salt and black pepper, to taste

For the balsamic reduction

  • 1/2 cup balsamic vinegar

So I know that there are a heck load more ingredients mentioned in the list above than what is shown in the shot – apologies! If you want a classic Bacon Eggs Benny without the fancy schmancy reductions and sauces, then feel free to omit. They’re really just optional for an extra boost of flavours to an already flavoursome dish.

METHOD

  1. Chimichurri Sauce: Mix all the ingredients together in a small bowl. Allow to sit for 5-10 minutes to release all of the flavours into the oil before using, but I think that the longer it sits, the better it tastes, so prepare this first before everything else to ensure this!
  2. Bacon and Tomatoes: Heat a medium size non-stick frying pan over high heat. Add the bacon  strips and cook for about 3-4 minutes per side. Place on a dish lined with paper towels to drain the excess oils. Next add the tomatoes and fry in the bacon fat for about 3-4 minutes per side as well. Set aside in an oven to keep warm before serving.
  3. Balsamic Reduction: Next, pour the 1/2 cup of balsamic vinegar in a small saucepan over medium heat. Bring the vinegar to a boil, then turn down the heat down so that the boil reduces to a simmer. Stir occasionally and allow to simmer until the vinegar has reduced by at least half (for a thinner reduction) or more (for a more syrup-like consistency). If you have impatient tendencies like me when it comes to food, do not increase the heat at this point! Your reduction may burn and you will be left with a stiff, hardened mess.
  4. Hollandaise Sauce: While the balsamic reduction is underway and slowly simmering, start on the Hollandaise sauce. Place a heatproof bowl over a medium saucepan that is quarter-filled with water. Make sure that the bowl should fit snugly into the pan without touching the water (lift the bowl to check and remove some water if it does). Bring the water to a boil over high heat, then reduce heat to very low so the water is barely simmering (there should be almost no movement at all). It is important that the water is barely simmering while making the sauce – if it is too hot, the egg yolks will cook too much and the sauce will curdle.
  5. Place the egg yolks and the 2 tablespoons of water in the heatproof bowl and place over the pan. Whisk the mixture constantly for 3 minutes or until it is thick and pale, has doubled in volume and a ribbon trail forms when the whisk is lifted.
  6. Add the butter a cube at a time, whisking constantly and adding another cube when the previous one is incorporated completely (about 10 minutes to add it all in). If butter is added too quickly, it won’t mix easily with the egg yolks or the sauce may lose volume. At the same time, it is important that the butter is at room temperature and added a cube at a time, so that it doesn’t take too long to be incorporated – if the sauce cooks for too long, it can curdle.
  7. Remove the bowl from the pan and place on a heatproof surface. The cooked sauce should have the consistency of very lightly whisked thickened cream. Whisk in the lemon juice, fresh thyme leaves, and season with salt and pepper.
  8. Poached Eggs: Bring small saucepan of water to the boil over medium-high heat, then reduce the heat to low-medium – the water should be just simmering. Add in the vinegar and stir. Crack one egg into a small bowl and quickly, but gently pour it into the water. Repeat with the other egg. A really soft poached egg should take around 2 minutes, but if you want it a bit more firm, it will take about 4 minutes. To check if they’re cooked right, carefully remove the egg from the pan with a slotted spoon and give the yolk a gentle push (you can tell just by your instincts if it is under or over – or perfect)!
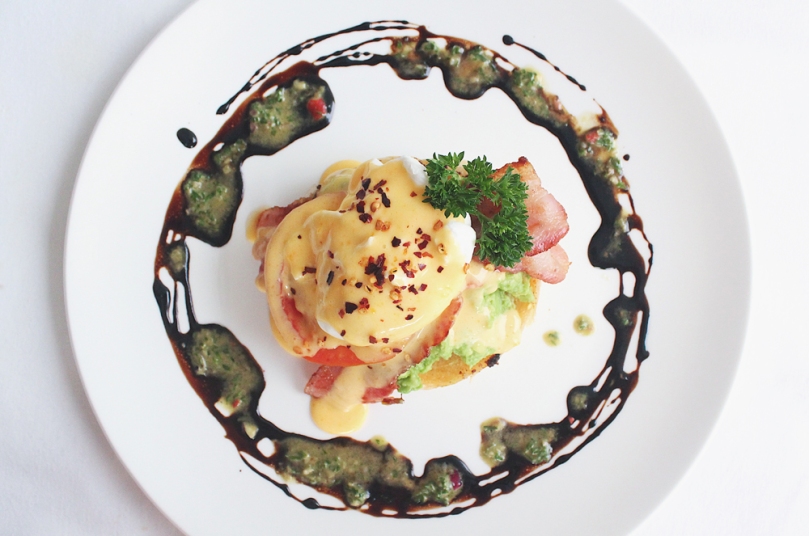
  9. Assembly: Spread the smashed avocado on the toasted and buttered English muffin half and top with the crispy bacon strips, tomato slice, and then the poached egg. Top a generous amount of the hollandaise sauce and sprinkle with a bit of chilli flakes to pack a slight kick. Finally, drizzle with the balsamic reduction and chimichurri sauce around the plate. Serve and enjoy!
Bacon Eggs Benedict

BON APPÉTIT

– Ally xx

myTaste.com

Smashed Avo Toast (9 ways)

Hello Everyone! Finally I am back on track with my posts and the theme for the month of April is Avocado! All you need is about half a medium-sized avocado everyday as it provides 1% of the calcium, 5% of the magnesium, and 10% of the potassium that you need daily. Avocados are a good source of potassium, which can help lower blood pressure, and in addition, the dark green flesh just under an avocado’s brittle skin contains large amounts of disease-fighting compounds. Though avocados are proven to help lower blood pressure and an abundance of health benefits, we have to be weary of how much we intake daily as they are also high in calories.

Tonight, I will be sharing 9 different ways you can start your mornings with a smile on your face with 9 different smashed avocado toasts! Of course, don’t limit yourselves to just these 9 recipes; I encourage you to get creative with your smashed avo toasts and share your creations with me on Instagram using the hashtag #amcarmenskitchen

1. Five Pepper Smoked Salmon with Red Onions, Capers & Chilli Flakes

Five Pepper Smoked Salmon with Red Onions, Capers & Chilli Flakes

PREP TIME <5 MINS | COOKING TIME  | SERVES 2

INGREDIENTS

  • 2 slices multigrain brown bread
  • 1/2 avocado, smashed
  • 1 small red onion, cut into rings
  • 2 tsp capers
  • Smoked salmon slices with five peppers

METHOD

  1. Lightly toast bread in a toaster for about 1-2 minutes.
  2. Spread a generous amount of the smashed avocado onto the toast and top with smoked salmon, red onion rings, and capers. Sprinkle with a touch of chilli flakes for an added kick (optional).
  3. Enjoy!

2. Medley of Grape Tomato Caprese Salad with Balsamic Reduction

Medley of Grape Tomato Caprese Salad with Balsamic Reduction

PREP TIME <5 MINS | COOKING TIME 5 MINS | SERVES 2

INGREDIENTS

  • 2 slices multigrain brown bread
  • 1/2 avocado, smashed
  • 1 punnet (250g) grape tomato medley, halved
  • 4 cherry bocconcini cheese, sliced
  • 4 tbsp balsamic vinegar
  • Ground sea salt and black pepper, to taste
  • Olive Oil
  • Sweet basil leaves

METHOD

  1. Combine the grape tomatoes, bocconcini slices, and sweet basil leaves in a small bowl. Drizzle with olive oil and season with a touch of ground sea salt and black pepper to taste. Set aside and leave to macerate.
  2. Meanwhile, heat the balsamic vinegar in a small non-stick saucepan over medium-high heat. Simmer, continuously stirring to check on the consistency of the glaze, until the vinegar reduces to a thick sauce, about 5 minutes. Remove from the heat and leave to cool down for a bit.
  3. Lightly toast bread in a toaster for about 1-2 minutes.
  4. Spread a generous amount of the smashed avocado onto the toast, top with the tomato cappers salad, and drizzle the balsamic reduction over the salad.
  5. Enjoy!

3. Sliced Banana & Pumpkin Seeds drizzled with Honey

Sliced Banana & Pumpkin Seeds drizzled with Honey

PREP TIME <5 MINS | COOKING TIME  | SERVES 2

INGREDIENTS

  • 2 slices multigrain brown bread
  • 1/2 avocado, smashed
  • 1 large banana, sliced
  • Honey
  • Pumpkin seeds

METHOD

  1. Lightly toast bread in a toaster for about 1-2 minutes.
  2. Spread a generous amount of the smashed avocado onto the toast, top with banana slices and pumpkin seeds, and drizzle with honey.
  3. Enjoy!

4. Soft-boiled Egg with Chilli Flakes & Parsley

Soft-boiled Egg with Chilli Flakes & Parsley

PREP TIME <5 MINS | COOKING TIME 6 MINS | SERVES 2

INGREDIENTS

  • 2 slices multigrain brown bread
  • 1/2 avocado, smashed
  • 2 large free range eggs
  • Chilli Flakes
  • Parsley, roughly chopped

METHOD

  1. Bring a small pot of water to a rolling boil. Once boiling, reduce the water to a rapid simmer before gently lowering the eggs one by one into the pot. Cook for 5 minutes for a runny yolk, or 7 minutes for a barely set yolk. Once done, remove from the heat and place in an ice bath to stop the cooking process. Once cool, peel the shell off and slice.
  2. Lightly toast bread in a toaster for about 1-2 minutes.
  3. Spread a generous amount of the smashed avocado onto the toast, top with the sliced eggs, and sprinkle with a touch of chilli flakes, and parsley.
  4. Enjoy!

5. Sliced Strawberries & Crumbled Goat’s Cheese with Balsamic Reduction and Peppermint Leaves

Sliced Strawberries & Crumbled Goat's Cheese with Balsamic Reduction and Peppermint Leaves

PREP TIME <5 MINS | COOKING TIME 5 MINS | SERVES 2

INGREDIENTS

  • 2 slices multigrain brown bread
  • 1/2 avocado, smashed
  • 4 large strawberries, sliced
  • 4 tbsp balsamic vinegar
  • Goat’s cheese, crumbled

METHOD

  1. Heat the balsamic vinegar in a small non-stick saucepan over medium-high heat. Simmer, continuously stirring to check on the consistency of the glaze, until the vinegar reduces to a thick sauce, about 5 minutes. Remove from the heat and leave to cool down for a bit.
  2. Lightly toast bread in a toaster for about 1-2 minutes.
  3. Spread a generous amount of the smashed avocado onto the toast, top with the sliced strawberries, crumbled goat’s cheese, and drizzle the balsamic reduction over the strawberries.
  4. Enjoy!

6. Sautéd Brown & Shimeji Mushrooms topped with Fried Enoki & Parsley

Sautéd Brown & Shimeji Mushrooms topped with Fried Enoki & Parsley

PREP TIME <5 MINS | COOKING TIME 8 MINS | SERVES 2

INGREDIENTS

  • 2 slices multigrain brown bread
  • 1/2 avocado, smashed
  • 4 large brown mushrooms, sliced
  • 1/2 bunch (100g) shimeji mushrooms
  • 1/2 bunch (50g) enoki mushrooms
  • 2-3 garlic cloves, minced
  • Ground sea salt and black pepper, to taste
  • Knob of unsalted butter
  • Olive oil
  • Parsley, roughly chopped

METHOD

  1. Melt the unsalted butter in a small frying pan over medium-high heat and add about a teaspoon of olive oil.
  2. Sauté the minced garlic until golden brown and fragrant, about 30 to 45 seconds. Add in the sliced brown mushrooms and shimeji mushrooms and cook until tender, about 3-4 minutes.  Season with pinch of ground sea salt and black pepper. Once tender, remove from the pan and set aside.
  3. In the same pan, heat about 3 tbsp of olive oil over high heat until slightly smoking. Add the enoki mushrooms in and fry until golden brown in colour, about 2-3 minutes. Once done, transfer to a small plate lined with a paper towel. Set aside.
  4. Lightly toast bread in a toaster for about 1-2 minutes.
  5. Spread a generous amount of the smashed avocado onto the toast and top with the sautéd garlic mushrooms and the fried enoki mushrooms. Garnish with a touch of ground black pepper and parsley.
  6. Enjoy!

7. Diced Mango with Chilli Powder & Peppermint

Diced Mango with Chilli Powder & Peppermint

PREP TIME <5 MINS | COOKING TIME  | SERVES 2

INGREDIENTS

  • 2 slices multigrain brown bread
  • 1/2 avocado, smashed
  • 1 small mango, diced
  • Chilli powder
  • Peppermint leaves

METHOD

  1. Lightly toast bread in a toaster for about 1-2 minutes.
  2. Spread a generous amount of the smashed avocado onto the toast and top with the diced mangoes, chilli powder, and peppermint leaves.
  3. Enjoy!

8. Roasted Chickpeas & Parsley

Roasted Chickpeas & Parsley

PREP TIME <5 MINS | COOKING TIME 10 MINS | SERVES 2

INGREDIENTS

  • 2 slices multigrain brown bread
  • 1/2 avocado, smashed
  • 1 can (200g) chickpeas, drained
  • 2 tsp ground smoked paprika
  • Ground sea salt and black pepper, to taste
  • Olive oil
  • Parsley, roughly chopped

METHOD

  1. Preheat oven to 200C (400F or gas mark 6). Line a baking tray with aluminium foil. Set aside.
  2. Add the drained chickpeas in a small bowl together with the ground smoked paprika, sea salt, black pepper, and a drizzle of olive oil. Toss to coat.
  3. Spread the chickpeas onto the prepared baking tray and roast in the oven for about 10 minutes. Once done, remove from the oven.
  4. Lightly toast bread in a toaster for about 1-2 minutes.
  5. Spread a generous amount of the smashed avocado onto the toast and top with the roasted chickpeas and parsley.
  6. Enjoy!

9. Chorizo Sausage & Sweet Corn

Chorizo Sausage & Sweet Corn

PREP TIME <5 MINS | COOKING TIME 4-6 MINS | SERVES 2

INGREDIENTS

  • 2 slices multigrain brown bread
  • 1/2 avocado, smashed
  • 1 chorizo sausage, sliced
  • 1 can (200g) sweet corn kernels, drained
  • Olive oil

METHOD

  1. Heat olive oil in a small frying pan over medium-high. Pan-fry the chorizo slices until browned, about 2-3 minutes per side. Once done, transfer to a plate lined with a paper towel. Set aside.
  2. Bring a small pot of water to a rolling boil and blanch the sweet corn kernels for about a minute or two. Drain and set aside to cool down for a bit.
  3. Lightly toast bread in a toaster for about 1-2 minutes.
  4. Spread a generous amount of the smashed avocado onto the toast, top with the pan-fried chorizo sausages and sweet corn kernels, and drizzle with a bit of the chorizo oil (optional).
  5. Enjoy!

Just a little side note before I end tonight’s post, I spent the whole day amending quite possibly the same artwork because their comments/amendments were all on an installation basis. Such completely waste of time which then prevented me from actually completing the work I had set to do today because I had to keep going back and forth to the same bloody artwork.

​BON APPÉTIT

– Ally xx

myTaste.com

The Ultimate Brekkie

The Ultimate Brekkie

Hello Everyone! Back with a quick one since I feel like you guys deserve another upload after being away for so long. Today I wanted to make a really filling and unforgettable brekkie where I can just sit down and enjoy it instead of packing it with me to bring to the office or even just skipping breakfast altogether. Well okay, I ended up having these for lunch after a deserved Sunday sleep in, but breakfast for lunch (even for dinner) is just the best thing ever!

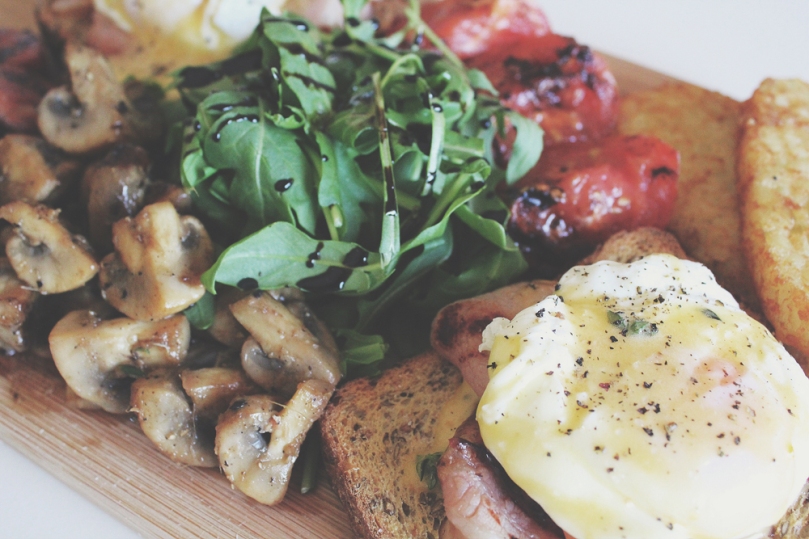
So after my visit to Paper Plane Café 2 weeks ago or so (again as I mentioned in the previous post, I will do a review soon-ish), I really wanted to recreate their breakfast board at home. It looked simple enough to be able to do so just by glancing at the board and even pin-pointing the obvious ingredients. I must say that it was a huge success in the kitchen this morning, even though I may have burnt my balsamic reduction and the other side of the toast, oops! But nonetheless a brekkie so worth the time and effort spent in the kitchen. I invited my housemate Lydia as well for breakfast/brunch/lunch, so basically today’s lunch was a joint effort between the two of us. She’s now a professional chef! Under my guidance and supervision, as well as the Taste recipe being read to her, she made the Hollandaise Sauce all by herself for the very first time to go with the poached eggs. Her sauce was to die for! Apart from that, she helped wash and cut up the tomatoes, mushrooms and chorizo sausages, and also did a fair bit of the cleaning up. I took care of the rest. (This note is for Vidhya – don’t stop reading here, there’s a small paragraph/story at the end of the post!)

The Ultimate Brekkie

PREP TIME 10 MINS | COOKING TIME 30-35 MINS | SERVES 2

INGREDIENTS

  • 2 hash browns
  • 2 hickory-smoked bacon rashers
  • 2 large free range eggs
  • 2 slices of Country Grain bread
  • 2 field grown tomatoes, quartered
  • 1 chorizo sausage, sliced diagonally
  • 250g cup mushrooms, quartered
  • 1 cup balsamic vinegar
  • 2 tbsp fresh lemon juice
  • Handfull of rocket leaves
  • Small thumb-sized ginger, grated
  • Fresh Thyme Leaves
  • Olive Oil

For the Hollandaise Sauce

  • 3 large free range eggs, yolks separated
  • 175g unsalted butter, cut into cubes, at room temperature
  • 2 tbsp water
  • 2 tbsp fresh lemon juice
  • Fresh Thyme Leaves
  • Ground salt and black pepper to taste

METHOD

  1. Preheat oven to 180C. Place the hash browns and slices of bread on a tray lined with baking paper. Drizzle the slices of bread with a bit of olive oil and bake for 10-15 minutes. Turn the oven heat down to about 50C to keep the food warm while you prepare and cook everything else.
  2. Balsamic Reduction: Next, pour a cup of balsamic vinegar in a small saucepan over medium heat. Bring the vinegar to a boil, then turn down the heat down so that the boil reduces to a simmer. Stir occasionally and allow to simmer until the vinegar has reduced by at least half (for a thinner reduction) or more (for a more syrup-like consistency). If you are a hopeless impatient person like me when it comes to food, do not increase the heat at this point! Your reduction may burn and you will be left with a stiff, hardened mess – basically what I did for the first batch of balsamic reduction. I was also stupid enough to try it and see if it was still edible, and it ended up sticking to the front of my teeth (not a very pleasing experience might I add).
  3. Meat, Tomatoes, and Mushrooms: Heat a grill pan over high heat. Add the bacon and chorizo and cook for about 3-4 minutes per side. Place on a dish lined with paper towels to drain the excess oils. Next add the tomatoes and grill for about 3-4 minutes per side as well. Place the bacon, chorizo slices, and tomatoes in the oven to keep warm. Add the mushrooms to the grill pan with a bit of olive oil and sauté for about 2-3 minutes. Add the grated ginger and lemon juice, and cook for a further 3-4 minutes. Sprinkle with fresh thyme leaves and then set aside in the oven to keep warm.
  4. Hollandaise Sauce: While the balsamic reduction is underway and slowly simmering, start on the Hollandaise sauce. Place a heatproof bowl over a medium saucepan that is quarter-filled with water. Make sure that the bowl should fit snugly into the pan without touching the water (lift the bowl to check and remove some water if it does). Bring the water to a boil over high heat, then reduce heat to very low so the water is barely simmering (there should be almost no movement at all). It is important that the water is barely simmering while making the sauce – if it is too hot, the egg yolks will cook too much and the sauce will curdle.
  5. Place the egg yolks and the 2 tablespoons of water in the heatproof bowl and place over the pan. Whisk the mixture constantly for 3 minutes or until it is thick and pale, has doubled in volume and a ribbon trail forms when the whisk is lifted.
  6. Add the butter a cube at a time, whisking constantly and adding another cube when the previous one is incorporated completely (about 10 minutes to add it all in). If butter is added too quickly, it won’t mix easily with the egg yolks or the sauce may lose volume. At the same time, it is important that the butter is at room temperature and added a cube at a time, so that it doesn’t take too long to be incorporated – if the sauce cooks for too long, it can curdle.
  7. Remove the bowl from the pan and place on a heatproof surface. The cooked sauce should have the consistency of very lightly whisked thickened cream. Whisk in the lemon juice, fresh thyme leaves, and season with salt and pepper.
  8. Poached Eggs: Bring small saucepan of water to the boil over medium-high heat, then reduce the heat to low-medium – the water should be just simmering. Add in the vinegar and stir. Crack one egg into a small bowl and quickly, but gently pour it into the water. Repeat with the other egg. A really soft poached egg should take around 2 minutes, but if you want it a bit more firm, it will take about 4 minutes. To check if they’re cooked right, carefully remove the egg from the pan with a slotted spoon and give the yolk a gentle push (you can tell just by your instincts if it is under or overcooked – or perfect)!
  9. Assembly: While the Hollandaise Sauce and Poached Eggs are almost done, assemble your dish, this part is entirely up to you on how you wish to present it. Drizzle your balsamic reduction over your rocket leaves. Use a slotted spoon to carefully remove the eggs from the saucepan. Place on top of the toast and bacon. Then top with a generous amount of sauce to your poached eggs. Crack a little salt and pepper and serve immediately!

While having our lunch, all Lydia could talk about was how good it all tasted. She was already full, but she still wanted to eat more. We also talked about how in cafés you’d get an average dollop of hollandaise sauce, which is sometimes not enough with the amount of serving your get from the rest of the food. We had a whole bowl of it and basically drowned our eggs in them, and had them with everything basically. Also, the best thing about eating at home is that we get to be barbaric in a sense that we didn’t care about using our forks and knives, we ate our toast with our hands and weren’t afraid to have them smothered over the sides of our mouths or dripping down the side of our fingers.

The Ultimate Brekkie

BON APPÉTIT

– Ally xx

myTaste.com