Mediterranean Baked Fish

Mediterranean Baked Fish

Hello Everyone! Two days ago I shared a post on my Instagram for an open collaboration that me and two of my foodie friends organised and hosted. It was for National Pack Your Lunch Day (March 10) and out of the three main components that made up my lunchbox, one of them was this Mediterranean Baked Fish.

This recipe is loaded with fresh Mediterranean, Greek flavours of olive oil, lemon, and capers. This combination enhances the flavour of the fish, while still allowing it to shine through as the star! Feel free to switch up the kind of fish that’s not only suitable to your liking, but what’s also fresh and available locally. Choose white fish that’s mild in flavour such as cod, haddock, striped bass, mahi-mahi, or grouper fish. I went with tilapia as that’s what’s affordable and readily available here in the Philippines.

Mediterranean Baked Fish

When it comes to baking fish, you don’t want to over cook it. As soon as the fish starts to flake easily, it’s done! For me, it took between 10 to 12 minutes for my fish to turn out perfect, but there are several factors that can differ the cooking time. For example, everyone’s oven cooks differently. Everyone’s fish fillet may be of a different size, shape, or thickness, and everyone’s baking dish heats up differently. Use your gut feeling when it comes to baking time here!

Mediterranean Baked Fish Ingredients

PREP TIME 10 MINS | COOKING TIME 10-12 MINS | SERVES 4

INGREDIENTS

  • 500g tilapia fillets (skinless and boneless)
  • 3 garlic cloves, thinly sliced
  • 2 tbsp capers
  • 1 tbsp olive oil
  • 1/2 tsp ground black pepper
  • 1/2 tsp ground coriander
  • 1/2 tsp ground paprika
  • 1/2 tsp salt
  • Fresh basil leaves, roughly chopped
  • Juice of half a lemon
  • Lemon slices
  • Zest of 1 lemon

METHOD

  1. Preheat oven to 218C (425F or gas mark 7) and grease a baking dish with a bit of olive oil or butter.
  2. Place the tilapia fillets in the basking dish and rub all the ingredients into the fish, making sure to coat them all. Arrange the fillets in the baking dish and top with the lemon slices. Set aside for about 15 minutes for the spices to infuse into the fish.
  3. Bake in the oven for 10 to 12 minutes, until the fish flakes easily with a fork.
  4. Garnish with more freshly chopped basil and serve with a warm salad or seasonal greens. Enjoy!

Mediterranean Baked Fish

BON APPÉTIT

– Ally xx

Follow me on my social media accounts:
Facebook: Amcarmen’s Kitchen
Instagram: @amcarmenskitchen
TikTok: @amcarmenskitchen

myTaste.com

Advertisement
Herb & Caper-crusted Salmon

Herb & Caper-crusted Salmon

Hello Everyone and happy first of July! If you’re a little pressed for time when it comes to preparing and cooking, this should be one of your go-to, quick yet healthy and light weeknight dinner recipes. The salmon is full of fresh flavours, tang, and heat! It could not be any simpler to make and goes from fridge to table in 20 minutes, even including all the sides you need to make this a complete meal! Simply chop up your herbs and capers, slather it onto your salmon filets, then bake. Easy peasy lemon squeezy right?

Herb & Caper-crusted Salmon

Salmon is one of the most nutritious foods you can find. This popular fatty fish is loaded with nutrients and may reduce risk factors for several diseases. It’s also super tasty, versatile, and widely available. Salmon is rich in long-chain omega-3 fatty acids, which have been shown to reduce inflammation, lower blood pressure and decrease risk factors for disease. Salmon is also rich in high-quality protein, which is needed to heal, protect bone health, and prevent muscle loss, among other benefits. The list goes on.

Before we dive into tonight’s recipe, please take the time to check out the original where I drew my inspiration from over on Iowa Girl Eats by Kristin. The original recipe crusts the salmon with a caper and dill-infused gremolata – which is just a fancy name for chopped parsley, lemon zest, and garlic. I used basil and green onions/scallions in place of the dill and parsley only because I could not find those herbs at the grocers. I think it worked well with the herb substitutes that I used, so don’t be afraid to mix up your herbs for the crust to what’s readily available at your local grocers.

Herb & Caper-crusted Salmon Ingredients

PREP TIME 10 MINS | COOKING TIME 7-9 MINS | SERVES 4

INGREDIENTS

  • 4 salmon filets, about 150g per filet
  • 2-3 garlic cloves, minced
  • 2 red bird’s eye chillies, minced
  • 2 stalks green onion, roughly chopped
  • 1 & 1/2 tbsp capers, drained, rinsed, and roughly chopped
  • Olive Oil
  • Salt and freshly ground pepper, to taste
  • Zest of 1 lemon

METHOD

  1. Preheat oven to 200C (400F or gas mark 4), and line a baking sheet with foil. Grease with a little bit of oil or butter and set aside.
  2. Mix the chopped/minced basil, green onions, chillies, capers, lemon zest, garlic, salt, and black pepper to the centre of a large plate. Squeeze a bit of lemon juice into the mixture to moisten.
  3. Rub the salmon filets with olive oil and then season generously with salt and freshly ground black pepper. Press the top and sides of each filet into the herb and caper mixture to create an even crust.Place the filets onto the prepared baking sheet and bake for 7-9 minutes. Be careful and do not over bake them!
  4. Once done, transfer the salmon filets to individual serving plates. Serve with a squeeze of fresh lemon juice on the salmon fillets, and some creamy mashed potatoes on the side with blanched asparagus or any other greens of choice. Enjoy!

Herb & Caper-crusted Salmon

Herb & Caper-crusted Salmon

BON APPÉTIT

– Ally xx

myTaste.com

Super Green Shakshuka

Super Green Shakshuka

Hello Everyone! I can’t believe that we’re already halfway through the year! Metro Manila has now shifted from Enhanced Community Quarantine to General Community Quarantine since the beginning of this week and I honestly don’t know what’s going to happen. We haven’t even started to flatten the curve, and here we are letting people out and go back to work with positive cases rising much higher than when we were under enhanced quarantine.

I’ll unfortunately be reporting back to the office starting this coming Monday and Tuesday, twice a week while the other 3 days will be to continue working from home. I honestly don’t see the point in risking my health and my life just to go into the office two times a week when there is still so much uncertainty with the on-going pandemic, especially when it’s ten times harder to get anywhere via public transport due to capacity limitations to comply with social distancing. It was hard enough to get a ride to and from work pre-pandemic times, what more now? I remember waiting almost an hour for a ride home on many occasions, now I’ll probably be waiting 2 or even more hours just to get home, exposed in the open to the virus. While there’s a shuttle service initiated by the company I’m working for to avoid this issue, I don’t know how long they’ll be able to keep up with a door-to-door pick-up/drop-off service.

Super Green Shakshuka

Anyway, mini tangent/rant aside, a new month means it’s time to move onto the next colour of the rainbow for this year’s theme on Amcarmen’s Kitchen! The recipe that I’ll be sharing with you tonight is inspired by a dish that I had way back when I was still living and studying in Australia. It was in fact a weekend farewell brunch for me as I left the country the following day for good after having completed my degree and graduated a couple months back before this weekend brunch gathering.

I first came across the idea of a green shakshuka at SHUK North Bondi. Green shakshuka puts a healthy green spin on the classic Middle Eastern shakshuka recipe. Traditionally, a shakshuka is a mixture of simmering tomato sauce and spices, topped with gently poached eggs. Within the tomato sauce there’s diced onions, garlic and bell peppers. Lastly, it’s garnished with freshly chopped herbs such as cilantro and parsley.

The great thing about a shakshuka is its versatility. Similar to how you can toss most ingredients from your fridge into a smoothie, the same can be said for a shakshuka. For this green shakshuka, I’ll be replacing the tomato sauce and bell peppers with an abundance of sautéed green vegetables.

Super Green Shakshuka Ingredients

Whatever veggies you’ve got lying around, just throw them in! For my improvised take on this recipe, I’m going with broccoli and asparagus for some bite, and leafy greens such as locally grown kale, spinach, chilli, and malunggay leaves. I also threw in some green chillies for a kick of heat and some fresh basil and green scallions for freshness.

Super Green Shakshuka Ingredients

PREP TIME 10 MINS | COOKING TIME 30 MINS | SERVES 3

INGREDIENTS

  • 3 large free range eggs
  • 1 cup broccoli, roughly chopped
  • 1 cup kale leaves, roughly chopped
  • 1 cup spinach leaves
  • 3/4 cup chilli leaves, stemmed
  • 1/2 cup asparagus, roughly chopped
  • 1/4 cup malunggay leaves, stemmed
  • 2-3 garlic cloves, finely minced
  • 2 large green chillies, sliced
  • 2 small red onions, finely diced
  • 2 small red bird’s eye chillies, sliced
  • 1 stalk green scallions, chopped
  • 3 tbsp olive oil
  • 2 tsp black olives, sliced
  • 2 tsp capers
  • Handful basil leaves, roughly chopped
  • Salt and ground black pepper, to taste
  • Shaved parmesan cheese

Optional (to serve with)

  • 1 large avocado, peeled, pitted, and sliced (optional)
  • Crusty bread, toasted

METHOD

  1. Heat olive oil in a non-stick sauté pan over medium heat. Add the minced garlic and sauté until golden brown and fragrant, about 30 seconds. Be careful to not burn the garlic. Then add in the diced onions together with half of the sliced green chillies and the white parts of the scallions, cooking until they soften, about 1-2 minutes.
  2. Next, add in the chopped broccoli and cook for about a minute before adding the chopped asparagus in. Season with a touch of salt and freshly ground black pepper. Give it a good mix and cook for a further minute or so until they start to soften a bit.
  3. Add in the chopped kale and spinach leaves with just a touch of water. Cover for about 30 to 45 seconds to allow the steam to wilt the leaves. Add in the chilli leaves followed by the malunggay leaves and give it a good mix. Cook, uncovered, for about a minute or two; turning the heat down to low at this point so that your veggies do not overcook.
  4. Flatten the veggie mixture with a spatula and create 3 small wells. Crack an egg into each well and season with a touch of salt freshly ground black pepper. Add the sliced black olives, capers, red and green chillies, and green scallions. Cook the eggs until done to your liking. You can also cover to steam and cook the eggs faster (about two minutes for cooked whites and a lovely runny yolk). Heat off, and sprinkle with the chopped basil leaves to garnish.
  5. Serve immediately with your choice of sliced avocado or crusty bread, or ever both for a heavy brunch. Enjoy!

Super Green Shakshuka

You can easily double this recipe to serve more hungry tummies. It’s an easy, one-pan dish filled with lots of green goodies and poached eggs. Whether you eat it for breakfast or dinner, it’s a hearty, nutrient-packed meal that will last you through any season!

Super Green Shakshuka

BON APPÉTIT

– Ally xx

myTaste.com

Strawberry & Mascarpone Dessert Pizza

Strawberry & Mascarpone Dessert Pizza

Hello Everyone! For the month of February, I’ll be sharing some sweet dishes to celebrate the month of love! Though in my opinion, I believe love should be celebrated every day. No, I don’t mean that you should buy gifts and whip up something special in the kitchen every single day, but you should always make your significant other feel loved, whether big or small the gesture.

Strawberry & Mascarpone Dessert Pizza

For tonight’s recipe, forget chocolate dipped strawberries. Here’s a dish that takes the classic combination of Strawberries and Chocolates to the next level and is sure to impress your significant other for Valentine’s Day. I originally had a different recipe planned for tonight, but I was inspired by someone special to make this dessert pizza and share it with you guys.

Also, check out this recipe that I made a couple of years back if you wish to try out a different take on a berry dessert pizza: Nutella & Mixed Berries Pizza.

PREP TIME 10 MINS* | COOKING TIME 10 MINS | SERVES 3-4

* When you plan to tackle this recipe, make your dough ahead of time as needs to be refrigerated overnight before using.

INGREDIENTS

  • Classic New York Style Pizza Dough Recipe
  • 2 punnets (600g) fresh strawberries, washed, hulled, and sliced
  • 250g Mascarpone Cheese
  • 1/2 cup balsamic vinegar
  • 1/4 cup nuts, roughly chopped
  • 5 tsp Nutella
  • Handful of fresh basil leaves

METHOD

  1. Preheat oven to 220C (245F or gas mark 7). Place your pizza stone in the oven as well to heat it up.
  2. Roll out your dough to a circle about the same size as your pizza stone on a lightly floured surface as thick or thin as you want. Transfer the rolled-out dough onto a sheet of parchment paper. This will easily help you transfer your pizza onto the preheated stone.
  3. Brush around the edges with a little bit of water, then spread a thick wall of Nutella all the way around the edges. Fold, or roll the edges over the wall of Nutella and seal it in by pressing down on the damp dough to form a stuffed crust.
  4. Carefully remove the pizza stone from the oven. Transfer the dough onto the hot stone and bake in the oven for about 3-4 minutes.
  5. While the pizza is baking, heat the balsamic vinegar in a small non-stick saucepan over medium-high heat. Simmer, continuously stirring to check on the consistency of the glaze, until the vinegar is reduced to a thick sauce, about 5 minutes, Remove from the heat and leave to cool down for a bit.
  6. Remove the pizza from the oven. Spread a thin (or if you are that type, a generous) layer of mascarpone cheese onto the dough and, top with the sliced strawberries and the nuts. Place it back into the oven with the grill setting on and grill for a further 3-4 minutes or until cooked all the way through. It should not take more than 10 minutes in total.
  7. Remove from the oven and top with fresh basil leaves and drizzle with the balsamic reduction. Serve and enjoy immediately!

Strawberry & Mascarpone Dessert Pizza

Strawberry & Mascarpone Dessert Pizza

BON APPÉTIT

– Ally xx

myTaste.com

Mangosteen, Lemon, and Basil Cocktail

Mangosteen, Lemon, and Basil Cocktail

Hello Everyone! Before we jump into a new fruit theme for the month, I would just like to take this opportunity to thank each and every one of my Auguesters for sharing, not only their deliciously enticing recipes, but for also sharing their story and passion for food. Thank you to the new faces, and of course to the recurring guests over the years since I started the series. I hope that I can call everyone together again next year! If you would like to know more about the series, and possible hop on the bandwagon for next year, check out the ‘Auguest’ tab above and feel free to drop me an email if you have any questions, or if you are interested in being a part of the series for next year. Yes, I will take bookings as early as now *cheeky grin*.

Moving forward, the theme, or shall I say, fruit for September is none other than the Queen of Fruits herself – Mangosteen. Mangosteen is a tropical fruit that is in season from May to September; widely grown in the eastern, central, and southern parts of Thailand. Mangosteen is known as the ‘Queen of Fruits’ because of its unique crown and deliciously sweet taste.

Mangosteen Fruit

The fruit has a thick reddish-purple-brown rind with a green petal-like crown. The juicy white pulp is made of segments of varying sizes – usually 4 to 8 pod-like fruits. The number of hard brown petals at the bottom of the fruit indicates the number of segments. Among the pulp segments, only one or two are big and have almond-like seeds in them.

Here are some pointers on how to select the best of the best mangosteens:

Colour

When the fruit starts to ripen, the rind turns reddish-purple. At this stage, the mangosteen has a sweet and sour flavour to it, and it can be stored longer than ripe ones which have a dark purple rind to it and is sweet.

Stem

Choose fruits that still have fresh, green stems. Dry stems indicate that the fruits are old.

Skin Appearance and Feel

Good mangosteens have firm yet flexible rinds. You want to avoid those with cracks and bruises since it is likely that they have fallen from the trees, and are generally bad. Bruising also causes the skin to harden.

Additionally, mangosteens that have a smooth and shiny skin usually means that they have been sprayed with chemicals. On the other hand, fruits that have brown stains are often organic and sweet.

Hardened yellow drops on the skin is dried-up sap. If it’s just on the skin, it has no negative effect on the fruit, however, once it enters into the fruit, it often spoils the pulp and thus making it inedible. Unfortunately, it is difficult to know before opening the fruit.

Weight

Choose fruits that are heavy for light fruits often mean that they are old and its pulp may be dry. If you are able to, it’s a good idea to sample the fruit first before buying it. Fruits from the same batch are more likely to be of the same quality. However, it is quite common in some markets that different grade fruits are mixed. Therefore it’s worth the extra effort to check out several fruit stalls and buy from the best ones.

Mangosteen Fruit

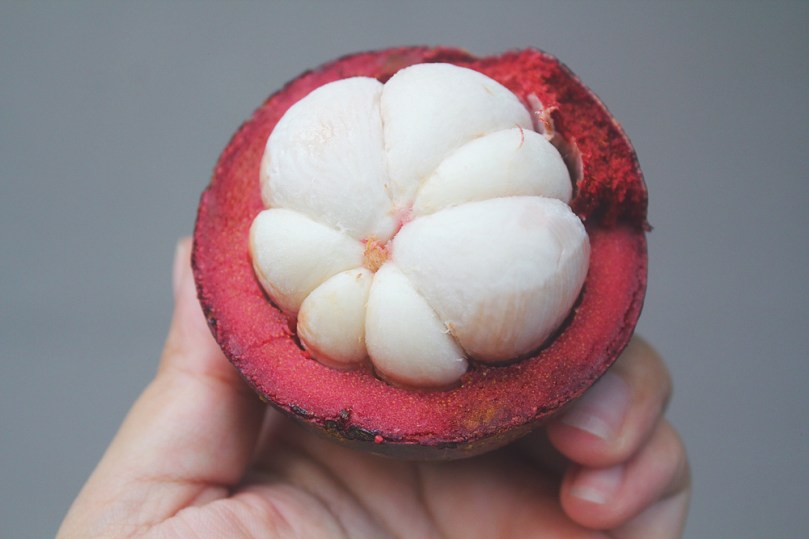
How to cut open a Mangosteen Fruit

Take a mangosteen fruit and insert a knife about half an inch into the rind (outer thick skin). Slide the knife around the fruit so that it does not touch the inner white fleshy pulp part, and without cutting the fruit in half. Another method would be to firmly press down on the fruit until the rind tears open. Twist and tear until it opens apart. Once open, scoop out the fleshy white fruit and discard the rind.

The recipe that I will be tackling tonight, is a simple yet refreshingly exotic cocktail drink to quench that weekend thrist. Or hey, maybe even a midweek-midday stress reliever? Your choice. I won’t judge. I’m probably the latter. Feel free to substitute the booze for any other alcoholic beverages such as vodka, or completely leave it out for a mocktail drink instead.

Mangosteen, Lemon, and Basil Cocktail Ingredients

PREP TIME <10 MINS | COOKING TIME | SERVES 1*

* Recipe can easily be doubled, tripled, etc. to serve 2, 3, or larger groups.
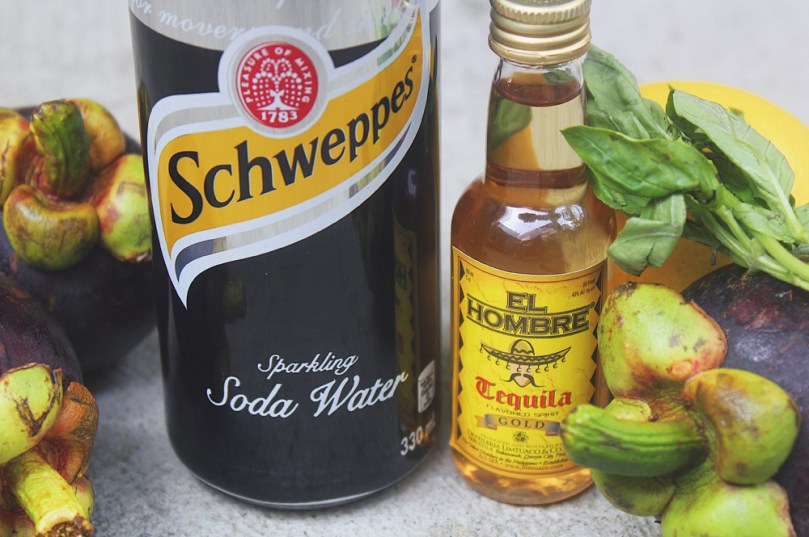
INGREDIENTS

  • 4 fresh mangosteen fruit
  • 2 shots tequila**
  • 330ml soda water
  • 1 sprig basil leaves, finely chopped
  • 1 tbsp white granulated sugar
  • Juice of 1 lemon

Optional

  • Basil leaves, to garnish
  • Coarse sea salt
  • Ice cubes
  • Lemon slice, to garnish

* 1 shot = 2 tbsp

METHOD

  1. Add the fleshy white fruit (pitted)*** of the mangosteen into a blender and blend well until it becomes a smooth fruit paste.
  2. In a pitcher, add the soda water, lemon juice, and sugar together. Stir well. After the sugar dissolves, add in the mangosteen fruit paste and shots of tequila. Stir.

Note: Add half of the lemon juice first. Taste then add/adjust if needed. If you add all the lemon juice in one go, it may become very tangy and you may have a hard time in adjusting the flavours. Diluting the juice isn’t a good idea.

  1. Transfer the juice to a salt-rimmed glass, and garnish with a lemon slice and basil sprig. Add ice cubes if you wish.
  2. Serve and enjoy!

Mangosteen, Lemon, and Basil Cocktail

*** While other choose not to eat the seeds of a mangosteen fruit, they are actually are soft and edible. In some cases though, the seeds may be hard and bitter so you might want to discard them if so. Only the larger pulps of fruit contain seeds.

BON APPÉTIT

– Ally xx

myTaste.com

Dragon-flamed Tuna Belly with Fiery Dragon Fruit Salsa

Dragon-flamed Tuna Belly with Fiery Dragon Fruit Salsa

Hello Everyone! I know I made it sound like I’d be gone for a while over on my IG stories last month, but I’m back feeling inspired and motivated to push through the year with fun recipes that I have been putting together during my short hiatus for Amcarmen’s Kitchen.

For the month of June I’ll be featuring one of my favourite fruits of all time – Pitaya or also known more commonly in English as Dragon Fruit, more specifically the red-fleshed variety. The name ‘Dragon Fruit’ was derived from the overall exterior aesthetic of the fruit, which has a leather-like skin and prominent scaly spikes. Pitaya (or pitahaya) is the name derived from Mexico, which refers to the name of tall cacti species with flowering fruits.

Fiery Dragon Fruit Salsa

Dragon Fruits grow on long, thin, and vining cactuses (yes, this is also a valid pluralisation of the word cactus). On the outside, Red Dragon Fruits look almost identical to the white-fleshed variety. The pulp of a Dragon Fruit has a texture that is similar to a kiwi, with small and black edible seeds throughout. Red Dragon Fruits are sweet, but not as sweet as the white-flesh variety, and has a mild acidity to it. In addition, these fruits pack a lot of nutrients that are beneficial for our health. They are low in calories and are a good source of iron, magnesium, and vitamins C & E. Dragon Fruits also contain prebiotics, which helps promote the growth of healthy bacteria and potentially improve the balance of them in your gut.

Dragon-flamed Tuna Belly with Fiery Dragon Fruit Salsa

Tonight, I’ll be whipping up an easy one for y’all. The recipe title may sound intimidating, but it’s really all “just for fancy show” to draw creative links between the fruit itself, and Dragons. Read below for further details on coming up with the name for this dish. This salsa recipe can be modified based on the availability of seasonal ingredients and what you have readily available in your pantry. So feel free to get creative here! You may also substitute the dragon fruit for kiwi, mango, nectarines, or peaches. Just make sure to use a firm and barely ripe fruit so that it will hold its shape in the salsa.

Fiery Dragon Fruit Salsa Ingredients

PREP TIME 20 MINS | COOKING TIME 30 MINS | SERVES 4

INGREDIENTS

  • 1 kg fresh tuna belly slab, washed and pat-dried
  • Olive oil
  • Sea salt and freshly ground black pepper, to season

For the salsa

  • 1 small dragon fruit, diced*
  • 1 small red onion, minced
  • 1 red bird’s eye chilli, seeds in and minced
  • 1 tbsp red wine vinegar
  • Drizzle of olive oil
  • Handful of finely chopped basil leaves
  • Sea salt and freshly ground black pepper, to taste

*The grocer that I bought them from only had gigantic dragon fruits, where the one I bought and pictured for this recipe was about 800g! In this case, I only used half of the fruit for the recipe.

METHOD

Breaking down a dragon fruit may look intimidating, but it really is quite simple.

  1. Fiery Dragon Fruit Salsa: Slice the fruit in half lengthwise and spoon around the outer edge of the fruit to scoop out the flesh. Dice and place in a medium-sized mixing bowl together with the minced onion, chillies, basil leaves, vinegar, and olive oil. Stir to combine and season to taste. Set aside in the fridge for the flavours to infuse and chill.
  2. Dragon-flamed Tuna Belly: Rub the tuna belly with olive oil and season with sea salt and freshly ground black pepper.
  3. Dracarys.

If you don’t understand step #3, then skip ahead to step #4 (also, this means we can’t be friends… Just kidding! *cheeky grin*)

  1. Flame-grill on lightly greased grates over hot coals for about 3 to 5 minutes on each side or until the fish flakes easily with a fork. Feel free to adjust grilling time depending on how you like your tuna to be cooked.
  2. Remove from the heat and transfer to a serving plate. Serve hot with the Dragon Fruit Salsa and a salad for a complete meal. Enjoy!

Dragon-flamed Tuna Belly with Fiery Dragon Fruit Salsa

Just before I wrap things up with tonight’s post, I just wanted to mention that the featured recipe is actually a mash-up of ideas between a friend and myself. I already had the choice of fruit in mind that I wanted to work with for the month and what to make of it to pair with a beautiful slab of tuna belly. He suggested that I cut the fruit in half, scoop out its flesh, chop it up, and serve it in its skin/casing. I mentioned that I already had the idea to make a fiery (spicy) Dragon Fruit Salsa to go with the tuna belly, to which I said I could take his idea of serving the salsa in the dragon fruit skin. In the end I put that idea aside just because there wasn’t much contrast with the colours of the salsa and the dragon fruit skin. Nonetheless, I’ll keep this idea for another dish!

In addition, while exchanging ideas, I mentioned that I thought of grilling the tuna belly, to which he suggested to play with the idea of ‘dragon’ in the name of the dish and hence Dragon-flamed Tuna Belly. It is still essentially flame-grilled tuna belly but Dragon-flamed sounded way more cool.

BON APPÉTIT

– Ally xx

myTaste.com

Salsa Verde

Salsa Verde

Salsa Verde

Hello Everyone! A new month means a new theme on the blog – and I’m sorry to start off on a negative note but I had plans to do a month-full of recipes that emphasise mangoes as the hero of the dish since it’s been in season for a while now here in Brunei. However, if you’re a regular reader on my blog, you’ll know that I have been working for the past 4 Sunday’s (which is basically my only time to enjoy myself in the kitchen), and because of that, I haven’t actually prepared any dishes for the theme that I had planned for my blog. I also haven’t been cooking any other dishes since my last free Sunday back in April, and so I decided that for this month, there will be no theme for the blog. Do not fret though! I will still be posting recipes, but they will be recipes that I have cooked up in the past – some taking us back towards the end of last year – that I didn’t get around to posting or fitting into a theme every month.

Tonight, I will be sharing with you, a recipe that I came across when I was exploring the Sydney Fish Markets for the nth time. Most of the fresh seafood stores there provide mini recipe cards to encourage the public to purchase their fresh catch. Every time I visited, I would always grab a recipe card, and one of the recipes that I was interested in was for Seared Tuna with Salsa Verde – and that’s what I’ll be sharing with you today, a recipe for an easy, simple, yet yummy Salsa Verde with pan-fried salmon in my case, but it’s completely up to you on what type of fish you’d like to pair it with!

For those of you who don’t know, Salsa Verde literally just means green sauce that contains mainly herbs, common in Italian, French, German, Spanish, and Mexican cuisines, each with their own twists and variants. The recipe that I will be sharing tonight gears more towards Mexican  where it is typically made up of puréed cooked or raw tomatillos, with jalapeños or other chili peppers, white onion, cilantro, and sometimes lime to enhance the taste. Salsa verde can range in spiciness from mild to mouth-searing. It may be served warm or cold, as a condiment – a dip for tortilla chips and served with tacos, or paired with grilled pork, grilled meats, and even fish.

Salsa Verde Ingredients

PREP TIME 10 MINS | COOKING TIME — MINS | SERVES 250ml

INGREDIENTS

  • 1/2 cup grapeseed oil
  • 1 bunch basil leaves
  • 1 bunch flat-leaf parsley leaves
  • 7 anchovy fillets
  • 4 garlic cloves
  • 2 tbsp baby capers in brine, rinsed
  • Juice of 1 lemon

METHOD

  1. Combine all the ingredients in a food processor or blender and process until smooth.
  2. Serve and enjoy as a condiment with your choice of dish (a dip for tortilla chips and served with tacos, or paired with grilled pork, grilled meats, and even fish). This recipe makes enough sauce to fill about a 250ml sized jar and can be kept in the fridge for up to a week.

Salsa Verde

Salsa Verde with Pan-fried Salmon

BON APPÉTIT

– Ally xx

myTaste.com