Pappardelle with Homemade Cheese-stuffed Meatballs

Pappardelle with Homemade Cheese-stuffed Meatballs

Pappardelle with Homemade Cheese-stuffed Meatballs

Hello Everyone! Oh wow – it has definitely been a while since I last updated my blog (well, I don’t think two weeks is “a while” but it definitely is for me)! I feel like I’ve lost touch on how to write since my last post, but I’m guessing that it is just the fatigue speaking here. In a nutshell, I’ve been super busy for the past two months, and it was really difficult for me to just sit down and write with a clear mind. I had been staying in the office until 9/9:30pm every night and have been working on Sunday’s as well since April. I know I shouldn’t be complaining because my other colleagues already do this on a daily basis and stay even later as well – it’s just that I am not used to this way of working.

Anyway! So what have I been up to? I don’t even remember if I have mentioned this in any of my previous blog posts – if I have, the annual Sukan Ria Antara Syarikat Inter-company Sports Fest 2016 finally closed two Sunday’s ago. You would think that that would be such a relief, but nooooooo! Just 3 days later, the opening of the 18th Consumer Fair snuck up on us, and that lasted up until Sunday. Though things have slowed down a bit, I still feel the stress from the past 2 months – and I believe it’s just because I haven’t had a proper rest yet. That’s right, right after the closing of the 18th Consumer Fair, we still had to report to work the next day at 8am *sigh*. Well, I’m just excited and really looking forward to the upcoming long weekend to just sit back, relax, and catch up on some cooking for my blog (doesn’t exactly scream relaxing, but cooking does made me happy).

Homemade Cheese-stuffed Meatballs

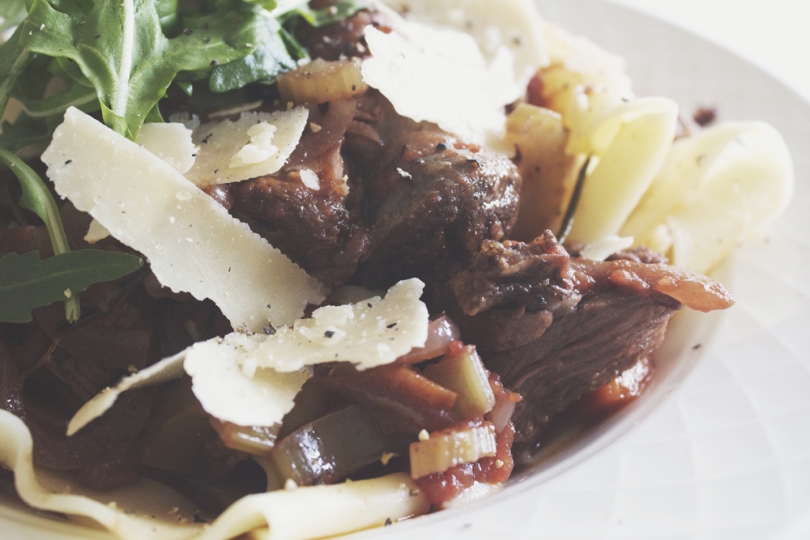
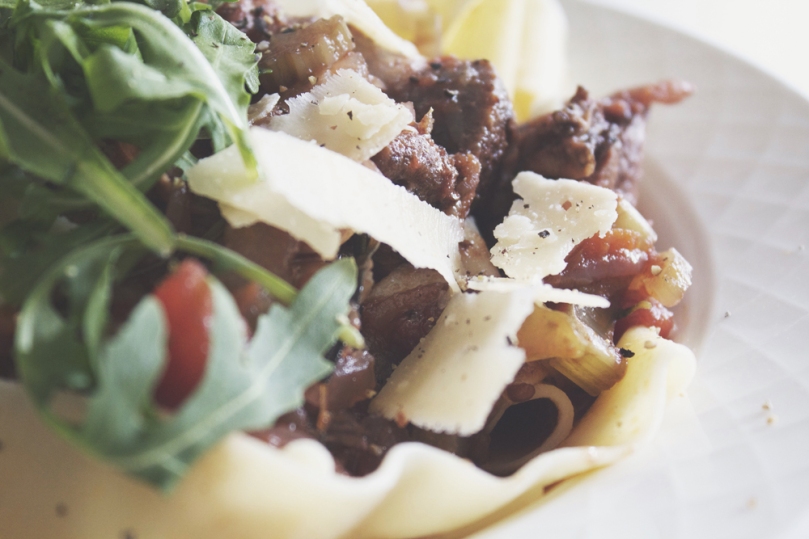
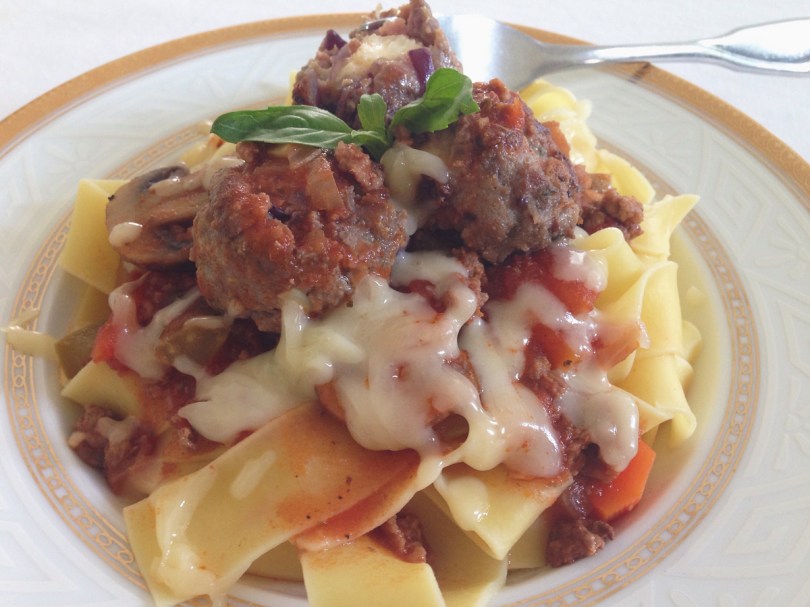
For the month of June, I will be sharing some delicious pasta recipes with you. I do believe that I mentioned about sharing some yummy mango recipes with you for this month – but I unfortunately did not have any time at all to make any dishes at all and mangoes are not in season anymore. So here’s a recipe for a classic bolognese sauce with pappardelle and homemade meatballs:

Pappardelle with Homemade Cheese-stuffed Meatballs Ingredients

PREP TIME 20 MINS | COOKING TIME 30 MINS | SERVES 4

INGREDIENTS

For the sauce

  • 250g pappardelle (or any other pasta)
  • 125g baby brown mushrooms, sliced
  • 1 can (400g) chopped tomatoes
  • 1 cup of chicken or beef stock
  • 3 garlic cloves, minced
  • 2-3 dried bay leaves
  • 1 celery stick, sliced
  • 1 medium-sized carrot, cut into small chunks
  • 1 red birds-eye chilli, sliced (optional for that added kick of spice)
  • 1/2 green capsicum, diced
  • 1/2 medium-sized red onion, diced
  • 2 tbsp tomato paste
  • 2 tsp dried oregano
  • Ground sea salt and black pepper to taste
  • Knob of unsalted butter
  • Mozzarella cheese, grated

For the meatballs

  • 250g minced beef
  • 1 large free range egg
  • 1/2 medium-sized red onion, minced
  • 1/4 cup bread crumbs*
  • 1 tsp dried oregano
  • Bocconcini balls
  • Ground sea salt and black pepper to taste

*You can buy readily made bread crumbs from the shelves or you can make your own by lightly toasting some stale bread (if you have some in handy) and then blitz it in the food processor.

METHOD

  1. Preheat oven to 190C (375F or gas mark 5). Line a baking tray with parchment paper and set aside.
  2. For the meatballs: Add all the ingredients, except for the bocconcini balls, to a large bowl and mix until well combined. Shape the mixture into small to medium-sized balls and press a bocconcini ball (cut into smaller pieces if it is too big) into the meatball. Gently place onto the prepared baking tray and repeat with the remaining meat, about a dozen to fifteen balls altogether depending on the size. Place in the oven and bake until browned, about 10 minutes. Once done, remove from the oven and set aside.
  3. For the sauce: Heat about a tablespoon of oil together with a knob of unsalted butter in a large frying pan over medium-high. Sauté the garlic until golden and fragrant, then add the chillies and onions. Sauté until the onions are soft and then add in carrots, followed by the celery, and then the mushrooms. Cook for about 3-4 minutes. Season with salt, pepper, and oregano. Cook, stirring, until the vegetables are soft.
  4. Add the dried bay leaves, chopped tomatoes, tomato paste, and stock. Give it a good mix and then turn the heat down to low, cover and let it simmer for about 15 minutes to allow the flavours to blend. Finally, add in the capsicum and meatballs, cooking for a further 5-8 minutes.
  5. Meanwhile, cook the pappardelle according to packet instructions.
  6. Remove the sauce from the heat and serve over the hot pasta. Top with the meatballs and a handful of grated mozzarella cheese. Enjoy!

Pappardelle with Homemade Cheese-stuffed Meatballs

BON APPÉTIT

– Ally xx

myTaste.com

Puto (Steamed Rice Cakes)

Puto (Steamed Rice Cakes)

Hello Everyone! So this is kind of unrelated, but related at the same time – I typed puto into Google because I wanted to know the English name for it (well I knew what they were in English, I just needed confirmation). To my surprise, Urban Dictionary was the first result. Puto is a Spanish word used to describe a male prostitute and is sometime’s offensive for homosexuals. In Mexico, the word is used for cowards and traitors. Anyway! Sorry but this post will not be about male prostitutes, but instead, it’ll be of a recipe for a steamed rice cakes. Before I begin, if from this point onwards you see me write put instead of puto, it’s because my laptop automatically autocorrects it to put. I have tendency to just keep typing without going back and reviewing what I’ve written.

Anyway, here’s an interesting fact about puto that I myself did not know until I did some research for this post. Puto is believed to have been derived from from Indian puttu of Tamil origin. These steamed rice cakes are usually eaten as a dessert, but most Filipinos much prefer to have them for breakfast with coffee or hot chocolate, or for a mid-afternoon snack with dinuguan (blood stew). The recipe that I will be sharing today is not, in a sense, the traditional puto you’d find in the Philippines. It is non-traditional because, self-raising flour is used instead of rice flour. Texture wise, it has more bite and is less airy than what I’ve had before. To be very honest, these are the best-tasting putos I’ve ever had and I am glad that I came across this recipe.

Puto (Steamed Rice Cakes)
the photo above was taken when I made these cakes for a family dinner in Brisbane. The silicone moulds I used here were a bit smaller so I think I was able to make a good 4 dozen mini cakes that time

I actually learnt this recipe from my Mom’s high school friend when we visited her and her family in Melbourne a few months back in early June. She runs her own catering business, together with her mother and sister, and while spending time at hers, I learnt how to make these delicious non-traditional putos. I think I made quite a hefty batch over the two days that they needed to be made, and I missed out on making a hundred of them for a special order because that was the day my family and I left and flew over to Brisbane.

I’ve made these rice cakes numerous times after having learnt from my Mom’s friend. I’ve made them for a family gathering in Brisbane and they were a big hit! I’ve also made them for a few family friends here in Brunei and they too loved it. The last time I made these, which was for this blog post as well, was a big hit when I shared them amongst my friends too. I’m pretty sure that you’ll love these cakes too when you get around to making them. If you for some reason don’t like them, then I’m sorry, but we can’t be friends *cheeky grin*.

Puto (Steamed Rice Cakes) Ingredients

PREP TIME 5 MINS | COOKING TIME 1 HOUR* | SERVES 2 DOZEN**

*Cooking time depends on how big a steamer you have. Mine is quite small and therefore I had to work in 3 batches to steam all cakes for this recipe.

**Serving size depends on the size of the moulds that you use – as stated above, when I used smaller moulds, I could easily get about twice the serving size from the bigger moulds that I used for this recipe post

INGREDIENTS

  • 2 cups self-raising flour
  • 1 cup caster sugar
  • 1 cup fresh milk
  • 3/4 cup desiccated coconut
  • 3-4 pcs sliced cheese, cut into thin strips
  • 3 large free range eggs, well beaten
  • 2 tbsp butter (I used olive butter)
  • 1 tbsp mayonnaise
  • 1 tbsp vanilla extract

METHOD

  1. Prepare your steamer by wrapping the lid with cloth and tie it in place around the handles. This will catch the water vapours from dripping onto you cakes and prevent them from getting wet and soggy.
  2. Add water to a pot and bring it to a boil.
  3. Combine all the dry ingredients in a large mixing bowl and whisk it together until combined. Next and in the butter and mayonnaise, and using the whisk, mash it into the flour mixture until moist crumbs form. Next, add in the milk, eggs, and vanilla extract, and mix until well combined.
  4. Line your moulds in the steamer and carefully pour the batter into the moulds and top, making an X, with the sliced cheese strips (see photo above).
  5. Carefully place the steamer over the top of that pot and cover with the cloth-wrapped lid. Steam for about 20 minutes.
  6. Once done, remove the steamer from the pot and place on a heat-proof surface. Remove the cooked rice cakes and repeat steps 4-6 for a fresh batch (because my steamer is quite small, I had to do three batches altogether).
  7. Leave the cakes in their moulds aside until they have cooled down slightly. Once they are quite cool, they will easily pop out from their moulds.
  8. Transfer to a serving dish and serve warm – either for breakfast, dessert, or an afternoon snack. Share and enjoy!

Puto (Steamed Rice Cakes)

Puto (Steamed Rice Cakes)

BON APPÉTIT

– Ally xx

myTaste.com

Minestrone Soup

Minestrone Soup

Hello Everyone! Winter Warmer Month is coming to an end this week *sad face* but surely we won’t be saying goodbye to soups forever. I’ll keep today’s post short only because I am actually just writing this now (maybe 30 minutes before this goes up) and I didn’t prepare it in advance or during the day. I’m keeping it short because I’m really tired, but I didn’t want to skip out on posting.

Basically I woke up at 6:30am today, yes that’s actually quite early for me especially since I didn’t sleep well last night, don’t know why. I got up earlier than usual to get ready and head over about an hour out West on the train, to Brendon’s (brendonthesmilingchef) place for a cooking collaboration that had been planning for just about over a month now. We spent the whole morning until late afternoon shopping, cooking, styling, eating, and talking – and overall it was a successful day. I won’t say what we made today because that will be coming up for the month of August!

Minestrone Soup

Okay (again I always do this), I said I’d keep it short but I’m already 200 words in and I haven’t actually talked about today’s recipe – Minestrone Soup. is a thick soup of Italian origin made with vegetables, often with the addition of pasta or rice. Common ingredients include beans, onions, celery, carrots, stock, and tomatoes. There is no set recipe for minestrone, since it is usually made out of whatever vegetables are in season. It can be vegetarian, contain meat, or contain a meat-based broth. I’ve made this soup a couple of times in the past and I used risoni pasta and added bacon chunks to it before. Today, I’m keeping it quite traditional, and used left over angel hair pasta hair that I cut into about 2cm long pieces.

Minestrone Soup Ingredients

PREP TIME 10 MINS | COOKING TIME 65 MINS | SERVES 4-6

INGREDIENTS

  • 375g McKenzie’s Italian Style Soup Mix, washed and drained
  • 150g maple-glazed bacon, cut into bits
  • 1 can (400g) canned diced tomatoes
  • 1 cup angel hair pasta, cut into 2cm long strands
  • 2-3 garlic cloves, minced
  • 2 small carrots, peeled and sliced
  • 1 celery stalk, sliced
  • 1 medium-sized onion, diced
  • 1 large potato, peeled and cut into small chunks
  • Ground salt and black pepper to taste
  • Shaved parmesan cheese
  • Bread of choice

METHOD

  1. Preparing the Beans:
    • Quick method: Put required quantity into a saucepan and cover with water – approximately 3 cups of water for every cup of soup mix. Bring to the boil and simmer for approximately 45 minutes or until cooked, skimming if necessary.
    • Traditional method: Soak soup mix for approximately 6-8 hours (overnight if convenient) before cooking.
  2. Minestrone Soup: Heat oil in a large pot over medium-high. Fry the bacon bits until browned, then sauté the garlic together with the bacon until fragrant and golden brown. The add in the onions and cooking until soft.
  3. Add in the carrots, celery, and potatoes, and season with salt and pepper to taste. Give it a good mix and leave to cooking for about 5 minutes before adding the canned diced tomatoes in. Cook for a further 5 minutes.
  4. Add in the chicken stock and bring to a boil. Once boiling, add in the prepared beans and further simmer for about 10-15 minutes, in the last 4 minutes, add in the angel hair pasta.
  5. Turn the heat off, and divide equally into serving bowls (4 large bowls, or 5-6 small bowls) and top with some shaved parmesan cheese. Serve immediately with some stone-baked Pane di Casa bread.

Minestrone Soup

BON APPÉTIT

– Ally xx

myTaste.com

Fresh Fruit Salad

Fresh Fruit Salad


Hello Everyone! Today’s post is a special one as this is my 100th recipe on the blog! I wanted to make something special, for my 100th recipe post, but I wasn’t in the mood to bake a cake for it because I baked one just last week, and I will be baking one this coming Thursday ready for my Mom’s birthday on Friday!

Fresh Fruit Salad

Anyway, today’s recipe is a classic dish that you will find on every Filipino’s table during Noche Buena (the eve of Christmas) and/or Media Noche (New Year’s eve) feasting celebrations. ‘Fruit Salad’ is a general term referring to a dish that is typically composed of an assortment of fruits, fresh or canned. The Filipino version of the fruit salad consists of these fruits, condensed milk, and table cream, making the dish a rich and sweet dessert. I personally don’t like the use of canned fruits just because of the amount of preservatives in them. Anyway, there are plenty of fresh fruits that can be bought at the local markets – and Philippine mangoes are in season right now so why substitute that for canned fruit cocktail?! However, buying a can of fruit cocktail is definitely cheaper for the average Filipino.

Here’s what you’d get if you use canned fruit cocktail to make your fruit salad; not as vibrant as the one above right? Also, by using fresh fruits, you get to play around not only with the type of fruit but with the many colours as well, for example vibrant green kiwis or bright orange mandarins/papayas? Take your pick! Just don’t forget to include bright yellow mangoes and definitely those luscious red dragonfruits.

Fruit Salad

Now, I’ve had a look at a few recipes online and none that I have come across add cheese in their fruit salads. From what I know, or I guess what my mom has told me is that, since this would normally be a dish served during Christmas and New Year’s time, a fruit salad would not be complete without the addition of pieces of queso de bola. Queso de Bola (translated: “ball of cheese”) is just Edam cheese, traditionally sold in spheres with a pale yellow interior and a coat of red paraffin wax.

Other than fruits, fresh or canned, and cheese, palm seeds and nata de coco can also be added. I love nata de coco; I’d always fish these out from the serving bowl! Nata de Coco, for those of you who don’t know, is produced by the fermentation of coconut water. It is translucent and has a jelly-like and chewy texture.

Fresh Fruit Salad Ingredients

PREP TIME 25 MINS | COOKING TIME | SERVES 8-10

INGREDIENTS

  • 3 young coconuts, flesh removed and shredded*
  • 1 can (380ml)  Nestlé cream
  • 1 can (570g) palm seeds, with syrup
  • 1 jar (340g) nata de coco, drained
  • 1 red dragonfruit, cut into chunks
  • 1 green apple, cut into chunks
  • 1 red apple, cut into chunks
  • 1 ripe Philippine mango, cut into chunks**
  • 1/2 block (125g) cheddar cheese, diced
  • 1/2 pineapple, cut into chunks
  • 1/2 large pomegranate, peeled and deseeded
  • 3 tbsp condensed milk
  • Handful of small black and red grapes

*The best thing about using fresh young coconut is that you get to have a nice tall glass of fresh coconut juice! The best thing in the world especially if you’re living right on the equator and experiencing high 30s all year round!

**You can use any other kinds of mango i.e. Kensington Pride mangoes, but honestly, Philippine mangoes are simply the best!

METHOD

  1. Combine all the fruits (except the dragonfruit), cheese, palm seeds with syrup, and nata de coco in a large serving bowl. If you add the dragonfruit in now and mix everything together, its colour will bleed into the cream and make everything pink!
  2. Add the condensed milk and cream and mix well, being careful though so that the fruits still remain intact and do not get crushed when mixing. Once everything is mixed, top with the dragonfruit chunks.
  3. Chill in the fridge/freezer for at least three hours.
  4. Serve and enjoy!

Fresh Fruit Salad

Fresh Fruit Salad

BON APPÉTIT

– Ally xx

myTaste.com

Pappardelle al Ragù

Pappardelle al Ragù

Hello Everyone! So today’s recipe is sort of a carry on from Monday’s special. If you’re like me, living by yourself, having a whole roast leg of lamb to yourself, you’re bound to have leftovers. What do you do? Lamb Ragù! Well, I’m pretty sure you can come up with other dishes to use your leftovers, if you have any that is, or you could always go out and buy lamb shanks or any other cuts that work for this dish.

I decided to go for a lamb ragù because not too long ago, exactly two weeks ago actually now that I think of it, a friend of mine planned for a little celebration for completing our degrees! We had dinner at the Westfield in Pitt Street, at a place called Janus Italian, and apparently she tried to book Jamie’s Italian but they are all booked out for groups until April! But nonetheless, Janus Italian was a nice dining place too – not to mention spacious as we had the whole back area to ourselves, well illuminated, and we could basically hear each other talk without having to shout across the table – all of which we probably wouldn’t have had/been able to do at Jamie’s. Seriously, though the food at Jamie’s is superb, it’s cramped, dark, and loud. Anyway, where I am getting at with this is that I had the Pappardelle al Ragù with slow cooked lamb. It was the best thing I’ve ever had! I even had the entrée sized dish and I was full about three quarters of the way into my dish. It was so good that when I knew I’d be making a roast leg of lamb, I would be able to make this too! Original recipe for slow-cooked lamb ragù can be found on Taste.

Pappardelle al Ragù Ingredients

PREP TIME 210 MINS | COOKING TIME 3 HOURS | SERVES 4-6

INGREDIENTS

  • 1kg roast leg of lamb meat
  • 500g pappardelle pasta
  • 1 can (400g) diced tomatoes
  • 3 celery sticks, sliced
  • 2 garlic cloves, crushed and then minced
  • 2 red bird’s eye chillies, sliced
  • 1 large carrot, peeled and cut into small chunks
  • 1 large spanish onion, finely chopped
  • 1/2 cup red wine
  • 1/4 cup fresh herbs such as rosemary and thyme, chopped
  • 2 tbsp extra virgin olive oil
  • 2 tbsp tomato paste
  • 1 chicken stock cube
  • Shaved parmesan cheese, to serve
  • Salt and pepper to taste

METHOD

  1. Preheat  oven to 220C.
  2. Heat olive oil in a large, frying pan over medium-high heat. Add in the garlic, chillies, and fresh herbs. Sauté until fragrant and then add the onions in. Cook until the onions are soft before adding the carrots and celery in. Season with salt and pepper, and cook for a further 10 to 12 minutes, stirring continuously.
  3. While the vegetables are cooking, add the lamb meat as well as the bones to a casserole dish (in my case I just used my rectangle pyrex dish).
  4. Add the red wine and leave to cook for about a minute or two before adding the the diced tomatoes, stock cubes, tomato paste, and about 2 cups of cold water. Stir to combine and then bring to a boil.
  5. Once boiled, remove from the heat are carefully scoop out the vegetables transfer them to the pyrex dish with the lamb meat. Then pour the liquid into the dish. Cover using aluminium foil, or with the lid if using a casserole dish with a lid, and place in oven to cook for about 3 hours or until tender.
  6. Once the lamb is done, get started on your pappardelle pasta. Bring a medium-sized saucepan of salted water to a boil. Cook the pasta according to the packet instructions, until al dente. Drain and transfer to a serving plate. Top with the lamb ragù and shaved parmesan. Serve!

Pappardelle al Ragù

Pappardelle al Ragù

BON APPÉTIT

– Ally xx

myTaste.com

Breakfast Muffins: Vegemite & Cheese

Breakfast Muffins: Vegemite & Cheese

Hello Everyone! Knowing that Muffin Making Monday would fall on ‘Straya Day, I just knew I had to make these muffins. All I can say is that when I was out doing groceries over the weekend, I had so many doubts about this, and I could not even comprehend WHY I decided to do this. I even struggled to place the tiny jar of vegemite into my trolley of groceries. I just could not bring myself to, but in my head I kept saying, “just do it. Do it for ‘Straya Day” and I did (what am I doing to myself).

Besides lamb, vegemite is another ‘Australian thing’. Vegemite has appeared on my blog once before, but for those of you who don’t know, vegemite is like the Australian version of marmite, a popular spread for sandwiches, toast, crumpets, crackers, and as well as a filling for various pastries. It is salty, slightly bitter, and apparently is similar to beef bouillon. You’ll either love it or hate it, and I did mention before that I am on the hateful side. The smell for me is a bit off-putting, and I know Vidhya hates it too, so I kept shoving the jar of vegemite up her nose whenever I had the chance to *cheeky grin*.

Breakfast Muffins: Vegemite & Cheese

I was too scared to bake a whole dozen muffins because I wasn’t too sure on how the taste would go down with me, so I only baked half a dozen, however, please note that the recipe below is for a full dozen – if you’re like me and don’t want to end up having to throw away the whole batch after eating one, then just half the measurements from the recipe below! Also, a little side note, I followed Sally’s master muffin mix recipe for these, and then added the vegemite and cheese. I only added about a tablespoon of vegemite as I was again afraid that the saltiness of it would overpower the taste of the muffin. But I can tell you that the batter smelled amazingly good!

But to be completely honest, these muffins did NOT taste as bad as I thought they would. It’s sort of like a taste that I cannot really describe. The only issue I had with them this morning was that because knowing that there was vegemite in them, I gagged a couple of times before even putting them in my mouth, so it kind of threw me off just a little bit. Nevertheless, the muffins were beautifully moist though, and I think that all the other ingredients mixed together with the vegemite sort of diluted its taste a bit. They weren’t at all overly salty like I thought they’d perhaps turn out to be. Having said that though, I would probably still never indulge in vegemite just as it is, like on toast or something as they have it here down under.

Breakfast Muffins: Vegemite & Cheese Ingredients

PREP TIME 25 MINS | COOKING TIME 25 MINS | MAKES 6 MUFFINS

INGREDIENTS

  • 3 cups plain flour
  • 1/2 cup granulated sugar
  • 1 cup milk, at room temperature
  • 1/2 cup light brown sugar
  • 1/2 cup vegetable oil
  • 2 handfuls of grated mozzarella cheese
  • 2 large free range eggs, at room temperature
  • 1-2 tbsp vegemite
  • 4 tsp baking powder
  • 1 tsp vanilla extract

METHOD

  1. Preheat oven to 220C. Line a 12 hole muffin pan with paper cases.
  2. Add the baking powder and flour in a large bowl, gently whizzing together until well combined. Set aside.
  3. In a medium-sized bowl, whisk together the eggs, granulated sugar, and brown sugar until combined. Then add in the milk, oil, and vanilla extract. Whisk together until the mixture is pale and yellow in colour.
  4. Using a spatula, fold the wet ingredients into dry ingredients and lightly mix everything together until all the flour is off the bottom of the bowl and no big pockets of flour remain. Then add in the cheese and vegemite, and continue to mix. Be careful as to not over mix the batter; it will result in tough, dense muffins. The batter will be extremely thick and somewhat lumpy.
  5. Spoon the batter into prepared muffin cups, filling them all the way to the top.
  6. Bake at 220C degrees for 5 minutes. Then reduce oven temperature to 190C and continue to bake for a further 25-26 minutes until tops are lightly golden. A toothpick inserted in the centre should come out clean. Allow to cool for 10 minutes before transferring to a wire rack to cool down completely.

Muffins taste best fresh the same day. Store muffins at room temperature in an airtight container for up to 5 days. Muffins freeze well, up to 3 months.

Breakfast Muffins: Vegemite & Cheese

Breakfast Muffins: Vegemite & Cheese

BON APPÉTIT

– Ally xx

myTaste.com

Vegemite & Tasty Cheese Damper Scrolls

Vegemite & Tasty Cheese Damper Scrolls

Hello Everyone! Sorry for not uploading a post on Tuesday; I did say that I would be in the Outback over the weekend! It was such an amazing trip, one I will never ever forget! The highlight for me was probably climbing Kings Canyon which was altogether probably a 3-4 hour climb/hike/walk with breaks in between. I am quite surprised that I am not aching everywhere after much climbing over the 3 days, but I do feel exhausted. The 4am wake ups were at first unbearable, but rewarded with the sight of the Milkyway covering the early morning sky. It was mesmerising. I even saw shooting stars for the very first time… While sitting on the toilet that faced out into the bush, no doors whatsoever, just sheets of tin that made three walls and a roof. Definitely an experience that no one else can say they’ve had while seeing shooting stars (unless of course my other fellow campers saw what I saw that morning as well)! I have many more stories to tell, but I will probably keep it for some other time and actually for those that do want to know more about my trip to the Red Centre.

Today’s recipe is something quite different, nothing I’ve made before and probably not something I would even attempt; because of a certain ingredient. It actually one of the things I had while camping, and that I actually helped make on our second night in the Outback. Our tour guide Dan from Wayoutback Australia (look them up if you are planning on an outback trip), briefly taught me how to make Vegemite(!) & Tasty Cheese Damper Scrolls. Ah yes, the infamous vegemite that you all either love or hate; I am probably on the latter. For those of you who don’t know, vegemite is like the Australian version of marmite, a popular spread for sandwiches, toast, crumpets, crackers, and as well as a filling for various pastries. It is salty, slightly bitter, and apparently is similar to beef bouillon.

I was honestly a bit reluctant on trying one of these, but for some reason the vegemite taste didn’t quite come through, and maybe it’s because of the lack of vegemite spread or the tasty cheese? Whichever it was, I actually quite enjoyed these damper scrolls – they were a bit rock hard though and I’m not sure why. I didn’t cook them, our tour guide Dan did over the campfire, so I’m not sure if it was the making or cooking process that made it hard. I did a bit of research and looked up a recipe for damper and it says to use butter – could it be the fact that we didn’t use butter in our damper? Dan if you see this (long shot), maybe give this recipe a go!

Damper, for those of you who don’t know is traditionally a simple Australian unleavened bread baked in an iron pot and buried in the hot coals of a campfire. During colonial times it was a staple food in the bush because the dry ingredients could be easily carried and they only needed to add water to make the damper. If you want to know more about damper, and for the original recipe, check it out at All Down Under.

Ps: I apologise for the poor quality of the photographs, they were taken using my phone as I had left my DSLR in the tent that night. I know, I could’ve gone and get it, but my hands were already dirty from making the damper.

PREP TIME 10 MINS | COOKING TIME 30 MINS | MAKES 12 SCROLLS

INGREDIENTS

  • 3 cups self-raising flour
  • 3/4 cups water or milk
  • 80g unsalted butter, chilled and cut into cubes
  • 1 tsp sugar
  • 1/4 tsp salt
  • 1 cup grated tasty cheese
  • 1/2 cup vegemite

METHOD

  1. Mix the flour, salt and sugar together into a bowl. Then rub the butter into the flour with your fingertips until it resembles fine breadcrumbs. Slowly add in the water (or milk) and mix together to form a soft dough. If your mixture is a bit too dry, add a little more liquid.
  2. Turn the dough over onto a lightly floured surface and knead lightly until smooth then roll out the dough into a thin rectangular shape. Spread the vegemite all over the dough and top with the tasty cheese.
  3. Roll up the pastry tightly and cut into equal portions (I cut mine up into 16 scrolls, just enough for one each for every camper), and place them cut-side up into a greased iron pot. Make sure to leave some space between the scrolls to allow room for spreading. Place in your campfire, cover with hot ashes and coals and bake for about 30 minutes or until damper is golden and the cheese has melted. Serve.

If you don’t have a campfire handy right now, you may also bake your scrolls in the oven. Just place them on a tray lined with baking paper and bake in the oven for about 30-40 minutes at 190C. I will probably give this recipe another go (not sure about the vegemite part) but just to see what if we had more vegemite and if the damper was a bit lighter and softer.

Vegemite & Tasty Cheese Damper Scrolls

BON APPÉTIT

– Ally xx

myTaste.com

Breakfast Muffins: Bacon, Cheese & Zucchini

Breakfast Muffins: Bacon, Cheese & Zucchini

Hello Everyone! Yes I am back and I do apologise for not posting a recipe or review for over 3 weeks now I think! I’ve been busy, with work, uni, and mainly procrastinating really. I haven’t stopped cooking though, in fact I have quite a few dishes to post – I just haven’t had the time to sit down and actually write a post for it. I know, you’re probably thinking that it’s not so hard writing up a recipe especially if it’s one that I followed from a book or online. Writing up the recipe isn’t the hard part, what’s sort of hard for me is spending time writing about let’s say a back story or just a story in general. I know this is a food blog but I do like to share a few things about myself, or my day/week etc.

Anyway, before I get to today’s recipe post, I just want to update all of you, about what’s been going on lately – also because I think my housemate Vidhya deserves a story to read after she was falsely mislead from my previous post. Now that I think about it, there’s actually nothing much to talk about – I know I have such a boring life! Just kidding! Otherwise I would’ve had all the time in the world to keep this blog updated. I mean, between uni and work, I do go out and see my friends over the weekend. I don’t even think that I’ve spent a lazy weekend at home just sleeping in and doing nothing all day for quite some time.

Breakfast Muffins: Bacon, Cheese & Zucchini

Two weeks ago I had a mid semester break, which really meant that I only had 2 weekdays off from classes because I still had to go in for my internship. And even so, those two days were spent out eating, shopping, and going to the cinema with friends. I went to Parramatta with Marissa and Jialing to check out this place called Paper Plane Café and the trip there was worth it all especially aster we massacred our brunch. I will get into more detail with this when I get around to posting a review on the place. I also recently joined the gym with Jialing! We’ve probably been going for three weeks now, basically just adding exercise into our daily life, toning the muscles, and overall staying fit (we have to burn all the brunches somehow)! I also hosted a dinner party probably 2 weeks ago or so for my COFA friends; a great success in terms of food and laughter. Those were probably the highlights of the past 3 weeks. Oh I almost forgot, the public holiday after the mid semester break, Edison, Jialing, and I had a photo shoot at the Royal Botanical Gardens, well more like Edison needed a new profile picture before he turned 23 and of course asked me to take the photos. Jialing and I had to join in the photo shoot fun of course! This photo shoot happened last week Monday which interrupted Muffin Making Mondays with Jialing and I – which is why we had our muffin session this Monday instead!

Today’s recipe post was actually requested by my mother. She told me she watched a cooking show with Chef Michael Smith in which he made mini bacon and cheese muffins. She told me to give it a go and tell her how it went and if it tasted good or not. I went online and found a recipe from Taste – Bacon, Cheese, and Zucchini Muffins! They taste so good! And I definitely made a few people in the office jealous I think as the smell of bacon travelled around. Jialing on the other hand made Orange, Lemon, and Poppy Seed Muffins – also so good! So good that I think I may make them for our next Muffin Making Mondays. I also baked some Macadamia and White Chocolate Cookies that Monday, but I will save the recipe for another time.

Breakfast Muffins: Bacon, Cheese & Zucchini Ingredients

PREP TIME 10 MINS | COOKING TIME 22 MINS | MAKES 12 MUFFINS

INGREDIENTS

  • 4 hickory-smoked bacon rashers, diced
  • 2 eggs, lightly beaten
  • 1 cup milk
  • 1 cup plain flour
  • 1 cup self-raising flour
  • 1/2 cup tasty cheese, grated
  • 1/2 cup zucchini, grated
  • 1/4 cup vegetable oil
  • 1 tsp baking powder
  • 1 tsp olive oil

METHOD

  1. Preheat oven to 190C. Line a 12 hole muffin pan with paper cases.
  2. Heat olive oil in a frying pan over medium-high heat. Add the bacon bits and cook for 5 minutes or until crisp. Once crisp, transfer the bacon bits to a dish lined with paper towels to drain off all the excess oils. Allow to cool.
  3. Meanwhile, squeeze the excess liquid from zucchini, this will prevent your muffins from becoming soggy. Tip, place the grated zucchini in a clean tea towel and squeeze – otherwise you can also just use your hands like what I did, working in small batches.
  4. Sift flours and baking powder into a bowl and make a well in the centre. Add in the vegetable oil, milk, and egg. Mix well until combined, and then fold in bacon, cheese, and zucchini.
  5. Spoon the mixture between the paper cases (makes 12 muffins). Bake for 20 to 22 minutes or until golden and just firm to touch. Stand in pan for 5 minutes and then transfer to a wire rack to cool.

Breakfast Muffins: Bacon, Cheese & Zucchini

Breakfast Muffins: Bacon, Cheese & Zucchini

BON APPÉTIT

– Ally xx

myTaste.com