Puto Bumbong

Puto Bumbong

Hello Everyone! I’d like to start the last post for the year by wishing everyone a very Merry Christmas! I hope everyone had a splendid eve celebrating, feasting, and continuing tradition with family and loved ones. What are some of your Christmas traditions? I’d love to know in the comments below! We had a simple and quiet Noche Buena at home, and of course watched some Christmas classics such as the Home Alone series. We’re not a family who gives gifts during the season of Christmas because we treat each other throughout the year – be in paying for the entire meal when we eat out as a family, or paying for the tickets and snacks when we go to the cinema together; gifts that allow us to spend time together as a family rather than materialistic things.

That aside, I mentioned in my last post that Christmas or Simbang Gabi would not be complete without this famous breakfast kakanin that is sold alongside Bibingka just outside the church. But, as all the other kakanins out there, you don’t have to wait until the Christmas season to roll around as you can find Puto Bumbong every day of the year at your local market, various street stalls, and in many restaurants and cafés nationwide.

Team Bibingka or Team Puto Bumbong

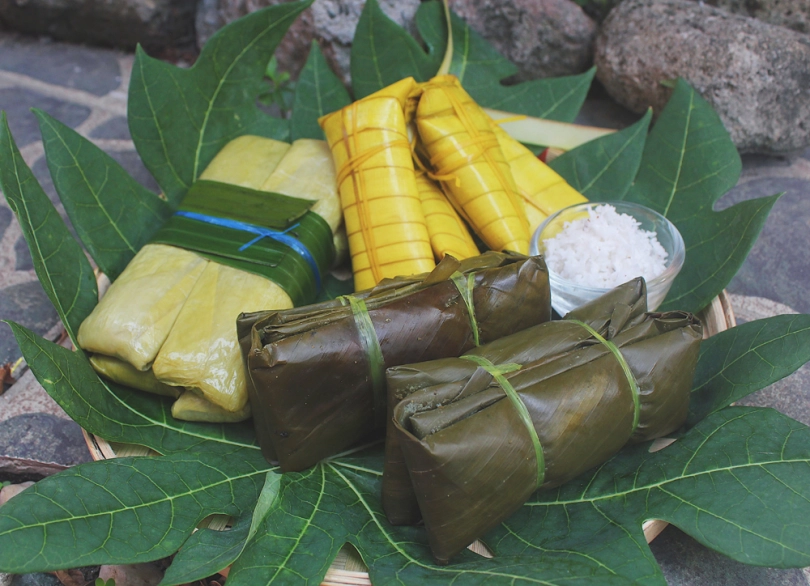
Puto Bumbong is a type of Filipino steamed rice cake that is traditionally made from a special variety of heirloom sticky (glutinous) rice known as pirurutong which has a distinct purple colour to it. Food colouring is not necessary for this. It is soaked in salted water and then dried overnight. It is then ground in a grinder made of solid stone before it is stuffed into a bamboo tube known as bumbong ng kawayan. It is then steamed until steam rises out of the bamboo tubes, placed onto a pre-cut banana leaf, and topped with margarine (or butter), grated coconut, and muscovado sugar to enhance its flavours.

And so for my last breakfast recipe of the year, I will share two ways in how you can make Puto Bumbong at home, with and without the bamboo tubes – depending if you have bamboo tubes readily available or not to be able to tackle this recipe. Before we dive in, be sure to check out the original recipe that I followed over on Panlasang Pinoy.

Puto Bumbong

PREP TIME 2 DAYS* | COOKING TIME 20 MINS | SERVES 6

*Be sure to allot yourself 2 days before you plan on tackling this recipe, as the rice needs to soak.

INGREDIENTS

For the puto bumbong

  • 6 cups water at room temperature, for soaking the rice
  • 1 & 1/3 cup sticky purple rice
  • 1 & 1/3 cup white glutinous rice
  • 2/3 cup long grain purple rice

For the toppings

  • Freshly grated coconut
  • Muscovado sugar
  • Softened butter or margarine
  • Banana leaves
  • Bamboo tubes

METHOD

  1. Combine all the different types of rice in a large mixing bowl together with the room temperature water. Set aside and leave to soak for at least 2 days.
  2. Drain and place the soaked rice in a large food processor. Pulse and grind until the rice becomes very fine (takes about 8 to 10 minutes to achieve this consistency). If you only have a small food processor handy, then work the rice in batches.

Cooking with Bamboo Tubes

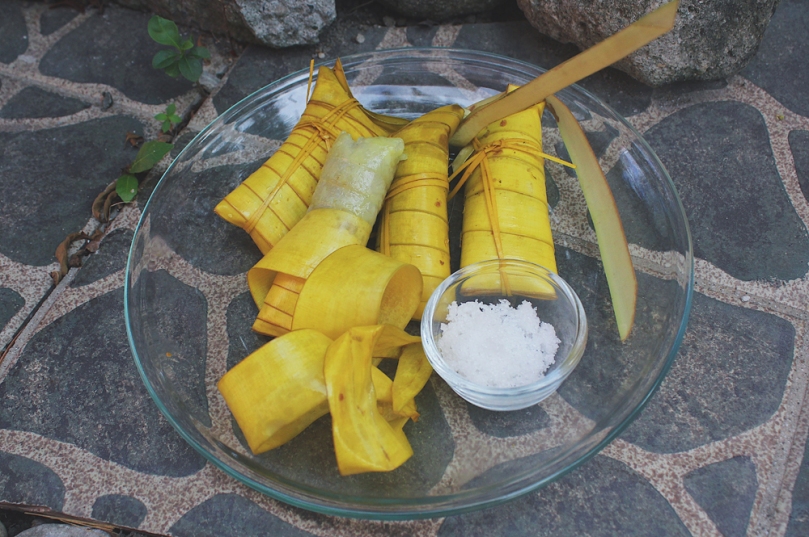
  1. Fill each bumbong (bamboo tube) with the powdered rice mixture, making sure not to compress the rice to allow the steam to pass easily.
  2. Prepare the steamer with enough water for steaming. Once the water has been brought to a boil, arrange each bamboo tube on the steamer. Cook until steam starts coming out of the tubes, about 8 to 10 minutes.
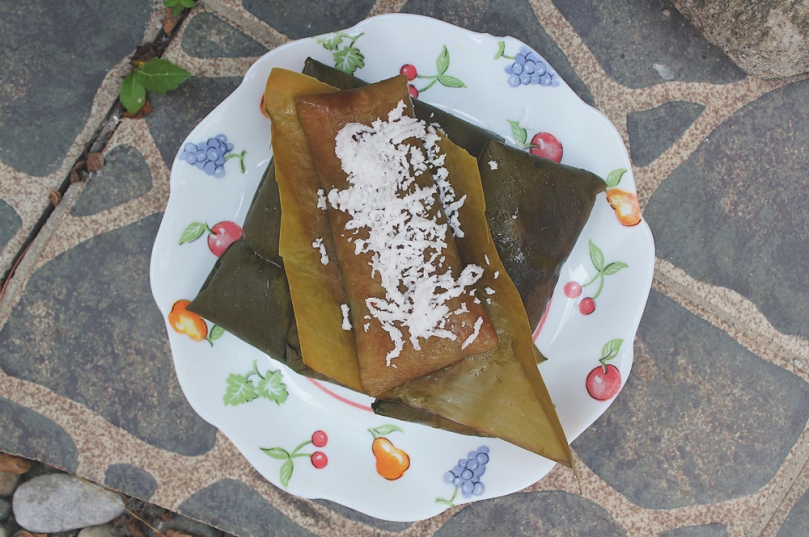
  3. Remove the tubes from the steamer, and carefully remove the puto bumbong from the tube and place over a piece of banana leaf.
  4. Spread with butter or margarine (I chose to leave this out of my serving) and top with freshly grated coconut and muscovado sugar. Serve, share, and enjoy with a hot cuppa!

Cooking without Bamboo Tubes

  1. Add about 2 cups of water to the powered rice mixture and mix together to form a dough. You may need less or more water, depending, so it’s best to add the water in gradually. Knead until smooth.
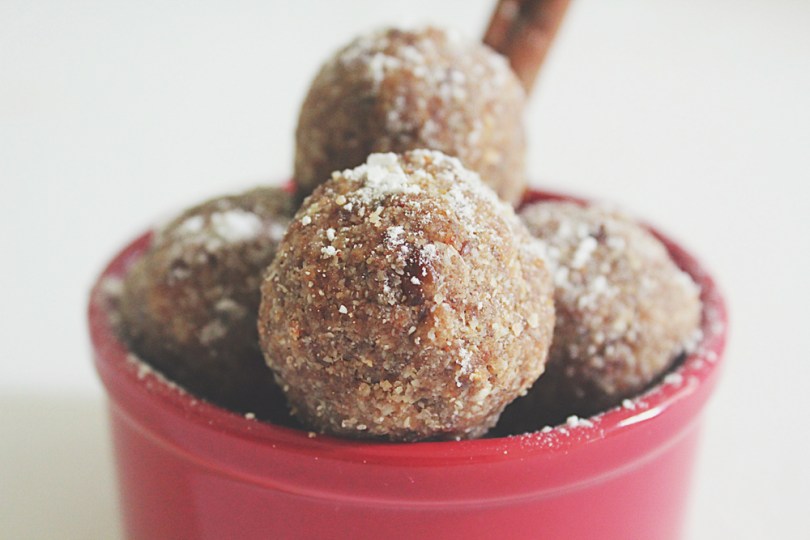
  2. Pinch off about 2 tablespoons of the dough and, using your hands, make a ball and then roll into a log, about 4 to 5 inches in length. Alternatively you can place the dough into a piping bag and using piping tip #807, pipe the dough onto a heat-proof plate greased with a bit of butter or margarine.
  3. Place the plate into a prepared steamer with a muslin-covered lid to prevent any droplets of water dripping onto the puto bumbong mixture. Steam for about 8 – 10 minutes.
  4. Remove from the steamer and place onto a banana leaf. Top with your preferred toppings and enjoy!

Puto Bumbong

A lot has happened this year, both in my personal and work life, which resulted in me having to put my attention to Amcarmen’s Kitchen on hold for a couple of months collectively. That being said, I’m going to try my best not to take as many breaks as possible for the upcoming year ahead, *fingers crossed*

I usually take the first month of the beginning of the year off to properly plan for the upcoming year ahead and to get a head start on experimenting in the kitchen for recipes to share with you guys. But since I haven’t been working since August of this year (still continuing to look for a job as I write this), I’ve had time to plan ahead and I’m excited to share with you what I have in store for the upcoming year! You’ll just have to wait until next week to find out the theme for the year ahead – which technically is in another week I just realised!

So for now, I would like to wish all my family, friends, and followers a Happy & Prosperous New Year! May the New Year bring you happiness, health, wealth, and peace!

BON APPÉTIT

– Ally xx

myTaste.com

Advertisement
Suman Malagkit, Suman sa Lihiya / Sumang Magkayakap, and Suman sa Ibos

Suman 3 Ways

Hello Everyone! Just 20 more days until Christmas, which means that Simbang Gabi is just around the corner! Simbang Gabi is a well-loved holiday tradition amongst Filipino Catholic devotees who attend mass at 4am. It is a series of 9 Novena Masses that commences on the morning of December 16 and culminates with the Misa de Gallo on Christmas Eve.

Apart from the Mass itself, another much loved part of the Simbang Gabi tradition that many look forward to are the local delicacies served just outside of the churches. You’ll find many vendors selling local Christmas favourites such as Suman, Puto Bumbong, Bibingka, Sapin-Sapin, and plenty more! Nowadays, these yummy treats, also known as kakanins, can be found in many establishments nationwide all year around so you don’t have to wait for Christmas to have your fill of them.

For the last month of the year, I will be sharing recipes for these traditional Filipino Christmas breakfast delights with you. And I’m going to kick it off with a popular favourite – Suman 3 ways!

Glutinous Rice (Malagkit) is a type of rice that is famous throughout Asia for its culinary use, especially in many variations of sweets. Here in the Philippines, one of the MANY most loved ways to cook glutinous rice is to wrap it in a banana leaf and then steamed. It is very easy to make, however time consuming. Filipinos take pride in doing it and many households have their own secret way to making this sweet and sticky rice delicacy.

Suman Malagkit

Suman Malagkit

In its simplest and most basic form is the Suman Malagkit, or translated, Sticky Rice Roll in a Banana Leaf.

PREP TIME 4 HOURS | COOKING TIME 2 HOURS | SERVES 20 PCS

INGREDIENTS

  • 2 cups glutinous rice, uncooked
  • 2-3 cups coconut milk (fresh, canned, or frozen)
  • 1 tsp salt
  • Banana leaves for wrapping

METHOD

  1. Malagkit Mixture: In a large bowl, soak the glutinous rice for 2 to 3 hours to soften, and strain when ready to cook.
  2. Place the strained glutinous rice in a large pot together with the coconut milk and salt. Bring to a brisking boil.
  3. Once boiling, immediately turn the heat down to low until the rice and coconut milk mixture comes down to a slow simmer. Give it a good stir and then simmer for about 20 to 30 minutes. Stir occasionally to keep the rice from sticking to the bottom of the pot.
  4. Turn the heat off, and leave the mixture for a further 15 to 30 minutes, covered, to allow the rice to finish cooking and cool down.
  5. Wrapping: While waiting for the rice to finishing cooking, prepare the banana leaves by quickly passing them over an open flame to make the leaves soft and pliable so that they are easier to work with when wrapping. This method also releases the natural aroma of the leaves.
  6. Cut the leaves into equal sizes, depending on the size of the suman roll that you want to make.
    Scoop about 2 to 3 heaping tablespoons of the rice onto the prepared banana leaf and shape into a log, leaving about 1 inch on the sides. Roll the banana leaf tightly around the rice to form a log and fold both edges in to seal.
  7. Repeat until all of the rice has been wrapped, yields about 20 pieces.
  8. Cook: Stack the suman rolls in a steamer and steam over boiling water for about 30 to 60 minutes. Make sure that they are tender before removing them from the steamer.
  9. Serve: Allow to cool slightly before unwrapping. Serve with fresh grated coconut, brown sugar, or my absolute favourite – with sweet ripe mangoes! They can also be enjoyed on its own without any accompaniments.

Suman sa Lihiya / Sumang Magkayakap

Suman sa Lihiya / Sumang Magkayakap

This is basically the same as Suman Malagkit, but is treated with lihiya (lye water) which gives the suman its yellowish colour, a delicacy from the southern part of Luzon, especially in the Batangas Region.

It is also known as Sumang Magkayakap because of how it is served – two rice cakes tied together appearing as if they are embracing/hugging (magkayakap) each other.

PREP TIME 4 HOURS | COOKING TIME 2 HOURS | SERVES 24 PCS

INGREDIENTS

  • 3 cups glutinous rice, uncooked
  • 1 tbsp lye water
  • Banana leaves for wrapping
  • Food-safe cotton string

METHOD

  1. Rice Mixture: In a large bowl, soak the glutinous rice for 2 to 3 hours to soften. Strain the water and then mix in the lye water together with the drained rice until it turns yellow in colour.
  2. Wrapping: Prepare the banana leaves by quickly passing them over an open flame to make the leaves soft and pliable so that they are easier to work with when wrapping. Cut the leaves into equal sizes, depending on the size of the suman roll that you want to make.
  3. Scoop about 3 heaping tablespoons of the rice onto the prepared banana leaf and shape into a log, leaving about 1 inch on the sides. Roll the banana leaf tightly around the rice to form a log and fold both edges in to seal.
  4. Take two of the wrapped rice rolls, with the folded sides facing each other, and tie them together using the cotton string.
  5. Repeat until all of the rice has been wrapped, yields about 24 pieces or 12 pairs of Sumang Magkayakap.
  6. Cook: Arrange the suman rolls in a large cooking pot. Pour enough water (room temperature) to cover them. Bring to a boil over low heat for about 2 hours or until done.
  7. Serve: Allow to cool slightly before unwrapping. Serve with fresh grated coconut or a sweet latik sauce.

Suman sa Ibos

Suman sa Ibos

A native delicacy known simply as Ibos (or also spelt as Ibus) by Ilonggos that is wrapped in palm or buri leaves. This is the counterpart of banana leaves, which is commonly used in many other suman recipes. They are mostly grouped and sold in bundles be it on the streets, in markets, mall stalls, and even restaurants.

The challenge with Suman sa Ibos is not the in cooking processing, but in preparing the ‘container’. You will need to swirl the palm leaves over a mold and locked properly to make individual containers to hold the glutinous rice mixture.

PREP TIME 3 HOURS | COOKING TIME 2 HOURS | SERVES 20 PCS

INGREDIENTS

  • 2 cups glutinous rice, uncooked
  • 2-3 cups coconut milk (fresh, canned, or frozen)
  • 1 tsp salt
  • Palm or buri leaves for wrapping

METHOD

  1. Preparation: In a large bowl, soak the glutinous rice for 2 to 3 hours to soften.
  2. While waiting for the rice, prepare the ibos (palm leaf) container/wrapper. The leaves should be about 1.5 inches in width. Fold the bottom edge of the palm leaf into a triangle. Swirl the leaf in an overlapping manner to create a cylindrical mold. To secure the tube, you can lock the leaf using a small piece of wooden pick. Prepare about 20 containers.
  3. Once the rice is done, drain the excess water and mix the coconut milk and salt in thoroughly. Set aside to stand for about 10 minutes.
  4. Fill the ibos container 3/4 of the way with the glutinous rice mixture. Seal the container by using the strips of the palm leaves.
  5. Cook: Arrange the suman containers in a large cooking pot. Pour enough water (room temperature) to cover them. Bring to a boil over low heat for about 2 hours or until done.
  6. Serve: Allow to cool slightly before unwrapping.Best paired with muscovado sugar or regular white sugar. Also best eaten with ripe mangoes or native tsokolate/tablea.

And there you have it! 3 ways in which you can make Suman! Of course there are many others way in which you can make suman that is native to the province of which they originate from. Two favourites of mine, which I have not included in this post, are Tupig native to Pangasinan and Ilocos Norte, and Suman Pinipig from Bulacan. These two are a little more complicated than the basic ones that I’ve shared in this post. You can find Suman Pinipig in many mall stalls across Metro Manila, however I still have yet to find Tupig around here.

With these rice cakes, you don’t necessarily have to eat it the moment you finish cooking it. It does however; definitely taste better when it’s not chilled. If you need to keep it in the fridge and indulge in them the day after, you can easily steam them again for 10 minutes before serving.

BON APPÉTIT

– Ally xx

myTaste.com

Raw Gingerbread Balls

Raw Gingerbread Balls

Hello Everyone! 2016 is coming to a close real soon and I would just like to take this opportunity to be thankful for what the past year has brought, not only for me, but for my family and my friends as well. Inevitably, life if not always perfect, it has its ups and downs, and for all the times where I felt down or put down but others, I can only say that – as cliché as this sounds – it has made me become a stronger person. I have been thrown under the bus countless of times by people around me and have had people say bad things about me behind my back – to all these people, you can go shove it where the sun don’t shine. You’ve made me realise how easy it can be for me to just shut you out because I don’t need that kind of toxicity in my life. Arrivederci.

Well, that escalated quickly haha! From being thankful to talking about the poisonous people is my life. Anyway, this will be the last recipe that I will be sharing on Amcarmen’s Kitchen for the year 2016. I hope that all my family, friends, and followers have had a good read and have cooked up a storm in their own kitchens with my recipes. Don’t forget to use the hashtag #amcarmensrecipes when you create a dish from my blog so I can share them on all my social media mediums. I will be back in February with a whole new concept to my recipes so please stay tuned! Yes, I will be taking a break in January as I have quite a full plate with work for the month and I might be able to spend time in the kitchen. I will also be planning content for Amcarmen’s Kitchen during my time off to ensure that everything runs smoothly for the upcoming year! Look out though for a post coming in mid-January as an introduction and hint to the recipes ahead for 2017!

Since Christmas passed not to long ago, I decided whip up these tasty raw vegan gingerbread balls as part of my ball-balls theme for December to keep with the Christmas-spirit.The only slight change I made to this recipe was replacing the buckwheat groats with more almonds just because I have no clue where to find buckwheat groats here in Brunei! Before we jump into the recipe for tonight, please check out the original recipe from Amanda over on Rawmanda.

Raw Gingerbread Balls Ingredients

PREP TIME 10 MINS | COOKING TIME  | SERVES 15 BALLS

INGREDIENTS

  • 1 & 1/4 cup pitted dates, roughly chopped
  • 3/4 cup gluten-free rolled oats
  • 1/4 cup almond meal
  • 1/4 cup buckwheat groats*
  • 3/4 cup gluten-free rolled oats
  • 1 tbsp ground cinnamon
  • 1 tsp ground ginger
  • 1/2 tsp nutmeg
  • 1/4 tsp ground cloves
  • 1/4 tsp vanilla extract

Optional

  • 1 tbsp coconut sugar

*If you’re like me and can’t seem to find buckwheat groats at your local grocers, you can substitute 1/4 cup of buckwheat groats for 3 tablespoons of almond flour. Alternatively, for nut-free balls, you can substitute 1/4 cup of almond meal for 1/4 cup + 1 tablespoon of buckwheat groats.

METHOD

  1. Place all the ingredients, except for the coconut sugar and dates in a high-speed blender or food processor until you get a flour-like consistency from the ingredients.
  2. Add half of the dates into the blender/food processor and pulse until well combined. Then add in the remaining dates until you have a uniform dough formed.
  3. Scoop the dough out of the blender/food processor, at about a tablespoon in size, and roll it into a ball (or flatten with a rolling pin and use a cookie cutter to make desired shapes). Repeat for the remaining dough. Optional: Roll the balls into coconut sugar or sprinkle on top of cookies.
  4. Share and enjoy as a light snack. Store the gingerbread balls or cookies in an air-tight container at room temperature for a 2-3 days or in the refrigerator for a week.

Raw Gingerbread Balls

BON APPÉTIT
– Ally xx

myTaste.com

Cranberry Vanilla Energy Bites

Cranberry Vanilla Energy Bites

Hello Everyone! Hopefully tonight’s recipe will be able to get your brains going to have a guess on what the theme for December on Amcarmen’s Kitchen is. Like I said in the previous post, it may be obvious to some after this, or maybe you’ll have to wait until next week to make the connections. My best friend Jialing actually planted the idea in my head, and when I came up with the final theme, even she was excited to know that I’d be doing this for December. I’ll give you guys a slight clue – it definitely is Christmas-related.

Cranberry Vanilla Energy Bites

Anyway, I’m going to keep tonight’s post short and only because I don’t have a long-winded back story to tell about who I came across these energy bites in the past and here I am having a go at my own version – because that isn’t the case here. I merely just browsed the World Wide Web in search for recipes that I could try out specifically for this month’s theme. I came across this recipe on Pinterest a while back, and I thought I’d give this one a go seeing as it is simple (that’s right, only 5 ingredients!) to make and deliciously energising indeed! Just a heads up, they may be a bit too sweet for some who are intolerant to anything sweet because of the dates, but nonetheless, they are pretty darn good! Check out the original recipe by Danae over on Recipe Runner.

Cranberry Vanilla Energy Bites Ingredients

PREP TIME 15 MINS | COOKING TIME  | MAKES 12 BALLS

INGREDIENTS

  • 1/2 cup dried cranberries (unsweetened if you want them to be paleo)
  • 1/2 cup medjool dates (about 6-7 dates), roughly chopped
  • 1/2 cup raw almonds (or almond meal)
  • 1/2 cup raw cashews
  • 1/2 teaspoon vanilla extract
  • Pinch of salt

METHOD

  1. Using a high-speed blender or a food processor, pulse the almonds and cashews and almonds until they are finely ground, but be careful as to not turn them into nut butter.
  2. Add in all the remaining ingredients to the blender or food processor and blend/pulse until everything starts to come together. When needed, scrape down the sides of the blender or food processor several times, and then add up to 2 tablespoons of water to the blended mixture. You may need to remove the mixture from the blender or food processor and place it into a bowl, mashing it together with your hands or a spatula.
  3. Form the mixture into approximately 12 balls at about a tablespoon each.
  4. Store the energy bites in an airtight container in the refrigerator or freezer. Enjoy as a snack when you feel that afternoon slump starting to kick in!

Cranberry Vanilla Energy Bites

Cranberry Vanilla Energy Bites

BON APPÉTIT

– Ally xx

myTaste.com

Double Chocolate Crinkle Cookies

Double Chocolate Crinkle Cookies

Hello Everyone! For those who follow me on my personal social media pages will most definitely know that I’ve probably celebrated my turning of a quarter of a century one too many times that I guess an average person would celebrate their birthday. To quote a friend “[I] only turn 25 once” I think she meant that in a way that I probably had too many celebrations – but of course I’m going to take that as yes, I only turn 25 once so I’m going to go all out and use my birthday as an excuse to eat all the cake and food without feeling guilty *cheeky grin* Okay, so it’s been exactly a week now since I turned 25 so I guess it’s only fair to put a cease to the celebrations and start hitting the gym to burn off all the cake (3 cakes in total to be honest).

That aside, tonight’s recipe that I will be sharing is one that I whipped up last year for Christmas. I baked a batch of soft, chewy Double Chocolate Crinkle Cookies long with some traditional Sugar Cookies to take to the office with me on Boxing Day, to share with my colleagues – I know right. I’m so nice. Anyway, you might realise  in the photos that the cookies may look like they have a hint of red to them – well, I tried adding a little bit of red food colouring (what I had left of it anyway) to make it look like a red velvet crinkle cookie, but I guess I didn’t have enough coloring for it to really shine through.

Double Chocolate Crinkle Cookies IngredientsOh you know – just my little owly friend that also happens to be one of my measuring spoons basking in a bowl of flour mixture.

Anyway! Before I head onto the recipe, please take the time to check out the original over on Sally’s Baking Addiction. I think I have said this before, but nonetheless, I will say it again. Sally’s recipes are definitely spot on and easy to follow. I don’t think that I’ve ever screwed up a recipe of hers when in the kitchen myself. Somewhere in the past, I attempted to bake crinkle cookies after seeing my Aunt post her cookies on her Facebook page. I followed a recipe, not Sally’s of course and they ended being a total FAIL. I was so sad because I had baked them to share with friends – which I did anyway, and I think they were just being nice and said that the cookies were ‘still’ good haha.

Double Chocolate Crinkle Cookies Ingredients

PREP TIME 3 HOURS 30 MINS* | COOKING TIME 10 MINS | SERVES 20 COOKIES

*Includes chilling time – it is highly recommended that you chill the cookie dough for at least 3 hours. The longer, the better! Chilling helps the flavors to develop, prevents spreading, and makes the otherwise sticky cookie dough easy to handle.

INGREDIENTS

  • 1 cup all-purpose flour, levelled
  • 1 cup confectioners’ sugar, for rolling
  • 1/2 cup & 2 tbsp unsweetened cocoa powder
  • 1/2 cup granulated sugar
  • 1/2 cup packed light or dark brown sugar
  • 180g Belgian dark chocolate, roughly chopped
  • 115g unsalted butter, softened to room temperature
  • 1 large free range egg, at room temperature
  • 1 tsp baking soda
  • 1 tsp pure vanilla extract
  • 1/8 teaspoon salt

METHOD

  1. Using a hand-held electric mixer, beat the butter in a large mixing bowl for about 1 minute on medium speed until completely smooth and creamy. Then, add in the granulated sugar and brown sugar, continuing to beat on medium-high speed until fluffy and light in colour. Beat in the egg and vanilla extract on high speed. Scrape down the sides and bottom of the bowl as needed. Set aside.
  2. In a separate medium-sized bowl, whisk the flour, cocoa powder, baking soda, and salt together until combined. On low speed, slowly mix into the wet ingredients until combined. The cookie dough will be quite thick. Switch to high speed and beat in the roughly chopped Belgian chocolate. At this point, the cookie dough will be sticky. Cover dough tightly with aluminum foil or plastic wrap and chill for at least 3 hours and up to 3 days. Chilling is mandatory for this cookie dough.
  3. Remove the cookie dough from the refrigerator and allow it to sit at room temperature for about 20 minutes; if the cookie dough was chilled longer than 3 hours, then let it sit at room temperature for about 30 minutes. This makes the cookie dough easier to scoop and roll.
  4. Preheat oven to 180C (350F or gas mark 4). Line two large baking sheets with parchment paper or silicone baking mats, and then set aside.
  5. Scoop and roll the dough, about 1.5 tbsp of dough each, into balls. Roll each ball generously in the confectioners’ sugar and place them on the prepared baking sheets.
  6. Bake the cookies for about 8-9 minutes. The baked cookies will look extremely soft in the centers when you remove them from the oven. Allow them to cool for 5 minutes on the cookie sheet; they will slightly deflate as you let them cool. Transfer to a cooling rack to cool completely. Once cooled, enjoy and share with family and friends!

Double Chocolate Crinkle Cookies

Double Chocolate Crinkle Cookies

Cookies stay fresh covered at room temperature for up to 1 week. Baked cookies freeze well – up to three months. Unbaked cookie dough balls (that are not coated in confectioners’ sugar) freeze well – up to three months. Coat the frozen cookie dough balls in confectioners’ sugar, then bake for about 10 minutes. No need to thaw them.

BON APPÉTIT

– Ally xx

myTaste.com

Paella de Marisco (Seafood Paella)

Paella de Marisco (Seafood Paella)

Hello Everyone! Maligayang Pasko! Joyeux Noël! ¡Feliz Navidad! Vrolijk Kerstfeest! And a very Merry Christmas to my family, friends and followers from all around the world! It’s weird knowing that Christmas  Day is coming to an end, and that the New Year is just around the corner! The year definitely went by real quick! Anyway, tonight will by my last post for the year (maybe) and it is also the very last post for my Festive Filipino Foods series for the blog. Day 12 of 12 is finally here and I have definitely saved the best for last!

If you weren’t able to guess from the hints I dropped in yesterday’s post, tonight’s dish is a Valencian rice dish with ancient roots that originated in its modern form in the mid-19th century near Albufera lagoon on the east coast of Spain adjacent to the city of Valencia. The dish is highly regarded as Spain’s National Dish with various types ranging from Vegetarian/Vegan Paella (Paella de Verduras), Seafood Paella (Paella de Marisco), Mixed Paella (Paella Mixta), and many, many more variants! From the name of this blog, you’ll already know what type of Paella I’ll be covering tonight, but now that I look back and think about my dish, it can actually be a Paella Mixta because what I will be sharing with you tonight is a free-style combination of land animals (well mainly processed pork in the form of a chorizo sausage), seafood, and vegetables.

According to tradition in Valencia, Paella is cooked over an open fire, fueled by orange and pine branches along with pine cones. This produces an aromatic smoke which infuses the Paella. It is cooked in a special wide-flat pan called a Paellera, and dinner guests traditionally eat directly out of the pan as well. Since paellera’s aren’t commonly found, or if you don’t have one handy, the recipe method below will show you how you can still make paella in a normal cooking pot. The last time I made Paella was back in 2012 if I’m not mistaken. I cooked it up together with my then housemate Vanessa and shared it with a friend of mine and her mother one cold wintery evening. We cooked it in a large frying pan and even served it up in that pan!

Paella de Marisco (Seafood Paella) Ingredients

Paella de Marisco (Seafood Paella) Ingredients

PREP TIME 20 MINS | COOKING TIME 30-40 MINS | SERVES 8-10

INGREDIENTS

  • 2 cups plain medium-grain rice, washed and drained
  • 1 cup glutinous rice, washed and drained
  • 1 cup frozen green peas
  • 300g fresh or frozen mussels
  • 200g fresh prawns, peeled and deveined, peels and heads reserved
  • 150g fresh or frozen baby clam meat
  • 100g squid, cleaned and cut into rings
  • 4-5 garlic cloves, minced
  • 2-3 dried bay leaves
  • 1 brown onion, diced
  • 1 chorizo sausage, sliced diagonally
  • 1 large tomato, diced
  • 1 lemon, cut into wedges
  • 1 yellow capsicum, sliced
  • 1 tbsp smoked paprika
  • Ground salt and black pepper, to taste
  • Pinch of Saffron threads
  • Whole black peppercorns

METHOD

  1. Start by making the broth to flavour your paella by adding the prawn heads and peels to a medium-sized pot and cover with about a litre and a half of water. Season with a bit of salt, bay leaves, and whole black peppercorns. Bring to a boil over high heat and then turn it down to a slow simmer. Make sure to press down on the heads and peels as it simmers away to extract as much flavour as you can. Leave it to simmer for about 30 minutes. Once done, turn the heat off and set aside.
  2. Heat about 2-3 tablespoons of oil in a large pot over medium-high, and panfry the chorizo slices until browned, about a minute per side. Remove and transfer to a plate lined with a paper towel to soak up any excess oil.
  3. In the same pot, sauté the garlic until fragrant and golden brown. Add in the onions and cook until soft, about 2-3 minutes altogether. Follow with the diced tomatoes and cook until soft, a further 3-4 minutes.
  4. Add in the rice, paprika, saffron threads, and season with and bit of ground salt and black pepper. Give it a good mix before adding about 3 cups of the prawn stock. Cover and leave it to cook without stirring – at this point, you may want to turn your heat down to medium to avoid the rice sticking to the bottom of the pan. Leave it alone for about 15 minutes or once the rice has absorbed most of the liquid.
  5. Turn the heat down to low, and add the seafood (if you are going to serve it up in the pot you cooked it in, then I suggest that you arrange your seafood in a presentable way, if not, then you can just chuck them in and arrange it later when you transfer your paella to a serving dish). Cover and leave it to cook/bake for a further 15 minutes, or until the seafood is cooked through. Add the vegetables and chorizo slices and cook for a further 5 minutes, after which you can turn the heat off and leave it in the pot for a further 5-10 minutes before serving.
  6. Serve immediately with a fresh squeeze of lemon, and enjoy amongst family and friends!

Paella de Marisco (Seafood Paella)

Paella de Marisco (Seafood Paella)

Paella de Marisco (Seafood Paella)

BON APPÉTIT

– Ally xx

ps: I may or may not actually post up two more festive recipes, depending if I have time to write them up from tomorrow onwards before the New Year kicks in.

myTaste.com

Buko Pandan

Buko Pandan

Hello Everyone! We’re on our second last day of Festive Filipino Foods! If you have been living under a rock and basically haven’t been following my blog for the past week and a half, I have been posting a recipe every single day for the past 10 days now (tonight will be the 11th of 12 posts) cooking up recipes leading up to Christmas Day. Tonight, I will be sharing one final dessert recipe before I close this series for the month of December. I have saved the best savoury dish for last tomorrow, and if you’d like to take a stab at what I’ll be making, here are some clues: Spanish-inspired with lots and lots of seafood including prawns, clams, mussels, and calamari.

But enough of the seafood talk, that will be for tomorrow – tonight I will be sharing with you a recipe for a dessert that is a classic Filipino favourite known as Buko Pandan, that originated from the island province of Bohol in the Central Visayas region. It is a dessert dish found on the tables at every fiesta and family gatherings. The two main ingredients for this dessert are buko, which is a young coconut, and screwpine leaves which are locally known as pandan leaves. You can find these leaves in most Asian grocery stores, but if you’re a lucky duck like me, you might have a neighbour that grows these leaves and you have full access to it for free. However, you can use bottled pandan extract if this is more convenient for you.

At first glance, this sumptuous dessert can be mistaken for Buko Salad because of the similarity in texture and dairy ingredients used. However, the green gelatin which contains the aroma and flavor of the Pandan gives the distinction. — Vanjo Merano from Panlasang Pinoy

The dessert is usually topped with pinipig (immature grains of glutinous rice pounded until flat before being toasted), but I just went for what I had in the pantry, which is cornflakes and it’s just as good because you get that crunch in the dish anyway from it too. Rice Krispies may be used as well. I don’t think it is really added, but I like my Buko Pandan Dessert with large sago pearls, which is why I have added it to the dish. I’ve read that you can also add palm seeds or nata de coco in your dessert too if you like.

ps: before I move on to the recipe, I’d like to first apologise once again for a later than usual post. We’ve had a busy morning/afternoon cooking up a storm in the kitchen for our Noche Buena, and I only had time to write this post in between cooking/waiting times, and after all the cleaning up after our dinner.

Buko Pandan Ingredients

PREP TIME 15 MINS | COOKING TIME 90 MINS | SERVES 10-12

INGREDIENTS

  • 3 young coconuts, flesh removed and cut into strips
  • 1L water
  • 1 packet (200ml) crème fraîche
  • 1/2 can (190g) condensed milk
  • 1 packet (10g) unflavoured green agar-agar powder, or simply just gelatine powder
  • 1 cup large sago balls
  • 1 cup white sugar
  • 2 tsp pandan extract*
  • Handful of cornflakes

*You can extract your own from pandan leaves, and here’s how you can do it: Place the pandan leaves and water into a blender (1 bunch (12 leaves) to about a half cup of water). Blend until the leaves are chopped very finely. Pour contents through a fine sieve and press against it using a spoon to draw out any extra juice. Discard the leaves. Tip: if you keep the extract in a sealed bottle, you can keep it for up to one week in the fridge. Do not freeze though.

METHOD

  1. Dissolve the agar-agar powder in 1L of water. Add the sugar, stir, and bring to a boil over low heat for about 10-15 minutes. Once done, pour into a large square mould (about 10″ in size) and leave it aside to cool down before placing it in the fridge to completely set.
  2. Meanwhile, bring a large pot of water to a boil, about 2L. Once boiling, add the large sago balls in and cook until tender – mine took more than an hour to cook through, about an hour and 20 minutes to be exact.
  3. While the sago is cooking away, mix all the ingredients together (except for the cornflakes) in a large bowl. Check to see if your gelatine has set, and once it has, cut it into small chunks and mix in the bowl together with all the other ingredients.
  4. Once the sago is done, drain and add it to the mixture. Give it once good final mix and then place in the fridge for about 3-4 hours before serving.
  5. Serve chilled, topped with cornflakes, or anything crunchy, and enjoy!

Buko Pandan

Buko Pandan

BON APPÉTIT

– Ally xx

myTaste.com

Callos a la Madrileña (Ox Tripe Stew)

Callos a la Madrileña (Ox Tripe Stew)

Hello Everyone! Sadly, we’re nearing the end of our 12 days before Christmas special on the blog. How will you be spending your Christmas Eve tomorrow? I know where I’ll be – in the kitchen whipping up food with my Mom for our Noche Buena; and when I’m not cooking, I’ll most likely be taking a relaxed 2-day off doing absolutely nothing… Maybe. I can’t exactly sit around and do nothing. Heck, I’m evening writing this post while watching The Incredibles on TV and I was just talking to my Mom about how this movie never gets old – I still love watching it to date.

Anyway, time to get off the tangent wagon and get down to tonight’s recipe. It is basically a stew that is common and traditional to Madrid, well known as Callos a la Madrileña, or Callos for short. The stew consists of ox tripe, ox feet (or shank), chickpeas, blood sausage (or chorizo), and red capsicum. The tripe and feet are boiled and simmered until the texture becomes extra tender; this makes eating this dish pleasurable. It is then cooked together with the chickpeas and capsicum.

The extra tender tripe and fat from the ox feet literally melts in your mouth while the luscious taste of chorizo and bacon lingers around – inviting you to try more. Though it looks and sounds enticing (which it does), moderation is still recommended because of the high fat and cholesterol content of this dish. It is good to enjoy food but it is better to enjoy life. — Vanjo Merano from Panlasang Pinoy

Ox feet is rarely found in stores/markets here in Brunei – they’re always sold out even if you go extra early in the morning. My guess is that restaurants who use this part of the cow have already reserved it. Anyway, you can substitute it for veal (beef) shanks, however, you won’t get the same feeling of the melt-in-your-mouth fat as you do from ox feet.

Callos a la Madrileña (Ox Tripe Stew) Ingredients

PREP TIME 15 MINS | COOKING TIME 2 HOURS | SERVES 6-8

INGREDIENTS

  • 500g ox tripe, washed and cleaned
  • 500g beef shank
  • 250g bacon
  • 1 can (240g) chickpeas/garbanzos, drained
  • 6 pcs dried bay leaves
  • 2-3 garlic cloves, minced
  • 2 red bird’s eye chillies (optional)
  • 1 brown onion, diced
  • 1 chorizo sausage, sliced diagonally
  • 1 red capsicum, cut into strips
  • 1 tomato, diced
  • 1 tbsp tomato paste
  • Ground salt and black pepper, to taste
  • Whole black peppercorns

METHOD

  1. Add the beef tripe, 3 bay leaves, salt and a generous pinch of whole black peppercorns to a large pot filled with water. Boil for about an hour and a half, or until tender. Do the same for the beef shank in a separate pot. Once done, turn he heat off and leave the meat in the broth for an extra half hours. Remove from the broth and slice both the meats into bit-sized pieces. Discard the liquids from the tripe, but reserve the beef shank broth for later.
  2. Heat a large frying pan over medium-high and add the bacon in, frying until crisp, about 2-3 minutes per side perhaps (or more). Remove from the pan and set aside to cool down a bit before cutting them into smaller pieces.
  3. If there isn’t enough oil produced from the fat of the bacon when you fried it, add about a tablespoon more of oil and fry the chorizo slices until browned, about a minute or two per side. Once done, remove from the frying pan and set aside on a plate lined with a paper towel to soak up any excess oils.
  4. In the same frying pan, sauté the garlic until fragrant and golden brown. Then, add in the onions and cook until soft, about 2-3 minutes altogether. Follow with the diced tomatoes and cook until soft, a further 3-4 minutes.
  5. Add in the tripe and shank, together with a touch of ground salt and black pepper. Give it a good mix before adding the reserved stock, tomato paste, and chillies. Bring to a boil, and cook for about 10 minutes.
  6. Add in the chickpeas/garbanzos, and carrots and cook for a further 5 minutes before adding in the capsicum, bacon bits, and chorizo slices. Give it one final mix and then turn the heat off. Leave, covered, in the pan for about 5 minutes before serving.
  7. Transfer to a serving dish and enjoy hot!

Callos a la Madrileña (Ox Tripe Stew)

Callos a la Madrileña (Ox Tripe Stew)

BON APPÉTIT

– Ally xx

myTaste.com

Cassava Cake

Cassava Cake

Hello Everyone! Once again, apologies for another later than usual post. I just got home after doing some gift shopping for a friend’s wedding this Sunday, and a Secret Santa exchange gift on Monday. After my shopping spree, I had a nice and filling dinner with my Mom and sisters at Rack & Brew, a café cum boutique. I’ve always wanted to try out the food from this place since it opened late this year somewhere in September, and I finally got around to tonight.

For those of you who have been following my blog on a daily basis for the past week, you would’ve known that I made something called Pichi-Pichi on Sunday using grated cassava. Tonight, I’m going to share with you another cassava recipe in case you have any leftovers that you didn’t get around to using for your pichi-pichi. Some of the ingredients are similar (just that this requires less!), but what differentiates one from the other is the method of cooking. Pichi-Pichi is steamed, while tonight’s recipe for cassava cake is oven-baked. I do recommend that when you go out to buy cassava, buy a few kilos (up to 3 or 4 is sufficient), so that you can just peel and grate everything all in one go and cook it up in many different ways. Also, grated cassava freezes well for up to 3 months, just defrost before using.

Cassava cake is a classic Filipino dessert, or a hefty afternoon snack made from grated cassava and coconut milk. My Mom always makes hers with pure cassava (no added flour like the pre-made ones we find in the shops/restaurants where the ratio feels like 98% flour and 2% cassava), and fresh coconut milk squeezed from the flesh of a mature coconut. You may add more coconut milk on top of the cassava once it is baked about halfway through, or you can top with off with other favourites such as macapuno or a non-traditional topping such as custard. My Mom likes hers plain, and it tastes just as good.

Cassava Cake Ingredients

PREP TIME <5 MINS* | COOKING TIME 40-45 MINS | SERVES 8-10

*This assumes that you have grated cassava readily available (fresh or frozen).

INGREDIENTS

  • 4 cups grated cassava
  • 2 cups fresh coconut milk (from a can is fine as well)
  • 1 can (380g) condensed milk
  • 50g unsalted butter, melted

METHOD

  1. Preheat oven to 190C. Grease 2 x 10″ square pans with a bit of butter. Set aside.
  2. Add all the ingredients together in a large mixing bowl and mix using a spatula until well combined.
  3. Pour the batter equally into the prepared pans and place in the oven for about 40-45 minutes, or until the tops have browned and a toothpick inserted into the centre of the cake comes out clean.
  4. Remove from the oven and leave it to cool down a bit on a wire rack. Once they have cooled down slightly, cut them into medium-sized squares.
  5. Serve warm and enjoy!

Cassava Cake

BON APPÉTIT

– Ally xx

myTaste.com

Rellenong Bangus (Stuffed Milkfish)

Rellenong Bangus (Stuffed Milkfish)

Hello Everyone! Hope everyone managed to get through their Monday blues and look forward to a short week followed by a long weekend of Christmas celebrations ahead! What are your plans for this Christmas? I’ve already told you guys mine if last night’s post – spending it quietly at home with family and food, and then looking forward to next week with the new year creeping up!

Tonight, I will be sharing a dish with you that is one of the most popular dish in the Philippines. On top of the delicious taste and unique process of preparation compared to other fish recipes, the amount of work involved is tedious. I guess it’s no wonder we don’t often eat this at home, and to be honest, I cannot remember the last time I had this dish, and if it was even made by my Mom or we had it at a restaurant. It is tedious because separating the skin from the meat and deboning and flaking of the milkfish meat requires a lot of patience. But after all the hard work of deboning, marinating the skin, cooking the meat with all the ingredients, stuffing the skin with the fish meat mixture and frying is the reward of eating a unique and delicious Filipino dish that will leave you craving for more. This is why I recommend that you work with 2-3 fishes in one go to save you all the trouble of having to repeat the whole process again in a few days/weeks time! You can stuff the fishes and freeze them for up to 3 months – just defrost before frying.

Rellenong Bangus (Stuffed Milkfish) Ingredients

PREP TIME 1 HOUR | COOKING TIME 30 MINS | SERVES 8-10

INGREDIENTS

  • 2 large size bangus (about 650g each), scaled, gutted, and cleaned
  • 3 tomatoes, diced
  • 2 brown onions, diced
  • 2 carrots, diced
  • 2 potatoes, diced
  • 1 large free range egg, beaten
  • 1 yellow capsicum, diced
  • 1/2 bulb garlic, minced
  • 3/4 cup frozen green peas
  • 4 tbsp plain flour
  • Ground salt and black pepper, to taste
  • Handful of raisins

METHOD

  1. Preparing the fish: Gently pound fish to loosen meat from the skin. Break the big bone at the nape (back of the neck) and on the tail, and gently pull the bone out. Insert a spoon through the neck of the fish neck and gently scrape out the meat. Scrape down to the tail, going around and on the other side of the fish, separating the the meat entirely from the skin. Be careful as to not cut the skin open while doing this. Marinate skin and head of fish with soy sauce and calamansi (lime) juice. Set aside.
  2. Boil the fish meat in a little water for about 5 minutes. Drain, pick out the remaining bones, and flake the meat.
  3. Preparing the stuffing: Heat oil in a large frying pan over medium-high and sauté the garlic until fragrant and golden brown. Then add in the onions and cook until soft, about 2-3 minutes altogether. Follow with the tomatoes and cook until soft, a further 3-4 minutes.
  4. Add the potatoes and carrots, and cook for about 2 minutes. Then add in the boiled fish meat together with the ground black pepper and salt. Give it a good mix and then cook for a further 2-3 minutes. Finally, add in the peas, capsicum, and raisins. Give it another good mix and turn the heat off. Add the beaten egg and mix. Leave it in the pan, covered for about 5 minutes before setting it aside to cool down completely.
  5. Stuffing the fish: Stuff the fish through its neck, packing in as much of the filling as you can, without breaking the skin that is.
  6. Frying: Coat the skin of the fish with a bit of flour. Heat oil (enough to cover at leat half of the fish) in a large frying pan over high heat. Make sure that the oil is scorching hot before adding the fish in. Carefully lower the fish into the oil and fry until browned, about 4-5 minutes (or less depending on the size of your fish) per side. Once done, remove from the pan and transfer to a serving dish. Wait for it to cool down before slicing into it.
  7. Serve immediately with steamed rice and spicy hot banana catsup on top of your Rellenong Bangus. Enjoy!

Rellenong Bangus (Stuffed Milkfish)

Rellenong Bangus (Stuffed Milkfish)

BON APPÉTIT

– Ally xx

myTaste.com