Spice-roasted Pineapple Nice Cream

Spice-roasted Pineapple Nice Cream

Hello Everyone! April is here and those who have been following my blog, or even just my social media pages (Facebook & Instagram) will know that a new month means that I get to play around with new ingredients! As the overall theme for this year is a “fruitful” one, I’m playing around with different kinds of fruit each month for 2019! For January I went nuts for Coconuts! For February it was all about Mangoes. For March they say an Apple a day keeps the doctors away! I ran a poll on Instagram stories for my followers to guess between Pineapple, Banana, and Lemon based on the set of ingredients for tonight’s post.

Of course, based on the title of this post, we all know that April with be all about Pineapples! I did mention in my previous post that I had to change what I had initially planned for tonight. Basically, I had planned for a Grilled Pineapple Oat Crumble, but I slowly realised towards the middle of last month that we’re at the peak of summer here in the Philippines, and it just made no sense whatsoever to be featuring warm/baked desserts in the heat we’re having! Thus I decided to take a cooler route for this month and beat the summer heat with this amazing Spice-roasted Pineapple Nice Cream!

Spice-roasted Pineapple Nice Cream

So what exactly is Nice Cream? Unlike most ice cream recipes, this one doesn’t require an ice cream maker/churner. The trusty food processor can transform any frozen fruits into a whipped dessert in mere minutes. Nice creams are also vegan, dairy-free, and treat-free from artificial flavours, colours, preservatives, and added sugar. Well okay, there is sugar for this particular recipe of mine that I used when making the spice-roasted pineapples, but other than that, I did not add any extra sugar to the nice cream.

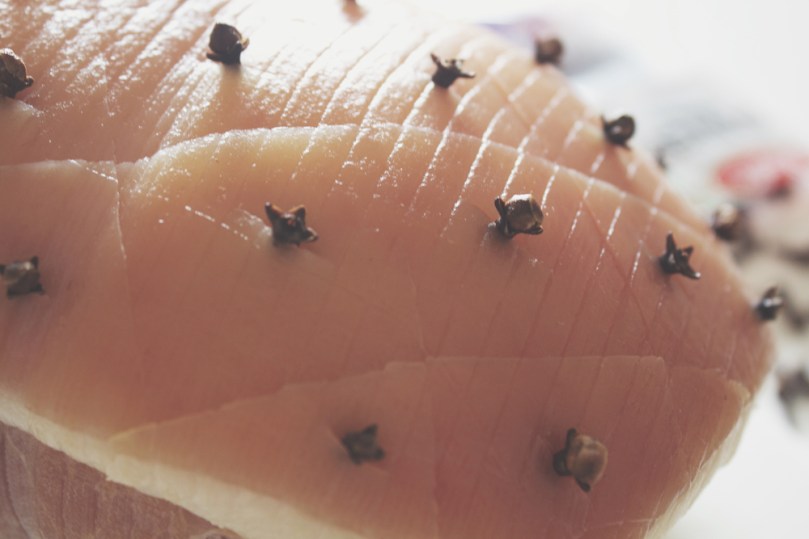
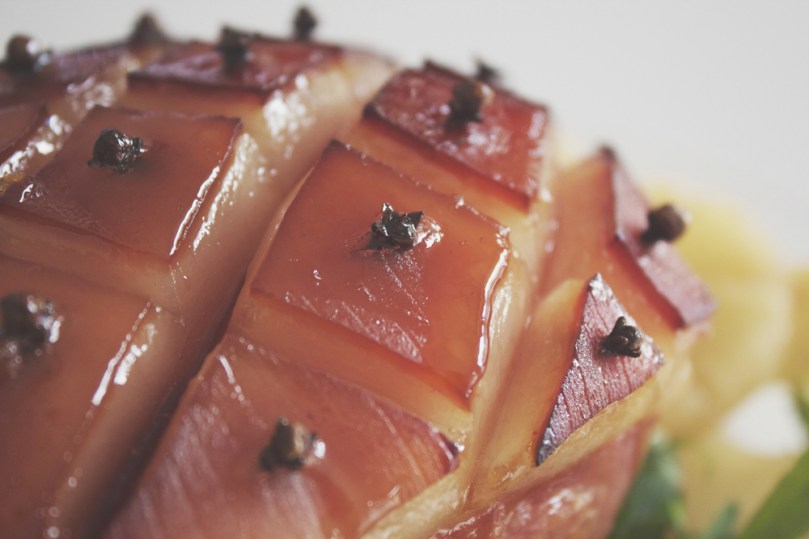
Banana-based ice cream may be the original nice cream, but there are endless ways to adapt the classic recipe. Take for example, tonight’s recipe for Spice-roasted Pineapples – bananas are only really added to ensure a creamy custard-like texture, but the other fruit is the star of the show. I didn’t just want to blitz up some frozen pineapples, which is why I went a little bit extra in roasting the pineapples first in a few spices such as cinnamon, cloves, and star anise before freezing them. The result? AMAZING!

Spice-roasted Pineapple Nice Cream Ingredients

PREP TIME 20 MINS* | COOKING TIME 30 MINS | SERVES 6

*Allow for the Spice-roasted Pineapple Chunks to freeze for at least 5 hours or overnight before making the nice cream.

INGREDIENTS

For the spice-roasted pineapple

  • 1 large pineapple, peeled and cut into bite-sized chunks
  • 5 pcs whole cloves
  • 3 pcs star anise
  • 2 cinnamon sticks
  • 2 tbsp brown sugar
  • 1 & 1/2 tbsp Tequila or Vodka (optional)**

For the nice cream

  • Frozen spiced-roasted pineapple
  • Frozen sliced bananas, about 2-3 large bananas
  • 1 tbsp freshly squeezed lemon juice
  • Ginger nut biscuits (optional)***

**Almost every brand of hard liquor – bourbon, whiskey, vodka, gin and rum – is vegan. Nearly all distilled spirits are vegan except for cream-based liqueurs and products that mention honey on the label.

***I used Tesco ginger nut biscuits which are vegan.

METHOD

  1. Spice-roasted Pineapple: Preheat oven to 220C (425F or gas mark 7).
  2. Toss the pineapple, sugar, spices, and everything nice (liquor) in an oven-safe baking dish. Sorry, I could not resist not say that!
  3. Roast in the oven for about 20 minutes. Once done, set aside to completely cool down before placing them in a food-safe zip lock bag together with the peeled and sliced bananas, and into the freezer for at least 5 hours or overnight. Discard the spices! Save a couple of tablespoons of the spice-roasted pineapple in the fridge to serve together with the nice cream.

Spice-roasted Pineapple Nice Cream Process

  1. Nice Cream: Place all the ingredients for the nice cream into a food processor and let it run on the highest speed for about a few minutes until the frozen fruit turns into a loose, crumbly mass.
  2. Stop the processor and push the fruits down. Turn the processor on to high speed once again and repeat this process until you have a very smooth and silky soft nice cream.
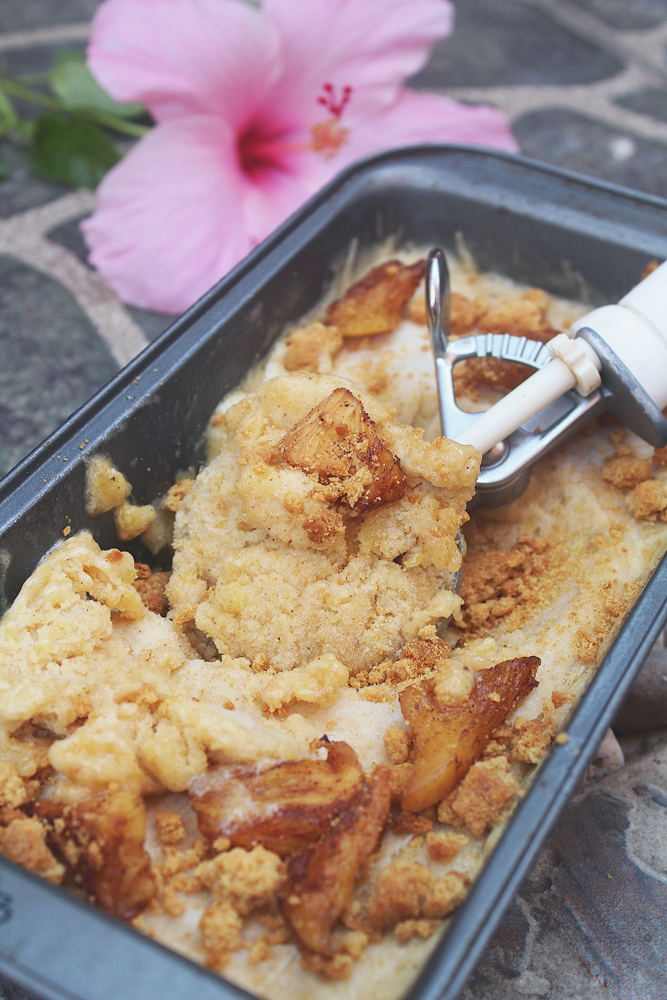
  3. You may serve it immediately or if you want a lovely scoop-able nice cream, transfer it into a freezer-friendly container and freeze it for another hour.
  4. Serve, topped with the spice-roasted pineapple, crushed ginger nut biscuits, and enjoy!

Spice-roasted Pineapple Nice Cream

Spice-roasted Pineapple Nice Cream

By all means, feel free to get loose with this recipe and try out other fruits that you can play around with for a guilt-free vegan nice cream to stay cool this summer!

BON APPÉTIT

– Ally xx

myTaste.com

Advertisement
Apple Chicken Bake

Apple Chicken Bake

Hello Everyone! March is here which can only mean one thing for Amcarmen’s Kitchen. That’s right! A new month means a new fruit to play with and we’re all about Apples this March! More specifically we’re going to be playing around with Red Washington Apples only because they were on sale at Rustan’s Supermarket for only P28 apiece! I think they were originally priced at like P35 or something. I know it’s not much of a difference but other supermarkets have them priced at P230 or something per kilo, which is crazy!

Apple Chicken Bake

I’ll keep my introduction short tonight, as I am not feeling well today – the creative writing juices aren’t flowing at the moment, apologies for that. I didn’t want to start off my post in saying what happened, but you can read more about it at the end of the post.

Before we dive right into the recipe, please head on over to Taste of Home for the original recipe where I drew my inspiration.

Apple Chicken Bake Ingredients

PREP TIME 5 MINS* | COOKING TIME 30 MINS | SERVES 3

*Allow for up to 4-6 hours to marinate the chicken, or even better, overnight in the fridge. Remove from the fridge about an hour before baking to bring the meat back to room temperature.

INGREDIENTS

  • 3 whole chicken legs (about 1/2 kg)
  • 1 large brown onion, peeled and wedged
  • 1 large Red Washington Apple, washed and wedged
  • Freshly cracked black pepper

For the marinade

  • 5 whole cloves
  • 2-3 garlic cloves, peeled and crushed
  • 1 cinnamon bark
  • 1/3 cup Hickory BBQ sauce
  • 1/4 cup apple juice
  • 1 tbsp honey
  • 1/4 tsp ground nutmeg
  • 1/4 tsp salt
  • 1/4 tsp whole black peppercorns

Apple Chicken Bake Process

METHOD

  1. Combine the marinade ingredients in a small bowl. Dip the chicken whole legs into the marinade and then place skin side down into an oven-safe Pyrex dish.
  2. Pour the remaining marinade into the Pyrex dish, cover with cling wrap and then set aside in the fridge to marinate for about 4-6 hours or overnight.
  3. When ready to bake, remove from the fridge and turn the chicken legs over skin side up. Leave aside to bring to room temperature, about an hour.
  4. Preheat oven to 200C (400F or gas mark 6). Scatter the wedged apples and onions onto the Pyrex dish, and season with a touch of freshly cracked black pepper. Bake in the oven for 30 minutes.
  5. Once done, turn the heat off. Drain the sauce into a small saucepan and place the chicken back into the oven to keep warm.
  6. Bring the sauce to a boil over medium-high heat. Once boiling, add slurry of cornstarch to the sauce to thicken it. Once thickened, turn the heat off.
  7. Serve with any sides of your choice. I served mine with a side of salad with cherry tomatoes and French beans, and corn on a cob.

Apple Chicken Bake Process

Apple Chicken Bake

Before I end tonight’s post, I would just like to say that it’s been one heck of a crazy week! So busy that I haven’t even had the time to plan and cook my dishes for this month ahead of time, which is what I usually do to stay on top of things. This is one of the reasons why tonight’s post isn’t as informative as my previous posts. The reason for that being is that I’m also suffering from piercing stomach pains and an irritable bowel syndrome, quite possibly due to food poisoning. I’m confined at home and hydrating lots. Hopefully I’ll be all good in the coming days and I can get back on track with my cooking and writing by the weekend or early next week!

BON APPÉTIT

– Ally xx

myTaste.com

Spiced Red Wine Poached Pears

Spiced Red Wine Poached Pears

… on a bed of Pistachio Crumble with a Quenelle of Homemade Vanilla Bean Ice Cream drizzled with a Red Wine & Orange Reduction *drools*

Hello Everyone! I’m really bad at this, and I sincerely apologise. I know I said that I would get back on track with Amcarmen’s Kitchen until the end of the year but once again I have fallen slack and behind for God knows how many weeks now. The truth is that I have been super busy towards the end of last month and into early November with a hectic and stressful event that definitely took a toll on my high blood pressure for sure. Though the past 2 weeks have been quiet, I spent most of it recovering and relaxing from that hell of an event.  I worked at least 15 hours a day from 8am until almost midnight on most nights. I’m just glad that it’s all over… For now.

But anyway, the recipe that I will be sharing tonight is one that I actually made waaaaaay back somewhere in June when I was left home alone (my mom and my sister flew out to Singapore to visit my other sister), during a long weekend too, and I had no plans of stepping out of the house unless I had to *cheeky grin*. So why didn’t I upload the recipe for this back then? Simple – it didn’t comply with the theme I had set out to accomplish for this year on Amcarmen’s Kitchen. So then why now? It’s still 2017. Stop asking so many questions! Haha! I amuse myself sometimes. Well, this is actually part of a special recipe that I will be posting (hopefully) next week, which will also most likely be the last recipe for the year unfortunately. I’m going to use the rest of my time before the year ends to plan and prepare recipes for the upcoming year. I already have a theme in mind to tackle for the whole year and I’m already excited for it!

Spiced Red Wine Poached Pears

Moving on, sorry that introduction went on way longer that I thought it would (as always though right?). If I can recall, I decided that I wanted to practice my dessert-making skills, you know to a MasterChef quality level worthy of a place in the competition ONE DAY. I have to say that I’m quite impressed with how this dessert played out in my head, to paper, and to the actual deal. The pears were soft on the outside, but still had a nice bite and a bit of crunch to it on the inside; beautifully spiced and contrasted well to the mild sweetness of the vanilla bean ice cream. And everyone loves pistachios, or at least I hope they do so throw that onto the plate for another added texture to the overall dessert dish.

You may want to get a head start on the ice cream so that it’ll have time to set in the freezer. You can either make it the day before, or early in the morning so that it’s ready for dessert time after a hearty dinner.

Spiced Red Wine Poached Pears Ingredients

PREP TIME 4 HOURS* | COOKING TIME 25-35 MINS | SERVES 6

*Includes the minimum freeze time for the no churn vanilla bean ice cream; see below for the freeze time range

INGREDIENTS

For the spiced red wine poached pears

  • 6 large pears, peeled and keeping the stems intact**
  • 1 bottle (750ml) red wine
  • 3/4 cup white sugar
  • 10 cloves
  • 3-inch cinnamon stick
  • 2 star anise
  • Juice and zest of 1 orange

For the no churn vanilla bean ice cream

  • 2 cups thickened cream
  • 1 can (300g) sweetened condensed milk
  • 1 vanilla bean pod
  • 1 tbsp pure vanilla extract

For the pistachio crumble

  • 1/2 cup roasted and salted pistachios
  • 3/4 cup plain flour
  • 6 tbsp unsalted butter, melted
  • 2 tbsp white sugar
  • 1/2 tsp salt

**Make sure that you use fairly large pears for this recipe. I found that using smaller pears overcook easily as they need a while to absorb that beautiful red wine colour as well as the flavours.

METHOD

  1. No Churn Vanilla Bean Ice Cream: Using a mixer, beat the thickened cream on medium speed until heavy peaks start to form. Add the can of sweetened condensed milk and beat further. Be careful as to not over whip the mixture. Add the vanilla beans into the mixture along with the pure vanilla extract and gently stir it into the ice cream mixture. Place the ice cream mixture into a container and freeze for a minimum of 4 to 6 hours or overnight.
  2. Spiced Red Wine Poached Pears: Add all the ingredients for the poached pears into a large pot or any that’s a suitable size. Cut out a piece of parchment paper and place it directly on the pears so they remain submerged in the liquid, or alternatively you could also use a small plate.
  3. Bring the wine mixture to boil and then turn it down to a simmer and cook until the pears are soft on the outside are still a little crisp in the middle instead of soft all the way through (about 25 minutes); cooking time will however depend on the size of the pears. For softer pears, cook for a further 10 minutes.
  4. Once the pears are cooked through, use a slotted spoon remove the pears and set aside to cool. Keep cooking the liquid until it reduces to a syrup. Then, strain the wine reduction and discard the spices and zest. If you find the sauce too sweet, add some lemon juice to it to cut through some of that sweetness.
  5. Pistachio Crumble: Preheat oven to 180C (350F or gas mark 4) and line a rimmed baking tray with parchment paper. Process the pistachios in a food processor until roughly chopped. Add the flour, sugar, and salt; processing further just until combined. Add the unsalted butter, and continue processing until the mixture is thoroughly combined and forms pea-size crumbs.
  6. Spread the pistachio crumble mixture on the prepared baking tray. Press gently with damp hands, flattening the crumble to about 1/2 inch thick and bake in the preheated oven until the crumble starts to brown at the edges, about 15 minutes.
  7. Remove from oven, and, using a flat spatula to lightly crumble the mixture. Return to oven, and bake until the crumble is golden brown, about 8 to 10 minutes further. Once done, transfer to a wire rack, and set aside to cool on the baking tray completely, about 20 minutes, before roughly crumbling.
  8. Assemble your dessert by spreading the crumble onto the middle of each individual serving plates. Place one pear on top of the crumble and drizzle with the orange and wine reduction syrup. Quenelle the vanilla bean ice cream and place atop the crumble on the side of the pear.
  9. Serve and enjoy!

Spiced Red Wine Poached Pears

BON APPÉTIT

Ps: speaking of desserts – this is completely unrelated by the way, but I just thought I’d share this because it’s hilarious! A week ago or so, my friend asked a question on our whatsapp group chat and the question was: if you were a dessert, what would you be? Without hesitation, my other friend quickly replied “cactus” and to her hasty realisation, she retracted and said “oh I thought you meant desert” and everyone went spiralling down into a pit of undignified laughters – well I couldn’t stop laughing out loud and looking like an insane freak in front of my colleagues at work during that time. God bless her.

– Ally xx

myTaste.com

Masala Chai Tea with Soy Milk Ingredients

Masala Chai Tea with Soy Milk

Hello Everyone! So on Tuesday I posted a recipe for homemade soy milk. The first thing I thought after making having made the soy milk was what other things could I do with it to make another delicious drink. So today’s recipe uses the soy milk that I made to make a masala chai tea. I mean, you can always use store bought soy milk, or any other milk for that matter.

Masala Chai (literally translated: ‘mixed-spice tea’) is basically a flavoured tea beverage made by brewing black tea with a mixture of aromatic Indian spices and herbs. Nowadays, it is a very popular and feature drink in many coffee and tea houses. Chai is traditionally prepared by brewing green cardamom pods, cinnamon sticks, ground cloves, ground ginger, and black peppercorn together with black tea leaves. Most retail versions of this tea includes tea bags for infusion, instant powdered mixtures, and concentrates. I used tea bags for mine only because I could not find any loose black tea leaves in stores.

I love chai tea. In fact, I ordered it almost every time I went to a café, aside from a café latte that is. I was surprised that it was that easy to make when I came across a recipe online on how to make you own chai tea.

Masala Chai Tea with Soy Milk Ingredients

PREP TIME 5 MINS | COOKING TIME 10-15 MINS | SERVES 4-5

INGREDIENTS

  • 3 cups water
  • 1 cup homemade soy milk (or any other type of milk)
  • 1/4 cup loose black tea leaves (or about 5 tea bags)
  • 3 tablespoons granulated white sugar
  • 1/4 inch of ginger root, peeled and sliced thinly
  • 6 cardamom pods
  • 6 whole cloves
  • 2 cinnamon sticks
  • Several peppercorns

Other optional spices that you can add to your chair tea inlaced: vanilla, almond, nutmeg, bay leaves, star anise, or fennel and allspice; I added star anise to mine.

METHOD

  1. Combine the water, spices, and tea in a medium-sized saucepan. Turn the heat to high and bring to a boil. Once boiling, let it boil for a further 5 minutes and then turn the heat off. Let the mixture steep for at least 10-15 minutes.
  2. Strain the tea mixture and discard the spices. Add the soy milk and sugar to the strained tea mixture and stir well. Then reheat the tea until piping hot.
  3. Enjoy! Serves about 4 cups of tea.

Masala Chai Tea with Soy Milk

BON APPÉTIT

– Ally xx

myTaste.com

Pineapple-glazed Ham

Pineapple-glazed Ham

Hello Everyone! Yes I am aware that today should be a Muffin Making Monday post but Jialing and I decided to have a break from making muffins since we are both on Christmas/New Year break from work. We will be resuming our fortnightly muffin making next week, or the week after, depending on what we decide.

Pineapple-glazed Ham Ingredients

This is the last of the Festive Holiday Recipes that I will be posting, and quite possibly the last recipe for 2014! So after splurging on thankfully less than $200 (but over my budget of $100) on Boxing Day, I decided to buy a portion of Smoked Leg Ham to roast in the oven for a little Boxing Day treat. Seriously, we had NO savoury leftover food from our Noche Buena – even the 3.8kg turkey was shredded to the bone; and I was so looking forward to trying out a Massaman Curry by Jamie Oliver with the leftover turkey meat. Oh well, I guess a fresh-from-the-oven smoked leg ham can, will, and did make up for it!

Pineapple-glazed Ham

Pineapple-glazed Ham

I read up about studding cloves into the ham and what they actually do to the ham other than of course add flavour. Most articles/blogs that I’ve read say that it’s also decorative. One article I read though asks: to stud or not to stud? Apparently, there is a saying that all garnishes should be edible; and hence why studding cloves is a no because no one wants to crack a tooth by biting into a whole clove. But can’t they just take the time to remove the cloves after baking? An alternative would be to add ground cloves into your choice of glaze. I went for the decorative version. The cloves were a bit overpowering for me though.

Very simple really – I didn’t want to get all fancy with the ham since it’s already smoked with beechwood to add to its natural flavour. So I went with a very easy and classic pineapple glaze to dress the ham as it slowly baked in the oven. Now, many of you will agree with me that I probably “scored” the fat on the leg ham a little bit too aggressively – Oops!

Pineapple-glazed Ham Ingredients

PREP TIME 5 MINS | COOKING TIME 1 HOUR | SERVES 8-10

INGREDIENTS

  • 750g smoked leg ham portion
  • 1 can (440g) pineapple slices in juice
  • 1/3 cup brown sugar
  • Handful of whole cloves

METHOD

  1. Preheat oven to 180C.
  2. Score the leg ham with a sharp knife in a diagonal pattern. Score again, diagonally, in the opposite direction to create a crossing pattern. Using the tip of your knife, poke a small hole in the middle of each segment and insert whole cloves.
  3. Combine the brown sugar and pineapple juices into a small saucepan over medium heat and bring to a full boil, stirring frequently. Once boiling, lower the heat and bring to a gentle simmer until the glazed is nice a thick.
  4. Cover the leg ham with half of the glaze and place the leg ham fat side up on a wire rack in the oven with a drip tray below. Bake in the oven for 1 hour, basting the ham every 25 minutes with the leftover glaze and pan drippings. In the last 25 minutes of cooking, add the pineapple slices into the drip tray to cook.
  5. Serve!

Pineapple-glazed Ham

Before I wrap up this post, I would like to thank each and every one of my friends who have been so kind to take the time to drop by and go through my blog. Thank you as well for always asking me how my blog is going, encouraging me everyday to continue doing what I do best. I would also like to thank my 110 followers and the whole wordpress community in general for being very nice, dropping, comments and likes since I started my blog earlier this year.

Have a safe and Happy New Year Everyone! See you in the New Year with many more kitchen adventures! I will also have some exciting news coming your way somewhere earlier next year!

BON APPÉTIT

– Ally xx

myTaste.com