Svenska Köttbullar (Swedish Meatballs)

Svenska Köttbullar (Swedish Meatballs)

Hello Everyone! We’re finally into the last month for 2016! Gosh how time flies by so quickly! Anyway, I won’t go into another sentimental tangent on how the year is almost up and all that jazz, and I’ll just get right into it! Like I said on Instagram, I won’t reveal what the theme for December will be for Amcarmen’s Kitchen – instead I will have you guys guess what the theme is. You don’t have to guess right away, and I think the theme will only be a little more clear by the second or third week.

Svenska Köttbullar (Swedish Meatballs)

So, I first came across this dish, not through my travels to Sweden, but through the many adventures I’ve had when, as stereotypical as this will sound, visiting IKEA. Yes, IKEA – whether it was when I was still living in Australia, or travelling through Singapore, you’d definitely see me at their food court for either lunch, or dinner, depending on the time of day I visited there, with a plate of köttbullar. If you were to ask ten different Swedes about making köttbullar, you will most indefinitely get ten different answers. Sure they would be similar in some way or another, but most Swedes will have their own way of making köttbullar and so everyone will use a bit more or a bit less of this or that ingredient. Apparently, köttbullar is Sweden’s national dish, which some do question as it is not a particular exciting dish that speaks for the whole Swedish cuisine. Nonetheless, I think most real Swedes would agree that these meatballs are pretty good.

Svenska Köttbullar (Swedish Meatballs)

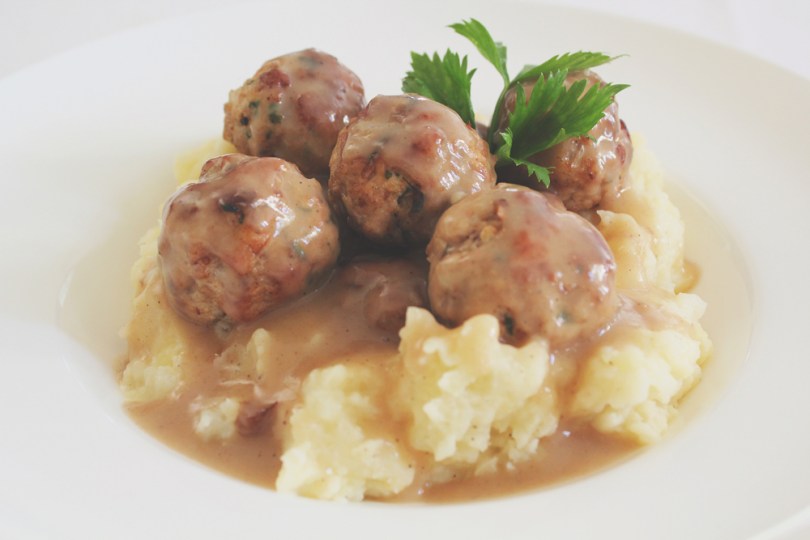
I can’t get over how deliciously amazing the gravy that accompanied my meatballs were. I think I probably ate half of it by the time every element for the dish was done, and I definitely drowned my balls in the gravy after. In southern Sweden many people prefer their ground meat with a little more fat, but the further north you go, the less pork you will find in the meatball mixture. However, bread or crumbs allowed to swell in milk are as important as the lingonberries on the side. They give Swedish meatballs their special soft consistency. I had some leftover herbed focaccia bread lying in the fridge from the week before and so I decided to cut them up into about 1cm cubes, drizzle them with a bit of olive oil and then toast them in the oven until browned and crisp. I then added the toasted bread into a food processor and pulsed until crumbed. Before we dive into the recipe, please check out the original recipe for Classic Swedish Meatballs over on BBC Good Food.

Also, you may notice that once you go through to the recipe that I mentioned about ‘blanching’ the balls before browning them. The reason why I decided to blanch the balls first is to maintain it’s round shape and therefore I shall not encounter a lifetime of sadness when it come to browning them after. I cannot express how much sadness I’ve experienced when making meatballs. Every time I fry them, the go flat on one side, and of course, when I try to flip them, they somehow get ruined, and when that happens, my day is ruined.

Svenska Köttbullar (Swedish Meatballs) Ingredients

Svenska Köttbullar (Swedish Meatballs)

PREP TIME 15 MINS | COOKING TIME 20 MINS | MAKES 20 MEATBALLS*

*My balls were about slightly smaller than a ping pong ball and I managed to make 20 of them. You could probably make 30-35 balls if they are slightly smaller than mine.

INGREDIENTS

For the meatballs

  • 400g lean pork mince
  • 1/3 cup bread crumbs
  • 1 large free range egg, beaten
  • 1 small brown onion, finely chopped
  • 1 tbsp finely chopped parsley, plus extra to serve
  • Ground salt and black pepper, to taste

For the gravy

  • 3 cups beef or pork stock**
  • 50g unsalted butter
  • 3 tbsp plain flour
  • Ground salt and black pepper, to taste

Optional to serve

  • Chunky mashed potatoes
  • 2-4 tbsp of Lingonberry (otherwise red currant, raspberry, or cranberry jelly), less or more to taste

**I made my own pork stock by boiling a few pork bones with black peppercorns, salt, and dried bay leaves.

METHOD

  1. In a large bowl, combine all the ingredients for the meatballs and mix until well incorporated. Then, form the pork mince mixture into meatballs to the size that you want.
  2. Bring a large pot of salted water to a boil and the drop each meatball in one by one and ‘blanch’ for about a minute to a minute and a half before removing them from the pot. You may need to do this in batches if your pot is not big enough. Once removed, drain.
  3. Heat a large frying pan with about 2 tbsp of olive oil over medium-high. Add in the meatballs and brown all over, about 5 minutes altogether. Again, you may need to do this in batches. Once browned, transfer to a dish lined with a paper towels to absorb any excess oil from the meatballs.
  4. To make the sauce/gravy, first make a roux by heating the butter in the same frying pan on medium heat until melted and slightly browned. Then, slowly whisk in the flour, stirring until smooth. Continue to stir for several minutes as this allows the flour mixture to cook, until the roux is the colour of coffee-with-cream.
  5. When the roux has cooked to a lovely shade of light brown, slowly add the stock to the roux, stirring as you add the stock. The stock will sputter at first and the roux may seize up, but keep adding the stock slowly and keep stirring. Eventually the sauce will loosen and become silky.
  6. Serve the meatballs on a bed of chunky mashed potatoes, topped with the gravy and an optional of lingonberry on the side. Enjoy with family and friends!

Svenska Köttbullar (Swedish Meatballs)

Svenska Köttbullar (Swedish Meatballs)

BON APPÉTIT

– Ally xx

myTaste.com

Advertisement

Paella de Marisco (Seafood Paella)

Paella de Marisco (Seafood Paella)

Hello Everyone! Maligayang Pasko! Joyeux Noël! ¡Feliz Navidad! Vrolijk Kerstfeest! And a very Merry Christmas to my family, friends and followers from all around the world! It’s weird knowing that Christmas  Day is coming to an end, and that the New Year is just around the corner! The year definitely went by real quick! Anyway, tonight will by my last post for the year (maybe) and it is also the very last post for my Festive Filipino Foods series for the blog. Day 12 of 12 is finally here and I have definitely saved the best for last!

If you weren’t able to guess from the hints I dropped in yesterday’s post, tonight’s dish is a Valencian rice dish with ancient roots that originated in its modern form in the mid-19th century near Albufera lagoon on the east coast of Spain adjacent to the city of Valencia. The dish is highly regarded as Spain’s National Dish with various types ranging from Vegetarian/Vegan Paella (Paella de Verduras), Seafood Paella (Paella de Marisco), Mixed Paella (Paella Mixta), and many, many more variants! From the name of this blog, you’ll already know what type of Paella I’ll be covering tonight, but now that I look back and think about my dish, it can actually be a Paella Mixta because what I will be sharing with you tonight is a free-style combination of land animals (well mainly processed pork in the form of a chorizo sausage), seafood, and vegetables.

According to tradition in Valencia, Paella is cooked over an open fire, fueled by orange and pine branches along with pine cones. This produces an aromatic smoke which infuses the Paella. It is cooked in a special wide-flat pan called a Paellera, and dinner guests traditionally eat directly out of the pan as well. Since paellera’s aren’t commonly found, or if you don’t have one handy, the recipe method below will show you how you can still make paella in a normal cooking pot. The last time I made Paella was back in 2012 if I’m not mistaken. I cooked it up together with my then housemate Vanessa and shared it with a friend of mine and her mother one cold wintery evening. We cooked it in a large frying pan and even served it up in that pan!

Paella de Marisco (Seafood Paella) Ingredients

Paella de Marisco (Seafood Paella) Ingredients

PREP TIME 20 MINS | COOKING TIME 30-40 MINS | SERVES 8-10

INGREDIENTS

  • 2 cups plain medium-grain rice, washed and drained
  • 1 cup glutinous rice, washed and drained
  • 1 cup frozen green peas
  • 300g fresh or frozen mussels
  • 200g fresh prawns, peeled and deveined, peels and heads reserved
  • 150g fresh or frozen baby clam meat
  • 100g squid, cleaned and cut into rings
  • 4-5 garlic cloves, minced
  • 2-3 dried bay leaves
  • 1 brown onion, diced
  • 1 chorizo sausage, sliced diagonally
  • 1 large tomato, diced
  • 1 lemon, cut into wedges
  • 1 yellow capsicum, sliced
  • 1 tbsp smoked paprika
  • Ground salt and black pepper, to taste
  • Pinch of Saffron threads
  • Whole black peppercorns

METHOD

  1. Start by making the broth to flavour your paella by adding the prawn heads and peels to a medium-sized pot and cover with about a litre and a half of water. Season with a bit of salt, bay leaves, and whole black peppercorns. Bring to a boil over high heat and then turn it down to a slow simmer. Make sure to press down on the heads and peels as it simmers away to extract as much flavour as you can. Leave it to simmer for about 30 minutes. Once done, turn the heat off and set aside.
  2. Heat about 2-3 tablespoons of oil in a large pot over medium-high, and panfry the chorizo slices until browned, about a minute per side. Remove and transfer to a plate lined with a paper towel to soak up any excess oil.
  3. In the same pot, sauté the garlic until fragrant and golden brown. Add in the onions and cook until soft, about 2-3 minutes altogether. Follow with the diced tomatoes and cook until soft, a further 3-4 minutes.
  4. Add in the rice, paprika, saffron threads, and season with and bit of ground salt and black pepper. Give it a good mix before adding about 3 cups of the prawn stock. Cover and leave it to cook without stirring – at this point, you may want to turn your heat down to medium to avoid the rice sticking to the bottom of the pan. Leave it alone for about 15 minutes or once the rice has absorbed most of the liquid.
  5. Turn the heat down to low, and add the seafood (if you are going to serve it up in the pot you cooked it in, then I suggest that you arrange your seafood in a presentable way, if not, then you can just chuck them in and arrange it later when you transfer your paella to a serving dish). Cover and leave it to cook/bake for a further 15 minutes, or until the seafood is cooked through. Add the vegetables and chorizo slices and cook for a further 5 minutes, after which you can turn the heat off and leave it in the pot for a further 5-10 minutes before serving.
  6. Serve immediately with a fresh squeeze of lemon, and enjoy amongst family and friends!

Paella de Marisco (Seafood Paella)

Paella de Marisco (Seafood Paella)

Paella de Marisco (Seafood Paella)

BON APPÉTIT

– Ally xx

ps: I may or may not actually post up two more festive recipes, depending if I have time to write them up from tomorrow onwards before the New Year kicks in.

myTaste.com

Buko Pandan

Buko Pandan

Hello Everyone! We’re on our second last day of Festive Filipino Foods! If you have been living under a rock and basically haven’t been following my blog for the past week and a half, I have been posting a recipe every single day for the past 10 days now (tonight will be the 11th of 12 posts) cooking up recipes leading up to Christmas Day. Tonight, I will be sharing one final dessert recipe before I close this series for the month of December. I have saved the best savoury dish for last tomorrow, and if you’d like to take a stab at what I’ll be making, here are some clues: Spanish-inspired with lots and lots of seafood including prawns, clams, mussels, and calamari.

But enough of the seafood talk, that will be for tomorrow – tonight I will be sharing with you a recipe for a dessert that is a classic Filipino favourite known as Buko Pandan, that originated from the island province of Bohol in the Central Visayas region. It is a dessert dish found on the tables at every fiesta and family gatherings. The two main ingredients for this dessert are buko, which is a young coconut, and screwpine leaves which are locally known as pandan leaves. You can find these leaves in most Asian grocery stores, but if you’re a lucky duck like me, you might have a neighbour that grows these leaves and you have full access to it for free. However, you can use bottled pandan extract if this is more convenient for you.

At first glance, this sumptuous dessert can be mistaken for Buko Salad because of the similarity in texture and dairy ingredients used. However, the green gelatin which contains the aroma and flavor of the Pandan gives the distinction. — Vanjo Merano from Panlasang Pinoy

The dessert is usually topped with pinipig (immature grains of glutinous rice pounded until flat before being toasted), but I just went for what I had in the pantry, which is cornflakes and it’s just as good because you get that crunch in the dish anyway from it too. Rice Krispies may be used as well. I don’t think it is really added, but I like my Buko Pandan Dessert with large sago pearls, which is why I have added it to the dish. I’ve read that you can also add palm seeds or nata de coco in your dessert too if you like.

ps: before I move on to the recipe, I’d like to first apologise once again for a later than usual post. We’ve had a busy morning/afternoon cooking up a storm in the kitchen for our Noche Buena, and I only had time to write this post in between cooking/waiting times, and after all the cleaning up after our dinner.

Buko Pandan Ingredients

PREP TIME 15 MINS | COOKING TIME 90 MINS | SERVES 10-12

INGREDIENTS

  • 3 young coconuts, flesh removed and cut into strips
  • 1L water
  • 1 packet (200ml) crème fraîche
  • 1/2 can (190g) condensed milk
  • 1 packet (10g) unflavoured green agar-agar powder, or simply just gelatine powder
  • 1 cup large sago balls
  • 1 cup white sugar
  • 2 tsp pandan extract*
  • Handful of cornflakes

*You can extract your own from pandan leaves, and here’s how you can do it: Place the pandan leaves and water into a blender (1 bunch (12 leaves) to about a half cup of water). Blend until the leaves are chopped very finely. Pour contents through a fine sieve and press against it using a spoon to draw out any extra juice. Discard the leaves. Tip: if you keep the extract in a sealed bottle, you can keep it for up to one week in the fridge. Do not freeze though.

METHOD

  1. Dissolve the agar-agar powder in 1L of water. Add the sugar, stir, and bring to a boil over low heat for about 10-15 minutes. Once done, pour into a large square mould (about 10″ in size) and leave it aside to cool down before placing it in the fridge to completely set.
  2. Meanwhile, bring a large pot of water to a boil, about 2L. Once boiling, add the large sago balls in and cook until tender – mine took more than an hour to cook through, about an hour and 20 minutes to be exact.
  3. While the sago is cooking away, mix all the ingredients together (except for the cornflakes) in a large bowl. Check to see if your gelatine has set, and once it has, cut it into small chunks and mix in the bowl together with all the other ingredients.
  4. Once the sago is done, drain and add it to the mixture. Give it once good final mix and then place in the fridge for about 3-4 hours before serving.
  5. Serve chilled, topped with cornflakes, or anything crunchy, and enjoy!

Buko Pandan

Buko Pandan

BON APPÉTIT

– Ally xx

myTaste.com

Callos a la Madrileña (Ox Tripe Stew)

Callos a la Madrileña (Ox Tripe Stew)

Hello Everyone! Sadly, we’re nearing the end of our 12 days before Christmas special on the blog. How will you be spending your Christmas Eve tomorrow? I know where I’ll be – in the kitchen whipping up food with my Mom for our Noche Buena; and when I’m not cooking, I’ll most likely be taking a relaxed 2-day off doing absolutely nothing… Maybe. I can’t exactly sit around and do nothing. Heck, I’m evening writing this post while watching The Incredibles on TV and I was just talking to my Mom about how this movie never gets old – I still love watching it to date.

Anyway, time to get off the tangent wagon and get down to tonight’s recipe. It is basically a stew that is common and traditional to Madrid, well known as Callos a la Madrileña, or Callos for short. The stew consists of ox tripe, ox feet (or shank), chickpeas, blood sausage (or chorizo), and red capsicum. The tripe and feet are boiled and simmered until the texture becomes extra tender; this makes eating this dish pleasurable. It is then cooked together with the chickpeas and capsicum.

The extra tender tripe and fat from the ox feet literally melts in your mouth while the luscious taste of chorizo and bacon lingers around – inviting you to try more. Though it looks and sounds enticing (which it does), moderation is still recommended because of the high fat and cholesterol content of this dish. It is good to enjoy food but it is better to enjoy life. — Vanjo Merano from Panlasang Pinoy

Ox feet is rarely found in stores/markets here in Brunei – they’re always sold out even if you go extra early in the morning. My guess is that restaurants who use this part of the cow have already reserved it. Anyway, you can substitute it for veal (beef) shanks, however, you won’t get the same feeling of the melt-in-your-mouth fat as you do from ox feet.

Callos a la Madrileña (Ox Tripe Stew) Ingredients

PREP TIME 15 MINS | COOKING TIME 2 HOURS | SERVES 6-8

INGREDIENTS

  • 500g ox tripe, washed and cleaned
  • 500g beef shank
  • 250g bacon
  • 1 can (240g) chickpeas/garbanzos, drained
  • 6 pcs dried bay leaves
  • 2-3 garlic cloves, minced
  • 2 red bird’s eye chillies (optional)
  • 1 brown onion, diced
  • 1 chorizo sausage, sliced diagonally
  • 1 red capsicum, cut into strips
  • 1 tomato, diced
  • 1 tbsp tomato paste
  • Ground salt and black pepper, to taste
  • Whole black peppercorns

METHOD

  1. Add the beef tripe, 3 bay leaves, salt and a generous pinch of whole black peppercorns to a large pot filled with water. Boil for about an hour and a half, or until tender. Do the same for the beef shank in a separate pot. Once done, turn he heat off and leave the meat in the broth for an extra half hours. Remove from the broth and slice both the meats into bit-sized pieces. Discard the liquids from the tripe, but reserve the beef shank broth for later.
  2. Heat a large frying pan over medium-high and add the bacon in, frying until crisp, about 2-3 minutes per side perhaps (or more). Remove from the pan and set aside to cool down a bit before cutting them into smaller pieces.
  3. If there isn’t enough oil produced from the fat of the bacon when you fried it, add about a tablespoon more of oil and fry the chorizo slices until browned, about a minute or two per side. Once done, remove from the frying pan and set aside on a plate lined with a paper towel to soak up any excess oils.
  4. In the same frying pan, sauté the garlic until fragrant and golden brown. Then, add in the onions and cook until soft, about 2-3 minutes altogether. Follow with the diced tomatoes and cook until soft, a further 3-4 minutes.
  5. Add in the tripe and shank, together with a touch of ground salt and black pepper. Give it a good mix before adding the reserved stock, tomato paste, and chillies. Bring to a boil, and cook for about 10 minutes.
  6. Add in the chickpeas/garbanzos, and carrots and cook for a further 5 minutes before adding in the capsicum, bacon bits, and chorizo slices. Give it one final mix and then turn the heat off. Leave, covered, in the pan for about 5 minutes before serving.
  7. Transfer to a serving dish and enjoy hot!

Callos a la Madrileña (Ox Tripe Stew)

Callos a la Madrileña (Ox Tripe Stew)

BON APPÉTIT

– Ally xx

myTaste.com

Cassava Cake

Cassava Cake

Hello Everyone! Once again, apologies for another later than usual post. I just got home after doing some gift shopping for a friend’s wedding this Sunday, and a Secret Santa exchange gift on Monday. After my shopping spree, I had a nice and filling dinner with my Mom and sisters at Rack & Brew, a café cum boutique. I’ve always wanted to try out the food from this place since it opened late this year somewhere in September, and I finally got around to tonight.

For those of you who have been following my blog on a daily basis for the past week, you would’ve known that I made something called Pichi-Pichi on Sunday using grated cassava. Tonight, I’m going to share with you another cassava recipe in case you have any leftovers that you didn’t get around to using for your pichi-pichi. Some of the ingredients are similar (just that this requires less!), but what differentiates one from the other is the method of cooking. Pichi-Pichi is steamed, while tonight’s recipe for cassava cake is oven-baked. I do recommend that when you go out to buy cassava, buy a few kilos (up to 3 or 4 is sufficient), so that you can just peel and grate everything all in one go and cook it up in many different ways. Also, grated cassava freezes well for up to 3 months, just defrost before using.

Cassava cake is a classic Filipino dessert, or a hefty afternoon snack made from grated cassava and coconut milk. My Mom always makes hers with pure cassava (no added flour like the pre-made ones we find in the shops/restaurants where the ratio feels like 98% flour and 2% cassava), and fresh coconut milk squeezed from the flesh of a mature coconut. You may add more coconut milk on top of the cassava once it is baked about halfway through, or you can top with off with other favourites such as macapuno or a non-traditional topping such as custard. My Mom likes hers plain, and it tastes just as good.

Cassava Cake Ingredients

PREP TIME <5 MINS* | COOKING TIME 40-45 MINS | SERVES 8-10

*This assumes that you have grated cassava readily available (fresh or frozen).

INGREDIENTS

  • 4 cups grated cassava
  • 2 cups fresh coconut milk (from a can is fine as well)
  • 1 can (380g) condensed milk
  • 50g unsalted butter, melted

METHOD

  1. Preheat oven to 190C. Grease 2 x 10″ square pans with a bit of butter. Set aside.
  2. Add all the ingredients together in a large mixing bowl and mix using a spatula until well combined.
  3. Pour the batter equally into the prepared pans and place in the oven for about 40-45 minutes, or until the tops have browned and a toothpick inserted into the centre of the cake comes out clean.
  4. Remove from the oven and leave it to cool down a bit on a wire rack. Once they have cooled down slightly, cut them into medium-sized squares.
  5. Serve warm and enjoy!

Cassava Cake

BON APPÉTIT

– Ally xx

myTaste.com

Rellenong Bangus (Stuffed Milkfish)

Rellenong Bangus (Stuffed Milkfish)

Hello Everyone! Hope everyone managed to get through their Monday blues and look forward to a short week followed by a long weekend of Christmas celebrations ahead! What are your plans for this Christmas? I’ve already told you guys mine if last night’s post – spending it quietly at home with family and food, and then looking forward to next week with the new year creeping up!

Tonight, I will be sharing a dish with you that is one of the most popular dish in the Philippines. On top of the delicious taste and unique process of preparation compared to other fish recipes, the amount of work involved is tedious. I guess it’s no wonder we don’t often eat this at home, and to be honest, I cannot remember the last time I had this dish, and if it was even made by my Mom or we had it at a restaurant. It is tedious because separating the skin from the meat and deboning and flaking of the milkfish meat requires a lot of patience. But after all the hard work of deboning, marinating the skin, cooking the meat with all the ingredients, stuffing the skin with the fish meat mixture and frying is the reward of eating a unique and delicious Filipino dish that will leave you craving for more. This is why I recommend that you work with 2-3 fishes in one go to save you all the trouble of having to repeat the whole process again in a few days/weeks time! You can stuff the fishes and freeze them for up to 3 months – just defrost before frying.

Rellenong Bangus (Stuffed Milkfish) Ingredients

PREP TIME 1 HOUR | COOKING TIME 30 MINS | SERVES 8-10

INGREDIENTS

  • 2 large size bangus (about 650g each), scaled, gutted, and cleaned
  • 3 tomatoes, diced
  • 2 brown onions, diced
  • 2 carrots, diced
  • 2 potatoes, diced
  • 1 large free range egg, beaten
  • 1 yellow capsicum, diced
  • 1/2 bulb garlic, minced
  • 3/4 cup frozen green peas
  • 4 tbsp plain flour
  • Ground salt and black pepper, to taste
  • Handful of raisins

METHOD

  1. Preparing the fish: Gently pound fish to loosen meat from the skin. Break the big bone at the nape (back of the neck) and on the tail, and gently pull the bone out. Insert a spoon through the neck of the fish neck and gently scrape out the meat. Scrape down to the tail, going around and on the other side of the fish, separating the the meat entirely from the skin. Be careful as to not cut the skin open while doing this. Marinate skin and head of fish with soy sauce and calamansi (lime) juice. Set aside.
  2. Boil the fish meat in a little water for about 5 minutes. Drain, pick out the remaining bones, and flake the meat.
  3. Preparing the stuffing: Heat oil in a large frying pan over medium-high and sauté the garlic until fragrant and golden brown. Then add in the onions and cook until soft, about 2-3 minutes altogether. Follow with the tomatoes and cook until soft, a further 3-4 minutes.
  4. Add the potatoes and carrots, and cook for about 2 minutes. Then add in the boiled fish meat together with the ground black pepper and salt. Give it a good mix and then cook for a further 2-3 minutes. Finally, add in the peas, capsicum, and raisins. Give it another good mix and turn the heat off. Add the beaten egg and mix. Leave it in the pan, covered for about 5 minutes before setting it aside to cool down completely.
  5. Stuffing the fish: Stuff the fish through its neck, packing in as much of the filling as you can, without breaking the skin that is.
  6. Frying: Coat the skin of the fish with a bit of flour. Heat oil (enough to cover at leat half of the fish) in a large frying pan over high heat. Make sure that the oil is scorching hot before adding the fish in. Carefully lower the fish into the oil and fry until browned, about 4-5 minutes (or less depending on the size of your fish) per side. Once done, remove from the pan and transfer to a serving dish. Wait for it to cool down before slicing into it.
  7. Serve immediately with steamed rice and spicy hot banana catsup on top of your Rellenong Bangus. Enjoy!

Rellenong Bangus (Stuffed Milkfish)

Rellenong Bangus (Stuffed Milkfish)

BON APPÉTIT

– Ally xx

myTaste.com

Pichi-Pichi (Steamed Cassava Cakes)

Pichi-Pichi (Steamed Cassava Cakes)

Hello Everyone! Christmas is in five days! I hope that those who are on holidays right now are enjoying every bit of it and making the most of the festive season. Well, we’ve reached the end of the first week of our 12 days before Christmas! Another 5 more recipes to go until I wrap things up for Amcarmen’s Kitchen – yes, after Christmas, you won’t be hearing from me until the weekend of the first week of January. I’ll be spending the festive season here in Brunei with my family with endless feastings and, of course, getting fat as usual.

Anyway, tonight, I will be sharing with you another recipe that I picked up from my travels with my Mom to Canada back in the Summer of 2007. Pichi-Pichi (pronounced pee-chee pee-chee) is one of the delicious cakes enjoyed by many Filipinos during special occasions such as Noche Buena, but is not limited to just festive celebrations. It is a gelatinous dessert, or even a heavy mid-afternoon snack, made from grated cassava (or locally known to Filipinos as Kamoteng Kahoy) and freshly grated coconut. The mixture is poured into a mould, then steamed until it forms a sticky-gelatinous texture, and finally coated in grated coconut for an extra added flavour.

Cassava Root (Kamoteng Kahoy)
Cassava (kamoteng kahoy) before and after it is peeled

To prepare the cassava, first wash the root to get rid all the dirt; then, peel off the brown and white silky outer skin. Using a fine grater grate cassava, removing the hard stems in the middle and discard. Keep on grating until you’re done with all your cassava. My Mom and I went to the wet market in the morning to get it grated – much quicker as they have a machine to do it for us, and just for a dollar per kilo grated. Just as an extra precaution, cassava is considered a dangerous food if consumed raw, or it is not prepared properly. The consequences are fatal. If prepared incorrectly, the cassava plant can produce cyanide, a deadly compound when consumed, and if you are allergic to latex rubber, you may want to consider a different dessert (source: Time Magazine). Just make sure that when you are working with cassava, make sure that you prepare it properly!

Pichi-Pichi (Steamed Cassava Cakes) Ingredients

PREP TIME 10 MINS | COOKING TIME 20-30 MINS | SERVES 6-8

INGREDIENTS

  • 1 & 1/2 cups cassava, grated
  • 1 cup warm water
  • 1 cup white sugar
  • 1/2 tsp lye water
  • 1/2 tsp pandan extract*
  • Freshly grated coconut
  • Red, yellow, and green food colouring

*You can use bottled pandan extract, or you can extract your own from pandan leaves. Here’s how you can do it: Place the pandan leaves and water into a blender (1 bunch (12 leaves) to about a half cup of water). Blend until the leaves are chopped very finely. Pour contents through a fine sieve and press against it using a spoon to draw out any extra juice. Discard the leaves. Tip: if you keep the extract in a sealed bottle, you can keep it for up to one week in the fridge. Do not freeze though.

METHOD

  1. Add the sugar, pandan extract, and warm water in a large mixing bowl. Mix until the sugar has completely dissolved. Once dissolved, add the grated cassava, together with the lye water, to the sugar mixture and give it a good mix.
  2. Divide the mixture equally into three moulds. Add a few drops of red food colouring into one of the moulds, then yellow, and green in the remaining two. Mix well until the colour is fully blended into the cassava mixture.
  3. Cover each mould with foil and place it in your steamer. Steam for about 15 to 20 minutes or until translucent. Once done, remove from the steamer and set aside to cool down.
  4. Once cooled, cut the pichi-pichi into bite-sized chunks. Coat each chunk with the freshly grated coconut and serve immediately. Share and enjoy!

Pichi-Pichi (Steamed Cassava Cakes)

BON APPÉTIT

– Ally xx

myTaste.com

Hamonado (Pork Rolls Stewed in Pineapple Juice)

Hamonado (Pork Rolls Stewed in Pineapple Juice)

Hello Everyone! First of all, apologies for a later than usual post. I just got back home about an hour ago and yes, I am still writing this post – I didn’t manage to get around to writing this in advance knowing that I wouldn’t get home until later than I usually do. Oh well! Anyway, we’re halfway through our 12 days before Christmas Special on Amcarmen’s Kitchen, and I want to know, which of the ones that have been posted are your favourites? Let me know in the comments section below 🙂 Anyway, tonight’s recipe is just as simple in terms of the ingredients used to make such lavish looking dish, and delicious of course, for Noche Buena. However, the dish is not limited to the Christmas season as it can also be found on tables on an everyday basis.

In a nutshell, Hamonado is simply, thinly sliced pork (like tapa style) sweetened in pineapple juice. It resembles sliced ham but is often thick, juicy, and exceptionally sweet. What makes this dish quite interesting is due to it’s simplicity – here are the three very basic steps: marinating, pan-frying, and simmering. What makes this dish right on the money is because of the balance of flavours – you’ve got the sweetness from the pineapple juice and sugar mixture that penetrated through a lovely pork shoulder from the marinating process, while you get a hit of salt from the salted egg that is stuff in between the meat when it is rolled up.

Hamonado (Pork Rolls Stewed in Pineapple Juice)

From doing some research on this dish, I’ve found multiple recipes that skip the process of having to roll up the meat into a log, which is also okay to do so as the flavours still remain the same. If you wish to go down this path, then I suggest you cut your pork shoulder into chunks instead of slicing it thinly and flattening it out. This is actually the easiest way of cooking pork hamonado for the novice cooks to take a stab at. I think what my Mom ended up doing was that she rolled up about 1/2 of the pork, and the other half she just stewed it in the marinade.

Hamonado (Pork Rolls Stewed in Pineapple Juice) Ingredients

PREP TIME 20 MINS* | COOKING TIME 30-45 MINS | SERVES 10-12

*Does not include marinating  process which is a minimum of 3 hours, or preferably overnight. Plan your time according by taking this into account.

INGREDIENTS

  • 3kg pork shoulder, sliced thinly
  • 4 salted eggs, hard boiled, and cut into 4 wedges
  • 2 cups sugar
  • 2 bulbs garlic, minced
  • 1 can (1360ml) Del Monte pineapple juice
  • 1 can (340g) pineapple slices
  • 1 tbsp achuete powder
  • Ground salt and pepper, to taste,

METHOD

  1. Combine the thin slices of pork in a large mixing bowl together with the pineapple juice, sugar, and achuete powder. Give it a good mix until the sugar has dissolved. Cover with plastic wrap and leave it in the refrigerator to marinate for a minimum of 3 hours, overnight preferred to soak up more of the flavours (my Mom marinated it for three days).
  2. Remove the pork from the marinade (do not discard), and place the slice on a flat surface and arrange the salted egg in the centre of the slice. Roll and form into a log. Secure the roll by tying cooking string around the log, making sure that it is tight enough to hold the roll.
  3. Heat about 2-3 tablespoons of oil in a large pot over medium-high. Sauté the garlic until fragrant and golden brown, about 1-2 minutes. Follow with the rolls of pork, searing it until all sides are golden brown, approximately 5-8 minutes. Pour in about half of the marinade juices and leave to simmer for about 30-40 minutes, or until the sauce thickens. You will need to flip the pork rolls from side to side every 15 minutes.
  4. Once done and the sauce has thickened, remove the pork rolls  and place it on a platter. Carefully remove the cooking string and slice into serving pieces.
  5. Pour the sauce over the pork hamonado rolls and serve, and enjoy with pineapple slices and any extra  wedges of salted egg. Usually eaten with steamed rice.

Hamonado (Pork Rolls Stewed in Pineapple Juice)

Hamonado (Pork Rolls Stewed in Pineapple Juice)

BON APPÉTIT

– Ally xx

myTaste.com

Bikò (Sweet Sticky Rice Cake with Coconut Curd Toppings)

Bikò (Sweet Sticky Rice Cake with Coconut Curd Toppings)

Hello Everyone! Day 05 of 12 is here and I have another dessert to share with all the sweet tooth’s out there. If you are following my Instagram page (@amcarmenskitchen), I posted a picture of the ingredients and made mention that you essentially only need 4 ingredients (actually 3 because you can omit one of the ingredients) to make this yummy and definitely filling dessert! All you really need it glutinous rice, white sugar, coconut milk, and a bit of violet food colouring. You can omit the food colouring and substitute the white sugar for brown to colour your bikò, which is actually how it’s traditionally done. I only picked up the idea of using violet colouring from my Mom’s relative when we visited their whole family in Canada back in the Summer of 2007. Adding the violet colouring doesn’t do anything for the taste (duh), but it definitely makes the dish a whole lot more attractive and inviting.

For those of you who don’t know, bikò, or otherwise known simply as a Filipino Sticky Rice Cake, served during special occasions such as birthday parties, family reunions, town fiestas, and of course, for Noche Buena. It’s not a tedious process, it’s just hard on the arm because of all the mixing that needs to be done.  It is then garnished with latík, which is basically just cooked coconut milk residue, set at the centre of each slice, and is traditionally served over a banana leaf in a bilao, which is basically just a round woven bamboo tray.

Bikò (Sweet Sticky Rice Cake with Coconut Curd Toppings) Ingredients

PREP TIME 10 MINS | COOKING TIME 40 MINS | SERVES 6-8

INGREDIENTS

  • 2 cups glutinous rice, washed and drained
  • 2 cups water
  • 2 packs (200ml each) coconut milk
  • 1 cup white sugar
  • 2 tsp violet food colouring
  • Banana leaves
  • Bilao

METHOD

  1. Add the glutinous rice, water, and violet for colouring in a large pot. Mix and then place over high heat, leaving the rice to cook for about 15 minutes or when the rice is about half-done.
  2. When the rice is half-done, add in one of the packs of coconut milk and mix well. Leave it to cook for another 15 minutes or until the oil starts to separate from the coconut milk. At this point, you want to reduce your heat down to about medium-low to avoid the rice sticking to the bottom of your pot.
  3. Meanwhile add the other pack of coconut milk in a separate pan and cook until the oil separates from the milk and turns golden brown. Drain from the oil and then set aside.
  4. Prepare the banana leaves by lightly heating it over the stovetop burner to make it pliable and easy to handle. Then, place the the banana leaves over the bilao and set aside.
  5. Crank up the heat to about medium-high and add the sugar into the glutinous rice mixture. Mix and allow the sugar to caramelised, about 10 minutes. Once done, turn the heat off.
  6. Assemble by spreading the sweet sticky rice cake mixture onto the prepare bilaos lined with banana leaves. Flatten evenly. Cut the rice cakes into diagonals and top the centres of each diagonal with some latík.
  7. Serve, share, and enjoy warm! This recipes makes for about 4 palm-sized bilaos.

Bikò (Sweet Sticky Rice Cake with Coconut Curd Toppings)

ps: apologies for only posting one picture of this dish (as you know it’s unlikely of me to only post one picture of the final dish), but I made this a while back, 2 years ago to be exact, and this was the only picture that I could find *sad face* at least it is a good picture!

BON APPÉTIT

– Ally xx

myTaste.com

Lengua Estofado (Ox Tongue Braised in Tomato Sauce)

Lengua Estofado (Ox Tongue Braised in Tomato Sauce)

Hello Everyone! We’re a third of the way into our 12 days of Festive Filipino Foods, and tonight I will be sharing something a little bit unusual, and when I say unusual, I mean it’s not something that I would think to buy in the stores and cook it myself. It is rather foreign and exotic for some, where adjectives such as gross or yucky is used to describe a dish where tongue is used. I don’t recall ever having lengua before – actually, now that I’ve said that, I have had it before, but only the ones that have been sliced very thinly and  grilled at a Korean BBQ Restaurant in Sydney. If you don’t think about the fact that you are eating tongue, it actually feels like you’re having beef brisket.

Upon doing further research, I have found that many different cuisine and cultures are accustomed to ox tongue. For example, it is a major ingredient in the making of what is called tongue toast in North America, where it is used in an open-faced sandwich served for either breakfast, lunch, dinner, or as an hors d’œuvre. In Mexico, it is widely used in their burritos and tacos. Tongue is also widely prepared, and considered a delicacy in many parts of South America, Asia, and European countries including Belgium, France, Italy, Portugal, Germany, and Poland to name a few.

Ox (beef) tongue is often prepared by boiling the meat first in various spices, and only after that is the skin removed. It is then cooked further by either braising it in a sauce, grilling, or roasting it in the oven. Tonight, I will be sharing with you a recipe for ox tongue braised in tomato sauce, and served with some mushrooms, olives, and potatoes on the side. Estofado is a Filipino method of cooking based on Spanish influences where it involves the braising or stewing of meat like beef or pork knuckles. Sugar, garlic, soy sauce and a bay leaf are among the other ingredients added into the pot during this process. Lengua Estofado is of a Hispanic origin and has been adapted to suit the palates of Filipinos due to centuries of Spanish colonisation. Despite initial impressions of the dish being gross and yucky, it is quite a popular dish during family gatherings, especially for Noche Buena.

Lengua Estofado (Ox Tongue Braised in Tomato Sauce) Ingredients

PREP TIME 10-15 MINS | COOKING TIME 1 HOUR 35 MINS | SERVES 4-5

INGREDIENTS

  • 1kg ox tongue
  • 1 punnet (250g) cup mushrooms, sliced
  • 125g green olives stuffed with feta
  • 3 red bird’s eye chillies
  • 2-3 dried bay leaves
  • 2-3 garlic cloves, minced
  • 1 large potato, washed and sliced thinly
  • 1 large tomato
  • 1 small brown onion, diced
  • 1 tbsp tomato paste
  • Ground salt and black pepper, to taste
  • Knob of butter
  • Whole black peppercorns

METHOD

  1. Add the ox tongue, bay leaves, whole peppercorns, and salt to a large pot filled with water. Boil the ox tongue for about an hour until tender. Once done, remove from the pot and set aside to cool down a bit after which you can then peel the skin off the tongue and then slice the meat into about 1-cm thick slices. Don’t forget to reserve some of the stock for when we braise it later.
  2. Heat oil a large frying pan over medium-high and sauté the minced garlic until fragrant and golden brown. Then add in the tomatoes and cook until soft, about 2 minutes altogether. Follow with the tomatoes and cook until soft, a further 3-4 minutes.
  3. Next, add the slices of lengua and season it with a bit of ground salt and black pepper. Give it a good mix before adding about a cup and a half of the reserved stock. Bring to a boil. Once boiling, add in the tomato paste and chillies. Stir, and leave to braise for a further 30 minutes.
  4. While the tongue is braising away, heat a couple of tablespoons of oil in a medium-sized pan and fry the potato slices until golden and crispy. Transfer to a dish lined with a paper towel to absorb and excess oils. Work in batches if necessary.
  5. Remove the oil from the pan and melt the knob of butter. Add the mushroom slices in and sauté until the mushrooms are soft.
  6. Once the long is done, plate up accordingly and serve immediately. Share with the family and enjoy!

Lengua Estofado (Ox Tongue Braised in Tomato Sauce)

Lengua Estofado (Ox Tongue Braised in Tomato Sauce)

BON APPÉTIT

– Ally xx

myTaste.com