Scallops with Bacon and Beet Purée

Scallops with Bacon and Beet Purée

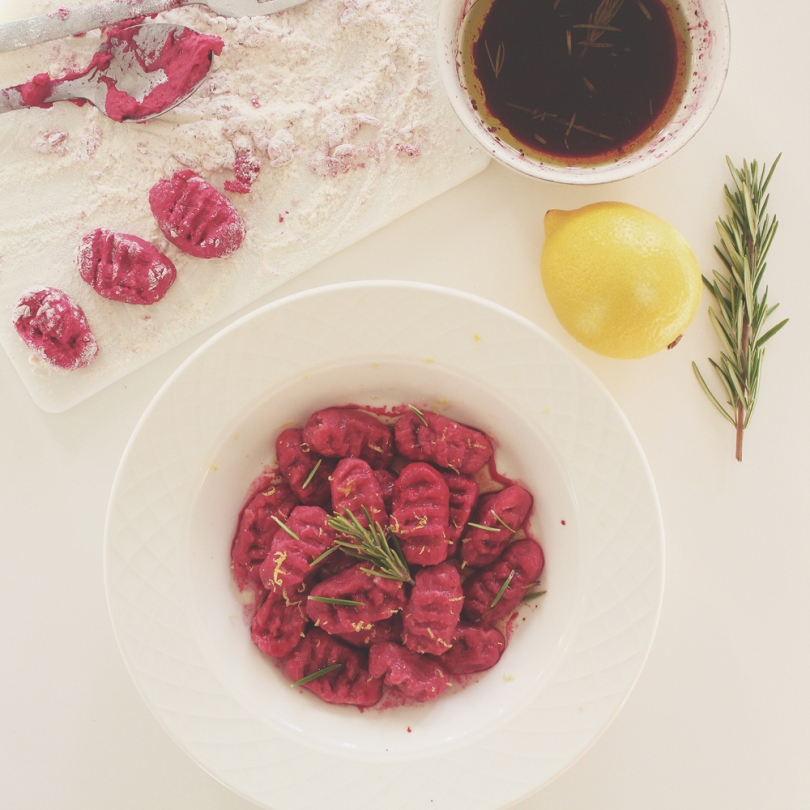
Happy Tuesday everyone! Beetroot is making an appearance in today’s post (from the leftover purée I had from the Beetroot Gnocchi recipe I posted last week). So, as you all probably know if you read that post, beetroot isn’t quite to my liking and I have no valid reason as to why I don’t particularly like it. As I said, can’t quite put my finger on it, might be the taste but I honestly have no idea. However, I did not want to waste such good produce so I decided to make something that goes with beet purée, and I found this recipe online that appealed a lot to me, mainly because I love scallops and I rarely get to eat them, or even cook with them because it’s a little bit over the ‘student’ budget (but today I will make an exception).

The original recipe garnishes the dish with goat cheese, and I would’ve added the goat cheese in if I hadn’t actually forgotten about it – yeah, it’s now sitting in my fridge and I’m trying to think of a dish that can incorporate this so I don’t have to store it in the fridge for a long time and eventually forget about it and then throw it out. But enough chitter-chatter, time to get on with the recipe (check out the original recipe here)! Also, before I continue, my scallops weren’t as thick as the ones in this recipe, so it looked a bit flat on the dish for me, but nonetheless, flavour was definitely there.

PREP TIME 5 MINS | COOKING TIME 10 MINS SERVES 2

INGREDIENTS

  • 1 dozen sea scallops
  • 1/2 cup roasted beet purée*
  • 1 bacon strip (in this case I used hickory-smoked bacon), diced
  • 1/4 red onion, minced
  • 1/2 cup Chardonnay
  • 1/4 cup thickened cream
  • Ground sea salt and pepper to taste
  • Fresh Italian parsley, chopped
  • Knob of butter
  • Fresh goat cheese

*See my Beetroot Gnocchi recipe on how to roast beets if you don’t have any ready at hand.

METHOD

  1. Melt butter in a medium-sized frying pan and cook the bacon over medium-high heat until crisp. Transfer the bacon to paper towels to drain off any excess oils. Pour out any excess oil from the pan leaving a bit behind, then add in the onions and sauté over medium heat until soft and caramelised (about 2 minutes).
  2. Add the Chardonnay and boil until reduced by half, scraping up any browned bits, about 1 minute. Add the cream and beet purée. Simmer until a thick purée is formed. Season to taste with salt and pepper. Remove from the heat.
  3. Meanwhile, pat the scallops dry and sprinkle with salt and pepper. Melt a knob of butter in a small frying pan and then add the scallops and cook until they’re brown, about 30 seconds to a maximum of 45 seconds per side (they will be slightly translucent in the centre).
  4. Spoon the beet purée onto a serving plate, spreading in a circular motion. Top with the scallops, drizzling any juices from the plate over the top. Spoon small dollops of the goat cheese, and sprinkle with bacon and fresh Italian parsley.

Scallops with Bacon and Beet Purée

BON APPÉTIT

– Ally xx

myTaste.com

Persian Lunch

Persian Lunch

May the 4th be with you.

About a month ago or so (I actually cannot remember) I saw a post on the UNSW Food Lovers Society page that linked to a Facebook page called mamaCOOKoo. As intrigued as I was to know more about it, I clicked on their page and found out that they are a community that “connects amazing home cooks with hungry locals”. I then went onto their website to find out more about what they do. I read up on the story of how mamaCOOKoo came to be and found it interesting, and smart. Basically, husband and wife, both terrible at cooking, wanted to find a cost-effective solution to their troubles, and thus the birth of mamaCOOKoo, food that reminds us of home, mamas and grandmas, and their magic in the kitchen. You could register as a foodie, or as an amazing home cook. Torn between the two, I decided to sign up as a foodie as a craved for delicious home-cooked meals and mainly because I am curious to know about and experience the different cuisines out there in my area. I mean, yeah my cooking is good, but I don’t know about the ‘amazing’ part, just yet.

So about 2 weeks ago I got an email from Rumana, the founder of mamaCOOKoo, inviting me to eat Persian food. When I read the menu, I was on board immediately. Also, I’ve never really had Persian food before so I was really interested to taste authentic home-cooked Persian food. I feel that if you really want to experience a new cuisine, authentic, home-cooked is always the way to go first. I feel that restaurants today, especially in Australia, rarely have that authentic taste, and is always in some way tweaked and fused with a bit of a western touch. The really authentic restaurants are often difficult to find as well.

I got to experience authentic, home-cooked Persian food today and I definitely have no regrets.The food, AMAZING. And of course the people that we shared the meal with were also amazing. I invited my fellow food buddy Jialing and her boyfriend Zargham. We met Rumana and her husband Nilesh, Aadil and of course Arash who was our home cook for the day. We also got to know his wife who came in just as we were about to have dessert (not Persian, but still amazing with the ‘scotch-butter’ sauce). Lots of fun talking about random things I might add, from experiences with fire alarms, to cats and dogs (and of course which of the two were better, dogs hands down), and just all things food in general. We also got to know Arash, about his inspirations and how he started cooking by learning from his mom.

Here are some shots of the food that we had today:

Persian Lunch: Mirza Ghosayme
Mirza Ghosayme – Smoked bbq eggplant with eggs, garlic and tomatoes; this was a winner for me! I could just eat this all day, everyday!

Persian Lunch: Albaloo Pollo
Albaloo Pollo – Sour cherry rice; I am generally not a fan of cherries (probably scarred from those horrible preserved cherries in a jar), but this changed my view on cherries! Such a creative and vibrant dish and definitely something I’ve not seen in restaurants before!

Persian Lunch: Adas Pollo
Adas Pollo – Lentils, sultana, nuts (almond, pistachio) and rice; again, sultanas aren’t my thing but it felt like it wasn’t even there, the dish was just so good. SO good.

Persian Lunch: Gaymeh Pollo
Gaymeh Pollo – Slow cooked lamb, saffron, tomatoes, split peas, potato and rice; perfection on a plate.

Persian Lunch: Fesunjun
Fesunjun – Slow cooked chicken breast with pomegranate and walnuts; so tender and YUM.

Persian Lunch: Dolmeh
Dolmeh – Eggplant and capsicum stuffed with mushrooms, beans and rice, cooked in a tomato and tarragon sauce; just WOW.

Persian Lunch: Poached Pear with a 'scotch-butter' sauce and a dollop of cream
and lastly our not-so-Persian dessert (more French-inspired), Poached Pear with a ‘scotch-butter’ sauce and a dollop of cream; scotch-butter is in fact just butterscotch sauce, but Arash calls in scotch-butter because he couldn’t pronounce it at first. We love us some scotch-butter!

Overall, an amazing experience, both the food and the company. I’m glad that I came across mamaCOOKoo and I’m glad that they have started up this community. The only downside to this is that I probably will have to start running/walking again after such a full-on breakfast/lunch/dinner all in one go (I didn’t have breakfast because I believed that it would ruin my Persian lunch experience, and I was obviously too full to have dinner afterwards). But hey, if you have not experienced this feeling before, then I have news for you. You are NOT a true foodie at heart.

Also, if you are based in NSW, you can order the food that you see in this blog if you don’t have time to cook, or don’t like to cook at all, and are after a nice home-cooked meal. You can also order food for parties! I recommend that you register with mamaCOOKoo so you can find out more about home cooks around your area. Or hey! If you are an amazing home cook then do get in touch with Rumana! Links below:

– Ally xx

Beetroot Gnocchi

Beetroot Gnocchi

Yesterday (30th April) was the 10-year anniversary of the iconic and always quotable click flick Mean Girls. I cannot even begin my obsession over this movie (okay, I’m not that obsessed, I just love it so much that I can quote it all day long). Leading up to this day, I planned a Mean Girls themed party and since its anniversary fell on a Wednesday, we had to bring in a pink dish to share, and of course wear pink as to quote Karen Smith, “On Wednesdays we wear pink”. If you want to skip ahead to the recipe, scroll down, otherwise enjoy reading about my DIY Mean Girls shirt:

Mean Girls Day: DIY Shirts

I was initially going to buy a shirt off eBay but it was a bit too expensive – well that was one of the reasons, the other reasons were the font not being right, not the right shade of pink, etc. Yes, the designer in me kicked in. And then I thought, yeah I’m a designer, why not I just make my own t-shirt? And so I did! I bought a pink tank top from Esprit and can I just say what a snatch! Originally priced at $14.95 and was down to $7.95 – and then a further 50% off from that price! With the help of my lovely friend Tara who does textiles as one of her majors for her degree, she taught me how to screen print using the photo-emulsion technique. Yeap, making my own screen printed shirt was the way to go, literally costed me less than $5 but a bit of time and effort. At least it was something that I am happy with and it turned out so great! “YOU CAN’T SIT WITH US!”

Mean Girls Day: DIY Shirts


So for the pink dish that I made to share with everyone, I made Beetroot Gnocchi. I’ve never made gnocchi before so I was a bit nervous as I didn’t want to screw up and have nothing for my guests to eat, but as always, beginner’s luck was on my side once again. They turned out really well and I would like to say that they taste really good (and I’m sure they do), I’m just not a very big fan of beetroot. It’s just something about the taste of it that I can’t really put my finger on. But as I said, I’m sure they would be so fetch for beetroot lovers.

Beetroot Gnocchi

PREP TIME 30 MINS | COOKING TIME 30 MINS SERVES 5-6

INGREDIENTS

For the beetroot purée

  • 1 bunch beetroot, cleaned and scrubbed (if the greens are still attached, cut them off, wash them, and reserve them for another use such as for salads)
  • Extra virgin olive oil
  • 2 sprigs rosemary

For the beetroot gnocchi dough

  • 3/4 cup roasted beetroot purée
  • 2 cups plain flour, divided
  • 1 cup ricotta cheese
  • 3/4 cup grated parmesan cheese
  • 1 large egg
  • 1 tsp salt
  • 1/2 tsp black pepper

To garnish

  • Juice and zest of one lemon
  • Rosemary sprigs

METHOD

  1. Preheat the oven to 250C. Place the beets in a large piece of aluminium foil. Coat the beets with the olive oil and sprinkle rosemary leaves over. Feel free to use plenty of olive oil as we will then use the beet-infused oil to dress the gnocchi. Fold the foil over and crimp the sides closed. This helps keep the beets moist, and also contains all the juices. Place in the oven and roast until tender. Smaller beets take about 25 minutes while larger and older beets can take up to an hour. You can check its tenderness by piercing a fork through them. Once done, remove the beets from the oven and set aside so that it is cool enough to handle. Once cool, you can use your fingers to to rub off the their peels. Transfer the beet-infused oil into a small bowl and reserve for later.
  2. Cut the beets into chunks and place them into a blender. Blend until smooth. Take 3/4 cup of the beet purée and place it into a medium bowl. If you have any extra puréed beets, place them into a container and refrigerate. You can use them for other dishes. Stir in the ricotta and parmesan cheese, eggs, salt, and pepper. Then mix in 1 & 1/2 cups of flour (the dough can be made a day ahead, just keep it refridgerated).
  3. Place the remaining 1/2 cup of flour in a bowl. Lightly dust a baking sheet with flour. Scoop the dough into rounds and transfer to the bowl with flour. Then with the tinges of a fork, press down into the dough and then transfer to baking sheet.
  4. Working in batches, cook the gnocchi in a large pot of simmering salted water. Cook for about 2 minutes or until when the gnocchi starts to float to the surface. Cook the gnocchi for a further 1 & 1/2 minutes longer. Then, using a slotted spoon, transfer gnocchi to a serving dish. Drizzle with the beet-infused oil and top with lemon zest, a few squeezes of lemon juice and fresh rosemary leaves.

Beetroot Gnocchi

Beetroot Gnocchi

BON APPÉTIT

– Ally xx

myTaste.com

Diabetic-friendly Chocolate Lava Cake

Diabetic-friendly Chocolate Lava Cake

Happy Birthday Mom!
Here’s to another year. Happy Birthday to the strongest woman I know; my chef, my role model, my bestfriend, my queen, Mama G. Thank you for making me into the person that I am today. Thank you for supporting me in my decisions. Thank you for being kind and generous to my sisters and myself. Thank you for feeding me and most of all thank you for teaching me how to cook! Thank you for everything. I love you ❤

Today (May 1st) as you can see, is my mother’s birthday. Unfortunately for the past four years, I have not been able to celebrate with her and the family back home being away for university. But today I decided to bake her a cake, a chocolate lava cake. A diabetic-friendly chocolate lava cake. For her birthday. Even though she’s not here to eat it.

I initially looked at this recipe by theurbanbaker but changed the portions slightly to make 2 chocolate lava cakes (I had to eat them all in the end since my Mom isn’t actually here to eat it with me, and 4 seemed a bit too much to handle for me).

Diabetic-friendly Chocolate Lava Cake

PREP TIME 10 MINS | COOKING TIME 6-7 MINS | MAKES 2 CAKES

INGREDIENTS

  • 3 tbsp unsalted butter, plus extra for greasing the ramekins
  • 50g Nestlé 70% cocoa dark chocolate for cooking, chopped
  • 1 large egg
  • 1 egg yolk
  • 1 tbsp granulated sugar substitute (in this case I used Equal)
  • 1 tsp plain flour
  • Unsweetened cocoa powder for dusting

METHOD

  1. Preheat oven to 230C. Grease the ramekins with room temperature butter and light dust with sifted cocoa powder.
  2. Add the chocolate and butter to a small bowl. Melt in the microwave for about a minute. Stir until smooth.
  3. In a medium bowl beat the egg, egg yolk and sugar substitute together until lightened in colour and thickened. Add the chocolate mix and stir until smooth and combined. Stir in the flour and divide between the ramekins.
  4. Bake for about 6-7 minutes. The sides will be cooked but the centre will be soft.
  5. Invert onto a plate and wait 10 seconds before sliding the ramekin off. The cake will fall into place. Light dust with confectioners sugar, garnish with a strawberry and serve with a glass of chilled St. Andrew’s Pink Moscato (optional).

Diabetic-friendly Chocolate Lava Cake

BON APPÉTIT!

– Ally xx

myTaste.com

Big Breakfast for One

Big Breakfast for One

The most wonderful thing about life when it comes to food is breakfast. I always look forward to breakfast, but I think 90% of the time I actually go without having a proper breakfast, or no breakfast at all – which does sadden me a bit. This is either because I get up too late for breakfast and just skip to brunch, or when I do get up early, I’m rushing off to Uni and usually grab a banana or whatever fruit I have lying around on my way out (which also rarely happens so I just end up waiting until class is over and then packed left-over lunch it is).

What makes me happy though is that I can have Breakfast for Lunch or Breakfast for Dinner. Breakfast all day everyday (please excuse my apparent over-excitement over breakfast). Today, I had my breakfast for lunch, and man it was so good. Who doesn’t love bacon and eggs for lunch?

Big Breakfast for One

PREP TIME 5 MINS | COOKING TIME 10-15 MINS SERVES 1

INGREDIENTS

  • 1 slice of wholemeal bread, toasted, buttered & cut diagonally in half
  • 2 slices of gourmet tomatoes, grilled
  • 2 fresh free range eggs at room temperature, poached
  • 3 slices of rindless bacon, grilled
  • Handful of loose leaf baby spinach, wilted
  • 1 tbsp white vinegar
  • Knob of unsalted butter
  • Ground salt and pepper to taste

METHOD

Poaching the eggs:

  1. Bring small saucepan of water to the boil over medium-high heat, then reduce the heat to low-medium – the water should be just simmering. Add in the vinegar and stir.
  2. Crack one egg into a small bowl and quickly, but gently pour it into the water. Repeat with the other egg. A really soft poached egg should take around 2 minutes, but if you want it a bit more firm, it will take about 4 minutes. To check if they’re cooked right, carefully remove the egg from the pan with a slotted spoon and give the yolk a gentle push (you can tell just by your instincts if it is under or overcooked – or perfect)!

I honestly think that the rest is pretty self-explanatory.

Big Breakfast for One

BON APPÉTIT

– Ally xx

myTaste.com

Cafe Con Leche

Cafe con Leche

Today I visited one of my most loved food spots in Sydney, Cafe con Leche, a Latin American café just on Fitzroy St. in Surry Hills. My high school friends from Brunei decided to meet up for lunch, and while we were discussing places to eat, naturally I suggested Cafe con Leche. How I came to know about this little gem is quite funny actually. It all started when my friend Jialing got on the wrong bus to campus and got off at the stop on Fitzroy St. She told me she smelt something so great and saw the café just across the street, so one Wednesday afternoon in between classes, we decided to go to this magical-smelling café. While we were digging into our meals, Jialing came across that ‘magical’ smell again and asked one of the staff where the smell was coming from. To our surprise, she said, “Oh it’s from the muesli place next door”. We had an “oh…” look on our faces, but honestly, if it weren’t for Farmer Jo’s sweet smelling muesli, we probably wouldn’t have known about Cafe con Leche. This was around late last year and to date, Cafe con Leche is and will always be in my top places to eat.

The food is simply divine, and affordable I may add. Good service, quick, and the staff, very friendly too, but I miss seeing this one lady who used to serve my friends and I when we first started going. She was always so shocked (in a good way) to see how happy and excited my friends and I got when our Arepas for three touched our table (we are always excited to see food arrive to our table, especially when we’re so hungry).

If you haven’t been or heard about Cafe con Leche, now is the time to befriend me so that I can join you and keep going back for more! Today between the 3 of us, we had the Ham and Chicken Quesadilla, South American Style Eggs and an Arepas for 2 plate to share. It was so good.

Cafe Con Leche: Arepas for 2
Arepas for 2, $12 – served with ogao, sour cream, guacamole, ropas vieja and aji

Cafe Con Leche: Ham & Chicken Quesadilla
Ham & Chicken Quesadilla, $9 – served with cheese and tomato with guacamole

Cafe Con Leche: South American Style Eggs
South American Style Eggs, $14 – scrambled eggs chorizo, served with an arepas and guacamole

As I mentioned above, I have been here many times and have tired numerous dishes on their menus, and of course photographed every meal (a true foodie). So if the above dishes aren’t to your liking, then here are some other dishes to try, all a big thumbs up from me. L-R: Arepas for 4, Chorizo Salad, Ajiaco (Colombian chicken soup) and Beef Lasagne.

Cafe Con Leche

Café con Leche
104 Fitzroy Street
Surry Hills, New South Wales
Australia, 2010

– Ally xx

Anzac Pancakes

Anzac Pancakes

Hello Everyone! Today (April 25) is Anzac Day, a national day of remembrance, commemorating Australians and New Zealanders who served and died in all wars, conflicts, and peacekeeping operations. So to commemorate Anzac day, I decided to bake some home-made Anzac biscuits. They are made using rolled oats, flour, desiccated coconut, sugar, butter, golden syrup, baking soda and boiling water, popular in Australia and New Zealand. It is said that Anzac biscuits were sent to the soldiers abroad by their wives, mainly because the ingredients used to make them did not spoil easily and the biscuits kept well during naval transportation. Today, Anzac biscuits are manufactured commercially for retail sale.

Initially, that was my plan, to bake some home-made Anzac biscuits. But I woke up today wanting to make some yummy pancakes. So I thought to myself, why not both?…In one? And thus for today’s recipe, Anzac Pancakes. I basically used a basic pancake mix and added a few extra ingredients from the Anzac biscuit.

Anzac Pancakes

PREP TIME 5 MINS | COOKING TIME 15-20 MINS MAKES 6 PANCAKES

INGREDIENTS

  • 1 cup plain flour
  • 2 tbsp sugar
  • 2 tsp baking powder
  • 1/2 tsp salt
  • 1/2 cup rolled oats
  • 1/3 cup desiccated coconut
  • 1 cup milk
  • 2 tbsp unsalted butter, melted
  • 1 large egg
  • 1 tbsp honey & maple syrup blend by Capilano, plus extra for drizzling
  • 1 tbsp vegetable oil, for cooking

METHOD

  1. In a small bowl, whisk together the flour, sugar, baking powder, salt, rolled oats, and desiccated coconut. Set aside. In a medium bowl, whisk together the milk, butter, egg, and honey & maple syrup blend. Add the dry ingredients to the milk mixture and whisk until well combined (do not overmix, a few small lumps are fine).
  2. Heat a small pan (nonstick or cast-iron) over medium heat. Fold a sheet of paper towel in half, and moisten with the vegetable oil and carefully rub the pan with the oiled paper towel. Ladle the batter onto the pan, using the back of the ladle to spread the batter into a round shape. Cook until the surface of the pancake starts to bubble, about 2-3 minutes. Flip carefully with a spatula, and cook until browned on the underside, about 1-2 minutes more.
  3. Continue with more oil and remaining batter (makes about 6 fairly large pancakes). Serve warm, with desired toppings.

It was quite a gloomy, rainy morning here in Sydney, so I decided to have a cup of Crème Brûlée flavoured black tea from T2 to go with my pancakes. What a great way to start a morning I reckon! Also, I actually really like my pancakes with a hint of cinnamon and vanilla. I just didn’t add these ingredients in because I really wanted this to be a true Anzac Pancake. But I think the pancakes definitely needed these extra two ingredients!

Anzac Pancakes

BON APPÉTIT

– Ally xx

myTaste.com

Smoked Salmon & Sour Cream Baked Eggs

Smoked Salmon & Sour Cream Baked Eggs

Coles Magazine: Smoked Salmon & Sour Cream Baked Eggs

Every month Coles releases a magazine that makes the most of fresh seasonal produce, as well as featuring tasty everyday recipes that are quick, easy and something that whole family will love. Coles Magazine is like my Bible for food. I NEED to get a copy for myself every month, and the best thing about it is that it’s free! Pictured above is the March 2014 issue of Coles Magazine. I looked back to last month for today’s recipe: Smoked Salmon & Sour Cream Baked Eggs.

I followed the recipe and changed minor things for various reasons, firstly instead of dill, I used chives only because I didn’t want to buy a whole packet of dill (I barely use this herb), and secondly, I didn’t add green peas as the recipe stated only because I didn’t have any to use. Nonetheless, the recipe turned out really well and it’s definitely a keeper. Cheap, simple dish that serves 4 – the only thing that was relatively expensive was the smoked salmon.

PREP TIME 5 MINS | COOKING TIME 12-15 MINS SERVES 4

INGREDIENTS

  • 2/3 cup sour cream
  • 1 & 1/2 tbsp chopped chives, plus extra to serve
  • 1/4 small red onion, finely chopped
  • 100g smoked salmon, roughly chopped
  • 4 large free range eggs
  • Slices of Pane di Casa bread from Bakers Delight, toasted and buttered
  • 1 bunch baby asparagus, woody ends snapped off
  • Olive oil
  • Ground salt and pepper to taste

METHOD

  1. Preheat oven to 180C. Grease four ramekins (or in this case I used my mini cocotte pots) and place on a baking tray.
  2. Combine the sour cream and chives in a small bowl, and season with salt and pepper to taste. Scatter the chopped onion evenly in each cocotte. Divide the salmon and half of the sour cream mixture among the cocottes and crack an egg into each. Top with the remaining sour cream mixture.
  3. Bake for 12-15 minutes or until eggs are just set. Meanwhile, grill the asparagus on a grill pan over high heat for about a minute per side or until tender. Turn the heat off and drizzle a bit of olive oil over the asparagus still in the pan and season with salt and pepper. Transfer to a serving plate.
  4. Set aside for a minute to settle. Top with extra chives, and (optional) a little bit of paprika.

Smoked Salmon & Sour Cream Baked Eggs

BON APPÉTIT!

– Ally xx

myTaste.com

Kangkung Belacan

Kangkung Belacan

My mom used to make this dish all the time back home. Honestly, I’ve never made it for myself ever since being here in Sydney, except for today. On occasions though when I’d be eating out with friends in various Asian-Malaysian restaurants, I would come across this on their menu and MY GOODNESS were they overpriced! Like I get the whole profit making thing but honestly, it’s like more than a 500-600% profit for this simple dish! Mamak in Chinatown for example is priced at $14.00 while Delima Restaurant is priced at $17.95. I know Delima adds prawns to their kangkung, but seriously. Overall, if I totalled how much I spent for this dish, it would total to about $3.00 inclusive of all the ingredients, and naturally it’d be even cheaper back home. Here a bunch of kangkung averages to about $1.50 depending where you get it from, while back home you paid 99c for five bunches.

Kangkung, also known as ‘water spinach’, is a vegetable commonly used in Southeast Asian cuisines, mainly Indonesia, Malaysia and Singapore where it is usually stir-fried in a chilli sauce. Kangkung is also evident in other Asian cuisines and I do recommend that you check out how else it can be used by going to wikipedia (I know, the whole conception of wikipedia not being a reliable source, but trust me). Belacan, or sambal belacan, basically consists of fresh red hot chillies, roasted Malaysian shrimp paste and lime, made into a paste or sauce to be used either as a condiment, or as an ingredient in cooking.

So for today’s recipe as titled: Kangkung Belacan (stir-fried water spinach with chillies and shrimp paste).

Kangkung Belacan

PREP TIME 5 MINS | COOKING TIME 10 MINS SERVES 3-4

INGREDIENTS

  • 2 tbsp canola oil
  • 2 cloves garlic, minced
  • 1/2 red onion, diced
  • 2 red bird’s eye chillies, sliced
  • 1 & 1/2 tbsp sambal belacan*
  • 1 bunch kangkung, washed, leaves separated from the stems, and stems cut into short lengths
  • Handfull of small-sized ikan bilis (dried anchovies)

*I used a store bought paste, but you can always follow a recipe make your own.

METHOD

  1. Heat oil in a medium frying pan over high heat. Add the ikan bilis and fry until crisp. Set aside.
  2. In the same pan, add the garlic and 1 of the sliced bird’s eye chilli and sauté until golden brown. Add in the onions and sauté until soft. Bring the heat down to low and then add in the sambal belacan, cooking the belacan over high heat will cause it to spit all over the stovetop and we don’t want to have a messy cooking area. Cover if needed. Sauté the belacan until fragrant.
  3. Add the the kangkung leaves, stems and a little bit of water to dilute the belacan you think can’t handle the heat. Cover until the leaves start to wilt. Toss around the belacan to coat the leaves and stems evenly (kangkung literally takes only a minute to cook).
  4. Transfer to a serving plate and top with the fried ikan bilis and fresh red chillies. Serve with hot rice.

Kangkung Belacan

BON APPÉTIT!

– Ally xx

myTaste.com

Mushroom and Avocado Toastie

Mushroom and Avocado Toastie

I remember when I was living in the suburbs of Cammeray in the Lower North Shore, my previous flatmate and myself would every month visit the farmers market and get our fresh produce from there. We got what we wanted from the same stalls each month and eventually made friends with the many farmers, one of which was Margin Mushrooms. They are very friendly and would always throw in an extra mushroom or two. I even got fresh curry leaves from them one time when I was in search for some that week – not to mention for free! Their mushrooms are the best indeed! I don’t live in the Lower North Shore anymore and the closet market that they participate in that’s relatively close to me is Bondi, but have have not been since!

I also remember that they gave out mini books by Power of Mushrooms, and I came across today’s featured recipe for this blog: Mushroom and Avocado Toastie. I whipped this up for breakfast one morning and it made me such a happy person! It’s an easy and quick fix to start your day off with a bang! I didn’t change anything from the recipe in particular as it was good as it was, the only thing I probably changed was the bread that I used and portion sizes. So please do check out the original recipe on their website.

PREP TIME 5 MINS | COOKING TIME 10-18 MINS SERVES 3-4

INGREDIENTS

  • 3-4 slices of Pane di Casa from Bakers Delight
  • 2 tbsp extra virgin olive oil, and extra for drizzling
  • 1 tbsp freshly grated ginger
  • 250g swiss brown mushrooms, sliced
  • 1 lime, halved
  • 2 sprigs of thyme
  • 1 large ripe avocado, roughly mashed
  • Ground salt and pepper to taste

METHOD

  1. Preheat oven to 180C. Drizzle both sides of the bread slices with oil and place on a large baking tray lined with baking paper. Bake for about 5-8 minutes or until lightly toasted and golden. Set aside to cool.
  2. Heat a large frying over high heat. Add the oil, ginger and mushrooms and cook, tossing often, for 5 minutes until mushrooms are light golden and tender. Remove from the heat and squeeze over the lime juice, and season with salt and freshly ground pepper.
  3. Spoon and spread the mashed avocado onto the toasted pane di casa bread slices and top with a spoonful of mushrooms. Garnish with thyme leaves.

Mushroom and Avocado Toastie

BON APPÉTIT!

– Ally xx

myTaste.com