Auguest 2020: Olive

Ube-glazed Doughnuts

“I’m a homecook and food photography enthusiast.
For me, it’s not just food, it’s my love language for family. I also believe that even if life isn’t perfect, having great food brings magic and creates good memories that makes life colorful.” — Olive

Auguest 2020: Olive

As I crave having sweet and indulgent doughnuts with my favorite flavor Ube, I thought, why not make them at home instead? Making homemade glazed doughnuts is easier than you think – with practice that is. I’m taking a deep dive into homemade doughnuts that taste like the ones you get from your favorite bakery – incredibly delicious and comforting.

Ube-glazed Doughnuts

Being able to make them from scratch without leaving the comforts of home is so much more fun. For my first attempt ever at making homemade doughnuts, they definitely aren’t the prettiest, but definitely delicious! Fried, sugary, old-fashioned, and comforting!

Ube-glazed Doughnuts Ingredients

PREP TIME 45-50 MINS | COOKING TIME 15 MINS | MAKES approx. 15 DOUGHNUTS
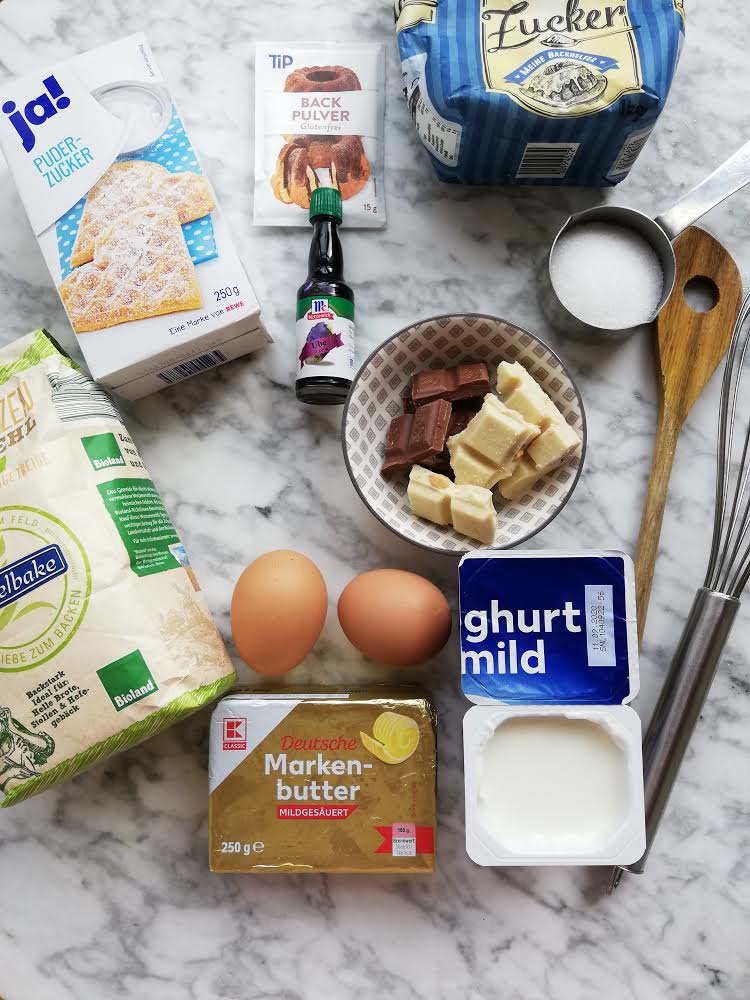
INGREDIENTS

For the doughnut batter

  • 2 cups all-purpose flour, plus more for dusting
  • 1 cup full-fat greek yoghurt
  • 1/2 cup granulated sugar
  • 2 large free-range eggs
  • 2 tbsp unsalted butter, melted
  • 2 & 1/2 tsp baking powder
  • 1 tsp salt
  • 1 tsp vanilla extract

For the ube-glaze

  • 1 cup powdered sugar
  • Pinch of salt
  • Ube flavouring
  • Water
  • Vegetable oil, for frying

METHOD

  1. Doughnuts: Combine all the ingredients for the doughnut batter in a large mixing bowl. Turn it out onto a lightly floured surface and knead it by hand for about 2 minutes.
  2. Lightly grease a large bowl with oil and place the dough in the bowl, turning it to coat all sides in the oil. Cover the bowl with a clean kitchen towel and set aside in a relatively warm environment to let the dough rise/rest for about 45 minutes or until doubled in size.
  3. When the dough is ready, punch it down to release the air.Remove dough from the bowl and turn it out onto a lightly floured surface. Roll the dough out and using a doughnut cutter, cut out about 15 doughnuts. If you can’t quite fit 15, re-roll the scraps and cut more out.
  4. Place the doughnuts and doughnut holes on a baking sheet lined with parchment paper. Loosely cover and allow to rest as you heat the oil. They will rise a bit as they rest.
  5. Prepare and heat the vegetable oil for frying in a large heavy-duty pot set over medium heat.
  6. Fry the doughnuts for 1 minute each side. Once done, carefully place the fried doughnuts over a cooling rack.
  7. Ube-glaze: Combine all the ingredients needed for the glaze in a medium-sized mixing bowl. Whisk together thoroughly.
  8. Dip each warm doughnut into the glaze. After 15 minutes the glaze will set and you can add any topping of your choice. A few examples to get you started are lemon zest, cocoa powder, choice of nuts, sprinkles, and so much more!
  9. Serve and enjoy!

Ube-glazed Doughnuts

Photo Courtesy & Recipe Copyright © 2020 | Olive (@whatoliveloves)

BON APPÉTIT

– Olive

myTaste.com

Auguest 2020: Mhyre Virtudazo

Celestial Ice Buko

“If I can make it from scratch, I will make it from scratch. I also try to cook with whole foods as much as possible and eat more vegetables/plant-based meals at least once a week.” — Mhyre Virtudazo

Auguest 2020: Mhyre Virtudazo

When Allison told me her plans for Auguest 2020 and asked if I wanted to be one of her guest contributors, I was immediately onboard! I didn’t hesitate and said yes in a heartbeat! I was very thrilled to hear about this month’s theme which is RAINBOW COLORS!! 🌈 How could I say no to that? I was just so excited that I volunteered to share a recipe for a blue-colored dish.

Fast forward to a couple of months before August, I realized that there’s a challenge to the color I chose. I wanted my dish to represent me. I wanted it to be completely plant-based. I’m trying to incorporate more vegetables and other plant-based products to my meals. I love meat and will not go vegan but this is my way of lessening my carbon footprint. I’ve also been trying to make more Filipino dishes so that’s another thing. The trickiest part is I don’t typically find blue-colored food attractive. I mean I won’t eat blue soup but I can eat a blue dessert.

Celestial Ice Buko

So… I had to come up with a Filipino dish that’s plant-based and visually appealing for my taste. Most importantly, I wanted to consider Allison’s readers and IG followers. I wasn’t only creating this for myself but also I’d like for you guys to try and enjoy what I’ll be sharing.

One afternoon, I was brainstorming by myself (LOL) when I heard an ice cream vendor pass by my house. So I thought, why not dessert? What about ice cream? I can make it blue by using butterfly pea flowers! But then I couldn’t imagine eating blue ice cream cone. I kept on making a list of possible ingredients then I wrote coconut milk on my notebook. That’s when the idea hit me—ice buko! Why not? I mean it brings me happy childhood memories and it meets my complicated requirements! Oh, and I just found out that there’s a Wikipedia entry for it! Haha! Most of all, I could eat it even if it’s colored blue!

I hope you try the recipe. I like how smooth and creamy the texture is even without condensed milk! You’ll also be amazed with how it turns out visually from making it to the final result! It freezes into a soft blue just like the color of the sky while the swirls of white are coconut milk and macapuno strings that look like clouds.

Celestial Ice Buko Ingredients

PREP TIME 10 MINS | COOKING TIME 10 MINS | MAKES 4 ICE LOLLIES

Freezing time: 4 hours

INGREDIENTS

  • 2 cups coconut milk
  • 2 cups of water
  • 2/3 cup white sugar (two 1/3 cups)
  • 1/2 cup macapuno strings (syrup must be drained)
  • 1/4 cup dried butterfly pea flowers
  • 1 tbsp cornstarch (two 1/2 tbsp)

METHOD

  1. In a pot, heat coconut milk and sugar in low heat.
  2. Make slurry using the coconut milk from the pot and some cornstarch. Combine it with the rest of the liquid in the pot.
  3. Stir the liquid gently until sugar has been fully dissolved. Be careful not to bring it to a boil.
  4. Add the dried blue pea flowers. Mix until all the flowers are soaked in coconut milk.
  5. Turn off heat and cover the pot. Steep for 8-10 minutes. Remove the flowers.
  6. Wait for the liquid to cool.
  7. Put a few spoons of macapuno strings in each mold. Pour the liquid, put the lolly holder on top and freeze for about 4 hours.
  8. Admire your beautiful Celestial Ice Buko before devouring them! Enjoy!

Celestial Ice Buko

Here are some conclusions/tips/notes for making this Celestial Ice Buko:

  • Traditional ice buko has red beans. I didn’t include them because it might not go well with the butterfly pea tea. But feel free to experiment!
  • Instead of red beans, I tried rice crispies and loved it! Wanna try it, too? It pretty much follows step 6 but you freeze a teaspoon of rice crispies and a tablespoon of blue liquid first for 30 minutes. The rice crispies will float if you put a large amount of liquid. They will also stick to the lolly holder if you quickly fill the mold up.
  • I wanted to dip my ice buko in melted white chocolate first and then sprinkle it with rice crispies. However, I read on the package that it had dairy in it so I scrapped my plan. If you’re okay with a not so 100% vegan dessert then go ahead and enjoy your ice buko with white chocolate casing. I bet it’s going to be yummy!
  • Another thing you can try is freezing 3/4 coconut milk-blue pea flower mixture in the mold for 2 hours. Fill up the rest of the mold with butterfly pea tea and freeze for another 2 hours. When it freezes, it will have different layers of sky blue and indigo. Just like the galaxy!
  • For another galaxy-looking option, sprinkle blue, pink and purple colored sugar on your ice buko.
  • No ice lolly molds? No worries! You may use paper cups and popsicle sticks. I also made a batch with them. I doubled the quantity and was able to make 11 pieces!
  • Freezing time may vary depending on your freezer. It took overnight for my ice buko to fully solidify in one of the refrigerators I used. (Back story: I made this recipe 8 times in 4 different houses. Therefore, I’ve tried 4 different refrigerators. 😅)

Celestial Ice Buko

Photo Courtesy & Recipe Copyright © 2020 | Mhyre Virtudazo (@acupofjasminerice)

BON APPÉTIT

– Mhyre Virtudazo

myTaste.com

Auguest 2020: Azrina Hidup

Thai Green Curry Mussels

“Cooking feeds the soul, both the cook and the people who are eating. For me, cooking is an act of love, a gift, and a way of sharing. It puts a smile in my heart when I put a lot of thought and care into preparing a dish. At home, cooking symbolizes love and family.” — Azrina Hidup

Auguest 2020: Azrina Hidup

Hello everyone! My name is Azrina Hidup and I am half Filipina and half Bruneian. I would like to thank my beautiful friend, Allison, for the opportunity to be featured on her blog along with other amazing foodies and chefs.

I am always the happiest girl when I get to put my apron on. It was my dream to enter ‘Le Cordon Bleu’ Culinary School, but somehow I ended up doing Political Science. My passion for cooking though, doesn’t stop. Every weekend I will be on my #apronmodeon doing recipe testing and feeding my family with my cooking.

I love creating different dishes. I love travelling for food and what I usually love doing when I travel is to explore and try the local cuisine. I will always try to remember the taste and look of the food so I can recreate them back home for my loved ones to try.

Thai Green Curry Mussels

Most of all, I strongly believe that cooking is more than just an act to fill the empty stomach. Cooking for me is an act of love, a gift, and a way of sharing. It puts a smile in my heart when I put a lot of thought and care into preparing a dish. I grew up with home cooked food, and growing up with my mom’s cooking inspires me a lot to develop my passion for cooking. For me, cooking and home cooked meals symbolize family and love.

For Allison’s Auguest series, I will be sharing my favourite Thai dish which is green curry. Tonight I have made Thai Green Curry Mussels with Homemade Green Curry Paste. Thai green curry is absolutely delicious when served with steamed rice. Nyums!

Thai Green Curry Mussels Ingredients

PREP TIME 30 MINS | COOKING TIME 20-25 MINS | SERVES 4-5

INGREDIENTS

For the green curry paste

  • 15-20 Thai basil leaves
  • 6 Thai green chillies (remove the seeds if you prefer it to be less spicy)
  • 3-4 cloves of garlic
  • 3 long green chillies
  • 2 stalks lemongrass, bottom part only, thinly sliced
  • 1-2 shallots
  • 1 & 1/2 inch size piece of galangal
  • 1 & 1/2 inch size piece of ginger
  • 1 lime
  • 1 tbsp of coconut milk
  • 1-2 tsp of kaffir lime zest
  • 1-2 tsp of shrimp paste (belacan)
  • 1/2 tsp white peppercorns
  • Cilantro leaves and roots
  • Coriander seeds
  • Cumin powder
  • Salt, to taste

Homemade Thai Green Curry Paste

For the Green Curry Mussels

  • Mussels
  • 1 cup fresh coconut water
  • 1 cup seafood stock*
  • 1 can (approx. 440g) coconut milk
  • 3 pieces kaffir lime leaves (torn to smaller pieces)
  • Basil leaves (5-6)
  • Fish sauce, to taste
  • Palm sugar, to taste
  • Squeeze 1-2 fresh limes
  • Thai eggplants
  • Cilantro and basil leaves for garnish (cut/torn to smaller pieces)

* For this recipe, I used homemade prawn stock. You may use any kind of stock as a substitute.

Thai Green Curry Mussels Ingredients

METHOD

  1. Thai Green Curry Paste: Toast coriander seeds simply by heating them in a skillet over medium-high heat. Then, finely grind using a mortar and pestle.
  2. In the same skillet, toast the shrimp paste/belacan and set aside.
  3. Slowly add the rest of the ingredients for the green curry paste to the mortar and pound until fine, adding liquid so that the mixture will become paste-like in texture. For this recipe, I used coconut milk as the liquid.
  4. Taste the curry paste and add season with salt to your preference and add a squeeze of lime juice.

Tip: You may also use an electric blender to speed up the process (and really make your life a little easier), if you prefer. For the coriander seeds, grind them first into a powder with the mortar and pestle. Then use the electric blender to grind all the remaining ingredients together. Similarly, add liquid to get the blender going. Since this will be used for a green curry dish, I highly suggest to use coconut milk as your liquid base.

  1. Thai Green Curry Mussels: Over medium heat, reduce half the can of the coconut milk in a heavy-bottomed pot until it becomes thick.
  2. Add the homemade green curry paste and sauté. Make sure to stir constantly for 2-3 minutes until fragrant/aromatic.
  3. Add the seafood stock, remaining half can of the coconut milk, kaffir lime leaves, and basil leaves. Leave to simmer gently for about 5-10 minutes, keeping the heat on medium.

Tip: You may also blend the basil leaves and some coconut milk into an electric blender to get nice green color soup.

  1. Add palm sugar and fish sauce to taste.
  2. Add coconut water and eggplants. Cover the pot until the eggplants are cooked through, about 3-4 minutes.
  3. Add in the mussels and cover until mussels are cooked, about 5 minutes.
  4. Garnish with chopped basil and cilantro. Add lime juice just before serving. Best to enjoy with steamed rice!

Thai Green Curry Mussels

Thai Green Curry Mussels

Photo Courtesy & Recipe Copyright © 2020 | Azrina Hidup (@azrinoh501)

BON APPÉTIT

– Azrina Hidup

myTaste.com

Auguest 2020: Simon Swadling

Salted Coconut & Rum Pineapple Upside-down Cake

“I love making food that makes people smile, or brings them joy, whether it’s a fancy beautiful patisserie creation, or a simple but delicious cake.” — Simon Swadling

Auguest 2020: Simon Swadling

This easy Salted Coconut & Rum Pineapple Upside-down Cake is loaded down with the flavours of the Caribbean islands and the tropics. Sweet caramelised pineapple slices lay perfectly on top of this light and fluffy coconut-infused yellow cake for a summer treat like no other. It is a play on a piña colada, which is a sweet cocktail made with rum, cream of coconut or coconut milk, and pineapple juice, usually served either blended or shaken with ice.

Salted Coconut & Rum Pineapple Upside-down Cake Ingredients

PREP TIME 20 MINS | COOKING TIME 1 HOUR 20 MINS | SERVES 8-10

INGREDIENTS

For the caramelised pineapple

  • 1/2 a pineapple
  • 20g butter
  • 3/4 cup sugar
  • 1/4 cup cream

For the cake batter

  • 150g butter
  • 100g almond meal
  • 100g all-purpose flour
  • 50g desiccated coconut
  • 3 large free-range eggs
  • 3/4 cup sugar
  • 1 tbsp golden syrup
  • 1 tbsp rum
  • 1 tbsp sour cream
  • 1 & 1/2 tsp baking powder
  • 1 tsp salt
  • 1 tsp vanilla extract

METHOD

  1. Preheat the oven to 160C (325F or gas mark 3). Grease and line an 8” (20.5 cm) round cake tin with parchment paper.
  2. Caramelised Pineapple: Peel and core the pineapple. Cut into 1cm thick slices and then thirds.
  3. In a heavy-based frying pan (do not use a non-stick pan!), add the sugar and cook on medium heat until it melts and begins to caramelise. Stir to avoid burning ‘hot spots’.
  4. When the caramel is golden brown, mix in the butter and then cream, being careful not to burn the caramel.
  5. Add in the pineapple sliced and cook until soft and semi transparent, about 10 to 15 minutes.
  6. Cake Batter: Add all the dry ingredients into a food processor and blitz to combine. Next, add in the butter and pulse until it is blended into the flour mixture.
  7. In a separate bowl, combine all the wet ingredients together and whisk. Slowly pour into the processor and pulse until combined and smooth.
  8. Layer the petals of pineapple at the bottom of your cake tin in an aesthetic pattern, adding a little bit of the caramel. Top with the cake batter.
  9. Bake for 55 minutes, or until done. You can tell when it’s done by piercing the middle of the cake with a skewer and it comes out clean. If not, bake further.
  10. Remove the cake from the oven and cool on a wire rack for about 20 minutes.
  11. Serve: Invert the slightly cooled cake onto a cake stand or serving plate. Some of the juices from the topping will seep over the sides – that’s okay.
  12. You can slice and serve the cake warm, or cool the cake down completely at room temperature before slicing and serving. Enjoy!

Salted Coconut & Rum Pineapple Upside-down Cake

Salted Coconut & Rum Pineapple Upside-down Cake

Photo Courtesy & Recipe Copyright © 2020 | Simon Swadling (@thebeardedpatissier)

BON APPÉTIT

– Simon Swadling

myTaste.com

Auguest 2020: Melissa Delos Reyes

Crispy Orange Tofu with Broccoli

“Creating food is a therapeutic process. It’s a way for me to unwind and slow down in this fast-paced world. To see my family & friends enjoy what I create is worth all the effort.” — Melissa Delos Reyes

Auguest 2020: Melissa Delos Reyes

Ola! I’m Melissa or Mel, the smol lady behind Eats Meru on Facebook and Instagram. I am a social media associate by profession and I freelance in photography and graphic design. Ever since I was young, I’ve always enjoyed cooking, experimenting with food, and following recipes!

I created Eats Meru pre-pandemic to share my food adventures at first. Everything changed when the Covid-19 virus struck. No one was prepared. Businesses were greatly affected, especially the small/start-up local brands. Since then, I’ve converted my goal for Eats Meru as a platform where I can help local MSMEs to share their products especially now that everyone is doing their best to make a living.

For this post in the Auguest series, I chose the color orange. I’ll be sharing a healthy and plant-based version of the famous Orange Chicken that uses tofu as the protein of the dish; it’s sticky, orange-y, tangy, crispy, and tasty too! You can easily make this dish as most of the ingredients can be found in your fridge and pantry. It is also perfect for those busy weeknights as it comes together in 20 minutes.

Crispy Orange Tofu with Broccoli Ingredients

PREP TIME 10 MINS | COOKING TIME 10 MINS | SERVES 4

INGREDIENTS

For the crispy tofu

  • 2 packs firm tofu, drained and cut into 1-inch size cubes
  • 2 tbsp cornstarch
  • 1 tsp rice flour
  • 1/4 tsp garlic powder
  • 1/4 tsp freshly ground black pepper
  • 1/4 tsp salt
  • Vegetable oil, for frying

For the orange sauce

  • 1 cup fresh orange juice (about 3 medium-sized oranges)
  • 1/4 cup water
  • 3 tbsp sugar
  • 2 tbsp soy sauce
  • 2 tbsp white or rice vinegar
  • 1 & 1/2 tbsp cornstarch (2 tbsp for a thicker sauce)
  • 1 tsp chilli, minced
  • 1/8 tsp salt
  • 4 garlic cloves, finely chopped
  • 1 inch ginger, minced (or 1 tbsp grated)
  • Spring onion (for garnishing)
  • Blanched broccoli

METHOD

  1. Crispy Tofu: In a large bowl, combine the cornstarch, rice flour, garlic powder, salt, and pepper. Mix well and coat the tofu in the cornstarch mixture.
  2. In a deep, heavy-bottomed pot, heat the vegetable oil (enough to cover the tofu) over medium-high. Carefully drop the coated cubed tofu in the oil and fry until slightly golden brown. Do not overcrowd the pot; work in batches if needed.
  3. Once done, use a slotted spoon to remove the tofu and transfer to a wire rack or strainer to cool down.
  4. Orange Sauce: Combine all the ingredients for the orange sauce, except water and cornstarch in a saucepan over medium heat. Cook and bring to a boil.
  5. Mix the cornstarch in the water together to create a slurry and gradually stir it into the simmering sauce. Cook until the sauce thickens, stirring well for even thickening. Taste for salt, sweetness, flavour, etc. and adjust as you go.
  6. Turn the heat off and add the crispy tofu. Toss to evenly coat them with the sauce. Transfer to a serving bowl and garnish with the spring onions. Serve immediately while hot, with rice and blanched broccoli (or any of your favorite greens for that matter). Enjoy!

This Crispy Orange Tofu can be modified for an even healthier option. For this recipe, the tofu is deep-fried in oil, but if you prefer, and have a bit more time on your hands, you can bake the tofu instead. Additionally, you can consider serving it with some cauliflower rice and other greens of your choice.

Crispy Orange Tofu with Broccoli

Crispy Orange Tofu with Broccoli

Photo Courtesy & Recipe Copyright © 2020 | Melissa Delos Reyes (@eatsmeru)

BON APPÉTIT

– Melissa Delos Reyes

myTaste.com

Auguest 2020: Karina Pineda

Adlai Tomato Risotto

“Take off on a food journey that is both healthy and happy” — Karina Pineda

Auguest 2020: Karina Pineda

Hello! My name is Karina, the girl behind wander little girl on Instagram. Two years ago, I initially started my food blog to document my #foodjourney—basically a marriage between transitioning to a healthy lifestyle (which was then a strictly plant-based diet) and learning my way around the kitchen. Fast forward to the present, a few things have changed, from my perspective on health and wellness to the direction of my blog. I decided to see wander little girl as a serious brand and grow it (especially now that we’re in the midst of a global pandemic).

At one point within that two-year timeline, Allison and I followed each other. Though we hardly interacted with one another, it was when she opened slots for this year’s Auguest series that we began to communicate.

When Allison told me the chosen theme and the recipe guidelines, I was thankful for having seen and grabbed the opportunity to guest in this series. Titled Colors of the Rainbow, participating guests (or should I say, Auguests) were tasked to come up with a vegan, vegetarian, or pescatarian recipe in line with their assigned color. For me, this served as a walk down memory lane, back to wander little girl’s roots.

Adlai Tomato Risotto

Having picked the color red, I challenged myself to cooking beyond my comfort zone, hence Adlai Tomato Risotto. I had never made risotto prior and I wanted to add a few twists to the beloved dish. First, the risottos that I’ve tried are usually creamy, and so I whipped up a tomato-based version; that way, it would scream bloody RED! Next, I veganized it by using vegetable broth made from scratch and vegan margarine. Last (but definitely not the least), I swapped rice (specifically arborio rice) with adlai. Before anything, please hear me out! Since I live in the Philippines, I wanted to promote a grain that was both locally produced and a healthier alternative. Since adlai absorbs more than the regular white rice here, this Adlai Tomato Risotto is just as creamy and thick as its traditional counterpart! The entire process from preparing to cooking may be tedious and time-consuming, but I promise that the hard work is worth it; it’s like a dish straight out of an Italian restaurant!

Adlai Tomato Risotto Ingredients

PREP TIME 45 MINS* | COOKING TIME 30 MINS | SERVES 4-5

* Includes making of the vegetable broth

INGREDIENTS

For the adlai tomato risotto

  • 1 cup uncooked adlai
  • 1 & 1/2 cup of canned diced tomatoes
  • 2 tbsp tomato paste
  • 1 & 1/2 tsp olive oil
  • 1 & 1/2 tsp vegan margarine or spreadable
  • 1 tsp rosemary (+ more for topping)
  • 1 tsp thyme (+ more for topping)
  • 3-4 cloves of garlic
  • Half a white onion (or less, depending on your taste)
  • Sliced mushrooms
  • Ground pepper
  • Spanish paprika
  • Brown sugar (optional)

For the vegetable broth

  • 6 cups water
  • Chosen vegetables (in picture: carrots, stems of sweet potato leaves, garlic, and ginger)
  • Ground pepper
  • Salt

METHOD

  1. Vegetable Broth: Gather the vegetables to be used for the broth and place them in a pot. Add ground pepper and salt to taste. Pour 6 cups of water into the pot. Allow it to boil on a stove top for 30 minutes. Set it aside afterwards.
  2. Adlai Tomato Risotto: Mince garlic cloves and half a white onion. Heat a pan on the stove top. Add olive oil. Sauté the minced garlic and onions. Add margarine to enhance the flavor.
  3. Pour the cup of uncooked adlai, and cook it until slightly toasted. Start with a bit of the vegetable broth from earlier (I used a ladle and poured two servings) and stir it. Once the broth has been absorbed, pour another portion again. Repeat the process until all of the vegetable broth has been used and the adlai is cooked.
  4. Add sliced mushrooms. Pour diced tomatoes and tomato paste. Mix well until everything is incorporated and evenly colored.
  5. Sprinkle the herbs (i.e. rosemary and thyme) as well as the spices (i.e. ground pepper and Spanish paprika). Add brown sugar to taste, but this step is optional. Continue to mix everything.
  6. Once cooked, allow the risotto to cool. Transfer it into a large plate or bowl. Top it with more rosemary and thyme. Eat the risotto on its own or pair it with corn. Enjoy!

Adlai Tomato Risotto

Adlai Tomato Risotto

Photo Courtesy & Recipe Copyright © 2020 | Karina Pineda (@wanderlittlegirl)

BON APPÉTIT

– Karina Pineda

myTaste.com

Auguest 2020: Shazrinah Shazali

Roasted Garlic & Onion Tomato Tagliatelle with Butter Beans,Tuna, and a Chilli Balsamic Drizzle

“Cooking is an exploration of our own creativity. Always try out new flavour combinations, different cooking techniques, build on textbook recipes, and have fun!” — Shazrinah Shazali

Auguest 2020: Shazrinah Shazali

Hello Everyone! I am a neuroscientist and home-grown chef best known as ShefShaz. I started my entrepreneurial journey from home, supplying healthy lunch meal plans to offices and homes. I then ventured into collaboration with The Healthy Habit in January 2018 to develop menus and co-founded FUEL’D. Just this year I’ve also recently co-opened a cafe in the gardens to work with the garden’s nursery to develop menus and create delicious food from their produce.

Tonight I will be sharing a delicious and healthy dish that is packed with the flavours of roasted garlic, chilli, and balsamic vinegar. You can easily whip up for a quick weeknight dinner if you’re pressed for time!

Roasted Garlic & Onion Tomato Tagliatelle with Butter Beans,Tuna, and a Chilli Balsamic Drizzle Ingredients

PREP TIME 10 MINS | COOKING TIME 20 MINS | SERVES 4

INGREDIENTS

For the tagliatelle

  • 200g dried tagliatelle pasta
  • 1 can (approx 400g) butter beans, drained
  • 1 can (approx. 185g) tuna in olive oil
  • 1 can (approx. 400g) roasted garlic and onion tomato pasta sauce
  • 4 garlic cloves, minced
  • 4 shallots, minced
  • 2 red bird’s eye chillies, minced
  • 1 tsp sweet ground paprika
  • Salt and freshly cracked black pepper, to taste
  • Parmesan cheese (optional)

For the chilli balsamic drizzle

  • 1/4 cup olive oil
  • 2 garlic cloves, minced
  • 1 red bird’s eye chilli, minced
  • 2 tbsp balsamic vinegar
  • 1 tsp fresh parsley, minced
  • Salt and freshly cracked black pepper, to taste

METHOD

  1. Chilli Balsamic Drizzle: In a mortar and pestle, grind the garlic, chilli, and parsley together. Add the olive oil, balsamic vinegar, and season with salt and pepper to taste. Adjust to your liking and set aside.
  2. Roasted Garlic & Onion Tomato Tagliatelle: In a large pot with boiling salted water, cook the tagliatelle pasta according to packet directions or until al dente. Drain and set aside, reserving about half a cup of the pasta water.
  3. In a separate pan over medium-high heat, sauté the minced garlic, shallots, and chilli until golden, fragrant, and translucent, about a minute or two.
  4. Add in the drained butter beans together with the tuna in olive oil and cooked until warmed through. Add the ground paprika and season with salt and pepper to taste.
  5. Stir in the canned tomato pasta sauce plus the half cup of reserved pasta water. Bring to a rapid simmer before adding the cooked pasta. Once done, transfer to individual serving plates.
  6. Top with parmesan cheese if desired, fresh arugula or any other leafy greens you prefer, and drizzle with the chilli balsamic mixture. Serve and enjoy!

Roasted Garlic & Onion Tomato Tagliatelle with Butter Beans,Tuna, and a Chilli Balsamic Drizzle

Roasted Garlic & Onion Tomato Tagliatelle with Butter Beans,Tuna, and a Chilli Balsamic Drizzle

Photo Courtesy & Recipe Copyright © 2020 | Shazrinah Shazali (@shefshaz // @fueld.bn // @glowcafebn)

BON APPÉTIT

– Shazrinah Shazali

myTaste.com

Garlic Bread Pasta Salad

Garlic Bread Pasta Salad

Hello Everyone! And just like that, another month in quarantine has passed and we’re two days away from the 8th month of the year. It’s crazy just thinking how we’ve gone through more than a third of a year (from mid-March to present day), here in the Philippines that is, in quarantine. I’m still lucky to be one of the few companies that still require a majority of their staff to work safely at home, but that may change in the next few days. There’s a high chance that it will be mandatory to report back to the office IF we do not go into another lockdown by August 1.

Garlic Bread Pasta Salad

Moving on, I remember that this wasn’t a recipe I had originally planned to tackle for my blog. To be honest, I can’t even remember what I had initially wanted to share with you guys. I was scrolling through recipes one Friday evening after work, looking for new recipes to add to my weekly menu so that I could prepare my market/grocery list for my weekend shop. I came across this recipe and thought, wow! Garlic bread AND pasta, together, tossed in a salad? YES! Plus, the dish fits perfectly with the theme of green for Colours of the Rainbow.

Garlic Bread Pasta Salad ; Garlic Focaccia Bread

With crispy garlic bread croutons and a creamy homemade caesar dressing, this easy pasta salad will be a hit with family and friends over a summer backyard barbecue! I used store-bought olive focaccia bread for the croutons, but really you can just use plain bread such as white, wheat, sourdough, etc. for this. You can also get creative and use your favourite veggies for this dish, and even swap out the caesar dressing for a healthier or lighter option. I think a simple thyme, lemon, and olive oil dressing would do the trick too!

Before we dive into tonight’s recipe, please take the time to check out the original where I drew my inspiration from over on Taste Australia. Also, I have a little announcement for you guys at the end of this post so make sure to read it!

Garlic Bread Pasta Salad Ingredients

PREP TIME 25 MINS | COOKING TIME 25 MINS | SERVES 6-8*

* Can serve more as a small side dish

INGREDIENTS

For the pasta salad

  • 250g fusilli, or any other type of pasta
  • 100g green beans, trimmed
  • 100g baby asparagus, tough ends snapped off and cut to the same lengths of the french beans
  • 2 green chillies, thinly sliced
  • 2 medium-sized avocados, roughly chopped
  • 1 bunch choice of leafy greens, trimmed and leaves separated
  • 2 tbsp sliced black olives
  • Handful of finely chopped malunggay leaves
  • Salt and freshly ground black pepper, to taste
  • Shaved parmesan, to garnish

For the garlic bread

  • 200g day-old bread, cut into 2cm pieces
  • 60g unsalted butter
  • 3 garlic cloves, minced
  • Handful of finely chopped malunggay leaves

For the caesar dressing

  • 1/3 cup free range egg mayonnaise
  • 4 anchovy fillets, minced
  • 1 garlic clove, finely minced
  • 1 tbsp red wine vinegar
  • Handful of grated parmesan
  • Salt and freshly ground black pepper, to taste
  • Squeeze of fresh lime juice

METHOD

  1. Caesar Dressing: Combine all the ingredients for the caesar dressing into a small bowl and whisk together. Taste and adjust as needed and then set aside in the fridge before using. You may make this a day ahead to allow the flavours to fully develop overnight, otherwise it’s also good on the same day.
  2. Garlic Bread: Preheat oven to 200C (400F or gas mark 6) and line a baking tray with parchment paper. Set aside.
  3. Heat butter and garlic in a small saucepan over medium and cook until the butter is foamy.
  4. Place the bread in a large mixing bowl and pour the butter mixture over the bread. Sprinkle with half of the chopped malunggay leaves. Toss until evenly combined and then transfer the bread mixture to your prepared baking tray.
  5. Bake for 15-20 minutes or until toasted. Once done, sprinkle the remaining malunggay leaves and then set aside to cool.
  6. Pasta Salad: While the garlic bread is baking in the oven, cook the pasta in a large saucepan of salted boiling water,following packet directions or until al dente. Add the asparagus and green beans in the last 3 minutes of cooking of the pasta. Drain and refresh under cold running water, and then drain again before transferring to a large mixing bowl.
  7. Add three-quarters of the caesar dressing the pasta and veggies. Toss to combine and then add the avocado, black olives, shaved parmesan, and half of the garlic bread croutons. Toss again before transferring it onto a large serving dish.
  8. Drizzle with the remaining dressing, and top with the remaining garlic bread croutons and extra shaved parmesan. Serve and enjoy as a side salad with baked, grilled, or pan-fried salmon (or any other choice of meat that tickles your taste buds)!

Garlic Bread Pasta Salad

As mentioned at the beginning of this post, I have a special announcement to make. For those of you who have been loyal followers of Amcarmen’s Kitchen since 2015, you’ll know that every year for the month of August, I gather my fellow foodie friends to feature their own recipe on my blog. With the theme of the year being Colours of the Rainbow each guest foodie, or also known as an  Auguester, has chosen a colour of the rainbow that they will translate into their dish. This year I’ve managed to round up 12 foodies, with some returning faces since I started the series 5 years ago, and some fresh new faces for this year. All I can say that it’s going to be an exciting month so stayed tuned for that! Our first Auguester will be live on the blog on Monday 3rd August!

Garlic Bread Pasta Salad with Pan-fried Salmon

BON APPÉTIT

– Ally xx

myTaste.com

Buko Pandan Ice Cream (No-Churn)

Buko Pandan Ice Cream (No-Churn)

Hello Everyone! A traditional Buko Pandan Salad is made with gulaman (jelly) cubes, tropical palm fruits, and shredded young coconut in sweetened cream. It is rich, creamy, and loaded with pandan flavour – a classic Filipino dessert that is a definite crowd favourite. You can check out my very out-dated recipe for it that I tackled back in 2015 by clicking here.

Buko Pandan Ice Cream (No-Churn)

Tonight however, I won’t be sharing with you another Buko Pandan Salad recipe. I thought you might want to enjoy its delicious flavours with a twist. I’ll be turning the traditional salad into an ice cream that can be enjoyed as both a snack or dessert. It’s rich, creamy, full of coconut flavour, and with an intense pandan taste using fresh screwpine leaves. If you don’t have access to fresh pandan leaves, you may also use pandan extract for this – just skip ahead to step 3 in the recipe below!

The process of homemade, no-churn ice cream is super simple. It’s just a matter of whipping together heavy cream, condensed milk, and adding in your choice of flavour/s. Seriously, the hardest part is waiting for the mixture to freeze! The ice cream comes out rich, creamy, and so much better than store-bought with far fewer ingredients. Oh, and did I mention that it’s a lot cheaper too?

Seriously, you’ll be craving for this all year long, especially during the hot summer days!

Buko Pandan Ice Cream (No-Churn) Ingredients

PREP TIME 4 HOURS* | COOKING TIME | SERVES 4-6

*For freezing time, minimum 4 hours or up to 24 hours.

INGREDIENTS

For the ice cream

  • 8-10 pandan leaves
  • 1 can (300g) sweetened condensed milk
  • 1 cup (250ml) all purpose cream
  • 3/4 cup (200ml) thick coconut milk/cream
  • Green buko pandan food colouring/flavouring (optional)

To serve with (optional)

  • Buko pandan jelly
  • Cornflakes
  • Lychees
  • Shredded coconut meat

METHOD

  1. Place the pandan leaves together with the all purpose cream and coconut milk in a food processor or heavy-duty blender, and blitz/blend for a few minutes until the pandan leaves have been finely puréed.
  2. Pour the blended pandan-infused cream and coconut milk over a fine sieve and into a chilled large mixing bowl. Strain the cream mixture from the pandan leaf pulp, pressing down firmly with the back of a spoon to extract all of the liquid from the pulp. Discard the pandan leaf pulp.
  3. Whip the pandan-infused cream using an electrical hand-held mixer until soft peaks start to form. Add the sweetened condensed milk. You may also add a dash of vanilla extract at this point. Continue to whip to soft peaks, it should be fluffy and mousse-like.
  4. Pour into an airtight container and freeze for 4 hours or up to 24 hours. Check the mixture every 30 minutes and mix (“churn”) using a spoon to avoid it turning into granita (coarse flavoured ice).
  5. Let sit at room temperature for about 15 minutes before scooping and serving as it is or with other elements such as fresh coconut meat, buko pandan jelly, other fruits of choice, and crushed cornflakes for that extra added crunch. Enjoy!

Buko Pandan Ice Cream (No-Churn)

Buko Pandan Ice Cream (No-Churn)

BON APPÉTIT

– Ally xx

myTaste.com

Potato Salad with Green Beans and Asparagus

Potato Salad with Green Beans and Asparagus

Hello Everyone! Potatoes and green beans are a classic combination; throw some asparagus and lettuce leaves or any other leafy greens into the mix and you’ve got yourself a great side dish that goes with almost anything. You can also bring it to a picnic, party, or barbecue.

Potato Salad with Green Beans and Asparagus

You’ll want to slice the baby potatoes (skin on) in half before cooking to help them cook faster. If you are using slightly bigger potatoes, you may want to quarter them. How long you cook them depends on their size, and you can check to see if they are tender by piercing a fork into the potatoes about 10 minutes into cooking. I prefer to steam my potatoes rather than boiling them because it takes a fraction of the time. Why? You’re only waiting for a small amount of water to boil, not a whole pot. In addition, unlike a big pot of boiling water, steam won’t dilute the flavour of the potatoes substantially.

This Potato Salad with Green Beans and Asparagus works really well at either room temperature or served cold. It has a bold, tangy taste thanks to the vinaigrette – a simple combination of red wine vinegar, olive oil, minced red onion and garlic, and seasoned with a touch of salt and freshly ground black pepper. You want to toss half the dressing over the warm potatoes to enhance their flavour. The remaining dressing is tossed over the whole salad at the end.

Potato Salad with Green Beans and Asparagus Ingredients

PREP TIME 15 MINS | COOKING TIME 15 MINS | SERVES 4-6

INGREDIENTS

For the salad

  • 450g baby potatoes, thoroughly cleaned and cut in half (skin on)
  • 250g french beans, ends trimmed and cut in half
  • 1 bunch asparagus, tough ends snapped off and cut to the same lengths of the french beans
  • 1 bunch leafy greens of choice, roughly chopped
  • Handful of chopped malunggay leaves
  • Handful of sliced almonds
  • Salt and freshly ground black pepper, to taste

For the vinaigrette

  • 4 tbsp olive oil
  • 2 tbsp red wine vinegar
  • 1 garlic cloves, finely minced
  • 1/2 small red onion, finely minced
  • Salt and freshly ground black pepper, to taste

METHOD

  1. Fill a pot with about an inch of water and put a steamer basket inside. Place the potatoes in the steamer basket and bring the water to a boil. Cover and steam until potatoes are tender, about 10 to 15 minutes.
  2. While the potatoes are cooking, combine all the ingredients for the vinaigrette into a small-sized jar. Put the lid on a shake vigorously to combine the ingredients together. You can make this ahead of time to ensure that all the flavours have time to develop.
  3. Bring a small pot of water to a boil. Once boiling, add both the french beans and asparagus to the boiling water. Cook for 4 to 5 minutes. While waiting, prepare an ice bath (large bowl with half ice and half water).
  4. When the french beans and asparagus are ready, drain and then plunge into the prepared ice bath. Let them sit in the ice bath until completely cool. Once cool, drain the french beans and asparagus and pat them dry with a paper towel. Set aside.
  5. Once the potatoes are done, transfer them into a large mixing bowl and add half of the vinaigrette. Toss to combine. Add the other vegetables together with the sliced almonds and remaining vinaigrette. Season to taste with salt and freshly ground black pepper. Give it a good toss and it’s ready to serve as a delicious side to your main! Enjoy!

Potato Salad with Green Beans and Asparagus

BON APPÉTIT

– Ally xx

myTaste.com