Batar Da’an (Pumpkin, Corn, and Mung Bean Stew)

Batar Da’an (Pumpkin, Corn, and Mung Bean Stew)

Hello Everyone! With only 28 calendar days, February flew by so quickly and it’s already the 3rd day of the 3rd month of 2021! In 13 days it’ll be a year since we (the Philippines) went into Enhanced Community Quarantine because of the global pandemic. Last week we shared our last recipe for local Cambodian delicacies; our second stop on our road to discover the Flavours of Southeast Asia for Amcarmen’s Kitchen. Our next stop for this month is a small Southeast Asian nation that is rarely heard of, a country that only gained its full independence in 2002 – East Timor! After centuries of Portuguese colonization, the state became independent in 1975 before being invaded by Indonesia. The country was finally able to restore its sovereignty in 2002.

This is why East Timorese Cuisine is heavily influenced by other Southeast Asian foods, Indonesian cuisine to be specific, and Portuguese cuisine. Since agriculture is one of the most important sectors in the country, the cuisine uses mainly rice (since its largely homegrown), sweet potatoes, corn, cassava, and taro. To add up to the base of every dish there is usually a vegetable component, also with homegrown products such as black-eyed peas, onions, spinach, and cabbage. Meat such as pork, chicken, goat, and fish are also common in East Timorese dishes.

Batar Da’an (Pumpkin, Corn, and Mung Bean Stew)

The first dish that we’re going to tackle for this month is known as Batar Da’an, or in English, Pumpkin, Corn, and Mung Bean Stew. Mung beans are very popular in Asia, particularly in Southeast Asia. Though having said that East Timorese cuisine is heavily influenced by other cultures, Batar Da’an is actually one of the few dishes that are authentic to the country. It is a simple, yet hearty and humble vegan dish (gluten-free too!) that is prepared with a combination of diced pumpkin, corn, and mung beans that are sautéed in garlic and onions, seasoned with just salt and pepper. There are also other variations of this dish, where squash is used instead of pumpkin, and kidney beans are used as an alternative to mung beans.

Before we dive into tonight’s recipe, please take the time to check out the original where I drew my inspiration from over on 196 Flavors by Vera and Mike. The original recipe uses water as the base for this stew. I replaced the water with my own homemade vegetable stock to really amplify the flavour of this dish. You may also use store-bought broth if you wish. Also, at the very last minute, I asked my maid to harvest some moringa (malunggay) leaves from our neighbour’s tree to not only add colour to the dish, but also an extra added nutrition!

Batar Da’an (Pumpkin, Corn, and Mung Bean Stew) Ingredients

PREP TIME 10 MINS* | COOKING TIME 20 MINS | SERVES 6

*Allow for 6 hours to overnight to soak the mung beans.
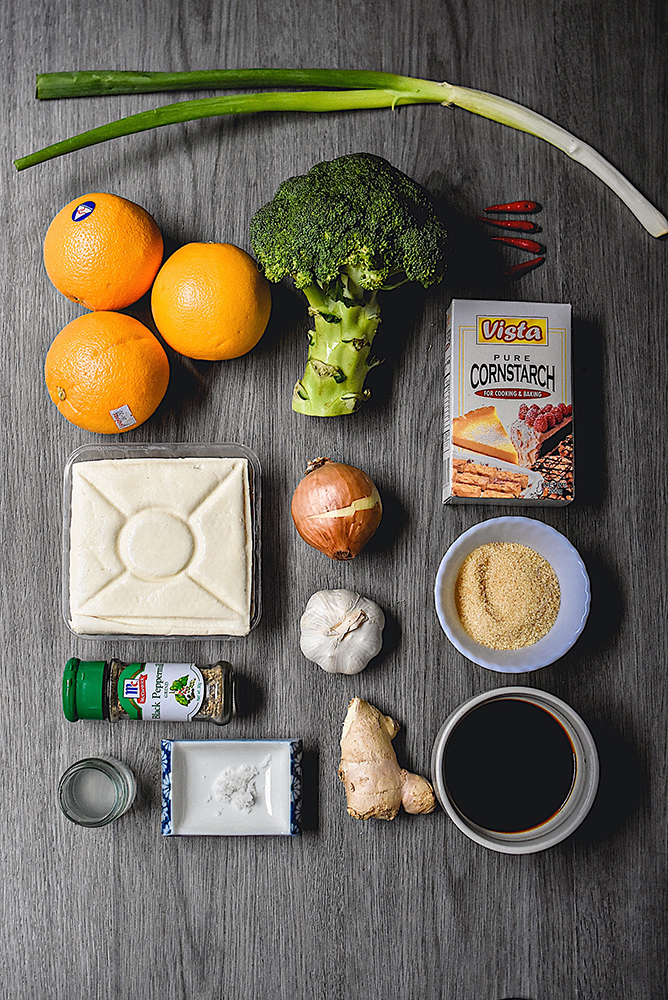
INGREDIENTS

For the vegetable broth

  • 6 cups water
  • Carrot
  • Onion
  • Garlic
  • Celery
  • Leek
  • Long Green Chilli
  • Dried Rosemary
  • Dried Bay Leaves
  • Salt
  • Whole Black Peppercorns

Note: When making a basic vegetable broth, you want vegetables with neutral, but savoury flavours. Onions, carrots, celery and mushrooms are the ideal starter vegetables for stock, but feel free to swap any of these for leeks, tomatoes or parsnips. Avoid starchy vegetables like potatoes and turnips will make for a gummy, cloudy vegetable stock. Beets overpower their aromatic counterparts. Zucchini and green beans become bitter when slowly simmered for as long it takes to make this stock.

For the batar da’an

  • 600g pumpkin, peeled and cut into large chunks
  • 4 & 1/2 cups vegetable broth
  • 1 cup corn kernels (fresh or frozen)
  • 3/4 cup dried mung beans, soaked for at least 6 hours to overnight
  • 3 tbsp coconut oil
  • 3-4 garlic cloves, finely minced
  • 1 red onion, finely diced
  • Salt and pepper, to taste
  • Moringa (malunggay) leaves, optional

METHOD

You can choose to make your vegetable broth the day before to save time when actually cooking the Batar Da’an.

  1. Vegetable Broth: Combine all the ingredients in a large stock pot and bring to a boil over high heat. Once boiling, turn the heat down low and leave to slowly simmer for an hour.

If you’re using your broth right away, skip ahead to step 3a.

  1. When done, turn the heat off and leave to cool down slightly for about half an hour.
  2. Strain the vegetables and spices from the broth, into a bowl and then:
    a) set aside until ready to use, or
    b) set aside to cool down completely before transferring into a jar/container to store in the fridge.
  3. Batar Da’an: Add the coconut oil to a large stockpot over medium-high heat and sauté the minced garlic until golden brown in colour and fragrant, about 30 seconds. Next, add the diced onions and cook until soft, a further 30 to 45 seconds.
  4. Add the pumpkin chunks and give it a good mix for about a minute and then add in the drained mun beans. Season with a touch of salt and freshly cracked black pepper and cook for about a minute to get some caramelisation happening.
  5. Pour in the vegetable broth, mix, and then turn the heat down to medium-low. Cover and cook for about 15 minutes.
  6. In the last 5 minutes, stir in the thawed corn and give it a good mix. At this point, you may taste and adjust the seasoning to your liking. Turn the heat off after 5 minutes and then serve immediately while hot and enjoy!

Optional: Once the heat is turned off, you may stir in some moringa (malunggay) leaves, or other choice of leafy greens, and let the residual heat cook them.

This dish is traditionally enjoyed as a main course, usually accompanied by rice, but it can also serve as an excellent side dish when paired with other meat or fish dishes.

Batar Da’an (Pumpkin, Corn, and Mung Bean Stew)

Batar Da’an (Pumpkin, Corn, and Mung Bean Stew)

BON APPÉTIT

– Ally xx

myTaste.com

Advertisement
Auguest 2020: Melissa Delos Reyes

Crispy Orange Tofu with Broccoli

“Creating food is a therapeutic process. It’s a way for me to unwind and slow down in this fast-paced world. To see my family & friends enjoy what I create is worth all the effort.” — Melissa Delos Reyes

Auguest 2020: Melissa Delos Reyes

Ola! I’m Melissa or Mel, the smol lady behind Eats Meru on Facebook and Instagram. I am a social media associate by profession and I freelance in photography and graphic design. Ever since I was young, I’ve always enjoyed cooking, experimenting with food, and following recipes!

I created Eats Meru pre-pandemic to share my food adventures at first. Everything changed when the Covid-19 virus struck. No one was prepared. Businesses were greatly affected, especially the small/start-up local brands. Since then, I’ve converted my goal for Eats Meru as a platform where I can help local MSMEs to share their products especially now that everyone is doing their best to make a living.

For this post in the Auguest series, I chose the color orange. I’ll be sharing a healthy and plant-based version of the famous Orange Chicken that uses tofu as the protein of the dish; it’s sticky, orange-y, tangy, crispy, and tasty too! You can easily make this dish as most of the ingredients can be found in your fridge and pantry. It is also perfect for those busy weeknights as it comes together in 20 minutes.

Crispy Orange Tofu with Broccoli Ingredients

PREP TIME 10 MINS | COOKING TIME 10 MINS | SERVES 4

INGREDIENTS

For the crispy tofu

  • 2 packs firm tofu, drained and cut into 1-inch size cubes
  • 2 tbsp cornstarch
  • 1 tsp rice flour
  • 1/4 tsp garlic powder
  • 1/4 tsp freshly ground black pepper
  • 1/4 tsp salt
  • Vegetable oil, for frying

For the orange sauce

  • 1 cup fresh orange juice (about 3 medium-sized oranges)
  • 1/4 cup water
  • 3 tbsp sugar
  • 2 tbsp soy sauce
  • 2 tbsp white or rice vinegar
  • 1 & 1/2 tbsp cornstarch (2 tbsp for a thicker sauce)
  • 1 tsp chilli, minced
  • 1/8 tsp salt
  • 4 garlic cloves, finely chopped
  • 1 inch ginger, minced (or 1 tbsp grated)
  • Spring onion (for garnishing)
  • Blanched broccoli

METHOD

  1. Crispy Tofu: In a large bowl, combine the cornstarch, rice flour, garlic powder, salt, and pepper. Mix well and coat the tofu in the cornstarch mixture.
  2. In a deep, heavy-bottomed pot, heat the vegetable oil (enough to cover the tofu) over medium-high. Carefully drop the coated cubed tofu in the oil and fry until slightly golden brown. Do not overcrowd the pot; work in batches if needed.
  3. Once done, use a slotted spoon to remove the tofu and transfer to a wire rack or strainer to cool down.
  4. Orange Sauce: Combine all the ingredients for the orange sauce, except water and cornstarch in a saucepan over medium heat. Cook and bring to a boil.
  5. Mix the cornstarch in the water together to create a slurry and gradually stir it into the simmering sauce. Cook until the sauce thickens, stirring well for even thickening. Taste for salt, sweetness, flavour, etc. and adjust as you go.
  6. Turn the heat off and add the crispy tofu. Toss to evenly coat them with the sauce. Transfer to a serving bowl and garnish with the spring onions. Serve immediately while hot, with rice and blanched broccoli (or any of your favorite greens for that matter). Enjoy!

This Crispy Orange Tofu can be modified for an even healthier option. For this recipe, the tofu is deep-fried in oil, but if you prefer, and have a bit more time on your hands, you can bake the tofu instead. Additionally, you can consider serving it with some cauliflower rice and other greens of your choice.

Crispy Orange Tofu with Broccoli

Crispy Orange Tofu with Broccoli

Photo Courtesy & Recipe Copyright © 2020 | Melissa Delos Reyes (@eatsmeru)

BON APPÉTIT

– Melissa Delos Reyes

myTaste.com

Vegan Turmeric, Chickpea, and Sweet Potato Stew

Vegan Turmeric, Chickpea, and Sweet Potato Stew

Hello Everyone! I’ll keep tonight’s introduction short, and so, on to the recipe! This glowing Turmeric, Chickpea, and Sweet Potato Stew is hearty, spicy, creamy, nutrient-rich, and delicious! The addition of pineapple juice in the stew adds a hint of sweetness and slightly enhances the flavour of the overall dish that pairs nicely with the coconut milk.

It’s the perfect comfort food for the cold weather months. Having said that, it’s probably not an ideal dish to whip up in the tropics, especially during the summer time *cheeky grin*

Vegan Turmeric, Chickpea, and Sweet Potato Stew

Before we dive into tonight’s recipe, please take the time to check out the original recipe I followed for reference, over on Yup, it’s Vegan by Shannon. It’s dairy-free, gluten-free, grain-free, and vegan/vegetarian altogether (that is if you skip the garlic-malunggay toast on the side)!

Vegan Turmeric, Chickpea, and Sweet Potato Stew Ingredients

PREP TIME 10 MINS | COOKING TIME 30 MINS | SERVES 4

INGREDIENTS

3 garlic cloves, minced
2 pcs dried bay leaves
2 small-sized sweet potato, peeled and cubed
1 small red bird’s eye chilli, finely minced
1 small red onion, diced
2 cups water or vegetable stock
1 & 1/2 cups cooked chickpeas
1 & 1/2 cups full-fat coconut milk
1/2 cup pineapple juice (fresh or if store-bought, with no added sugar)
2 tbsp freshly squeezed lime juice
1 & 1/2 tbsp fresh turmeric, grated
1 tbsp coconut oil
1 tbsp fresh ginger, grated
1/2 tbsp yellow curry powder
2 tsp light soy sauce
1 tsp turmeric powder
Blanched kale leaves, roughly chopped to garnish
Salt and freshly ground black pepper, to taste

METHOD

  1. Add the coconut oil in a large heavy-bottomed pot over medium heat. When the oil starts to shimmer, add the minced garlic and sauté until golden brown and fragrant, about 30 seconds. Be careful to not burn the garlic. Then add in the diced onions, chillies, ginger, turmeric, and dried bay leaves, stirring often, until they soften, about 1-2 minutes.
  2. Add the sweet potatoes into the pot, together with the curry and turmeric powder. Season with salt and freshly ground black pepper, to taste, and then give it a good mix, cooking for about a minute or two.
  3. Add the water or vegetable stock and bring to a gentle boiling. Once boiling, add in the pineapple juice, and half of the coconut milk and bring back to a gentle boil before reducing the heat to a steady simmer. Cover the pot and leave to cook for about 15 to 20 minutes, or until the sweet potatoes are cooked through.
  4. If desired, use a fork to mash up some of the sweet potatoes to thicken the stew slightly. Stir in the cooked chickpeas, lime juice, soy sauce, and the remaining coconut milk. Let it simmer, partially covered, for 5 to 10 more minutes.
  5. Check and taste to see if the stew needs additional seasoning. If so, season with a touch more salt, freshly ground black pepper, and lime juice.
  6. Once done, top with some blanched kale and fresh chillies. Serve hot with some garlic-malunggay bread slices on the side (optional). Enjoy!

Vegan Turmeric, Chickpea, and Sweet Potato Stew

Note: The sweet potatoes in this stew makes it nice and hearty on its own, but it is also lovely served with jasmine rice. Feel free to add other stew-friendly vegetables too, such as cauliflower or other leafy greens like how I added kale to mine.

BON APPÉTIT

– Ally xx

myTaste.com

Seafood Thai Red Curry

Seafood Thai Red Curry

Hello Everyone! The secret to a great, vibrant, and spicy Seafood Thai Red Curry is of course the quality of the red curry paste, spices and aromatics, vegetables, and the freshest seafood you can find out there. The best thing about this dish is that it is pescatarian-friendly, dairy-free, and gluten-free!

Seafood Thai Red Curry

When it comes to a seafood-loaded curry, versatility is one of the things that I love about it. You can pretty much load it up with any type of fish, shellfish, and seafood of your choice. The same goes with the vegetables. Also, depending on the ingredients you choose to add to the dish, it can be prepared in 30 minutes or less.

For those who know me, I would normally tackle recipes like this by making my own paste. However, due to the limited availability of certain ingredients here in the Philippines, I thought long and hard before I opted to use store-bought paste. Just make sure that if you are using good-quality and authentic Thai Red Curry Paste. They can usually be found in the international aisle of any large supermarket chains.

Seafood Thai Red Curry Ingredients

PREP TIME 30 MINS | COOKING TIME 45 MINS | SERVES 4-6

INGREDIENTS

  • 200g salmon belly, skin removed* and cut into bite-sized pieces
  • 100g baby clams, de-grit and cleaned**
  • 100g baby mussels, cleaned and debearded***
  • 100g baby squid, cleaned
  • 50g snow peas
  • 10 cherry tomatoes, halved
  • 2-3 bunch baby bok choy, halved
  • 2-3 red bird’s eye chillies, whole or sliced
  • 1 block firm tofu, cut into large cubes
  • 1 large lemon, juiced
  • 1 stalk lemongrass, sliced
  • 1 small piece ginger, sliced
  • 1 small red onion, halved then sliced
  • 3/4 cup fish stock (or 1 fish bouillon cube dissolved in 3/4 cup water)
  • 3/4 cup extra light olive oil
  • 200ml full cream coconut milk
  • 4 tbsp Authentic Thai Red Curry Paste
  • 2 tbsp Thai fish sauce
  • 1 tbsp brown sugar
  • Thai basil leaves or spring onion, to garnish
  • Salt and freshly ground black pepper, to taste

* Do not discard the skin
** Find out how to de-grit and clean clams over on Just One Cookbook
*** Find out how to clean and debeard mussels over on Epicurious

METHOD

  1. Crispy Salmon Skin: Place the salmon skin into a bowl and toss with about 2 tablespoons of salt. Set aside for 10 to 15 minutes. This is to draw out the moisture from the salmon skin to get it nice and crispy when fried. Pat the salmon skin dry with a paper towel.
  2. In a medium-sized frying pan, heat the 3/4 cup of extra light olive oil, or enough oil for shallow frying, over medium-high. The oil should be very hot, but not smoking or else the salmon skin will burn before fully crisping. Stir the skin around frequently to prevent it from sticking to the pan. The skin will look rubbery at first, so take your time as it can take a full 10 to 15 minutes for it to crisp up. Once crispy, transfer to a plate lined with a paper towel to absorb any excess grease. Set aside.
  3. Preparing the Tofu: Meanwhile, if using tofu from a package, drain and allow to sit on a clean tea towel or paper towel to get rid of any excess water. Set aside for about 15 to 20 minutes for it to fully extract moisture.
  4. In the same medium-sized frying pan, over medium-high heat, carefully add the tofu in and cook for about 5 minutes per side, or until golden brown and crispy. Remove from the pan and let it sit on a plate lined with a paper towel to absorb any excess grease. Cut the tofu into bite-sized cubes, and set aside.
  5. Seafood Thai Red Curry: In a soup pot or heavy duty Dutch oven, heat about 2 tablespoons of the extra light olive oil over medium-high and sauté the onions, ginger, lemongrass, and chillies until fragrant, about 2 minutes. Add the Thai red curry paste and cook for a further 1 to 2 minutes.
  6. Add the fish stock and cherry tomatoes. Bring to a boil. Season with salt and black pepper, as well as with the Thai fish sauce and brown sugar to get the balance of flavours up to your liking. Feel free to add more chillies in if you feel you need a bit more of a spicy punch to the soup base.
  7. Add the lemon juice for some tang, together with the tofu bites, and followed by the snow peas. Cook the snow peas for about a minute and then remove them from the pot. Transfer to a separate plate. Do the same with the baby bok choy. This is to prevent the vegetables from overcooking.
  8. Add the baby clams and mussels and cook for 2 minutes before adding the salmon belly and baby squid to the pot, together with the coconut milk. Cook for a further minute, or until the soup comes back up to a rapid simmer.
  9. Turn the heat off and transfer the curry to a serving dish. Garnish with the crispy salmon skin, Thai basil leaves or spring onions, and fresh chillies. Serve immediately with steamed rice and enjoy!

Seafood Thai Red Curry

BON APPÉTIT

– Ally xx

myTaste.com

Auguest 2017: Jialing Mew

Curried Lentil & Vegetable Stew

Curried Lentil & Vegetable Stew

Happy Guestember everyone! I’ll be taking over Amcarmen’s kitchen this week, for my third guest appearance. Having lived in Sydney for the past few years, I’ve crossed paths with several people, all with different lifestyles, backgrounds, and interests. Amidst the social and cultural melting pot, I’ve found that food is always a common talking point and a great way to bring people together. And what’s better than food that can be enjoyed by all? I’ve certainly managed to surpass my own expectations this year – not only does my recipe use multiple ingredients from Allison’s high-blood-pressure-lowering list, but it is also gluten-free, dairy-free, and… vegan! (Read about last year’s vegan recipe struggle here MATE YOU GOTTA LINK THIS PART WHERE IT SAYS HERE TO THE RECIPE FROM LAST YEAR PLZ CUZ I DONT KNOW HOW TO DO EET AND ALL THIS TEXT IN RED PLZ REMOVE FROM POST TENKS. Yes, 2017 Jialing can laugh about it now).

[I’m sorry Jialing, I had to share the text in red for the blogging world to see because it’s just too funny!] – Ally xx

Inspired by seasonal ingredients in my kitchen, staples in my pantry, and great people in my life, this dish is something that I hope everyone can enjoy. True to my appetite, my recipe makes a LOT, so it’s best made in the largest pot or pan you can scrounge up, then shared with a small army. Or simply halve the first lot of ingredients for a more regular quantity. Enjoy!

Curried Lentil & Vegetable Stew Ingredients

PREP TIME 10 MINS | COOKING TIME 45-50 MINS | SERVES 12

INGREDIENTS

  • 500g scrubbed potatoes, cubed
  • 500g split lentils
  • 500g sweet potatoes, peeled and cubed
  • 1 can (400g) white beans, drained
  • 2 onions, diced
  • 2 tomatoes, diced
  • 1 bunch kale, roughly chopped
  • 1 head garlic, minced
  • 1 lemon, cut into wedges
  • 3 tbsp hot curry powder (use mild if less heat is preferred)
  • 2 tbsp olive oil
  • 1 tbsp ginger paste
  •  (optional)
  • 2 tsp coriander powder
  • A small handful of dried curry leaves
  • Salt and pepper, to taste

Optional

  • 1 tbsp cornstarch, for slurry
  • 2 tsp chilli powder
  • Lemon and coriander, to garnish

METHOD

  1. In your very large pot over high heat, fry onion in oil until browned. Add garlic and stir until fragrant. Add ginger paste and tomatoes, stirring until tomatoes are soft and start to break down (being careful not to let the garlic burn).
  2. Add curry powder, coriander powder, and chill powder if desired, stirring briefly for a few seconds.
  3. Add potatoes, sweet potatoes and lentils, increase heat to high, and add enough water to the pan to cover the potatoes and lentils. Keep covered until the water boils.
  4. Once the water boils, reduce the heat to low and add lemon wedges, stirring occasionally and topping up water until lentils and potatoes are all cooked through (may take roughly half an hour). Be sure to leave enough liquid to just cover the lentils.
  5. Add curry leaves, then salt and pepper, adjusting to your taste (I usually end up adding about 1 tbsp of salt). At this point, make the optional slurry with cornstarch and 1 tbsp of water, and add to the pan to thicken the gravy.
  6. Add drained white beans to pan, stirring until heated through. Take your pan off the heat.
  7. Toss in the kale, stirring through gently until evenly distributed. Be careful not to spill, as I always do…
  8. Garnish with fresh coriander and lemon. Serve hot with basmati rice or flat bread, chutney or fresh yogurt, or even on its own. Enjoy with friends or family 🙂

Curried Lentil & Vegetable Stew

Curried Lentil & Vegetable Stew

Recipe Copyright © 2017 | jialingmew

BON APPÉTIT

– xx Jialing

myTaste.com

Auguest 2017: Simon Swadling

Blueberry Cheesecake Tarts (Gluten Free)

I met Allison 6 years ago in Sydney, Australia where we studied Design together at The College of Fine Arts. We both had a great passion for the chicken schnitzel sandwiches they sold across the road from COFA (with caramelised carrots of course) as well as food in general. Recently I’ve taken my passion for food and cooking to the next level by starting my own baking business “The Bearded Patissier” selling baked goods to people in my area, cakes, tarts, macarons, and desserts all give me an opportunity to combine my love for good design and art with good food.

June 2015: Graduation DayJune 2015: The Bearded Patissier & Amcarmen’s Kitchen on Graduation Day

Here’s my recipe for gluten free blueberry cheesecakes. Making them in a tart means you have a great ratio of biscuit to cheesecake and I would happily just eat the base by itself too – it makes a great (healthy) gluten free cookie!

Blueberry Cheesecake Tarts (Gluten Free)

PREP TIME 15 MINS | COOKING TIME 1 HOUR 15 MINS* | SERVES 12 TARTS

*Includes a minimum of 1 hour chilling time

INGREDIENTS

For the base

  • 150g almond meal
  • 75g unsalted butter, cubed
  • 40g caster sugar
  • 40g raw sugar
  • 1/4 cup fine rolled oats
  • 1/4 cup shredded coconut
  • 1/2 tbsp cornflour
  • Pinch of ground cinnamon
  • Pinch of salt

For the blueberry and pomegranate jam

  • 2 x 125g punnets fresh blueberries
  • 2 tbsp pomegranate molases
  • 1 tbsp caster sugar
  • 1 tbsp lemon juice

For the cheesecake

  • 250g cream cheese, at room temperature
  • 1 cup thickened cream
  • 1/2 cup syrup from jam (see recipe below)
  • 2 tsp gelatine powder, dissolved in 3 tsp of water
  • 1/4 caster sugar

METHOD

  1. Base: add all the ingredients for the base into a mixer with the paddle attachment.
  2. Mix on a low speed until fine crumbs start to form, and the butter is well combined into the mixture. Continue mixing until larger crumbs start to form, it should look similar to the size of granola, but don’t let it fully combine into a ball of dough.
  3. Press half a tablespoon of the mix into lose bottomed 3-inch tart shells making sure it is an even thickness across the whole tin. The mixture should cover 12 tins. Alternatively you can also make one large cheesecake in a big tin.
  4. Bake in a 160C fan-forced oven for 12-15 minutes until evenly golden in colour.
  5. Allow tarts to cool fully before removing them from their casing. You may have to press them flat a bit after they come out of the oven while they are still hot.
  6. Blueberry and Pomegranate Jam: add all the ingredients into a pan over medium heat. Bring to a simmer and cook for 10-15 minutes until thickened.
  7. Strain out half a cup of the syrup while still warm and add in the gelatine mixture for the cheesecake. Allow to cool slightly and if you want the bits of blueberry in the cheese cake just measure out without straining. Reserve the rest for topping the cheesecake.
  8. Cheesecake: while the blueberry and gelatine mix is cooling, beat the cream cheese and sugar in a bowl until smooth, making sure no lumps are left on the sides of the bowl as these will not mix in later and leave you with lumps in your mix.
  9. Beat in the cream, and then gently fold through the cooled blueberry gelatine syrup.
  10. Spoon tablespoons of the filling into the tart shells and refrigerate for an hour minimum.
  11. Top the cheese cakes with reserved jam and fresh blueberries or flowers. Serve and enjoy!

Blueberry Cheesecake Tarts (Gluten Free)

Blueberry Cheesecake Tarts (Gluten Free)

Recipe Copyright © 2017 | thebeardedpatissier

BON APPÉTIT

– Simon Swadling aka The Bearded Patissier

myTaste.com

Pan-fried Cinnamon Bananas

Pan-fried Cinnamon Bananas

Hello Everyone! First and foremost, I am truly apologise for the lack of posts for the past month! As some of you may have been aware from previous posts, or if you follow my personal social media pages, I spent the last 3 weeks travelling Australia and the Northern Island of New Zealand. I arrived back home last weekend and have just been catching up on truckloads of work that I haven’t had the time to update Amcarmen’s Kitchen during that catch up week, as well as when I was on holiday. I did have content and material prepared beforehand and I was supposed to be posting while I was on holiday, but let’s face it – I didn’t want to be stuck in front of the computer all day while there were so many beautiful places around me to visit. Plus, I usually get home late and just want to rest a recharge for the following day’s adventure. Other than my apologies, I had an amazing time in New Zealand and I am already planning a trip back same time next year for a South Island trip!

Just a quick note before I jump onto today’s recipe (yes I am aware that today is Sunday and it’s not my usual Wednesday upload schedule), I will be posting two more Banana recipes (this one inclusive), which for those of you who don’t follow, was the theme for the month of February for Amcarmen’s Kitchen. The reason being is that I have already had these recipe lined up to upload but didn’t get around to doing so and I didn’t just want to scrap them off, and yes, that is why I am posting today as well – just until  I catch up with the present and resume back to my normal Wednesday posts.

Today’s recipe is one of the easiest and quickest thing to make when you find yourself with a handful or more of overripe bananas. Of course, the first go-to recipe for overripe bananas would be to whip up a delicious loaf of banana bread – provided that I have the time and energy to do so – but pan-fried cinnamon bananas are just as tasty as banana bread. Pair them with a cuppa and you’ve got your Sunday afternoon hi-tea set and all ready to go!

Pan-fried Cinnamon Bananas Ingredients

PREP TIME <5 MINS | COOKING TIME 10 MINS | SERVES 2

INGREDIENTS

  • 2 large slight overripe bananas, sliced into 1/3″ thick rounds
  • 2 tbsp granulated sugar
  • 1 tsp ground cinnamon
  • 1/4 tsp ground nutmeg
  • Olive oil, for frying

METHOD

  1. Combine the granulated sugar, cinnamon, and nutmeg in a small bowl. Set aside.
  2. Add about a teaspoon of olive oil to a large non-stick frying pan and warm over medium heat.
  3. Add the sliced banana rounds and cook for about 2-3 minutes. During the last minute of cooking on the first side, sprinkle about half of the cinnamon mixture over the banana rounds.
  4. Flip the rounds, sprinkle with the remaining cinnamon mixture, and cook about 2-3 more minutes, until the bananas are soft and warmed through.
  5. Remove from the pan. Serve and enjoy with a nice cup of tea.

Pan-fried Cinnamon Bananas

BON APPÉTIT

– Ally xx

myTaste.com

Raw Gingerbread Balls

Raw Gingerbread Balls

Hello Everyone! 2016 is coming to a close real soon and I would just like to take this opportunity to be thankful for what the past year has brought, not only for me, but for my family and my friends as well. Inevitably, life if not always perfect, it has its ups and downs, and for all the times where I felt down or put down but others, I can only say that – as cliché as this sounds – it has made me become a stronger person. I have been thrown under the bus countless of times by people around me and have had people say bad things about me behind my back – to all these people, you can go shove it where the sun don’t shine. You’ve made me realise how easy it can be for me to just shut you out because I don’t need that kind of toxicity in my life. Arrivederci.

Well, that escalated quickly haha! From being thankful to talking about the poisonous people is my life. Anyway, this will be the last recipe that I will be sharing on Amcarmen’s Kitchen for the year 2016. I hope that all my family, friends, and followers have had a good read and have cooked up a storm in their own kitchens with my recipes. Don’t forget to use the hashtag #amcarmensrecipes when you create a dish from my blog so I can share them on all my social media mediums. I will be back in February with a whole new concept to my recipes so please stay tuned! Yes, I will be taking a break in January as I have quite a full plate with work for the month and I might be able to spend time in the kitchen. I will also be planning content for Amcarmen’s Kitchen during my time off to ensure that everything runs smoothly for the upcoming year! Look out though for a post coming in mid-January as an introduction and hint to the recipes ahead for 2017!

Since Christmas passed not to long ago, I decided whip up these tasty raw vegan gingerbread balls as part of my ball-balls theme for December to keep with the Christmas-spirit.The only slight change I made to this recipe was replacing the buckwheat groats with more almonds just because I have no clue where to find buckwheat groats here in Brunei! Before we jump into the recipe for tonight, please check out the original recipe from Amanda over on Rawmanda.

Raw Gingerbread Balls Ingredients

PREP TIME 10 MINS | COOKING TIME  | SERVES 15 BALLS

INGREDIENTS

  • 1 & 1/4 cup pitted dates, roughly chopped
  • 3/4 cup gluten-free rolled oats
  • 1/4 cup almond meal
  • 1/4 cup buckwheat groats*
  • 3/4 cup gluten-free rolled oats
  • 1 tbsp ground cinnamon
  • 1 tsp ground ginger
  • 1/2 tsp nutmeg
  • 1/4 tsp ground cloves
  • 1/4 tsp vanilla extract

Optional

  • 1 tbsp coconut sugar

*If you’re like me and can’t seem to find buckwheat groats at your local grocers, you can substitute 1/4 cup of buckwheat groats for 3 tablespoons of almond flour. Alternatively, for nut-free balls, you can substitute 1/4 cup of almond meal for 1/4 cup + 1 tablespoon of buckwheat groats.

METHOD

  1. Place all the ingredients, except for the coconut sugar and dates in a high-speed blender or food processor until you get a flour-like consistency from the ingredients.
  2. Add half of the dates into the blender/food processor and pulse until well combined. Then add in the remaining dates until you have a uniform dough formed.
  3. Scoop the dough out of the blender/food processor, at about a tablespoon in size, and roll it into a ball (or flatten with a rolling pin and use a cookie cutter to make desired shapes). Repeat for the remaining dough. Optional: Roll the balls into coconut sugar or sprinkle on top of cookies.
  4. Share and enjoy as a light snack. Store the gingerbread balls or cookies in an air-tight container at room temperature for a 2-3 days or in the refrigerator for a week.

Raw Gingerbread Balls

BON APPÉTIT
– Ally xx

myTaste.com

No Bake Strawberry & Coconut Vegan 'Cheesecake'

No Bake Strawberry & Coconut Vegan ‘Cheesecake’

Hello Everyone! Yes I am aware that it is indeed Tuesday and not a Wednesday – but today is a special day which indefinitely deserves a special post too! Today is the middle child’s 22nd Birthday, and since last year (which was the year I came back to Brunei) I’ve been baking cakes for the family. It was the better solution to, I guess, wanting a specific flavour for an affordable price. I cannot stress enough house much I hate store bought cakes – mainly because of their icing; too thick, too sweet, just… Ugh. I’m not much of a baker since I’m more into savoury foods, but I guess baking a cake 4 times a year (at minimum) isn’t too stressful and helps me practice.

Happy 22nd Birthday Angela!
Happy 22nd Birthday Angela! – early dinner at Balkony today after work. The cake not only looked amazing, but it tasted so good as well! I will definitely try out more no bake vegan ‘cheesecakes’ in the upcoming months – maybe for my Birthday in November!

Today’s recipe shall keep in theme with the theme for this month on Amcarmen’s Kitchen, which is, if you haven’t been following, Yes Ve Gan! A month of tribute to animal-free dishes that are sure to tickle your tummies from a different perspective. Before I had the idea of coming up with an animal-free theme for the blog, I wanted to bake a strawberry shortcake for my sister. I then only just changed my mind earlier last week to do a No Bake Strawberry & Coconut ‘Cheesecake’ for her after being inspired and reminded of the cake that Miao made back in March when we gathered for a dinner and catch up session with friends in Singapore. I think I mentioned in the beginning of the month in a post that it was a pretty darn delicious cake and it made me crave for more! So I thought to myself, why do I give a raw vegan cake a try since, like Miao at that time, I have never done one before! It’s super easy to make and you can substitute the strawberries out for your favourites berries such as raspberries, blueberries, blackberries, or boysenberries.

No Bake Strawberry & Coconut Vegan 'Cheesecake'

This ‘cheesecake’ is completely gluten-free, dairy-free, and egg-free! The recipe makes for one 8″ sized cake, but of course you can always double the recipe to make a bigger one if you wish! Mind you, for those who have not read in an earlier post this month, I haven’t stopped eating animals, dairy, or eggs altogether. I still eat my meat, but not as often as I used to, and I still have my daily dose of cow’s milk in the mornings  to accompany my breakfast. I don’t see myself going completely vegan in the next couple of years – but who knows, that may change over time when I make that shift to loving all animals, and most importantly for a healthier lifestyle. For now, it is something that I want to look into and slowly add this way of eating into my daily diet.

No Bake Strawberry & Coconut Vegan 'Cheesecake' Ingredients

PREP TIME 25 MINS | FREEZE TIME min. 4 HOURS* | SERVES 8-10

*preferably overnight to ensure that the cake is set.

INGREDIENTS

For the crust

  • 250g medjool dates, pitted
  • 3/4 cup sliced almonds
  • Pinch of salt

For the filling

  • 1 cup raw cashews, soaked overnight* and drained
  • 1 punnet (25g) fresh or frozen (but thawed) strawberries
  • 2/3 cup full fat coconut milk
  • 4 tbsp coconut oil, liquified
  • 2 & 1/2 tbsp lemon juice
  • 2 tbsp maple syrup
  • Zest of 1 small lemon

For the topping

  • Fresh strawberries
  • Shredded coconut
  • Edible flowers (optional)

*if you are a bit pressed for time, or decided to make your cake today and hadn’t realised that you needed to soak your cashews overnight, then you can soak them in very hot water for about an hour instead of overnight.

METHOD

  1. Crust: Soak the pitted medjool dates in warm water for about 15-20 minutes and then drain. Put almonds in a food processor and pulse until finely chopped. Add the dates and a pinch of salt, and pulse until a paste forms.
  2. Press mixture into an 8-inch springform pan (if you don’t have a springform pan, use a pie tin or a regular cake pan covered with baking paper). Place the crusted pan in the freezer while you prepare the filling.
  3. Filling: Put all ingredients for the filling in a blender and blend on low until mixture is as smooth as possible. Pour the filling into the crust, cover with plastic wrap and freeze for at least 4 hours.
  4. Remove the cake from the pan and leave to thaw in room temperature for about 10-15 minutes before cutting. Top with fresh strawberries, shredded coconut, and edible flowers.

Tip: Run your knife under warm water (and dry off) before cutting, to make a cleaner cut. Let each piece thaw for a few more minutes before serving.

No Bake Strawberry & Coconut Vegan 'Cheesecake'

No Bake Strawberry & Coconut Vegan 'Cheesecake'

BON APPÉTIT

– Ally xx

myTaste.com

Three-ingredient Pancakes

Three-ingredient Pancakes

A very good morning to all! Well, it’s like past 10am here in Sydney (almost 11am probably by the time I get this post up), but probably only just about past midnight in parts of the world, or maybe just a few hours behind/ahead depending where you are really. Anyway, today, I managed to get out of bed by 8am (I usually wake up at 8 but laze around until 9-9:30), maybe because it wasn’t as cold as the previous days that made me just want to snuggle in my thick warm blanket. Who I am kidding? I got out of bed because I was hungry and I wanted to do something about my overripe bananas sitting in the corner of my room. I then remembered a friend of mine posting a photo (probably a month ago or so) on Instagram about his ‘failed’ two-ingredient pancakes – well more like when he tried to flip it, it tore. And it was slightly burnt.

Anyway, so this magical two-ingredient pancake is gluten and dairy free – basically two eggs per large banana. But I decided to put a little twist to my two-ingredient pancake and make it my very own three-ingredient pancake (I’m pretty sure someone out there thought about it already, but who cares). I decided to add a spoonful (or two) of crunchy peanut butter to the mix. YUM. I love peanut butter, especially the crunchy ones. I also added a touch of vanilla and more than I should’ve added, ground cinnamon. I also love me some cinnamon. You can never go overboard with it – I guess?

PREP TIME 5 MINS | COOKING TIME 15-20 MINS SERVES 4 PANCAKES

INGREDIENTS

  • 1 large ripe banana, mashed
  • 2 large free range eggs
  • 2 tbsp crunchy peanut butter
  • Dash of vanilla extract
  • Dash of ground cinnamon
  • Honey & maple syrup blend, to drizzle
  • 1 tbsp vegetable oil

METHOD

  1. Add the peanut butter and eggs in a medium-sized bowl and beat together. Add in the mashed bananas, vanilla extract and cinnamon. Mix until well combined. (Tip: if you are pressed for time, use a blender to mix all the ingredients together).
  2. Heat a small pan (nonstick or cast-iron) over medium heat. Fold a sheet of paper towel in half, and moisten with the vegetable oil and carefully rub the pan with the oiled paper towel. Ladle the batter onto the pan, using the back of the ladle to spread the batter into a round shape. Cook until the surface of the pancake starts to bubble, about 2-3 minutes. Flip carefully with a spatula, and cook until browned on the underside, about 1-2 minutes more (I am actually unsure about the timings so please don’t accurately follow them, I just used my eyes and instincts to tell whether they are cooked through or not).
  3. Continue with more oil and remaining batter (makes about 4 pancakes). Serve warm, with desired toppings.

Three-ingredient Pancakes

BON APPÉTIT

– Ally xx

myTaste.com