“Learn as much as you can through reading cookbooks, watching cooking shows, attending short cooking classes, and from other people. Then try to incorporate all these in your daily cooking.” — Jenel Laureta

I was greatly influenced by my paternal grandfather to love food and cooking! Hands down, he was a great cook because there was not a dish I didn’t like. All his dishes were simply delicious. His cooking was not by-the-book and he had no recipes to follow. He cooked by taste and with utmost passion.
In my Lolo Pepe’s kitchen, I began with peeling garlic and onions for homemade atchara. We were busiest in the kitchen during town fiestas. Lolo Pepe would whip up his specialties: Asadong Manok, Mechadong Baka, and Adobong Hito to name a few. I would linger in the kitchen to smell the bubbling sauces and of course to get a taste of each cooked dish.
From him, I also learned how to appreciate good food. We weren’t rich but he wouldn’t settle for less than the best. I remember that he would always buy our butter from a PX store and we would always travel to a nearby city to eat good food.
A great part of my childhood memory is about food and cooking, and this may be the reason why until now I love to eat and cook! In my kitchen now, I try to replicate Lolo Pepe’s cooking. Although I do not have any recipes to follow, I just try to remember the smell, the taste, and the look of a certain dish!
Jambalaya is a popular dish of West African, French (especially in Provençal cuisine), Spanish and Native American influence; similar to, but distinct from, other rice-and-meat dishes known in Louisiana cuisine.
An easy Jambalaya recipe is pure comfort food filled to the brim with flavor. A soffritto-like trinity of onion, bell peppers and celery are also included, along with rice, chilies, cajun spice, other seasonings, and broth. Jambalaya is a quintessential one pot recipe, usually cooked together until the rice is done, but since this is a recipe for a deconstructed Jambalaya, we’re going to need a pot/pan more or two.
PREP TIME 10 MINS | COOKING TIME 45 MINS | SERVES 1-2
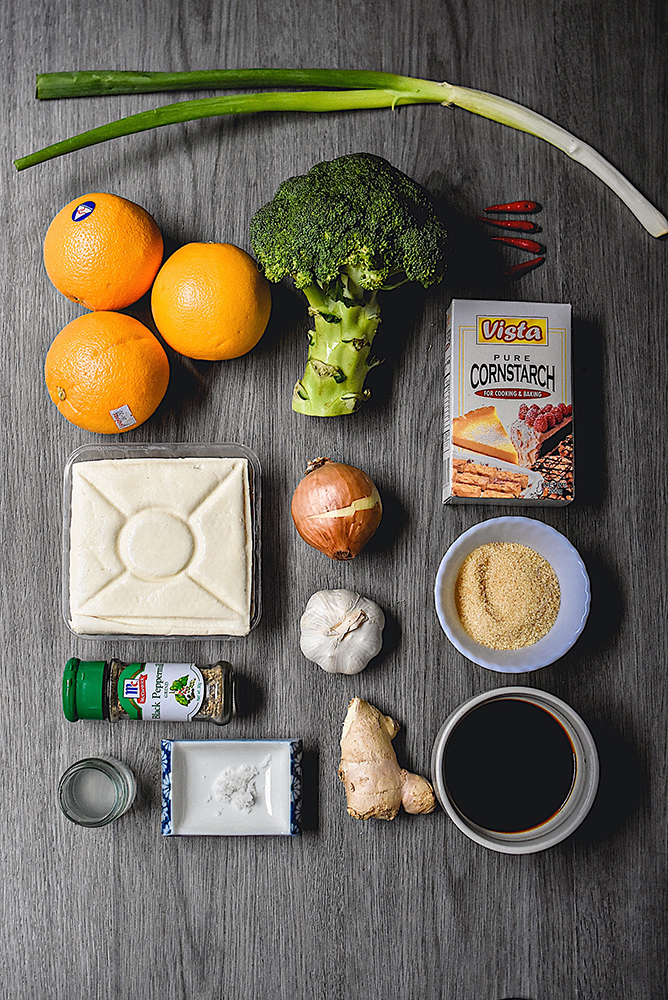
INGREDIENTS
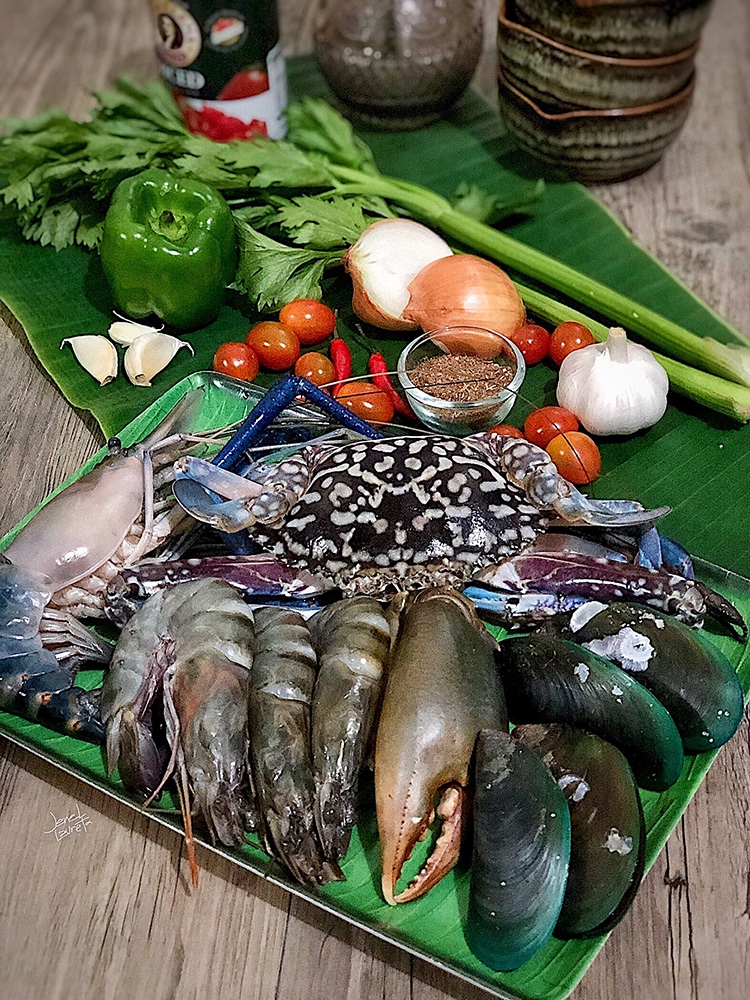
- 1 pc river prawn
- 1 pc blue swimmer crab
- 1 pc crab claw
- 3 pcs large prawns
- 4 pcs mussels
- 2 stalks celery, sliced
- 1 whole green bell pepper, cubed
- 1 medium-sized white onion, minced
- 5 cloves garlic, minced
- 1-2 pcs red chili, diced (optional)
- 1 & 1/2 to 2 cups seafood broth or water
- 1 to 1 & 1/2 tbsp cajun spice
- 1 can (approx. 400g) diced tomatoes
- Olive oil
- Salt, to taste
- 2 cups cooked rice
- Cherry tomatoes, lightly fried, for garnish
METHOD
- Jambalaya Stew: Add olive oil in a shallow pan and start sautéing in this order: green bell pepper, celery, white onion, and then garlic. Add cajun spice and continue cooking for a further 2 minutes.
- Pour the can of diced tomatoes and let it cook until softened before adding a cup of seafood broth or water. Bring to a boil.
- Add assorted seafood and cover until cooked. Add more seafood broth or water as needed and leave to simmer, seasoning with salt according to your taste.
- Once the assorted seafood is cooked through, fish out into a bowl and set aside.
- Jambalaya Rice: In a separate pan, sauté the garlic until golden and fragrant.
- Ladle about a cup of the jambalaya stew and add it to the pan with sautéed garlic. Leave to simmer to allow the flavors to concentrate.
- Add the cooked rice and mix well. Season with salt and pepper to taste, and allow the rice to absorb all the stew.
- Jambalaya Soup: Add half a cup of seafood broth to the remaining jambalaya stew and simmer.
- Season with salt and pepper, to taste. Optional, if you want an intense jambalaya flavor, you can add a half teaspoon more of cajun spice.
- Purée the stew in a blender and pass it through a fine sieve.
- Pour soup in a bottle and keep warm.
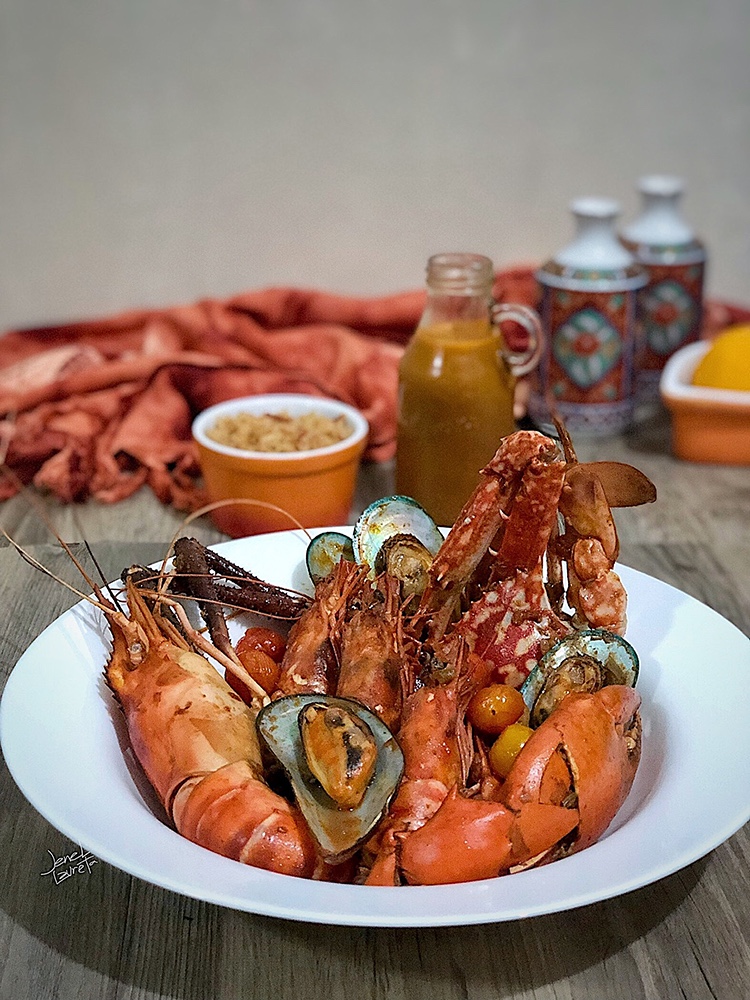
- Assembly: Arrange the assorted seafood in a large shallow plate and garnish with lightly fried cherry tomatoes.
- Pour the warm jambalaya soup over the assorted seafood and serve with jambalaya rice. Enjoy!


Photo Courtesy & Recipe Copyright © 2020 | Jenel Laureta (@jenel.laureta)
BON APPÉTIT
– Jenel Laureta