Spiced Carrot Cake Loaf with Cinnamon Cream Cheese Frosting

Spiced Carrot Cake Loaf with Cinnamon Cream Cheese Frosting

Hello Everyone!

AMCARMEN’S KITCHEN TURNS EIGHT TODAY!

And what a journey it has been indeed! So much has happened this year that it’s been extra difficult to keep up with the blog and my social media accounts associated with Amcarmen’s Kitchen. Just before my blog turned 7 last year, I started a foodie community group on Instagram together with a foodie friend of mine, Chamaine (she also participated in my Auguest 2021 series). From there, we started organising and hosting food collaborations amongst the IG foodie community, internationally. Aside from that, I also expanded my social media reach into the world of TikTok and started uploading video content there. It was also from TikTok where I placed third in a virtual cooking competition, and was invited to join in food campaigns where I won prizes weekly.

To be honest, with all that going on side-by-side with my work and social life, I actually didn’t prepare anything for my blog’s anniversary today. In fact, I was going back and forth with myself whether to whip up something or indulge in a lazy Easter long weekend. Prior to this weekend, I spent the last two weekends (Friday to Sunday) in a classroom from 9am – 7pm where I did a Premiere Pro and After Effects course. So yes, I totally deserve a do-nothing weekend after all that *cheeky grin*.

Luckily, because of my oh-so busy schedule, I had this recipe for a Spiced Carrot Cake Loaf with Cinnamon Cream Cheese Frosting that didn’t get posted towards the end of March. Still, it’s perfect for a celebration!

Spiced Carrot Cake Loaf with Cinnamon Cream Cheese Frosting

This carrot cake turned carrot cake loaf is dense, yet ultra soft, moist, and flavoured with fall-favourite spices such as cinnamon, ginger, and nutmeg. You can serve it plain, or spruce it up with your choice of nuts, dried fruit, and/or top with some cream cheese frosting. Now if you want to be a little bit extra, all you need is a pinch or two of cinnamon powder to take your frosting to another level. The delicious cinnamon-flavoured cream cheese frosting really heightens each slice of carrot cake loaf!

I’ve made this carrot cake loaf three times now, the first time was just because I wanted to bake something that was easy to take to work for a mid-morning or mid-afternoon snack. The second time I baked this loaf was with my boyfriend when he visited for the weekend a few months back. The third time, I was searching for a recipe where I could feature Binda Valley’s Vanilla Bliss Natural Greek Style Yoghurt, which I received courtesy of Gourmet Direct PH a few months back. This is also one of my achievements from last year, to be recognised by a brand and create promotional content for them.

This recipe makes two carrot cake loaves, feel free to double or downsize the recipe, but trust me, you don’t want to be downsizing because one loaf disappears fast! If you can turn a cake into a loaf, you can most definitely turn this loaf into muffins as well!

PREP TIME 15 MINS | COOKING TIME 55 – 65 MINS | MAKES 2 LOAVES

INGREDIENTS

Spiced Carrot Cake Loaf Ingredients

For the carrot cake loaf

Dry ingredients

  • 3 cups all-purpose flour
  • 2 tsp baking powder
  • 2 tsp ground cinnamon
  • 1/2 tsp ground nutmeg
  • 1 & 1/2 tsp baking soda
  • 1/2 tsp salt
  • 3/4 cup roasted walnuts, roughly chopped

Wet ingredients

Cinnamon Cream Cheese Frosting Ingredients

For the cinnamon cream cheese frosting

  • 1 block (225g) cream cheese, softened
  • 2 tbsp unsalted butter, softened
  • 1 cup confectioners’ sugar
  • 1/2 tsp vanilla extract
  • 1/4 tsp ground cinnamon
  • Pinch of salt

METHOD

  1. Preheat oven to 180C (350F or gas mark 4) and line two 9×5-inch loaf pans with parchment paper.
  2. Carrot Loaf: Whisk all the dry ingredients, except for the walnuts, together in a large mixing bowl until well combined. Set aside.
  3. In a medium-sized mixing bowl, whisk all the wet ingredients together until well combined.
  4. Pour the wet ingredients into the dry ingredients and gently whisk together until just combined. The batter should be semi-thick in consistency. Fold the chopped walnuts into the batter.
  5. Equally divide the batter between the prepared loaf pans and bake for 55 to 65 minutes, or until a toothpick inserted into the center of the cake comes out clean as baking times may vary.
  6. Remove from the oven once done and leave it to cool completely in its pan on a wire rack.
  7. Cinnamon Cream Cheese Frosting: Using a handheld (or stand) mixer, beat the cream cheese in a medium-sized bowl on medium-high speed until smooth and creamy.
  8. Beat in the butter, and then followed by the confectioners’ sugar, vanilla extract, cinnamon, and a pinch of salt over low speed until smooth and creamy. Taste and adjust to your liking.
  9. Once the carrot cake loaf has cooled, frost with the cinnamon cream cheese and top with roasted walnuts and shredded carrots.
  10. Slice, serve, and enjoy!

Spiced Carrot Cake Loaf

Storage tip: Store your carrot cake loaf without the frosting! Cover and store leftover loaf/slices at room temperature for up to 3-4 days or in the refrigerator for up to about 10 days. Store the frosting separately in the refrigerator for up to a week.

Before I end tonight’s post, I just want to say a special thank you to my Mom. She was the one who patiently taught me how to cook my favourite dishes when I was growing up. She was my #1 supporter. Thank you Mama for passing down your knowledge and love for food on to me. I know you’re proudly watching from above. I love you.

Spiced Carrot Cake Loaf with Cinnamon Cream Cheese Frosting

BON APPÉTIT

– Ally xx

Follow me on my social media accounts:
Facebook: Amcarmen’s Kitchen
Instagram: @amcarmenskitchen
TikTok: @amcarmenskitchen

myTaste.com

French Toast Wraps with Mixed Berry Compote & Vanilla Yoghurt

French Toast Wraps with Mixed Berry Compote & Vanilla Yoghurt

Hello Everyone! Yesterday I shared a recipe for a simple mixed berry compote, and tonight I’ll show you how you can use it in a sweet breakfast dish (or even for dessert), featuring Binda Valley’s Vanilla Bliss Natural Greek Style Yoghurt, courtesy of Gourmet Direct PH!

French Toast Wraps with Mixed Berry Compote & Vanilla Yoghurt

These French Toast Wraps are a creative cross between traditional French toast and crêpes. They are made by dipping wholewheat wraps in a mixture of egg, soy milk, cinnamon, nutmeg, and vanilla extract. Make sure that you dip the wraps in the egg mixture rather than soak. You can let them soak for 30 seconds or so, but it will make the wraps a touch more fragile to handle. They are then fried in butter on both sides until golden brown. For my recipe, I fried them in coconut oil as I realised I didn’t have any butter left in my fridge.

The result is a deliciously mouth-watering, crêpe-like wrap without the hassle of actually making crêpes from scratch. Fill the wraps with your yoghurt of choice, sweetened or unsweetened, and you can also mix up your choice of fruits and granola, and even use herbs such as basil or mint. You can even go for savoury French Toast Wraps if you want with this recipe!

French Toast Wraps with Mixed Berry Compote & Vanilla Yoghurt Ingredients

PREP TIME 10 MINS | COOKING TIME 10 MINS | SERVES 3

INGREDIENTS

For the French toast wraps

  • 6 wholewheat tortilla wraps
  • 1/2 cup soy milk
  • 1 large free range egg
  • 1 tsp vanilla extract
  • 1/2 tsp ground cinnamon
  • 1/4 tsp ground nutmeg
  • 3/4 cup Binda Valley’s Vanilla Bliss Natural Greek Style Yoghurt
  • 1 tbsp lemon juice
  • 1/2 tbsp honey
  • 1/3 cup mixed berry compote
  • 3 large bananas, peeled and sliced
  • Granola (with dried cranberries and pumpkin seeds)
  • Confectioners’ sugar (optional)
  • Coconut oil, for cooking

METHOD

  1. In a shallow bowl, add the soy milk, egg, vanilla extract, cinnamon, and nutmeg together. Whisk until well combined. Dip both sides of each tortilla in the egg mixture.
  2. Add the coconut oil to a pan over medium-high heat. Add the dipped tortilla to the pan and cook until golden brown, about 1 to 2 minutes on each side. Once done, transfer to a plate and repeat with the other tortillas.
  3. In a small bowl, mix the yoghurt, lemon juice, and honey together until well combined. Spoon the yoghurt mixture down the centre of each tortilla and top with the sliced bananas.
  4. Fold the sides of the tortilla over the top of the yoghurt and bananas, and top with the warmed mixed berry compote. Top with more sliced bananas, granola, and sprinkle with confectioners’ sugar (optional). Serve and enjoy immediately!

French Toast Wraps with Mixed Berry Compote & Vanilla Yoghurt

French Toast Wraps with Mixed Berry Compote & Vanilla Yoghurt

BON APPÉTIT

– Ally xx

Follow me on my social media accounts:
Facebook: Amcarmen’s Kitchen
Instagram: @amcarmenskitchen
TikTok: @amcarmenskitchen

myTaste.com

Mixed Berry Compote

Mixed Berry Compote

Hello Everyone! A great way to use up fruits, especially berries, that have been sitting in your fridge for a while and on the verge of over-ripening, is to make compote! I’ve made my fair share of compote when I was still living in Australia, usually using fresh, overripe berries as they are easily accessible when in season. While you can sometimes get fresh berries here in the Philippines, they’re really expensive which is why I opted to use frozen berries for this compote recipe that I will be sharing.

Mixed Berry Compote

Compote is a type of fruit spread that is made from slowly cooking whole or small fruit pieces combined with a sugar syrup. The three main ingredients for a compote are as follows:

  • Berries – fresh or frozen, whatever you have on hand,
  • Juices – any liquid with some tang i.e. lemon, lime, orange, or pomegranate juice, and
  • Sweeteners – sugar, honey, maple syrup, or other natural sweeteners.

Other than those three main ingredients, you may also add other flavours to enhance your compote. Some options include, but are not limited to orange zest, lemon zest, mint, or your favourite liqueur.

This mixed berry compote is best served over pancakes, toast, French toast, waffles, yoghurt, ice cream, or cheesecake. The possibilities are endless! Stick around tomorrow to see what I served my mixed berry compote over!

Mixed Berry Compote Ingredients

PREP TIME 5 MINS | COOKING TIME 10 MINS | SERVES 4

INGREDIENTS

  • 250g frozen mixed berries
  • 1/4 cup white granulated sugar
  • Zest of 1 lemon
  • Juice of half a lemon

METHOD

  1. Combine all the ingredients in a small saucepan.
  2. Over medium-high heat, bring the mixture to a boil until the berries break down and the compote thickens to your desired consistency, not more than 10 minutes.
  3. Serve over your choice of breakfast foods to satisfy your sweet tooth cravings in the morning. Enjoy!

I served mine over some delicious Vanilla Bliss Greek Style Yoghurt from Binda Valley. If you’re residing in the Philippines, you can get your fix of this yoghurt from Gourmet Direct PH.

Mixed Berry Compote & Binda Valley's Vanilla Bliss Yoghurt

You can easily make a large batch of compote and store them in the fridge, warming them up as you need them. Just be sure to keep the compote in an airtight container or sterlised jar. It should be able to last for up to 2 weeks when properly stored and refrigerated.

If you want to keep some around for even longer, you can always freeze it. Pour the compote into jars, then seal it while it is still hot. The compote will last in the freezer for up to 2 months.

BON APPÉTIT

– Ally xx

Follow me on my social media accounts:
Facebook: Amcarmen’s Kitchen
Instagram: @amcarmenskitchen
TikTok: @amcarmenskitchen

myTaste.com

Bengali Doi Maach (Fish in Yoghurt Curry)

Bengali Doi Maach (Fish in Yoghurt Curry)

Hello Everyone! I’m back with another recipe featuring one of Binda Valley’s products, specifically their Natural Greek Style Yoghurt that I received from Gourmet Direct PH last month. I featured smoothies in my previous posts and tonight I wanted to share a savoury recipe using yoghurt. As far as my knowledge goes, I know that yoghurt is commonly used as a marinade for chicken in savoury Indian dishes, but since I wanted to keep in line with only sharing pescatarian, vegetarian, or vegan recipes for my blog, I had to do further research for this.

Gourmet Direct PH x Binda Valley Yoghurt

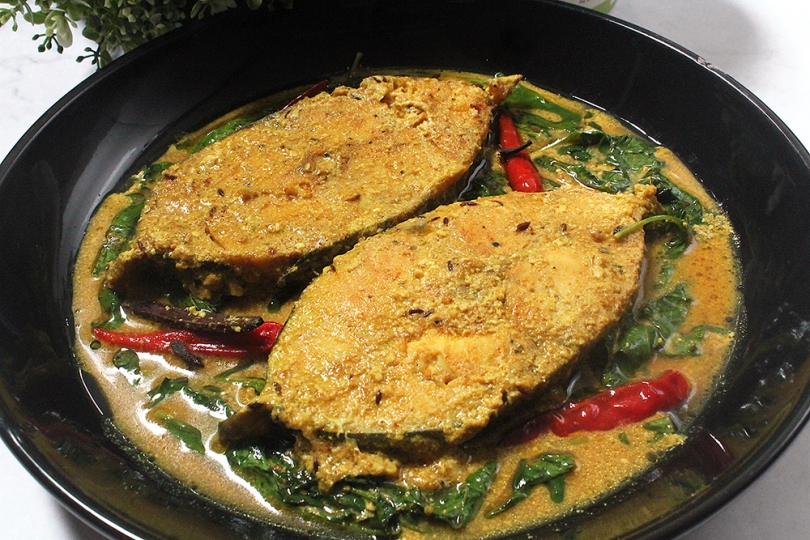
I typed ‘fish and yoghurt’ recipes into Google and a recipe for Bengali Doi Maach, or in English, Fish in Yoghurt Curry caught my attention. It is a deliciously thick, subtly spicy, and delicately sour fish curry. The fish is first marinated, lightly fried, and then simmered in a yoghurt-based gravy. The end result is a very tender and flavourful fish having absorbed the wonderful flavours of the gravy. The yoghurt and minimal spices used makes this dish light yet hearty, and is best served with basmati rice for a complete Indian meal.

Bengali Doi Maach (Fish in Yoghurt Curry)

Not only does it come together quickly, making it a perfect weeknight dish, it is also very cost effective. The ingredients for this dish are quite cheap and easy to find. You can use your choice of freshwater fish (the best would be thick, meaty fish) and get it simmering away with pantry staples. I literally had all the ingredients readily available in my pantry, which made me super excited to tackle this Doi Maach!

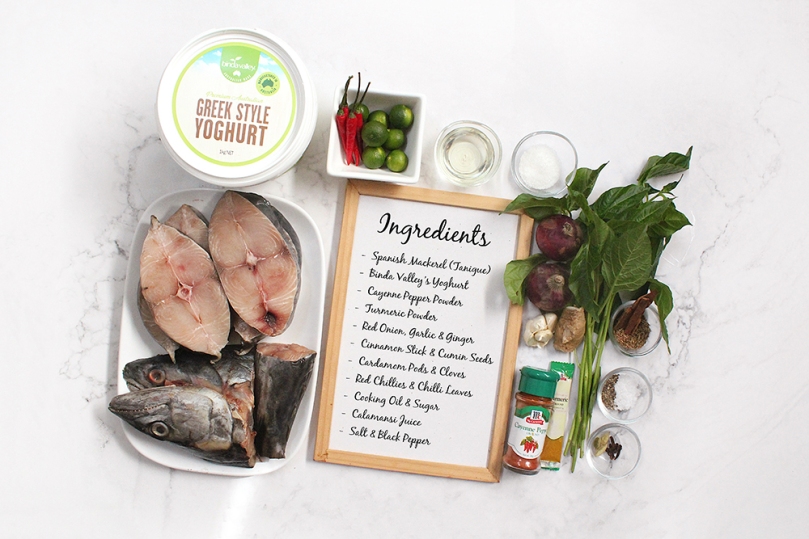
Bengali Doi Maach (Fish in Yoghurt Curry) Ingredients

PREP TIME 30 MINS | COOKING TIME 30 MINS | SERVES 6

INGREDIENTS

For the fish

  • 1 kg Spanish mackerel (tanigue, in Tagalog), sliced
  • 1 tbsp turmeric powder
  • 1 tbsp cayenne pepper powder
  • 2 tsp salt
  • 1 & 1/2 tsp ground black pepper
  • 1 tbsp coconut oil
  • 2 tbsp calamansi juice (or lemon/lime juice)
  • Cooking oil, for searing

For the yoghurt curry

  • 6 whole cloves
  • 4 red chillies (fresh or dried)
  • 3 green cardamom pods
  • 1-inch cinnamon stick
  • 1 tsp cumin seeds
  • 2 red onions, grated
  • 6 cloves garlic, grated
  • 1/2-inch ginger, grated
  • 1 cup water
  • 1 & 1/2 cups Binda Valley’s Natural Greek Style Yoghurt
  • 2 tsp sugar
  • Salt, to taste
  • Chilli leaves* (optional)

*Normally, this dish would be garnished with some coriander leaves, but if you know me, you know I detest the taste of coriander. So to add a pop of green to this dish, I used chilli leaves instead.

METHOD

  1. Combine all the ingredients for the fish marinade in a large mixing bowl, making sure the fish slices are evenly coated. Cover and set aside to marinate for at least 30 minutes to an hour.
  2. Heat enough oil in a large pan, over high heat and sear the marinated fish slices; work in batches if needed. Once done, remove from the pan and set aside.
  3. Remove any excess oil from the pan, leaving about 2 tablespoons and reduce the heat down to medium. Toast the spices (cloves, chillies, cardamom pods, cinnamon stick, and cumin seeds) until fragrant, before adding the grated onions, garlic, and ginger. Cook for about 30 to 45 seconds.
  4. Add half of the cup of water to the pan to deglaze it, and then add the yoghurt, stirring until it is incorporated into the water and spices mixture.
  5. Season with salt and sugar, and leave to simmer over medium-high heat for about 15 minutes, or until slightly reduced.
  6. Add the fried fish to the pan and cook for a further 10 minutes. In the last cooking minute, add the chilli leaves to the pan and cook until the leaves have just wilted.
  7. Transfer the fish curry to a serving dish and enjoy immediately with freshly steamed rice!

Bengali Doi Maach (Fish in Yoghurt Curry)

Bengali Doi Maach (Fish in Yoghurt Curry)

BON APPÉTIT

– Ally xx

Follow me on my social media accounts:
Facebook: Amcarmen’s Kitchen
Instagram: @amcarmenskitchen
TikTok: @amcarmenskitchen

myTaste.com

Yu Xiang Qie Zi (Spicy Sichuan Eggplant Stir-fry)

Yu Xiang Qie Zi (Spicy Sichuan Eggplant Stir-fry)

Hello Everyone! Back in May of last year, a foodie friend of mine and I started hosting open food collaborations on Instagram under the Foodies United PH group that we co-admin. Most of the food that I featured for the collaborations didn’t end up here on my blog; the reason being was that it didn’t fit with the theme. This is also part of the reason why I decided not to go with a theme for my blog for this year.

International Hot & Spicy Food Day Collaboration by Foodies United PH

This post was supposed to go up on Sunday, but I was having issues with WordPress at that time. Anyway, on Sunday 16 January 2022, we hosted a collaboration for International Hot & Spicy Food Day. I love spicy food, and I would say that my spice tolerance is above average. When I was brainstorming a dish for this collaboration, I had a faint memory of an eggplant dish that I had way back when I was still studying in Australia. I remember it being a spicy dish that I absolutely loved, but unfortunately could not remember what the dish was. So after some research, I think the closest to my vivid memory of the dish is Yu Xiang Qie Zi, or in English, Sichuan Eggplant, which is the dish that I am featuring to celebrate International Hot & Spicy Food Day.

Before we begin, here’s a fun fact: Yu Xiang literally translates to ‘fish-fragrant’ while Qie Zi means ‘eggplant’. Despite the literal translation, this dish does not actually have any fish in it. The term is actually a style of cooking for a particular Sichuan fish dish. Since this eggplant dish uses the same aromatics, sauce, and style of cooking, it was named Yu Xiang, preceding the Qie Zi.

Yu Xiang Qie Zi (Spicy Sichuan Eggplant Stir-fry)

Yu Xiang Qie Zi is essentially a Sichuan chilli garlic eggplant stir-fry, and can be cooked with or with minced pork. The addition of minced pork is to add more flavour to the dish, but you can completely leave this out to make this a vegetarian/vegan friendly dish. I wanted to add mince though for texture to contrast the eggplants. So I decided to try out Veega’s Meat-free Giniling (in English, mince) in place for the minced pork. I’ve been seeing this product all over social media for the past year and have been wanting to try it out, but to my surprise though, their meat-free giniling actually contains egg whites. I’m not sure if their other products also include egg (or derivatives) in them.

I checked to see if they are marketing their brand as vegan, which thankfully they aren’t, but did state they are a vegetarian line, which they should actually properly label as ovo-vegetarian (a person who does not eat meat or dairy products but does eat eggs and egg-derived ingredients) in my opinion. I did also see that they’ve started a vegan line with no egg or dairy in them – so this is something I look forward to trying as well!

Yu Xiang Qie Zi is a quick and easy dish that you can be put together with minimal effort in under 30 minutes, which makes it perfect for a weeknight lunch or dinner.

Yu Xiang Qie Zi (Spicy Sichuan Eggplant Stir-fry) Ingredients

PREP TIME 15 MINS | COOKING TIME 20 MINS | SERVES 5-6

INGREDIENTS

  • 6 long eggplants, halved and then cut into long strips
  • 1 tsp salt, for soaking
  • Cornstarch, for cooking
  • Oil, for frying
  • 200g Veega meat-free giniling (mince)
  • 1 tbsp doubanjiang (chilli bean paste)
  • 3 red chillies, minced
  • 2 dried red chillies, chopped
  • 3 tsp grated ginger
  • Spring onion (white part), chopped
  • 4 garlic cloves, finely minced

For the sauce

  • 1/3 cup water (or veggie stock)
  • 4 tbsp white granulated sugar
  • 3 tbsp black vinegar
  • 3 tbsp cornstarch
  • 2 tbsp light soy sauce
  • 1 & 1/2 tsp sichuan peppercorns, toasted and ground
  • 1/2 tsp salt

To garnish

  • Red chillies, chopped
  • Spring onion (green part), chopped

METHOD

  1. Sauce: Add all the ingredients for the sauce in a small bowl and mix to combine. Set aside.
  2. Eggplant: Soak the eggplant slices in salted water for about 15 minutes. Once done, drain and pat dry.
  3. Evenly coat the individual eggplant slices in cornstarch and shallow fry in a preheated pan over high heat, until browned. Remove and transfer to a plate lined with a paper towel to soak up any excess grease. Work in batches if needed. Set aside.
  4. Turn the heat down to medium and remove some of the oil, leaving behind about a tablespoon’s worth.
  5. Sichuan Eggplant: In the same pan, sauté the garlic, chillies, ginger, and white part of the spring onion until golden and fragrant, about 30 seconds.
  6. Add the meat-free mince and continue to cook, stirring for about 2 to 3 minutes, before adding the chilli bean paste and cooking for a further 3 to 4 minutes.
  7. Add the sauce mixture to the pan and cook until thickened. Turn the heat off.
  8. Immediately stir in the eggplant and then plate up. Garnish with the green part of the spring onion and extra chilli slices (optional). Serve with freshly steamed rice and enjoy!

Yu Xiang Qie Zi (Spicy Sichuan Eggplant Stir-fry)

BON APPÉTIT

– Ally xx

Follow me on my social media accounts:
Facebook: Amcarmen’s Kitchen
Instagram: @amcarmenskitchen
TikTok: @amcarmenskitchen

myTaste.com

Mantou Bruschetta

Mantou Bruschetta

Hello Everyone! Wishing all my family, friends, followers, and passersby a Happy New Year! I hope everyone had a good Christmas and New Year’s break to refresh, rejuvenate, and reflect asides from celebrating. I hope 2022 will be a better year for all of us.

For those who have been following my blog for a while now, you’ll all know that I always set a theme for the year. This year will be a little bit different. I won’t be setting a specific theme only because I have a backlog of recipes that I created last year but did not have a chance to post it on my blog. Rather than have it sit in my archives, I decided that I’ll spend the first few months of the year getting them up on the blog.

To kick off the new year, I will be sharing my recipes that I whipped up for the King Chef 2021 Challenge last year, starting with this non-traditional bruschetta recipe using mantou buns. We could create anything and everything as long as it featured any ingredient/product from Lee Kum Kee and King Chef, from the challenge kits provided.

Mantou Bruschetta

Like with many of my ideas, this Mantou Bruschetta came into mind while I was in the shower. For those who aren’t familiar with bruschetta, it is an Italian starter dish that consists of grilled bread that has been rubbed with garlic, and then topped with olive oil and salt. There are many variations for toppings, but the most popular and most known one outside of Italy is a mixture of basil, fresh tomato, garlic, onion, and mozzarella.

Traditionally, the best choice of bread for bruschetta is an Italian or French loaf – preferably a loaf of bread that has a thick crust and firm consistency. In fact, the dish was developed as a way of salvaging bread that was going stale. Though mantou buns don’t have either of those characteristics, I thought that I could use them as an option for this recipe. Now, As you can see in my photos, I may have pan-toasted them a little bit too much as they turned out to be darker in colour than I wanted them to be. It all worked out in the end in terms of flavour though; the browning gave the mantou bun slices an extra nutty flavour that complimented the sweetness of them.

Now that I got the King Chef product sorted out, I thought hard about what Lee Kum Kim product to incorporate from the challenge kit provided – between premium soy sauce or hoisin sauce. Since soy sauce is salty in taste, I decided to add this to the tomato topping for my bruschetta. So here’s my Chinese-Italian fusion of Mantou Bruschetta; it’s light and fresh, yet tangy and intense at the same time from the balsamic vinegar glaze. It is also sweet and nutty, making it the perfect antipasto to serve at your next dinner party!

Mantou Bruschetta Ingredients

PREP TIME 1 HOUR | COOKING TIME 5 MINS | SERVES 2-3

INGREDIENTS

For the mantou bruschetta

  • 4-5 pcs King Chef’s mantou buns, cut into 1-inch thick slices
  • Olive oil
  • Salted butter (or margarine)

For the tomato topping

  • 4 small-sized tomatoes, deseeded and chopped
  • 2 garlic clove, finely minced
  • 1 small red onion, diced
  • Handful of basil leaves, roughly chopped
  • Cracked black pepper, to taste
  • 1 tbsp extra virgin olive oil
  • 1 tsp Lee Kum Kee’s premium soy sauce
  • Balsamic vinegar glaze, to garnish

METHOD

  1. Tomato Topping: Add all the ingredients in a medium-sized bowl and mix until well combined. Set aside to chill in the fridge for at least an hour before serving.
  2. Mantou Bruschetta: Melt butter with a little bit of olive oil in a small non-stick pan over medium heat. Toast each side of the slice until browned to your liking. Once done, remove from the pan. Work in batches if needed.
  3. Plate up by topping each toasted mantou slice with about a tablespoon of the tomato mixture. Drizzle with some balsamic vinegar glaze, and top each with a small basil leaf. Serve and enjoy immediately.

Mantou Bruschetta

BON APPÉTIT

– Ally xx

Follow me on my social media accounts:
Facebook: Amcarmen’s Kitchen
Instagram: @amcarmenskitchen
TikTok: @amcarmenskitchen

myTaste.com

Pad Krapow (Thai Basil Tofu)

Pad Krapow (Thai Basil Tofu)

Hello everyone! This will be the last recipe that I will be sharing for the year on our Flavours of Southeast Asia journey. I’ve had to cut our journey short as the holiday season syndrome took over; basically all I wanted to do was just relax and take twice as long to get the things I needed done, actually done – for example this post! I had it up and ready to go two weeks ago but I hadn’t gotten around to editing the video for this to upload on my TikTok account, not until just this afternoon *cheeky grin*. So yes, our Flavours of Southeast Asia journey for 2021 will be ending here in Thailand tonight. Maybe next year I’ll cover some Vietnamese dishes to make up for this.

Tonight’s recipe is actually something I’ve been wanting to share on the blog for a while after coming across a vegetarian/vegan-friendly version of it on Instagram several times. Pad Krapow is a dish that I have tried many times before, but with chicken or pork (this was way back when I used to eat meat), so when I came across a version of it using tofu to make it meat-free, I knew I had to try this out.

There are three main types of basil used in Thai cooking: Thai sweet basil (ใบโหระพา bai horapa), or just referred to as Thai basil, lemon basil (ใบแมงลัก bai maenglak), and holy basil (ใบกะเพรา bai kra prao). Unfortunately it can be challenging to find holy basil outside of Thailand. You can still make this recipe using other basil variants, just be weary that it won’t have the same vibrant peppery flavour that holy basil has to give this dish its authentic Thai flavour profile.

Pad Krapow (Thai Basil Tofu)

Pad Krapow is usually served with steamed rice, but if you want to make it a little fancier without the extra carbs, serve it in a lettuce leaf and top each with a fried quail egg instead. I’ve also seen versions of pad krapow as a spaghetti dish so feel free to get creative when serving this dish up!

Now, I can’t exactly make it 100% vegan because pad krapow isn’t what it is without a fried egg where the edges of the egg white are crispy and browned to give it an added nutty flavour, but the yolk is still runny and creamy. So here’s an ovo-vegetarian Pad Krapow for you!

Pad Krapow (Thai Basil Tofu) Ingredients

PREP TIME 10 MINS | COOKING TIME 15 MINS | SERVES 2-3

INGREDIENTS

For the sauce

  • 2-3 garlic cloves, finely minced
  • 1 dried red chilli, chopped
  • 1 stalk scallion (white part only), chopped
  • 1 tsp grated ginger
  • 1 tbsp light soy sauce
  • 2 tbsp sweet soy sauce

For the tofu

  • 500g firm tofu, mashed
  • 2 tbsp coconut oil
  • 1 red onion, diced
  • 1 red bird’s eye chilli, chopped
  • 1 stalk scallion (white part only), chopped
  • 100g cremini mushrooms, diced
  • Salt and black pepper, to taste
  • 1 bunch Thai basil leaves

To serve with

  • Crispy Thai basil leaves
  • Fried quail eggs
  • Lettuce leaves

METHOD

  1. Sauce: Add all the ingredients for the sauce in a small bowl and mix well to combine. Set aside.
  2. Pad Krapow: Add a tablespoon of the oil into a large pan over medium-high heat. Cook the mashed tofu until dry. Remove from the pan.
  3. Add the remaining oil and the sauté the red onion, chilli, and scallion until fragrant, about 30 seconds, before adding the cremini mushrooms and cooking for a further 30 to 45 seconds.
  4. Add the mashed tofu back into the pan and mix to combine.
  5. Season with salt and black pepper, to taste, and add the sauce mixture to the tofu. Mix until well combined into the tofu, and cook for about 5 minutes.
  6. Add the Thai basil leaves and mix it into the tofu, then remove from the heat.
  7. Add about a tablespoon or more to a piece of lettuce, then top with a fried quail egg and some crispy-fried Thai basil leaves.
  8. Plate up, serve immediately, and enjoy!

Pad Krapow (Thai Basil Tofu)

Pad Krapow (Thai Basil Tofu)

BON APPÉTIT

– Ally xx

Follow me on my social media accounts:
Facebook: Amcarmen’s Kitchen
Instagram: @amcarmenskitchen
TikTok: @amcarmenskitchen

myTaste.com

Singapore Fish Head Curry

Singapore Fish Head Curry

Hello Everyone! It’s been a while since my last post here on the blog; I’ve been super busy with work since I moved to a new department in the beginning of October, and doing some freelance work on top of that. I’ve also been focusing on creating sponsored content for Instagram and participating in a TikTok Challenge this past month. Now that things have slowed down just a little bit, I finally found the time to sit down and write this post/recipe (just hours before this is going live), to share with everyone!

We still have three more countries to venture through on our Flavours of Southeast Asia before the year ends, so the coming weeks will just be quick stopovers – and first, we’re taking a stroll through the many hawker centers in Singapore for their famous Fish Head Curry!

Singapore Fish Head Curry

The dish is actually of South Indian origins, but has been popularised in countries such as Malaysia and Singapore where it was introduced by the Indian migrants when they moved to the region. Thus, this dish is more commonly found at many Indian eateries across Malaysia and Singapore, served typically as a main to steamed rice.

Of course, there’s no problem in using the whole fish, which is what I did, as opposed to just using the head. The main reason why the fish head is much sought after when making a curry is because the meat found at the jaws, below the gills, and at the back of the neck is the sweetest and most delicate. It is also where it absorbs the flavours of the curry best. The important thing is to use fresh fish, whether sea bream, sea bass, snapper, tilapia, or any other white-fleshed fish, and to not overcook it.

I’ve had this dish many times before during my travels to Singapore and have made it a couple of times before when I was still living in Brunei. This is the first time I am making it again at home after a couple of years. The curry is thick, creamy, aromatic, tangy, and spicy; best served with vegetables such as okra and eggplant to soak up all the gravy goodness.

Note that there are some ingredients that I could not source locally for this dish, eg. brown mustard seeds, fenugreek seeds, fresh galangal, and fish curry paste. The seeds I just left out, and used crushed galangal from a jar, and red curry paste instead.

Singapore Fish Head Curry Ingredients

PREP TIME 30 MINS | COOKING TIME 30 MINS | SERVES 4

INGREDIENTS

  • 1.5 kg red snapper fish, sliced
  • 2 tbsp cooking oil
  • 2 tsp cumin seeds
  • 15 pcs dried curry leaves
  • 3 pcs dried long red chillies
  • 3 tbsp red curry powder (or fish curry powder)
  • 2 tbsp tamarind paste
  • 2 tbsp coconut sugar
  • 200 ml coconut milk (or more if you want it creamier)
  • 2 tsp salt
  • 2 cups water (or fish stock)
  • 1 large tomato, cut into wedges
  • 1 bunch (5 pcs) okra, halved
  • 2 eggplants, halves lengthwise and then cut into 3 horizontally
  • Shredded scallion, to garnish

For the curry paste

  • 6 garlic cloves, peeled and chopped
  • 3 pcs red bird’s eye chillies (more if you want it spicier, or vice versa)
  • 2 stalks lemongrass (white part only), chopped
  • 1 medium-sized red onion, peeled and chopped
  • 1-inch sized ginger, peeled and chopped
  • 1-inch sized turmeric, peeled and chopped
  • 1 & 1/2 tsp crushed galangal paste
  • 1/4 cup water

METHOD

  1. Curry Paste: Pound all the ingredients together for the curry paste, except the water, using a mortar and pestle, until a smooth paste is formed. This should take about 10 to 15 minutes of elbow grease. Mix the water with the paste and then set aside until ready to use. Alternatively, you can place all the ingredients in a blender and blitz them into a smooth paste.
  2. Fish Head Curry: Heat 2 tablespoons of cook oil in a heavy-based pan over high heat. Fry the eggplant slices until browned and tender. Once done, set aside.
  3. Reduce the heat down to medium, and in the same pan toast the cumin seeds, curry leaves, and dried chillies. Cook until fragrant and be careful to not burn them.
  4. Add the curry paste and curry powder, cooking and stirring continuously for about 4 to 5 minutes or until the paste darkens in colour and the oils start to separate.
  5. Add the tamarind paste, coconut sugar, coconut milk, and season with salt. Stir and bring the mixture to a simmer before adding the water and tomato wedges. Bring to a boil.
  6. Once boiling, add the fish head (and fish slices) to the curry mixture. Cover and cook on low heat for 8 – 10 minutes or until the fish is cooked through. In the last minute or so, add the okra to the curry and cook until tender.
  7. Transfer the fish head curry to a serving dish, top with the fried eggplant, and garnish with some shredded scallions. Serve immediately with steamed rice and enjoy!

Singapore Fish Head Curry

Singapore Fish Head Curry

BON APPÉTIT

– Ally xx

Follow me on my social media accounts:
Facebook: Amcarmen’s Kitchen
Instagram: @amcarmenskitchen
TikTok: @amcarmenskitchen

myTaste.com

Tohu Thoke (Chickpea Tofu Salad)

Tohu Thoke (Chickpea Tofu Salad)

Hello Everyone! This will be the last Burmese recipe that I will be sharing on our Flavours of Southeast Asia journey throughMyanmar for the month of September. Next week we’ll be heading off to one of the remaining three Southeast Asian countries I have yet to cover for the year.

The recipe that I will be sharing tonight is a build on of the recipe for Tohu (Burmese Chickpea Tofu) that I shared last week. We’ll be turning the tohu into a delicious salad known as Tohu Thoke, or in English, Chickpea Tofu Salad. Ever since coming across this recipe, I’ve already made this salad three times this month – yes it’s THAT addicting! Not only does it taste oh-so good, it’s also very easy to put together which makes it ideal for a quick weeknight dinner, provided that you’ve made the chickpea tofu in batches and ahead of time. This salad is also perfect for vegetarians, vegans, and Meatless Mondays.

Tohu Thoke (Chickpea Tofu Salad)

Tohu Thoke is bright, tangy, refreshing, and meant to be eaten cold, therefore perfect for those hot summer days. By mixing both fresh and fried tohu together, you get creamy, silky-smooth, and crispy textures altogether. If you don’t fancy frying, then feel free to skip it. It’s nevertheless delicious with or without the fried aspect or not. Also, the triangle shape for the fried tofu pieces isn’t necessary; cut them into whatever shape you want; same goes for the fresh ones too.

The great thing about this salad is that it gives you the chance to get creative with it. As long as you keep the sour flavours of the tamarind dressing and balance with a hint of sweetness and heat (which is essential to Burmese cuisine), you can bulk up the salad with other vegetables or leafy greens to make it more substantial and a full meal on its own.

Tohu Thoke (Chickpea Tofu Salad) Ingredients

PREP TIME 15 MINS | COOKING TIME 10 MINS | SERVES 4

INGREDIENTS

For the tamarind dressing

  • 5 garlic cloves, finely minced
  • 1 stalk scallion (white part), thinly sliced
  • 2 tbsp tamarind paste
  • 1 tbsp water
  • 4 tsp coconut sugar
  • 2 tsp salt
  • 1 tsp cayenne pepper powder

For the tohu thoke

  • 1 recipe for Tohu (Burmese Chickpea Tofu), fresh and fried pieces
  • 10 cherry tomatoes, halved
  • 3 kaffir lime leaves, thinly sliced
  • 1 red chilli, finely minced
  • Handful of bean sprouts, blanched
  • 3 tbsp sesame oil

To garnish

  • Crispy shallots or garlic
  • Roasted peanuts, crushed
  • Scallions (green part), thinly sliced

METHOD

  1. Dressing: Combine all the ingredients in a small bowl. Mix and adjust the dressing to your taste. Set aside. Extra dressing can keep for up to 1 month in the refrigerator.
  2. Tohu Thoke: Add all the ingredients into a large mixing bowl. Add the tamarind dressing, about a quarter cup for this recipe, and gently toss everything together.
  3. Transfer to a serving plate and top with the garnishes. Serve immediately and enjoy!

Tohu Thoke (Chickpea Tofu Salad)

Tohu Thoke (Chickpea Tofu Salad)

BON APPÉTIT

– Ally xx

myTaste.com

Tohu (Burmese Chickpea Tofu)

Tohu (Burmese Chickpea Tofu)

Hello Everyone! This is probably one of the best food discoveries that I have come across from the many years of researching for Amcarmen’s Kitchen and experimenting in the kitchen.

Tohu, or in English, Burmese Tofu, is made using chickpea (besan) flour, mixed with water, a little salt, and if you want, turmeric powder, mainly to give it a more vibrant yellow colour. The mixture is then heated and stirred constantly, until it reaches a thick and creamy consistency. It is then transferred into a tray and allowed to set.

The end result is matte yellow in colour, jelly-like but firm in consistency, therefore it does not crumble when cut or sliced. It is basically the best of both worlds between silken tofu and egg tofu – you get the silkiness of the silken tofu and firmness from the egg tofu in this Burmese tofu. The best part? It is dairy, egg, and soy-free; perfect for vegetarians, vegan, and/or anyone with soy allergies!

1986

Additionally, chickpea flour is high in protein, fiber, and micronutrients, while being low in carbohydrates and calories. Half a cup of chickpea flour contains an impressive 11 grams of protein, 5 grams of fiber, and nutrients like folate, iron, magnesium, and zinc. Chickpea flour is also heart-healthy, making this Burmese tofu oh-so healthy!

In Myanmar, the tofu can be eaten fresh in a salad, deep fried to make tofu fritters, or sliced very thinly and dried to make crackers for deep frying. It is also used in curries as well for added protein if meat or poultry is unaffordable (especially amongst the poorer population).

I still have some besan flour on hand after making this recipe, so I can definitely say that I will be making more of these delicious Burmese tofu and experimenting them in certain dishes outside of Burmese cuisine!

Tohu (Burmese Chickpea Tofu)

PREP TIME 1 HOUR | COOKING TIME 8 MINS | SERVES 2-3

INGREDIENTS

  • 1 cup chickpea flour (also known as garbanzo bean flour or besan flour)
  • 1 tsp salt
  • 1/4 tsp ground turmeric (optional)
  • 3 cups water, divided
  • Oil

METHOD

  1. Lightly grease an 8-in x 8-in baking dish with a bit of neutral flavoured oil.
  2. Add the chickpea flour in a medium-sized mixing bowl together with the salt and, if using, the ground turmeric as well. Whisk to combine.
  3. Add 1 and a half cups of water to the flour and whisk until smooth.
  4. Add the remaining 1 and a half cups of water into a small saucepan and bring to a boil over high heat.
  5. Once boiling, reduce the heat to medium-high and slowly pour the chickpea flour mixture into the boiling water while continuing to whisk.
  6. Whisk over the heat until the mixture becomes really thick and glossy. This should take about 8 minutes in total.
  7. Once done, immediately pour the mixture into your prepared baking dish and leave it to cool down at room temperature for at least an hour. The longer you let it sit, the more water will drain out of the tofu and therefore firmer in texture.
  8. Cut into your desired shapes and sizes, depending on how you will use it. Enjoy it as it is, deep fried, or use it as a source of protein for other dishes.

Tohu (Burmese Chickpea Tofu)

Stay tuned next week to see what Burmese dish I will make with this Burmese Tofu!

Note: You can store the tofu in an airtight container and in the fridge for up to 3 days.

Tohu (Burmese Chickpea Tofu)

BON APPÉTIT

– Ally xx

myTaste.com