Apple Chicken Bake

Apple Chicken Bake

Hello Everyone! March is here which can only mean one thing for Amcarmen’s Kitchen. That’s right! A new month means a new fruit to play with and we’re all about Apples this March! More specifically we’re going to be playing around with Red Washington Apples only because they were on sale at Rustan’s Supermarket for only P28 apiece! I think they were originally priced at like P35 or something. I know it’s not much of a difference but other supermarkets have them priced at P230 or something per kilo, which is crazy!

Apple Chicken Bake

I’ll keep my introduction short tonight, as I am not feeling well today – the creative writing juices aren’t flowing at the moment, apologies for that. I didn’t want to start off my post in saying what happened, but you can read more about it at the end of the post.

Before we dive right into the recipe, please head on over to Taste of Home for the original recipe where I drew my inspiration.

Apple Chicken Bake Ingredients

PREP TIME 5 MINS* | COOKING TIME 30 MINS | SERVES 3

*Allow for up to 4-6 hours to marinate the chicken, or even better, overnight in the fridge. Remove from the fridge about an hour before baking to bring the meat back to room temperature.

INGREDIENTS

  • 3 whole chicken legs (about 1/2 kg)
  • 1 large brown onion, peeled and wedged
  • 1 large Red Washington Apple, washed and wedged
  • Freshly cracked black pepper

For the marinade

  • 5 whole cloves
  • 2-3 garlic cloves, peeled and crushed
  • 1 cinnamon bark
  • 1/3 cup Hickory BBQ sauce
  • 1/4 cup apple juice
  • 1 tbsp honey
  • 1/4 tsp ground nutmeg
  • 1/4 tsp salt
  • 1/4 tsp whole black peppercorns

Apple Chicken Bake Process

METHOD

  1. Combine the marinade ingredients in a small bowl. Dip the chicken whole legs into the marinade and then place skin side down into an oven-safe Pyrex dish.
  2. Pour the remaining marinade into the Pyrex dish, cover with cling wrap and then set aside in the fridge to marinate for about 4-6 hours or overnight.
  3. When ready to bake, remove from the fridge and turn the chicken legs over skin side up. Leave aside to bring to room temperature, about an hour.
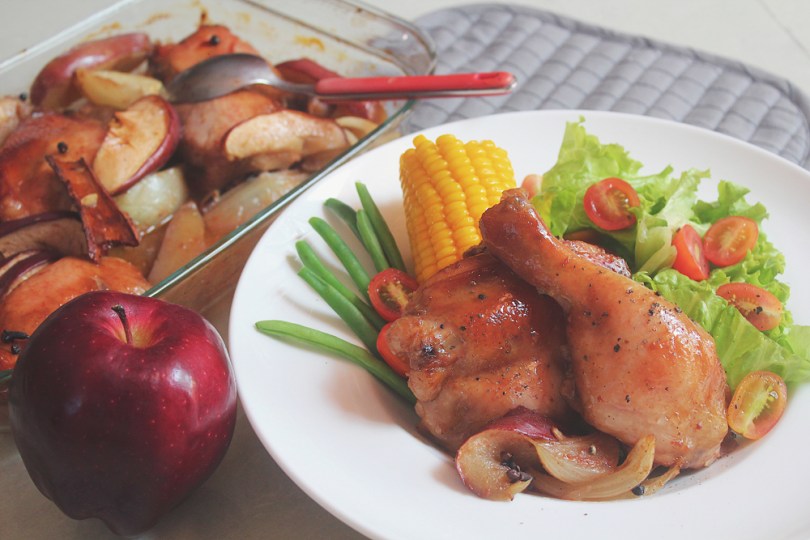
  4. Preheat oven to 200C (400F or gas mark 6). Scatter the wedged apples and onions onto the Pyrex dish, and season with a touch of freshly cracked black pepper. Bake in the oven for 30 minutes.
  5. Once done, turn the heat off. Drain the sauce into a small saucepan and place the chicken back into the oven to keep warm.
  6. Bring the sauce to a boil over medium-high heat. Once boiling, add slurry of cornstarch to the sauce to thicken it. Once thickened, turn the heat off.
  7. Serve with any sides of your choice. I served mine with a side of salad with cherry tomatoes and French beans, and corn on a cob.

Apple Chicken Bake Process

Apple Chicken Bake

Before I end tonight’s post, I would just like to say that it’s been one heck of a crazy week! So busy that I haven’t even had the time to plan and cook my dishes for this month ahead of time, which is what I usually do to stay on top of things. This is one of the reasons why tonight’s post isn’t as informative as my previous posts. The reason for that being is that I’m also suffering from piercing stomach pains and an irritable bowel syndrome, quite possibly due to food poisoning. I’m confined at home and hydrating lots. Hopefully I’ll be all good in the coming days and I can get back on track with my cooking and writing by the weekend or early next week!

BON APPÉTIT

– Ally xx

myTaste.com

Mango Mochi (マンゴー餅)

Mango Mochi (マンゴー餅)

Hello Everyone! Yes, I did mention earlier in the beginning of this month that I’d be tackling my mango recipes with a Thai influence – and tonight’s recipe that is far from that.

Let me explain.

When I was planning ahead for the month, I couldn’t think of any other Thai desserts that had mangoes in them other than the infamous Thai Mango Sticky Rice. Amongst my quest to find another dessert was Mango Mochi. Hardly Thai, in fact Japanese, but this was one of the desserts that popped up under the search term “Thai Mango Desserts” and from a site titled 14 Must-try Mango Desserts and the Best Places to Find Them in Bangkok. You must be thinking FOURTEEN desserts and you had to pick the non-Thai one?

Let me explain further.

I wanted to tackle a recipe that was firstly, less complicated in terms of the number of elements that it needed to be plated. So if it had more than, well, basically one element, I set aside. Secondly, I wanted to tackle a recipe with ingredients that I already had sitting in my pantry just so that I wouldn’t have to go and buy more things just for that one recipe. This is a problem that I constantly face and am trying to eliminate. Many times too often, in the past that is, I plan for recipes that require a heck load of ingredients that I don’t usually work with, or rather don’t work with that often. So if there are any leftovers, they end up sitting in the pantry or fridge until their shelf life date and eventually end up in the waste, i.e. flour and a variety of certain spices have been my worst enemies. I used to have a shelf of expired spices that have only been touched once or twice and that made my heart ache. What I try to do now is for example, if I need to buy nutmeg for one recipe, I make sure that future recipes will need nutmeg in them just so that I can use it up before or does not end up in the waste.

Mini tangent aside, that is how I made the final decision to take a stab at Mango Mochi though evidently not a traditional Thai dessert. I had all the ingredients readily available at home; all I really needed to buy were the mangoes and mango juice. With just a few ingredients and a simple recipe to follow, you’re in for a cracker of a dessert!

Mango Mochi (マンゴー餅)

Mochi is a Japanese rice cake made of mochigome, a short-grain japonica glutinous rice that is pounded into a paste and molded into various desired shapes and sizes. In Japan, mochi is traditionally made during a labour-intensive mochi-pounding ceremony known as mochitsuki. The glutinous rice is first soaked overnight and then steamed. The steamed rice is then mashed and pounded using wooden mallets (kine) in a traditional mortar (usu). The process involves two people, one pounding and the other turning and wetting the substance (mochi). The two must keep a steady rhythm or they may accidentally injure each other with the heavy kine. After this process of pounding, the mochi can be eaten immediately or formed into various shapes, usually a sphere or a cube.

Modern mochi making is far less labour-intensive. Plain and natural mochi is prepared from glutinous rice flour that is mixed with water and them steamed, or cooked in the microwave, until it forms a sticky and opaque substance that is malleable. Other than flour and water, other ingredients can be added such as sugar for sweetness and cornstarch to prevent it from sticking to basically anything from your hands to serving containers/dishes. On top of that, other ingredients can also be added for more flavour variants, and here enters my recipe for Mango Mochi!

Mango Mochi (マンゴー餅) Ingredients

PREP TIME 20 MINS | COOKING TIME 20 MINS | MAKES 10 BALLS

INGREDIENTS

  • 1 ripe mango, peeled and cubed
  • 1 & 1/4 cup glutinous rice flour
  • 1 can (340ml) mango juice or nectar
  • 3 tbsp white granulated sugar
  • Cornstarch
  • Shredded coconut (optional)

Note: Instead of using water, I used mango juice/nectar to flavour the rice cake itself to really heighten the mango flavour in the mochi. I know Gina Mango Nectar can be super sweet, and that is why I decided to lessen the amount of sugar in the mochi dough mixture. But for the initial ratios that I used, I found that the dough did need the extra sugar as it tasted rather flour-y than mango or sweet. I’ve adjusted the sugar quantities already in this recipe.

METHOD

  1. In a heatproof, medium-sized bowl, add the mango juice/nectar and sugar together and mix until well dissolved. Add in the rice flour, half cup at a time and mix until well blended and smooth.
  2. Place the bowl into a prepared steamer and steam for about 20 minutes or until a toothpick inserted in the middle of the steamed dough comes out clean.
  3. While waiting for the dough to cook, prepare the mango for the filling. Set aside in the fridge.
  4. Once the dough is done, remove from the steamer and leave it to cool down for about 10 to 15 minutes.
  5. Generously cover you hands with cornstarch and while the dough is still warm, scoop about a heaped tablespoon and roll the dough into medium sized balls.

Tip: Rolling the balls from the dough is the tough part. It is very sticky and somewhat difficult to work with. The more cornstarch you have on your hands and use, the less it will stick to you and the dough will be easier to work with. Also, the cooler the dough, the harder the dough will be to work with.

  1. Flatten the dough ball and place a mango cube in the middle. Close the ball tightly and place on a large serving plate dusted with cornstarch. Repeat until all of the dough is used, should make approximately 10 balls, less or more depending on the size.
  2. Optional, lightly brush the balls with water and then sprinkle the shredded coconut over the top.
  3. Chill in the fridge before serving and then enjoy!

Mango Mochi (マンゴー餅)

Mochi is best enjoyed immediately, especially if you opted to coat them with shredded coconut. They can be kept in the fridge for a short period of time, I’d say less than a week. If you’ve made a large batch of them and want to keep them for longer, then freezing them in an individual sealed plastic bag is recommended. Although they can be kept in the freezer for up to a year, it may lose its flavour and softness over time or may get freezer-burned.

BON APPÉTIT

– Ally xx

myTaste.com

Yam Pla Duk Fu (ยำปลาดุกฟู) Crispy Fish with Green Mango Salad

Yam Pla Duk Fu (ยำปลาดุกฟู) Crispy Fish with Green Mango Salad

Hello Everyone! Tonight’s dish branches out from the first recipe I shared with you guys at the beginning of this month. If you haven’t been able to check that recipe out, here it is again: Som Tam Mamuang (ส้มตำมะม่วง) Green Mango Salad.

Yam Pla Duk Fu (ยำปลาดุกฟู), or in English, Crispy Fish with Green Mango Salad, is a classic and much loved Thai “drinking food” of all time. The combination of a crispy exterior with moist fish meat on the inside, paired with a spicy, tart green mango salad is truly a match made in heaven. For all my alcohol-loving Filipino family, friends, and followers out there, give the sisig a rest and opt for a lighter and maybe healthier alternative to your pulutan and pair this humble fish dish with your beer. On the flip side, don’t think that you can limit this dish just for happy hour; it is also best paired with a cup of steamed rice for a delicious lunch or dinner.

Yam Pla Duk Fu (ยำปลาดุกฟู) Crispy Fish with Green Mango Salad

Traditionally, Thai charcoal-grilled catfish (pla duk) is used to make this dish, as it is widely available on the streets of Thailand. The fish is first grilled whole. Its flesh is then fluffed (fu) into tiny cotton-like flakes, and then deep-fried until crispy and golden brown. A simple green mango salad (yam) is then served alongside the crispy fluffy fish flakes.

You can see that the ingredients and process of making this dish literally translates into its name – Yam Pla Duk Fu. Since I’m not using catfish for this recipe, nor have I really paid attention to the ‘fluffing’ of the fish meat, my rendition of this dish can simply be called Yam Pla, just Salad Fish *cheeky grin*

Yam Pla Duk Fu (ยำปลาดุกฟู) Crispy Fish with Green Mango Salad

As I did further research into this dish, many restaurants in Thailand have opted to use other variants of fish. I’ve also seen various images of the dish where a whole fish is used instead of it being fluffed into flakes. At least I know I won’t be cursed for using a fish other than the traditional Thai catfish. I did find a rather angry blog post about why people are still insistent on calling the dish by its traditional name of Yam Pla Duk Fu when ‘duk fish’ isn’t even used. So before I too get bombed about titling this post by its traditional name where it’s far from it, just note that I did this just so that I could touch on the back-story of this dish.

This dish would otherwise be named, Yam Pla (ยำปลา) Fish Salad: My Rendition of the Traditional Yam Pla Duk Fu (ยำปลาดุกฟู) Crispy Fish with Green Mango Salad. That’s one heck of a long-ass title – reminds me of the days of how Fall Out Boy used to title their songs back in the day! One of my favourites: I’m Like a Lawyer with the Way I’m Always Trying to Get You Off (Me & You).

Yam Pla Duk Fu (ยำปลาดุกฟู) Crispy Fish with Green Mango Salad Ingredients

PREP TIME 15-20 MINS | COOKING TIME 10-12 MINS | SERVES 4

INGREDIENTS

For the Green Mango Salad

  • Som Tam Mamuang (ส้มตำมะม่วง) Green Mango Salad Recipe

For the Crispy Fish

  • 2 large tilapia fish (about 700g – 800g per fish), gutted and scaled
  • Ground salt and pepper, to taste

METHOD

  1. Prepare the Green Mango Salad according to the recipe (link provided above). Set aside.
  2. Season the fish with a touch of salt and ground black pepper on both sides and fry until browned and crispy, about 5-6 minutes per side. Once done, transfer to a serving dish.
  3. Top with the Green Mango Salad and serve with steamed jasmine rice, or a cold bevy of your choice.

Tip: We usually rub about a tablespoon of turmeric powder when frying fish for added flavour. I completely forgot to pick some up when grocery shopping hence why we’ve left it out, but if you do happen to have it lying around, use it!

Yam Pla Duk Fu (ยำปลาดุกฟู) Crispy Fish with Green Mango Salad

I know the recipe says 2 tilapia fish, but in the final shots of the dish there’s only one. It’s only because we had this dish for lunch and dinner for the day and instead of frying both for lunch, we fried the other when it came to dinner time so that it’d be hot and crispy for then!

Disclaimer: Again, like in last week’s post, I do apologise to any of my Thai followers, or any who have just stumbled upon my blog, and this post in particular. I’ve seen so many variations of the spelling for Yam Pla Duk Fu and I’m not sure if I’ve picked the right one! *cheeky grin*

BON APPÉTIT

– Ally xx

myTaste.com

Khao Neoo Mamuang (ข้าวเหนียวมะม่วง) Mango Sticky Rice

Khao Neoo Mamuang (ข้าวเหนียวมะม่วง) Mango Sticky Rice

Hello Everyone! Yes, besides sharing mango recipes on the blog for the month, I’ll also be tackling the fruit with a Thai influence. I mentioned in my post last week that Thai food is one of the many favourite cuisines that I enjoy – and let’s be honest here – I’m in the middle of satisfying my insane cravings for it!

Mango Sticky Rice is a traditional Thai dessert where the main ingredients needed are sticky glutinous rice, canned or fresh coconut milk, palm sugar, and mangoes. Although this dessert originated in Thailand, it is highly consumed throughout the Indo-China region of Southeast Asia such as Laos, Cambodia, and Vietnam. Mango Sticky Rice is usually only eaten during the peak mango season, which is during the summer months of April and May. Notable shops in Bangkok famous for their Mango Sticky Rice will only sell this dessert for 4 months per year from February to June.

Khao Neoo Mamuang (ข้าวเหนียวมะม่วง) Mango Sticky Rice

I can’t remember if the first time I had this dish was during a trip to Bangkok way back when, or at a Thai restaurant when I was still in Brunei – but nonetheless, I remember my Aunt (who is Thai) teaching me how to make this dish a couple of years back. At that time I wasn’t interested in cooking or food, so I didn’t realise then how easy it was to put this dish together and that is really only required the pantry essentials to make. Aside from having to get the mangoes from the market when I wanted to make this dish, I already had sugar, peanuts, coconut milk, and sticky rice at home.

To prepare the dish, the glutinous rice is first soaked in water and then cooked by steaming, or cooked in a rice cooker. I cooked mine over a gas stove together with the sugar and kept a very close eye on it. The coconut milk is heated, without boiling, separately with salt and then added to the cooked glutinous rice to flavour it. Mangoes are then peeled and sliced to serve with the rice, and smothered in more salted coconut milk. The result is just heavenly! If you’re a mango lover like me, then you’re definitely going to fall in love with this exotic Thai dessert.

Khao Neoo Mamuang (ข้าวเหนียวมะม่วง) Mango Sticky Rice

Disclaimer: I do apologise to any of my Thai followers, or any who have just stumbled upon my blog, and this post in particular. I’ve seen so many variations of the spelling for Khao Neoo Mamuang and I’m not sure if I’ve picked the right one! *cheeky grin*

Khao Neoo Mamuang (ข้าวเหนียวมะม่วง) Mango Sticky Rice Ingredients

PREP TIME 1 HOUR | COOKING TIME 30 MINS | SERVES 4-6

INGREDIENTS

  • 2 ripe mangoes, peeled and sliced
  • 1 cup sticky glutinous rice
  • 2 cups water
  • 1/2 cup coconut milk (fresh, canned, or frozen)
  • 2 tbsp white granulated sugar
  • 1/2 tsp salt
  • Roasted peanuts, roughly chopped to garnish

METHOD

  1. Sticky Glutinous Rice: Rinse the sticky glutinous rice and then leave to soak for about an hour. Drain was ready to use.
  2. Transfer the rice to a medium-sized non-stick cooking pot together with the 2 cups of water and the sugar. Bring to a slow simmer over low heat, partially covered with a lid (to leave room for steam to escape).
  3. Once simmering, leave to cook for a further 20 minutes or until the water has been absorbed by the rice. Turn the heat off, but leave the rice in the pot with the lid on tight. Allow it to sit for a further 5 to 10 minutes.
  4. Salted Coconut Sauce: While the rice is cooking away, prepare the salted coconut sauce by adding the coconut milk to a small saucepan together with the salt. Bring to a slow simmer over low heat, about 10 minutes. It is important to heat it slowly to avoid curdling the coconut milk. This happens when it is heated too quickly.
  5. Once done, turn the heat off and set aside. If your rice is already done at this point, then add half of the salted coconut sauce to the rice and give it a good mix. Set aside the other half of the sauce for later.

Tips: Experiment with naturally flavouring the sticky rice for another dept of flavour. I used juices from pandan leaves and ube (purple yam) when tackling this recipe. All you have to do is add these flavourings together before cooking the rice.

  1. Shape the sticky rice into logs and place on a serving plate. Top the rice logs with a slice of ripe mango and roasted peanuts.
  2. Drizzle with the remaining salted coconut sauce or use for dipping.
  3. Serve and enjoy while warm!

Khao Neoo Mamuang (ข้าวเหนียวมะม่วง) Mango Sticky Rice

Mango Sticky Rice is usually served differently with one big serving of rice and mango slices on the side. I decided to plate mine up differently after stumbling upon an Instagram post of Mango Sticky Rice “Sushi” hence why they look like nigiri!

BON APPÉTIT

– Ally xx

myTaste.com

Som Tam Mamuang (ส้มตำมะม่วง) Green Mango Salad

Som Tam Mamuang (ส้มตำมะม่วง) Green Mango Salad

Hello Everyone and welcome to an all new theme on Amcarmen’s Kitchen for the month of February! Well okay, it’s not exactly a new theme, but more like we get to play around with a new fruit for this month! In my very first post for the year I mentioned that it’s going to be a FRUITFUL year on the blog. Last month we went nuts for Coconuts and now we’re moving onto Mangoes!

From what I know, mango season here in the Philippines isn’t until March but you can already spot an abundance of mangoes at the markets for a reasonable price (well they are cheaper than a couple of months ago when they weren’t in season), and since they’re here early, I’ve been non-stop playing around with them for the dishes that I will be sharing with you guys over the next couple of weeks.

Also, just to note, I’m going to stray away from Filipino food for a while since I’ve been sharing dishes from that cuisine for the past 4 months on the blog ever since I’ve been back here. It’s not that I have anything against it (quite the opposite actually), it’s just that I want to continue exploring and enhancing my skills and techniques in other cuisines. Amcarmen’s Kitchen is afterall, A Third Culture Foodie.

Som Tam Mamuang (ส้มตำมะม่วง) Green Mango Salad Process

Thai food is one of the many favourite cuisines that I enjoy. It is also a cuisine that I’m constantly craving for from time to time, whether it’s heading to my favourite Thai restaurant or cooking up a Thai storm in the kitchen. I think my tolerance for spice was developed from this cuisine, though I am definitely not at their level of tolerance. Every time I order a Thai dish, I keep forgetting to tell the waiter to make it “less spicy” or to only add 1 chilli. I then end up tearing up, sniffling endlessly and needing to extinguish my mouth, followed by fiery trips to the bathroom after. I remember when I used to have Som Tam everyday for lunch from a food stall during events that I worked and forgot to tell the lady to make it less spicy – she ended up adding 10-15 pieces of chillies into the dish. The following day, I asked her to make it less spicy, but for them less spicy was still about 5-6 chillies in. I ended up having to tell her to only add 1 chilli the day after that and she looked at me weirdly.

Even though there are many recipes online that you can follow, I’ve had the opportunity to be taught by my Thai Aunt, and also learnt a few dishes from Chef Sujet Saenkham of Spice I Am, Australia, who I met last year in Brunei during an event I worked for the Thailand Grand Fair. Tonight’s dish is one I learnt from him, but I’ve replaced the green papaya for green mango instead. Note that, it’s not so much about how green the mango is – as long as it’s sour!

Som Tam Mamuang (ส้มตำมะม่วง) Green Mango Salad Ingredients

PREP TIME 15-20 MINS | COOKING TIME | SERVES 4-6

INGREDIENTS

  • 2 green mangoes, peeled and julienned
  • 3 pcs long green beans, cut into 1-inch long stalks
  • 2-3 red bird’s eye chillies, seeds in and roughly chopped (more if you want a spicier kick to your palette)
  • 2 small tomatoes, roughly chopped
  • 1 garlic clove, roughly chopped
  • 1 small red onion, roughly chopped
  • 2 tbsp dried salted shrimp
  • 2 tbsp roasted peanuts
  • 1 & 1/2 tbsp fish sauce
  • 1 & 1/2 tbsp fresh lime or lemon juice
  • 1 tbsp palm sugar
  • Spring Onions, to garnish

METHOD

  1. Lightly crush the garlic and chillies large and deep mortar and pestle.
  2. Add the dried salted shrimp together with the long green beans. Pound a few times to slightly bruise the beans. Add in the roasted peanuts and lightly crush.
  3. Next, add in the fish sauce, lime/lemon juice, and palm sugar. Lightly grind until the sugar has dissolved into the mixture.

Tip: At this point, taste the mixture to see if the balance of flavours is to your liking. Add more fish sauce if it needs more salt, or add more lime juice if it needs more acidity. Add more palm sugar if the other flavours are too overpowering. Want more spice? Crush more chillies!

  1. Add in the chopped tomatoes and lightly crush to bruise them a bit, followed by the julienned green mango and softly pound. Use a spoon to mix all the ingredients around while pounding. Be careful as to not over pound, grind, or crush the ingredients.
  2. Garnish with a spring onion and serve as a main or side dish. Enjoy!

Som Tam Mamuang (ส้มตำมะม่วง) Green Mango Salad

BON APPÉTIT

– Ally xx

myTaste.com

Spicy Chipotle Adobo Ribs sa Gata

Spicy Chipotle Adobo Ribs sa Gata

Hello Everyone! Okay I lied… Well not exactly. You see, last week I said that that would be my last Coconut post for the month. Technically it is since it’s already February, but I do have one more Coconut post to share *cheeky grin* The recipe that I’m going to share with you guys tonight was actually not planned at all. I didn’t want this to end up in my already growing archive of recipes that I never get around to posting because it doesn’t fit with the current theme that I have going. Lucky for me tonight’s dish still fits! Let’s just say that this is a special Chinese New Year post to welcome in the Year of the Pig!

I saw a post on Instagram a while back, towards the beginning of the year I believe, of a new dish that Max’s Restaurant put out which is their Adobo Ribs. I haven’t had the chance to try it yet, but it made me want to try it out at home for myself, with my own twists of course – the twists being adding chipotle peppers for a spicy kick and stewing them in coconut milk as well – to fit with the theme of course *cheeky grin*

Spicy Chipotle Adobo sa Gata (Marination Process)

Adobo can mean marinade, sauce, or seasoning. It is a highly popular Filipino dish amongst locals and even foreigners. I remember when I was still studying in Australia, my taxi driver asked me where I was from. I told him that I was born in Brunei, but a Filipino by blood. To which he replied, “Oh I love the Philippines! And I love… What’s that dish called? Chicken Adobo!” Basically any non-Filipino that I’ve talked to throughout the years, Chicken Adobo and Sinigang are their favourite Filipino dishes.

Anyway, the cooking process of adobo is indigenous to the Philippines. Pre-colonial Filipinos often cooked or prepared their food with vinegar and salt to keep them fresh longer in the tropical climates of the country. To make adobo, you start off by marinating any variant of meat, seafood, or vegetables in vinegar, soy sauce, fresh garlic, black peppercorns, and dried bay leaves. It is then simmered in the marinade until the meat is tender. The dish is characteristically salty and sour in taste.

Now adding gata to the classic adobo makes the dish not only hearty, but also rich and creamy. Would you believe me if I said I’ve never had adobo sa gata before? I mean, I’ve had adobo countless of times growing up, but never with gata – until about a few weeks ago when we had lunch out after our Sunday morning mass. It felt like I had discovered a whole new world of adobo!

Spicy Chipotle Adobo sa Gata Ingredients

PREP TIME 1 HOUR | COOKING TIME 45 MINS | SERVES 4

INGREDIENTS

  • 1 kg pork ribs
  • 5-6 dried bay leaves
  • 3 chipotle peppers in adobo sauce, sliced or minced
  • 3 garlic cloves, crushed
  • 2 garlic cloves, sliced thinly
  • 1/2 cup coconut milk (fresh, canned, or frozen)
  • 1/2 cup water
  • 1/2 cup white vinegar
  • 1/4 cup dark soy sauce
  • 1 tbsp whole black peppercorns
  • Red bird’s eye chilli, to garnish

METHOD

  1. In a large cooking pot, add the pork ribs together with the soy sauce, crushed garlic, whole black peppercorns, dried bay leaves, and chipotle peppers. Marinate for a minimum of 20 minutes. If you have time, marinate for an hour for the flavours to really infuse into the meat.
  2. Add the vinegar and water. Cover and cook over medium-high heat for about half an hour. Once done, turn the heat off and leave it aside, covered, for a further half an hour. The residual heat* from the cooking process will further cook and tenderise the meat.

*Residual heat, or residual cooking, or carry-over cooking, is when food continues to cook after it has been removed from a heat source. The heat held within the food itself raises its overall temperature before it starts to cool down.

  1. Meanwhile, heat about 2-3 tablespoons of oil in a small frying pan. Fry the garlic slices until golden brown, about 2-3 minutes. Drain and set aside.
  2. Turn the heat back on again on low and bring it back to a slow simmer. Once simmering, add the coconut milk in. It is important to slowly bring it back up to a simmer to avoid curdling the coconut milk. This happens when it is heated too quickly. Cook for a further 15 minutes.
  3. Once done, turn the heat off and transfer to a serving plate. Garnish with the fried garlic slices and chopped bird’s eye chillies. Serve with steamed jasmine rice and enjoy!

Spicy Chipotle Adobo sa Gata

Spicy Chipotle Adobo sa Gata

And with that, I would like to wish all my Chinese Family, Friends, Followers, and all those who are celebrating, a Happy Chinese New Year! May the Year of the Earth Pig bring you happiness, prosperity, good health, peace and success! 恭喜发财 Gōngxǐ fācái!

BON APPÉTIT

– Ally xx

myTaste.com

Crispy Pork Bicol Express

Crispy Pork Bicol Express

Hello Everyone! I can’t believe that this is the last recipe for my Coconut series on the blog – time sure does fly by in the wink of an eye. I’ve enjoyed cooking up a coconut storm in the kitchen for the past month, though I’ve realised that all my recipes (expect for one) focused on using Coconut Milk instead of the actual fruit itself *whoops* Nevertheless, I still covered the brief for the month… Hopefully. I did say in my very first post of the year that I will be “cooking with fruits or their… Derivatives“.

For my last Coconut recipe of the month, I will be sharing with you the ultimate Filipino Comfort Food (well let’s face it, almost every Filipino dish is worthy of the ‘ultimate’ title), known as Bicol Express.

Now, I can get into the whole in-depth history of its origins and disputes, but I honestly have no mental power right now to paraphrase the information I’ve read up on. For those who are interested, here’s an article on Market Manila I stumbled upon while trying to figure out why this dish is named ‘Bicol Express’ – which by the way until now remains a mystery to me. Other than it being a catchy name, it’s name is also derived from an overnight passenger train service from Manila to the Bicol region; a region in the Philippines that is famous for their spicy cuisine.

Crispy Pork Bicol Express

Bicol Express is a dish made from pork, bagoong (salted shrimp fry), coconut milk, and lots and lots of chillies that is of course adjustable to your tolerance of spice. Bicol Express is traditionally cooked by stewing the ingredients altogether while crisping up the pork first is just another creative way of enjoying the dish. I prefer it this way just because I love a nice crisp skin when it comes to pork. Roasting it rather than deep-frying it also makes me feel a little less guilty *cheeky grin* but unfortunately, truth be told that this dish is not exactly waist-friendly. Succulent pork belly cubes and a creamy coconut sauce does come with a price to pay!

Crispy Pork Bicol Express Ingredients

PREP TIME 10 MINS* | COOKING TIME 50 MINS | SERVES 4

*Allow of 24 hours of resting time in the fridge for the pork belly after boiled.

INGREDIENTS

For the lechon kawali

  • 1 kg pork belly
  • 6 dried bay leaves
  • 1 tsp ground salt
  • 1 tsp whole black peppercorns
  • Extra salt, for roasting

For the Bicol Express sauce

  • 2 cups coconut milk (fresh, canned, or frozen)
  • 1/2 cup pork stock (from boiling the pork)
  • 5 red bird’s eye chillies, sliced
  • 3 long green chillies, sliced
  • 2-3 cloves garlic, minced
  • 1 small red onion, roughly chopped
  • 3 tbsp bagoong alamang (salted shrimp fry)
  • Ground black pepper, to taste

METHOD

  1. Lechon Kawali: Score the pork belly skin with a very sharp knife. Place the meat in a large pot with water, 1 tsp of the whole peppercorns and half of the bay leaves. Boil for 20 minutes. Remove from the heat and drain, placing in a large bowl and let to cool to room temperature.

Tip: Do not throw out the remaining pork stock. Reserve the pork stock to make other dishes or to use as a soup base. Keep in the fridge for up to 5 days or in the freezer for up to 1 month.

  1. Once the meat has cooled down, refrigerate uncovered for at least 24 hours for a better result. Refrigerating the meat will help to draw out any remaining moisture. Remove from the refrigerator and bring back to room temperature prior to roasting in the oven.
  2. Preheat oven between 220-240C (425-475F or gas mark 7-9). Rub oil and plenty of salt into the scored skin, really getting it into the slits of the score marks. The fat under the skin will react to the salt and that is what makes the skin puff up and crisp up.
  3. Roast in the oven for 20 minutes and then bring the temperature down to 160C (325F or gas mark 3) and roast for another 10 minutes. Remove from the oven and let the meat rest for 20 minutes. Then cut the pork into chunks and plate.
  4. Bicol Express Sauce: While the pork is roasting in the oven, prepare the Bicol Express sauce by heating about a tablespoon of oil over medium-high in a medium-sized cooking pot. Sauté the minced garlic until golden brown and fragrant, about 30 seconds, and then add in the onions. Cook until soft, a further minute or so.
  5. Add the salted shrimp fry and cook for about 3-4 minutes before adding the coconut milk and pork stock. Lower the heat down and bring to a slow boil. It is important to bring it back to a boil slowly to avoid curdling the coconut milk. This happens when it is heated too quickly.
  6. Season the sauce with ground black pepper and add in the sliced red and green chillies (reserve some for garnishing later). Continue to cook the sauce until it starts to thicken and reduce by half, about 10-15 minutes further on low heat.
  7. Once the sauce is done, pour over the plated crispy pork belly chunks and garnish with the fresh chillies.
  8. Serve with steamed jasmine rice and pair with some sautéed long beans in garlic (or any other favourite vegetable dish of yours) to balance out the richness of the Bicol Express. Enjoy!

Crispy Pork Bicol Express

Before I end tonight’s post, I just want to say that next week I will be back with a new fruit to hero with my upcoming recipes to share so stay tuned for that!

BON APPÉTIT

– Ally xx

myTaste.com

Ginataang Halo-Halo (Binignit)

Ginataang Halo-Halo (Binignit)

Hello Everyone! For some reason I felt that the week went by so slowly, yet so fast at the same time. Has anyone ever had this feeling before? Maybe it’s because I’m growing bored of being home all week for the past several months. For those of you just tuning in, I quit my job back in Brunei last August 2018 and until present day have yet to find a new job to keep me busy. I’ve applied to many places and attended a handful of interviews, but none have been successful so far. I’m hoping to find a job soon – my savings are slowly deteriorating away…

Ginataang Halo-Halo (Binignit)

Anyway, small tangent aside, Ginataang Halo-Halo, or also known as Binignit in some parts of the Philippines, is a popular Filipino dessert dish. Aside from it being a dessert, it is also widely served as a mid-afternoon snack.

As mentioned in previous posts, Ginataan is a cooking process that involves stewing in coconut milk/cream. Halo-Halo, when directly translated into English means mix mix, is referred to the combination of different ingredients that are used to complete the dish – a mix mix of various root vegetables such as sweet potatoes, yams, and taro, plantains, tapioca pearls, and glutinous rice balls (bilo-bilo) are simmered in coconut milk. Bilo-bilo are glutinous rice balls simply made from a mixture of glutinous rice flour and water. You don’t have to add any colouring to them, I just made mine purple to add colour to the dish.

Ginataang Halo-Halo (Binignit) Bilo-Bilo

Most, or all recipes I guess of Ginataang Halo-Halo have shredded langka (jackfruit) in them. I personally don’t like langka, which is why I’ve omitted them from my recipe. Instead, I wanted to replace them with shredded young coconut flesh which I didn’t end up adding to the dish because they went off in the fridge having kept them in there for a few days before using it *whoops*

Ginataang Halo-Halo (Binignit) Ingredients

PREP TIME 25 MINS | COOKING TIME 2 HOURS | SERVES 6-8

INGREDIENTS

  • 3 cups coconut milk (fresh, canned, or frozen)
  • 2 cups water
  • 1 cup young coconut flesh, shredded
  • 3/4 cup white granulated white sugar
  • 2 tsp vanilla extract or essence
  • 3-4 pcs ripe plantains (saba), sliced
  • Medley of sweet potatoes (I used 1 medium-sized each of orange, yellow, and white), diced

For the bilo-bilo (makes about 20-24 balls)

  • 1 cup glutinous rice flour
  • 1/2 cup water
  • 1 tbsp purple food colouring (optional)

For the tapioca pearls

  • 1 cup big tapioca pearls (sago)
  • 6 cups water

METHOD

  1. Tapioca Pearls: Add the water to a large cooking pot and bring to a boil over high heat. Add in the tapioca pearls. Turn the heat down to medium, cover, and leave to boil for about 50 minutes. Check and stir every 10 minutes. Add more water if needed to prevent the pearls from sticking to the bottom of the pot and burning. Once done, turn the heat off and set aside.

Tip: For better results, leave the pearls in the cooking pot until it reaches back to room temperature. One hour of boiling will completely cook the pearls, but the core will still be slightly opaque. Leaving the pearls in the cooking pot for several hours (with the heat turned off) gives them a chance to absorb more water. Which makes the core translucent overtime.

  1. Bilo-bilo: Combine the purple food colouring and water together and add to the glutinous rice flour. Mix thoroughly – a soft yet sticky mixture should take form.
  2. Scoop about 1 & 1/2 to 2 teaspoons of the mixture and roll into a ball shaped figure using the palm of your hands. Wet your palms with a bit of water to prevent the mixture from sticking to your hands.
  3. Place the balls on a plate or container that has been dusted with a bit of glutinous rice flour to prevent them from sticking to the plate. Set aside.
  4. Ginataang Halo-Halo: Add the 2 cups of water to a large cooking pot and bring to a boil over medium-high heat. Add 3/4 cup of the coconut milk and bring to a slow boil. It is important to bring it back to a boil slowly to avoid curdling the coconut milk. This happens when it is heated too quickly.
  5. Once boiling again, add in the sweet potatoes and simmer for about 8 minutes.
  6. Pour in the remaining coconut milk together with the sugar, and glutinous rice balls. Stir and simmer for a further 5-7 minutes. Then add in the sliced plantains and simmer for an additional 2 minutes.
  7. Add in the young coconut flesh together with the cooked tapioca pearls. Stir for about a minute and then turn the heat off.
  8. Transfer to a large serving dish, or individual bowls. Serve either hot or cold and enjoy!

Ginataang Halo-Halo (Binignit)

I definitely prefer to have this dish warm for an afternoon snack. To have this right after a main meal might be too heavy for a dessert – just my opinion! And no! You don’t need basil leaves for this dish. It just so happens that I had some lying around from a dish I made for lunch that day and used a sprig of it to add some green for photography purposes only *cheeky grin*

BON APPÉTIT

– Ally xx

myTaste.com

Salmon Belly Paksiw sa Gata (Stewed in Vinegar & Coconut Milk)

Salmon Belly Paksiw sa Gata (Stewed in Vinegar & Coconut Milk)

Hello Everyone! I find it hard to believe that it’s already the middle of the month – oh how time flies by so quickly! I don’t have a long-winded tangent to go on about tonight so this post will most likely be shorter than the previous two.

Paksiw sa Gata is a Filipino cooking procedure that involves two cooking styles – Paksiw (stewed in vinegar), and Ginataan (stewed in coconut milk/cream). This cooking procedure is a quick and easy way of preparing a fish dish; a staple amongst Filipino families.

Salmon Belly Paksiw sa Gata (Stewed in Vinegar & Coconut Milk)

You can use other cuts of salmon such as the heads, tails, and the flesh itself. Likewise, you can also use other types of fish such as Threadfin Bream (Bisúgo) and this unnamed White/Silver Fish that my mom used to get from the markets in Brunei for her paksiw (without the gata) dishes that we grew up on. The only reason why it’s unnamed is because I don’t actually know the name of it *cheeky grin*

Besides the protein, it is also an easy dish to incorporate greens into. Bitter melon (ampalaya) leaves are most common, but not restricted to. I absolutely detest bitter melon and its leaves, and so I opted to use malunggay leaves for this dish. Other common/favourite alternatives include spinach, water spinach (kangkong), and chilli leaves.

Salmon Belly Paksiw sa Gata (Stewed in Vinegar & Coconut Milk) Ingredients

PREP TIME 10 MINS | COOKING TIME 20 MINS | SERVES 6

INGREDIENTS

  • 1 kg salmon belly, washed, scaled and, cut into large chunks
  • 1 cup coconut milk (fresh, canned, or frozen)
  • 1 cup water
  • 1/2 cup spicy vinegar*
  • 3 long green chillies
  • 3 red bird’s eye chillies**
  • 2-3 garlic cloves, crushed
  • 1 small red onion, quartered
  • 1 bunch malunggay leaves
  • Thumb-sized ginger, peeled and sliced
  • 1 tsp whole black peppercorns
  • Salt, to taste

*Or you can always use normal white vinegar if you don’t sit well with spice

**Optional – only if you want your paksiw sa gata to have a spicy kick to it or not

METHOD

  1. Add the ginger, garlic, onions, chillies, black peppercorns, vinegar, and water into a medium-sized cooking pot. Heat over medium-high and bring to a brisk boil. Continue boiling for about 10 minutes to allow the vinegar to cook and for the aromatics to infuse into the liquid.
  2. Turn the heat down to low, and slowly stir in the coconut milk in and season with a touch of salt. Bring to a slow boil. It is important to bring it back to a boil slowly to avoid curdling the coconut milk. This happens when it is heated too quickly.
  3. Add in the salmon belly chunks and allow to cook for a further 5-7 minutes before adding the malunggay leaves in. Turn the heat off and cover for about 30-60 seconds to allow the malunngay leaves to wilt.
  4. Transfer to a serving plate and enjoy with steamed jasmine rice. Paksiw and Ginataan dishes are always best eaten with rice!

Salmon Belly Paksiw sa Gata (Stewed in Vinegar & Coconut Milk)

This only just came into mind as I was finishing this post off. I thought back to popular (highly viewed) dish that I made a while back that also uses Salmon Belly (Pan-fried Salmon Bellies).

The next time I make this dish, I’m going to pan-fry my salmon bellies to get it nice and crisp. Then, cook the vinegar and coconut milk sauce separately and just pour it over the pan-fried bellies. There’s nothing I love more than a mouthful of crispy yet melt-in-the-mouth belly fat!

BON APPÉTIT

– Ally xx

myTaste.com

Buko Salad Crumble

Buko Salad Crumble

Hello Everyone! I hope you all had a smooth-running first week of the New Year and resolutions haven’t been broken yet. I stopped making resolutions a very long time ago because I never follow them anyway. Instead, I always like to set an intention for the New Year. Read further after the recipe to find out more.

Last week we (as in my family and I) hosted a potluck lunch on New Years Day. Our relative brought over a TON of food. Even though I asked them in advance what they would be bringing so that we wouldn’t double up on the same dishes, it was the quantity of each dish that went beyond my expectations. Amongst the dishes that they brought over was Buko Salad.

Buko Salad

Buko Salad, or in English, Sweet Young Coconut Salad, is a mainstay dessert dish served in every, or any special occasions such as fiestas or birthday parties. The main ingredient of this dessert is definitely freshly shredded young coconut meat, accompanies by fruit cocktail from a can, sugar palm fruit, coconut gel (nata de coco), condensed milk, and fresh cream. Some (i.e. me) like to add little chunks of cheese into it as well.

With an abundance of it from our potluck party, I could do two things:

Continue eating it as it is, or

Make another dessert out of it.

Which did I choose? Well both obviously! I continued to eat it as it is, and also shook things up with it. I already had the intention of making a Buko Pie Crumble for my series of Coconut Recipes for this month, and when I was eating a bowl of this Buko Salad while watching a teleseyre the day after the potluck, a light bulb flashed. I could totally use this Buko Slad mixture for my crumble instead!

Buko Salad Crumble

So just to let you know, my measuring cups and spoons were nowhere to be found. I mean, they are probably in a box that I have yet to unpack since moving back to the Philippines – but I wasn’t about to go look for them when I had the oven already preheating and the Buko Salad already in their cocottes. I followed my Peach Crumble recipe to make the crumble, but I ended up just eyeballing all the measurements. Still turned out good though! If not, even better than the one I made for my Peach Crumble.

I ended up having about half of the crumble mixture left over *cheeky grin* so I placed the extra mixture into the freezer and then made another crumble the next day with the apples we had sitting on our table from our 12 Round Fruits for the New Year.

Buko Salad Crumble Ingredients

PREP TIME 10 MINS | COOKING TIME 20-25 MINS | SERVES 4

INGREDIENTS

For the crumble topping

  • 100g salted butter (cold), cut into little cubes
  • 1 cup plain flour
  • 2/3 cup white granulated sugar
  • 1/3 cup walnuts, roughly chopped
  • Ube Ice cream, optional

*Or you can always make a fresh batch to make this crumble.

METHOD

  1. Preheat oven to 190C (375F or gas mark 5).
  2. Divide the buko salad equally into 4 mini-cocottes, filling about half or three-quarters of the way. Set aside.
  3. Add the sugar together with the butter, flour, and walnuts in a medium sized mixing bowl that has been chilled in the freezer for about 10 minutes (this is to help keep the butter chilled when making the crumbled).
  4. With your fingertips, quickly mix the ingredients together until looks like rough breadcrumbs. If your mixture is too warm, put the bowl into the refrigerator for 15 minutes and start again when it has chilled.
  5. Top the buko salad with about 2-3 tablespoons of the crumble mixture.
  6. Place the mini cocottes on a baking tray and into the oven. Bake for 20 minutes, uncovered.
  7. If your crumble topping is still towards the blonde side, turn the grill on and bake for a further 5 minutes or until the crumble starts to brown.
  8. Serve hot out of the oven or at room temperature with ube ice cream (optional).

Buko Salad Crumble

Buko Salad Crumble


So, I initially wrote the following up at the beginning of the post, not knowing that I would be getting personal with two long paragraphs. I didn’t want to start my post of with this so I moved it for after the recipe for those who want to read on.

I mentioned in the beginning that I’m not one to make resolutions. Instead, I set an intention. Last year I tackled things with a “there is a difference between giving up and knowing when you’ve had enough” mindset and it definitely worked. The two things that bothered me when I entered the New Year last year were:

My Job, and

A Man/Men in general.

I hit a low point with my job. I wasn’t enjoying what I was doing anymore and to make things even worse, the environment and the toxicity of the people that surrounded me really affected my work and the way I worked. It also affected the way I interacted with my family and friends outside of the workplace – I was always grumpy and always avoided socialising with my friends. For 3 years I put up with this environment, and I let it consume me because I didn’t want to show others that I was weak for letting the people at work get to me. I didn’t want to give up. I wanted to fight. I reminded myself that: there is a difference between giving up and knowing when you’ve had enough. I didn’t give up. I knew that I definitely had enough. I put my foot down and filed for resignation early that year and I’ve never looked back.

Towards the second half of 2017, I met a man and we both fell in love with each other. It was a bit difficult seeing as he was all the way in the States and I was still working in Brunei at that time. We talked everyday. Made future plans together. Heck even made a bucket-list of things we’d do together. Shortly after, things started to die down. He started talking to me less and less each day even though I still tried just to keep things going. Eventually he stopped. He disappeared. He ghosted me as if I never existed at all. I stopped trying. I realised in time that we never really loved each other; we both just fell in love with the idea of falling in love. Did I give up on him? No. I just knew that I had enough trying to convince him and myself that it was love. After him, I had enough with men in general. I stopped looking for love and reminded myself that it’ll come when it comes.

So what is my intention for 2019? To be honest I haven’t thought much about it, but I looked at myself and where I am in life right now. What do I want to achieve by the end of the year? And this is it:

Go with the flow. Force Nothing. Let it happen.

Trusting that whichever way it goes, it’s for the best.

Happy New Year once again to all!

Buko Salad Crumble

BON APPÉTIT

– Ally xx

myTaste.com