Classic New York Style Pizza Dough

Classic New York Style Pizza Dough

Hello Everyone! It been a while since I last posted, and I had my reasons for that. If you aren’t following my page on Facebook, then you would’ve missed out on the announcement I made over there. I decided to take two weeks off as during those past weeks I was busy finishing up a submission so that I can hopefully graduate from my degree, finalising my packing (seriously packing up 4 years of your life was a pain), and travelling to two countries altogether in that span of two weeks. I’ve finally settled down in my hometown Brunei and have a whole lot of recipes lined up for the next month. During this time I will also be travelling so I do apologise if things aren’t running as smoothly as it was before.

Classic New York Style Pizza Dough

Before I left the beautiful city of Sydney, I had been firing up the oven and creating a few homemade pizzas. So for the next two weeks on the blog, I will be covering these recipes, kicking off with how to make your own basic pizza dough! Now, if you don’t have a pizza oven, you can still make pizzas in a regular oven. It is highly recommended that you get a pizza stone as well if you want to cook them in the oven so that your pizza cooks all the way through without taking forever to do so.

I was inspired to try out making my own range pizzas from the lovely Tara; she celebrated her birthday last year with a DIY pizza night at her place. And the pizzas that came out of the oven that night were to die for! I simply had to do a repeat – all for myself that is! *cheeky grin* Anyway, this simple pizza dough recipe should be able to make one large pizza or two small pizzas. Also, you can find the original recipe that I followed on American Food.

Classic New York Style Pizza Dough Ingredients

PREP TIME 2 HOURS 35 MINS | COOKING TIME | MAKES DOUGH FOR 2 REGULAR-SIZED PIZZAS

INGREDIENTS

  • 2 & 1/2 cups bread and pizza flour, plus 1/2 cup extra
  • 1 cup lukewarm water (not hot!)
  • 2 tbsp extra virgin olive oil, plus extra
  • 1/2 tbsp white sugar
  • 2 & 1/4 tsp instant dry active yeast
  • 1 & 1/2 tsp salt

METHOD

  1. Start by adding the water, yeast, and sugar, and a 1/2 cup of the flour into a large mixing bowl. Stir well and let it sit for at least 20 minutes to proof. The mixture should become bubbly, if not then your yeast is probably dead and you will have to start your mixture all over again. To check if your yeast is still alive, proof it first by using the same ingredients excluding the flour.
  2. Then, add in the olive oil, salt, and the remaining 2 cups of flour, and mix with a spatula or wooden spoon until it is together enough to turn out onto a lightly floured work surface to knead.
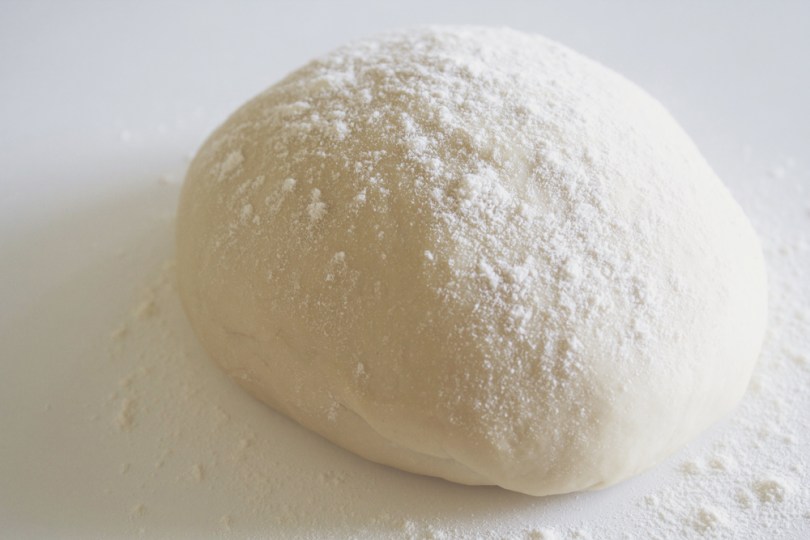
  3. Knead the dough for about 10 minutes, while adding more flour a little at a time. The dough should be soft, elastic and slightly sticky dough. Add just enough flour to keep it from sticking to the work surface as you knead.
  4. Form the dough into a ball and place in a large oiled bowl. Drizzle a few drops of oil and coat the top of dough to prevent the surface from becoming dry. Place a kitchen towel over the bowl and place in a warm spot for 2 hours, or until the dough doubles in size.
  5. Punch down the dough and divide into 2 balls. Place in large zip lock plastic bags and refrigerate overnight.
  6. When ready to use, remove from fridge, and let the dough come up to room temperature before using.

Classic New York Style Pizza Dough

Classic New York Style Pizza Dough

Classic New York Style Pizza Dough

Stay tuned for the next upcoming two weeks for some easy pizza toppings that are sure to please either yourself or a crowd! Likewise, you can get creative yourself and come up with your favourite flavour combinations to top your own pizza now that you’ve got the dough down.

BON APPÉTIT

– Ally xx

myTaste.com

Chicken Adobo

Chicken Adobo

Hello Everyone! For those of you who don’t know (or haven’t read the about me section of this blog), I was born and bred in Brunei, but I have the blood of the Philippines running in my veins. Even though I have never really lived in my country of residence, I am very familiar with the many cuisines the Philippines has to offer. This is through my travels to the Philippines, and of course also from my mothers cooking.

Tonight’s recipe is one that was always on the menu when I was growing up as a kid, and up to today, it is one of my go to dishes if I want a quick and hassle-free dinner. Its got the proteins, and all you really need is to load it up with carbs, which usually is just steamed rice and a side of boiled veggies to go with it. A perfect meal (well for me that is), especially since I get home at around 8/8:30pm after a good workout at the gym, a hassle-free dinner is just what I need. All you really have to do is add all the ingredients to a pot, simmer for 20 minutes and ta-da! How easy is that? I’ve read other recipes where it says to marinate the chicken beforehand anywhere from 30 minutes to 3 hours, but I honestly don’t think it needs the marinating, it tastes just as good the way my mom taught me how to make it!

Chicken Adobo is a very famous Filipino dish. I say famous because, besides swear words being the number one thing people say they know when I tell them I am Filipino, “do you know how to cook Chicken Adobo?” is the next thing they’d ask. It may not look that appetising; I know, I struggled to make Chicken Adobo look aesthetically pleasing on a plate but I just couldn’t, but believe me when I say this dish tastes amazing!

Chicken Adobo Ingredients

PREP TIME 5 MINS | COOKING TIME 20-25 MINS | SERVES 4

INGREDIENTS

Chicken Adobo Ingredients

METHOD

  1. Combine all ingredients in a large pot. Cover and bring to boil. Once boiling, lower the heat and let it simmer for about 20 to 25 minutes until sauce is reduced and thickened, and the chicken is tender. The great thing about this is you don’t have to stir it around!
  2. Serve with steamed rice and a side of veggies of your choice.

Chicken Adobo

As you can see the chicken does produce a lot of oil, so what I usually do is separate the chicken and set the sauce aside in the fridge for a few hours until the oil has settled. Once it has settled, I then scoop out the oil and heat the sauce up again.

BON APPÉTIT

– Ally xx

myTaste.com

Greek-inspired Barley Salad

Greek-inspired Barley Salad

Hello Everyone! I can’t believe that it’s already February, which means sad times ahead as I only have less than two week in this beautiful city I have been calling home for the past 4 years. I’m finding it difficult to wrap my head around the fact that once I leave, the possibility of coming back is unlikely. Yes I will be back for graduation, but after that it’s quite possible that it’s sayōnara for good.

So why am I starting off my blog post on this matter? Well it’s because leaving and knowing you won’t be back in a long time has me in this cleaning-up-the-pantry phase. I discovered that I have a tin of pearl barley in my pantry and so I wanted to make use of this. I came across a recipe on the Food Network for a Barley Greek Salad and decided to give this a try. I didn’t change much of the recipe besides the fact that I used balsamic vinegar instead of red wine vinegar only because I had about a quarter of a bottle left of balsamic. I didn’t want to buy a whole new bottle of red wine vinegar seeing as I didn’t have any (since my whole point is to clear the pantry)! I also decided to throw in some avocado chunks instead of cucumber because for those who know me, cucumber isn’t my thing.

Greek-inspired Barley Salad

Easy, simple, and packed with lots of flavour. Good for a light and healthy (I presume) lunch or as a side to a classic Aussie summer BBQ. The flavours worked really well together; you’ve got the saltiness from the olives, counterbalanced with the acidity of the balsamic vinegar. You’ve got the freshness of the added vegetables as well as the crunch from the diced capsicum, chewiness from the pearl barley, and creaminess of the avocado. Like fireworks in your mouth I tell you; an absolute burst of flavours to the palette!

Greek-inspired Barley Salad Ingredients

PREP TIME 15 MINS | COOKING TIME 45 MINS | SERVES 4

INGREDIENTS

  • 1 cup pearl barley
  • 1/2 cup danish feta cheese, crumbled
  • 1/2 cup kalamata olives, pitted
  • 1 avocado, pitted and cut into chunks
  • 1 punnet (250g) cherry tomato medley, quartered
  • 1 small red capsicum, seeded, ribs removed, and diced
  • 1 small red spanish onion, minced
  • 3 tbsp balsamic (or red wine) vinegar
  • 3 tbsp fresh mint leaves, torn
  • 2 tbsp extra-virgin olive oil
  • Freshly ground black pepper
  • Pinch of salt

METHOD

  1. Combine the barley, 3 cups water, and a pinch salt in a medium-sized saucepan and bring to a boil. Once boiling, reduce the heat to low and simmer until the barley is tender, approximately 45 minutes. Strain* and set aside to cool.
  2. Combine the tomatoes, feta, olives, mint, capsicum and shallots in a large bowl. Once the barley has cooled down, add it to the bowl. Set aside.
  3. Whisk together the balsamic vinegar and olive oil in a separate small bowl. Season with salt and pepper, and dress the salad and toss to combine. Cover with plastic wrap and place in the refrigerator until ready to serve. It’s best to make the barley salad at least 3 hours ahead of time so the flavours have time to incorporate and mingle into each other.

*Optional: when straining the barley, reserve the water for drinking. There are numerous health benefits associated to drinking barley water such as lowering cholesterol levels in the body because of its high fibre content. Barley water also helps reduce the risk of developing type-2 diabetes. It is a good source of magnesium, which reacts with various enzymes involving glucose levels in the body. To find out more about the health benefits of barley water, check out the Diet Health Club.

Greek-inspired Barley Salad

BON APPÉTIT

– Ally xx

myTaste.com

Pappardelle al Ragù

Pappardelle al Ragù

Hello Everyone! So today’s recipe is sort of a carry on from Monday’s special. If you’re like me, living by yourself, having a whole roast leg of lamb to yourself, you’re bound to have leftovers. What do you do? Lamb Ragù! Well, I’m pretty sure you can come up with other dishes to use your leftovers, if you have any that is, or you could always go out and buy lamb shanks or any other cuts that work for this dish.

I decided to go for a lamb ragù because not too long ago, exactly two weeks ago actually now that I think of it, a friend of mine planned for a little celebration for completing our degrees! We had dinner at the Westfield in Pitt Street, at a place called Janus Italian, and apparently she tried to book Jamie’s Italian but they are all booked out for groups until April! But nonetheless, Janus Italian was a nice dining place too – not to mention spacious as we had the whole back area to ourselves, well illuminated, and we could basically hear each other talk without having to shout across the table – all of which we probably wouldn’t have had/been able to do at Jamie’s. Seriously, though the food at Jamie’s is superb, it’s cramped, dark, and loud. Anyway, where I am getting at with this is that I had the Pappardelle al Ragù with slow cooked lamb. It was the best thing I’ve ever had! I even had the entrée sized dish and I was full about three quarters of the way into my dish. It was so good that when I knew I’d be making a roast leg of lamb, I would be able to make this too! Original recipe for slow-cooked lamb ragù can be found on Taste.

Pappardelle al Ragù Ingredients

PREP TIME 210 MINS | COOKING TIME 3 HOURS | SERVES 4-6

INGREDIENTS

  • 1kg roast leg of lamb meat
  • 500g pappardelle pasta
  • 1 can (400g) diced tomatoes
  • 3 celery sticks, sliced
  • 2 garlic cloves, crushed and then minced
  • 2 red bird’s eye chillies, sliced
  • 1 large carrot, peeled and cut into small chunks
  • 1 large spanish onion, finely chopped
  • 1/2 cup red wine
  • 1/4 cup fresh herbs such as rosemary and thyme, chopped
  • 2 tbsp extra virgin olive oil
  • 2 tbsp tomato paste
  • 1 chicken stock cube
  • Shaved parmesan cheese, to serve
  • Salt and pepper to taste

METHOD

  1. Preheat  oven to 220C.
  2. Heat olive oil in a large, frying pan over medium-high heat. Add in the garlic, chillies, and fresh herbs. Sauté until fragrant and then add the onions in. Cook until the onions are soft before adding the carrots and celery in. Season with salt and pepper, and cook for a further 10 to 12 minutes, stirring continuously.
  3. While the vegetables are cooking, add the lamb meat as well as the bones to a casserole dish (in my case I just used my rectangle pyrex dish).
  4. Add the red wine and leave to cook for about a minute or two before adding the the diced tomatoes, stock cubes, tomato paste, and about 2 cups of cold water. Stir to combine and then bring to a boil.
  5. Once boiled, remove from the heat are carefully scoop out the vegetables transfer them to the pyrex dish with the lamb meat. Then pour the liquid into the dish. Cover using aluminium foil, or with the lid if using a casserole dish with a lid, and place in oven to cook for about 3 hours or until tender.
  6. Once the lamb is done, get started on your pappardelle pasta. Bring a medium-sized saucepan of salted water to a boil. Cook the pasta according to the packet instructions, until al dente. Drain and transfer to a serving plate. Top with the lamb ragù and shaved parmesan. Serve!

Pappardelle al Ragù

Pappardelle al Ragù

BON APPÉTIT

– Ally xx

myTaste.com

Breakfast Muffins: Vegemite & Cheese

Breakfast Muffins: Vegemite & Cheese

Hello Everyone! Knowing that Muffin Making Monday would fall on ‘Straya Day, I just knew I had to make these muffins. All I can say is that when I was out doing groceries over the weekend, I had so many doubts about this, and I could not even comprehend WHY I decided to do this. I even struggled to place the tiny jar of vegemite into my trolley of groceries. I just could not bring myself to, but in my head I kept saying, “just do it. Do it for ‘Straya Day” and I did (what am I doing to myself).

Besides lamb, vegemite is another ‘Australian thing’. Vegemite has appeared on my blog once before, but for those of you who don’t know, vegemite is like the Australian version of marmite, a popular spread for sandwiches, toast, crumpets, crackers, and as well as a filling for various pastries. It is salty, slightly bitter, and apparently is similar to beef bouillon. You’ll either love it or hate it, and I did mention before that I am on the hateful side. The smell for me is a bit off-putting, and I know Vidhya hates it too, so I kept shoving the jar of vegemite up her nose whenever I had the chance to *cheeky grin*.

Breakfast Muffins: Vegemite & Cheese

I was too scared to bake a whole dozen muffins because I wasn’t too sure on how the taste would go down with me, so I only baked half a dozen, however, please note that the recipe below is for a full dozen – if you’re like me and don’t want to end up having to throw away the whole batch after eating one, then just half the measurements from the recipe below! Also, a little side note, I followed Sally’s master muffin mix recipe for these, and then added the vegemite and cheese. I only added about a tablespoon of vegemite as I was again afraid that the saltiness of it would overpower the taste of the muffin. But I can tell you that the batter smelled amazingly good!

But to be completely honest, these muffins did NOT taste as bad as I thought they would. It’s sort of like a taste that I cannot really describe. The only issue I had with them this morning was that because knowing that there was vegemite in them, I gagged a couple of times before even putting them in my mouth, so it kind of threw me off just a little bit. Nevertheless, the muffins were beautifully moist though, and I think that all the other ingredients mixed together with the vegemite sort of diluted its taste a bit. They weren’t at all overly salty like I thought they’d perhaps turn out to be. Having said that though, I would probably still never indulge in vegemite just as it is, like on toast or something as they have it here down under.

Breakfast Muffins: Vegemite & Cheese Ingredients

PREP TIME 25 MINS | COOKING TIME 25 MINS | MAKES 6 MUFFINS

INGREDIENTS

  • 3 cups plain flour
  • 1/2 cup granulated sugar
  • 1 cup milk, at room temperature
  • 1/2 cup light brown sugar
  • 1/2 cup vegetable oil
  • 2 handfuls of grated mozzarella cheese
  • 2 large free range eggs, at room temperature
  • 1-2 tbsp vegemite
  • 4 tsp baking powder
  • 1 tsp vanilla extract

METHOD

  1. Preheat oven to 220C. Line a 12 hole muffin pan with paper cases.
  2. Add the baking powder and flour in a large bowl, gently whizzing together until well combined. Set aside.
  3. In a medium-sized bowl, whisk together the eggs, granulated sugar, and brown sugar until combined. Then add in the milk, oil, and vanilla extract. Whisk together until the mixture is pale and yellow in colour.
  4. Using a spatula, fold the wet ingredients into dry ingredients and lightly mix everything together until all the flour is off the bottom of the bowl and no big pockets of flour remain. Then add in the cheese and vegemite, and continue to mix. Be careful as to not over mix the batter; it will result in tough, dense muffins. The batter will be extremely thick and somewhat lumpy.
  5. Spoon the batter into prepared muffin cups, filling them all the way to the top.
  6. Bake at 220C degrees for 5 minutes. Then reduce oven temperature to 190C and continue to bake for a further 25-26 minutes until tops are lightly golden. A toothpick inserted in the centre should come out clean. Allow to cool for 10 minutes before transferring to a wire rack to cool down completely.

Muffins taste best fresh the same day. Store muffins at room temperature in an airtight container for up to 5 days. Muffins freeze well, up to 3 months.

Breakfast Muffins: Vegemite & Cheese

Breakfast Muffins: Vegemite & Cheese

BON APPÉTIT

– Ally xx

myTaste.com

Roast Leg of Lamb

Roast Leg of Lamb

Hello Everyone and Happy Australia Day! Or as they say it here in the land down under, Happy ‘Straya Day! It is the official national day of Australia that is celebrated on the 26th of January. It marks the anniversary of the 1788 arrival of the First Fleet of British Ships at Port Jackson, NSW, and raising of the Flag of Great Britain at that site by Governor Arthur Phillip. If there’s anything that I’ve learnt about Australia from living here for the past 4 years is that they really love their lamb. So for this special Monday post, I am bringing to you a classic leg of lamb roast. All you really need are garlic, olive oil, rosemary, and a little salt and pepper – you need not do anything fancy with this leg! These make for a flavourful and tasty leg of lamb.

Roast Leg of Lamb

So this is probably the fourth leg of lamb roast that I’ve made over the years of being in Australia. I was never in the country for Australia Day, except this year of course, so I remember that my previous flatmate and I would always serve one up during our annual Easter dinner. A simple roast with simple and humble ingredients to flavour it up; all you really need is some patience with it as it does require some time in the oven. But you can always do something else with your time rather than sit and watch it cook. Just remember to check on it every hour incase it starts to tan a bit too much.

Roast Leg of Lamb Ingredients

PREP TIME 10 MINS | COOKING TIME 2 HOURS 30 MINS | SERVES 8-10

INGREDIENTS

  • 2.5kg leg of lamb, washed and pat dried
  • 5 garlic cloves, crushed
  • 1 large sprig of rosemary
  • Garlic infused olive oil
  • Salt and pepper

METHOD

  1. Preheat oven to 200C. Line a deep baking tray with foil and place a wire rack above it.
  2. Place the leg on the rack and rub with salt, pepper, and olive oil. Make small incisions throughout the leg and insert garlic pieces and rosemary in each. Chop up any remaining garlic pieces and sprinkle over the top of the leg.
  3. Place in the oven and let it roast for about 2 to 2 and a half hours. Once done, transfer the leg to a deep dish (I used my rectangular pyrex) cover the leg with foil and let it rest for about 10 to 15 minutes. While the lamb is resting, pour the pan juices into a small saucepan and let it simmer away. This is totally optional by the way! Once simmering, add about half a cup of white wine and bring back to a simmer. Then add in about a teaspoon of flour and mixture until the juices start to thicken. Serve with the leg of lamb!

Roast Leg of Lamb

Roast Leg of Lamb

The rest is up to you! You can have it with some steamed rice or mashed potatoes. Whatever tickles your fancy. If you have any leftovers, get creative and whip up another stellar dish – like perhaps my lamb ragù which will be up on the blog on Thursday!

Once again, happy Australia Day to all my fellow Aussie friends!

Roast Leg of Lamb

BON APPÉTIT

– Ally xx

myTaste.com

Celery & Green Apple Slaw

Celery & Green Apple Slaw

Hello Everyone! The story behind me attempting this recipe is that I always seem to struggle with celery. There are times where I’d buy a whole bunch for a dollar (on special) when the halves weren’t available or if they didn’t have the bags of pre-cut celery sticks. The thing with me and celery is that I only use it when I’m making a bolognese or minestrone soup. I rarely use it for any of my dishes. So half the time it sits in the fridge waiting to be use, and then eventually thrown out because it’s been sitting there for weeks, possibly months. I know, most of you are probably thinking that I could’ve just eat them like that with some sort of dip, but in all honesty, raw celery isn’t quite my thing. Again, another rabbit food moment here.

Celery & Green Apple Slaw

So, I bought a bag of celery sticks last week for a dish that will be posted next week, and before going out to do my weekly groceries, I jumped online and search for a recipe that I could make that included celery – yes, I was determined to not waste my bag of celery! I came across this recipe from Taste and I thought that I’d give this one a go. I know, when I thought about it and how I mentioned that “raw celery isn’t quite my thing”, and here I am attempting a raw celery slaw. Well, I thought it was about time that I gave raw celery a chance and it did not disappoint. Well to be honest I could’t distinctly pick out its taste, maybe because from the crème fraîche dressing, but the crispiness and freshness from both the celery and apple paired with the creamy sweet yet tangy dressing really made the dish exciting to my palette. Why did I not think of this sooner! All those celery sticks that went to waste…

Celery & Green Apple Slaw Ingredients

PREP TIME 20 MINS | COOKING TIME | SERVES 2-3

INGREDIENTS

  • 4 celery sticks, cut into matchsticks
  • 1 large green apple, cut into matchsticks
  • 100g Danish feta cheese, crumbled
  • 1/3 cup walnuts, toasted and coarsely chopped
  • 2 tbsp crème fraîche
  • 2 tbsp freshly squeezed lemon juice
  • 1 & 1/2 tbsp chopped fresh chives
  • Pinch of caster sugar
  • Salt and pepper to taste

METHOD

  1. In a small bowl, whisk the crème fraîche, lemon juice, sugar and chives in a small bowl. Season with a bit of salt and pepper.
  2. Plate up the celery and apple matchsticks in a deep dish. Pour the crème fraîche mixture over the celery and apples, and top with crumbled danish feta and walnuts. Serve!

Celery & Green Apple Slaw

If you want to add some protein or omega-3 to this fresh, light slaw, you can have some chicken on the side, or as what I’ve done is grill some salmon to go with this dish. Season with salt, pepper, and lemon juice, pop in the grill oven for about 5 to 7 minutes (for a thin portion as what I had), and serve!

Celery & Green Apple Slaw with Salmon

Celery & Green Apple Slaw with Salmon

BON APPÉTIT

– Ally xx

myTaste.com

Caesar Salad with Lemon & Thyme Roast Chicken

Caesar Salad with Lemon & Thyme Roast Chicken

Hello Everyone! As mentioned at the end of my last recipe post on Lemon & Thyme Roast Chicken, I made a Caesar Salad to go with the roast. A quick and healthy dish (excluding the mayonnaise), to easily pack and take to work with you, which is exactly what I did last week.

Caesar Salad with Lemon & Thyme Roast Chicken

I have a funny, but quite saddening story on my part about this. So as usual, I always pre-pack my lunches the day I make them, which is usually on Monday afternoon, and I made the decision to add the caesar dressing in the morning before going to work because I didn’t want the lettuce leaves to soak in the dressing overnight. Tuesday was fine, but I completely forgot to add the dressing on the salad for Wednesday. I specifically remembered to do it when I woke up in the morning, and even had it running in my mind throughout my morning shower. But for some mystical reason, it slipped my mind and it only hit my that I completely forgot to add the dressing was when I was halfway through the journey to work by bus. I was so devastated when I came to that realisation. I was too devastated that I didn’t even look forward to having my lunch that day. I now know what it’s like to eat rabbit food. Rabbits must have such a hard life to have to go through this every single meal of every single day.

All that aside, even though I had bottled caesar dressing sitting in the fridge, I decided to make my own (sort of) caesar dressing. I say ‘sort of’ because I used bottled mayonnaise; if you really want to go all out, then be my guest and whip up your own healthier version of mayo! Anyway, I wanted to give making my own caesar dressing a go since I had all the ingredients to make it possible already in the pantry. Maybe my next challenge will be to make my own mayo too! Also, I accidentally left the croutons in the oven for a little bit too long that they were overly tanned, but thankfully not burnt. Oops! I made the mistake of not setting a timer to remind me that they were in the oven; I think at that time I was busy carving the chicken. (I picked the least tanned ones for the photographs)!

Caesar Salad Ingredients

Croutons Ingredients

Caesar Salad Dressing Ingredients

PREP TIME 20 MINS | COOKING TIME 10 MINS | SERVES 4

INGREDIENTS

  • Baby cos lettuce, washed and sliced
  • Garlic infused olive oil
  • Mini stone-baked pane di casa, cut into small chunks
  • Roast chicken slices

For the caesar dressing

  • 1/3 cup free range egg mayonnaise
  • 4 anchovy fillets, minced
  • 1 garlic clove, crushed then minced
  • 1 tbsp white wine vinegar
  • Handful of grated parmesan
  • Salt and pepper to taste

METHOD

  1. Preheat oven to 180C. Spread the small chunks of bread over a large baking tray lined with parchment paper and sprinkle the garlic infused olive oil over them. Rub the oil into the bread and season with a little salt if you like. Bake for about 8 to 10 minutes, turning the croutons a few times during cooking so they brown evenly on all sides. Once done, remove from the oven and set aside.
  2. Combine all the ingredients for the caesar dressing into and small bowl and whisk together to combine.
  3. Plate up the baby cos lettuce and the roast chicken. Drizzle a generous amount of the dressing, and top with the croutons, shaved parmesan, and a bit of cracked black pepper.

Caesar Salad with Lemon & Thyme Roast Chicken

You can skip the chicken if you wish for a great light salad for lunch, and for those who want to bulk it up so that it’s not just leaves, have it with the chicken of course! For this salad, I carved up the breast parts from the whole roast chicken that I posted the recipe to last week. Check it out here on the blog for those of you who missed it!

BON APPÉTIT

– Ally xx

myTaste.com

Lemon & Thyme Roast Chicken

Lemon & Thyme Roast Chicken

Hello Everyone! Today’s recipe is pretty much what the title says, a classic whole roast chicken. I know some of you guys out there, myself included, would’ve probably rubbed some herds onto the skin and then pop it in the oven to roast away. I kid you not, I have had my fair share of roast chicken, homemade or from the grocers and almost every time the chicken is quite dry, especially the breast parts (which is why I hated eating chicken breast while growing up as a kid). It wasn’t only until recently I learnt about a cooking technique known as brining (submerging in salted water at the very basic) when we roasted a whole turkey for last year’s Noche Buena. It feels weird saying last year when it was technically less than a month ago. Anyway, the turkey was super moist and flavoursome! So I decided to try out brining again with a whole chicken.

Lemon & Thyme Roast Chicken

Keeping your bird juicy isn’t that hard – all you need is the right seasoning, and a little bit of patience and motivation to add that extra step before having your lunch or dinner. It does pay off though! Brining chicken not only adds moisture to the chicken, making it nice and plump, it also helps prevent it from drying out when you cook it. The result is a delicious, moist, and juicy chicken. In addition, not only does it affect the texture and juiciness of your chicken, it also affects the taste. A few hours, or even better if overnight, in brine will let the salt penetrate deep into the chicken meat, enhancing its natural flavour. Of course, there is one disadvantage. All the extra water that ends up in the chicken can make it harder to get a crispy skin. Luckily, that’s easy to fix. If you’re going for crispy skin, just let the chicken air dry in the refrigerator for an hour or so. Yes, it does take the extra effort, but it’s so easy to do!

Lemon & Thyme Roast Chicken Brine

So what actually happens during the brining process? A little bit of high school science for you!

  • Diffusion: This occurs when particles move from a region of higher concentration to an area of lower concentration. So, as we have established above, the brine has a lot more salt in it than the chicken. Therefore, to balance things out, the salt gets absorbed by the chicken – not just on the surface, but all through the meat.
  • Osmosis: This is when water (or another liquid) moves through a membrane from one region that has more water to another region that has less water. This is exactly what happens when you brine chicken. The brine has a lot more water than the chicken, so the water moves through the chicken cells, from the brine to the chicken.

Lemon & Thyme Roast Chicken Brining Process

Lemon & Thyme Roast Chicken Brining Process

Salt is the most important ingredient when brining chicken. It actually doesn’t make the chicken salty in the end, but as explained above, really enhances the chicken’ natural flavour. You can also add some other seasonings to your chicken brine, and they’ll work the same way and diffuse into the chicken. If you’re planning on using extra seasonings in your chicken brine, you’re going to need to boil it. Otherwise, the flavors just won’t penetrate the chicken. Think of it as if you were making tea – if you try making it with cold water, nothing happens. You need the heat to leech the flavour out of your seasonings. But remember to cool your brine down first before submerging your chicken into it. Not only does it end up cooking the chicken just a little bit, it also creates a bacteria farm that could potentially make you sick.

Lemon & Thyme Roast Chicken Ingredients

PREP TIME 24 HOURS* | COOKING TIME 2 HOURS | SERVES 6-8

*This includes the brining process.

INGREDIENTS

  • 2kg whole free range chicken, washed and cleaned
  • 3L water
  • 3/4 cup salt
  • 1/2 cup white wine
  • 4 garlic cloves, crushed and peeled
  • 1 medium-sized spanish onion, halved and sliced thinly
  • 1/2 lemon, sliced
  • 2 tsp chicken stock powder
  • Few sprigs of fresh thyme
  • Handful of whole black peppercorns
  • 50g butter, chilled

The basic ratio of salt to water for a brine is 4 tablespoons of salt per litre of water.

METHOD

  1. Start by clearing out a space big enough to fit a bowl large enough to hold your chicken in the fridge. Line two plastic bags over your bowl, or if you don’t have one large enough, a cooking pot will do. Place your chicken into the bag, and set aside.
  2. Combine half of the water and all the ingredients, except the butter, chicken, and wine, in a large cooking pot and bring to a slight boil to allow all the flavours and seasoning to incorporate into the liquid. Once boiling, let it boil for a further 5 minutes before removing from the heat.
  3. Add the remaining water and the wine. Set aside to cool down completely. There are other ways of cooling down the brine faster if you are short on time, or a little bit impatient. You can submerge the pot in cold water, or even add ice to the brine.
  4. Once the brine has cooled down completely, slowly and carefully pour it over the prepared bowl/pot of chicken. If there is too much liquid, do not panic! Simply lift the plastic bags up and then pour the remaining brine in.
  5. Tie the bags ups nice and tightly and refrigerate for a few hours, or overnight. If you’re going for crispy skin, just let the chicken air dry in the refrigerator for an hour or so before roasting in the oven.
  6. Preheat oven to 190C. Line a deep baking tray with foil and place a wire rack above it.
  7. Using cooking twine, tie the drumsticks together as well as the wings to hold them in place while roasting. I don’t actually know how to tie the wings properly, so that’s how I tied mine! I don’t even know if tying it the way I did is how it’s done either!
  8. In a small bowl, combine the butter with a few thyme leave, mashing it together just by using your fingertips, and then rubbing it all over the chicken.
  9. Add the garlic and onions from the brining liquid to the drop tray, as well as a little bit of the brine. This will later add flavour to the gravy that you can make combined with the drippings from the chicken. Just combine the pan drippings into a small sauce pan and add flour to thicken it up.
  10. Place the chicken on the wire rack, and into the oven for about 2 hours.
  11. Once done, remove from the oven and tent it for about 10 to 15 minutes before serving. Serve with steamed rice or mashed potatoes and veggies. Alternatively, you can serve with is a nice Caesar Salad which is what I did – stay tuned for the recipe on Tuesday!

Lemon & Thyme Roast Chicken

BON APPÉTIT

– Ally xx

myTaste.com

Breakfast Muffins: Mixed Berries

Breakfast Muffins: Mixed Berries

Hello Everyone and three cheers for the return of Muffin Making Mondays! I hate to start off on a bad note, but this is sadly my second last muffin making session with Jialing as I will be leaving this beautify country that I have called my second home for the past 4 years. I now truly understand the concept of time flying past.

Anyway, all that mushy stuff aside, yesterday we were joined by Yvonne, who spectated our Muffin Making Monday session, and was going on about how she should’ve started coming over when we first started our muffin baking sessions. It wasn’t so that she could bake with us too, but so that she could have a muffin from each of us to eat on the spot, and another to takeaway!

Breakfast Muffins: Mixed Berries

I whipped up a dozen very berry muffins while Jialing made a muffin. Yes you read that right, just ONE muffin. One BIG muffin. She had no muffin cups left and said that it was too far to go out and buy new ones; so she brought her pie tin over instead and made the decision to make ‘muffin slices’. She made an eggless and flourless chocolate muffin (cake) topped with chocolate bits, a chocolate streusel and mixed berries. Unfortunately for her, the streusel burnt, but nonetheless, beneath that was a very chocolatey and moist muffin (cake). It tasted delicious even though the little mishap!

Mine tasted really good as well! If you want to check out the original recipe, please head on over to Sally’s Baking Addiction. Also, while you are there, read up on how she came up with the Master Muffin Mix; basically kitchen tested bakery-style muffin batter with endless possibilities! Never have flat and/or deflated muffins ever again with her master mix!

Breakfast Muffins: Mixed Berries Ingredients

PREP TIME 10 MINS | COOKING TIME 25 MINS | MAKES 12 MUFFINS

INGREDIENTS

  • 3 cups plain flour
  • 2 cups mixed berries, fresh or frozen (not thawed)
  • 1/2 cup granulated sugar
  • 1 cup milk, at room temperature
  • 1/2 cup light brown sugar
  • 1/2 cup vegetable oil
  • 2 large free range eggs, at room temperature
  • 4 tsp baking powder
  • 1 tsp ground cinnamon
  • 1 tsp vanilla extract
  • 1/2 tsp salt
  • Coarse sugar for sprinkling on top

METHOD

  1. Preheat oven to 220C. Line a 12 hole muffin pan with paper cases.
  2. Add the baking powder, cinnamon, flour, ad salt in a large bowl, gently whizzing together until well combined. Set aside.
  3. In a medium-sized bowl, whisk together the eggs, granulated sugar, and brown sugar until combined. Then add in the milk, oil, and vanilla extract. Whisk together until the mixture is pale and yellow in colour.
  4. Using a spatula, fold the wet ingredients into dry ingredients and mix everything together until all the flour is off the bottom of the bowl and no big pockets of flour remain. Be careful as to not over mix the batter; it will result in tough, dense muffins. The batter will be extremely thick and somewhat lumpy.
  5. Spoon the batter into prepared muffin cups, about halfway. Then press a few berries into the batter of each muffin cup. Spoon the rest of the batter into each cup, filling them all the way to the top. Press a few more berries into the tops of each muffin and sprinkle with coarse sugar.
  6. Bake at 220C degrees for 5 minutes. Then reduce oven temperature to 190C and continue to bake for a further 25-26 minutes until tops are lightly golden. A toothpick inserted in the centre should come out clean. Allow to cool for 10 minutes before transferring to a wire rack to cool down completely.

Muffins taste best fresh the same day. Store muffins at room temperature in an airtight container for up to 5 days. Muffins freeze well, up to 3 months.

Breakfast Muffins: Mixed Berries

Breakfast Muffins: Mixed Berries

BON APPÉTIT

– Ally xx

myTaste.com