Kangaroo Lasagne

Kangaroo Lasagne

Hello Everyone! The kangaroo makes another appearance on tonight’s blog post! I finally got around to using the other half of the kangaroo mince that I first cooked with about a month or more ago now. I decided to go with making a lasagne only because I had most of the essential ingredients already in my fridge/pantry at the time I was planning on making it – I really only needed the lasagne sheets and a few of the vegetables.

Tonight’s post is not going to be as long as the others; I don’t have much to tell. If you read my post on the Kangaroo Bolognese that I made a while back, you’d know the story behind how I came to purchase roo mince. Also, I mentioned in that post that I neither loved nor hated the taste of kangaroo – it was just an inexplainable feeling. I even said that, after having given kangaroo a second chance while camping in Uluru, I was leaning more towards liking it. After making this lasagne though, I’m definitely disliking the taste of it. However, it may very well be the fact that I made a lot of it to last me 6 meals, so that may be the reason why I started to dislike it after a while – but no; I won’t be purchasing kangaroo for a while. Maybe never again actually because I’ll be leaving Sydney soon and roo meat is DEFINITELY not available back home.

Kangaroo Lasagne

I actually ran out of mozzarella cheese when making the lasagne so I ended up adding tasty cheese as well because that was the only other cheese I had in the fridge – and I didn’t have much of it either. I have also doubled the quantities for the béchamel sauce as I found that I didn’t have enough for the meat filling recipe that I had.

Also, just a little side note, if you want to try this recipe out, DON’T lay the eggplant slices raw. They barely even cooked when the lasagne was in the oven. Took a bite, and it just ruined the dish for me. I had to take them out and cook them separately. Much hassles! So make sure you bake/grill/pan fry them before layering them in-between the meat and lasagne sheets. I mean, I already had this at the back of my head, that I needed to cook them first, but no, I didn’t. First amateur cook mistake for 2015 – yeap, I’m off to a good start.

Kangaroo Lasagne Ingredients

PREP TIME 15 MINS | COOKING TIME 1 HOUR 30 MINS | SERVES 6-8

INGREDIENTS

For the meat filling

  • 500g kangaroo mince
  • 1 can (400g) Italian diced tomatoes
  • 1 sachet (2 tbsp) tomato paste
  • 1 cup water
  • 3 tbsp olive oil
  • 4-5 dried bay leaves
  • 3 garlic cloves, crushed then minced
  • 2 tsp dried oregano
  • 1 carrot, cut into small chunks
  • 1 medium-sized red onion, diced
  • 1 red birds-eye chilli, sliced (optional for that added kick of spice)
  • 1 zucchini, cut into small chunks
  • Ground sea salt and black pepper to taste

For the béchamel sauce

  • 2 cups milk
  • 3 tbsp olive oil
  • 3 tbsp plain flour
  • 1/2 tsp nutmeg
  • Pinch of sea salt
  • Wholemeal lasagne sheets
  • 1 pack (250g) mozzarella cheese, grated
  • 1 large eggplant, sliced

METHOD

  1.  Preheat oven to 180C.
  2. Heat the olive oil in a large frying pan and pan fry the eggplant slices until done, about 4-5 minutes per side. Set aside.
  3. In the same frying pan, sauté the garlic until golden and fragrant. Then add the onions in a sauté until soft. Add the vegetables in and cook for about 5 minutes before adding the kangaroo mince in. Cook over medium heat and slowly brown the meat. When the meat has completely browned, add the canned diced tomatoes, tomato paste, oregano, and water. Season with salt and pepper, then simmer for about 25 to 30 minutes.
  4. While the meat is simmering away, get a head start on the béchamel sauce. Heat the olive oil in a medium-szied saucepan. Add the plain flour and nutmeg to the oil and stir continuously for 2 to 3 minutes. Slowly add the milk in a bit at a time while still stirring the mixture continuously. Stir until the sauce is smooth, season and then set aside.
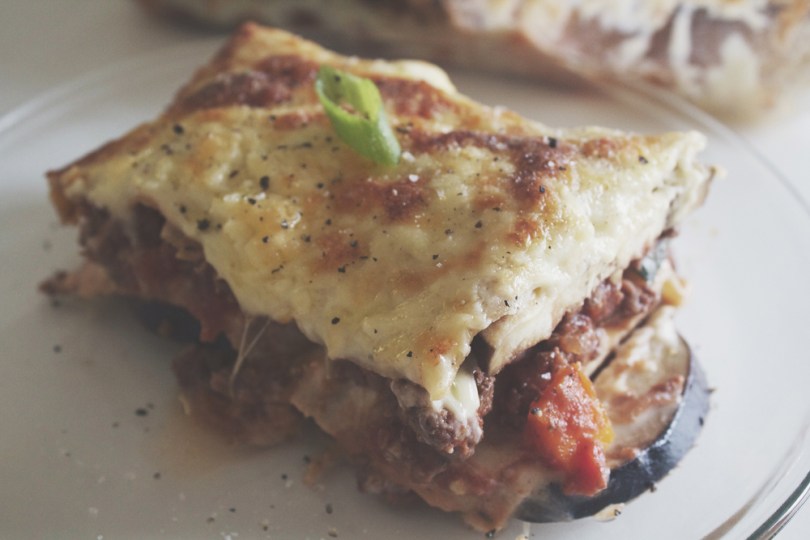
  5. In a ovensafe dish (I used a 28cm x 18cm pyrex dish), add half of the meat filling and top with half of the eggplant slices. Arrange a layer of lasagne sheets over the top and then followed by a layer of the béchamel sauce. Top with half of the pack of mozzarella cheese and then repeat for another layer.
  6. Place the in the oven and bake for about 40 to 45 minutes.
  7. Serve with a salad on the side and perhaps some yummy garlic bread.

Kangaroo Lasagne

Kangaroo Lasagne

BON APPÉTIT

– Ally xx

myTaste.com

Nasi Lemak (Coconut Rice)

Nasi Lemak (Coconut Rice)

Hello Everyone! I’m back tonight with a recipe for you guys. So I did a little bit of reading on what Nasi Lemak actually translates to – I knew “Nasi” (pronounced nah-see) meant rice, but I was not sure what “Lemak” (pronounced leh-mahk) meant. Lemak apparently, if directly translated means “fat” and therefore Nasi Lemak means “fat rice”, but in the cooking context, lemak means enriched, and in this case, rice enriched with coconut milk.

The truth is, no one really know where the dish originated from as coconut rice is common in many other South-east Asian cultures such as Indonesia, Malaysia, and Thailand. Apparently there is an old folklore story from a village just south of the country’s state, Kuala Lumpur, where a village girl accidentally spilled a cup of coconut milk in a pot of rice while she was helping her mother cook. Though her mother was enraged, she ended up liking the taste of the rice with coconut milk, and hence the birth of Nasi Lemak.

Nasi Lemak (Coconut Rice)

Traditionally, the two elements that make up this dish are the rice of course, and the spicy sambal (a chilli-based sauce) that either has anchovies or prawns in it accompanying the rice. Sliced cucumbers, half a hard-boiled egg, and roasted peanuts are also essential condiments found in this dish. Nowadays, many variations of accompaniments are served with the dish, such as chicken, beef or prawn curry, and even fried chicken. It is then wrapped and packed in a banana tree leaf as this gives an added fragrance. Restaurants nowadays serve up a modernised version on a plate with all the trimmings.

Back home in Brunei, Nasi Lemak was practically on every menu in every restaurant. They were sold in almost every stall at the Gadong Pasar Malam (Night Market) and even on the side of the streets if I’m not mistaken. All ranging between $1.00 to $3.00, probably a little bit more in restaurant, but surely no more than $5.00. I remember I went to Mamak in Chinatown somewhere in the middle of last year to meet up with Sam’s friends (now my friends too) from the Netherlands. I had a sudden crave for Roti Kosong and Nasi Lemak, but it was so difficult to order it. I think I may have complained about this place before in terms of price comparisons to back home, and I am about to do it again. Their Nasi Lemak here was $9.00, and if you wanted a curry or fried chicken to go with it, it was another $3.00 extra, $4.00 if you wanted seafood. After that, never getting Nasi Lemak here ever again. Thus I decided to give homemade Nasi Lemak a go! Now, I may have steered away from ‘traditional’ by using pre-made sambal, but it tasted pretty good!

Nasi Lemak (Coconut Rice) Ingredients

Nasi Lemak (Coconut Rice) Ingredients

Here is where you can get quite creative yourself. As I’ve mentioned before, the rice and the sambal is essential. The other components are basically up to you. I paired my Nasi Lemak with Sambal Kangkung, which is basically water spinach stir fried in the chilli-based sauce with garlic and onions, and a piece of fried chicken. You can whip up your own curry with your choice of meat or vegetables to accompany this dish.

Ayam Goreng Ingredients

Kang Kong Belacan Ingredients

PREP TIME 1 HOUR | COOKING TIME 20-25 MINS | SERVES 4

INGREDIENTS

For the coconut rice

  • 2 cups long grain rice
  • 1 cup of water
  • 2 pandan (screwpine) leaves, tie them into a knot as shown above
  • 1 small can (170ml) coconut milk

For the fried chicken

  • 4 pcs chicken thigh cutlets, skin-on, washed and cleaned
  • 1/2 vegetable oil, for shallow frying
  • 2 tbsp cornflour
  • 2 tbsp plain flour
  • 2 tbsp water
  • 1 tsp dried chilli flakes
  • 1 tsp sesame oil
  • 1/2 tsp salt
  • Dash of ground black pepper

For the sambal kangkung

  • 1 bunch kangkung, washed, leaves separated from the stems, and stems cut into short lengths
  • 2 cloves garlic, minced
  • 2 red bird’s eye chillies, sliced
  • 1/2 red onion, diced
  • 1 & 1/2 tbsp sambal belacan
  • 1 tbsp vegetable oil
  • 2 hard-boiled eggs, halved
  • Handfull of small-sized ikan bilis (dried anchovies), fried
  • Handfull of peanuts, roasted
  • Sliced cucumbers
  • Banana leaf

METHOD

  1. First things first, combine all the marinade ingredients for the fried chicken in a large bowl. Mix the chicken around until well coated in the batter. Cover the bowl with cling wrap and set aside to marinade for 1 hour.
  2. Coconut Rice: Just like making steamed rice, rinse your rice and drain. Add the coconut milk, a pinch of salt, and water. Add the pandan leaves into the rice and cook your rice. Once done, transfer to a serving dish lined with a banana leaf together with the other condiments.
  3. Fried Chicken: Preheat oven to 180C. Heat up oil in a large frying pan an working in batches, shallow dry the chicken until skin is crispy and golden (about 4-5 minutes per side). Remove from the heat and place on a baking tray lined with aluminium foil. Place the wings in the oven for a further 8-10 minutes to finish off in the oven.
  4. Sambal Kangkung: Heat oil in a medium frying pan over high heat. Add the garlic and 1 of the sliced bird’s eye chilli and sauté until golden brown. Add in the onions and sauté until soft. Bring the heat down to low and then add in the sambal belacan, cooking the belacan over high heat will cause it to spit all over the stovetop and we don’t want to have a messy cooking area. Cover if needed. Sauté the belacan until fragrant.
  5. Add the the kangkung leaves, stems and a little bit of water to dilute the belacan you think can’t handle the heat. Cover until the leaves start to wilt. Toss around the belacan to coat the leaves and stems evenly (kangkung literally takes only a minute to cook). Serve together with your coconut rice and fried chicken, and top with fresh red chillies.

Nasi Lemak (Coconut Rice)

BON APPÉTIT

– Ally xx

myTaste.com

Pineapple-glazed Ham

Pineapple-glazed Ham

Hello Everyone! Yes I am aware that today should be a Muffin Making Monday post but Jialing and I decided to have a break from making muffins since we are both on Christmas/New Year break from work. We will be resuming our fortnightly muffin making next week, or the week after, depending on what we decide.

Pineapple-glazed Ham Ingredients

This is the last of the Festive Holiday Recipes that I will be posting, and quite possibly the last recipe for 2014! So after splurging on thankfully less than $200 (but over my budget of $100) on Boxing Day, I decided to buy a portion of Smoked Leg Ham to roast in the oven for a little Boxing Day treat. Seriously, we had NO savoury leftover food from our Noche Buena – even the 3.8kg turkey was shredded to the bone; and I was so looking forward to trying out a Massaman Curry by Jamie Oliver with the leftover turkey meat. Oh well, I guess a fresh-from-the-oven smoked leg ham can, will, and did make up for it!

Pineapple-glazed Ham

Pineapple-glazed Ham

I read up about studding cloves into the ham and what they actually do to the ham other than of course add flavour. Most articles/blogs that I’ve read say that it’s also decorative. One article I read though asks: to stud or not to stud? Apparently, there is a saying that all garnishes should be edible; and hence why studding cloves is a no because no one wants to crack a tooth by biting into a whole clove. But can’t they just take the time to remove the cloves after baking? An alternative would be to add ground cloves into your choice of glaze. I went for the decorative version. The cloves were a bit overpowering for me though.

Very simple really – I didn’t want to get all fancy with the ham since it’s already smoked with beechwood to add to its natural flavour. So I went with a very easy and classic pineapple glaze to dress the ham as it slowly baked in the oven. Now, many of you will agree with me that I probably “scored” the fat on the leg ham a little bit too aggressively – Oops!

Pineapple-glazed Ham Ingredients

PREP TIME 5 MINS | COOKING TIME 1 HOUR | SERVES 8-10

INGREDIENTS

  • 750g smoked leg ham portion
  • 1 can (440g) pineapple slices in juice
  • 1/3 cup brown sugar
  • Handful of whole cloves

METHOD

  1. Preheat oven to 180C.
  2. Score the leg ham with a sharp knife in a diagonal pattern. Score again, diagonally, in the opposite direction to create a crossing pattern. Using the tip of your knife, poke a small hole in the middle of each segment and insert whole cloves.
  3. Combine the brown sugar and pineapple juices into a small saucepan over medium heat and bring to a full boil, stirring frequently. Once boiling, lower the heat and bring to a gentle simmer until the glazed is nice a thick.
  4. Cover the leg ham with half of the glaze and place the leg ham fat side up on a wire rack in the oven with a drip tray below. Bake in the oven for 1 hour, basting the ham every 25 minutes with the leftover glaze and pan drippings. In the last 25 minutes of cooking, add the pineapple slices into the drip tray to cook.
  5. Serve!

Pineapple-glazed Ham

Before I wrap up this post, I would like to thank each and every one of my friends who have been so kind to take the time to drop by and go through my blog. Thank you as well for always asking me how my blog is going, encouraging me everyday to continue doing what I do best. I would also like to thank my 110 followers and the whole wordpress community in general for being very nice, dropping, comments and likes since I started my blog earlier this year.

Have a safe and Happy New Year Everyone! See you in the New Year with many more kitchen adventures! I will also have some exciting news coming your way somewhere earlier next year!

BON APPÉTIT

– Ally xx

myTaste.com

Cherry Ripple Black Forest Cake

Cherry Ripple Black Forest Cake

Hello Everyone! Yes, I know it is a Sunday which for those of you who are new to my blog, I don’t normally post on a Sunday – but I wanted to get all the Noche Buena recipes up before the New Year because I’ll probably have another batch of recipes to post from a New Years Day Lunch (maybe dinner depending on how energised I am to cook after a long day/night out the previous night) that I am planning to host – a small one though with probably 2-3 dishes maximum. Noche Buena was hectic and I don’t want to have a repeat that’s a week apart from each other. I won’t be doing Media Noche because I will most likely be camping out the whole day/night for a good spot by the harbour to view the Harbour Bridge Fireworks at midnight.

Cherry Ripple Black Forest Cake

Anyway, tonight’s recipe is from our Noche Buena dinner that Jialing and I hosted on the Eve of Christmas. This Cherry Ripple Black Forest Cake is one of the many desserts we had on the menu for the night. When deciding on a cake to make for the festive dinner, we found it difficult to decide on a cake that felt festive – besides a Yule Log. Even though I wasn’t too fond of a Black Forest cake, that is what we decided on. The reason why I am not fond of it is because every time I indulged in a store bought Black Forest cake, they ALWAYS use those horrible canned/tinned/jarred Maraschino Cherries that I absolutely hate. Not for our Black Forest cake NO! I was determined to use fresh cherries and if I had to use cherries from a can, at least not the maraschino ones!

Before Jialing and I went to do our groceries for the dinner, we talked about how we haven’t been seeing any fresh cherries at the local supermarkets. But when we got to Coles, we saw that cherries were on special and looking very fresh! I was so happy! Also, please do check out the original recipe over on Taste. Like how I’ve probably been describing over and over again in my previous posts, the recipe says to use a little more than 1/4 cup of Jim Beam Black Cherry Bourbon, but I didn’t want to buy a 700ml bottle for $30 for that amount. So from the leftover vodka I had from the East Orange Frosting I made for my Gingerbread Men, Jialing had the idea of infusing that into the cherry syrup for that boozy touch. Also, our sponge didn’t rise that much to be able to cut it into three layers, so we ended up having a two layer cake.

Cherry Ripple Black Forest Cake Ingredients

PREP TIME 10 MINS | COOKING TIME 1 HOUR 20 MINS | SERVES 8-10

INGREDIENTS

For the chocolate sponge

  • 1 & 1/4 cup self-raising flour
  • 1 cup brown sugar, firmly packed
  • 1/2 cup almond meal
  • 1/2 cup buttermilk
  • 1/4 cocoa powder
  • 200g dark cooking chocolate, melted and cooled
  • 200g unsalted butter, at room temperature
  • 2 large free range eggs

For the cream-jam filling

  • 1 can (425g) pitted black cherries in syrup, drain and reserve syrup
  • 300ml double cream
  • 250ml thickened cream
  • 1/2 cup black cherry jam

For the choc-cherry ganache

  • 100g dark cooking chocolate, chopped
  • 60ml thickened cream
  • Vodka-infused cherry syrup*
  • Fresh cherries
  • Chocolate curls

*Add the reserved syrup to a small sauce pan together with about a tablespoon of vodka to the reserved syrup and bring to a simmer to infuse the flavours. Use this to brush onto the sponge cake layers and in the chocolate ganache.

METHOD

  1. Preheat oven to 160C. Grease the sides of a 20cm round springform cake pan with melted butter and line the base with baking paper.
  2. Chocolate Sponge Cake: Sift the flour, almond meal, and cocoa powder into a medium sized bowl. Whisk until combined and set aside.
  3. In a large bowl, beat the butter and sugar using an electric handheld mixer until pale and creamy. Beat in the melted chocolate and eggs, and fold in the dry ingredients and buttermilk until well combined. Spoon the batter into the prepared pan.
  4. Bake for 1 hour and 20 minutes or until a skewer inserted into the centre comes out clean. Set aside to cool slightly before transferring the cake to a wire rack to cool completely.
  5. Choc-cherry Ganache: While the cake is baking in the oven, stir all the ingredients (leaving about 1/4 cup of the vodka-infused syrup for brushing) for the choc-cherry ganache in a small saucepan over low heat for 5 minutes or until the chocolate has melted and is smooth. Set aside cool slightly.
  6. Cream-jam Filling: Using an electric mixer, beat the double and thickened cream in a large bowl until firm peaks form. Then fold in the jam to create a swirled effect.
  7. Assembly: Cut the cake horizontally into 2 (or 3 if you can) even layers. Place the cake base on a round cake board and brush the cut surface with half of the vodka-infused syrup and spoon over the cream-jam mixture. Dip each pitted black cherry into the ganache and place on top of the cream filling. Brush the vodka-infused syrup on the cut surface with the other half of the cake layer and top over the base. Pour the choc-cherry ganache over the cake and decorate with fresh cherries and chocolate curls. Sprinkle with a bit a icing sugar for a Christmasy finish.

Cherry Ripple Black Forest Cake

Cherry Ripple Black Forest Cake

Cherry Ripple Black Forest Cake

BON APPÉTIT

– Ally xx

myTaste.com

Gingerbread Stained Glass Cookies

Gingerbread Stained Glass Cookies

Hello Everyone! So today’s recipe was inspired by a video I watched on YouTube from one of my favourite channels SORTED Food. This recipe is by far one of my new Christmas favourites and spot on because this year for Christmas planned on decorating our Christmas Tree with food items! We strung some popcorn and wrapping them around our tree. We have candy canes, Ferrero Rochers, Lindt chocolate, and sugar cookie wreaths lined up as our ornaments:

Edible Christmas Tree

I actually completely forgot about this recipe for Stained Glass Cookies until the night before Jialing and I had planned to make the cookies. It’s a good thing that we picked up the Turkey I preordered yesterday which meant that I could also pick up some boiled candy for this recipe! But I mean, does Australia have something against boiled sweets? Or did they just sell out or something? I swear I could not find any form of boiled sweets at the local supermarkets other than soothers or lozenges. Lucky for me that Woolies stocked their own home brand fruity sweets. But even so, the bag of candy only had 4 green sweets and half of the bag was filled with yellow sweets. So I ended up crushing some of the yellow with the green and added a few drops of green food colouring to it.

Initially I had planned to make my gingerbread cookies again for the tree, and since I have all the ingredients ready for some gingerbread making, I decided to do a little twist on their recipe and make Gingerbread Stained Glass Cookies. Do check out the original recipe on their main channel: Stained Glass Cookie Decorations, or if you want to see a step-by-step write-up version of the recipe, check it out on their website: SORTED Food.

Gingerbread Stained Glass Cookies

The first batch of cookies turned out to be a massive fail that they only deserved a before picture. Can’t even bare the look of the result after. Lesson learned? Don’t bake these stained glass cookies with raising agents in them – just don’t. I think you may have a picture in your head how these first batch of cookies turned out:

Gingerbread Stained Glass Cookies Ingredients

PREP TIME 30 MINS | COOKING TIME 12 MINS | MAKES 2 DOZEN

INGREDIENTS

  • 2 cups plain flour (plus 1/2 cup additional for rolling, if needed)
  • 85g unsalted butter, softened
  • 1 large free range egg
  • 1/2 lemon, juiced
  • 1 cup caster sugar
  • 1/4 cup dark molasses (or honey in my case)
  • 2 tbsp milk
  • 2 tsp ground dry ginger
  • 1 tsp ground cinnamon
  • 3/4 tsp baking powder
  • 1/4 tsp baking soda
  • 1/4 tsp ground allspice
  • 1/4 teaspoon ground cloves
  • 1/4 tsp ground nutmeg
  • 1/4 teaspoon salt
  • Boiled Sweets (Hard Candy)

METHOD

  1. Preheat oven to 200C. Add the unsalted butter and sugar in a large bowl and beat using an electric mixer fitted with a paddle at medium-high speed until smooth; about 5 to 8 minutes.
  2. Meanwhile, in another bowl, sift together the flour, baking powder, baking soda, dry ginger, nutmeg, allspice, cinnamon, cloves, and salt. Whisk to blend and then set aside. In another bowl, whisk together the eggs, milk, molasses (or honey), and lemon juice.
  3. When the butter and sugar mixture is smooth, lower the speed of the mixer and add the wet ingredients. Then gently fold the dry ingredients until a dough starts to form.
  4. Divide the cookie dough in half. Wrap each half with cling wrap and chill in the fridge for about 15 minutes. This step will make it easier to finish rolling out the dough when it has chilled. It will also mean you only have half of the dough getting warm as you roll it.
  5. Lightly flour a flat surface. Use a floured rolling pin to gently roll the first half of the dough about 1/2-inch thick. Lightly flour the cookie cutter(s) and cut out your desired cookie shapes. Cut another shape out of the centre of each cookie and transfer the cookies to a lined baking tray.
  6. Chop up some boiled fruit sweets with a knife or by bashing them with a rolling pin whilst still in their wrappers, keeping the different colours separate. Sprinkle the chopped sweets into the hole in the centre of the cookies and bake them for 12 minutes.
  7. Leave to cool until completely cold before removing them from the lined baking tray. Ice them however you wish and thread a ribbon through the hole to hang your decorations. For these cookies, I made a simple vanilla icing to decorate with and edible silver balls.

Gingerbread Stained Glass Cookies

Gingerbread Stained Glass Cookies

Hope everyone had a merry festive Christmas!

BON APPÉTIT

– Ally xx

myTaste.com

Cinnamon Roll Pancakes

Cinnamon Roll Pancakes

Hello Everyone! So today’s recipe was made a while back, somewhere in November before I travelled to the Red Centre of Australia. The story goes back to my former housemate Lydia. Long story short, after having lunch together and going back to our rooms (or so I thought) I came back down to the kitchen and Lydia was STILL in the kitchen. She was flipping pancakes. I asked her how she was going with them, and she replied “not so good. I actually waited for you to go upstairs so you wouldn’t see my fail pancakes!”

If you’ve read my blog post from somewhere in September, you’d know that Lydia and pancakes do not go well together. Even when she tried to flip them the first time we made them together, life was just being too difficult for her – until we made these pancakes though! She flipped about 3 or even more pancakes successfully! And these pancakes aren’t considered easy for beginners like Lydia I would assume. I didn’t want to just make plain pancakes, we we stepped it up a notch and we (mainly I) decided to try out a recipe for Cinnamon Roll Pancakes.

Cinnamon Roll Pancakes

The first pancake I attempted was a slight fail – I didn’t know when to pipe the cinnamon filling onto the pancake. What I did at first was basically wait for the pancake batter to start bubbling on the top and then pipe on the filling. Two things went wrong; firstly the filling was a bit firm so it wasn’t piping out in one smooth squeeze. The second thing, when I flipped the pancake, the filling just went everywhere. The first one was easy to resolve, we basically just let the filling out for a while until it started to soften a bit. The second took a little bit of thinking, but in the end we ended up piping the filling straightaway onto the pancake batter as it hit the pan. 100% success from then on!

Also, this recipe can originally be found on Vegan Yumminess – though I highly doubt that these pancakes that I’ve made are 100% vegan because of the choices of ingredients that I’ve used.

Cinnamon Roll Pancakes Ingredients

PREP TIME 10 MINS | COOKING TIME 45 MINS | MAKES 6-8 PANCAKES

INGREDIENTS

For the pancake batter

  • 40g unsalted butter, melted
  • 1 & 1/2 cup plain flour
  • 1 & 1/2 cup milk
  • 3 tbsp palm sugar
  • 1 tbsp baking powder
  • 1 tbsp cornstarch
  • 1 tsp lemon juice

For the cinnamon filling

  • 60g unsalted butter, slightly softened
  • 5 tbsp brown sugar
  • 1 tbsp ground cinnamon
  • 1 tbsp plain flour

For the cream cheese glaze

  • 100g cream cheese, room temperature
  • 1/2 cup confectioners sugar, sifted
  • 3 tbsp milk, plus more if needed
  • 1 tbsp lemon juice
  • Pinch of salt

METHOD

  1. Preheat oven to 100C. Line a tray with baking paper.
  2. Cinnamon Filling: Place all the ingredients into a zip-lock sandwich bag and seal closed. Knead the ingredients together with your hands until there are no big lumps or chunks of anything. Place the bag in the fridge for at least 10 minutes to allow the mixture to firm up a little bit. The consistency should be similar to that of toothpaste. When you are ready to draw swirls into your pancakes, cut about a 1/3-inch (.8cm) hole in one of the bottom corners of your sandwich bag.
  3. Cream Cheese Glaze: In a medium-sized bowl beat the cream cheese using an electric mixer on medium-high speed until light and fluffy, about 4-5 minutes, scraping down sides of bowl as needed. Add the sugar and beat until combined, about 1 minute. Then add the salt, lemon juice, and milk; mixing on low speed until smooth. If the glaze is too thick to drizzle, add more milk, 1 tbsp at a time.
  4. Pancake Batter: Add the dry ingredients into a large bowl and whisk to combine. Then add in the wet ingredients and whisk until smooth. Heat a nonstick pan on the stove on medium and once heated, turn the heat down to medium-low. Lightly butter the pan and pour about a 1/4 cup of batter. Immediately add your cinnamon filling by gently squeezing your sandwich bag in a circular motion around your pancake to form a swirl. Try not to get too close to the edge of your pancake.
  5. When bubbles have formed towards the centre of your pancake (about 2-3 minutes), flip your pancake quickly in one continuous motion. When the pancake has cooked on the other side for a further 1-3 minutes, remove it from the pan and place on your prepare baking tray and place into the oven to keep warm while you work on the remaining pancake batter. Make sure to wipe your pan clean before starting your next pancake.
  6. Stack your pancakes and drizzle with cream cheese glaze.

Cinnamon Roll Pancakes

Cinnamon Roll Pancakes

BON APPÉTIT

– Ally xx

myTaste.com

Gingerbread Cookies

Gingerbread Cookies

Hello Everyone! I apologise in advance for not posting yesterday as scheduled. Long story short, I didn’t write my post yesterday (I have my reasons) and I just wanted to go to bed when I got home from a work event yesterday. Anyway, if you read my last post on the Gingerbread Muffins, you would’ve know what tonight’s recipe will be about. I wanted to do something nice for my colleagues in the office for my last week before the Christmas/New Year holidays, so I decided to bake batches of Gingerbread Cookies. Actually these cookies inspired me to try out and bake Gingerbread Muffins on Monday to stick to the festive theme. I packed them into little plastic bags and tied them up with Christmas tags that I bought from the Christmas Markets at The Grounds of Alexandria.

Gingerbread Cookies

I think, if not all, most of them loved my cookies. My boss had the best reaction hands down when he saw his bag of goodies on his desk when he came into work; he let out what seemed like a squeal of excitement. I also managed to change my manager’s view on gingerbread – she normally doesn’t like gingerbread, but mine were an exception. I genuinely believe that she wasn’t just saying that because I was there; she apparently went on for about 5 minutes about the cookies to her sister. Also, one of the interns didn’t come in at all so he didn’t get his bag of goodies, so the other manager said that he was tempted to just open his bag for more. Towards the end of the day I saw the bag closer to his desk and opened. Yesterday I asked him if he ate all of the other intern’s cookies, and he said he gave some to his housemates!

Some of my cookies ended up on Instagram as well:

Gingerbread Cookies on Instagram

Like the little gingerbread men that was featured on Tuesday’s post, I made my own cookie cutter using aluminium foil, which meant that each time I pressed it on the rolled out dough, it would slightly deform. I would then reshape it, but that meant that I had men that differed in shape – some were fat, some skinny. Some had one leg longer than the other, one arm higher than the other, big heads, small heads, etc. but to quote Jialing (as well as from the previous post), “everyone is different in their own way and we don’t discriminate!” Also, a special thanks and shoutout to my main girl Jialing for decorating my cookies while I frantically tried to do some many things at once in the kitchen. They look absolutely stunning!

Before I move onto the recipe, please do visit the site where I originally got the recipe from: Food Network. As usual, I used slightly different ingredients only because some I didn’t have on me – or I wasn’t up for buying let’s say a bottle worth $30+ of orange liqueur when I only needed half a teaspoon of it. Making my own orange liqueur crossed my mind, but then I only thought of a week before making these cookies. I still wanted to add a hint of booze to my frosting though, so I ended up getting a tiny bottle of vodka for this. Again, I didn’t want to buy a big bottle of vodka because I don’t drink vodka. If you are making these for the little ones, just remember to exclude the vodka from the frosting!

Gingerbread Cookies Ingredients

Gingerbread Cookies Ingredients

PREP TIME 25 MINS | COOKING TIME 8-10 MINS | MAKES 3 DOZEN

INGREDIENTS

For the gingerbread dough

  • 4 cups plain flour (plus 1/2 cup additional for rolling, if needed)
  • 170g unsalted butter, softened
  • 2 large free range eggs
  • 1 large navel orange, zested
  • 1 lemon, juiced
  • 1 & 2/3 cups caster sugar
  • 1/2 cup dark molasses (or honey in my case)
  • 1/4 cup milk*
  • 1 tablespoon ground dry ginger
  • 2 teaspoons ground cinnamon
  • 1 & 1/2 teaspoons baking powder
  • 1/2 teaspoon baking soda
  • 1/2 teaspoon ground allspice
  • 1/2 teaspoon ground nutmeg
  • 1/2 teaspoon salt
  • 1/4 teaspoon ground cloves

For the easy orange frosting

  • 1 cup soft icing sugar
  • 1 large orange, zested and juiced
  • 1 tsp vodka (optional)

*I don’t know what I did wrong but when I was rolling out my dough after I had chilled it in the fridge for about 15-20minutes, my dough it felt a bit dry and crumbly. I fixed it by adding some milk and putting it back into the fridge before rolling it out again. It seemed to have worked this way! I’m not sure if I did something wrong or just looking at the recipe, maybe the ratio between dry and wet was a bit out of proportion.

METHOD

  1. Preheat oven to 180C. Add the unsalted butter, sugar, and orange zest in a large bowl and beat using an electric mixer fitted with a paddle at medium-high speed until smooth; about 5 to 8 minutes.
  2. Meanwhile, in another bowl, sift together the flour, baking powder, baking soda, dry ginger, nutmeg, allspice, cinnamon, cloves, and salt. Whisk to blend and then set aside. In another bowl, whisk together the eggs, molasses (or honey), and lemon juice.
  3. When the butter and sugar mixture is smooth, lower the speed of the mixer and add the dry ingredients. Then add the egg mixture until well blended. At this point, if you feel your mixture is too dry or crumbly, add the milk in.
  4. Divide the cookie dough in half. Wrap each half with cling wrap and chill in the fridge for about 15 minutes. This step will make it easier to finish rolling out the dough when it has chilled. It will also mean you only have half of the dough getting warm as you roll it.
  5. Lightly flour a flat surface. Use a floured rolling pin to gently roll the first half of the dough about 1/2-inch thick. Lightly flour the cookie cutter(s) and cut the shapes, making as few scraps as possible. Got scraps? Form the scraps into a ball, press it flat and chill in the refrigerator. These cookies may be a little more “tough” because the dough will have been worked a little more than the others.
  6. Transfer the cut out cookies to a tray lined with baking paper. Leave room between the cookies as they can spread a little. You’ll end up having to bake them it batches depending on the size of your cookies and how many can fit into a single baking tray. Bake until brown around the edges; about 8 to 10 minutes. While your first half of your batch of dough is cut and baking/waiting to bake, work on your second half of cookie dough. Once your cookies are done, set them aside to cool down and get started on making your easy orange frosting.
  7. Easy Orange Frosting: In a medium bowl add all of the ingredients and whisk together to combine. If the consistency is too thick, add a touch more orange juice (or vodka if you prefer) to thin it out. Transfer the frosting into a party bag (or if you are like me and don’t have one, you can use a zip lock bag and cut a hold at the tip, OR even use a ketchup bottle as you will see in one of the photographs below).
  8. Work on and decorate the batch of cookies that went into the oven first as these would have had enough time to cool down before the others. The work your way through the batches of cookies.

I guess, if you want it to look more festive you can go with green/red decorations but our local Coles only had blue or pink. Of course, cookies are best served fresh but you can store these cookies in an airtight container for up to 5 days.

Gingerbread Cookies

Gingerbread Cookies

BON APPÉTIT

– Ally xx

myTaste.com

Breakfast Muffins: Gingerbread

Breakfast Muffins: Gingerbread

Hello Everyone! Another Muffin Making Monday recipe post for all of you tonight, and why not bake these not so little, but cute muffins for the kids or maybe even the adults this holiday season? Just remember to exclude that hint of vodka in the orange frosting when serving it up for the little ones! These muffins are moist and packed with a spicy sweet gingerbread flavour with that touch of citrusy goodness; not to mention they also create a beautiful gingery aroma in the kitchen. As usual with all my baking adventures, I always look to Sally’s Baking Addiction. Her recipes are straight forward, easy to follow, and really require minimal work in the kitchen (as far as I know from the recipes I’ve tried). I also always try to tweak the recipe myself, which I have definitely done here to make these muffins a little more special for this festive season.

Besides tonight’s muffin post, I also baked gingerbread cookies yesterday to bring in and share amongst my workmates. The recipe for these gingerbread cookies will be up on Thursday’s post. From the dough I had,  I made little gingerbread men to stuff into my muffins. I also topped the muffins with leftover orange frosting. I shall call these Hot Tub Gingerbread Muffins! I actually got this idea from the front cover of the December issue of Coles Magazine. The featured cupcakes were topped with frosting and little gingerbread man cookies. I pre-baked the little gingerbread men before baking my muffins, and my plan was to stuff the muffins with the men while the tops were still moist before completely cooked. But forgetting that I wanted to do that, Jialing had already frosted and decorated my little men, and putting them into the oven would basically just melt the frosting off. Also it meant that the gingerbread men would potentially over bake in the oven. So what I did was once the muffins were ready and slightly cooled, I cut a slit in the muffins and inserted the little men. They were a bit large for the muffins, so I ended up amputating their legs just so they would fit snuggly. I remember when I brought a muffin into work today, one of the managers noticed that his legs were missing and asked where his legs went. I told her the sad story.

Breakfast Muffins: Gingerbread

I also by the way, did not have any cookie cutters for these, instead I made my own cookie cutter using aluminium foil following this tutorial on wikiHow. I mean, it wasn’t ideal for the foil kept reshaping itself every time I pressed down on it to cut out my cookies, so as you can see from the image above, some were fat, some skinny. Some had one leg longer than the other, one arm higher than the other, big heads, small heads, etc. but as Jialing said, everyone is different in their own way and we don’t discriminate! And of course, being such a professional baker (sarcasm intended), I don’t even own a rolling pin – but who says a bottle of Jack can’t fix the problem and stand in as a makeshift rolling pin?

Breakfast Muffins: Gingerbread

I went ingredient shopping two days before making these muffins, and unfortunately I could not get a hold of molasses which gives the muffins their deep brown colour and rich flavour. I wasn’t able to look at another grocery store on the Sunday because I had my own little adventure kayaking over the Sydney Harbour, overlooking the Sydney Opera House and Harbour Bridge. So I settled with using honey for this recipe, which is one of the various substitutes for molasses. Also, you may notice that the batter is quite thick. Very, very thick. It may make you wonder if you’ve done anything wrong, or if the proportions of this recipe is right. Well, you didn’t do anything wrong, and neither is the recipe wrong. A thick batter helps make a muffin have that beautiful high dome top. So do expect a thick (and lumpy) batter and you’ll be happy with the results of your muffins! In addition, no need to take out your electric mixer for this, because I always dread having to dig for it at the back of the cupboard and cleaning it up afterwards.

Also, just a quick note incase you missed it, the recipe for the gingerbread men will be posted on Thursday – as well as the orange frosting since that came with the gingerbread recipe, so stay tuned for that! Tonight will just be on the Gingerbread Muffins.

Breakfast Muffins: Gingerbread Ingredients

PREP TIME 10 MINS | COOKING TIME 15 MINS | MAKES 12 MUFFINS

INGREDIENTS

  • 3 cups plain flour
  • 115g unsalted butter
  • 1/2 cup dark brown sugar
  • 3/4 cup dark molasses (or honey in my case)
  • 3/4 cup plain or vanilla yoghurt
  • 1/4 cup milk
  • 1 large free rage egg
  • 1 & 1/2 tsp baking soda
  • 1 & 1/2 tsp ground cinnamon
  • 1 & 1/4 tsp ground ginger
  • 1/2 tsp ground cloves
  • 1/4 tsp salt

METHOD

  1. Preheat oven to 220C. Line a 12 hole muffin pan with paper cases.
  2. Add the flour, salt, baking soda, ginger, cinnamon, and cloves in a large bowl and whisk together. Set aside. Add the honey and unsalted butter together in a microwave-safe bowl and heat on high for about 1 minute in the microwave. Stir until thoroughly mixed together. Set aside. In third bowl, whisk together the brown sugar, egg, yogurt, and milk.
  3. Pour the mixture into the into the honey and butter mixture and whisk until everything is incorporated. Then pour the wet ingredients into dry and mix until just combined, careful to not over mix the batter which will be very thick and lumpy.
  4. Fill your muffin cups tins to the very top and bake for about 5 minutes at 220C. Baking them at a higher temperature right at the beginning will help create a burst of steam inside the muffin and rapidly lift the tops. Then reduce the temperature down to 190C and continue to bake for about 15 more minutes. Muffins are finished when a toothpick inserted into the centre comes out clean.
  5. Once done, remove the muffins from the oven and set aside to cool down for a bit. Cut slits into your muffins and insert a gingerbread man in each. Top with a drizzle of orange frosting. Serve!

Muffins taste best eaten the same day, and can be stored in an air-tight container at room temperature.

Breakfast Muffins: Gingerbread

BON APPÉTIT

– Ally xx

myTaste.com

Kangaroo Bolognese

Kangaroo Bolognese

Hello Everyone! So today’s recipe was inspired by a meal that I had while travelling the outback a few weeks ago. It was our first night of the tour and our tour guide Dan was showing us the way to Ewing’s Lookout to have champagne, wine, and crackers while watching the sun set over Ayers Rock and Kata Tjuta. I remember him saying that while we were enjoying the sunset, he’ll be back at the campsite and have “tea” ready for us. Then someone called out “what about dinner?” Dan didn’t hear her though because he was getting out of the 4WD as she said it. I then remember a couple of guys discussing about how they came to book the tour, and I remember him specifically saying “it said that dinner would be provided”. I then chimed in and told them that when Dan said “tea” he meant dinner, to which he responded “that’s so weird, in England tea is just tea, like would you like a cup of tea. But here it’s would you like a cup of dinner?” He was hilarious. But nonetheless, I assured the others that dinner will be served. “Tea” is apparently an Aussie slang for a light late afternoon meal or main meal in the evening.

Kangaroo Bolognese Ingredients

Anyway, tea aside, Dan made Kangaroo Bolognese for dinner that night. I’ve ever only had kangaroo once before during my first year in Sydney. It was my 20th birthday party and one of my friends brought kangaroo patties to throw on the barbie. I’ll be honest and say that I cringed a little bit when I found out that he was cooking kangaroo. Even though I was reluctant to, he made me try a bit. I don’t even remember  what it tasted like; I just knew that I neither loved nor hated it. But ever since then until now, it never crossed my mind to actually purchase kangaroo and consume it. I’ll admit that I was even reluctant to eat it while camping – but i had no choice because I didn’t want to starve during the night and wait for breakfast. After giving kangaroo a second chance, I still had the same feelings of neither loving it nor hating it, but I can safely say that I was leaning more towards liking it.

After returning from the trip, I decided that I would give Kangaroo Bolognese a go and last week Monday was the day I tried out the recipe for myself. I basically just cooked it the way I would normally cook a bolognese with minced beef. It turned out to be pretty good! But I think I got sick of eating it after the 3rd day – I made enough to last me 4 meals, and to those who know me, I actually cannot eat the same meal more than twice in a row otherwise I’d get sick and tired of eating it. I still have half a kilo left in my freezer and I am unsure what to make next. I immediately thought of kangaroo lasagna, but I’ve had various suggestions such as kangaroo pie, Aussie kangaroo burger and even a Roorito (kangaroo burrito). I might give the last one a go just because I like the name of it!

Kangaroo Bolognese Ingredients

PREP TIME 10 MINS | COOKING TIME 30 MINS | SERVES 4

INGREDIENTS

  • 500g kangaroo mince
  • 250g linguine (or any other pasta)
  • 1 can (400g) Italian diced tomatoes
  • 1 sachet (2 tbsp) tomato paste
  • 4-5 dried bay leaves
  • 3 baby carrots, cut into small chunks
  • 3 celery sticks, sliced
  • 3 garlic cloves, crushed then minced
  • 1 medium-sized brown onion, diced
  • 1 red birds-eye chilli, sliced (optional for that added kick of spice)
  • 1 cube vegetable stock dissolved in 1 cup boiling water
  • 2 tsp dried oregano
  • Grated parmesan cheese
  • Ground sea salt and black pepper to taste
  • Parsley

METHOD

  1. Heat about a tablespoon of oil in a large frying pan over medium-high. Sauté the garlic until golden and fragrant, then add the chillies and onions. Sauté until the onions are soft and then add in the kangaroo mince. Season with salt, pepper, and oregano. Cook, stirring, until the meat is no longer pink (about 5-7 minutes).
  2. Add the dried bay leaves, diced tomatoes, tomato paste, and vegetable stock. Give it a good mix and then turn the heat down to low, cover and let it simmer for about 15 minutes to allow the flavours to blend. Finally, add in the carrots and celery, and cook for a further 8-10 minutes.
  3. Meanwhile, cook the linguine according to packet instructions.
  4. Remove the sauce from the heat and serve over the hot pasta. Top with a handful of grated parmesan cheese and fresh parsley.

Kangaroo Bolognese

Fun fact: Australia is the only nation to eat its Coat of Arms – not quite!

I was told that Australia is the only nation to eat kangaroos and emus, both of which are national symbols on the Australian Coat of Arms. After doing some research, it’s not quite true and turns out that there are 20 (or maybe even more) other nations that eat their national symbol. Kangaroo has been historically a staple source of protein for indigenous Australians. Kangaroo meat is high in protein, low in fat (about 2%), and has been attributed with a wide range of health benefits.

BON APPÉTIT

– Ally xx

myTaste.com

Beer-braised Pulled Pork Eggs Benedict

Beer-braised Pulled Pork Eggs Benedict

Hello Everyone! Today’s post will actually consist of two recipes; one leading to the other that is. So I’ve been debating whether I should actually post them as two separate posts but then I thought to myself that I wouldn’t be able to do a proper write up (i.e. a story for Vidhya) if I had just posted the first recipe. She would’ve been so mad at me if I didn’t have a story for her! But I do have a good story to tell about the second, which I kind of already mentioned it to Vidhya briefly when I saw her in the kitchen on Monday afternoon.

Anyway, so what happened was that somewhere during the beginning-mid year, my friends and I went out for brunch on a fine weekend. I suggested that we head on over to John Smith Café in Waterloo specifically because I saw a whole lot of Instagram posts about this heavenly Pulled Pork Cronut with Hollandaise Sauce! I was seriously drooling all over my phone, so naturally I made it my mission to head on over and drag my lovely ladies Jialing and Yvonne along too. We planned to meet for brunch, and but of course brunch turned into late lunch as Jialing and I adjusted our timings to suit Yvonne. When we got to the café the waiter (possibly owner) showed us to the table and said that he had good news and bad news. I honestly forgot what the good news was, but the bad news was indeed BAD news. So bad that I just can’t even. They ran out of pulled pork. I was so devastated that I even told the guy serving us in a sort of like sad little girl voice “but I came specifically here for that!” To which he replied “I am very sorry about that, but here’s a cronut on me!”

Beer-braised Pulled Pork Eggs Benedict

Oh well, at least I got a free cronut. But what I really wanted to say is that I really wanted to go back another time to devour this Pulled Pork Cronut of theirs – but sadly it’s already nearing the end of the year and I have no been back! So I thought to myself, why wait to go back if I can possibly just whip one up of my own at home? Minus the cronut that is; just the pulled pork, eggs benny style. I know it’s not the same thing, but who doesn’t love pulled pork eggs benny for a big Sunday breakfast/brunch/lunch?

First things first, the pulled pork. This recipe for beer-braised pulled pork is just so great. Why I have chosen to braise the pork in beer is because, well I’ve had a 6-pack of Corona lying in my closet for quite possibly 7 months now. For those of you who know me, I don’t drink beer. I just don’t like the taste of it. So why do I have beer in my  closet do you ask? I bought it for a prank video I filmed for my Major Design Project for an anti-binge drinking campaign. So instead of drinking it, or giving it away, I decided the only way I can ‘consume’ it would have to be incorporating it into my cooking – hence the beer-braised pulled pork. So technically you don’t have to follow this pulled pork recipe, you can find another one to use, or if you have one of your own up your sleeve then be my guest!

*Note: my casserole dish was a wee-bit too small for the meat I had. Oops! I didn’t have anything bigger so I ended up using only half of the vegetables and half a bottle of beer. Ideally you would use all! Also, you can find the original recipe for this beer-braised pork shoulder over on The Kitchn. I tweaked the recipe a little bit, and of course to suit my not-so-good oven that jut takes double (sometimes triple) the amount of time to cook anything. I also kept the fat on the pork shoulder – that’s where the goodness is!

Beer-braised Pulled Pork

Beer-braised Pulled Pork Ingredients

PREP TIME 30 MINS | COOKING TIME 5 HOURS | SERVES 4-6

INGREDIENTS

  • 1kg pork shoulder
  • 355ml beer of choice
  • 4 garlic cloves, crushed and minced
  • 2 celery sticks, sliced
  • 2 large tomatoes, diced
  • 1 large brown onion, cut into wedges
  • 1 large carrot, cut into chunks
  • 1 tbsp olive oil
  • 2 tsp brown sugar
  • 1 & 1/2 tsp paprika
  • 1 tsp cumin powder
  • 1 tsp ground rock salt
  • 1 tsp ground black pepper
  • 1 tbsp plain flour

METHOD

  1. Preheat oven to 200C. Combine the brown sugar, cumin powder, paprika, salt, and pepper in a small bowl. Rub the pork with the spice mixture and allow to sit for about 30 minutes.
  2. Heat the olive oil in a large frying pan over medium-high heat. Sear and brown the pork on all sides, about 3 minutes per side. Remove from the pan and transfer to the casserole dish. Sauté the garlic and onions until fragrant. Then add in the tomatoes and cook until soft before adding the carrots and celery. Scrape the bottom of the pan while mixing to bring up any browned bits.Transfer the vegetables to the casserole dish with the pork.
  3. Pour the beer over the meat and vegetables and cover. Cook in the oven for 5 hours, checking once or twice, until the meat is extremely tender. Once done, transfer the pork to a plate and shred using a fork.
  4. Strain juices into a small saucepan and bring to a boil. Once boiling, add the flour in and stir continuously to get rid of any lumps. This will be your gravy to go with your pulled pork eggs benny.

Beer-braised Pulled Pork

Beer-braised Pulled Pork


Pulled Pork Eggs Benedict with Sriracha Hollandaise Sauce

This is where shit gets real. Sriracha Hollandaise Sauce? Yes please! Also, please see the original ideas that I got form Pineapple & Coconut (basically where I got the idea to use English Muffins and Sriracha Hollandaise sauce for this recipe).

Beer-braised Pulled Pork Eggs Benedict Ingredients

PREP TIME 5 MINS | COOKING TIME 15 MINS | SERVES 2

INGREDIENTS

For the Eggs Benny

  • 1 cup pulled pork
  • 3 tbsp pulled pork gravy
  • 2 English muffins, lightly toasted
  • 2 large free range eggs
  • 1/2 avocado, mashed
  • Handful of snow pea shoots
  • Pinch of paprika

For the Sriracha Hollandaise Sauce

  • 3 large free range eggs, yolks separated
  • 175g unsalted butter, cut into cubes, at room temperature
  • 2 tbsp water
  • 2 tbsp fresh lemon juice
  • 1-3 tbsp sriracha sauce (depending on how hot you want it)
  • Ground salt and black pepper to taste

METHOD

  1. Sriracha Hollandaise Sauce: Place a heatproof bowl over a medium saucepan that is quarter-filled with water. Make sure that the bowl should fit snugly into the pan without touching the water (lift the bowl to check and remove some water if it does). Bring the water to a boil over high heat, then reduce heat to very low so the water is barely simmering (there should be almost no movement at all). It is important that the water is barely simmering while making the sauce – if it is too hot, the egg yolks will cook too much and the sauce will curdle.
  2. Place the egg yolks and the 2 tablespoons of water in the heatproof bowl and place over the pan. Whisk the mixture constantly for 3 minutes or until it is thick and pale, has doubled in volume and a ribbon trail forms when the whisk is lifted.
  3. Add the butter a cube at a time, whisking constantly and adding another cube when the previous one is incorporated completely (about 10 minutes to add it all in). If butter is added too quickly, it won’t mix easily with the egg yolks or the sauce may lose volume. At the same time, it is important that the butter is at room temperature and added a cube at a time, so that it doesn’t take too long to be incorporated – if the sauce cooks for too long, it can curdle.
  4. Remove the bowl from the pan and place on a heatproof surface. The cooked sauce should have the consistency of very lightly whisked thickened cream. Whisk in the lemon juice, sriracha sauce, and season with salt and pepper.
  5. Poached Eggs: Bring small saucepan of water to the boil over medium-high heat, then reduce the heat to low-medium – the water should be just simmering. Add in the vinegar and stir. Crack one egg into a small bowl and quickly, but gently pour it into the water. Repeat with the other egg. A really soft poached egg should take around 2 minutes, but if you want it a bit more firm, it will take about 4 minutes. To check if they’re cooked right, carefully remove the egg from the pan with a slotted spoon and give the yolk a gentle push (you can tell just by your instincts if it is under or overcooked – or perfect)!
  6. Assembly: Combine the pulled pork and gravy in a small bowl. Spread each English muffin with mashed avocado and top with the pulled pork. Place the poached egg on each and top with a generous amount of sriracha hollandaise sauce. Crack a a little pepper on top, sprinkle with a bit of paprika, and decorate with  snow pea shoots. Serve immediately!

Beer-braised Pulled Pork Eggs Benedict

Beer-braised Pulled Pork Eggs Benedict

BON APPÉTIT

– Ally xx

myTaste.com