Spiced Carrot Cake Loaf with Cinnamon Cream Cheese Frosting

Spiced Carrot Cake Loaf with Cinnamon Cream Cheese Frosting

Hello Everyone!

AMCARMEN’S KITCHEN TURNS EIGHT TODAY!

And what a journey it has been indeed! So much has happened this year that it’s been extra difficult to keep up with the blog and my social media accounts associated with Amcarmen’s Kitchen. Just before my blog turned 7 last year, I started a foodie community group on Instagram together with a foodie friend of mine, Chamaine (she also participated in my Auguest 2021 series). From there, we started organising and hosting food collaborations amongst the IG foodie community, internationally. Aside from that, I also expanded my social media reach into the world of TikTok and started uploading video content there. It was also from TikTok where I placed third in a virtual cooking competition, and was invited to join in food campaigns where I won prizes weekly.

To be honest, with all that going on side-by-side with my work and social life, I actually didn’t prepare anything for my blog’s anniversary today. In fact, I was going back and forth with myself whether to whip up something or indulge in a lazy Easter long weekend. Prior to this weekend, I spent the last two weekends (Friday to Sunday) in a classroom from 9am – 7pm where I did a Premiere Pro and After Effects course. So yes, I totally deserve a do-nothing weekend after all that *cheeky grin*.

Luckily, because of my oh-so busy schedule, I had this recipe for a Spiced Carrot Cake Loaf with Cinnamon Cream Cheese Frosting that didn’t get posted towards the end of March. Still, it’s perfect for a celebration!

Spiced Carrot Cake Loaf with Cinnamon Cream Cheese Frosting

This carrot cake turned carrot cake loaf is dense, yet ultra soft, moist, and flavoured with fall-favourite spices such as cinnamon, ginger, and nutmeg. You can serve it plain, or spruce it up with your choice of nuts, dried fruit, and/or top with some cream cheese frosting. Now if you want to be a little bit extra, all you need is a pinch or two of cinnamon powder to take your frosting to another level. The delicious cinnamon-flavoured cream cheese frosting really heightens each slice of carrot cake loaf!

I’ve made this carrot cake loaf three times now, the first time was just because I wanted to bake something that was easy to take to work for a mid-morning or mid-afternoon snack. The second time I baked this loaf was with my boyfriend when he visited for the weekend a few months back. The third time, I was searching for a recipe where I could feature Binda Valley’s Vanilla Bliss Natural Greek Style Yoghurt, which I received courtesy of Gourmet Direct PH a few months back. This is also one of my achievements from last year, to be recognised by a brand and create promotional content for them.

This recipe makes two carrot cake loaves, feel free to double or downsize the recipe, but trust me, you don’t want to be downsizing because one loaf disappears fast! If you can turn a cake into a loaf, you can most definitely turn this loaf into muffins as well!

PREP TIME 15 MINS | COOKING TIME 55 – 65 MINS | MAKES 2 LOAVES

INGREDIENTS

Spiced Carrot Cake Loaf Ingredients

For the carrot cake loaf

Dry ingredients

  • 3 cups all-purpose flour
  • 2 tsp baking powder
  • 2 tsp ground cinnamon
  • 1/2 tsp ground nutmeg
  • 1 & 1/2 tsp baking soda
  • 1/2 tsp salt
  • 3/4 cup roasted walnuts, roughly chopped

Wet ingredients

Cinnamon Cream Cheese Frosting Ingredients

For the cinnamon cream cheese frosting

  • 1 block (225g) cream cheese, softened
  • 2 tbsp unsalted butter, softened
  • 1 cup confectioners’ sugar
  • 1/2 tsp vanilla extract
  • 1/4 tsp ground cinnamon
  • Pinch of salt

METHOD

  1. Preheat oven to 180C (350F or gas mark 4) and line two 9×5-inch loaf pans with parchment paper.
  2. Carrot Loaf: Whisk all the dry ingredients, except for the walnuts, together in a large mixing bowl until well combined. Set aside.
  3. In a medium-sized mixing bowl, whisk all the wet ingredients together until well combined.
  4. Pour the wet ingredients into the dry ingredients and gently whisk together until just combined. The batter should be semi-thick in consistency. Fold the chopped walnuts into the batter.
  5. Equally divide the batter between the prepared loaf pans and bake for 55 to 65 minutes, or until a toothpick inserted into the center of the cake comes out clean as baking times may vary.
  6. Remove from the oven once done and leave it to cool completely in its pan on a wire rack.
  7. Cinnamon Cream Cheese Frosting: Using a handheld (or stand) mixer, beat the cream cheese in a medium-sized bowl on medium-high speed until smooth and creamy.
  8. Beat in the butter, and then followed by the confectioners’ sugar, vanilla extract, cinnamon, and a pinch of salt over low speed until smooth and creamy. Taste and adjust to your liking.
  9. Once the carrot cake loaf has cooled, frost with the cinnamon cream cheese and top with roasted walnuts and shredded carrots.
  10. Slice, serve, and enjoy!

Spiced Carrot Cake Loaf

Storage tip: Store your carrot cake loaf without the frosting! Cover and store leftover loaf/slices at room temperature for up to 3-4 days or in the refrigerator for up to about 10 days. Store the frosting separately in the refrigerator for up to a week.

Before I end tonight’s post, I just want to say a special thank you to my Mom. She was the one who patiently taught me how to cook my favourite dishes when I was growing up. She was my #1 supporter. Thank you Mama for passing down your knowledge and love for food on to me. I know you’re proudly watching from above. I love you.

Spiced Carrot Cake Loaf with Cinnamon Cream Cheese Frosting

BON APPÉTIT

– Ally xx

Follow me on my social media accounts:
Facebook: Amcarmen’s Kitchen
Instagram: @amcarmenskitchen
TikTok: @amcarmenskitchen

myTaste.com

Easy Hummus (without Tahini)

Easy Hummus (without Tahini)

Hello Everyone! Tonight, I will be sharing the recipe for the last and third component of my lunchbox series from the National Pack Your Lunch Day (March 10) collaboration that I organised with my foodie friends over on IG. Here’s a quick and easy recipe for Hummus, without the tahini.

The debate over the origin of hummus dates back to the 13th century. The Greeks like to claim it as their own, but based on historical information, hummus likely originated from ancient Egypt. Regardless of where it’s originally from, hummus is enjoyed by all cultures, not just Greek and Middle Eastern. In the Middle East, hummus is usually eaten as a dip, with pita bread. In the West, it is now produced industrially, and is often served as a snack or an appetiser with crackers.

Easy Hummus (without Tahini)

But before we dive into the recipe, what exactly is tahini?

Tahini is a Middle Eastern paste or sauce made from toasted ground hulled sesame seeds, oil, and sometimes salt. The ground sesame seeds are emulsified with oil to create a smooth and creamy seed butter with a pourable consistency. It can be served by itself, as a dip or used as a major ingredient in hummus.

If tahini is a key ingredient in hummus, can we make hummus without tahini?

The answer is, yes!

Unlike all the other ingredients that go into making hummus, tahini is one where you’re likely to not always have on hand. It’s not cheap either if you manage to find them at your local supermarket, but it’s not commonly found here in the Philippines. You can also make your own at home, but if you’re on the same boat as me and want homemade hummus without the fuss of making your own tahini at home, then this recipe is just as good without it!

Because of the other ingredients that are mixed in the making of hummus, it tastes nothing like chickpeas. Instead, it tastes a little garlicky, smoky, and also tangy because of lemon juice. It’s a smooth, creamy paste that melts in your mouth, and the taste of cumin will linger on your tongue.

Easy Hummus (without Tahini) Ingredients

PREP TIME 5 MINS | COOKING TIME — MINS | SERVES 6-8

INGREDIENTS

  • 1 can (425g) garbanzo beans (chickpeas), drained and blanched
  • 1 garlic clove, minced
  • 2 to 4 tbsp water
  • 2 tbsp extra virgin olive oil
  • 1 tbsp lemon juice
  • 3/4 tsp toasted ground cumin
  • 1/2 tsp ground paprika
  • 1/4 tsp salt

METHOD

  1. Add all the ingredients into a food processor. Process until smooth and creamy; if needed, you may add additional water to get your desired consistency. You may also add additional spices, and/or seasoning to suit your taste preference.
  2. Transfer to a serving dish and top with more olive oil, toasted cumin seed, and ground paprika.
  3. Serve with your veggies and crackers of choice. I went with carrots and celery, and multi-seed rice crackers. Enjoy!

Easy Hummus (without Tahini)

BON APPÉTIT

– Ally xx

Follow me on my social media accounts:
Facebook: Amcarmen’s Kitchen
Instagram: @amcarmenskitchen
TikTok: @amcarmenskitchen

myTaste.com

Mediterranean Multi-grain Rice & Chickpea Salad

Mediterranean Multi-grain Rice & Chickpea Salad

Hello Everyone! Last week I shared a post on my Instagram for an open collaboration that me and two of my IG foodie friends organised and hosted. It was for National Pack Your Lunch Day (March 10) and out of the three main components that made up my lunchbox, one of them was this Mediterranean Multi-grain Rice & Chickpea Salad, alongside the recipe I shared last week to serve with this salad.

Mediterranean-inspired Lunchbox

Like with the recipe I shared last week for a Mediterranean Baked Fish dish, this salad is also loaded with fresh Greek flavours of olive oil, olives, feta, and lemon. Other than those ingredients, all you really need is a killer salad dressing and some grain of choice; brown, red, or a mix of those two. I recently bought a pack of multi-grain rice made of a mix of black, brown, and red rice, with adlai as well, so decided to use that for this recipe.

Mediterranean Multigrain Rice Salad

Everything else is customisable to your liking; instead of rice, you can use quinoa or anything rice-like shaped such as farro, pearl barley, or couscous. You can choose whether to add fresh, roasted, or sautéed vegetables, and add your leafy greens of choice. Change up the cheese, or even leave it out to make it vegan friendly. If you don’t have walnuts lying in your pantry, feel free to swap it out for flaked almonds, pine nuts, pistachios, cashews, sunflower seeds, or pepitas – anything really to give the salad an added texture and crunch. The possibilities with this salad are endless!

This salad comes together effortlessly and is an excellent work lunch option or to bring to a potluck party as you can easily double or triple its serving size. Coat the salad with a Balsamic, Olive Oil, and Basil Dressing and you’re in for a delicious treat! It’s light, yet filling at the same time; tangy, juicy, and crunchy!

PREP TIME 10-15 MINS | COOKING TIME 20 MINS | SERVES 4*

*This recipe serves 4 as a meal, or 6 to 8 as a side.

INGREDIENTS

Mediterranean Multigrain Rice Salad Ingredients

For the salad

  • 1 & 1/2 cups multigrain rice (combination of black, red, and brown rice, plus adlai), cooked
  • 1 can (425g) garbanzo beans (chickpeas), drained and blanched
  • 100g cherry tomatoes, halved
  • 100g kale, leaves trimmed and roughly torn
  • 100g marinated Greek feta with olives, in olive oil
  • 1/4 cup walnuts, toasted and roughly chopped
  • 1 packet 5 grain rice cakes, crushed

Balsamic, Lemon, and Basil Dressing Ingredients

For the dressing

  • 2 tbsp balsamic glaze
  • 2 tbsp extra virgin olive oil
  • 1 garlic clove, finely minced
  • Basil leaves, roughly chopped
  • Juice and zest of 1 lemon
  • Salt & black pepper, to taste

METHOD

  1. Dressing: Add all the ingredients together in a jar and seal tightly. Shake vigorously for about 2 to 3 minutes, until well combined. Set aside.
  2. Salad: Add all the ingredients to a large mixing bowl and toss to combine.
  3. Add the dressing and then toss again to evenly coat the salad with the dressing. Transfer to individual serving plates and serve with some Mediterranean Baked Fish. Enjoy!

Mediterranean Multi-grain Rice & Chickpea Salad

BON APPÉTIT

– Ally xx

Follow me on my social media accounts:
Facebook: Amcarmen’s Kitchen
Instagram: @amcarmenskitchen
TikTok: @amcarmenskitchen

myTaste.com

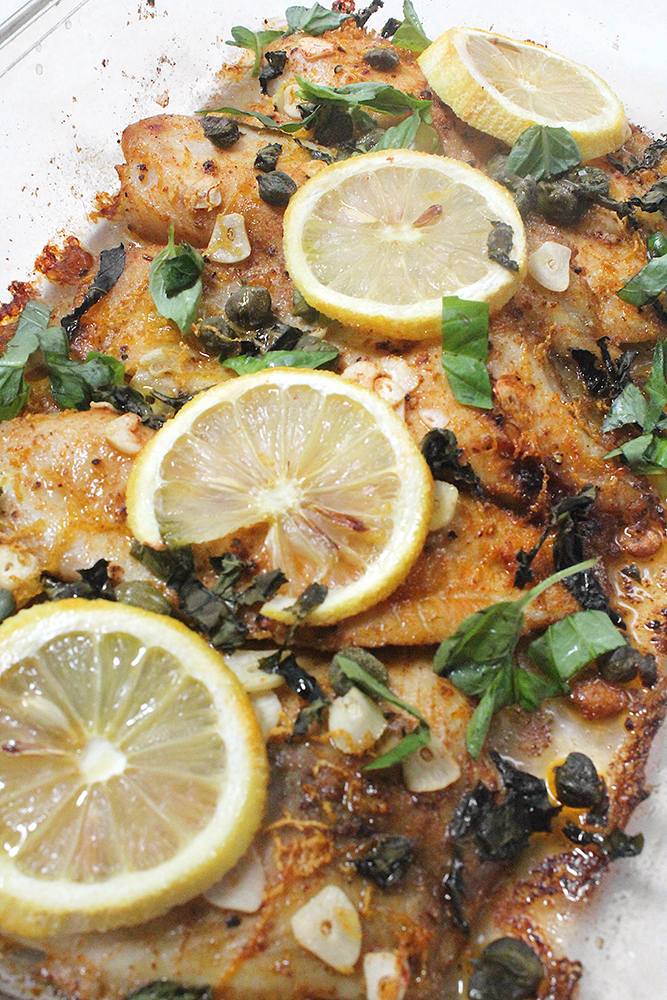
Mediterranean Baked Fish

Mediterranean Baked Fish

Hello Everyone! Two days ago I shared a post on my Instagram for an open collaboration that me and two of my foodie friends organised and hosted. It was for National Pack Your Lunch Day (March 10) and out of the three main components that made up my lunchbox, one of them was this Mediterranean Baked Fish.

This recipe is loaded with fresh Mediterranean, Greek flavours of olive oil, lemon, and capers. This combination enhances the flavour of the fish, while still allowing it to shine through as the star! Feel free to switch up the kind of fish that’s not only suitable to your liking, but what’s also fresh and available locally. Choose white fish that’s mild in flavour such as cod, haddock, striped bass, mahi-mahi, or grouper fish. I went with tilapia as that’s what’s affordable and readily available here in the Philippines.

Mediterranean Baked Fish

When it comes to baking fish, you don’t want to over cook it. As soon as the fish starts to flake easily, it’s done! For me, it took between 10 to 12 minutes for my fish to turn out perfect, but there are several factors that can differ the cooking time. For example, everyone’s oven cooks differently. Everyone’s fish fillet may be of a different size, shape, or thickness, and everyone’s baking dish heats up differently. Use your gut feeling when it comes to baking time here!

Mediterranean Baked Fish Ingredients

PREP TIME 10 MINS | COOKING TIME 10-12 MINS | SERVES 4

INGREDIENTS

  • 500g tilapia fillets (skinless and boneless)
  • 3 garlic cloves, thinly sliced
  • 2 tbsp capers
  • 1 tbsp olive oil
  • 1/2 tsp ground black pepper
  • 1/2 tsp ground coriander
  • 1/2 tsp ground paprika
  • 1/2 tsp salt
  • Fresh basil leaves, roughly chopped
  • Juice of half a lemon
  • Lemon slices
  • Zest of 1 lemon

METHOD

  1. Preheat oven to 218C (425F or gas mark 7) and grease a baking dish with a bit of olive oil or butter.
  2. Place the tilapia fillets in the basking dish and rub all the ingredients into the fish, making sure to coat them all. Arrange the fillets in the baking dish and top with the lemon slices. Set aside for about 15 minutes for the spices to infuse into the fish.
  3. Bake in the oven for 10 to 12 minutes, until the fish flakes easily with a fork.
  4. Garnish with more freshly chopped basil and serve with a warm salad or seasonal greens. Enjoy!

Mediterranean Baked Fish

BON APPÉTIT

– Ally xx

Follow me on my social media accounts:
Facebook: Amcarmen’s Kitchen
Instagram: @amcarmenskitchen
TikTok: @amcarmenskitchen

myTaste.com

French Toast Wraps with Mixed Berry Compote & Vanilla Yoghurt

French Toast Wraps with Mixed Berry Compote & Vanilla Yoghurt

Hello Everyone! Yesterday I shared a recipe for a simple mixed berry compote, and tonight I’ll show you how you can use it in a sweet breakfast dish (or even for dessert), featuring Binda Valley’s Vanilla Bliss Natural Greek Style Yoghurt, courtesy of Gourmet Direct PH!

French Toast Wraps with Mixed Berry Compote & Vanilla Yoghurt

These French Toast Wraps are a creative cross between traditional French toast and crêpes. They are made by dipping wholewheat wraps in a mixture of egg, soy milk, cinnamon, nutmeg, and vanilla extract. Make sure that you dip the wraps in the egg mixture rather than soak. You can let them soak for 30 seconds or so, but it will make the wraps a touch more fragile to handle. They are then fried in butter on both sides until golden brown. For my recipe, I fried them in coconut oil as I realised I didn’t have any butter left in my fridge.

The result is a deliciously mouth-watering, crêpe-like wrap without the hassle of actually making crêpes from scratch. Fill the wraps with your yoghurt of choice, sweetened or unsweetened, and you can also mix up your choice of fruits and granola, and even use herbs such as basil or mint. You can even go for savoury French Toast Wraps if you want with this recipe!

French Toast Wraps with Mixed Berry Compote & Vanilla Yoghurt Ingredients

PREP TIME 10 MINS | COOKING TIME 10 MINS | SERVES 3

INGREDIENTS

For the French toast wraps

  • 6 wholewheat tortilla wraps
  • 1/2 cup soy milk
  • 1 large free range egg
  • 1 tsp vanilla extract
  • 1/2 tsp ground cinnamon
  • 1/4 tsp ground nutmeg
  • 3/4 cup Binda Valley’s Vanilla Bliss Natural Greek Style Yoghurt
  • 1 tbsp lemon juice
  • 1/2 tbsp honey
  • 1/3 cup mixed berry compote
  • 3 large bananas, peeled and sliced
  • Granola (with dried cranberries and pumpkin seeds)
  • Confectioners’ sugar (optional)
  • Coconut oil, for cooking

METHOD

  1. In a shallow bowl, add the soy milk, egg, vanilla extract, cinnamon, and nutmeg together. Whisk until well combined. Dip both sides of each tortilla in the egg mixture.
  2. Add the coconut oil to a pan over medium-high heat. Add the dipped tortilla to the pan and cook until golden brown, about 1 to 2 minutes on each side. Once done, transfer to a plate and repeat with the other tortillas.
  3. In a small bowl, mix the yoghurt, lemon juice, and honey together until well combined. Spoon the yoghurt mixture down the centre of each tortilla and top with the sliced bananas.
  4. Fold the sides of the tortilla over the top of the yoghurt and bananas, and top with the warmed mixed berry compote. Top with more sliced bananas, granola, and sprinkle with confectioners’ sugar (optional). Serve and enjoy immediately!

French Toast Wraps with Mixed Berry Compote & Vanilla Yoghurt

French Toast Wraps with Mixed Berry Compote & Vanilla Yoghurt

BON APPÉTIT

– Ally xx

Follow me on my social media accounts:
Facebook: Amcarmen’s Kitchen
Instagram: @amcarmenskitchen
TikTok: @amcarmenskitchen

myTaste.com

Mixed Berry Compote

Mixed Berry Compote

Hello Everyone! A great way to use up fruits, especially berries, that have been sitting in your fridge for a while and on the verge of over-ripening, is to make compote! I’ve made my fair share of compote when I was still living in Australia, usually using fresh, overripe berries as they are easily accessible when in season. While you can sometimes get fresh berries here in the Philippines, they’re really expensive which is why I opted to use frozen berries for this compote recipe that I will be sharing.

Mixed Berry Compote

Compote is a type of fruit spread that is made from slowly cooking whole or small fruit pieces combined with a sugar syrup. The three main ingredients for a compote are as follows:

  • Berries – fresh or frozen, whatever you have on hand,
  • Juices – any liquid with some tang i.e. lemon, lime, orange, or pomegranate juice, and
  • Sweeteners – sugar, honey, maple syrup, or other natural sweeteners.

Other than those three main ingredients, you may also add other flavours to enhance your compote. Some options include, but are not limited to orange zest, lemon zest, mint, or your favourite liqueur.

This mixed berry compote is best served over pancakes, toast, French toast, waffles, yoghurt, ice cream, or cheesecake. The possibilities are endless! Stick around tomorrow to see what I served my mixed berry compote over!

Mixed Berry Compote Ingredients

PREP TIME 5 MINS | COOKING TIME 10 MINS | SERVES 4

INGREDIENTS

  • 250g frozen mixed berries
  • 1/4 cup white granulated sugar
  • Zest of 1 lemon
  • Juice of half a lemon

METHOD

  1. Combine all the ingredients in a small saucepan.
  2. Over medium-high heat, bring the mixture to a boil until the berries break down and the compote thickens to your desired consistency, not more than 10 minutes.
  3. Serve over your choice of breakfast foods to satisfy your sweet tooth cravings in the morning. Enjoy!

I served mine over some delicious Vanilla Bliss Greek Style Yoghurt from Binda Valley. If you’re residing in the Philippines, you can get your fix of this yoghurt from Gourmet Direct PH.

Mixed Berry Compote & Binda Valley's Vanilla Bliss Yoghurt

You can easily make a large batch of compote and store them in the fridge, warming them up as you need them. Just be sure to keep the compote in an airtight container or sterlised jar. It should be able to last for up to 2 weeks when properly stored and refrigerated.

If you want to keep some around for even longer, you can always freeze it. Pour the compote into jars, then seal it while it is still hot. The compote will last in the freezer for up to 2 months.

BON APPÉTIT

– Ally xx

Follow me on my social media accounts:
Facebook: Amcarmen’s Kitchen
Instagram: @amcarmenskitchen
TikTok: @amcarmenskitchen

myTaste.com

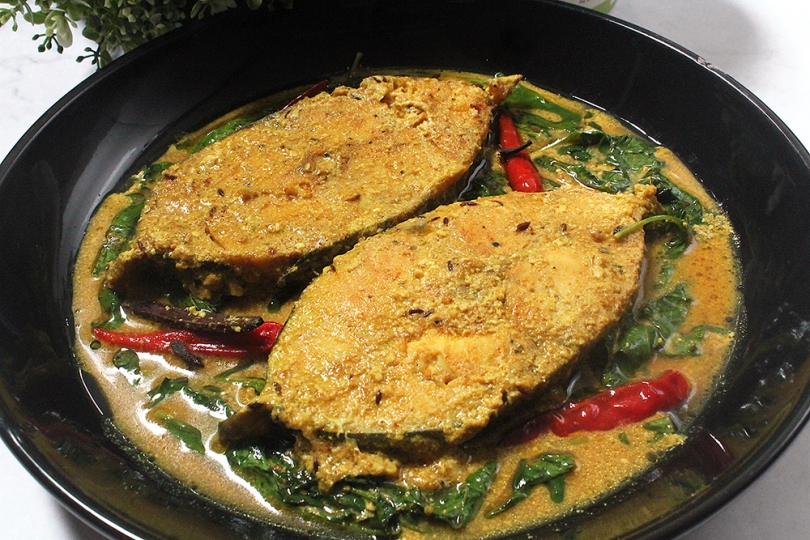
Bengali Doi Maach (Fish in Yoghurt Curry)

Bengali Doi Maach (Fish in Yoghurt Curry)

Hello Everyone! I’m back with another recipe featuring one of Binda Valley’s products, specifically their Natural Greek Style Yoghurt that I received from Gourmet Direct PH last month. I featured smoothies in my previous posts and tonight I wanted to share a savoury recipe using yoghurt. As far as my knowledge goes, I know that yoghurt is commonly used as a marinade for chicken in savoury Indian dishes, but since I wanted to keep in line with only sharing pescatarian, vegetarian, or vegan recipes for my blog, I had to do further research for this.

Gourmet Direct PH x Binda Valley Yoghurt

I typed ‘fish and yoghurt’ recipes into Google and a recipe for Bengali Doi Maach, or in English, Fish in Yoghurt Curry caught my attention. It is a deliciously thick, subtly spicy, and delicately sour fish curry. The fish is first marinated, lightly fried, and then simmered in a yoghurt-based gravy. The end result is a very tender and flavourful fish having absorbed the wonderful flavours of the gravy. The yoghurt and minimal spices used makes this dish light yet hearty, and is best served with basmati rice for a complete Indian meal.

Bengali Doi Maach (Fish in Yoghurt Curry)

Not only does it come together quickly, making it a perfect weeknight dish, it is also very cost effective. The ingredients for this dish are quite cheap and easy to find. You can use your choice of freshwater fish (the best would be thick, meaty fish) and get it simmering away with pantry staples. I literally had all the ingredients readily available in my pantry, which made me super excited to tackle this Doi Maach!

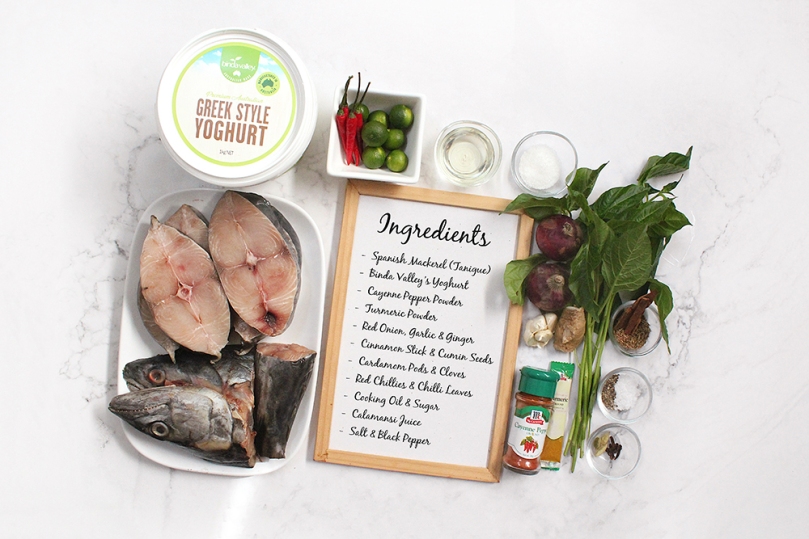
Bengali Doi Maach (Fish in Yoghurt Curry) Ingredients

PREP TIME 30 MINS | COOKING TIME 30 MINS | SERVES 6

INGREDIENTS

For the fish

  • 1 kg Spanish mackerel (tanigue, in Tagalog), sliced
  • 1 tbsp turmeric powder
  • 1 tbsp cayenne pepper powder
  • 2 tsp salt
  • 1 & 1/2 tsp ground black pepper
  • 1 tbsp coconut oil
  • 2 tbsp calamansi juice (or lemon/lime juice)
  • Cooking oil, for searing

For the yoghurt curry

  • 6 whole cloves
  • 4 red chillies (fresh or dried)
  • 3 green cardamom pods
  • 1-inch cinnamon stick
  • 1 tsp cumin seeds
  • 2 red onions, grated
  • 6 cloves garlic, grated
  • 1/2-inch ginger, grated
  • 1 cup water
  • 1 & 1/2 cups Binda Valley’s Natural Greek Style Yoghurt
  • 2 tsp sugar
  • Salt, to taste
  • Chilli leaves* (optional)

*Normally, this dish would be garnished with some coriander leaves, but if you know me, you know I detest the taste of coriander. So to add a pop of green to this dish, I used chilli leaves instead.

METHOD

  1. Combine all the ingredients for the fish marinade in a large mixing bowl, making sure the fish slices are evenly coated. Cover and set aside to marinate for at least 30 minutes to an hour.
  2. Heat enough oil in a large pan, over high heat and sear the marinated fish slices; work in batches if needed. Once done, remove from the pan and set aside.
  3. Remove any excess oil from the pan, leaving about 2 tablespoons and reduce the heat down to medium. Toast the spices (cloves, chillies, cardamom pods, cinnamon stick, and cumin seeds) until fragrant, before adding the grated onions, garlic, and ginger. Cook for about 30 to 45 seconds.
  4. Add half of the cup of water to the pan to deglaze it, and then add the yoghurt, stirring until it is incorporated into the water and spices mixture.
  5. Season with salt and sugar, and leave to simmer over medium-high heat for about 15 minutes, or until slightly reduced.
  6. Add the fried fish to the pan and cook for a further 10 minutes. In the last cooking minute, add the chilli leaves to the pan and cook until the leaves have just wilted.
  7. Transfer the fish curry to a serving dish and enjoy immediately with freshly steamed rice!

Bengali Doi Maach (Fish in Yoghurt Curry)

Bengali Doi Maach (Fish in Yoghurt Curry)

BON APPÉTIT

– Ally xx

Follow me on my social media accounts:
Facebook: Amcarmen’s Kitchen
Instagram: @amcarmenskitchen
TikTok: @amcarmenskitchen

myTaste.com

Mango Berry Probiotic Yoghurt Smoothie

Mango Berry Probiotic Yoghurt Smoothie

Hello Everyone! If you read my post last week, I mentioned that in the upcoming weeks ahead, I’ll be featuring recipes using Binda Valley’s Probiotic Drinking Yoghurt and/or Greek Style Yoghurt that Gourmet Direct PH sent over in mid January. Last week I shared a recipe for Peach Mango Pie Probiotic Yoghurt Smoothie Bowl and this week I’ll also be sharing another smoothie recipe.

This Mango Berry Smoothie Probiotic Yoghurt Smoothie combines the delicious flavors of a juicy sweet mango together with tangy berries in one refreshing drink. Since berries aren’t native to the Philippines (except for strawberries where you can source locally), I decided to use frozen mixed berries to make this smoothie. You can also use fresh berries for this recipe but I find that they don’t give off a vibrant colour as opposed to using frozen fruit. Also, using frozen fruit gives the smoothie a nice and thick consistency.

Gourmet Direct PH x Binda Valley Yoghurt

To be honest, I was never really a smoothie kind of person until I left for Australia for my university studies. I always cherished my sleep more than waking up early in the morning to prepare my breakfast. I leave just enough time to shower, get ready, and dash out the door, grabbing breakfast either on campus or just outside my workplace during my internship. While this worked out fine, I realised I was spending so much money for breakfast. I remember getting toast with ricotta and berries for AUD 8 (almost 300 PHP) which is like a full fancy meal here in the Philippines or 3 full fast food meals.

Not that this smoothie is any cheaper than a fast food breakfast meal, but if you’re pressed for time in the mornings, and want to eat healthier, this smoothie is perfect for a quick and on-the-go breakfast. All you need to do is add an extra 5 minutes to your morning routine!

Mango Berry Probiotic Yoghurt Smoothie Ingredients

PREP TIME 5 MINS | COOKING TIME | SERVES 1

INGREDIENTS

  • 1 cup Binda Valley’s Probiotic Drinking Yoghurt
  • 1 cup mango, frozen
  • 1 & 1/2 cups mixed berries, frozen
  • 1 banana, peeled and cut into 1-inch pieces
  • 1 tbsp coco syrup
  • Granola, to top

METHOD

  1. Add all the ingredients, except the granola, into a blender and blend until smooth.
  2. Transfer to a glass and top with the granola. Serve immediately and enjoy!

Mango Berry Probiotic Yoghurt Smoothie

BON APPÉTIT

– Ally xx

Follow me on my social media accounts:
Facebook: Amcarmen’s Kitchen
Instagram: @amcarmenskitchen
TikTok: @amcarmenskitchen

myTaste.com

Yu Xiang Qie Zi (Spicy Sichuan Eggplant Stir-fry)

Yu Xiang Qie Zi (Spicy Sichuan Eggplant Stir-fry)

Hello Everyone! Back in May of last year, a foodie friend of mine and I started hosting open food collaborations on Instagram under the Foodies United PH group that we co-admin. Most of the food that I featured for the collaborations didn’t end up here on my blog; the reason being was that it didn’t fit with the theme. This is also part of the reason why I decided not to go with a theme for my blog for this year.

International Hot & Spicy Food Day Collaboration by Foodies United PH

This post was supposed to go up on Sunday, but I was having issues with WordPress at that time. Anyway, on Sunday 16 January 2022, we hosted a collaboration for International Hot & Spicy Food Day. I love spicy food, and I would say that my spice tolerance is above average. When I was brainstorming a dish for this collaboration, I had a faint memory of an eggplant dish that I had way back when I was still studying in Australia. I remember it being a spicy dish that I absolutely loved, but unfortunately could not remember what the dish was. So after some research, I think the closest to my vivid memory of the dish is Yu Xiang Qie Zi, or in English, Sichuan Eggplant, which is the dish that I am featuring to celebrate International Hot & Spicy Food Day.

Before we begin, here’s a fun fact: Yu Xiang literally translates to ‘fish-fragrant’ while Qie Zi means ‘eggplant’. Despite the literal translation, this dish does not actually have any fish in it. The term is actually a style of cooking for a particular Sichuan fish dish. Since this eggplant dish uses the same aromatics, sauce, and style of cooking, it was named Yu Xiang, preceding the Qie Zi.

Yu Xiang Qie Zi (Spicy Sichuan Eggplant Stir-fry)

Yu Xiang Qie Zi is essentially a Sichuan chilli garlic eggplant stir-fry, and can be cooked with or with minced pork. The addition of minced pork is to add more flavour to the dish, but you can completely leave this out to make this a vegetarian/vegan friendly dish. I wanted to add mince though for texture to contrast the eggplants. So I decided to try out Veega’s Meat-free Giniling (in English, mince) in place for the minced pork. I’ve been seeing this product all over social media for the past year and have been wanting to try it out, but to my surprise though, their meat-free giniling actually contains egg whites. I’m not sure if their other products also include egg (or derivatives) in them.

I checked to see if they are marketing their brand as vegan, which thankfully they aren’t, but did state they are a vegetarian line, which they should actually properly label as ovo-vegetarian (a person who does not eat meat or dairy products but does eat eggs and egg-derived ingredients) in my opinion. I did also see that they’ve started a vegan line with no egg or dairy in them – so this is something I look forward to trying as well!

Yu Xiang Qie Zi is a quick and easy dish that you can be put together with minimal effort in under 30 minutes, which makes it perfect for a weeknight lunch or dinner.

Yu Xiang Qie Zi (Spicy Sichuan Eggplant Stir-fry) Ingredients

PREP TIME 15 MINS | COOKING TIME 20 MINS | SERVES 5-6

INGREDIENTS

  • 6 long eggplants, halved and then cut into long strips
  • 1 tsp salt, for soaking
  • Cornstarch, for cooking
  • Oil, for frying
  • 200g Veega meat-free giniling (mince)
  • 1 tbsp doubanjiang (chilli bean paste)
  • 3 red chillies, minced
  • 2 dried red chillies, chopped
  • 3 tsp grated ginger
  • Spring onion (white part), chopped
  • 4 garlic cloves, finely minced

For the sauce

  • 1/3 cup water (or veggie stock)
  • 4 tbsp white granulated sugar
  • 3 tbsp black vinegar
  • 3 tbsp cornstarch
  • 2 tbsp light soy sauce
  • 1 & 1/2 tsp sichuan peppercorns, toasted and ground
  • 1/2 tsp salt

To garnish

  • Red chillies, chopped
  • Spring onion (green part), chopped

METHOD

  1. Sauce: Add all the ingredients for the sauce in a small bowl and mix to combine. Set aside.
  2. Eggplant: Soak the eggplant slices in salted water for about 15 minutes. Once done, drain and pat dry.
  3. Evenly coat the individual eggplant slices in cornstarch and shallow fry in a preheated pan over high heat, until browned. Remove and transfer to a plate lined with a paper towel to soak up any excess grease. Work in batches if needed. Set aside.
  4. Turn the heat down to medium and remove some of the oil, leaving behind about a tablespoon’s worth.
  5. Sichuan Eggplant: In the same pan, sauté the garlic, chillies, ginger, and white part of the spring onion until golden and fragrant, about 30 seconds.
  6. Add the meat-free mince and continue to cook, stirring for about 2 to 3 minutes, before adding the chilli bean paste and cooking for a further 3 to 4 minutes.
  7. Add the sauce mixture to the pan and cook until thickened. Turn the heat off.
  8. Immediately stir in the eggplant and then plate up. Garnish with the green part of the spring onion and extra chilli slices (optional). Serve with freshly steamed rice and enjoy!

Yu Xiang Qie Zi (Spicy Sichuan Eggplant Stir-fry)

BON APPÉTIT

– Ally xx

Follow me on my social media accounts:
Facebook: Amcarmen’s Kitchen
Instagram: @amcarmenskitchen
TikTok: @amcarmenskitchen

myTaste.com

Mantou Bruschetta

Mantou Bruschetta

Hello Everyone! Wishing all my family, friends, followers, and passersby a Happy New Year! I hope everyone had a good Christmas and New Year’s break to refresh, rejuvenate, and reflect asides from celebrating. I hope 2022 will be a better year for all of us.

For those who have been following my blog for a while now, you’ll all know that I always set a theme for the year. This year will be a little bit different. I won’t be setting a specific theme only because I have a backlog of recipes that I created last year but did not have a chance to post it on my blog. Rather than have it sit in my archives, I decided that I’ll spend the first few months of the year getting them up on the blog.

To kick off the new year, I will be sharing my recipes that I whipped up for the King Chef 2021 Challenge last year, starting with this non-traditional bruschetta recipe using mantou buns. We could create anything and everything as long as it featured any ingredient/product from Lee Kum Kee and King Chef, from the challenge kits provided.

Mantou Bruschetta

Like with many of my ideas, this Mantou Bruschetta came into mind while I was in the shower. For those who aren’t familiar with bruschetta, it is an Italian starter dish that consists of grilled bread that has been rubbed with garlic, and then topped with olive oil and salt. There are many variations for toppings, but the most popular and most known one outside of Italy is a mixture of basil, fresh tomato, garlic, onion, and mozzarella.

Traditionally, the best choice of bread for bruschetta is an Italian or French loaf – preferably a loaf of bread that has a thick crust and firm consistency. In fact, the dish was developed as a way of salvaging bread that was going stale. Though mantou buns don’t have either of those characteristics, I thought that I could use them as an option for this recipe. Now, As you can see in my photos, I may have pan-toasted them a little bit too much as they turned out to be darker in colour than I wanted them to be. It all worked out in the end in terms of flavour though; the browning gave the mantou bun slices an extra nutty flavour that complimented the sweetness of them.

Now that I got the King Chef product sorted out, I thought hard about what Lee Kum Kim product to incorporate from the challenge kit provided – between premium soy sauce or hoisin sauce. Since soy sauce is salty in taste, I decided to add this to the tomato topping for my bruschetta. So here’s my Chinese-Italian fusion of Mantou Bruschetta; it’s light and fresh, yet tangy and intense at the same time from the balsamic vinegar glaze. It is also sweet and nutty, making it the perfect antipasto to serve at your next dinner party!

Mantou Bruschetta Ingredients

PREP TIME 1 HOUR | COOKING TIME 5 MINS | SERVES 2-3

INGREDIENTS

For the mantou bruschetta

  • 4-5 pcs King Chef’s mantou buns, cut into 1-inch thick slices
  • Olive oil
  • Salted butter (or margarine)

For the tomato topping

  • 4 small-sized tomatoes, deseeded and chopped
  • 2 garlic clove, finely minced
  • 1 small red onion, diced
  • Handful of basil leaves, roughly chopped
  • Cracked black pepper, to taste
  • 1 tbsp extra virgin olive oil
  • 1 tsp Lee Kum Kee’s premium soy sauce
  • Balsamic vinegar glaze, to garnish

METHOD

  1. Tomato Topping: Add all the ingredients in a medium-sized bowl and mix until well combined. Set aside to chill in the fridge for at least an hour before serving.
  2. Mantou Bruschetta: Melt butter with a little bit of olive oil in a small non-stick pan over medium heat. Toast each side of the slice until browned to your liking. Once done, remove from the pan. Work in batches if needed.
  3. Plate up by topping each toasted mantou slice with about a tablespoon of the tomato mixture. Drizzle with some balsamic vinegar glaze, and top each with a small basil leaf. Serve and enjoy immediately.

Mantou Bruschetta

BON APPÉTIT

– Ally xx

Follow me on my social media accounts:
Facebook: Amcarmen’s Kitchen
Instagram: @amcarmenskitchen
TikTok: @amcarmenskitchen

myTaste.com