Chicken Sopas

Chicken Sopas

Hello Everyone! I am now in the Sunshine State of Queensland where I spent the weekend at a family friend’s farm in the countryside of Cedar Vale, near Jimboomba. They have a lovely country home with about 4 acres of land, and an alpaca(!), a donkey, three goats, and six chickens. Today, my family and I caught the bus to the city of Brisbane where we will be staying for 2 nights before heading back to the country and then to the Gold Coast for a day. Anyway, it’s actually already late here, I mean past 11pm isn’t late, but I need to go to bed and start early tomorrow as we are spending the day at Lone Pine Koala Sanctuary! Finally after 5 years in Australia, I get to cuddle a koala and feed kangaroos! So I’ll keep tonight’s post short so I can get as much z’s as I can.

Chicken Sopas Ingredients

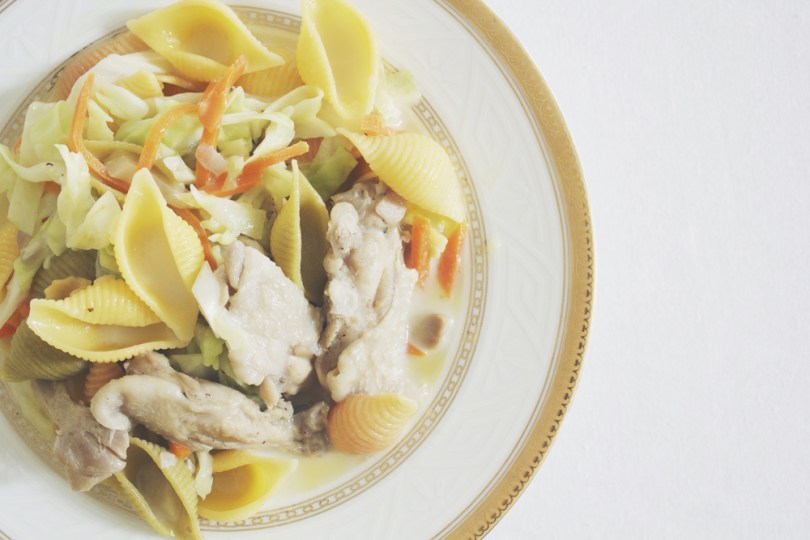
Tonight’s recipe is a Filipino classic; a soup dish made of shredded boneless chicken, macaroni noodles, a bit of milk, and some vegetables to flavour the dish. This dish is actually common for breakfast or a snack time treat during cold and rainy seasons. The difference between a regular chicken soup and a chicken sopas is the use of milk, either fresh or evaporated for a richer flavour. Other meats besides chicken can be added to the dish, such as diced hotdogs or luncheon meat in some recipes, and also chicken liver. I think my Mom has made a sopas dish with chicken liver before; didn’t fancy it. Play with the ingredients if you wish – the pasta and vegetables may also vary so feel free to use the appropriate ingredients in which you desire!

Note: If anywhere you see ‘soaps’ instead of ‘sopas’, it’s not a typo, it’s autocorrect and I’m a bit tired to go through and change them if you see any beyond this point – it’s happened to the first two above and I managed to go back and change those; but otherwise Chicken Soaps sounds like an intriguing dish! Also, on the ingredients photograph, you will notice the chicken wings. We actually used chicken spare ribs in this recipe but my Mom was insistent on photographing the wings because it looked ‘prettier’ than the ribs.

Chicken Sopas Ingredients

PREP TIME 20 MINS | COOKING TIME 20 MINS | SERVES 4

INGREDIENTS

  • 500g chicken spare ribs, washed and cleaned
  • 250g tri-colour shells
  • 2 cups water
  • 1 cup fresh milk
  • 3 small red onions, thinly sliced
  • 2 cloves garlic, crushed and minced
  • 1 small carrot, julienned
  • Half head cabbage, roughly chopped
  • Ground salt and pepper to taste

METHOD

  1. Heat oil in a large pot and sauté the garlic until golden brown. Add in the onions and cook until soft, about 2 minutes. Add in the chicken ribs, seasoning with salt and pepper. Give it a good mix and then let it cook for about 10 minutes, checking and mixing regularly to avoid the chicken meat sticking to the bottom of the pot.
  2. Add in the water and bring it back to a boil. Once boiling, add in the shells and cook according to packet instructions, mine took about 10 minutes.
  3. About 5-6 minutes into the 10, add the carrots and cabbage. Continue cooking until pasta is tender. Add in the milk and turn the heat off.
  4. Serve hot and enjoy!

Chicken Sopas

BON APPÉTIT

– Ally xx

myTaste.com

Goong Ob Woon Sen (กุ้งอบวุ้นเส้น)

Goong Ob Woon Sen (กุ้งอบวุ้นเส้น)

Hello Everyone! Tonight’s recipe is actually quite different from a traditional Goong Ob Woon Sen (Prawns and Glass Noodles in Claypot), only because my Auntie taught my Mom how to cook it very differently. I only knew that it was different when I looked up the Thai name for this dish before I started to write this post and saw other recipes that used bacon, and other ingredients to make up the broth/sauce.

Goong Ob Woon Sen (กุ้งอบวุ้นเส้น) Ingredients

Oh well. Also, you would whip up this recipe in a claypot, but since we didn’t have one, we cooked it in a regular frying pan. Actually, we remembered that my Auntie had one, and so we borrowed it and transferred the prawns and glass noodles to the claypot for the presentation. Anyway, the dish was nevertheless still delicious, but I bet would taste even better with the bacon in it – because who doesn’t love bacon?

Goong Ob Woon Sen (กุ้งอบวุ้นเส้น) Ingredients

PREP TIME 20 MINS | COOKING TIME 15 MINS | SERVES 4

INGREDIENTS

  • 750g tiger prawns, washed, cleaned, and deveined
  • 500g glass noodles
  • 2 cups chicken broth, hot
  • 2 inch ginger, thinly sliced
  • 2 tbsp vegetable oil
  • 1 tbsp light soy sauce
  • 1 heaped tbsp whole black peppercorns
  • 1 tsp annatto powder
  • 1 tsp chicken stock powder
  • Fish sauce to taste, optional
  • Fresh coriander, cut into 1-inch lengths

METHOD

  1. Heat vegetable oil in a large frying pan and fry the garlic, ginger, black peppercorn until fragrant. Add in the prawns together with the chicken stock powder; mix and let to cook for about 2-3 minutes. Remove from the prawns pan, leaving the garlic, ginger slices, and peppercorns in the pan. Set the prawns aside.
  2. Dissolve the annatto powder in the hot chicken broth and pour into the same frying pan. Bring to a boil before adding in the glass noodles. Cook the noodles in the broth until they start to soften.
  3. Place the prawns back into the frying pan, together with the coriander and fish sauce (if you need to season it a bit more) and cook until the noodles have absorbed the gravy, about 5 minutes.
  4. Once done, turn the heat off an transfer to a claypot. Garnish with some more coriander and serve hot. Enjoy!

Goong Ob Woon Sen (กุ้งอบวุ้นเส้น)

PS: On the train home from Melbourne City to Cranbourne, I was going through my Instagram feed and saw that Thanis Lim also made Ob Woon Sen with a twist, adding clams instead of prawns. Maybe I will give this recipe a try, using bacon and cooking it the traditional way for next time!

BON APPÉTIT

– Ally xx

myTaste.com

Tom Yum Gài Tôt (ต้มยำ ไก่ทอด)

Tom Yum Gài Tôt (ต้มยำ ไก่ทอด)

Hello Everyone! So, if you have been following my blog recently over the past few weeks, you will have noticed some changes to the theme of blog. If you head on over to the About section of my blog, you can read about the reasons for the changes there.

Tom Yum Gài Tôt (ต้มยำ ไก่ทอด)

Back when we were still in Brunei, before we set off to travel Australia, I wanted to make fried chicken wingettes for the family. I used the basic fried chicken batter that I always used, and before I added in the dried chilli flakes to give it a little kick, I remembered that I had made my own tom yum paste the day before. So I decided to experiment and added just about a teaspoon and a half of the paste to the batter. Marinated it for at least an hour or two, and then got my mom to fry the wingettes. It tasted really, really good! It had just the right amount of spice, and we even had some sweet chilli sauce on the side for the wingettes.

It was so good that I even made a second batch before we flew off, and the even more batches from my friends in Sydney (with store-bought paste since I was not really bothered to make my own paste at that time). The taste of the tom yum didn’t quite shine through and I’m guessing it’s because it didn’t have much of a kick of heat in the paste, and I couldn’t really taste the freshness of the galangal, lemongrass, lime leaves, etc. Nonetheless, the wingettes were still succulent and juicy.

Tom Yum Gài Tôt (ต้มยำ ไก่ทอด) Ingredients

Tom Yum Gài Tôt (ต้มยำ ไก่ทอด) Process

PREP TIME 1 HOUR* | COOKING TIME 15 MINS | SERVES 4

*Includes marination time

INGREDIENTS

  • 500g chicken wingettes, wash and cleaned
  • 8 tbsp water
  • 6 tbsp cornflour
  • 6 tbsp plain flour
  • 3 tsp sesame oil
  • 1 & 1/2 tsp salt
  • 1-2 tsp Homemade Tom Yum Paste
  • Dash of ground black pepper

METHOD

  1. Combine all the marinade ingredients in a large bowl and mix the chicken around until well coated. Cover the bowl with cling wrap and leave to marinade for 1 hour (I usually leave it for about 4 hours minimum to let the flavour of the tom yum infuse into the chicken. Do not refrigerate it to bring the meat down to room temperature before cooking.
  2. Preheat oven to 180C (350F or gas mark 4). Heat up oil in a large frying pan an working in batches, shallow fry the chicken until skin is crispy and golden (about 5-6 minutes per side).
  3. Remove from the heat and place on a baking tray lined with aluminium foil. Place the wings in the oven for a further 8-10 minutes to finish off in the oven.
  4. Serve the wings with thai sweet chilli sauce on the side. Enjoy!

Tom Yum Gài Tôt (ต้มยำ ไก่ทอด)

I think you can try and experiment with other pastes if you wish. When I get around to, I will attempt to make my own green curry paste and try some green curry friend chicken wings!

BON APPÉTIT

– Ally xx

myTaste.com

Tom Yum Gài (ต้มยำไก่)

Tom Yum Gài (ต้มยำไก่)

Hey Everyone! Just letting you guys know that I’m currently in Victoria with my family for 9 days; staying in Cranbourne with a family friend. Anyway, yes, besides that, today’s recipe is based on what I uploaded on Tuesday; using the homemade tom yum paste to make a (yes) chicken feet tom yum soup. Now I know what you’re thinking, “Chicken feet, really? And gizzards as well? Ew!” – actually not ew, well in my opinion that is! When I first learnt this dish from my Auntie, she cooked this with these cuts of chicken. My mom even gives the chicken feet a little pedicure; scrubbing them clean and cutting off their nails on each toe – so much work that I myself wouldn’t even be bothered to do! If you’re not into chicken feet, this spicy and sour soup can be made with other meats varying from mixed seafood such as prawns, squid, and clams, or other cuts of chicken, pork, and fish.

Also, I didn’t know this until I did a bit of research, but tom yum is actually a Lao and Thai dish; all along I thought it was just Thai. Anyway, for those of you who don’t know what tom yum is, it is a clear, spicy, and sour soup served widely in many neighbouring countries such as Cambodia, Brunei, Malaysia, and Singapore, but has also been popularised around the world. “Tom” actually refers to the boiling process while “yum” refers to a spicy and sour salad; and therefore “tom yum” is a hot and sour soup characterised by the fragrant herbs used to flavour the broth. The basic broth is made of stock and fresh ingredients such as lemongrass, kaffir lime leaves, galangal, lime juice, fish sauce, and crushed fresh chillies. When I first learnt to cook this dish, I added coconut milk to the broth. Over time, we eliminated the coconut milk because my mom can’t eat, or more like, isn’t allowed to have anything with coconut in her diet.

Tom Yum Gài (ต้มยำไก่) Ingredients

PREP TIME 30 MINS | COOKING TIME 1 HOUR | SERVES 5-6

INGREDIENTS

  • 1kg chicken feet, wash, cleaned, and nails cut off
  • 250g chicken gizzards, washed and cleaned
  • 2.5L boiling water
  • 1 heaped tbsp Homemade Tom Yum Paste (or more if you’ve deseeded your chillies before making it into a paste), likewise, you may use store-bought paste
  • 1 tsp chicken stock powder
  • 4 pcs kaffir lime leaves
  • 3 inch galangal, sliced
  • 2 large tomatoes, quartered
  • 2 pcs red bird’s eye chillies
  • 2 red onions, quartered
  • 2 stalks lemongrass, cut into 2-inch lengths
  • Juice of 2 limes
  • Fish sauce to taste

METHOD

  1. Add the all the ingredients, except for the kaffir lime leaves, fish sauce, lime juice, and tom yum paste, into a large pot. Bring to a boil and let it simmer for about 15 to 20 minutes.
  2. Then add in the kaffir lime leaves, lime juice, and tom yum paste. Give it a good mix and then add in the fish sauce about a tablespoon at a time; taste until the seasoning and taste is to your liking. At this point, you may also add in straw mushrooms or oyster mushroom if you wish. Let it cook for a further 45 minutes, or until chicken feet and gizzards are tender.
  3. Serve with steamed rice and enjoy! Quite a nice dish actually for a cold winter night.

Tom Yum Gài (ต้มยำไก่)

BON APPÉTIT

– Ally xx

myTaste.com

Homemade Tom Yum Paste

Homemade Tom Yum Paste

Hello Everyone! Today’s post will be a simple one – well at first before even tackling the recipe, I thought it’d be a complicated and labour-intensive process. Actually, it took a while to finely chop up the garlic, onions, galangal, and ginger as I did not have a food processor to do it all for me in a jiffy; nonetheless, it helped me improve on my chopping skills (probably not really).

Homemade Tom Yum Paste

Tom Yum is one of the first Thai dishes that I learned to love, and it was probably from this dish that I slowly started to love chillies and the kick of spice it gave to my palette. In fact, Chicken Tom Yum was the very first Thai dishes that I learnt to cook from my auntie, who is Thai; but at that time I still used pre-packed tom yum paste from the supermarkets. It wasn’t until recently that I decided that I wanted to learn how to make my own tom yum paste – and quite a success I might add! The flavours were obviously tastier and had more kick than store-bought paste, and very easy to make as well! The opportunities are endless with this paste; you can use it to make a tom yum broth to accompany various meats such as chicken, pork, prawns, fish, and mixed seafood’s including clams and squid, or you can use it as a seasoning to various dishes. The original recipe can be found at Pickyin.

Homemade Tom Yum Paste Ingredients

PREP TIME 30 MINS | COOKING TIME 45 MINS | MAKES 40 TBSP (approx.)*

*What I normally do is place about a tablespoon of the paste in small plastic bags and place them into the freezer. Each time I make a dish that requires Tom Yum Paste, I defrost a bag (or two) depending on how many I need. This is how I keep my batch on Tom Yum Paste without the need for additives or preservatives to keep them on the shelf/fridge.

INGREDIENTS

  • 250g chili paste (from soaked, deseeded and blended dry chilies)**
  • 20g shrimp paste (or more to taste)
  • 1 cup tamarind pulp water
  • 5 cloves garlic, finely chopped
  • 4 pieces kaffir lime leaves, finely chopped
  • 3 inches ginger, finely chopped
  • 2 inches galangal, finely chopped
  • 2 stalks lemongrass, white parts only, finely chopped
  • 1 large red onion, finely chopped
  • 3 tbsp brown sugar
  • 3 tbsp vegetable oil
  • 2 tbsp fish sauce
  • 2 tsp ground coriander

**I couldn’t be bothered to deseed each and every dried chilli, so I ended up adding the seeds in. I’m not sure if you can buy already deseeded dried chillies in stores, but I could not find any myself. I mean, if you want the heat then by all means leave the seeds in – caution though, very hot!

METHOD

  1. Heat vegetable oil over high heat in a medium-sized frying pan, and then add in the onions, garlic, galangal, and ginger. Sauté until softened and slightly browned. Remove from the pan and set aside, leaving the remaining oils in the pan.
  2. In the same pan, add the chilli paste, kaffir lime leaves, lemonsgrass, coriander, shrimp paste, fish sauce, tamarind water, and brown sugar. Cook until the mixture slightly thickens before adding the other fried ingredients into the chilli mixture.
  3. Continue frying until the paste is thick and the oil starts to separate from chilli and surfaces. Set aside to cool down before sealing them in jars/cans. The paste can keep in the refrigerator for up to 1 week or in the freezer for a few months.

Homemade Tom Yum Paste

BON APPÉTIT

– Ally xx

myTaste.com

Ube Halaya (Purple Yam Jam)

Ube Halaya (Purple Yam Jam)


Hello Everyone! Today’s recipe is a dessert that is made from grated and boiled purple yam which is locally known as ‘Ube’ in the Philippines. Besides the purple yam jam (Ube Halaya), many different desserts such and pastries such as ice cream, tarts, and cakes make use of this root crop. Halaya (en español: jalea), directly translates to jelly or jam, but it is hardly a traditional jelly or jam.

Ube Root

I know I basically say this is every post that I upload, but let’s face it, if it not one of my favourites then I wouldn’t be posting the recipe online! Anyway, this is also one of my favourite Filipino desserts besides Leche Flan. Here in Brunei, you can find this root crop in the local markets known as ubi belayar ranging from $3.00 to $5.00, and sometimes even $7.00 per kilo especially if it has been newly harvested (you just have to shop around to find the stall that sells for much cheaper). We managed to buy some from an old man selling them for $3.00/kg and the root still looked fresh.

Ube Halaya (Purple Yam Jam) Process

Ube Halaya (Purple Yam Jam) Process

I am not sure of how readily available the purple yam is in various countries, but I am aware that you can buy ready-made boiled and grated purple yam in Asian stores. Having a prepared product such as this definitely saves time in the kitchen, but if it’s definitely available raw from the markets, I definitely recommend making it from scratch and burn some calories in the kitchen with this dish! In the past, I have found that by just grating and pounding the flesh, you still get lumps of the yam in your end result, and therefore not as smooth. We therefore pass the flesh through a sieve as well to get rid of any remaining lumps. A lot of work, but a stellar end result; smooth and creamy lump-free halaya!

Ube Halaya (Purple Yam Jam) Ingredients

PREP TIME 1 HOUR | COOKING TIME 1 HOUR 10 MINS | SERVES 8-10

INGREDIENTS

  • 2.5kg purple yam, skin on, thoroughly washed and scrubbed
  • 1 can (395g) condensed milk
  • 125g unsalted butter, chilled

METHOD

  1. Submerge the purple yam in a very large pot (the largest you have!) of hot water. Bring the water to a boil and cook the purple yam for 30-45 minutes or until the yam is soft and tender. If you don’t have a pot big enough to fit the yam, you may cut it on half (or quarters if needed).
  2. Once tender, remove from the pot and set aside to cool down before peeling the skin off.
  3. Working it batches, finely grate the purple yam. Once you’ve done that, get out your mortar and pestle and get pounding! Once you’re done with the pounding, get you sieve out and press the mashed purple yam through the sieve. This ensures that your ‘jam’ is smooth and there are no lumps in your mixture. This is probably the most labour-intensive part of the recipe!
  4. Next, heat a large cooking pot on low and add in the butter to melt.
  5. Once the butter has completely melted, add in the condensed milk and stir well. Add the purple yam in and stir occasionally so that the mixture does not stick to the bottom of the pot. Cook until the texture or the mixture becomes really thick (about 20-25 minutes). When cooked, turn the heat off and let it sit in the cooking pot for another half hour before transferring them into moulds/containers.
  6. Refrigerate for at least two hours, then serve and enjoy with family and/or friends!

Ube Halaya (Purple Yam Jam)

PS: It was very hard as to not resist the temptation to wrap this yam jam in spring roll wrappers as an experiment to see if they would work just as well as wrapping leche flan. Guess what? It was successful! There’s this phrase in Tagalog that you would use when you have too much of something that you get fed up, but it’s quite the opposite when you have it wrapped in spring roll pastry; it becomes “hindi nakakasuya”. Anyway, basically add about a teaspoon or two of purple yam jam on top of a spring roll wrapper together with a few strips of fresh coconut; then fold, locking the wrapper on each side. Freeze it overnight before frying and viola! Crispy Fried Ube Halaya. You’re welcome.

Cripsy Fried Ube Halaya (Purple Yam Jam)

BON APPÉTIT

– Ally xx

myTaste.com

Crispy Fried Leche Flan

Hello Everyone! Firstly, I would just like to say to you all that I am back in Sydney! Currently staying at a friends place while waiting for my Mom and two younger sisters to arrive in Sydney on Saturday morning before we start our Australian tour!I’ll be showing them around Sydney, and then we will be off to Melbourne, Brisbane, and then back again for my graduation ceremony in mid-June! Now because of all our travels, I will momentarily cease Review Sundays, only because I don’t have any places in my folders to write about, and also because there is a possibility that I won’t have the time (or most likely won’t be bothered) to write reviews on places I’ve visited on this trip, during the trip. Once I’ve settled back down from my 1-month vacation, then I will get back into Review Sundays; but don’t fret, I will still be uploading recipes twice a week on Tuesdays and Thursdays as I’ve cooked up a whole lot of dishes while I was in Brunei to prepare for this vacation period of mine.

Crispy Fried Leche Flan Process

Anyway, today’s recipe is a little twist on what I have been making for a while now – mainly for lunch/dinner parties, or during Christmas and New Year celebrations. Or sometimes, I make it upon the request of my friends for their birthdays (Jialing especially) or just whenever they want me to make it for them when I invite them over to my place. During my recent trip to the Philippines, I encountered ‘Crispy Fried Leche Flan’ on two different menus. I thought long and hard about the possibility and HOW they are able to deep-fry a soft, smooth, and silky custard – at one point I thought, battered flan? Anyway, weird techniques were going through my mind and it killed me not knowing how it was possible – until I ordered it that is. I did not expect it to be wrapped spring roll style; such a clever idea! The first time I had these babies was at Catalino’s Restaurant (Villa Javierto) in Lucena City. I was so amazed by the lovely golden brown, crispy spring roll pastry complimented by an oozy, smooth flan filling with a side of soft caramel dip. It was like love at first bite with these I tell you. Never have a ever heard of crispy fried flan until this very day at Catalino’s; and I was even more excited to see it on Mesa’s menu in the city! However, as I probably mentioned in that blog review, Mesa’s crispy flans did not live up to the hype of my first experience. To quote my blog review, I said that theirs were “small, not so crispy rolls of flan that didn’t quite taste like flan in my opinion and more like steamed egg”.

Ever since my trip to the Philippines and encountering these beautiful rolls of delight, I knew I had to take it to my kitchen and whip up a batch of these. At first I was unsure of how it was they managed to handle and wrap soft flan; I thought that they needed to go into the freezer first and once frozen you could handle them easily. My mother showed me otherwise; she handled the slices of flan with great care, and was very gentle with them when wrapping them. The trick to get them nice and crispy is basically the same with the plantain rolls I posted roughly a month back; by freezing them overnight and frying them straight away with no defrosting required.

Leche Flan Ingredients

Crispy Fried Leche Flan Ingredients

PS: Before I start with the recipe, I just want to point out that I showed these images to one of my friends prior to writing this post because I told her about how I made crispy leche flan. She wanted to know how it was possible and so I showed her how it was done. Her first reaction to the side of caramel dip – “IS THAT FISH SAUCE?” I seriously could not stop laughing.

INGREDIENTS

  • 1 recipe Leche Flan (Crème Caramel)
    • 6 egg yolks, at room temperature
    • 1 can (395g) condensed milk, at room temperature
    • 1 cup milk, at room temperature
    • 6 tsp caster sugar
    • 1 & 1/2 tsp vanilla extract
  • Large springroll wrappers

METHOD

  1. Make a batch of leche flan prior to starting this recipe. Make sure that you refrigerate them for at least 6 hours before working with them. You can find the recipe linked above in the ingredient list. Instead of using small round moulds, I suggest you use square moulds (or in my case I used oval because that’s what I had) and cut them into thick rectangular strips. Do not discard the caramel sauce, instead pour it into a sauce dish and serve alongside the crispy fried leche flan rolls.
  2. Place the slice of flan on top of a spring roll wrapper and fold, locking the wrapper on each side. then place in a container and repeat until all the slices of flan have been wrapped. Freeze overnight.
  3. In a small (or medium, depending on how many you’re going to fry) pan, heat the oil over medium-high. Make sure it is quite hot before adding the wrapped flans in. Fry until the wrapper turns golden brown.
  4. Serve hot during dessert or meryenda, with ice cream on the side if you wish. Enjoy!

Crispy Fried Leche Flan

BON APPÉTIT

– Ally xx

myTaste.com

Lemon Molten Cakes with Raspberry & Cream

Lemon Molten Cakes with Raspberry & Cream

Hello Everyone and Happy Mother’s Day to all mothers out there, and most especially to my mother. You are braver than you believe, stronger than you seem, smarter than you think, and loved more than you know. Happy Mother’s Day to you Mumu; love you forever and always, even if we sometimes don’t see eye to eye.

Happy Mother's Day
There is nothing more sincere than a mother’s love for her children, and this picture clearly portrays your love for me while I care more about putting my hairband on for the picture (but really I’ve got my eye on the food).

Last week after my Mom’s birthday celebration (and that whole fiasco that I had with baking her cake), I asked her what she wanted me to bake for her for Mother’s Day, and I’m not gonna lie, but said aloud to her, “please not another cake” – the troubles of my mother being born a week before Mother’s Day. We both started thinking for a while, and then I remembered that I wanted to make this cake back when I was still in Sydney. Now I know I said no cakes, but this technically isn’t a massive layered cake, but instead, mini molten lava cakes.

Lemon Molten Cakes with Raspberry & Cream

Somewhere back in July last year, I hosted a tea and scones party for some of my favourite ladies, and one male housemate. We had an assortment of tea of course, homemade scones, homemade strawberry jam, and homemade lemon curd. I had a lot of strawberry jam left over, but I had a way of finishing it by having it with toast in the mornings with a cup of tea. Lemon curd on the other hand I had no clue on how to consume it. I then searched for other recipes that used lemon curd, except for the obvious lemon meringue pie/tart since I am not a huge fan of meringue. I then came across this recipe and I instantly knew that this was the recipe that I was going attempt – but never got around to doing so. Reasons? I actually don’t remember. I think it was because the lemon curd had been sitting in the fridge for weeks and probably already off at the time I decided that I want to make these molten cakes. After that, I wasn’t bothered to make a whole new batch of lemon curd just for this dessert to happen. But now for Mother’s Day – I don’t see any better chance to have a go at these!

The original recipe can be found on The Gallery Gourmet and this recipe makes about 8 cakes but I guess differs on the size of your moulds/ramekins.

Lemon Molten Cakes with Raspberry & Cream Ingredients

PREP TIME 15 MINS | COOKING TIME 13-15 MINS | MAKES 4 CAKES

INGREDIENTS

  • 120g white baking chocolate, roughly chopped
  • 100g unsalted butter
  • 3/4 cup Homemade Lemon Curd
  • 2/3 cup plain flour
  • 1/2 cup confectioners’ sugar
  • 4 large free range eggs, lightly beaten
  • 4 large free range egg yolks, lightly beaten
  • 2 tsp freshly grated lemon zest
  • 1/2 tsp vanilla extract
  • Pinch of salt
Accompaniments
  • Confectioners’ sugar for dusting
  • Whipped cream
  • Fresh raspberries

METHOD

  1. Preheat the oven to 220C (425F or gas mark 7). Grease 8 ramekins with softened butter or non-stick baking spray.  Place them onto a baking tray and set aside.
  2. Melt the butter and white chocolate in a large microwave-safe bowl, stirring every 15 seconds (for a total of 60-90 seconds) until melted and smooth. Remove from the microwave and whisk until smooth.
  3. Add the flour, sugar and salt; mix well. Then add in the eggs, egg yolks, lemon curd, lemon zest, and vanilla extract and whisk until well blended. Divide the batter evenly into the prepared ramekins.
  4. Bake for about 13-15 minutes or until the edges are just starting to to turn golden brown, and the centre is puffy and just beginning to set. Transfer the ramekins to a wire rack and let cool for 5 minutes.
  5. Run the tip of a paring knife around the edges of the cakes to loosen them and then invert the cakes onto small dessert plates or dishes.
  6. Dust the top with confectioners’ sugar, garnish with fresh raspberries, and serve with whipped cream.
  7. Share with the family (or friends) and enjoy!

Lemon Molten Cakes with Raspberry & Cream Process

Lemon Molten Cakes with Raspberry & Cream

PS: I completely forgot about the whipped cream when I was photographing the cakes, and by the time I had the cream ready and whipped, I found out that my Mom and my sister had already dug into the perfect molten cake that I specifically set aside for my photograph (the other cakes weren’t as runny as the one I had opened for the photo). The whipped cream nicely balances out the sweetness and tartness of the cakes.

BON APPÉTIT

– Ally xx

myTaste.com

Masala Chai Tea with Soy Milk Ingredients

Masala Chai Tea with Soy Milk

Hello Everyone! So on Tuesday I posted a recipe for homemade soy milk. The first thing I thought after making having made the soy milk was what other things could I do with it to make another delicious drink. So today’s recipe uses the soy milk that I made to make a masala chai tea. I mean, you can always use store bought soy milk, or any other milk for that matter.

Masala Chai (literally translated: ‘mixed-spice tea’) is basically a flavoured tea beverage made by brewing black tea with a mixture of aromatic Indian spices and herbs. Nowadays, it is a very popular and feature drink in many coffee and tea houses. Chai is traditionally prepared by brewing green cardamom pods, cinnamon sticks, ground cloves, ground ginger, and black peppercorn together with black tea leaves. Most retail versions of this tea includes tea bags for infusion, instant powdered mixtures, and concentrates. I used tea bags for mine only because I could not find any loose black tea leaves in stores.

I love chai tea. In fact, I ordered it almost every time I went to a café, aside from a café latte that is. I was surprised that it was that easy to make when I came across a recipe online on how to make you own chai tea.

Masala Chai Tea with Soy Milk Ingredients

PREP TIME 5 MINS | COOKING TIME 10-15 MINS | SERVES 4-5

INGREDIENTS

  • 3 cups water
  • 1 cup homemade soy milk (or any other type of milk)
  • 1/4 cup loose black tea leaves (or about 5 tea bags)
  • 3 tablespoons granulated white sugar
  • 1/4 inch of ginger root, peeled and sliced thinly
  • 6 cardamom pods
  • 6 whole cloves
  • 2 cinnamon sticks
  • Several peppercorns

Other optional spices that you can add to your chair tea inlaced: vanilla, almond, nutmeg, bay leaves, star anise, or fennel and allspice; I added star anise to mine.

METHOD

  1. Combine the water, spices, and tea in a medium-sized saucepan. Turn the heat to high and bring to a boil. Once boiling, let it boil for a further 5 minutes and then turn the heat off. Let the mixture steep for at least 10-15 minutes.
  2. Strain the tea mixture and discard the spices. Add the soy milk and sugar to the strained tea mixture and stir well. Then reheat the tea until piping hot.
  3. Enjoy! Serves about 4 cups of tea.

Masala Chai Tea with Soy Milk

BON APPÉTIT

– Ally xx

myTaste.com

Homemade Soy Milk Ingredients

Homemade Soy Milk

Hello Everyone! I’ve got a few drinks that I want to cover on the blog for the next two weeks; simple but very tasty indeed! Today’s recipe is pretty straight forward, just plain regular soy milk, but definitely much richer than those that you find at the stores/markets because the ones I’ve bought are usually very watered down. By making your own soy milk as well, you ensure that no other extra ingredients go into them, especially sugar in my case (or more like in the case of my mom who is a diabetic).

Homemade Soy Milk Process

Homemade Soy Milk Process

Though it sounds very simple and the process doesn’t require a lot of skill, it requires a lot of time. Firstly having to soak the beans for a couple of hours until they are soft takes about 4-5 hours of waiting (the longer the better I guess). Then having to blend the beans with water and strain out the liquids using a muslin cloth, batch by batch; and then finally boiling it with the pandan leaves for about 30 minutes. Indeed simple, but can be time consuming. Whenever I make soy milk, I always needs another pair of hands in the kitchen and it’s usually my mom who does the straining while I do the blending.

Homemade Soy Milk Ingredients

PREP TIME 5 HOURS 30 MINS | COOKING TIME 30 MINS | SERVES 10-12

INGREDIENTS

  • 1kg soybeans
  • 5 pandan leaves
  • 3 litres water

METHOD

  1. Place the soybeans in a large bowl of water and soak for 4-5 hours or until the beans have doubled in size and have softened. Drain.
  2. Working in batches, add about 2 cups of the softened soybeans into the blender together with about 3 cups of water. Blend until the mixture is smooth.
  3. Pour out the mixture onto a muslin cloth placed over a large bowl. Strain and squeeze out as much of the liquids as possible. Transfer the remaining soybean pulp into another bowl.
  4. Repeat steps 2 and 3 for the remaining soybeans.
  5. Transfer the raw soy milk to a large cooking pot and together with the pandan leaves, boil of about 30 minutes. Stir the mixture at intervals to avoid the milk sticking to the bottom of the pot. Skim the top to get some of the foam off.
  6. Add about a quarter cup of sugar if you wish (we usually add a teaspoon of sugar afterwards in our mug of soy milk), or flavour it up any way you want. Some flavouring suggestions include: chocolate, honey, vanilla, etc.
  7. Drink and enjoy either hot or cold!

Homemade Soy Milk Process

Homemade Soy Milk

PS: Don’t throw the leftover bean pulp away! You can make your very own homemade tofu from it! Visit this the Food Network for more on how to make your own tofu.

BON APPÉTIT

– Ally xx

myTaste.com