Auguest 2021: Chamaine

Spicy Purple Sweet Potato Soup

“Happiness is Homemade. Real cooking is more about following your heart than following recipes. Fresh is always better.” — Chamaine

Auguest 2021: Chamaine

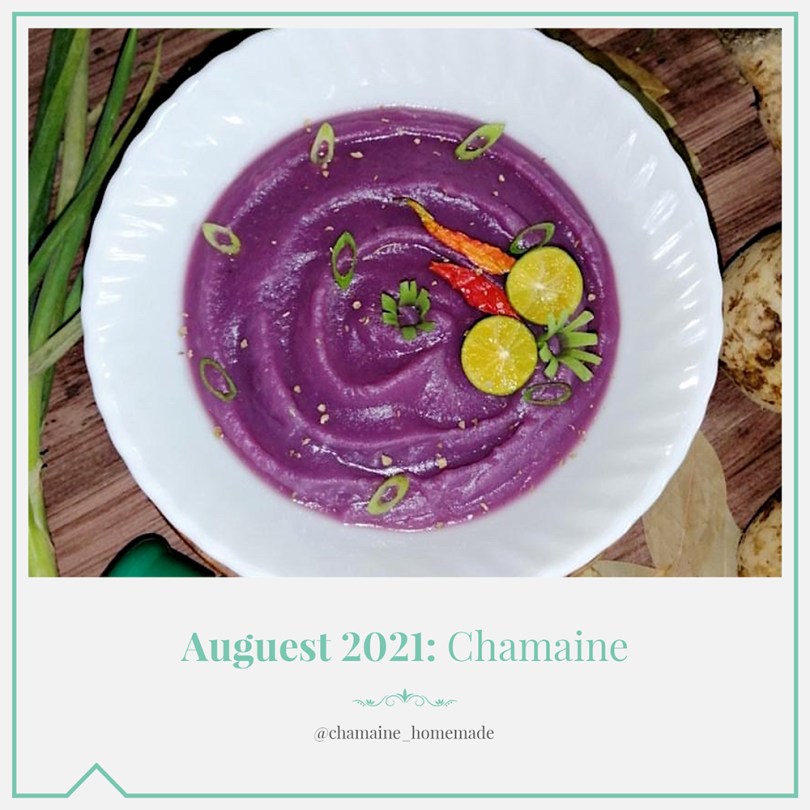
Hello Everyone! Chamaine here taking over Amcarmen’s Kitchen tonight to bring you a Thai-inspired dish for the Flavours of Southeast Asia journey on this blog for this year’s Auguest theme. I am so grateful to be part of this series as, through this, I have learnt to explore other cuisines and dishes from countries outside of my home country and knowledge.

I believe that Happiness is Homemade. My favourite thing to do at home is COOK, and I season everything with LOVE. For me, cooking is an ART. I plate like an ARTIST and invent recipes like a SCIENTIST.

Spicy Purple Sweet Potato Soup

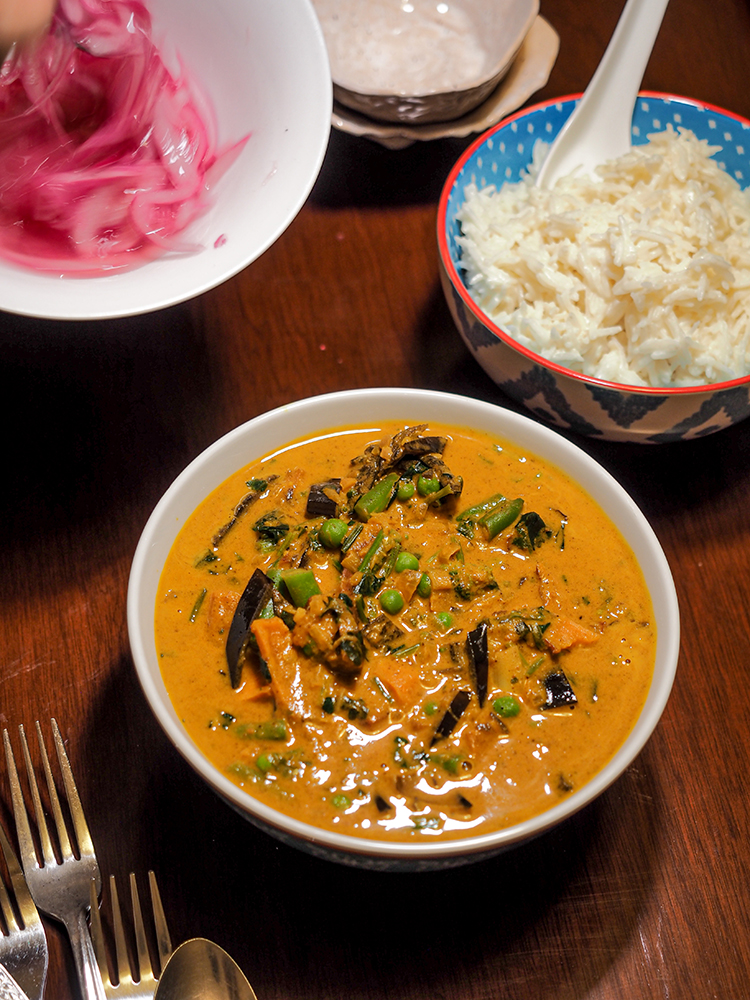
Thai cuisine has proven to be quite a challenge for me since I am not so familiar with it. Some ingredients are unusual to me, but since I am eager to learn something new, I accepted this challenge. Upon my research, I found this recipe for Sweet Potato Soup rather intriguing. All my life, I have known sweet potatoes to be used as a snack and finger food; I never thought that it could potentially be used to make a starter or appetizer in the form of a soup.

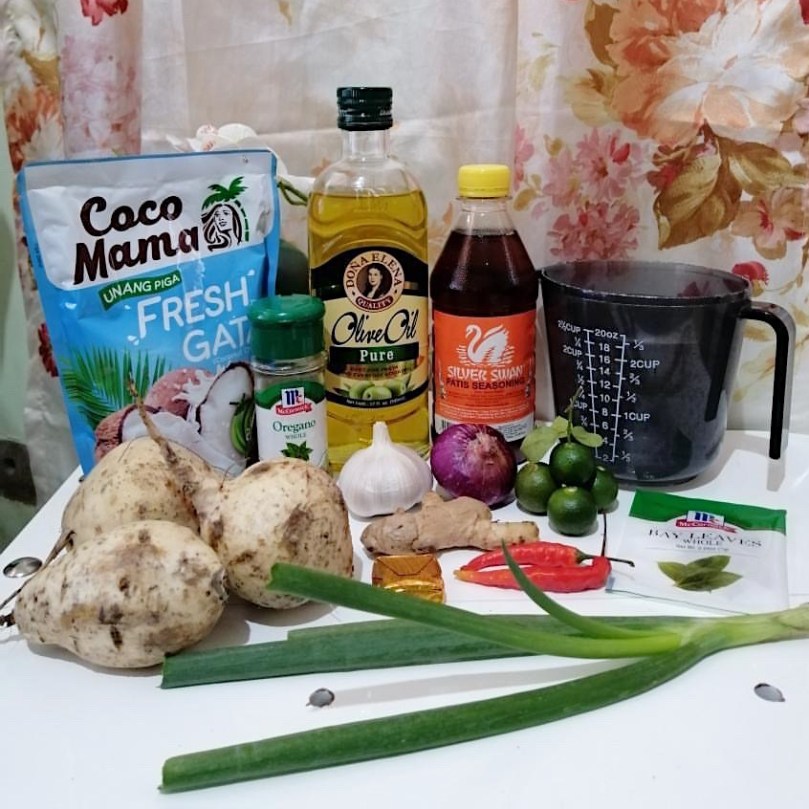
For this dish, I substituted some of the ingredients as I could not source some of them, but don’t worry, I have the best options in our pantry. If you do have these original ingredients readily available for you, then by all means stick to using them:

  • Kaffir lime leaves to bay leaves
  • Lime juice to calamansi juice
  • Coriander seeds to oregano
  • Red curry paste to red chillies

As a result, I can say this dish is absolutely appetizing. With its tangy, savoury, and creamy flavour, plus the slightly sour and sweet taste, everything complimented each other so well!

Spicy Purple Sweet Potato Soup

PREP TIME 10 MINS | COOKING TIME 25 MINS | SERVES 4

INGREDIENTS

  • 3 medium-sized purple sweet potatoes, peeled and cut into small chunks
  • 1 tbsp olive oil
  • 1 tsp fresh ginger, finely chopped
  • 1 red onion, finely chopped
  • 1 bay leaf
  • 2 red chillies, roughly chopped
  • 1 tbsp fish sauce*
  • 1 vegetable stock cube
  • 2 cups water
  • 1 cup coconut milk
  • 1 tbsp calamansi juice
  • 1 stalk spring onion
    A pinch of oregano

*Replace with salt for a fully vegetarian/vegan alternative

METHOD

  1. In a large frying pan over medium-high, heat the olive and sauté the ginger and onions until lightly golden and fragrant, about 30 seconds.
  2. Add the sweet potatoes, bay leaf, red chillies, fish sauce and toss, cooking for a few minutes.
  3. Pour in the coconut milk and water, and add a vegetable stock cube. Bring to a boil then reduce the heat to bring it down to a simmer. Continue to cook until the sweet potatoes are tender.
  4. Once done, remove the bay leaf, and then transfer everything into a food processor and blend until smooth and creamy.
  5. Add the calamansi juice and gently mix into the soup.
  6. Transfer to individual serving dishes and garnish with more chopped chillies, spring onions, calamansi juice, and a sprinkle of oregano. Serve and enjoy!

1957

Spicy Purple Sweet Potato Soup

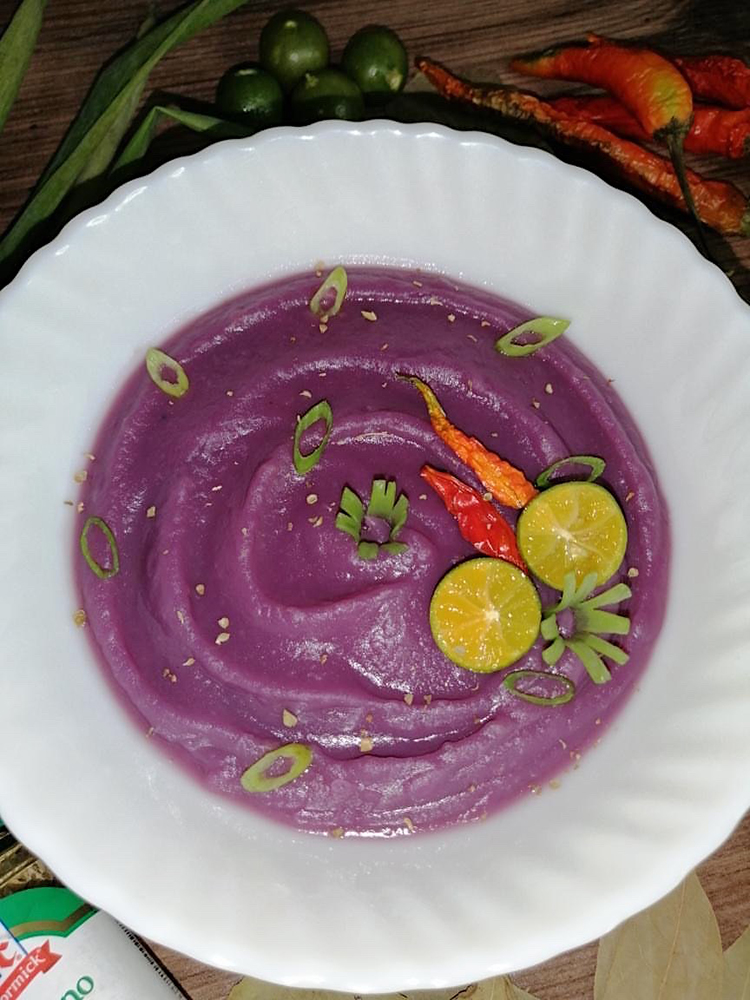
Photo Courtesy & Recipe Copyright © 2021 | Chamaine (@chamaine_homemade)

BON APPÉTIT

– Chamaine

myTaste.com

Auguest 2021: Brendon D'Souza

Banana Peel Curry with Coconut Rice & Pickled Red Onion

“When someone cooks with love, the meal deserves to be celebrated. You get dressed, choose a killer playlist, and pour a glass of wine then sit down to share the magic with your loved ones.” — Brendon D’Souza

Auguest 2021: Brendon D'Souza

Hello Everyone! How’s life? It’s Brendon D’Souza from CookWithBrendon.com here. By day I work in sales and around the clock I spend the countless hours we have in lockdown doing my favourite thing – cooking for my loved ones and developing recipes for my blog.

After 6 years at my former blog Brendon The Smiling Chef, I realised there might be a space for online cooking classes and social get-togethers for like-minded foodies. After running a number of free workshops with my colleagues and friends I’m so ready to take it to the next level and open up the classes to the world. Let me know if you would like to join in the fun!

Now more than ever is the perfect time to try and find clever little ways to use up leftover bits and pieces you find in the kitchen. This curry will allow you to do exactly that, and is inspired by the flavours of Laos, Thailand, India, and Australia altogether.

Banana Peel Curry

By no means do I claim to be the creator of this dish. As I’m sure you’ve seen over your socials it gained cult status recently when Nigella Lawson wrote about it in her 2020 TV series and cookbook Cook Eat Repeat. It’s such a great way to transform something that would otherwise be destined for the bin. I was surprised to learn that banana skins are packed full of potassium so I’m hoping it’s doing that extra bit of good for my insides too.

I’ve also taken the liberty to use up some leftovers for this dish including a batch of leftover marinara sauce and some roast sweet potatoes. So you can absolutely feel free to swap out some of the ingredients for others which you may have at hand. Don’t forget to tag #CookWithBrendon so I can see your creations. Let’s cook!

Banana Peel Curry Ingredients

PREP TIME 30 MINS | COOKING TIME 30 MINS | SERVES 2-3

INGREDIENTS

  • 2 ripe bananas
  • 2 medium red onion, sliced
  • 1/2 tbsp castor sugar
  • 1/4 cup rice wine vinegar
  • 1/2 cup basmati or jasmine rice
  • 1 can coconut milk
  • 1 tsp ground cumin
  • 1 tsp ground coriander
  • 1 tsp ground turmeric
  • 1/2 cup canned tomatoes
  • 1/2 tsp brown sugar
  • 1/2 cup diced sweet potato (or use regular potato)
  • 1/2 cup frozen peas (or any other fresh or frozen green veg)
  • 1 bunch coriander

METHOD

Start this recipe 1 hour before serving time.

  1. Banana Peel: Peel the bananas. Slice off the tops and tails.*
  2. Place the banana peels into a large heatproof bowl with 1/2 tbsp salt. Cover with boiling water and leave to soak for 30 mins. This helps to tenderise the skins and they will change in colour from yellow to brown which is totally fine.
  3. Pickled Onion: While the bananas are soaking. Finely slice 1 onion and place into a glass or ceramic bowl with the rice vinegar, castor sugar and 1/2 a tablespoon of salt. Give it a stir and then set aside. Repeat every 10 minutes or so while you’re making the curry and the onions will turn a vibrant pink and tenderise by the time you’re ready.

Banana Peel Curry with Coconut Rice & Pickled Onion

  1. Remove the banana peels from the soaking liquid** and pat dry with a paper towel. Slice the peels finely into batons.
  2. Coconut Rice: Place the rice into a medium heatproof saucepan. Cover with enough cold water to reach 2-cm above the level of the rice, then add the coconut milk. Place over a high heat and bring to the boil. When it is bubbling, immediately turn the heat off and pop on a tight fitting lid and let it sit there***. The rice will continue to absorb any liquid while you prepare the curry.
  3. Banana Peel Curry: Heat a medium saucepan over a low heat. Add 1 tablespoon of sunflower oil, the cumin, coriander powder, and turmeric. Cook, stirring for 1-2 minutes to toast the spices, and then add the marinara sauce****.
  4. Add 1 tablespoon of crushed ginger and the banana skins, and cook, stirring over medium heat for 5 minutes.
  5. Add 1/2 a cup of vegetable stock or water and bring to the boil. Cook for a further 5 minutes or until the banana peels are tender.
  6. Add the sweet potato, frozen peas, coconut milk, and chopped coriander stems, and cook for another 2-3 minutes or until the veggies are cooked through. Finally, add the coconut milk and stir until combined.
  7. Serve with the coconut rice and pickled onion. Enjoy!

Banana Peel Curry with Coconut Rice & Pickled Onion

Notes:

  • *These can be composted. Save the banana flesh for another use (I’m thinking everyone’s favourite lockdown banana bread!).
  • **The minerals found in the banana peels such as potassium, phosphorus and calcium, will leach into the water. You can then use this liquid fertiliser for your plants.
  • ***I use my Mum’s absorption method trick to cook my rice and it works every time!
  • ****I’ve used 1/2 a cup of leftover marinara sauce with onion in it but you could easily substitute for 1 small onion and 1/2 a cup of crushed tomatoes.

Give this recipe a try and if you do be sure to tag #CookWithBrendon in your posts when you do!

I’m trying really hard to grow @cookwithbrendon on Instagram and now TikTok so if you have a second to visit and give both a follow I’d be so grateful.

Banana Peel Curry with Coconut Rice & Pickled Onion

Photo Courtesy & Recipe Copyright © 2021 | Brendon D’Souza (@cookwithbrendon)

BON APPÉTIT

– Brendon D’Souza

myTaste.com

Auguest 2021: Karina Pineda

Ginataang Kalabasa (Squash with Coconut Milk)

“Take off on a food journey that is both healthy and happy.” — Karina Pineda

Auguest 2021: Karina Pineda

Hello Everyone! Karina here again returning for the second time on Amcarmen’s Kitchen! When Allison had invited me to join this year’s Auguest series, she told me that the theme would be Flavours of Southeast Asia. She also gave me the liberty to choose from a list of available countries, and fortunately, the Philippines still had an available slot and I grabbed it immediately. Aside from being Filipino, I’ve always appreciated Philippine cuisine — from the variety of flavours it has to offer, to the culture and history it’s rich in. I want to celebrate my country through my entry.

My chosen dish is Ginataang Kalabasa (Squash with Coconut Milk). I also put a twist to the traditional recipe by adding ground tofu. Following the guidelines, I decided to make something vegetarian to show that Filipino food goes beyond adobong manok, lechon kawali, balut, and other meat dishes. We, Filipinos, actually have a number of equally delicious vegetable meals!

Ginataang Kalabasa (Squash with Coconut Milk) Ingredients

PREP TIME 10 MINS | COOKING TIME 20 MINS | SERVES 2-3

INGREDIENTS

  • 500g kalabasa (squash), cubed
  • 2 to 2 1/2 cups of fresh gata (coconut milk)
  • 1/4 block of firm tofu, ground
  • Garlic cloves, minced
  • Ground black pepper (to taste)
  • Cooking oil

METHOD

  1. Mince the garlic cloves and mash the tofu until it resembles ground meat/tofu scramble.
  2. Sauté the minced garlic cloves in a deep pan until slightly roasted.
  3. Add the kalabasa (squash) cubes and cook for about 2-3 minutes.
  4. Pour the gata (coconut milk) into the pan, and sprinkle with some ground black pepper to taste.
  5. Let it boil until the kalabasa is soft and cooked through, no more than 15 minutes. Stir occasionally and allow the coconut milk to thicken.
  6. While waiting for the mixture to boil, cook the ground tofu in a separate pan until slightly roasted.
  7. Once done, add the cooked ground tofu to the kalabasa and gata.
  8. Transfer the ginataang kalabasa to a serving bowl and enjoy on its own or paired with your favorite ulam (viand)!

Ginataang Kalabasa (Squash with Coconut Milk)

Photo Courtesy & Recipe Copyright © 2021 | Karina Pineda (@wanderlittlegirl)

BON APPÉTIT

– Karina Pineda

myTaste.com

Auguest 2021: Maria Reed

Pepes Ikan (Fish in Banana Leaves)

“Explore food beyond borders. Travel around the world, delve into different cultures, learn from people you cross paths with, and create recipes you’ve never tried before.” — Maria Reed

Auguest 2021: Maria Reed

Hello Everyone! I’m Maria. My love for food can be traced back to my roots. I inherited it from my family. My nanay, inang, mama, and aunts love to cook. Having a big family gives us reasons to celebrate and feast most of the time. I never learned how to cook until I got married and had to find my way around the kitchen on my own. I could still vividly remember when I started; I’d ask my mom for her recipes, watch a lot of videos, and read countless food blogs. I’ve travelled, tried new cuisines, and discovered my passion in recreating dishes I’ve had or never had before. I’ve gotten out of my comfort zone and became a junkie – learning, creating, and tweaking recipes.

I will be taking you on a trip to Indonesia on the Flavours of Southeast Asia journey here on Amcarmen’s Kitchen. The dish that I will be sharing with everyone is called Pepes Ikan. ‘Pepes’ is a cooking method where food (usually fish) is wrapped in banana leaves with its marinade. It is first steamed which gives it an earthy flavour and then grilled or baked for a smoky taste.

Pepes Ikan (Fish in Banana Leaves)

The spices are mashed together to a paste and then added with basil leaves, Indonesian bay leaves, tomatoes, and peppers with fish. All are wrapped in banana leaves and sealed with bamboo sticks at each end. Pepes Ikan is often thought of to be a Sundanese dish; favourite among the Sundanese people in the West Java, but it is also popular in other regions of Indonesia.

Pepes Ikan (Fish in Banana Leaves) Ingredients

Pepes Ikan (Fish in Banana Leaves) Ingredients

PREP TIME 30 MINS | COOKING TIME 30 MINS | SERVES 2-4

INGREDIENTS

  • 2 large tilapia fish
  • 8 cloves garlic, chopped
  • 10 shallots, chopped
  • 1 pc fresh red chilli pepper
  • 10 pcs candlenuts, roasted
  • 1 tsp ground coriander
  • 1 tsp shrimp paste, toasted
  • 2 stalks lemongrass, bruised and cut into 2 inches long
  • 10 pcs kaffir lime leaves
  • 2 tomatoes, cut into wedges
  • Bunch of Thai basil leaves
  • Juice of 1 lime
  • 1 pc lime, sliced
  • 2 knobs fresh turmeric, chopped
  • 1 knob fresh ginger, chopped
  • 1 tbsp sugar
  • 1 tsp salt
  • Banana leaf
  • Bamboo sticks

METHOD

  1. Pat dry the tilapia fish with a paper towel. Rub with the juice of half a lime and set aside.
  2. Paste: Add the chopped garlic, shallots, turmeric, chillies, and roasted candlenuts into a food processor, and blend into a smooth paste.
  3. Transfer the paste into a bowl, together with the fish, lemongrass, juice of half a lime, shrimp paste, ground cumin, sugar, salt, and bay leaves (if available).
  4. Place everything into a pan over medium high and add about half a cup of water so it won’t burn. Simmer for 15 minutes, flipping the fish halfway and season as needed. Turn the heat off and let it cool before wrapping.
  5. Once the fish has cooled down, lay some banana leaves with the bay leaves, kaffir lime leaves, lime slices, tomato wedges, and Thai basil leaves on top. Place the fish on top with the spice marinade, and top with more bay leaves, kaffir lime leaves, Thai basil leaves, and tomatoes.
  6. Seal the banana leaf with bamboo sticks on both ends and brush it with some oil. Place into a pan over medium high and grill, flipping until the banana leaf is wilted, for about 15 minutes or less. This process enhances the taste and aroma of the dish.
  7. Serve and plate with carrots and cucumber on the side. Enjoy!

Pepes Ikan (Fish in Banana Leaves)

Note: To make this dish more authentic, use bilimbi, also known as tree cucumbers and are known for their tart-tangy flesh, instead of lime and dahun salam, Indonesian bay leaves, instead of kaffir lime leaves.

Photo Courtesy & Recipe Copyright © 2021 | Maria Reed (@mariacocinera)

BON APPÉTIT

– Maria Reed

myTaste.com

Mee Goreng Mamak (Mamak-style Stir-Fried Noodles)

Mee Goreng Mamak (Mamak-style Stir-Fried Noodles)

Hello Everyone! We’re venturing forward on our Flavours of Southeast Asia journey through Malaysia with a dish that’s very close to my heart. Now, you probably already know that there are countless recipes for mee goreng (fried noodles), that vary depending on its country or region of origin, but tonight in particular, I will be sharing a Mamak-style mee goreng dish; a staple of ours that we would always order when my family and I were at our favourite roti canai eatery.

Mee Goreng Mamak (Mamak-style Stir-Fried Noodles)

Mamak is a local word used to describe people of Indian-Muslim origins in Malaysia; and thus with these two cultures merging together created a unique dish known as Mee Goreng Mamak, or in English, Mamak-style Stir-Fried Noodles. It is normally made with fresh egg noodles, boiled potatoes, fried tofu, and Chinese greens of choice that is tossed in a delicious sauce, but you can also bulk it up with other proteins such as chicken, squid, or seafood. Pork and beef are typically avoided for obvious reasons.

If you’re looking for a way to change up your weeknight noodle meals, then this is a recipe you should definitely try out. It’s quick, easy, and made with ingredients that you can easily source at your local market or grocer. Mee Goreng Mamak is a delicious blend of spicy, savoury, sweet, tangy, smoky (from all that wok hay), and sticky flavours in a single dish. The recipe that I will be sharing tonight is perfect for ovo-vegetarians.

Mee Goreng Mamak (Mamak-style Stir-Fried Noodles) Ingredients

PREP TIME 15 MINS | COOKING TIME 30 MINS | SERVES 4

INGREDIENTS

For the sauce

  • 1/2 cup water
  • 2 tbsp ketchup
  • 2 tbsp light soy sauce
  • 1 tbsp curry powder
  • 1 tbsp dark soy sauce
  • 1 tbsp sambal paste
  • 2 tsp white granulated sugar

For the noodles

  • 2 x 500g packs fresh yellow noodles, washed and drained*
  • 4 pcs firm tofu, fried and cut into chunks
  • 2 medium-sized cooked potatoes, peeled and cut into chunks
  • 2-3 garlic cloves, minced
  • Spring onion
  • 2 large free-range eggs
  • Handful of celery leaves
  • 1/2 cup bean sprouts
  • Oil, for cooking
  • Chinese cabbage, blanched
  • Red pepper, sliced
  • Lemon wedges, optional

*Fresh yellow noodles are usually oiled. Rinse it in cold water to loosen up the threads and remove part of the oil, or you can quickly blanch it in hot water and drain before using.

METHOD

  1. Sauce: In a medium-sized bowl, mix all the ingredients together until well combined. Set aside until ready to use.
  2. Mee Goreng Mamak: Add oil in a large pan over high heat. Add the garlic and white/light green part of the spring onion and sauté until the garlic is lightly golden and fragrant, about 30 seconds.
  3. Add the yellow noodles and fry for about a minute or two. Push the noodles to the side and add the eggs. Let the eggs cook a little to set and then mix it into the noodles.
  4. Add the fried tofu, cooked potatoes, celery leaves, and the sauce mixture to the noodles. Toss until the noodles are evenly coated with the sauce, frying for about 3 to 4 minutes. Try not to mix too hard or it will break up the noodles into tiny threads.
  5. Add the remaining spring onion and bean sprouts. Give it another quick toss, about a minute or so for the bean sprouts to cook.
  6. Once done, transfer to individual serving plates and serve with red peppers and Chinese cabbage (or any greens of your choice). Garnish with a squeeze of fresh lemon juice and enjoy immediately while hot!

1933

1934

BON APPÉTIT

– Ally xx

myTaste.com

Assam Pedas Ikan

Assam Pedas Ikan

Hello everyone! A new month means we’ve ventured onwards to our next Southeast Asian destination, and tonight we’re kicking off our journey through Malaysia! Having lived in Brunei for 26 years of my life, and Bruneian food being so heavily influenced by the cuisine of its neighbouring country, Malaysia, it’s no wonder that it’s a cuisine that’s very close to my heart and that I love so much on top of everything else that I seem to love when it comes to food *cheeky grin*

Assam Pedas Ikan

Assam Pedas Ikan, or literally translated as Sour Spicy Fish in English, is a classic Malaysian dish that’s undoubtedly sour, fiery hot, and super satisfying! Special ingredients such as tamarind peel, ginger torch flower, and Vietnamese coriander (laksa leaves) are key in achieving the flavour profile and aroma of Assam Pedas. However, while these ingredients may be difficult to source in certain countries, the sourness is the important component; and you can use tamarind pulp or paste for this. I guess that it’s also safe to say why everyone has their own take on this favourite Malaysian dish; the adaptations are endless! Ultimately, a good balance of sourness, saltiness, sweetness, and spiciness is all you need to make a good Assam Pedas dish.

Tonight, I’ll be sharing the way I remember how my Mom used to make it when we were still living in Brunei. It’s been a while since I’ve had this dish and I was actually surprised by how quick and easy it is to make, as well as how readily available all the ingredients are, for the version that I will be making of course. Instead of using water for my version, I used my own homemade fish broth from fish scraps to give the Assam Pedas more depth in flavour. Traditionally, locals would use ikan tenggiri (Spanish mackerel), or ikan pari (stingray), but my Mom and I prefer to use pomfret fish (pampano in Tagalog) for its delicate white flesh, subtle non-fishy and sweet taste, as well for its firm texture.

Assam Pedas Ikan Pedas

PREP TIME 30 MINS | COOKING TIME 10 MINS | SERVES 4

INGREDIENTS

For the spice paste

  • 8-10 pcs dried red chillies, roughly chopped
  • 1 garlic clove, roughly chopped
  • 1 small red onion, diced
  • 1 stalk lemongrass (white part only), roughly chopped
  • 1/2 tbsp sambal belacan paste

For the assam pedas ikan

  • 2 large pomfret fish
  • 2 tbsp cooking oil
  • Spice Paste
  • 1 tsp fish curry powder
  • 1 tbsp coconut sugar
  • 2 tbsp tamarind paste
  • 2 cups fish broth
  • 2 tomatoes, quartered
  • 1 small red onion, quartered
  • 1 thumb-sized ginger, sliced
  • Spring onion, white part
  • 10 pcs okra
  • Salt, to taste
  • Spring onion (green part), to garnish

METHOD

  1. Spice Paste: Using a mortar and pestle, pound all the ingredients for the spice paste together, or you may also use a food processor to do so. Set aside.
  2. Assam Pedas Ikan: Heat cooking oil to a large pot over medium-high. Add the spice paste and fry for about 2 minutes or until fragrant before adding the curry powder, coconut sugar, and tamarind paste. Fry for a further 2 minutes.
  3. Add the fish broth, followed by the tomatoes, red onion, ginger slices, and white parts of the spring onion, and leave to simmer for about 5 minutes or until the tomatoes have softened.
  4. Add the pomfret fish and cook for 20 minutes or until the fish is cooked through. Add the okra and cook for a further 5 minutes, or until the okra is tender.
  5. Serve immediately while hot and enjoy with freshly steamed white rice!

Assam Pedas Ikan is best served with plain steamed white rice. You may also serve it with noodles, kind of like a laksa, if you’re using boneless fish. Rice noodles would be the go-to choice as they take on the flavour of the Assam Pedas best.

Assam Pedas Ikan

Assam Pedas Ikan

BON APPÉTIT

– Ally xx

myTaste.com

Khua Mee (Fried & Caramelised Rice Noodles)

Khua Mee (Fried & Caramelised Rice Noodles)

Hello everyone! This will be the second and last dish that I will be sharing on our quick trip to Laos. As I mentioned in my previous post, I am not very knowledgeable when it comes to Lao cuisine and will only be sharing recipes that I am familiar with in terms of taste and similar dishes from their neighbouring countries.

Khua Mee, or in English, Fried & Caramelised Rice Noodles, is the Laotian cousin of what Pad Thai is in Thailand. Now, while I’ve never had Khua Mee before until I experimented for Amcarmen’s Kitchen, I’ve had plenty of Pad Thai before, from my trips to Thailand, or just a visit to an authentic Thai restaurant back home in Brunei, and when I was living in Australia. Khua Mee is actually more sweet than savoury, and has a more unique flavour to it. This flavour comes from caramelising the sugar at the start of the cooking process which is then accompanied by other savoury flavours such as oyster sauce, fish sauce, and soy sauce. The sweet and savoury marriage of flavours is what sets this dish apart from other noodle dishes.

Khua Mee (Fried & Caramelised Rice Noodles)

The dish is fairly easy to put together. I guess the only tricky part would be the caramelisation of the sugar if you’re not used to it. You want to keep the heat on a medium-low temperature and watch it like a hawk so that the sugar does not burn. Traditionally, this noodle dish is topped with a fried egg omelette and bean sprouts. If you want to make this dish more substantial, you can also bulk it up with beef, pork, chicken, or prawns. To keep this ovo-vegetarian friendly though, my choice of protein was firm tofu. I also used mushroom sauce instead of oyster sauce, and omitted the fish sauce by adding more salt, as needed, instead. To add more flavour, I used homemade vegetable stock instead of water as the liquid base for the rice noodles to soak up.

Push the Pad Thai aside for now because once you take a bite and get a mouthful of these caramelised noodles, fried omelette, fresh herbs, and fried chillies, you will know why this is a much loved Laotian dish. It’s also a perfect potluck party dish as it tastes even better when served at room temperature.

Khua Mee (Fried & Caramelised Rice Noodles) Ingredients

PREP TIME 30 MINS | COOKING TIME 10 MINS | SERVES 4

INGREDIENTS

For the fried omelette

  • 4 large free range eggs
  • Spring onion, green part
  • Salt and freshly cracked black pepper, to taste
  • 2 tbsp cooking oil

For the fried noodles

  • 1 packet (500g) rice noodles
  • 4 tbsp cooking oil
  • 4 tbsp white granulated sugar
  • 4 garlic cloves, finely minced
  • 2 small red onions, halved then sliced thinly
  • 1 & 1/2 cup homemade vegetable stock*
  • 2 tbsp light soy sauce
  • 2 tbsp mushroom sauce
  • 1 tbsp dark soy sauce
  • 1 cup bean sprouts
  • Spring onion
  • Fried red chillies
  • Fried tofu
  • Salt and freshly cracked black pepper, to taste
  • Calamansi or lemon, to garnish

*You can use store-bought vegetable stock, or water instead.

METHOD

  1. Noodles: Soak the rice noodles in room temperature water for 30 minutes. Set aside.
  2. Fried Omelette: While the rice noodles are soaking, whisk the eggs in a medium-sized bowl, season with salt and cracked black pepper, and add the spring onion.
  3. Add cooking oil in a large pan over high heat. Pour in the egg mixture and cook until firm and slightly brown around the edges, about 2 to 3 minutes. Flip and cook for a further 1 minute then transfer to a plate and cut into long strips. Set aside.
  4. Fried Noodles: Add the 4 tablespoons of cooking oil in the same pan, and bring the heat down to medium-low. Add the sugar and caramelise until melted and lightly golden in colour.
  5. Add the minced garlic and onions, and cook for about 30 seconds. Don’t cook it for too long as the sugar will start to darken faster and most likely burn at this point.
  6. Immediately add in the vegetable broth to stop the caramelisation process of the sugar, followed by the light and dark soy sauce, mushroom sauce, white part of the spring onion, and season with a pinch of salt. Turn the heat up to medium, mix, and then leave to simmer for about 5 to 10 minutes for the flavours to develop.
  7. Add the soaked rice noodles and cook until most of the liquid has been absorbed before adding the bean sprouts, fried tofu and fried omelette slices. Mix and cook until the liquid has been absorbed then add in the green part of the spring onion and the fried red chillies.
  8. Transfer to individual serving plates and add a squeeze of calamansi or lemon juice before eating. Enjoy!

Khua Mee (Fried & Caramelised Rice Noodles)

Khua Mee (Fried & Caramelised Rice Noodles)

BON APPÉTIT

– Ally xx

myTaste.com

Laab Paa (Fish Herb Salad)

Laab Paa (Fish Herb Salad)

Hello Everyone! For the later part of June, we’ll be saying goodbye to Indonesia for now and will be venturing off to Laos and since I am not very familiar with Lao dishes, I’ll only be covering two dishes that I’ve had similar experiences with.

The first Lao dish that I will be sharing tonight is known as laab (can also be spelt as larb). Laab is a type of Lao minced meat salad that can be made with either chicken, duck, beef, pork, fish, or mushrooms. It is seasoned with fish sauce, lime juice and padaek, a traditional Lao condiment made from pickled or fermented fish that has been cured. It is thicker and more seasoned than the fish sauce. Chillies, assorted vegetables, and fresh herbs such as mint, are also added to give the salad more flavour.

1916

Though this is the first time I’m tackling a Lao dish, I am familiar with the process and taste of laab. My Thai aunt taught me how to make the Thai version of this dish using chicken, beef, and pork; this was way back when I was still in university and used to eat meat. Even though this is the ‘unofficial’ national dish of Lao, it is also eaten in a certain region in Northern Thailand where the majority of the population is of the Lao ethnicity. Variants of this dish can also be found in Myanmar (Burma) and in the Yunnan province of China.

I’ll be sharing a pescatarian-friendly version known as Laab Paa, or in English, Fish Herb Salad. It is refreshing because of the fresh mint and fresh ginger slices that cut through the saltiness, sourness, and spiciness of the dish as a whole. While the fish meat is soft and tender, you also get a different texture from the crispy-fried fish skin that is mixed into the salad. The dish is served at room temperature and usually with a serving of sticky rice and raw or fresh vegetables. You can even serve them as lettuce wraps. We served ours with rice noodles instead.

Laab Paa (Fish Herb Salad) Ingredients

PREP TIME 20 MINS | COOKING TIME 5 MINS | SERVES 2

INGREDIENTS

  • 500g minced fish, I used red grouper fish
  • Fish skin
  • Salt, to taste
  • 2-3 red chillies, minced
  • 1 small red onion, halved and sliced thinly
  • 1 thumb-sized ginger, julienned
  • 1/2 tbsp fish sauce
  • 1/2 tbsp sesame oil
  • Juice of half a lemon
  • Handful of blanched bean sprouts
  • Mint leaves
  • Spring onion

METHOD

  1. Add about a tablespoon or 2 of cooking oil in a medium-sized frying pan over medium-high. Add the minced fish and season with salt, to taste. Cook until translucent, about 4 to 5 minutes.
  2. While the fish is cooking, heat oil in a separate pan and fry the fish skin until browned and crispy. Once fried, break them into smaller sizes. Set aside.
  3. In a large mixing bowl, toss the cooked fish together with all the remaining ingredients. Adjust the seasoning to your liking, i.e. add more fish sauce for saltiness, or more lemon juice for sourness.
  4. Plate up and top the laab paa with the crispy-fried fish skin. Serve and enjoy!

Laab Paa (Fish Herb Salad)

Laab Paa (Fish Herb Salad)

BON APPÉTIT

– Ally xx

myTaste.com

Tahu Telur (Indonesian Tofu Omelette)

Hello Everyone! So if you saw my recipe yesterday for Homemade Egg Tofu, you’ll know that I’m back with a recipe that uses them in the dish that I will be sharing tonight.

Back in my very first post in May when we first landed in Indonesia for our Flavours of Southeast journey, I mentioned that there was this Indonesian restaurant in Brunei that my family and I would always go to on a weekly basis. One of the dishes that we would always order is Tahu Telur, or in English, Indonesian Tofu Omelette. It is an inexpensive and humble dish that originated from East Java, and although meatless, it is packed with protein from the eggs and tofu, making it perfect for those on a ovo-vegetarian diet. The dish may seem intimidating in terms of its preparation, but trust me, it doesn’t require much skill and is actually easy to put together. It’s also worth it!

Tahu Telur (Indonesian Tofu Omelette)

What makes this tahu telur dish stand out from other omelettes out there is its tower-like structure. You can also find flat versions of this dish, but it’s not as exciting and dynamic as a vertical omelette in my opinion. To achieve this tower, you’ll need a ring mold to cook the eggs and tofu in. If you do not have a ring mold, you can DIY one from a tin can that is at least 4 inches in diameter and 5 inches high. This is what I did when I could not seem to find ring molds in stores; and it worked just as good!

When fried the eggs are fluffy and crispy on the outside, but soft and moist on the inside when you cut through it due to the tofu that’s mixed in it. You can top it with various fresh vegetables of your choice to add a different crunch that’s refreshing to the palette. The dish is then brought together with a sweet and spicy peanut sauce that you can easily adjust to suit your liking.

1907

PREP TIME 15 MINS | COOKING TIME 20 MINS | SERVES 4

INGREDIENTS

For the tauhu telur

  • 5 large free-range eggs
  • 2 tbsp tapioca flour
  • 1 tsp salt
  • Homemade egg tofu*, deep fried
  • Cooking oil

*I used a quarter serving of this recipe, and cut them into 8 rectangular pieces.

For the peanut sauce

  • 5 garlic cloves, peeled
  • 3 red chillies
  • 1 cup hot water
  • 3 tbsp kicap manis
  • 2 tbsp coconut sugar
  • 1 & 1/2 tbsp peanut butter

To garnish

  • Blanched bean sprouts
  • Fresh red chillies, chopped
  • Spring onion

METHOD

  1. Peanut Sauce: In a small pan, fry the garlic cloves and chillies until soft and browned. Add all the ingredients into a blender and blend until combined.
  2. Transfer the mixture to a small saucepan and cook over medium heat until reduced and slightly thickened. You may want to add more kicap manis at this point to darken the colour of the sauce. Once done, remove from the heat and set aside. Reheat later if needed.
  3. Tauhu Telur: Beat the eggs, tapioca flour, and salt together until well combined. Dissolve as much of the flour as possible.
  4. In a large frying pan, heat over medium-high, enough oil so that you are able to scoop up using a ladle, I used about 6 to 8 cups. Place the ring mold in the center of the pan and ladle the hot oil over the mold to prevent sticking while cooking.
  5. Pour about a third of the egg mixture into the ring mold and let it cook for about 30 to 45 seconds. Add half of the deep fried egg tofu to the eggs and cook for a further 30 seconds, ladling hot oil into the mold.
  6. Add another third of the egg mixture and top with the remaining egg tofu. Ladle more hot oil into the mold, and then add the remaining egg mixture on top.
  7. Reduce the heat down to medium and cook by continuously ladling hot oil on top of the mixture. Remove the oil if it stops sizzling and pour hot oil on top, repeating until golden brown in colour, about 4 to 5 minutes, or until the egg is cooked enough that it can hold its shape upright.
  8. Using a knife, gently scrape the inner side of the mold to loosen the egg. Use tongs to slowly and gently pull the mold away from the egg. Continue to cook until the sides are golden brown in colour.
  9. Once done, remove from the pan and shake off any excess oil. Transfer to a plate lined with paper towels to soak up any more excess grease.
  10. Transfer to a serving plate with the peanut sauce, and top with the blanched bean sprouts, fresh chillies, and spring onion. Enjoy!

Tahu Telur (Indonesian Tofu Omelette)

1909

BON APPÉTIT

– Ally xx

myTaste.com

Homemade Egg Tofu

Homemade Egg Tofu

Hello Everyone! Apologies for being MIA for the past few weeks; I’ve been having some issues with accessing the photos for my recipes, along with other things that have kept me busy in the past weeks. Anyway, a new month usually means we’ll be travelling to another country on our Flavours of Southeast Asia journey, but since I was away for half of May, I already had Indonesian dishes cooked up and planned for then. I’ll continue to share them first before we fly off to another country.

Tonight’s recipe isn’t particularly Indonesian; in fact it is of Chinese origin, commonly consumed in Hong Kong and Taiwanese cuisine. Egg tofu is made from eggs and soy milk, which means it is much sturdier than silken tofu. The main difference between the two is that egg tofu is not vegan because it has eggs whereas silken tofu is typically vegan since it’s made by coagulating soy milk without curdling it. Egg tofu is vegetarian if you consume eggs as part of your vegetarian diet. You can usually find egg tofu in a tube-like shape sold in many Asian groceries, but since I could not find any at my local grocer/supermarket, I decided to do some research and found out that it’s actually super simple to make at home! All you need are eggs, soy milk, salt, and voilà!

Homemade Egg Tofu

But wait! Before I dive any further, why am I sharing a recipe for Chinese-style egg tofu when we’re supposed to be venturing in Indonesia? Well, I will be sharing a recipe that uses egg tofu in an Indonesian dish; I just decided that I want to share this recipe for egg tofu separately. It’s so versatile; you can pan/deep fry it, boil it, and braise it. Use this recipe as a base for other delicious recipes, like what I’ll be sharing tomorrow night.

Normally I would opt to make my own homemade soy milk, but because I could not source soy beans at my local grocer or supermarkets, I used store-bought soy milk instead. Now, it’s important to use unsweetened soy milk. The first time I tried this recipe out, I used slightly sweetened soy milk because that’s what I had sitting in my pantry at that moment. The result is very different, especially if you’re going to fry the egg tofu.

The result I got when I used sweetened soy milk was that the exterior of the egg tofu turned dark brown in patches, almost like it caramalised instead of fried. It wasn’t crispy at all. When I made a second batch using unsweetened soy milk, the exterior of the egg tofu was perfectly golden brown in colour when fried, and was also extra crispy. So please use unsweetened soy milk!

Homemade Egg Tofu Ingredients

PREP TIME 10 MINS | COOKING TIME 30 MINS | SERVES 4

INGREDIENTS

  • 7 large free-range eggs
  • 2 cups unsweetened soy milk, homemade or store-bought
  • 1/2 tsp salt

METHOD

  1. Whisk the eggs and salt together in a large mixing bowl until well combined. While continuing to whisk, slowly pour the soy milk into the eggs.
  2. Line a square baking dish (8-in x 8-in) with parchment paper, and sieve the egg mixture into the prepared pan. Get rid of any bubbles on the surface. Cover with aluminium foil and steam for 30 minutes or until a toothpick inserted into the center of the egg tofu comes out clean.
  3. Once done, remove from the steamer and transfer the egg tofu to a plate lined with paper towels to soak up all the excess moisture. This step is really important if you’re going to pan/deep fry these later to prevent oil splatters.
  4. Set aside to cool down completely before cutting into desired shapes and sizes. Enjoy as it is, fried, or include it in various dishes.

1903

Stay tuned to see what I’ve used this egg tofu for!

How to store egg tofu?

  • Store raw egg tofu in a container with water and use it within 2 days. Make sure to drain the water and pat dry before cooking with them, especially if you’re going to fry them.
  • Cooked egg tofu can last up to 3 days if refrigerated, however, it’s best to eat it freshly pan fried.

Homemade Egg Tofu

BON APPÉTIT

– Ally xx

myTaste.com