Auguest 2019: Jialing Mew

Baked Brie with Rosemary, Honeyed Pear & Walnuts

Happy Auguest everyone! I’m Jialing and this is my 5th year as the grand finale for Amcarmen’s Kitchen’s Auguest series. I’ve learnt a lot in these past five years, but clearly not how to stop procrastinating.

Baked Brie with Rosemary, Honeyed Pear & Walnuts

I am at a friend’s wedding, typing away on my phone as quickly as I can while waiting for dinner to come out, moments before it is meant to go live (despite Allison having sent me daily reminders – sorry mate). If you, like me, frequently find yourself with many commitments, and little time, boy do I have a recipe for you! Having learnt from my previous Auguest blogs, this recipe uses just a few ingredients and equipment, and comes together in 15 minutes!

As a bonus, it is vegetarian friendly, and can be easily adapted to be gluten friendly, by swapping out the bread. But it’s not for vegans. Sorry. Please direct yourself to Auguest 2016 for my Poached Pears with Chocolate Chia Mousse if that’s what you’re after.

Baked Brie with Rosemary, Honeyed Pear & Walnuts Ingredients

PREP TIME 5 MINS | COOKING TIME 10-12 MINS | SERVES 4-6*

*Or one (1) very hungry Jialing.

INGREDIENTS

  • 200g Brie cheese
  • 3 pears
  • 2 sprigs rosemary
  • 1/4 cup walnuts
  • 2 tbsp honey

To serve

  • Strawberries
  • Crusty bread

METHOD

  1. Pre-heat oven to 180C (350F or gas mark 4) and line a tray with baking paper – this will help keep the honey from sticking to the surface when it caramelises!
  2. Cut pears into quarters, and lay onto the baking tray, leaving space for the brie cheese in centre.
  3. Place the unwrapped brie cheese in the centre of the tray and lay whole sprigs of rosemary on top.

Tip: Laying them on top rather than poking them into the cheese infuses the flavour without creating holes that the melting cheese will spill out of as it bakes!

  1. Pile walnuts gently on top of the rosemary sprigs, and drizzle the brie cheese and pears generously with honey.
  2. Bake for 10-12 minutes, until the brie cheese is soft and the honey just starts to bubble. As the honey cools it will caramelise the walnuts.
  3. Gently lift the brie cheese using spatula and place onto a cheese board. Arrange pears (careful, they’ll be hot too) and fresh strawberries around the brie cheese and serve immediately with fresh crusty bread. Enjoy!

Baked Brie with Rosemary, Honeyed Pear & Walnuts

Baked Brie with Rosemary, Honeyed Pear & Walnuts

And here we have a rather curious Winston.

Photo Courtesy & Recipe Copyright © 2019 | Jialing Mew

BON APPÉTIT

– Jialing Mew

myTaste.com

Advertisement
Apple Chicken Bake

Apple Chicken Bake

Hello Everyone! March is here which can only mean one thing for Amcarmen’s Kitchen. That’s right! A new month means a new fruit to play with and we’re all about Apples this March! More specifically we’re going to be playing around with Red Washington Apples only because they were on sale at Rustan’s Supermarket for only P28 apiece! I think they were originally priced at like P35 or something. I know it’s not much of a difference but other supermarkets have them priced at P230 or something per kilo, which is crazy!

Apple Chicken Bake

I’ll keep my introduction short tonight, as I am not feeling well today – the creative writing juices aren’t flowing at the moment, apologies for that. I didn’t want to start off my post in saying what happened, but you can read more about it at the end of the post.

Before we dive right into the recipe, please head on over to Taste of Home for the original recipe where I drew my inspiration.

Apple Chicken Bake Ingredients

PREP TIME 5 MINS* | COOKING TIME 30 MINS | SERVES 3

*Allow for up to 4-6 hours to marinate the chicken, or even better, overnight in the fridge. Remove from the fridge about an hour before baking to bring the meat back to room temperature.

INGREDIENTS

  • 3 whole chicken legs (about 1/2 kg)
  • 1 large brown onion, peeled and wedged
  • 1 large Red Washington Apple, washed and wedged
  • Freshly cracked black pepper

For the marinade

  • 5 whole cloves
  • 2-3 garlic cloves, peeled and crushed
  • 1 cinnamon bark
  • 1/3 cup Hickory BBQ sauce
  • 1/4 cup apple juice
  • 1 tbsp honey
  • 1/4 tsp ground nutmeg
  • 1/4 tsp salt
  • 1/4 tsp whole black peppercorns

Apple Chicken Bake Process

METHOD

  1. Combine the marinade ingredients in a small bowl. Dip the chicken whole legs into the marinade and then place skin side down into an oven-safe Pyrex dish.
  2. Pour the remaining marinade into the Pyrex dish, cover with cling wrap and then set aside in the fridge to marinate for about 4-6 hours or overnight.
  3. When ready to bake, remove from the fridge and turn the chicken legs over skin side up. Leave aside to bring to room temperature, about an hour.
  4. Preheat oven to 200C (400F or gas mark 6). Scatter the wedged apples and onions onto the Pyrex dish, and season with a touch of freshly cracked black pepper. Bake in the oven for 30 minutes.
  5. Once done, turn the heat off. Drain the sauce into a small saucepan and place the chicken back into the oven to keep warm.
  6. Bring the sauce to a boil over medium-high heat. Once boiling, add slurry of cornstarch to the sauce to thicken it. Once thickened, turn the heat off.
  7. Serve with any sides of your choice. I served mine with a side of salad with cherry tomatoes and French beans, and corn on a cob.

Apple Chicken Bake Process

Apple Chicken Bake

Before I end tonight’s post, I would just like to say that it’s been one heck of a crazy week! So busy that I haven’t even had the time to plan and cook my dishes for this month ahead of time, which is what I usually do to stay on top of things. This is one of the reasons why tonight’s post isn’t as informative as my previous posts. The reason for that being is that I’m also suffering from piercing stomach pains and an irritable bowel syndrome, quite possibly due to food poisoning. I’m confined at home and hydrating lots. Hopefully I’ll be all good in the coming days and I can get back on track with my cooking and writing by the weekend or early next week!

BON APPÉTIT

– Ally xx

myTaste.com

Pear & Walnut Cake with Spiced Red Wine Pears

Pear & Walnut Cake with Spiced Red Wine Pears

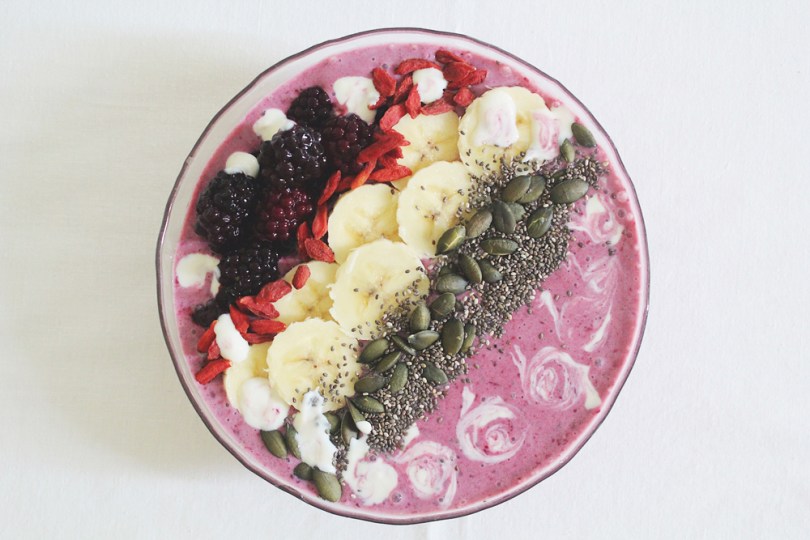
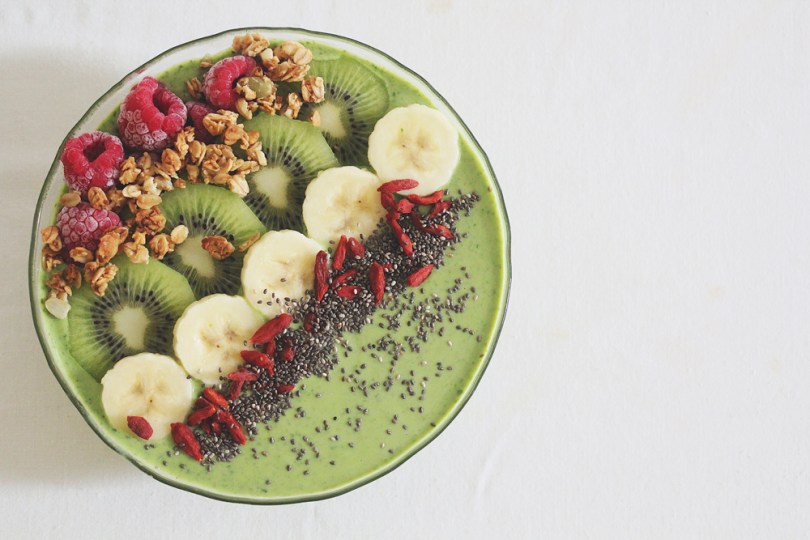
Hello Everyone! I’ve got a special post for you this evening as today marks 4 years of Amcarmen’s Kitchen! Don’t worry, I’ll still post a Breakfast Smoothie Bowl up for you guys most probably towards the end of the week since I already had the post and pictures prepared for it.

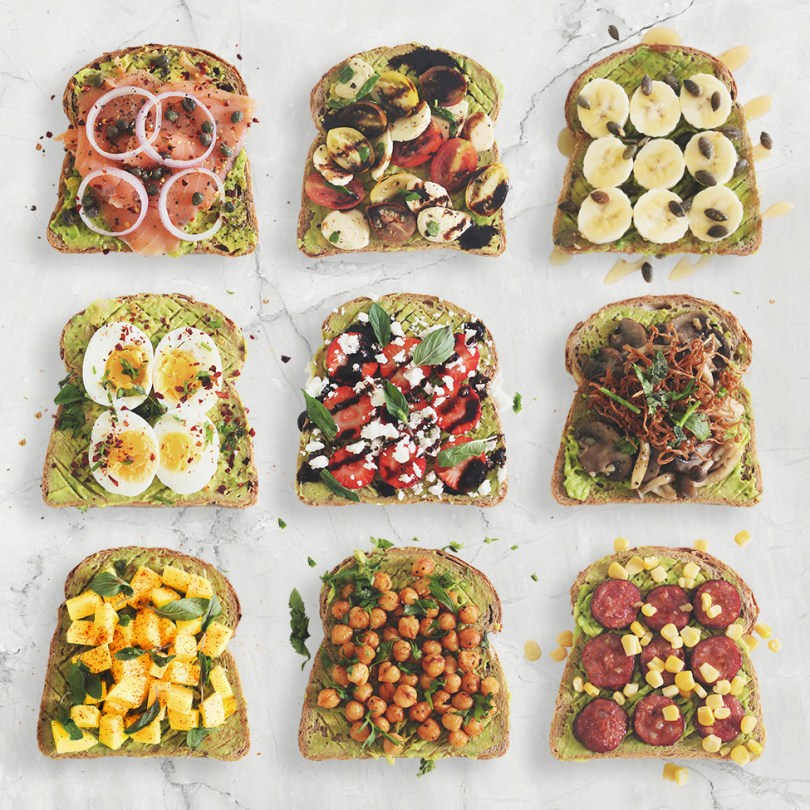
Anyway, technically I started this blog on April 16th, but it wasn’t until 2 days after on the 18th that I posted my very first recipe! You can check it out here: Cheesy Mushroom Omelette with Avocado Mint Greek Yoghurt & Wilted Spinach. Yes, you could say I was less talkative (wordy) for my first few posts, mainly because I had no clue on what else I could write about. When I started this blog out of pure procrastination way back in 2014 during my uni mid-semester break, I didn’t think I would be able to make it this far to be honest! I did slack behind a bit (a lot) towards the end of last year as it wasn’t easy juggling both a very demanding job, this blog, time for family and friends, and wanting some free time to myself as well. I have been doing a better job at keeping up so far, but it’s too early to tell to be honest, since I only just started getting back into this last month.

Pear & Walnut Cake with Spiced Red Wine Pears

I want to say that I promise that I will try to do better this year, but even I know that that’s a promise that I won’t be able to keep, so bear with me my dear followers! I know it is not in any way an obligation for me to share with you guys every single week, but I feel a sense of accomplishment for when I do so, and I don’t ever want this blog to drift away. It’s the only passion that I have going on for me right now because of my busy work schedule, and I don’t want all the hard work I’ve put into this blog for the past now coming 4 years to just become all for nothing.

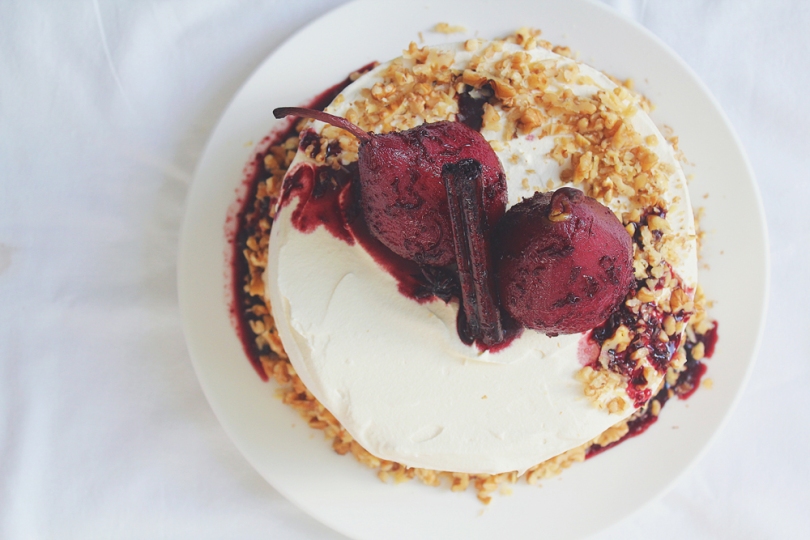
With that being said, tonight I will be sharing a recipe that I tackled last November actually… For my 26th birthday! I never got around to posting it, and since I literally just got back from Hong Kong last night and had to report straight to work this morning, I’ve had no time to bake a new cake to celebrate Amcarmen’s Kitchen turning 4. So here’s my Pear & Walnut Cake that I drew inspiration from Olivia over on Liv for Cake. The cake itself was moist, not too sweet and had a lovely texture from the soft pear chunks and crunchy toasted walnuts. The honey buttercream was light and fluffy, beautifully contrasted by the deep red pears sitting atop a white-frosted cake.

(Apologies for not having an ingredient shot like how I normally do for almost all my recipe posts, but the photo didn’t turn out so great so I just decided not to post it)

PREP TIME 20 MINS | COOKING TIME 30 MINS | SERVES 8-10

INGREDIENTS

For the pear and walnut cake

  • 2 & 1/4 cups plain flour
  • 1 cup buttermilk, at room temperature
  • 1 cup toasted walnuts, roughly chopped (plus extra to top)
  • 180g unsalted butter, at room temperature
  • 3/4 cup brown sugar
  • 3/4 cup granulated sugar
  • 3 large free range eggs, at room temperature
  • 2 large pears, peeled, cored, and coarsely shredded
  • 2 tsp baking powder
  • 1 & 1/2 tsp vanilla extract
  • 3/4 tsp salt
  • 1/2 tsp ground cinnamon

For the honey Swiss meringue buttercream

  • 4 large free range eggs, whites only
  • 360g unsalted butter, at room temperature
  • 1 cup granulated sugar
  • 1/4 cup honey

Optional: for the spiced red wine poached pears to top

METHOD

  1. Spiced Red Wine Poached Pears: Follow the recipe method provided in the link above.
  2. Pear and Walnut Cake: Preheat oven to 180C (350F or gas mark 4). Grease and flour two 8-inch cake rounds and line with parchment paper.
  3. In a medium-sized bowl, whisk the plain flour, baking powder, ground cinnamon, and salt until well combined. Set aside.
  4. Next, using a stand mixer fitted with a paddle attachment, cream the butter and sugar on medium-high speed until the mixture becomes pale and fluffy (approximately 3 minutes). Reduce the speed and add the eggs in one at a time to allow to fully incorporate after each addition. Add the vanilla extract.
  5. Alternate adding the flour mixture and buttermilk, beginning and ending with flour (3 additions of flour and 2 of milk altogether). Make sure to fully incorporate after each addition. Then, gently fold in the toasted walnuts and shredded pears, and divide the mixture evenly between the two pans.
  6. Bake for 50 to 55 minutes or until a toothpick inserted into the centre of both cakes come out mostly clean. Place the cakes on wire rack to cool for about 10 minutes and then turn out onto the wire rack to cool further.
  7. Honey Swiss Meringue Buttercream: Place the egg whites and sugar into the bowl of a stand mixer, and whisk until combined.* Place the bowl over a double boiler on the stove and whisk constantly until the mixture is hot and no longer grainy to the touch (approximately 3 minutes), or until it registers 70C/160F on a candy thermometre.
  8. Place the bowl back on your stand mixer and whisk on medium-high speed until the meringue is stiff and has cooled (the bowl is no longer warm to the touch (approximately 5 to 10 minutes).
  9. Switch to a paddle attachment and slowly add in the butter (cubed). Mix until smooth.** Add the honey and whip until smooth. Set aside.
  10. Assembly: Place one layer of cake on a cake stand or serving plate. Top with approximately 1 cup of the buttercream and repeat with the remaining layer. Crumb coat the cake and place in the fridge to chill for about 20 minutes.
  11. Continue to frost the top and sides of the cake in a rustic manner. If desired, add toasted walnuts along the bottom and top, and place the poached pears on top. Secure pears in place with toothpicks and drizzle with the poaching syrup.
  12. Serve and enjoy!

* Ensure that there are NO traces of egg yolks in your whites and that your mixer bowl and whisk is completely grease free or your meringue won’t stiffen.

** The buttercream may look like it’s curdled at some point. Keep mixing until it is completely smooth.

Pear & Walnut Cake with Spiced Red Wine Pears

BON APPÉTIT

– Ally xx

myTaste.com

Banana & Blackberry Smoothie Bowl

Banana & Blackberry Smoothie Bowl

Hello Everyone! So my allergies have been acting up all day and usually dust triggers my constant sneezing, but I didn’t do anything out of the ordinary today to inhale a load of dust for this to happen. While I’m left clueless, I’m also left with a slight headache, fatigue, and quite possibly (but hopefully not) might end up with the flu when I wake up tomorrow morning, followed by a chain of bugs – a fever, a sore throat, and a terrible cough. On the other hand, sometimes I wake up feeling 120% better as if nothing happened. So I HOPE for the latter.

To be completely honest with everyone – I’ve never had a smoothie bowl until I started this series of mine. I’ve seen it all over social media back when it was the new ‘foodie’ trend and it always looked aesthetically pleasing to the eye, but I was a bit skeptic on the idea of using a spoon to eat my smoothie rather than using a conventional straw to drink it. I tried to wrap my head around the idea to imagine as if I was having a bowl of thick soup, but the thought of having cold soup soon consumed my mind and I didn’t like that thought. I just thought that it was weird for some reason, until I decided to try one out for my breakfast series on Amcarmen’s Kitchen and feel completely in love with them.

They are super EASY to make, as you may have seen in my previous posts, the take about a minimum of 5 minutes to put together. It allows you to get creative with your favourite toppings and this not only adds colour to your mornings or makes it look pretty, but it also adds texture to your smoothie. Furthermore, it’s a great way to slowly use up those chia seeds and pepitas lying on your pantry shelf just waiting to go out of date because you don’t know where else you can use them!

Banana & Blackberry Smoothie Bowl Ingredients

PREP TIME 5 MINS | COOKING TIME  | SERVES 1

INGREDIENTS

For the smoothie mixture

  • 1 cup frozen blackberries
  • 1/2 cup vanilla yoghurt
  • 1/4 cup low-fat milk
  • 1 large banana
  • 1 tbsp honey
  • 1 tbsp chia seeds

Toppings

  • Bananas – loaded with essential vitamins and minerals such as potassium, calcium, manganese, magnesium, iron, folate, niacin, riboflavin, and B6
  • Blackberriesrich in vitamin A, B, C, E, K, as well as antioxidants lutein and zeaxanthin, and minerals such as sodium, copper, manganese, magnesium, potassium, pantothenic acid, pyridoxine, riboflavin, niacin, and folic acid
  • Chia Seeds – contains omega-3 fatty acids, fibre, antioxidants, iron, and calcium
  • Goji Berries – excellent source of antioxidants and nutrients that help boost the immune system and protect the body from high levels of inflammation
  • Pumpkin Seeds – contains magnesium, manganese, copper, protein, and zinc

METHOD

  1. Blend the frozen blackberries, yoghurt, milk, banana, honey, and chia seeds until smooth.
  2. Transfer to a bowl and top with sliced bananas, blackberries, chia seeds, goji berries, and pumpkin seeds. Enjoy!

Banana & Blackberry Smoothie Bowl

If you have yet to try out a smoothie bowl, then you should definitely try out this recipe for a Banana and Blackberry Smoothie Bowl. The great thing about this bowl was that I had everything on hand and didn’t need to buy extra ingredients for this bowl – except for the blackberries of course. We always have a bunch of bananas lying around in the kitchen, and well, we’ve had the chia seeds, pepitas, and goji berries lying around for a bit now.

Don’t forget that you are not limited to the choice of toppings mentioned above. Use whatever you have lying around so that you don’t have to go and spend extra money on the things that you don’t have. I’ve basically been doing the same thing since I started my Smoothie Bowl series at the beginning of the month!

BON APPÉTIT

– Ally xx

myTaste.com

Avocado & Spinach Smoothie Bowl

Avocado & Spinach Smoothie Bowl

Hello Everyone! So yesterday my friend, who is visiting from New Zealand, and I went on a day-trip adventure to the pristine rainforest district of Brunei. We took a 45-minute boat ride from the city centre to the small town of Bangar in Temburong where we then travelled about 20 minutes by car to the Freme Rainforest Lodge where we had some local delights for our morning tea before setting off again on a 45-minute longboat ride to the Ulu National Park.

We climbed almost a thousand steps to get to the forest floor of the canopy walk, and then scaled a total of about 60m to the highest tower above the tallest trees of the luscious green rainforest. Even with multiple layers of sunblock, we were red from the scorching sun and we definitely worked our calves and derrières as we felt our legs shake when climbing back down to head to the mini waterfall for a nice cooling dip. The water was refreshingly blue but had fishes that weren’t afraid to nibble on you. They were the fish spa kind of fishes that really just wanted to nibble on your dead skin, but the fishes were much bigger that the little ones that you find at fish spas, so their bite was a little more scary.

Ulu Temburong National Park Adventures

After we cooled down, we headed back out on a longboat to the starting point of our kayak ride. On the way back down the crystal clear waters we spotted two freshwater crocodiles by the riverbanks – and apparently that didn’t seem to make us second guess our kayak ride back to the lodge. After our relaxing (or should I say, workout for our arms), kayak down the river, we got changed into dry clothes and had our late lunch. We were supposed to go zip-lining after but because it started to pour, we weren’t allowed to. Such a bummer though because apparently it hadn’t rained in Temburong for the past week, and it decided to as we were about to do our final activity before heading back to the main city. All-in-all it was a fun-filled day of nature and adventure – things that we both enjoy.

Anyway, I just wanted to share this little adventure for everyone before I dive right into tonight’s recipe for a lovely green smoothie bowl to match our little nature adventure from yesterday. You can switch out the low-fat milk to almond milk or coconut water, and the honey for agave nectar or maple syrup for a vegan alternative.

Avocado & Spinach Smoothie Bowl Ingredients

PREP TIME 5 MINS | COOKING TIME  | SERVES 1

INGREDIENTS

For the smoothie mixture

  • 1 cup spinach leaves
  • 1 cup low-fat milk
  • 1 large banana
  • 1 small avocado
  • 1 tbsp honey

Toppings

  • Bananas – loaded with essential vitamins and minerals such as potassium, calcium, manganese, magnesium, iron, folate, niacin, riboflavin, and B6
  • Chia Seeds – contains omega-3 fatty acids, fibre, antioxidants, iron, and calcium
  • Goji Berries – excellent source of antioxidants and nutrients that help boost the immune system and protect the body from high levels of inflammation
  • Granolacontains vitamins, minerals, and other essential nutrients, including, but not limited to, dietary fibres, sodium, potassium, zinc, phosphorus, magnesium, calcium, vitamin C & E, niacin, iron, and thiamin
  • Kiwis – loaded with vitamins and minerals such as Vitamins A, B6, B12, E, and potassium, calcium, iron, and magnesium
  • Raspberriesgood source of vitamin C, E, K, manganese, dietary fibre, copper pantothenic acid, biotin, magnesium, folate, omega-3 fatty acids, and potassium

METHOD

  1. Blend the spinach, milk, banana, avocado, and honey until smooth.
  2. Transfer to a bowl and top with the raspberries, kiwi slices, chia seeds, granola, goji berries, and banana slices. Enjoy for breakfast or a power-boosting afternoon snack!

Avocado & Spinach Smoothie Bowl

As I have mentioned in last week’s post, whipping up a smoothie bowl is a great opportunity to get creative and top them with whatever you have lying around in your pantry and/or fridge. Top them with your favourite fruits, seeds, nuts, and grains!

BON APPÉTIT

– Ally xx

myTaste.com

Strawberry Kiwi Lime Yoghurt Cake

Strawberry Kiwi Lime Yoghurt Cake

Hello Everyone! I know the last two posts have been a bit of a downer; let’s just say I’m starting to feel a little bit better and more of myself this week so I hope that I will be back to my chirpy self soon. That aside, tonight’s recipe is actually one that I made just almost 2 months ago for a very special occasion; my sister’s 23rd birthday last August 23rd! We celebrated her birthday with a yummy all-you-can-eat Korean BBQ dinner at Seoul Garden followed by a surprise visit from a family friend which at that time we had offered to look after their two little boys for a week since their helper had to go back to the Philippines and they couldn’t find anyone else under short notice. Overall it was a fun evening spent with lots of food, cake, and little, but great company!

Happy 23rd Birthday Angela!

The cake that I decided to make for my sister was inspired by a recipe that I found online when I was researching ways that I could incorporate some of the ingredients from my blood pressure friendly list that I compiled at the beginning of the year. This recipe, from that list, features kiwis, strawberries, bananas, and fat-free yoghurt, all of which help lower your blood pressure. This cake is simple and easy to put together, yet is still delicious and guilt-free for when you reach out for a second heap of serving or three (or four)… Or you know the whole cake *cheeky grin* Not that I have done this myself before, you know, have a whole cake for no one else but just me, myself, and I. Anyway, onward with the recipe shall we? But before that, just a quick mention that the original recipe can be found over on SkinnyMs.

Strawberry Kiwi Lime Yoghurt Cake Ingredients

PREP TIME 10 MINS | FREEZING TIME 3 HOURS | SERVES 10-12

INGREDIENTS

For the base

  • 1/4 cup hazelnuts, finely ground
  • 1/4 cup walnuts, finely ground
  • 1 tbsp coconut oil, melted
  • 1 tbsp honey
  • 1 tbsp unsalted butter, melted
  • 1/4 tsp salt
  • Honey graham crackers (enough to make about 1 cup of crumbs)

For the filling

  • 2 punnets (2 x 250g) fresh strawberries, sliced thinly
  • 1 tub (500g) fat free all natural yoghurt
  • 1 large banana, mashed
  • 3 tbsp lime juice
  • 2 tbsp honey

For the topping

  • 2 kiwis, peeled and sliced into thin circles
  • Sliced strawberries (about 2-3 from the punnet)
  • Extra honey graham cracker crumbs (optional)

PS: Please ignore the egg in the ingredient shot, I actually didn’t use it at all even though it was in the original recipe. I decided to go with a no-bake base and therefore omitted the egg from my recipe.

METHOD

  1. Prepare an 8.5-inch springform pan by lining the bases with baking paper and greasing the edges with a little bit of butter. Add all of the base ingredients into a medium-sized mixing bowl and mix until well combined. Press half of the mixture over the base of the prepared pan and set aside in the refrigerator for about 10-15 minutes or until firm.
  2. In a separate medium-sized mixing bowl, combine the mashed banana, yoghurt, honey, and lime juice, whisking well until smooth. Set aside.
  3. Arrange half of the strawberry slices on top of the cooled crust then pour over half of the yoghurt mixture on top of the strawberries in an even layer.
  4. Repeat by adding the remaining half of the base over the top of the yoghurt mixture, arranging the strawberries slices, and the pouring the remaining half of the yoghurt mixture.
  5. Top the cake with the kiwi slices and strawberries slices before placing in freezer for about 3 hours or until completely frozen.
  6. Serve and enjoy! Tip: to cut, hold a knife under hot water for 10 seconds, dry and cut the frozen cake wile the knife is still warm!

Strawberry Kiwi Lime Yoghurt Cake

Strawberry Kiwi Lime Yoghurt Cake

BON APPÉTIT

– Ally xx

myTaste.com

Smashed Avo Toast (9 ways)

Hello Everyone! Finally I am back on track with my posts and the theme for the month of April is Avocado! All you need is about half a medium-sized avocado everyday as it provides 1% of the calcium, 5% of the magnesium, and 10% of the potassium that you need daily. Avocados are a good source of potassium, which can help lower blood pressure, and in addition, the dark green flesh just under an avocado’s brittle skin contains large amounts of disease-fighting compounds. Though avocados are proven to help lower blood pressure and an abundance of health benefits, we have to be weary of how much we intake daily as they are also high in calories.

Tonight, I will be sharing 9 different ways you can start your mornings with a smile on your face with 9 different smashed avocado toasts! Of course, don’t limit yourselves to just these 9 recipes; I encourage you to get creative with your smashed avo toasts and share your creations with me on Instagram using the hashtag #amcarmenskitchen

1. Five Pepper Smoked Salmon with Red Onions, Capers & Chilli Flakes

Five Pepper Smoked Salmon with Red Onions, Capers & Chilli Flakes

PREP TIME <5 MINS | COOKING TIME  | SERVES 2

INGREDIENTS

  • 2 slices multigrain brown bread
  • 1/2 avocado, smashed
  • 1 small red onion, cut into rings
  • 2 tsp capers
  • Smoked salmon slices with five peppers

METHOD

  1. Lightly toast bread in a toaster for about 1-2 minutes.
  2. Spread a generous amount of the smashed avocado onto the toast and top with smoked salmon, red onion rings, and capers. Sprinkle with a touch of chilli flakes for an added kick (optional).
  3. Enjoy!

2. Medley of Grape Tomato Caprese Salad with Balsamic Reduction

Medley of Grape Tomato Caprese Salad with Balsamic Reduction

PREP TIME <5 MINS | COOKING TIME 5 MINS | SERVES 2

INGREDIENTS

  • 2 slices multigrain brown bread
  • 1/2 avocado, smashed
  • 1 punnet (250g) grape tomato medley, halved
  • 4 cherry bocconcini cheese, sliced
  • 4 tbsp balsamic vinegar
  • Ground sea salt and black pepper, to taste
  • Olive Oil
  • Sweet basil leaves

METHOD

  1. Combine the grape tomatoes, bocconcini slices, and sweet basil leaves in a small bowl. Drizzle with olive oil and season with a touch of ground sea salt and black pepper to taste. Set aside and leave to macerate.
  2. Meanwhile, heat the balsamic vinegar in a small non-stick saucepan over medium-high heat. Simmer, continuously stirring to check on the consistency of the glaze, until the vinegar reduces to a thick sauce, about 5 minutes. Remove from the heat and leave to cool down for a bit.
  3. Lightly toast bread in a toaster for about 1-2 minutes.
  4. Spread a generous amount of the smashed avocado onto the toast, top with the tomato cappers salad, and drizzle the balsamic reduction over the salad.
  5. Enjoy!

3. Sliced Banana & Pumpkin Seeds drizzled with Honey

Sliced Banana & Pumpkin Seeds drizzled with Honey

PREP TIME <5 MINS | COOKING TIME  | SERVES 2

INGREDIENTS

  • 2 slices multigrain brown bread
  • 1/2 avocado, smashed
  • 1 large banana, sliced
  • Honey
  • Pumpkin seeds

METHOD

  1. Lightly toast bread in a toaster for about 1-2 minutes.
  2. Spread a generous amount of the smashed avocado onto the toast, top with banana slices and pumpkin seeds, and drizzle with honey.
  3. Enjoy!

4. Soft-boiled Egg with Chilli Flakes & Parsley

Soft-boiled Egg with Chilli Flakes & Parsley

PREP TIME <5 MINS | COOKING TIME 6 MINS | SERVES 2

INGREDIENTS

  • 2 slices multigrain brown bread
  • 1/2 avocado, smashed
  • 2 large free range eggs
  • Chilli Flakes
  • Parsley, roughly chopped

METHOD

  1. Bring a small pot of water to a rolling boil. Once boiling, reduce the water to a rapid simmer before gently lowering the eggs one by one into the pot. Cook for 5 minutes for a runny yolk, or 7 minutes for a barely set yolk. Once done, remove from the heat and place in an ice bath to stop the cooking process. Once cool, peel the shell off and slice.
  2. Lightly toast bread in a toaster for about 1-2 minutes.
  3. Spread a generous amount of the smashed avocado onto the toast, top with the sliced eggs, and sprinkle with a touch of chilli flakes, and parsley.
  4. Enjoy!

5. Sliced Strawberries & Crumbled Goat’s Cheese with Balsamic Reduction and Peppermint Leaves

Sliced Strawberries & Crumbled Goat's Cheese with Balsamic Reduction and Peppermint Leaves

PREP TIME <5 MINS | COOKING TIME 5 MINS | SERVES 2

INGREDIENTS

  • 2 slices multigrain brown bread
  • 1/2 avocado, smashed
  • 4 large strawberries, sliced
  • 4 tbsp balsamic vinegar
  • Goat’s cheese, crumbled

METHOD

  1. Heat the balsamic vinegar in a small non-stick saucepan over medium-high heat. Simmer, continuously stirring to check on the consistency of the glaze, until the vinegar reduces to a thick sauce, about 5 minutes. Remove from the heat and leave to cool down for a bit.
  2. Lightly toast bread in a toaster for about 1-2 minutes.
  3. Spread a generous amount of the smashed avocado onto the toast, top with the sliced strawberries, crumbled goat’s cheese, and drizzle the balsamic reduction over the strawberries.
  4. Enjoy!

6. Sautéd Brown & Shimeji Mushrooms topped with Fried Enoki & Parsley

Sautéd Brown & Shimeji Mushrooms topped with Fried Enoki & Parsley

PREP TIME <5 MINS | COOKING TIME 8 MINS | SERVES 2

INGREDIENTS

  • 2 slices multigrain brown bread
  • 1/2 avocado, smashed
  • 4 large brown mushrooms, sliced
  • 1/2 bunch (100g) shimeji mushrooms
  • 1/2 bunch (50g) enoki mushrooms
  • 2-3 garlic cloves, minced
  • Ground sea salt and black pepper, to taste
  • Knob of unsalted butter
  • Olive oil
  • Parsley, roughly chopped

METHOD

  1. Melt the unsalted butter in a small frying pan over medium-high heat and add about a teaspoon of olive oil.
  2. Sauté the minced garlic until golden brown and fragrant, about 30 to 45 seconds. Add in the sliced brown mushrooms and shimeji mushrooms and cook until tender, about 3-4 minutes.  Season with pinch of ground sea salt and black pepper. Once tender, remove from the pan and set aside.
  3. In the same pan, heat about 3 tbsp of olive oil over high heat until slightly smoking. Add the enoki mushrooms in and fry until golden brown in colour, about 2-3 minutes. Once done, transfer to a small plate lined with a paper towel. Set aside.
  4. Lightly toast bread in a toaster for about 1-2 minutes.
  5. Spread a generous amount of the smashed avocado onto the toast and top with the sautéd garlic mushrooms and the fried enoki mushrooms. Garnish with a touch of ground black pepper and parsley.
  6. Enjoy!

7. Diced Mango with Chilli Powder & Peppermint

Diced Mango with Chilli Powder & Peppermint

PREP TIME <5 MINS | COOKING TIME  | SERVES 2

INGREDIENTS

  • 2 slices multigrain brown bread
  • 1/2 avocado, smashed
  • 1 small mango, diced
  • Chilli powder
  • Peppermint leaves

METHOD

  1. Lightly toast bread in a toaster for about 1-2 minutes.
  2. Spread a generous amount of the smashed avocado onto the toast and top with the diced mangoes, chilli powder, and peppermint leaves.
  3. Enjoy!

8. Roasted Chickpeas & Parsley

Roasted Chickpeas & Parsley

PREP TIME <5 MINS | COOKING TIME 10 MINS | SERVES 2

INGREDIENTS

  • 2 slices multigrain brown bread
  • 1/2 avocado, smashed
  • 1 can (200g) chickpeas, drained
  • 2 tsp ground smoked paprika
  • Ground sea salt and black pepper, to taste
  • Olive oil
  • Parsley, roughly chopped

METHOD

  1. Preheat oven to 200C (400F or gas mark 6). Line a baking tray with aluminium foil. Set aside.
  2. Add the drained chickpeas in a small bowl together with the ground smoked paprika, sea salt, black pepper, and a drizzle of olive oil. Toss to coat.
  3. Spread the chickpeas onto the prepared baking tray and roast in the oven for about 10 minutes. Once done, remove from the oven.
  4. Lightly toast bread in a toaster for about 1-2 minutes.
  5. Spread a generous amount of the smashed avocado onto the toast and top with the roasted chickpeas and parsley.
  6. Enjoy!

9. Chorizo Sausage & Sweet Corn

Chorizo Sausage & Sweet Corn

PREP TIME <5 MINS | COOKING TIME 4-6 MINS | SERVES 2

INGREDIENTS

  • 2 slices multigrain brown bread
  • 1/2 avocado, smashed
  • 1 chorizo sausage, sliced
  • 1 can (200g) sweet corn kernels, drained
  • Olive oil

METHOD

  1. Heat olive oil in a small frying pan over medium-high. Pan-fry the chorizo slices until browned, about 2-3 minutes per side. Once done, transfer to a plate lined with a paper towel. Set aside.
  2. Bring a small pot of water to a rolling boil and blanch the sweet corn kernels for about a minute or two. Drain and set aside to cool down for a bit.
  3. Lightly toast bread in a toaster for about 1-2 minutes.
  4. Spread a generous amount of the smashed avocado onto the toast, top with the pan-fried chorizo sausages and sweet corn kernels, and drizzle with a bit of the chorizo oil (optional).
  5. Enjoy!

Just a little side note before I end tonight’s post, I spent the whole day amending quite possibly the same artwork because their comments/amendments were all on an installation basis. Such completely waste of time which then prevented me from actually completing the work I had set to do today because I had to keep going back and forth to the same bloody artwork.

​BON APPÉTIT

– Ally xx

myTaste.com

Honey Lime Rainbow Fruit & Quinoa Salad

Honey Lime Rainbow Fruit & Quinoa Salad

Hello Everyone! I can’t believe the month is going by in the blink of an eye! It’s already the third week of Cooking with Quinoa and I’ve got another colourful recipe to share with y’all. I’ll keep tonight’s post short as I’ve got nothing much to tell really – other than the fact that it was a slow day at work today, and has been for the second half of last week up until today. Tomorrow may be another slow day and I guess it will be like this for a while until another event creeps up on me. Even though there’s not much to do, I’m still slowly preparing the things that I need to deliver for January’s event so that I won’t find myself stressing out and doing things last minute a month before the event. At least I can enjoy my Christmas and New Years when it comes.

All that aside, if you’re obsessed with fresh fruit, then this is a dish you’d want to whip up as an easy pre and/or post workout meal. This salad is also very versatile in a sense that you can easily mix and match fruit combinations depending on what you like and what fruits are in season. The original recipe can be found over on The Recipe Critic: Tried and True.

Honey Lime Rainbow Fruit & Quinoa Salad Ingredients

PREP TIME 10 MINS | COOKING TIME 15 MINS | SERVES 4-6

INGREDIENTS

For the salad

  • 1 cup baby spinach leaves, rinsed and drained
  • 1 cup tri-colour quinoa, uncooked
  • 1 large orange, peeled and segmented
  • 1 punnet (125g) blueberries
  • 1 punnet (125g) strawberries, hulled and halved
  • 1/2 pineapple, peeled and cut into bite-sized chunks

For the honey lime glaze

  • 1/4 cup honey
  • 2 tbsp freshly squeezed lime juice

METHOD

  1. Rinse the quinoa before combining it with 2 cups of room temperature water in a medium-sized pot. Turn the heat up to high and bring the quinoa to a boil. Once boiling, cover, reduce heat to low, and simmer until the quinoa is tender, about 15 minutes. Drain and then set aside to cool. Note: Quinoa holds lots of water, so you have to make sure you drain it thoroughly after it’s cooked.
  2. Meanwhile, combine the honey and lime juice in a small bowl. Set aside.
  3. Add all the fruits into a large mixing bowl together with the cooked and cool quinoa. Mix until well combined.
  4. Transfer to a serving dish with the spinach leaves and then drizzled with the honey lime glaze. Serve as a healthy morning or afternoon snack, pre or post gym workout. Enjoy!

Honey Lime Rainbow Fruit & Quinoa Salad

Honey Lime Rainbow Fruit & Quinoa Salad

BON APPÉTIT

– Ally xx

myTaste.com

California-inspired Quinoa Salad

California-inspired Quinoa Salad

California-inspired Quinoa Salad Ingredients

Hello Everyone! A new month calls for a new theme on the blog, and for the month of September, I’ve got some creative and healthy quinoa recipes for everyone! Now, I remember the times where people would ask me… “What is quinoa (kee-NOO-ah)?” Firstly, I’d correct them and say that it’s pronounced KEEN-wah, and not kee-NOO-ah – but then again after doing some research, I realised that both are actually correct in a way. Apologies to those that I’ve made a big fuss with in terms of how to pronounce this grain.

So back to the question, what is quinoa? Well, I have always been stumped whenever this question pops up, and all I could respond was “it’s a grain, like rice – but it’s not really rice.” Yeah, that doesn’t help. Quinoa is a grain crop grown primarily for its edible seeds. The seeds are cooked in the same manner as rice and can be used in a wide range of dishes. Quinoa is naturally gluten-free and contains iron, B-vitamins, magnesium, phosphorus, potassium, calcium, vitamin E, and fibre. It is one of only a few plant foods that are considered a complete protein, containing all nine essential amino acids. Quinoa also has a low glycemic index, which is good for blood sugar control, however, be mindful as it is still pretty high in carbs, so it is not a good choice for a low-carb diet.

California-inspired Quinoa Salad Ingredients

Find the original recipe over on Jo Cooks. She used sultanas in her salad, I didn’t. If you know me personally, I really despise raisins and sultanas – don’t ask me why, I just do. So I’ve omitted them from my salad and replaced them with wake instead. Wakame is a sea vegetable; edible seaweed or kelp common in Japanese, Korean, and Chinese cuisines. It has a subtly sweet flavour and is most often served in soups and salads. Wakame is a good source of the following (Source: MindBodyGreen):

  1. Magnesium: A mineral critical in the contraction and relaxation of muscles, function of certain enzymes in the body, production and transport of energy, and the production of protein.
  2. Iodine: Iodine is needed for strong metabolism of cells – the process of converting food into energy. It also maintains the balance of the thyroid gland and is needed for the production of thyroid hormones.
  3. Calcium: Wakame easily allows for the absorption of calcium into the human body. Each 100 grams of raw wakame contains 150mg of calcium. Calcium is needed for strong healthy bones and the prevention of osteoporosis.
  4. Iron: We need iron because it is essential for the production of red blood cells and the prevention of anemia.
  5. Vitamins!
    • Vitamins A, C, E, and K: These vitamins are all amazing for skin health and repair as well as immunology.
    • Vitamin D: Promotes the absorption of calcium for healthy bones and enhances the nerve, muscle, and immune systems.
    • Riboflavin (Vitamin B2): We need riboflavin to use the carbohydrates, fats, and proteins in the foods we eat. Riboflavin helps us use these nutrients for energy in our bodies for growth and is also necessary for red blood cell production. Riboflavin functions as an antioxidant and works in the body with other vitamins such as niacin, folate, and vitamin B6.
  6. Folate: Helps the body make new cells and is especially important for pregnant women.
  7. Lignans: Thought to play a role in preventing certain types of cancer, particularly breast cancer.

California-inspired Quinoa Salad Ingredients

PREP TIME 20 MINS | COOKING TIME 10 MINS | SERVES 4

INGREDIENTS

For the salad

  • 1 cup shelled edamame, steamed
  • 3/4 cup almond slices (toasted if you prefer)
  • 3/4 cup unsweetened shredded coconut
  • 1/2 cup tri-coloured quinoa, cooked and cooled
  • 1/4 cup chopped cilantro, or parsley if you don’t like cilantro
  • 1/4 cup wakame
  • 1 large mango, cut into small chunks
  • 1 small red capsicum, chopped
  • 1 small red onion, chopped
For the dressing
  • 2 tbsp balsamic vinegar
  • 1 tbsp honey
  • 1 tbsp olive oil
  • Ground salt and black pepper, to taste
  • Juice of 1 lemon

METHOD

As easy as whisking all the dressing ingredients together in a small bowl, and then tossing all the salad ingredients together in a large bowl until well mixed; dressed and then served cold. Enjoy! It will keep in the fridge for about 5 days, but of course, it’s always better when it is consumed right away!

California-inspired Quinoa Salad

California-inspired Quinoa Salad

California-inspired Quinoa Salad

BON APPÉTIT

– Ally xx

myTaste.com

Honey-Roasted Chicken

Honey-Roasted Chicken

Honey-Roasted Chicken

Hello Everyone! Before I begin with this post, I just want to say that I just realised that two Sunday’s ago was quite possibly the last Sunday that I had off and I probably won’t see another relaxed Sunday at home until the beginning of June. Yes, you read that right! Last Sunday I got up at the wee hours of 3:55am to get ready for work. WORK! Last Sunday we kicked off our month-long sporting event with a 2km and 10km Run that started at around 7am. Our team had to be there by 5am to help set up, prepare, and do a lot more things in order to ensure a smooth event. I was also event photographer that morning so I was constantly moving here and there for a good 5 hours. Though it wasn’t a whole day/night event, it was still tiring – I mean, getting up at 4 in the morning is tiring enough especially when I couldn’t sleep well the few hours before. Anyway, so this Friday will be another opening ceremony, this time for Badminton, and then on Sunday again for Basketball.

Besides my 7-day working months from now until June, I’m thrilled to say that my blog will be turning 2 years old on Saturday! I’ll be posting a recipe up on that day to celebrate 2 years of not giving up on this blog – which I believe is a first! I’ve started up many blogs before (but mainly diary-style) and so far I’ve been able to keep up with this one! I won’t say anymore and save the rest of my tangents for Saturday’s post. Anyway, it’s week 2 of delicious yummy roast chicken and I’ve got a classic recipe to share with you. To be honest, whenI first came across this recipe, I found it weird how it had a hint of ground cinnamon and turmeric in it which in my opinion dominated the honey flavour just a bit. I’ll admit that I much preferred the taste of last week’s roast, but this one is alright too. You can eat it with a whole load of roast veggies and fresh greens, or steamed rice. Don’t forget to check out the original recipe over on SBS.

Honey-Roasted Chicken Ingredients

PREP TIME 10 MINS* | COOKING TIME 1 HOUR 35 MINS | SERVES 6

*plus 4-6 hours of marination, or preferably overnight

INGREDIENTS

  • 2kg whole chicken, washed and cleaned thoroughly
  • 8 tbsp honey
  • 3 tbsp light soy sauce
  • 3 tbsp olive oil
  • 2 tbsp freshly squeezed lime juice
  • 1 & 1/2 tsp ground cinnamon
  • 1 & 1/2 tsp ground tumeric
  • Thumb-sized ginger, minced
  • Butter, for basting
  • Ground salt and black pepper, to taste
  • Assorted veggies, for roasting
  • Cooking twine

METHOD

  1. Combine all the ingredients, except for the butter, in a large mixing bowl. Mix well until combined. Coat your chicken in the marinade and then leave in the fridge to marinate for about 4-6 hours (or preferably overnight). Remove chicken from the fridge 45-60 minutes before roasting to bring it back to room temperature.
  2. Preheat oven to 230C (450F or gas mark 8). Line a baking tray with aluminium foil and place a rack above it.
  3. Start by making a loop with the twine and fastening it around the stub of the neck. Bring it around the sides and tie a knot at the cavity, then pull it tight around the breast. Now, loop the twine around the drumsticks and tie another knot, tightening it until the legs cross.
  4. Place the chicken on the rack and into the preheated oven for 10-15 minutes. The lover the heat down to 175C (350F or gas mark 4) and continue roasting for an hour and 20 minutes more. Baste the chicken with a little bit of butter at every 20 minute intervals.
  5. Once done, remove the oven and set aside to rest for about 10 minutes before serving with seasonal roast veggies, or steamed rice. Enjoy!

Honey-Roasted Chicken

BON APPÉTIT

– Ally xx

myTaste.com