Milo French Toast

Milo French Toast

Hello Everyone! Anyway, so it’s week 4 of Breakfast/Brunch month and this week I will be sharing with you my now-favourite french toast recipes. I say ‘now-favourite’ because this is the very first time I’ve attempted these recipes. I’ve had and made french toast before, but the recipes I’ll be sharing with you this week are beyond than that of the classic french toast – they got a certain twist to them that will make you fall in love with french toast all over again.

Today’s recipe is one that I came across on Facebook as I was scrolling through my newsfeed. BuzzFeed Australia posted a video recipe for Milo French Toast. If you love milo and fancy some french toast to go with that, then this recipe was made for you, only that, you get to combine milo together with your french toast – how cool is that? You can top them off simply with some butter and syrup, or you can make it a bit more interesting by topping them off with some of your favourite fruits – I topped mine with some strawberries, crushed pistachios, honey, and a bit of powdered sugar.

I remember growing up, even up until now, my mom would make a classic french toast for breakfast at least once a week. When I came across this recipe and talked to her about it, we decided to try it out. It was a great success in my opinion and I loved it, so did my Mom and sister Angela. Original video recipe can be found on BuzzFeed Australia‘s Facebook page.

Milo French Toast Ingredients

PREP TIME <5 MINS | COOKING TIME 8-12 MINS | SERVES 2-4*

*Depending if you want one or two slices of french toast per person; recipe is for 4 slices of bread

INGREDIENTS

  • 4 thick slices of bread
  • 1/2 cup milk
  • 1/2 cup milo
  • 1 large free range egg
  • 1/2 tbsp vanilla extract

Optional:

  • 1 punnet (250g) strawberries, hulled then halved
  • Handful of pistachios, shelled and lightly crushed
  • Honey
  • Powered sugar

METHOD

  1. Heat a bit of oil in a non-stick frying pan over medium.
  2. Combine the milo, milk, egg, and vanilla extract in a bowl. Mix until well combined.
  3. Dip both sides of a bread slice to soak up the wet mixture; do not soak it for too long.
  4. Place the soaked bread slice into the frying pan and cook until done, about 2-3 minutes per side.
  5. Once done, transfer to a plate lined with a paper towel to soak up any excess oils. Repeat for the remaining bread slices.
  6. Serve up this Aussie twist on a French favourite with some honey and butter if you like, or with some fresh fruits and crushed nuts and enjoy!

This slideshow requires JavaScript.

BON APPÉTIT

– Ally xx

myTaste.com

Layered Pistachio Cake with Honey Vanilla Buttercream

Layered Pistachio Cake with Honey Vanilla Buttercream

Hello Everyone! Today I have a special post for you as today is my not so little sister’s 19th birthday! Today is also the first time in 4 years that I have been home to celebrate with her and the rest of the family. If you have been following my blog since September last year, you would know that I started getting into baking cakes. I never really liked baking cakes to be honest, only because I find it very time consuming and my level of patience does have a limit. Since I started baking cakes, my Mom and sisters now prefer a homemade birthday cake instead of an expensive and cliché store-bought cake. So on Sunday, with the help of the birthday girl, we baked her birthday cake together. We baked it on Sunday even though her birthday is today. Why? Well only because tomorrow we’ll be off for a 1-month vacay to the Philippines, and if we had baked it today, leftovers would be sitting in the fridge until April.

Layered Pistachio Cake with Honey Vanilla Buttercream

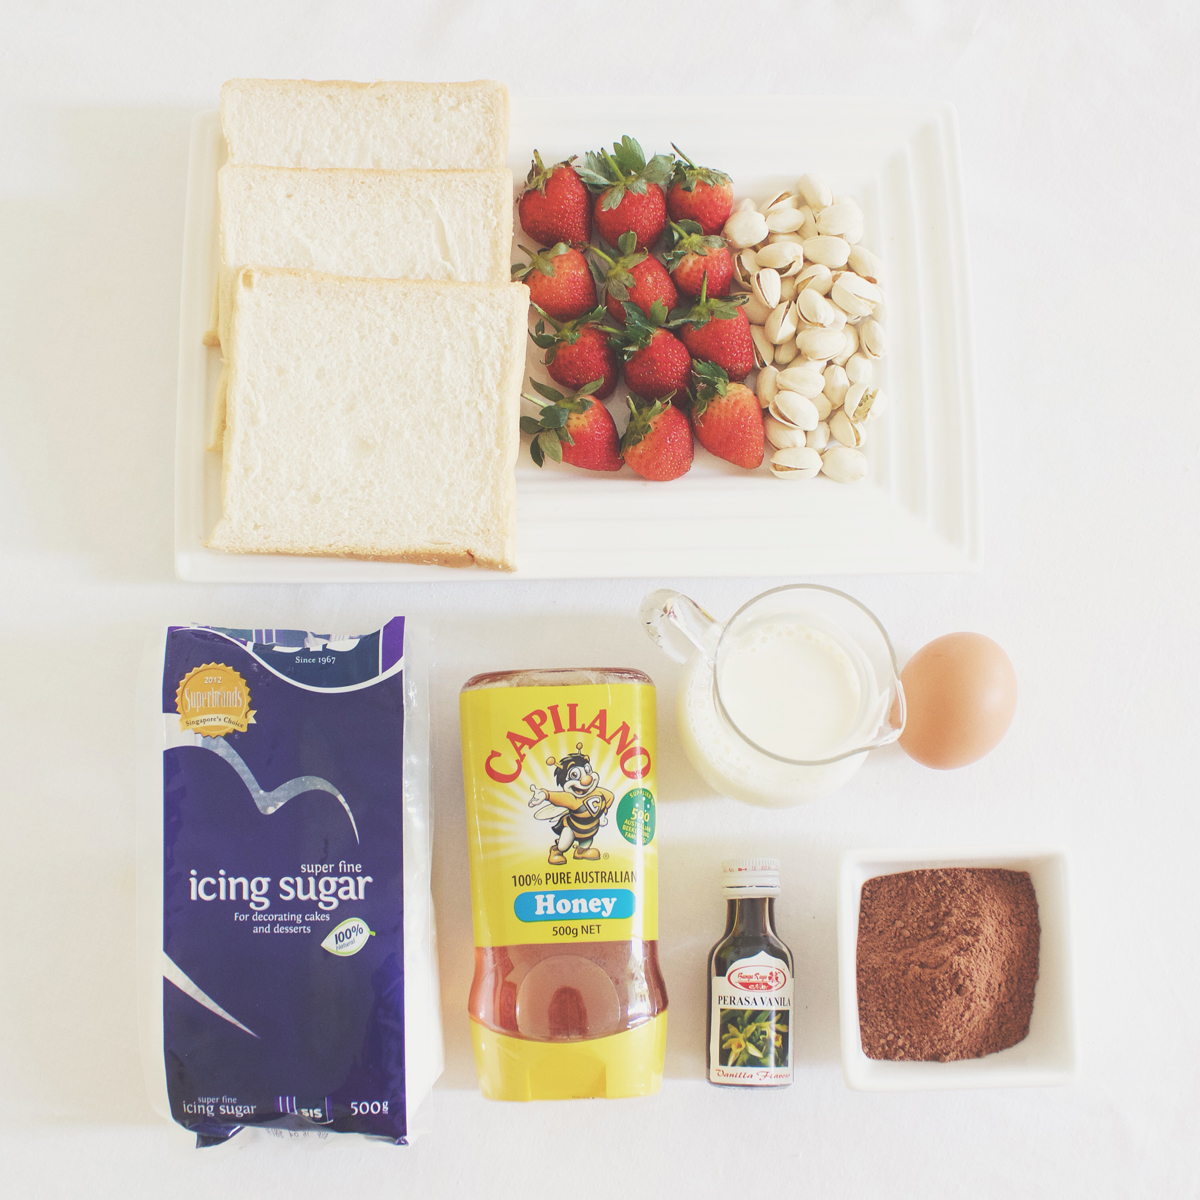
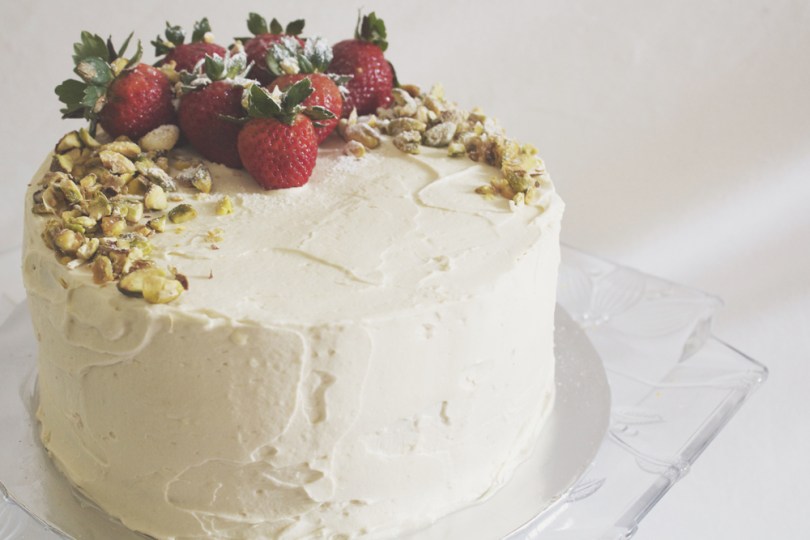
Today’s cake recipe has been slightly adapted from, and can be found on Joanne Eats Well With Others. As you have already read from the title, it is a 3-layer pistachio cake with honey vanilla buttercream. I decided to add the strawberries and crushed pistachios on top to bring some life and colour to the presentation of the cake. I substituted some ingredients, such as instead of using cream of tartare, I used lemon juice instead. I barely use cream of tartare in my baking and buying a jar of it didn’t seem very economical as I know it’ll just sit in the pantry waiting for its expiry date. Also, instead of cake flour, also because I barely use it, I used plain flour combined with cornstarch instead. The easiest way to do this substitution is to put 2 tablespoons of cornstarch in the bottom of a 1-cup measuring cup, then fill the cup as usual with plain flour and level the top. In addition, I lessened the amount of sugar and butter in this recipe and it still turned out fine for me! I am not a huge fan of overly sweet desserts, and also I had to take into consideration my Mom who is a diabetic.

Layered Pistachio Cake with Honey Vanilla Buttercream

Before I move on to the recipe, I HIGHLY recommend that you buy shelled pistachios. We went to four different grocery stores and could not find any and so we decided to buy the shelled ones. It took forever to shell just over a cup of pistachios – thank goodness I had my Mom and my sisters to do the tedious job while I worked on the batter. Also, have a food processor handy, but if you’re like me and don’t own one, then all you need is a motor and pestle to bash it all up as well as grinding it. It takes time but it gets the job done. I think that’s why towards the end of this cake I was starting to lose a little bit of my patience because everything took longer to do! But hurray for a gas oven! I cannot stress how much I hated using the oven at the Doncaster Lodge. Everything took at least double or triple the normal time to cook!

Layered Pistachio Cake with Honey Vanilla Buttercream Ingredients

PREP TIME 30 MINS | COOKING TIME 1 HOUR | SERVES 8-10

INGREDIENTS

For the cake
  • 3 & 1/4 cups plain flour
  • 1 & 1/2 cups ice water
  • 1 cup caster sugar
  • 1 cup shelled pistachios, plus extra for decorating
  • 250g unsalted butter, softened
  • 3 large free range egg whites, at room temperature
  • 1 large free range egg
  • 5 tbsp cornflour
  • 1 tbsp baking powder
  • 1 tbsp vanilla extract
  • 1 tsp baking soda
  • 3/4 tsp salt
  • 1/4 tsp lemon juice
For the buttercream
  • 300g unsalted butter, soft, cut into small pieces
  • 1 & 1/2 cups milk
  • 1 cup caster sugar
  • 1/3 cup plain flour
  • 1/3 cup thickened cream
  • 3 tbsp honey
  • 1 tsp vanilla extract

METHOD

  1. Preheat the oven to 160C or gas mark 3. Grease three 8.5-inch cake pans with a little butter.
  2. For the Cake Batter: Using a food processor, pulse the pistachios until coarsely chopped. Remove half of the pistachios and transfer to a small bowl. Pulse the remaining pistachios until they are an almost powder-like consistency.
  3. Transfer to a large bowl and whisk together both the roughly chopped and fine pistachios with the plain flour, cornstarch, baking powder, baking soda, and salt. Set aside
  4. Cream the butter using an electrical mixer on high speed for about 3 minutes. Add in the sugar and vanilla and beat until fluffy for about another 3 minutes. Scrape down the sides of the bowl, and then add in the egg, mixing until just combined.
  5. Turn the mixer to low and add the flour+pistachio mix to the butter mixture in three additions, alternating with the ice water, mixing each time until just combined. Scrape down the bowl and mix on low speed for a few more seconds.
  6. In a medium, clean bowl whisk together the egg whites with the lemon juice until soft peaks form, about 3-5 minutes. Fold the egg whites into the batter.
  7. Divide the batter evenly among the cake pans and smooth the tops. Bake for 40-45 minutes, rotating the pans halfway through baking, until a toothpick inserted in the centre comes out clean.
  8. Transfer to a cooling rack and let them completely cool.
  9. For the Buttercream: Meanwhile, as the cakes are cooling down, whisk together the flour and sugar in a medium-sized saucepan. Then, add in the milk and cream, and cook over medium heat, whisking frequently, until the mixture comes to a boil and then thickens, about 10 to 15 minutes.
  10. Transfer the hot milk mixture to a large bowl and mix on high speed until cool, about 9 minutes. Reduce the speed to low and add the butter, a few pieces at a time, until it is full incorporated. Increase the speed to medium-high and beat until light and fluffy for a further few minutes. Then add in the vanilla and honey, and continue mixing until combined. If the frosting is too soft, chill it in the freezer for a while and then mix again.
  11. Assembly: Place one cake layer top side up on a serving platter. Use a long serrated knife to cut the top so that it is flat and even. Spread a little over a cup of frosting on top. Add the next later and, again, trim so that it is flat. Top with another cup of frosting. Add the remaining cake layer and trim the top again. Spread cake with a very thin layer of frosting for the crumb coating. Put in the freezer for 5 to 10 minutes. Spread the sides and top of the cake with the remaining frosting and decorate as desired.

Layered Pistachio Cake with Honey Vanilla Buttercream

Happy Birthday Alyssa!

BON APPÉTIT

– Ally xx

myTaste.com

Honey & Lime Wings with Corn Salsa

Honey & Lime Wings

Hello Everyone! So I made this dish two days back and I must say, it was finger-licking good that I just wanted to devour everything in one go! Note that I made enough for at least 3 meals so downing all of them in one go is actually a lot to eat! Oh well, at least I can enjoy this scrumptious meal for another 2 days.

Anyway, I think you can gather from previous posts that I love me some chicken wings! I don’t actually have much recipes for wings up my sleeves, so for today’s recipe I had to do a little bit of research, to find something new that I hadn’t really had before. I then came across this recipe from allrecipes for honey lime chicken wings. A few of the photographs on the recipe uploaded by others who tried out the recipe looked different, but nevertheless, I stuck to the original recipe and just added an extra step to the cooking process. I also served this dish with a lovely fresh corn salsa on the side (which again the recipe for will be posted separately from this the next day). So much yum!

Honey & Lime Wings Ingredients

PREP TIME 5 MINS | COOKING TIME 12-15 MINS SERVES 4-5

INGREDIENTS

  • 15 pcs chicken mid-wings, washed and cleaned
  • 1/4 cup Capilano honey and ginger blend
  • 1/4 cup vegetable oil, for shallow frying
  • 1 clove garlic, finely chopped
  • 2 tbsp plain flour
  • Juice and zest of 1 lime
  • Ground salt and pepper to taste

METHOD

  1. Preheat oven to 180C. In a medium-sized bowl, mix together the honey and ginger blend, lime juice, zest, garlic, salt and pepper. Set aside.
  2. Coat the chicken wings with a flour, salt, and pepper mix. Heat the oil in a large frying pan over high heat and fry the chicken wings until golden brown (about 2-3 minutes per side). Once golden, transfer to a lined baking tray and finish off in the oven for another 6-8 minutes or until cooked through.
  3. Place the cooked wings in the honey/lime mixture one by one and toss to coat well. Serve immediately with a side dish of your choice, in this case I served it with a nice serving of a fresh corn salsa.

Honey & Lime Wings

BON APPÉTIT

– Ally xx

myTaste.com

Honeyed Dutch Carrots

Honeyed Dutch Carrots

Hello Everybody! If you read yesterday’s blog post, I mentioned that I would be posting the recipe to these lovely honeyed Dutch carrots separate from yesterday’s recipe – so here it is now! Don’t worry, I’m not going to write another long-winded post as I have no back story to this. I just wanted some vegetables to go with my steak au poivre yesterday and I looked up some ways that I could make my Dutch carrots a little more fancy than just having them just steamed.

I came across Julie Goodwin’s recipe for honey carrots and they are just divine! Instead of using just regular honey, I decided to go for a fusion by Capliano which is a blend of honey and ginger (recently getting into these honey fusions, if you remember from a few posts I used a honey and maple syrup a couple of time in various recipes). Also, apparently these carrots are in season in Australia around July time (though I am one week into August already), but if you do want to keep on your budget, you can make do with ordinary carrots, just remember to cut them into small batons to cook through well.

PREP TIME 5 MINS | COOKING TIME 12 MINS SERVES 2-3

INGREDIENTS

  •  1 bunch baby Dutch carrots, peeled and tops trimmed to 2cm
  • 10g unsalted butter
  • 1 tbsp Capilano honey and ginger blend
  • Ground salt and pepper to taste

METHOD

  1. Steam (or microwave) the carrots for 3 minutes until tender but not soggy.  The time will depend on how big that carrots as smaller ones may need even less than 3 minutes.
  2. Melt the butter in a medium frypan over medium-high heat. When it starts to froth, add the carrots and cook for about 1-2 minutes, browning the carrots slightly before adding the honey in. Then toss in the pan for 5-6 minutes or until the honey becomes a lovely dark brown in colour.
  3. Season with salt and pepper and serve immediately as an accompaniment to any dish. In my case, I served with yesterday’s Braised Steak au Poivre in Red Wine dish.

Honeyed Dutch Carrots

BON APPÉTIT

– Ally xx

myTaste.com

Banana & Peanut Butter Popsicles

Banana & Peanut Butter Popsicles

Happy June everyone! There is no doubt that my Dutch housemates Kevin and Sam, as well as myself, share an unconditional love for peanut butter. I also know that Kevin loves bananas and Sam loves popsicles. All these into account, I was almost certain that there is something out there that incorporates the three together.

I did some research and I found a recipe by Megan via Detoxinista, for Peanut Butter Banana Ice Pops. I shared the recipe with my housemates and we all agreed that we should make this – well, more like I make it and then they eat it. So that’s what I did yesterday, made the popsicles and let them to set in the freezer overnight for a happy Sunday afternoon snack 🙂

The recipe makes 8 popsicles, but I only had a mould that is good for 6, also it depends on the side of your moulds. I just kept the rest of the mixture in a container in the refrigerator to later pour into the mould as we consume them.

Banana & Peanut Butter Popsicles: Procedure

PREP TIME 10 MINS | COOKING TIME  SERVES 6 POPSICLES

INGREDIENTS

  • 3 large bananas (or 4 if small)
  • 1/2 cup smooth peanut butter
  • 1/2 cup full cream milk
  • 1 tbsp honey and maple syrup blend
  • 1/2 tsp vanilla extract
  • 1/4 tsp salt (optional only if you are using unsalted peanut butter)

METHOD

  1. Combine all of the ingredients in a blender, and blend until very smooth and creamy. If necessary, adjust the sweetness to taste keeping in mind that the frozen version will taste less sweet than the mixture.
  2. Pour the batter into the popsicle moulds and freeze for at least 6 hours, or until solid. When removing the frozen popsicles from their moulds, submerge them in hot water for about 20 seconds to allow them to loosen.

Banana & Peanut Butter Popsicles

BON APPÉTIT

– Ally xx

myTaste.com

Banana, Blueberry & Peanut Butter Teddy Toasts

Banana, Blueberry & Peanut Butter Teddy Toasts

Good afternoon everyone! Maybe still morning for others, even maybe early morning or late evening. Today’s post is very simple, no method needed really. I made this a while back and was inspired by an Instagram photo that my sister tagged me in. A creative fix to shake away the Monday Blues! That’s really all I have to say today 🙂

PREP TIME 5 MINS | COOKING TIME  SERVES 1

INGREDIENTS

  • 3 slices of Wholemeal Omega-3 Chia Bread, from Baker’s Delight
  • 1 large banana
  • 1 punnet (125g) fresh blueberries
  • Crunchy peanut butter
  • Honey & maple syrup blend, to drizzle

I just realised when writing the ingredient list out, how stupid it looked when I first wrote “9 slices of bananas” and “9 blueberries” 😛

Banana, Blueberry & Peanut Butter Teddy Toasts

BON APPÉTIT

– Ally xx
myTaste.com

Three-ingredient Pancakes

Three-ingredient Pancakes

A very good morning to all! Well, it’s like past 10am here in Sydney (almost 11am probably by the time I get this post up), but probably only just about past midnight in parts of the world, or maybe just a few hours behind/ahead depending where you are really. Anyway, today, I managed to get out of bed by 8am (I usually wake up at 8 but laze around until 9-9:30), maybe because it wasn’t as cold as the previous days that made me just want to snuggle in my thick warm blanket. Who I am kidding? I got out of bed because I was hungry and I wanted to do something about my overripe bananas sitting in the corner of my room. I then remembered a friend of mine posting a photo (probably a month ago or so) on Instagram about his ‘failed’ two-ingredient pancakes – well more like when he tried to flip it, it tore. And it was slightly burnt.

Anyway, so this magical two-ingredient pancake is gluten and dairy free – basically two eggs per large banana. But I decided to put a little twist to my two-ingredient pancake and make it my very own three-ingredient pancake (I’m pretty sure someone out there thought about it already, but who cares). I decided to add a spoonful (or two) of crunchy peanut butter to the mix. YUM. I love peanut butter, especially the crunchy ones. I also added a touch of vanilla and more than I should’ve added, ground cinnamon. I also love me some cinnamon. You can never go overboard with it – I guess?

PREP TIME 5 MINS | COOKING TIME 15-20 MINS SERVES 4 PANCAKES

INGREDIENTS

  • 1 large ripe banana, mashed
  • 2 large free range eggs
  • 2 tbsp crunchy peanut butter
  • Dash of vanilla extract
  • Dash of ground cinnamon
  • Honey & maple syrup blend, to drizzle
  • 1 tbsp vegetable oil

METHOD

  1. Add the peanut butter and eggs in a medium-sized bowl and beat together. Add in the mashed bananas, vanilla extract and cinnamon. Mix until well combined. (Tip: if you are pressed for time, use a blender to mix all the ingredients together).
  2. Heat a small pan (nonstick or cast-iron) over medium heat. Fold a sheet of paper towel in half, and moisten with the vegetable oil and carefully rub the pan with the oiled paper towel. Ladle the batter onto the pan, using the back of the ladle to spread the batter into a round shape. Cook until the surface of the pancake starts to bubble, about 2-3 minutes. Flip carefully with a spatula, and cook until browned on the underside, about 1-2 minutes more (I am actually unsure about the timings so please don’t accurately follow them, I just used my eyes and instincts to tell whether they are cooked through or not).
  3. Continue with more oil and remaining batter (makes about 4 pancakes). Serve warm, with desired toppings.

Three-ingredient Pancakes

BON APPÉTIT

– Ally xx

myTaste.com