Mango Berry Probiotic Yoghurt Smoothie

Mango Berry Probiotic Yoghurt Smoothie

Hello Everyone! If you read my post last week, I mentioned that in the upcoming weeks ahead, I’ll be featuring recipes using Binda Valley’s Probiotic Drinking Yoghurt and/or Greek Style Yoghurt that Gourmet Direct PH sent over in mid January. Last week I shared a recipe for Peach Mango Pie Probiotic Yoghurt Smoothie Bowl and this week I’ll also be sharing another smoothie recipe.

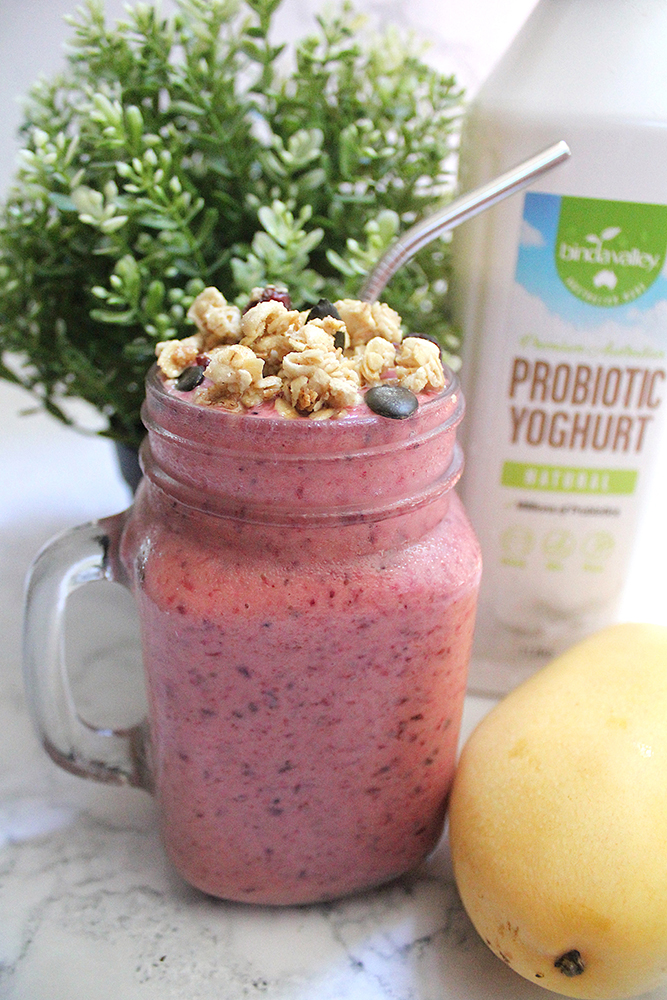
This Mango Berry Smoothie Probiotic Yoghurt Smoothie combines the delicious flavors of a juicy sweet mango together with tangy berries in one refreshing drink. Since berries aren’t native to the Philippines (except for strawberries where you can source locally), I decided to use frozen mixed berries to make this smoothie. You can also use fresh berries for this recipe but I find that they don’t give off a vibrant colour as opposed to using frozen fruit. Also, using frozen fruit gives the smoothie a nice and thick consistency.

Gourmet Direct PH x Binda Valley Yoghurt

To be honest, I was never really a smoothie kind of person until I left for Australia for my university studies. I always cherished my sleep more than waking up early in the morning to prepare my breakfast. I leave just enough time to shower, get ready, and dash out the door, grabbing breakfast either on campus or just outside my workplace during my internship. While this worked out fine, I realised I was spending so much money for breakfast. I remember getting toast with ricotta and berries for AUD 8 (almost 300 PHP) which is like a full fancy meal here in the Philippines or 3 full fast food meals.

Not that this smoothie is any cheaper than a fast food breakfast meal, but if you’re pressed for time in the mornings, and want to eat healthier, this smoothie is perfect for a quick and on-the-go breakfast. All you need to do is add an extra 5 minutes to your morning routine!

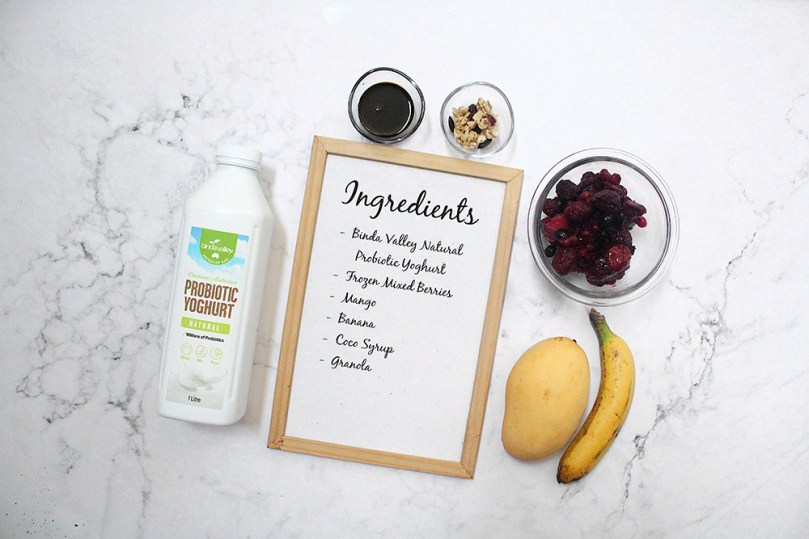
Mango Berry Probiotic Yoghurt Smoothie Ingredients

PREP TIME 5 MINS | COOKING TIME | SERVES 1

INGREDIENTS

  • 1 cup Binda Valley’s Probiotic Drinking Yoghurt
  • 1 cup mango, frozen
  • 1 & 1/2 cups mixed berries, frozen
  • 1 banana, peeled and cut into 1-inch pieces
  • 1 tbsp coco syrup
  • Granola, to top

METHOD

  1. Add all the ingredients, except the granola, into a blender and blend until smooth.
  2. Transfer to a glass and top with the granola. Serve immediately and enjoy!

Mango Berry Probiotic Yoghurt Smoothie

BON APPÉTIT

– Ally xx

Follow me on my social media accounts:
Facebook: Amcarmen’s Kitchen
Instagram: @amcarmenskitchen
TikTok: @amcarmenskitchen

myTaste.com

Pulut Tai Tai (Blue Glutinous Rice Cakes)

Pulut Tai Tai (Blue Glutinous Rice Cakes)

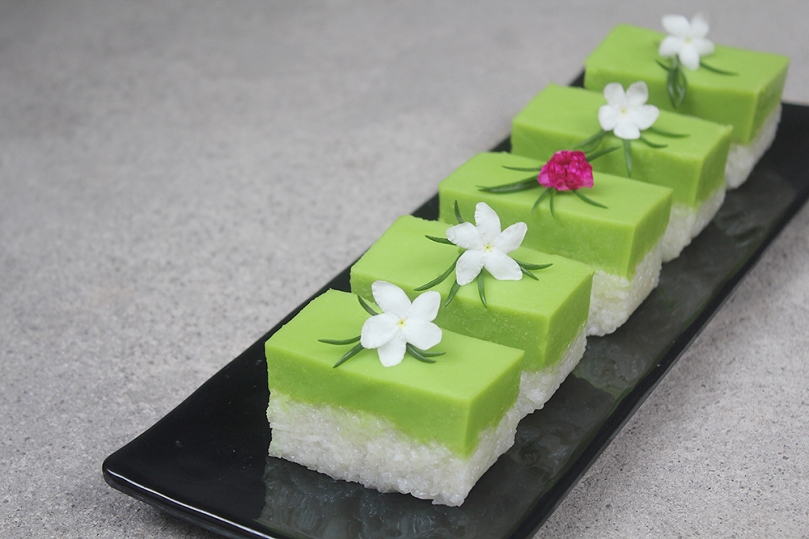
Hello Everyone! Pulut Tai Tai is a Nyonya kuih made of fluffy glutinous rice that is steamed in coconut milk, and tinted with a beautiful natural blue colour from butterfly pea flowers. You can leave it out if you can’t find butterfly pea flowers, as it’s mostly for the colour, but it wouldn’t be as elegant-looking without it.

It is typically served with a coconut-pandan spread where the contrasting colours of green together with the vibrant blue and white of the glutinous rice makes the kuih all the more delightful and pleasing to the eyes of the beholder. In addition to colour, the slight tinge of saltiness of the glutinous rice coupled with the sweetness of the kaya makes this kuih a delight to savour.

Pulut Tai Tai (Blue Glutinous Rice Cakes)

Tai Tai refers to a rich man’s wife who enjoys a life of leisure. It is said that this specific kuih was only served to the wives of rich men back then. This kuih is also known as Pulut Tekan which literally translates to ‘pressed glutinous rice.’

Before we dive into tonight’s recipe, please take the time to check out the original recipe for these Blue Glutinous Rice Cakes over on Bake with Paws by Yeanley.

Before I tackled this recipe, I read that soaking the glutinous rice with the addition of vinegar or lemon juice will reduce the phytic acid found in the grain. It also helps in breaking down the gluten and aids for better absorption of the blue colour from the butterfly pea flowers. Now, while I included lemon in the ingredients shot below, I in fact did not use the lemon at all for one main reason – the addition of acidity to the butterfly pea flower infused water would make it turn violet in colour. Since I am all about sharing blue recipes for this month, that’s definitely not what I want. I found that the glutinous rice absorbed the blue colour well anyway without the need for vinegar or lemon juice.

Pulut Tai Tai (Blue Glutinous Rice Cakes) Ingredients

PREP TIME 20 MINS* | COOKING TIME 30-45 MINS | SERVES 4-6

* Additional 4 hours min. overnight max. for soaking time

INGREDIENTS

  • 2 cups white glutinous rice
  • 1 cup coconut milk
  • 2/3 cups water
  • 3/4 tsp salt
  • 25 pcs dried butterfly pea flowers
  • Banana leaves
  • Pandan (screwpine) leaves
  • Lemon juice (optional)

METHOD

  1. Bring a small saucepan of water and the dried butterfly pea flowers to a boil, over high heat. Let it simmer for a few minutes and then remove from the heat. Cover and leave to steep for 10 minutes before straining. Press down on the flowers to extract the blue colour from the flowers. Set aside to cool.
  2. Wash the glutinous rice until the water is clear. Soak 1/3 of the glutinous rice with the blue-infused water and the remaining 2/3 in water. Soak for at least 4 hours or overnight. After 4 hours or the next day, drain them both separately.
  3. Prepare your steamer by lining with clean banana leaves. Light grease with a touch of coconut oil and top with pandan leaves followed by the glutinous rice; blue rice on one side and white on the other.
  4. Mix the coconut milk and salt together. Pour half of the coconut milk mixture over the rice and mix well. Steam over high heat for 20 minutes. After 20 minutes, remove from the steam and fluff the rice. Add the remaining coconut milk mixture and then return it to the steamer to cook for a further 10 to 15 minutes.
  5. Line a square pan with banana leaves and lightly grease with coconut oil. Transfer the cooked rice to the pan, alternating between the white and the blue rice. Level the surface and cover with more banana leaves. Place another pan on top of it and weigh it down with heavy objects to compress the rice. Set aside to cool.
  6. Cut into small rectangular pieces and serve with some homemade Nyonya-style kaya. Enjoy it as a mid-afternoon snack!

This kuih can be kept for a couple of days if stored in the refrigerator. Before consuming it again, steam or heat it in a preheated oven at 70C for 10 minutes to soften it.

Pulut Tai Tai (Blue Glutinous Rice Cakes)

PS: Before I end tonight’s post, let’s see if a particular someone actually reads my blog from start to finish *cheeky grin* I would like to take this opportunity to wish a special person in my life, a Happy Birthday! I hope you like the little gift I had sent to you earlier this afternoon. I wish you an abundance of happiness, good health, peace, and prosperity in life. To many more birthdays and hopefully I can spend them all with you by your side!

BON APPÉTIT

– Ally xx

myTaste.com

Seri Muka Kuih

Seri Muka Kuih

Hello Everyone! Our last recipe for the month of June is an amazing Malaysian and Nyonya kuih made of glutinous rice, coconut milk, sugar, and pandan leaves. Kuihs (or kuehs) are common snacks of the Hokkien, Teochew and Peranakan cuisine.The terminology is actually a general description for bite-size pastries/nibbles. These traditional delights come in many different forms and are either sweet or savoury snacks/desserts.

Seri Muka literally translates to beautiful face in Malay. It is a two-layered cake that consists of a glutinous rice layer steamed with coconut milk and topped off with a sweet and silky smooth pandan custard layer (hence the green colour). It’s heady with the flavour of coconut milk, a key ingredient used to impart a creamy taste when cooking the glutinous rice and making the custard layer.

Seri Muka Kuih

My fondest memory of Seri Muka would have to be during the festive season of the Islamic New Year. These pretty faces, alongside other kuihs of course, were served at almost every Malay household I would visit during that time of the year. The soft, sticky rice underneath with just a hint of saltiness pairs so deliciously with the decadently sweet pandan custard on top.

Before we dive into tonight’s recipe, please take the time to check out the original where I drew my inspiration from over on Rasa Malaysia by Bee. Seri Muka can also be found in the Indonesian province of South Kalimantan, and is also known as Kuih Putri Salat in Singapore.

Seri Muka Kuih Ingredients

PREP TIME 35 MINS | COOKING TIME 50 MINS | MAKES 14-16 SLICES

INGREDIENTS

For the bottom layer

  • 1 & 1/3 cups glutinous rice, soaked in water for 30 minutes
  • 1 cup thin coconut milk (1/2 cup coconut milk plus 1/2 cup water)
  • 2 pandan leaves
  • 1 tsp salt

For the top layer

  • 1 cup thick coconut milk (or coconut cream)
  • 1/2 cup pandan juice*
  • 1/2 cup white granulated sugar
  • 2 large free-range eggs
  • 2 large free range egg yolks
  • 5 tbsp all purpose flour
  • 2 tbsp cornstarch

*For the pandan juice

  • 8-10 pandan leaves
  • 1/2 cup water

METHOD

  1. Bottom Layer: In a large mixing bowl, combine all the ingredients needed, except for the pandan leaves, to make the bottom layer. Evenly spread onto a lightly greased 8in x 11in rectangular baking dish and add the in pandan leaves, making sure that they are submerged in the rice mixture. Steam over high heat for 20 minutes. Meanwhile, prepare the pandan juice for the top layer.
  2. Pandan Juice: Place the pandan leaves together with the water in a food processor or heavy-duty blender, and blitz/blend for a few minutes until the pandan leaves have been finely puréed.
  3. Pour the blended pandan-infused water over a fine sieve and into a small bowl. Strain the liquid from the pandan leaf pulp, pressing down firmly with the back of a spoon to extract all of the juice from the pulp. Discard the pandan leaf pulp.
  4. Top Layer: Mix all the remaining ingredients for the top layer in a medium-sized heatproof bowl until well combined.
  5. Create a bain-marie (double-boiler) by pouring some water into a pot that is slightly larger than your heat-proof bowl. Very important, check to see if your bowl can sit on top of the pot without any water touching the bottom of the bowl.
  6. Heat your pot of water over low-medium and bring to a slight simmer. Once slightly simmering, place the bowl with the pandan, coconut milk, and egg mixture over it. Cook until the mixture thickens slight, but is still runny enough to pour, about 8-10 minutes.
  7. Seri Muka Kuih: Once the rice layer is done, discard the pandan leaves. Stir and flatten the rice with the back of a spoon, making sure that it is compact. Using a fine sieve, strain the pandan, coconut milk, and egg mixture over the cooked rice. Return to the steamer and steam over medium heat for 30 minutes.
  8. Remove from the steamer once done and leave aside to completely cool down before cutting them into diamond or rectangular-shaped bite-size pieces. Serve with a hot cup of coffee or tea for a lovely mid-afternoon snack. Enjoy!

Seri Muka Kuih

Seri Muka Kuih

BON APPÉTIT

– Ally xx

myTaste.com

Chunky Apple Cake

Chunky Apple Cake

Hello Everyone! So I probably didn’t think this through when I was planning for my recipes for the month of March. As I’ve said many times before, yes we are definitely in the middle of summer right now here in the Philippines, and having a warm Apple Cake just doesn’t seem to fit with the temperatures that we’re currently experiencing this summer.

Not to worry though, when I caught on with the dishes that I’ve been cooking for this month, I went back and had to change some of my recipes for next month. I won’t reveal it to you guys yet so you’ll just have to wait for next Wednesday for it!
Chunky Apple Cake

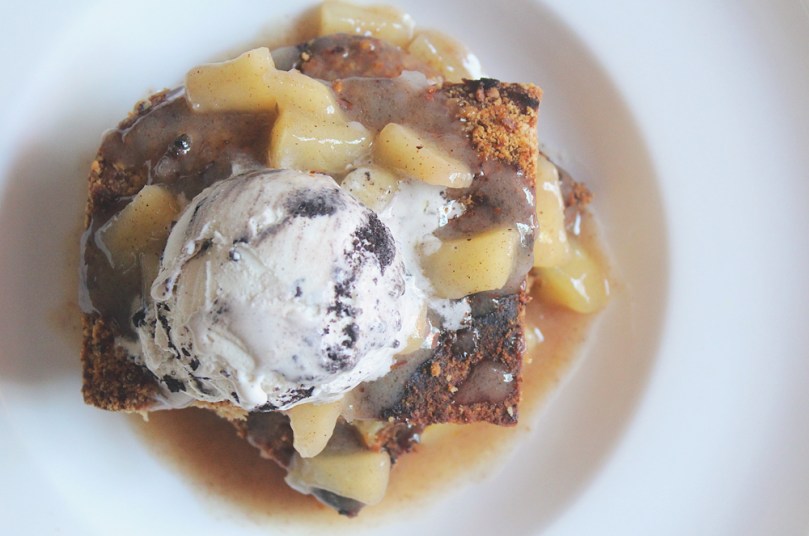
Nonetheless, you can have this Chunky Apple Cake with some ice cream for a cooling element. I would’ve much preferred a simple vanilla ice cream but I had come cookies and cream flavoured ice cream sitting in the freezer that I could use to go with my cake.

I skipped the butterscotch sauce for this recipe as I still had some leftover apple pie filling sitting in the fridge from when I made my Apple Danish recipe. I used that instead to drizzle over the cakes. In addition, I also used the leftover crumb topping from that recipe to top my cake for another layer of texture.

Before we jump onto the recipe, do check out the original over on Taste of Home. Also, please read some very important comments below after the recipe before the end of tonight’s post!
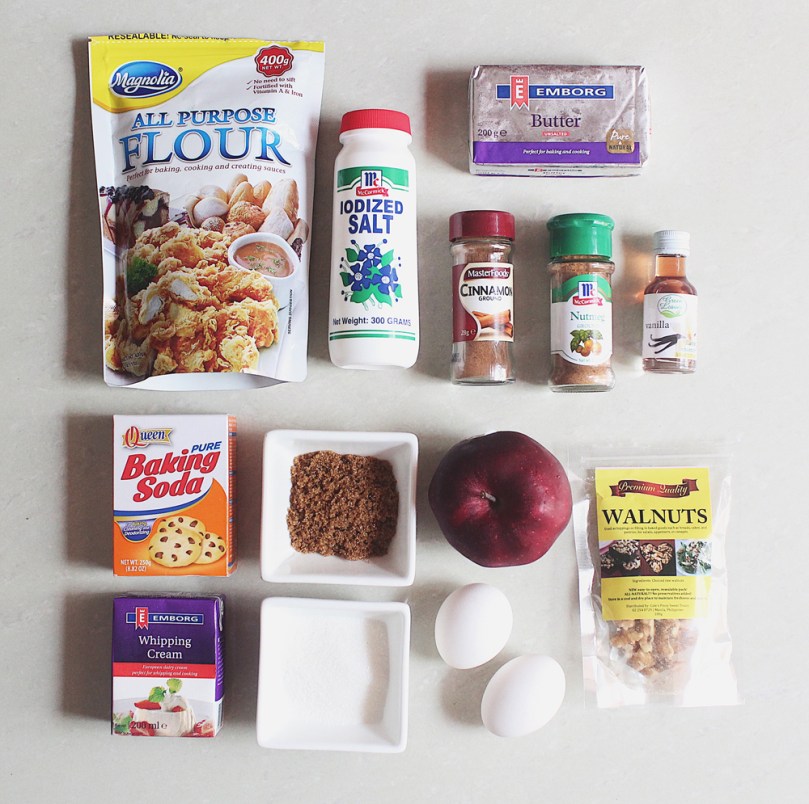
Chunky Apple Cake Ingredients

PREP TIME 15 MINS | COOKING TIME 40 MINS | SERVES 6-8

INGREDIENTS

For the chunky apple cake

  • 110g unsalted butter, softened
  • 2 cups plain flour
  • 2 cups white granulated sugar
  • 2 large free-range eggs
  • 2 medium-sized (or 1 large) Red Delicious Apples, peeled and chopped
  • 1 & 1/2 tsp ground cinnamon
  • 1 tsp ground nutmeg
  • 1/2 tsp baking soda
  • 1/2 tsp salt
  • 1/2 tsp vanilla extract

For the butterscotch sauce

  • 57g unsalted butter
  • 1/2 cup brown sugar
  • 1/2 cup whipping cream

METHOD

  1. Chunky Apple Cake: Preheat oven to 180C (350F or gas mark 4). Grease a 13in x 9in baking dish with a bit of butter and set aside.
  2. Combine the plain flour, cinnamon, nutmeg, salt and baking soda in a small bowl. Mix well and set aside.
  3. In a large mixing bowl, cream the butter, white sugar, and vanilla extract. Add the eggs one at a time, beating well after each addition.
  4. Gradually add the flour mixture to the creamed mixture and mix well. The batter will be stiff. Stir in the apples until well combined. Spread the mixture onto the prepared baking dish and (optional) top the batter with the crumb topping.
  5. Bake in the oven for 40-45 minutes or until the top is lightly browned and springs back when lightly touched. Once done, cool for 30 minutes before serving.
  6. Butterscotch Sauce: Meanwhile, in a small saucepan, combine the brown sugar and butter. Cook over medium heat until the butter has melted. Gradually add the cream and bring to a slow boil, stirring constantly, about 2-3 minutes. Remove from the heat.
  7. Serving: Once the cake has cooled down, cut them into slices and serve in individual serving plates. Top with the butterscotch sauce and ice cream flavour of your choice. Enjoy!

Chunky Apple Cake

Now, I’ll be honest, the cake turned out to be quite dry, and you can probably tell from the photographs. Here are several reasons on why your cakes turn out dry and crumbly:

  1. Using too much flour. When measuring dry ingredients, gently spoon the flour mixture into a measuring cup for dry ingredients and level off with a flat spatula.
  2. Adding too little shortening/liquid. Measure liquids in a liquid-measuring cup placed on a level surface. Read the liquid measurement at eye level.
  3. Improperly mixed or undermixed. Careful mixing to evenly distribute the ingredients throughout the cake batter will give it a uniform consistency. Be careful not to overmix once the flour is added as this can cause the cake to be tough.
  4. Overbeating or using too many egg whites. Egg whites act as a drying agent. Try using less egg whites if you want to avoid a dry cake.
  5. Too much or too little sugar. Too much sugar can cause a cake to crumble when cut, while too little sugar can make a cake tough. The best cake recipes have a good balance of ingredients.
  6. Pan too big for the amount of batter. Using a pan that is too big for the amount of batter you have can cause it to overbake and become dry. The pan should be filled from half to three-fourths full.
  7. Oven temperature too high. If the temperature is to high, your cake could turn out dry. Overbaking could also be a culprit so check your cake for doneness at the lower end of the baking range.

– from Taste of Home.

I’m most definitely guilty of numbers 3, 5 and 6. I probably undermixed my batter as I creamed the butter and sugar by hand instead of using an electrical mixer (because I still have not bought one)! I also most definitely used too little sugar. I halved the portion of sugar because 2 cups scared me a lot. My Mom’s a diabetic, and because of that we’ve grown up in a household where our intolerance to sugar is quite low due to the fact that we don’t have a lot of sweet things lying around the house. When I read 2 cups of sugar from the original recipe, I felt my non-existent (yet) diabetes rise up. In addition, I definitely used a cake pan too big for the amount of batter I had, and thus lead to overbaking since I did not adjust the time it needed to bake in the oven. Silly rookie mistakes.

Chunky Apple Cake

I did end up with some leftovers, and what my Mom did was steam the cakes the next day for our mid-afternoon snack. The cakes turned out soft and moist, kind of like the texture of a sponge cake.

Anyway, I’ve kept the recipe as is, without adjusting the quantities of sugar just so that I hope for anyone who does try out this recipe, that it won’t be a flop like mine. I’m still posting this recipe anyway for me to learn from it. But to be honest, even one cup of sugar that I used for this recipe was on the verge of being too sweet for me.

BON APPÉTIT

– Ally xx

myTaste.com

Ginataang Halo-Halo (Binignit)

Ginataang Halo-Halo (Binignit)

Hello Everyone! For some reason I felt that the week went by so slowly, yet so fast at the same time. Has anyone ever had this feeling before? Maybe it’s because I’m growing bored of being home all week for the past several months. For those of you just tuning in, I quit my job back in Brunei last August 2018 and until present day have yet to find a new job to keep me busy. I’ve applied to many places and attended a handful of interviews, but none have been successful so far. I’m hoping to find a job soon – my savings are slowly deteriorating away…

Ginataang Halo-Halo (Binignit)

Anyway, small tangent aside, Ginataang Halo-Halo, or also known as Binignit in some parts of the Philippines, is a popular Filipino dessert dish. Aside from it being a dessert, it is also widely served as a mid-afternoon snack.

As mentioned in previous posts, Ginataan is a cooking process that involves stewing in coconut milk/cream. Halo-Halo, when directly translated into English means mix mix, is referred to the combination of different ingredients that are used to complete the dish – a mix mix of various root vegetables such as sweet potatoes, yams, and taro, plantains, tapioca pearls, and glutinous rice balls (bilo-bilo) are simmered in coconut milk. Bilo-bilo are glutinous rice balls simply made from a mixture of glutinous rice flour and water. You don’t have to add any colouring to them, I just made mine purple to add colour to the dish.

Ginataang Halo-Halo (Binignit) Bilo-Bilo

Most, or all recipes I guess of Ginataang Halo-Halo have shredded langka (jackfruit) in them. I personally don’t like langka, which is why I’ve omitted them from my recipe. Instead, I wanted to replace them with shredded young coconut flesh which I didn’t end up adding to the dish because they went off in the fridge having kept them in there for a few days before using it *whoops*

Ginataang Halo-Halo (Binignit) Ingredients

PREP TIME 25 MINS | COOKING TIME 2 HOURS | SERVES 6-8

INGREDIENTS

  • 3 cups coconut milk (fresh, canned, or frozen)
  • 2 cups water
  • 1 cup young coconut flesh, shredded
  • 3/4 cup white granulated white sugar
  • 2 tsp vanilla extract or essence
  • 3-4 pcs ripe plantains (saba), sliced
  • Medley of sweet potatoes (I used 1 medium-sized each of orange, yellow, and white), diced

For the bilo-bilo (makes about 20-24 balls)

  • 1 cup glutinous rice flour
  • 1/2 cup water
  • 1 tbsp purple food colouring (optional)

For the tapioca pearls

  • 1 cup big tapioca pearls (sago)
  • 6 cups water

METHOD

  1. Tapioca Pearls: Add the water to a large cooking pot and bring to a boil over high heat. Add in the tapioca pearls. Turn the heat down to medium, cover, and leave to boil for about 50 minutes. Check and stir every 10 minutes. Add more water if needed to prevent the pearls from sticking to the bottom of the pot and burning. Once done, turn the heat off and set aside.

Tip: For better results, leave the pearls in the cooking pot until it reaches back to room temperature. One hour of boiling will completely cook the pearls, but the core will still be slightly opaque. Leaving the pearls in the cooking pot for several hours (with the heat turned off) gives them a chance to absorb more water. Which makes the core translucent overtime.

  1. Bilo-bilo: Combine the purple food colouring and water together and add to the glutinous rice flour. Mix thoroughly – a soft yet sticky mixture should take form.
  2. Scoop about 1 & 1/2 to 2 teaspoons of the mixture and roll into a ball shaped figure using the palm of your hands. Wet your palms with a bit of water to prevent the mixture from sticking to your hands.
  3. Place the balls on a plate or container that has been dusted with a bit of glutinous rice flour to prevent them from sticking to the plate. Set aside.
  4. Ginataang Halo-Halo: Add the 2 cups of water to a large cooking pot and bring to a boil over medium-high heat. Add 3/4 cup of the coconut milk and bring to a slow boil. It is important to bring it back to a boil slowly to avoid curdling the coconut milk. This happens when it is heated too quickly.
  5. Once boiling again, add in the sweet potatoes and simmer for about 8 minutes.
  6. Pour in the remaining coconut milk together with the sugar, and glutinous rice balls. Stir and simmer for a further 5-7 minutes. Then add in the sliced plantains and simmer for an additional 2 minutes.
  7. Add in the young coconut flesh together with the cooked tapioca pearls. Stir for about a minute and then turn the heat off.
  8. Transfer to a large serving dish, or individual bowls. Serve either hot or cold and enjoy!

Ginataang Halo-Halo (Binignit)

I definitely prefer to have this dish warm for an afternoon snack. To have this right after a main meal might be too heavy for a dessert – just my opinion! And no! You don’t need basil leaves for this dish. It just so happens that I had some lying around from a dish I made for lunch that day and used a sprig of it to add some green for photography purposes only *cheeky grin*

BON APPÉTIT

– Ally xx

myTaste.com