Auguest 2020: Shazrinah Shazali

Roasted Garlic & Onion Tomato Tagliatelle with Butter Beans,Tuna, and a Chilli Balsamic Drizzle

“Cooking is an exploration of our own creativity. Always try out new flavour combinations, different cooking techniques, build on textbook recipes, and have fun!” — Shazrinah Shazali

Auguest 2020: Shazrinah Shazali

Hello Everyone! I am a neuroscientist and home-grown chef best known as ShefShaz. I started my entrepreneurial journey from home, supplying healthy lunch meal plans to offices and homes. I then ventured into collaboration with The Healthy Habit in January 2018 to develop menus and co-founded FUEL’D. Just this year I’ve also recently co-opened a cafe in the gardens to work with the garden’s nursery to develop menus and create delicious food from their produce.

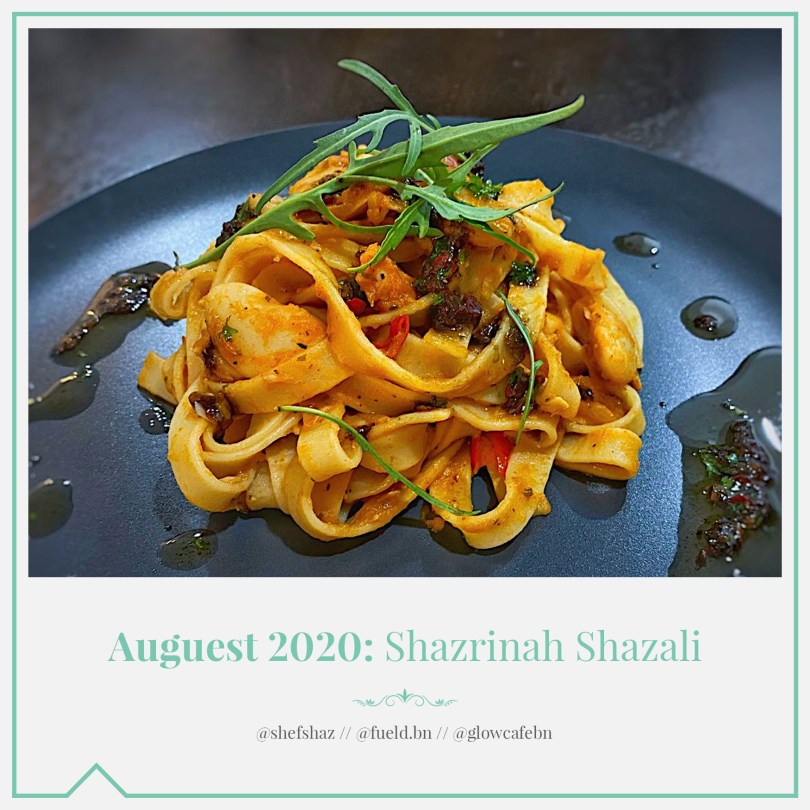
Tonight I will be sharing a delicious and healthy dish that is packed with the flavours of roasted garlic, chilli, and balsamic vinegar. You can easily whip up for a quick weeknight dinner if you’re pressed for time!

Roasted Garlic & Onion Tomato Tagliatelle with Butter Beans,Tuna, and a Chilli Balsamic Drizzle Ingredients

PREP TIME 10 MINS | COOKING TIME 20 MINS | SERVES 4

INGREDIENTS

For the tagliatelle

  • 200g dried tagliatelle pasta
  • 1 can (approx 400g) butter beans, drained
  • 1 can (approx. 185g) tuna in olive oil
  • 1 can (approx. 400g) roasted garlic and onion tomato pasta sauce
  • 4 garlic cloves, minced
  • 4 shallots, minced
  • 2 red bird’s eye chillies, minced
  • 1 tsp sweet ground paprika
  • Salt and freshly cracked black pepper, to taste
  • Parmesan cheese (optional)

For the chilli balsamic drizzle

  • 1/4 cup olive oil
  • 2 garlic cloves, minced
  • 1 red bird’s eye chilli, minced
  • 2 tbsp balsamic vinegar
  • 1 tsp fresh parsley, minced
  • Salt and freshly cracked black pepper, to taste

METHOD

  1. Chilli Balsamic Drizzle: In a mortar and pestle, grind the garlic, chilli, and parsley together. Add the olive oil, balsamic vinegar, and season with salt and pepper to taste. Adjust to your liking and set aside.
  2. Roasted Garlic & Onion Tomato Tagliatelle: In a large pot with boiling salted water, cook the tagliatelle pasta according to packet directions or until al dente. Drain and set aside, reserving about half a cup of the pasta water.
  3. In a separate pan over medium-high heat, sauté the minced garlic, shallots, and chilli until golden, fragrant, and translucent, about a minute or two.
  4. Add in the drained butter beans together with the tuna in olive oil and cooked until warmed through. Add the ground paprika and season with salt and pepper to taste.
  5. Stir in the canned tomato pasta sauce plus the half cup of reserved pasta water. Bring to a rapid simmer before adding the cooked pasta. Once done, transfer to individual serving plates.
  6. Top with parmesan cheese if desired, fresh arugula or any other leafy greens you prefer, and drizzle with the chilli balsamic mixture. Serve and enjoy!

Roasted Garlic & Onion Tomato Tagliatelle with Butter Beans,Tuna, and a Chilli Balsamic Drizzle

Roasted Garlic & Onion Tomato Tagliatelle with Butter Beans,Tuna, and a Chilli Balsamic Drizzle

Photo Courtesy & Recipe Copyright © 2020 | Shazrinah Shazali (@shefshaz // @fueld.bn // @glowcafebn)

BON APPÉTIT

– Shazrinah Shazali

myTaste.com

Advertisement
Dragon-flamed Tuna Belly with Fiery Dragon Fruit Salsa

Dragon-flamed Tuna Belly with Fiery Dragon Fruit Salsa

Hello Everyone! I know I made it sound like I’d be gone for a while over on my IG stories last month, but I’m back feeling inspired and motivated to push through the year with fun recipes that I have been putting together during my short hiatus for Amcarmen’s Kitchen.

For the month of June I’ll be featuring one of my favourite fruits of all time – Pitaya or also known more commonly in English as Dragon Fruit, more specifically the red-fleshed variety. The name ‘Dragon Fruit’ was derived from the overall exterior aesthetic of the fruit, which has a leather-like skin and prominent scaly spikes. Pitaya (or pitahaya) is the name derived from Mexico, which refers to the name of tall cacti species with flowering fruits.

Fiery Dragon Fruit Salsa

Dragon Fruits grow on long, thin, and vining cactuses (yes, this is also a valid pluralisation of the word cactus). On the outside, Red Dragon Fruits look almost identical to the white-fleshed variety. The pulp of a Dragon Fruit has a texture that is similar to a kiwi, with small and black edible seeds throughout. Red Dragon Fruits are sweet, but not as sweet as the white-flesh variety, and has a mild acidity to it. In addition, these fruits pack a lot of nutrients that are beneficial for our health. They are low in calories and are a good source of iron, magnesium, and vitamins C & E. Dragon Fruits also contain prebiotics, which helps promote the growth of healthy bacteria and potentially improve the balance of them in your gut.

Dragon-flamed Tuna Belly with Fiery Dragon Fruit Salsa

Tonight, I’ll be whipping up an easy one for y’all. The recipe title may sound intimidating, but it’s really all “just for fancy show” to draw creative links between the fruit itself, and Dragons. Read below for further details on coming up with the name for this dish. This salsa recipe can be modified based on the availability of seasonal ingredients and what you have readily available in your pantry. So feel free to get creative here! You may also substitute the dragon fruit for kiwi, mango, nectarines, or peaches. Just make sure to use a firm and barely ripe fruit so that it will hold its shape in the salsa.

Fiery Dragon Fruit Salsa Ingredients

PREP TIME 20 MINS | COOKING TIME 30 MINS | SERVES 4

INGREDIENTS

  • 1 kg fresh tuna belly slab, washed and pat-dried
  • Olive oil
  • Sea salt and freshly ground black pepper, to season

For the salsa

  • 1 small dragon fruit, diced*
  • 1 small red onion, minced
  • 1 red bird’s eye chilli, seeds in and minced
  • 1 tbsp red wine vinegar
  • Drizzle of olive oil
  • Handful of finely chopped basil leaves
  • Sea salt and freshly ground black pepper, to taste

*The grocer that I bought them from only had gigantic dragon fruits, where the one I bought and pictured for this recipe was about 800g! In this case, I only used half of the fruit for the recipe.

METHOD

Breaking down a dragon fruit may look intimidating, but it really is quite simple.

  1. Fiery Dragon Fruit Salsa: Slice the fruit in half lengthwise and spoon around the outer edge of the fruit to scoop out the flesh. Dice and place in a medium-sized mixing bowl together with the minced onion, chillies, basil leaves, vinegar, and olive oil. Stir to combine and season to taste. Set aside in the fridge for the flavours to infuse and chill.
  2. Dragon-flamed Tuna Belly: Rub the tuna belly with olive oil and season with sea salt and freshly ground black pepper.
  3. Dracarys.

If you don’t understand step #3, then skip ahead to step #4 (also, this means we can’t be friends… Just kidding! *cheeky grin*)

  1. Flame-grill on lightly greased grates over hot coals for about 3 to 5 minutes on each side or until the fish flakes easily with a fork. Feel free to adjust grilling time depending on how you like your tuna to be cooked.
  2. Remove from the heat and transfer to a serving plate. Serve hot with the Dragon Fruit Salsa and a salad for a complete meal. Enjoy!

Dragon-flamed Tuna Belly with Fiery Dragon Fruit Salsa

Just before I wrap things up with tonight’s post, I just wanted to mention that the featured recipe is actually a mash-up of ideas between a friend and myself. I already had the choice of fruit in mind that I wanted to work with for the month and what to make of it to pair with a beautiful slab of tuna belly. He suggested that I cut the fruit in half, scoop out its flesh, chop it up, and serve it in its skin/casing. I mentioned that I already had the idea to make a fiery (spicy) Dragon Fruit Salsa to go with the tuna belly, to which I said I could take his idea of serving the salsa in the dragon fruit skin. In the end I put that idea aside just because there wasn’t much contrast with the colours of the salsa and the dragon fruit skin. Nonetheless, I’ll keep this idea for another dish!

In addition, while exchanging ideas, I mentioned that I thought of grilling the tuna belly, to which he suggested to play with the idea of ‘dragon’ in the name of the dish and hence Dragon-flamed Tuna Belly. It is still essentially flame-grilled tuna belly but Dragon-flamed sounded way more cool.

BON APPÉTIT

– Ally xx

myTaste.com

Apple Chicken Bake

Apple Chicken Bake

Hello Everyone! March is here which can only mean one thing for Amcarmen’s Kitchen. That’s right! A new month means a new fruit to play with and we’re all about Apples this March! More specifically we’re going to be playing around with Red Washington Apples only because they were on sale at Rustan’s Supermarket for only P28 apiece! I think they were originally priced at like P35 or something. I know it’s not much of a difference but other supermarkets have them priced at P230 or something per kilo, which is crazy!

Apple Chicken Bake

I’ll keep my introduction short tonight, as I am not feeling well today – the creative writing juices aren’t flowing at the moment, apologies for that. I didn’t want to start off my post in saying what happened, but you can read more about it at the end of the post.

Before we dive right into the recipe, please head on over to Taste of Home for the original recipe where I drew my inspiration.

Apple Chicken Bake Ingredients

PREP TIME 5 MINS* | COOKING TIME 30 MINS | SERVES 3

*Allow for up to 4-6 hours to marinate the chicken, or even better, overnight in the fridge. Remove from the fridge about an hour before baking to bring the meat back to room temperature.

INGREDIENTS

  • 3 whole chicken legs (about 1/2 kg)
  • 1 large brown onion, peeled and wedged
  • 1 large Red Washington Apple, washed and wedged
  • Freshly cracked black pepper

For the marinade

  • 5 whole cloves
  • 2-3 garlic cloves, peeled and crushed
  • 1 cinnamon bark
  • 1/3 cup Hickory BBQ sauce
  • 1/4 cup apple juice
  • 1 tbsp honey
  • 1/4 tsp ground nutmeg
  • 1/4 tsp salt
  • 1/4 tsp whole black peppercorns

Apple Chicken Bake Process

METHOD

  1. Combine the marinade ingredients in a small bowl. Dip the chicken whole legs into the marinade and then place skin side down into an oven-safe Pyrex dish.
  2. Pour the remaining marinade into the Pyrex dish, cover with cling wrap and then set aside in the fridge to marinate for about 4-6 hours or overnight.
  3. When ready to bake, remove from the fridge and turn the chicken legs over skin side up. Leave aside to bring to room temperature, about an hour.
  4. Preheat oven to 200C (400F or gas mark 6). Scatter the wedged apples and onions onto the Pyrex dish, and season with a touch of freshly cracked black pepper. Bake in the oven for 30 minutes.
  5. Once done, turn the heat off. Drain the sauce into a small saucepan and place the chicken back into the oven to keep warm.
  6. Bring the sauce to a boil over medium-high heat. Once boiling, add slurry of cornstarch to the sauce to thicken it. Once thickened, turn the heat off.
  7. Serve with any sides of your choice. I served mine with a side of salad with cherry tomatoes and French beans, and corn on a cob.

Apple Chicken Bake Process

Apple Chicken Bake

Before I end tonight’s post, I would just like to say that it’s been one heck of a crazy week! So busy that I haven’t even had the time to plan and cook my dishes for this month ahead of time, which is what I usually do to stay on top of things. This is one of the reasons why tonight’s post isn’t as informative as my previous posts. The reason for that being is that I’m also suffering from piercing stomach pains and an irritable bowel syndrome, quite possibly due to food poisoning. I’m confined at home and hydrating lots. Hopefully I’ll be all good in the coming days and I can get back on track with my cooking and writing by the weekend or early next week!

BON APPÉTIT

– Ally xx

myTaste.com

Breakfast Muffins: Feta Cheese, Onion & Rosemary

Breakfast Muffins: Feta Cheese, Onion & Rosemary

Hello Everyone and a happy first Monday for the month of June! Hope the Monday blues didn’t hit you guys hard, especially to my friends/followers in Brunei – unlike me, I know some of you guys have had a super long weekend with all the public holidays we’ve been having. We, as in my office, didn’t get to have one of the public holiday off so it was a normal working day for us on Thursday while most likely 80% of the working population was off. Thank goodness Saturday was public holiday that applied to us so yay for the long weekend (normal weekend anyway for some)! If you guys don’t already know from my constant mentions on several posts, and on the ‘about’ section of my blog, I work SIX full days a week. So getting to have a Saturday off (which is quite rare) because of a public holiday is pure bliss.

Moving on from that… mini rant? I mentioned in one of my posts last week that I’ll be switching up my post schedule just for this month – and yes it does have something to do with the theme for June. The title of this post may have already given it away for some of my loyal and consistent followers. Drumroll please! So I may have taken it to Google and searched ‘how to type out a drumroll sound’ – gives up 30 minutes later.

Breakfast Muffins: Feta Cheese, Onion & Rosemary

MUFFIN MAKING MONDAY IS BACK ON AMCARMEN’S KITCHEN! Muffin Making Mondays started about 4 years ago now I think, where Jialing would come back to my place after our Monday morning lecture together on main campus. We’d bake muffins together for our on-the-go work brekkie for that week. Well, we’d bake together but we’d both have our own recipes, i.e. she’d make sweet muffins for herself while I’d make savoury ones – we still share 1 or 2 though after we’ve baked them. I also remember how we’d both have a 1-on-1 Cards Against Humanity game where we’d both just unanimously vote which was the best (dirtiest) answer while our muffins were baking in the oven. Those were the days.

Anyway, it’s probably going to get lonely in the kitchen as it’ll just be me, myself, and I without Jialing, but I’m bringing back Muffin Making Mondays for the month of June! And to kick things off, I’ve got a delicious Feta, Onion, and Rosemary Savoury Muffin to start your mornings with a bang! Check out the original recipe over on Genius Kitchen.

Breakfast Muffins: Feta Cheese, Onion & Rosemary Ingredients

PREP TIME 15 MINS | COOKING TIME 30 MINS | SERVES 12 MUFFINS

INGREDIENTS

For the muffin batter

  • 1 & 3/4 cups plain flour
  • 1 cup milk
  • 1 large free range egg
  • 1 tbsp baking powder
  • 1 tsp salt

For the onion and cheese mixture

  • 100g feta cheese, crumbed
  • 1 medium-sized brown onion, finely chopped
  • 1 tbsp fresh rosemary, finely chopped
  • Freshly ground black peppercorns
  • Knob of unsalted butter

METHOD

  1. Preheat oven to 200C (400F or gas mark 6). Line a 12 hole muffin pan with paper cases.
  2. Melt the butter in a small frying pan over medium heat. Add in the chopped onions and cook for about 5 minutes until soft and slightly caramelised. Remove from heat and set aside to cool.
  3. Once the onions have cooled down, add in the crumbed feta cheese and chopped rosemary. Season with freshly ground black pepper and give it a good mix. There is no need for salt since the feta is quite salty by itself. Set aside.
  4. For the muffin batter, sift the plain flour, baking powder, and salt into a large mixing bowl.
    In another medium-sized bowl, beat the egg, followed by the milk and give it a good whisk to combine.
  5. Pour the egg and milk mixture into the flour, until well incorporated, using minimum number of folding movements. Ignore the lumps in the mixture and do not over-mix.
  6. Gently add the onion and cheese mixture into the batter mixture, folding in, as before, with as few strokes as possible. Spoon the mixture into the prepared muffin pan.
  7. Bake for about 20 minutes, or until well risen and golden. Remove the muffins from the tins and serve immediately. Enjoy!

Breakfast Muffins: Feta Cheese, Onion & Rosemary

Breakfast Muffins: Feta Cheese, Onion & Rosemary

These muffins are perfect for sahur with a hot cup of teh tarik for my Muslim friends and followers. Well to be honest, it’s perfect for any time of the day with a nice hot cup of anything like coffee, tea, or hot chocolate!

BON APPÉTIT

– Ally xx

myTaste.com

Homemade Tom Yum Paste

Homemade Tom Yum Paste

Hello Everyone! Today’s post will be a simple one – well at first before even tackling the recipe, I thought it’d be a complicated and labour-intensive process. Actually, it took a while to finely chop up the garlic, onions, galangal, and ginger as I did not have a food processor to do it all for me in a jiffy; nonetheless, it helped me improve on my chopping skills (probably not really).

Homemade Tom Yum Paste

Tom Yum is one of the first Thai dishes that I learned to love, and it was probably from this dish that I slowly started to love chillies and the kick of spice it gave to my palette. In fact, Chicken Tom Yum was the very first Thai dishes that I learnt to cook from my auntie, who is Thai; but at that time I still used pre-packed tom yum paste from the supermarkets. It wasn’t until recently that I decided that I wanted to learn how to make my own tom yum paste – and quite a success I might add! The flavours were obviously tastier and had more kick than store-bought paste, and very easy to make as well! The opportunities are endless with this paste; you can use it to make a tom yum broth to accompany various meats such as chicken, pork, prawns, fish, and mixed seafood’s including clams and squid, or you can use it as a seasoning to various dishes. The original recipe can be found at Pickyin.

Homemade Tom Yum Paste Ingredients

PREP TIME 30 MINS | COOKING TIME 45 MINS | MAKES 40 TBSP (approx.)*

*What I normally do is place about a tablespoon of the paste in small plastic bags and place them into the freezer. Each time I make a dish that requires Tom Yum Paste, I defrost a bag (or two) depending on how many I need. This is how I keep my batch on Tom Yum Paste without the need for additives or preservatives to keep them on the shelf/fridge.

INGREDIENTS

  • 250g chili paste (from soaked, deseeded and blended dry chilies)**
  • 20g shrimp paste (or more to taste)
  • 1 cup tamarind pulp water
  • 5 cloves garlic, finely chopped
  • 4 pieces kaffir lime leaves, finely chopped
  • 3 inches ginger, finely chopped
  • 2 inches galangal, finely chopped
  • 2 stalks lemongrass, white parts only, finely chopped
  • 1 large red onion, finely chopped
  • 3 tbsp brown sugar
  • 3 tbsp vegetable oil
  • 2 tbsp fish sauce
  • 2 tsp ground coriander

**I couldn’t be bothered to deseed each and every dried chilli, so I ended up adding the seeds in. I’m not sure if you can buy already deseeded dried chillies in stores, but I could not find any myself. I mean, if you want the heat then by all means leave the seeds in – caution though, very hot!

METHOD

  1. Heat vegetable oil over high heat in a medium-sized frying pan, and then add in the onions, garlic, galangal, and ginger. Sauté until softened and slightly browned. Remove from the pan and set aside, leaving the remaining oils in the pan.
  2. In the same pan, add the chilli paste, kaffir lime leaves, lemonsgrass, coriander, shrimp paste, fish sauce, tamarind water, and brown sugar. Cook until the mixture slightly thickens before adding the other fried ingredients into the chilli mixture.
  3. Continue frying until the paste is thick and the oil starts to separate from chilli and surfaces. Set aside to cool down before sealing them in jars/cans. The paste can keep in the refrigerator for up to 1 week or in the freezer for a few months.

Homemade Tom Yum Paste

BON APPÉTIT

– Ally xx

myTaste.com

Stir-fried Gravy Beef with Chilli, Ginger & Shallot

Stir-fried Gravy Beef with Chilli, Ginger & Shallot

Hello Everyone! I actually wasn’t planning on photographing and posting today’s dish as I kind of made it up on the go. I usually plan ahead the dishes that I want to make for the week to ensure that I have all the ingredients that I need for the upcoming week – saves me time of having to go back and forth the grocery shops if I forget one or two ingredients. I actually don’t have much in the fridge right now (in terms of accompanying ingredients for my meat).

Last night I took my beef shanks out of the freezer to defrost in the fridge overnight but still not knowing what I was going to make until later on the next day. I still had the pantry essentials, such as chillies, ginger, onions, and shallots – so I decided to whip up a beef stir-fry! I also had all of the ingredients to marinade the beef in so that was good! I kind of eyeballed the measurements though so forgive me if this recipe is too bland or salty; I’m just going to go off by remembering how much of each ingredient I added to the marinade, feel free to adjust though!

Stir-fried Gravy Beef with Chilli, Ginger & Shallot Ingredients

PREP TIME 1 HOUR | COOKING TIME 10-15 MINS SERVES 2-3

INGREDIENTS

For the marinade:

  • 300g beef shank, sliced thinly
  • 1 tbsp cornflour
  • 1 tbsp dark soy sauce
  • 1 tbsp light soy sauce
  • 1 tbsp oyster sauce
  • 1 tbsp sesame oil
  • 2 tsp shaoxing rice wine
  • Ground black pepper
  • 2 stalks spring onion, cut into 1-inch long strips
  • 2 red bird’s eye chillies, sliced
  • 1 thumb-sized ginger, peeled and sliced
  • 1/2 red onion, sliced
  • 3 tbsp Sunflower oil

METHOD

  1. Add all the ingredients for the marinade in a medium-sized bowl and mix together until combined. Cover the bowl with cling wrap and let the beef marinate for at least an hour before cooking.
  2. Heat the sunflower oil in a medium-sized frying pan over high heat. Add the green onions and ginger. Sauté for about 2 minutes. Then add in half of the chilli slices and onions, and cook for a further 2-3 minutes. Add the beef shank slices and toss to combine. Cook for a further 5 minutes, adding a little bit of water to loosen the sauce a bit. Cook for a further 3-5 minutes or until cooked through.
  3. Garnish with the remaining chillies and serve with steamed rice and asian greens.

Stir-fried Gravy Beef with Chilli, Ginger & Shallot

BON APPÉTIT

– Ally xx

myTaste.com